manuals.online logo
Brands
  1. Home
  2. •
  3. Brands
  4. •
  5. HP
  6. •
  7. Dashcam
  8. •
  9. HP Compaq Presario,Presario F760 User manual

HP Compaq Presario,Presario F760 User manual

f760
Car Camcorder
User Manual
1
Contents
About this Guide ........................................................................... 3
Notes on Installation .................................................................... 3
Battery arning ........................................................................... 3
Caution ......................................................................................... 4
1 Introduction ................................................................... 5
1.1 Features ........................................................................... 5
1.2 Package Contents ............................................................. 5
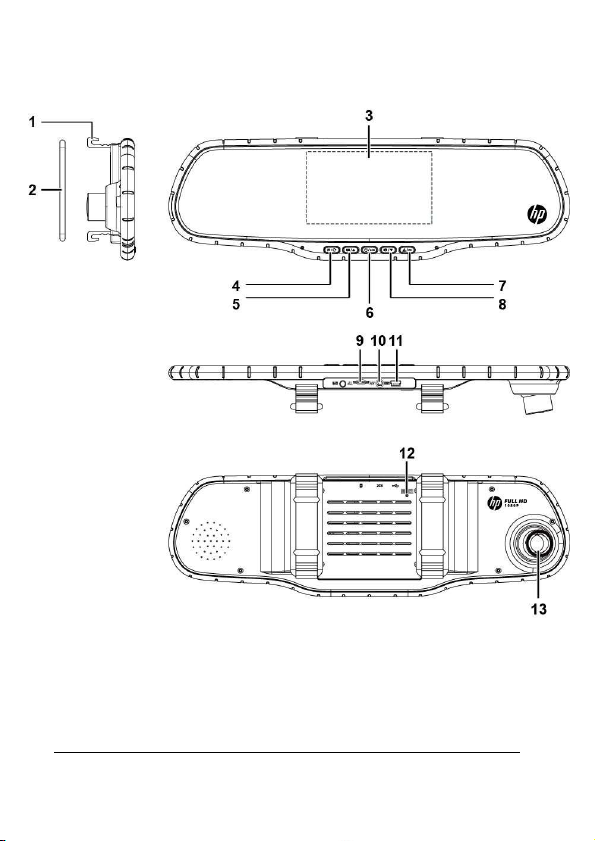
1.3 Product Overvie ............................................................. 6
2 Getting Started .............................................................. 8
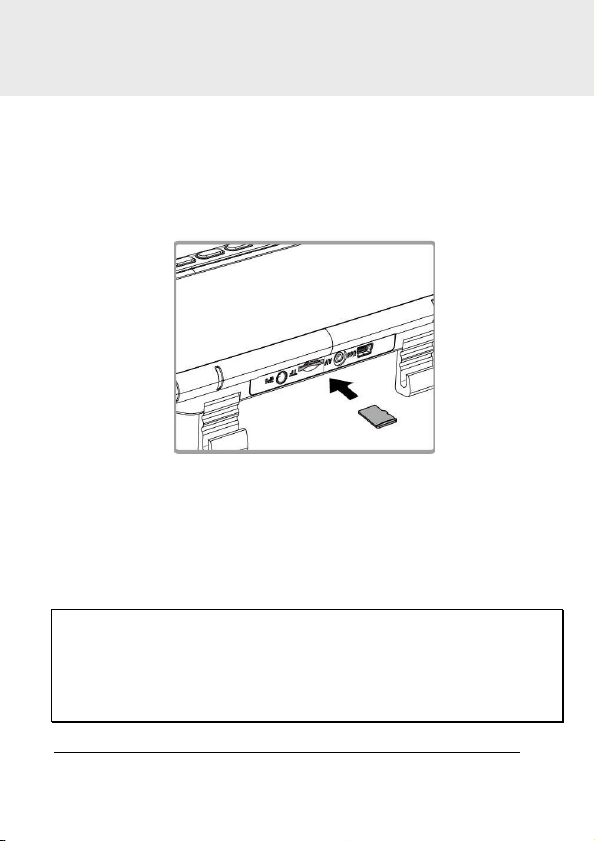
2.1 Inserting the Memory Card ............................................... 8
2.2 Installing in Vehicles ......................................................... 9
2.3 Connecting to Po er ........................................................ 9
2.4 Po ering the Camcorder On / Off and Reset .................. 11
2.4.1 Auto Po er On/Off ............................................. 11
2.4.2 Manual Po er On/Off ......................................... 11
2.4.3 Reset the camcorder .......................................... 11
2.5 Initial Settings ................................................................ 12
2.5.1 Set the Date and Time ........................................ 12
3 Using the Camcorder ..................................................... 13
3.1 Recording Videos ............................................................ 13
3.1.1 Record videos hile driving ................................ 13
3.1.2 Emergency Recording ......................................... 14
3.1.3 The Recording Screen ......................................... 15
3.1.4 Taking Photographs ........................................... 16
3.2 Playback Videos and Photos .......................................... 16
3.3 The Playback Screen ...................................................... 17
3.4 Deleting Files .................................................................. 18
2
3.5 Collision Detection ..........................................................19
3.6 Parking Mode ..................................................................20
3.7 LDWS ...............................................................................22
3.8 FCWS ...............................................................................24
4 Adjusting the Settings .................................................. 25
4.1 Menu Tree .......................................................................25
5 Specifications .............................................................. 2
3
About this Guide
The content in this document is for information purpose and is subject to
change ithout prior notice. We made every effort to ensure that this User
Guide is accurate and complete.
Ho ever, no liability is assumed for any errors and omissions that may
have occurred.
The manufacturer reserves the right to change the technical specifications
and accessories ithout prior notice.
Notes on Installation
1.
Do NOT setup the camcorder hile driving or hile the vehicle is in motion.
Please stop at a safe place before adjusting or installing.
2.
Install the camcorder above the rear-vie mirror to obtain the best
open-field vie . Do NOT install the camcorder in a location that ill
obstruct your required driving vie .
3.
Make sure that the lens is ithin the iping range of the indscreen iper
to ensure a clear vie even hen it rains.
4.
Do not touch the lens ith your fingers. Finger grease may be left on the
lens and ill result in unclear videos or snapshots. Clean the lens on a
regular basis.
Battery warning
Never dismantle, crush, or pierce the battery, or allo the battery to
short-circuit. Do not expose battery being placed in high temperature
environment, if battery leaks or bulges, stop continue to use.
Al ays charge using the system. Risk of explosion if battery is
replaced by an incorrect type.
Keep the battery out of reach of children.
Batteries may explode if exposed to naked fire. Never dispose of
batteries in a fire.
Never replace the battery on your o n; have the dealer do it for you.
Disposed of used batteries observing local regulations.
4
Caution

Never disassemble or attempt repair of this product. Doing so may
damage the camcorder, cause electric shock and void your product
arranty.

Set up time and date accurately before you use this camcorder.

Exposing the camcorder to open flames can cause explosion.

Due to local la s and vehicles safety considerations, do not manually
operate the camcorder hile driving.

The values displayed in this system, such as speed, position, and the
distance arning to the speed camera set points, may be inaccurate
due to the influence of surrounding environment. They are for your
reference only.

HP Inc. Company is NOT responsible for the loss of any
data/content during operation.
Before you start using the
Car Camcorder it is
assumed that you agree to the above statements.
5
1Introduction
Thank you for purchasing this advanced camcorder. This camcorder is
specifically designed for real time video and audio recording hen driving.
1.1 Features
•Full HD 1920*1080
•Up to 150 Degree Wide Angle Glass Lens &IR-Filter
•Built-in G-sensor
•Collision Detection
•Emergency Recording File
•Advanced Driver Assistance Systems (LDWS, FCWS)
•Parking Mode
1.2 Package Contents
The package contains the follo ing items. If there are any missing or
damaged items, contact your dealer immediately.
Car camcorder Rubber Band CD-ROM
Quick start guide Car adapter Rear Camera
6
1.3 Product Overview
7
No. Item
1 Rearvie mirror clip
2 Rubber Band
3 LCD Display
4 Menu and Return ( )
5 Playback and Up/Previous option ( )
6 Po er on/off and LCD on/off ( )
7 Confirm and Emergency record ( )
8 Photo and Do n/Next option, Audio on/off ( )
9 MicroSD memory card slot
10 Rear Camera connection
11 Car po er adapter connection
12 Reset
13 Lens
8
2Getting Started
2.1 Inserting the Memory Card
Insert the memory card ith the gold contacts facing the back of the
camcorder. Push the memory card until it clicks into place. (Use class 10 or
greater speed micro SD cards for this camcorder; It is recommended to
format the micro SD cards before the initial use.)
To remove the memory card
Push the edge of the memory card in ard until you hear/feel it click, then
allo it to push out until you can remove it from the slot.
Note:
1. Do not remove or insert the memory card hen the camcorder is po ered on. This
may damage the memory card.
2. It is recommended to use a 32 GB, Class 10 speed or above micro SD card.
3. It is recommended to format the micro SD cards before the initial use.
9
2.2 Installing in Vehicles
1. Clip on to your original car mirror.
2. Circle the clip ith the band.
3. Adjust the camcorder lens.
Note:
Image sho n here is for installation illustration. The outlook may differ from hat you
purchased.
2.3 Connecting to Power
Use only the supplied car adapter to po er up the camcorder and charge
the built-in battery.
10
1. Connect one end of the car adapter to the USB connector of the
camcorder. USB port input: DC 5V / 1A.
2. Plug the other end of the car charger to the cigarette lighter socket of
your vehicle. Once the vehicle engine is started, the camcorder
automatically po ers on. Car charger input: DC 12 / 24V.
Note:
Please take note if the environment temperature reaches 45°C or above, the car
adapter still can supply po er to camcorder, but it may not charge the battery. This is
characteristic of Lithium polymer battery and is not a malfunction.
Battery Status Indicator:
Icon Description
Fully Charged
75% Po er
50% Po er
25% Po er
lo battery
11
2.4 Powering the Camcorder On / Off and Reset
2.4.1 Auto Power On/Off
Once the vehicle engine is started, the camcorder automatically po ers on.
And the recording ill automatically start.
Once the vehicle engine shuts do n, the camcorder automatically saves
the recording and turns off the po er ithin 10 seconds.
Note:
Automatic po er up and shut do n assumes the po er socket is linked to the car
ignition.
2.4.2 Manual Power On/Off
To manually turn on the po er, press the POWER button.
To turn off, press and hold the POWER button for at least 2 seconds.
2.4.3 Reset the camcorder
To reset, press and hold the RESET button on the back of the camcorder for
at least 5 seconds.
12
2.5 Initial Settings
2.5.1 Set the Date and Time
To set the correct date and time, do the follo ing:
1. Press the button
to enter the OSD menu.
2. Press the
or
button to select Date / Time and
press the button.
3. Press the
or
button to adjust the value and
press the button to
move to another field.
4. Repeat step 3 until the date and time setting is complete.
5. Press the button to exit the Date/Time settings. Press the
button again to exit the settings menu and return to the live
vie mode.
Note:
When the battery is depleted, you must reset the date/time before the function
-automatic record is started.
13
3Using the Camcorder
3.1 Recording Videos
3.1.1 Record videos while driving
When the vehicle engine starts up and the Automatic Record function is
enabled, the camcorder automatically turns on and starts recording.
Recording ill automatically stop hen the engine is s itched off.
Note:
1. On some cars, the recording ill continue hen the engine is s itched off. If this
happens, please manually turn off the cigarette lighter or remove the car adapter from
the cigarette lighter.
2. It can be configured to save a video file for every 30 seconds, 1 minute or 3 minutes of
recording.
3. The camcorder saves the recording in the memory card. If the memory card capacity is
full, the oldest file in the memory card ill be over ritten.
14
3.1.2 Emergency Recording
This Car Camcorder is equipped ith a sensor that is designed to detect
collisions and automatically trigger the Emergency Recording feature. The
“ Emergency” icon ill be displayed if this feature is initiated as illustrated.
The Emergency Recording video ill not be over ritten via the normal loop
recording function of this product.
To manually initiate the Emergency
Recording feature, press the
button during the normal recording
function.
To stop the emergency recording,
press the button.
Note:
1. If the Collision Detection function is enabled and a collision is detected, the camcorder
ill automatically trigger the emergency recording feature.
2. The emergency file is created as a ne file and save in Event folder, hich ill be
protected to avoid being over ritten by normal loop recording. The emergency video
folder ill occupy 40% of available memory card capacity. For example, if you use 8GB
memory card, about 3.2GB memory space ill be saved for emergency files. When the
emergency video folder is full, the oldest emergency file ill be automatically deleted by
the ne est emergency file.
15
3.1.3 The Recording Screen
No.
Item
Description
1 Duration Indicates the current recording duration
2 Microphone
Indicates sound ill be recorded ith the video.
Indicates sound ill NOT be recorded ith the video.
Long Press to disable/ enable
3 Resolution
Resolution can be changed in the Settings menu. If the
camcorder is in Video mode, available resolutions are:
1080P: Full HD 1920 x 1080 pixels @30fps
720P: HD 1280 x 720 pixels @30fps
4 TF Card
When a compatible micro SD memory card is inserted, the LCD
displays .
If no memory card is inserted or if the memory card is damaged
/ incompatible, the LCD displays
5 Battery Indicates the estimated remaining battery po er. See Battery
Status Indicator 2.3
6 Date / Time Current date and time.
16
3.1.4 Taking Photographs
You can also use this camcorder to
take snapshots of the current
scene.
1. In recording status, press
to capture recording
screen shots from the front lens.
2. When the icon sho s in the central of screen, it means the
screenshots is completed.
Note:
The picture resolution is limited by the speed of the target object and changes in ambient
lighting. The photograph function is better used for taking still pictures in accident
scenes or hen the car is stopped to ait for a traffic light.
3.2 Playback Videos and Photos
1. If recording is in progress, press the button to stop recording
and enter the playback menu.
2. Press the
or
button to select the file
category that you ant to
bro se and press the
button to display thumbnail
images of the recorded video
or photo files.
3. Use the
or to
select the video or photo you ant to playback, and press
button to confirm your selection.
17
3.3 The Playback Screen
No.
Item Description
1 File name File name
2 Duration Indicates the video elapse time
3 Total recorded
time Indicates total recorded time
4 File Current file / total file number
5 Stamp print Indicates date and time stamp
6 Battery Indicates the estimated remaining battery po er. See
battery Status Indicator 2.3
7 Date and time Date and time of photo taking
18
3.4 Deleting Files
To delete file(s), perform the follo ing steps:
1. Press the button to
stop recording and enter the
main Menu.
2. Press the
or
button to select File Deletion
and press the button
to confirm.
3. Press the
or
button to select folder and
press the button to
confirm.
4. Use the or
to select the video or photo
you ant to delete, and press button to confirm your
selection.
Item Description
Delete One Delete the current selected file.
Delete All Deletes all files in this folder.
5. Press the button to confirm deletion.
Note:
Deleted files CANNOT be recovered. Ensure the files you ish to preserve are backup
before deletion.
19
3.5 Collision Detection
If the Collision Detection function is enabled, this camcorder begins
emergency recording once it detects any collision. Sensitivity of the
Collision Detection function is set to Normal Sensitivity by default, if user
ants to change the settings of Collision Detection, do the follo ing:
1. Press the button to
enter the main menu.
2. Press the
or
button to select Collision
Detection, and then press the
button to confirm.
3. Press the
or
button to change the sensitivity
of this camcorder’s collision
detection (High Sensitivity /
Normal Sensitivity / Lo
Sensitivity / Off), and then
press the button to
confirm your selection
4. Press the button to
return to recording screen.

Other manuals for Compaq Presario,Presario F760

1

Other HP Dashcam manuals

HP U818 Series User manual

HP

HP U818 Series User manual

HP f210 User manual

HP

HP f210 User manual

HP f500g User manual

HP

HP f500g User manual

HP f550g User manual

HP

HP f550g User manual

HP Compaq Presario,Presario F558 User manual

HP

HP Compaq Presario,Presario F558 User manual

HP F510 User manual

HP

HP F510 User manual

HP f200 User manual

HP

HP f200 User manual

HP f790 User manual

HP

HP f790 User manual

HP f870x User manual

HP

HP f870x User manual

HP Presario F500 - Notebook PC User manual

HP

HP Presario F500 - Notebook PC User manual

HP f520g User manual

HP

HP f520g User manual

HP Compaq Presario,Presario F760 User manual

HP

HP Compaq Presario,Presario F760 User manual

HP F900 User manual

HP

HP F900 User manual

HP f330 User manual

HP

HP f330 User manual

HP f300c User manual

HP

HP f300c User manual

HP f530g User manual

HP

HP f530g User manual

HP f720 User manual

HP

HP f720 User manual

HP f520 User manual

HP

HP f520 User manual

HP f969x User manual

HP

HP f969x User manual

HP f800g User manual

HP

HP f800g User manual

HP f720 User manual

HP

HP f720 User manual

HP Deskjet F335 User manual

HP

HP Deskjet F335 User manual

HP f800g User manual

HP

HP f800g User manual

HP f870g User manual

HP

HP f870g User manual

Popular Dashcam manuals by other brands

BrandMotion ADAS+ ADAS-1100 manual

BrandMotion

BrandMotion ADAS+ ADAS-1100 manual

Uniden iGo CAM 820O owner's manual

Uniden

Uniden iGo CAM 820O owner's manual

Kenwood DRV-A700W quick start guide

Kenwood

Kenwood DRV-A700W quick start guide

DOD LS460W user manual

DOD

DOD LS460W user manual

Transcend DrivePro 200 user manual

Transcend

Transcend DrivePro 200 user manual

Lampa DVR 2 manual

Lampa

Lampa DVR 2 manual

Vicovation Vico-Opia 2 Premium installation guide

Vicovation

Vicovation Vico-Opia 2 Premium installation guide

Xiaomi MI 70MAI quick start guide

Xiaomi

Xiaomi MI 70MAI quick start guide

Vantrue Nexus 5 user manual

Vantrue

Vantrue Nexus 5 user manual

Insignia NS-CT1DC8 Quick setup guide

Insignia

Insignia NS-CT1DC8 Quick setup guide

AOLBEA P100 user manual

AOLBEA

AOLBEA P100 user manual

Boss Audio Systems CAM25 user manual

Boss Audio Systems

Boss Audio Systems CAM25 user manual

Wizard-tk ON-CD31 user manual

Wizard-tk

Wizard-tk ON-CD31 user manual

Peiying PY0105 owner's manual

Peiying

Peiying PY0105 owner's manual

LANCERTECH LT-510 user manual

LANCERTECH

LANCERTECH LT-510 user manual

Prestigio RoadRunner 560 user manual

Prestigio

Prestigio RoadRunner 560 user manual

Boyo VTR102 user manual

Boyo

Boyo VTR102 user manual

Dasaita DAS-X9s user manual

Dasaita

Dasaita DAS-X9s user manual

manuals.online logo
manuals.online logoBrands
  • About & Mission
  • Contact us
  • Privacy Policy
  • Terms and Conditions

Copyright 2025 Manuals.Online. All Rights Reserved.