HP R837 - Photosmart 7MP Digital Camera User manual

HP Photosmart R830/R840
series Digital Camera
English

Legal and notice information
© Copyright 2007 Hewlett-Packard Development Company, L.P.
The information contained herein is subject to change without notice. The
only warranties for HP products and services are set forth in the express
warranty statements accompanying such products and services. Nothing
herein should beconstrued as constituting an additional warranty. HP shall
not be liable for technical or editorial errors or omissions contained herein.
Windows® is a U.S. registered trademark of Microsoft Corporation.
SD Logo is a trademark of its proprietor.
Disposal of waste equipment by users in private households
in the European Union
This symbol on the product or on its packaging indicates that this
product must not be disposed of with your other household waste.
Instead, it is your responsibility to dispose of your waste equipment by
handing it over to a designated collection point for the recycling of waste
electrical and electronic equipment. The separate collection and recycling
of your waste equipment at the time of disposal will help to conserve
natural resources and ensure that it is recycled in a manner that protects
human health and the environment. For more information about where you
can drop off your waste equipment for recycling, please contact your local
city office, your household waste disposal service or the shop where you
purchased the product.
For future reference, enter the following information:
•Model number: _________
•Serial number: _________
•Purchase date: _________
English

Contents
1 Getting started
Accessing the electronic User Guide.......................4
Camera top, side, and back ....................................6
Camera front and bottom.........................................7
Camera dock insert..................................................8
2 Setting up your camera
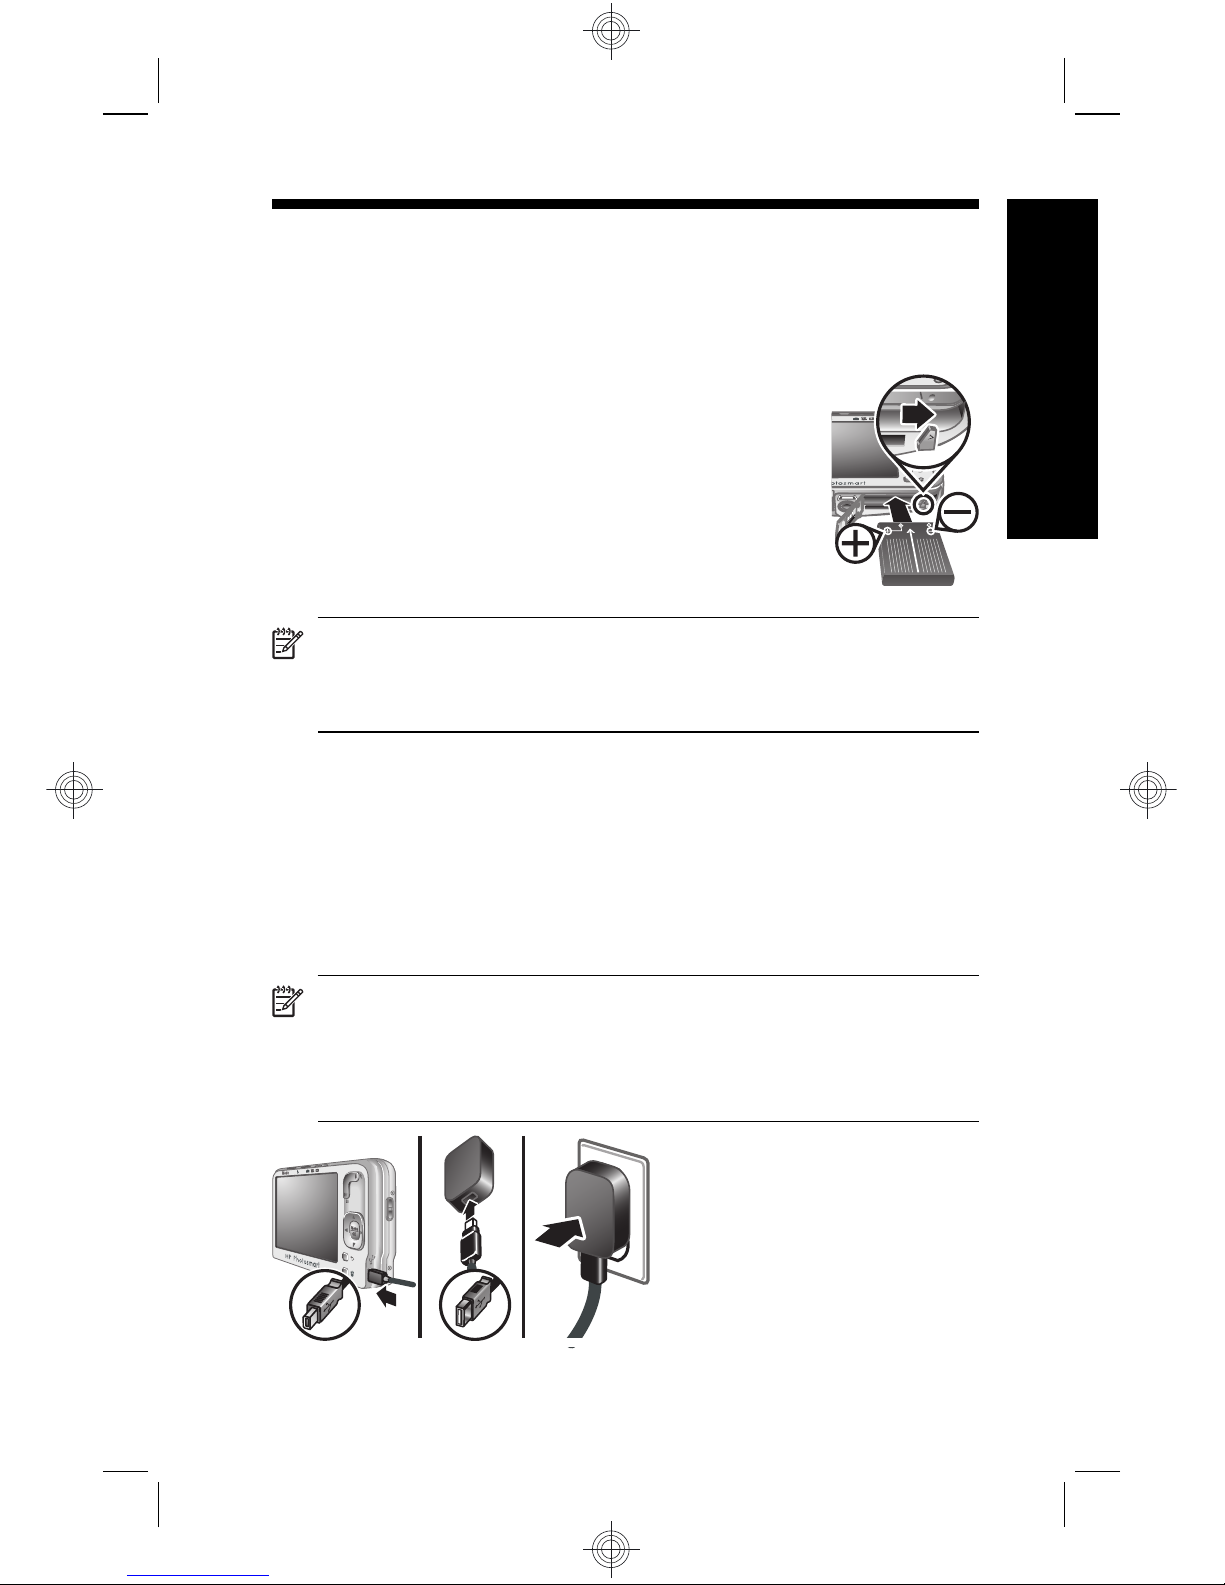
Install the battery......................................................9
Charge the battery....................................................9
Turn on the camera................................................10
Choose the language.............................................10
Set the region.........................................................11
Set the date and time.............................................11
Install and format an optional memory card...........12
Install the software.................................................13
Windows...........................................................13
Macintosh.........................................................13
3 Taking pictures and recording video clips
Take a still picture..................................................15
Record a video clip.................................................15
4 Reviewing and deleting images and video clips
Review images and video clips..............................17
Delete an image.....................................................17
5 Transferring and printing images
Transfer images.....................................................18
Print images from the camera................................18
6 Camera quick reference.......................................20
3
English

1 Getting started
This printed Quick Start Guide provides the information
you need to get started using the essential features of
your camera. For detailed information about camera
features, see the electronic User Guide (see Accessing
the electronic User Guide on page 4).
Quick Start Guide Electronic User Guide
This printed guide will help
you to:
• Start using your
camera quickly
• Install the
HP Photosmart
Software
• Become familiar with
your camera's basic
features
The electronic User Guide
includes:
• Descriptions of all the
camera features
• Battery information,
including:
• Extending battery
life
• A description of the
power indicator
icons
• Troubleshooting
• Getting assistance
from HP
• Camera specifications
Accessing the electronic User
Guide
The electronic User Guide is on the HP Photosmart
Software CD.
4 HP Photosmart R830/R840 series Digital Camera
English

To view the User Guide:
1. Insert the HP Photosmart Software CD into the CD
drive of your computer.
2. Click View User Guide on the main page of the
installation screen.
The electronic User Guide is also copied to your computer
when you install the HP Photosmart Software. To view the
User Guide after it has been installed on your computer:
•On Windows: Open the HP Solution Center and
click help.
•On Macintosh: Open the HP Device Manager and
select Camera User Guide from the Information and
Settings pop-up menu.
Getting assistance
• For tips and tools to help you use your camera more
effectively, visit www.hp.com. From here, click on
Learn About: Digital Photography (English Only).
• For product support, including firmware, software, and
driver updates, visit www.hp.com/support.
• For help with the HP Photosmart Software, see the
software's online help.
Getting started 5
English

Camera top, side, and back
1 2
4 5 6
7
8
9
10
14
13 12 11
3
1Mode button—Accesses the Shooting Mode menu
while in Picture Capture. Shooting Mode
options are Auto Mode, Close-up, Steady Photo
(R830 series), Theatre, Panorama Right, Panorama
Left, Landscape, Portrait, Action, Night Portrait,
Beach, Snow, Sunset.
2Flash button—Accesses the flash settings while
in Picture Capture. Settings are Auto, Flash On,
Flash Off.
3selector—Switches between Picture
Capture, Video Record, and Playback
(see Picture Capture, Video Record, and Playback
on page 20).
4Speaker.
6 HP Photosmart R830/R840 series Digital Camera
English

5Shutter button.
6Power light.
7Zoom lever (Digital and Optical)—Accesses /
Zoom while in Picture Capture or Video
Record; accesses Thumbnails and
Magnify while in Playback.
8and buttons—Scroll through menus and
images.
9button—Displays camera menus, selects
options, and confirms actions.
10 USB connector.
11 Battery Charging light.
12 Delete button—Accesses the Delete function
while in Playback.
13 Back button—Returns you to a previous menu
or view.
14 Image Display.
Camera front and bottom
2 43
5
1
678
Getting started 7
English

1Microphone.
2Flash.
3Self-Timer/Focus Assist light.
4Lens.
5Lens cover/Power switch—Turns the camera on
and off and protects the lens while the camera is off.
6Dock connector.
7Tripod mount.
8Battery/Memory Card door.
Camera dock insert
If you purchase an optional HP Photosmart dock, it will
come with multiple plastic inserts. When setting up the
dock for use with this camera, use the dock insert with the
black triangle tag. For instructions, see the documentation
that came with your dock.
8 HP Photosmart R830/R840 series Digital Camera
English

2 Setting up your camera
Install the battery
1. Open the Battery/Memory Card door by
sliding the door latch as indicated on the
Battery/Memory Card door.
2. Insert the battery in the larger slot,
pushing the battery in until the latch
catches.
3. Close the Battery/Memory Card door.
NOTE: Fully charge the battery before using it the
first time. Turn the camera off before removing the
battery.
To remove the battery, move the battery latch as shown
until the battery springs free.
Charge the battery
You can charge the battery in the camera, using the USB
cable and power adapter.
NOTE: Your camera uses a rechargeable
HP Photosmart R07 Lithium Ion battery (L1812A/
L1812B). Do not charge any other battery in the
camera, optional dock, or optional quick recharger.
Setting up your camera 9
English

1. Plug the small end of the USB cable into the camera,
and the large end into the power adapter, as shown.
2. Plug the power adapter into an electrical outlet.
The camera’s blinking Battery Charging light indicates
that the battery is charging; the battery is fully charged
when the light stays on solid (approximately 2-3 hours).
Turn on the camera
To turn on the camera, slide the lens
cover open until it clicks, uncovering
the lens.
To turn off the camera, slide the lens
cover closed until it clicks, covering
the lens.
CAUTION: When sliding the lens cover, keep your
fingers clear of the lens. Fingerprints on the lens can
impair the quality of the picture.
Choose the language
Use to choose the
language that you want, then
press .
10 HP Photosmart R830/R840 series Digital Camera
English

Set the region
Along with the language setting,
the region setting determines the
default date format and the format
of the video signal for displaying
camera images on a television.
Use to choose the region
you want, then press .
Set the date and time
Accurately setting the date and time will help you locate
images once you have transferred them to your computer,
and will ensure that images are accurately marked if you
use the date and time imprint feature.
1. Use to adjust the
highlighted value.
2. Use to move to the other
selections and repeat Step 1
until the date and time are set
correctly.
3. Press when the date,
time, and format settings are correct, then press
again to confirm.
Setting up your camera 11
English

Install and format an optional
memory card
This camera supports standard, high speed, and high
capacity Secure Digital (SD and SDHC) memory cards,
32MB to 8GB.
1. Turn off the camera and open
the Battery/Memory Card door.
2. Insert the optional memory card
in the smaller slot as shown.
Make sure the memory card
snaps into place.
3. Close the Battery/Memory Card
door and turn on the camera.
NOTE: When you turn on your camera with a
memory card installed, the camera indicates the
number of images you can store on the memory card
at the current Image Quality setting. This camera
supports storing a maximum of 1999 images on a
memory card.
Always format new memory cards before first use.
Formatting removes all images from the memory card, so
make sure to transfer existing images before formatting.
1. With the camera turned on, slide to .
2. Press to display the Delete menu.
3. Use to select Format Card, then press .
4. Use to select Yes, then press to format the
card.
Once you install a memory card, all new images and video
clips are stored on the card, rather than in internal
memory.
12 HP Photosmart R830/R840 series Digital Camera
English

To use internal memory and view images stored there,
turn the camera off, then remove the memory card.
Install the software
The HP Photosmart Software provides features for
transferring images and video clips to your computer, as
well as features for modifying stored images (remove red
eyes, rotate, crop, resize, and more).
To install the HP Photosmart Software, your computer
must meet the system requirements as stated on the
camera packaging. To learn about Windows Vista support
for your camera, see www.hp.com/go/windowsvista
(English only).
If you have trouble installing or using the HP Photosmart
Software, see the Hewlett-Packard Technical Support
website for more information: www.hp.com/support.
Windows
1. Close all programs and temporarily disable any virus
protection software.
2. Insert the HP Photosmart Software CD into the CD
drive and follow the on-screen instructions. If the
installation window does not appear, click Start,
click Run, type D:\Setup.exe, where Dis the letter of
your CD drive, then click OK.
3. When the software has finished installing, re-enable
virus protection software.
Macintosh
1. Insert the HP Photosmart Software CD into the CD
drive.
2. Double-click the CD icon on the computer desktop.
Setting up your camera 13
English

3. Double-click the installer icon, then follow the on-
screen instructions.
Once installation is complete and you have restarted your
computer, System Preferences automatically opens to
the HP Photosmart Camera settings. You may change
settings so the HP Photosmart Software starts
automatically when you connect your camera to your
Macintosh (for more information, click the help button on
the HP Photosmart Camera settings dialog).
14 HP Photosmart R830/R840 series Digital Camera
English

3 Taking pictures and
recording video clips
Slide to either to take pictures or to to
record video clips.
Take a still picture
You can take a picture when you are in
Picture Capture.
1. Slide to .
2. Frame the subject in the Image
Display.
3. Press the Shutter button halfway down to measure
and lock the focus and exposure. The focus brackets
in the Image Display turn solid green when focus is
locked.
4. Press the Shutter button all the way down to take the
picture.
After you have taken a picture, the camera displays it
briefly in the Image Display.
Record a video clip
You can record a video when you are
in Video Record.
1. Slide to .
2. Frame the subject in the Image
Display.
3. Press the Shutter button halfway down to measure
focus and exposure. The focus brackets in the Image
Display turn solid green when focus is locked.
Taking pictures and recording video clips 15
English

4. Press the Shutter button all the way down and
release to begin recording video.
5. To stop recording video, press and release the
Shutter button again.
After you have recorded a video clip, the camera displays
it briefly in the Image Display.
16 HP Photosmart R830/R840 series Digital Camera
English

4 Reviewing and deleting
images and video clips
Review images and video clips
You can review images and video clips in Playback.
1. Slide to .
2. Use to scroll through your images and video clips.
To play a video clip, press once the first screen of
the clip appears on the Image Display.
Delete an image
You can delete individual images during Playback:
1. Slide to .
2. Use to select an image or video clip.
3. Press to display the Delete menu.
4. Use to select This Image, then press .
Reviewing and deleting images and video clips 17
English

5 Transferring and printing
images
Transfer images
Use this procedure to transfer images and video clips to
your computer.
NOTE: Transferring a large number of high-
resolution images from a memory card to your
computer may take up to two hours.
1. Turn off the camera.
2. Connect the camera to the
computer using the USB cable
that came with your camera.
3. Turn on the camera. When the
Image Display indicates that the
camera is connected to the
computer, follow the
instructions on the computer
screen to transfer the images. If you have installed the
HP Photosmart Software and need more information,
see the Help feature in the HP Photosmart Software.
Print images from the camera
You can connect the camera to any PictBridge-
certified printer to print images.
1. Check that the printer is turned on, there is
paper in the printer, and there are no printer
error messages.
18 HP Photosmart R830/R840 series Digital Camera
English

2. Turn off the camera, then
connect the camera and
printer using the USB
cable that came with your
camera.
3. Turn on the camera.
4. When the camera is
connected to the printer,
the Image Display shows
an image. Use to
select the image you want to print.
5. Press .
6. In the Print Options menu, select Print this image
now and press to begin printing.
displays on the selected image in the Image
Display to indicate that the image is being printed.
7. After the printer has printed the image, disconnect the
camera from the printer.
To learn about other printing options, see either the
electronic User Guide or Camera Help located in any
menu.
Transferring and printing images 19
English

6 Camera quick reference
Use this chapter as a quick reference to camera features.
To learn more about these camera features, refer to the
electronic User Guide or on-camera Help.
Picture Capture, Video Record, and Playback
•Picture Capture allows you to frame pictures in
the Image Display and take pictures. To activate
Picture Capture, slide to .
•Video Record allows you to frame videos in the
Image Display and record videos. To activate
Video Record, slide to .
•Playback allows you review and delete images
and video clips. To activate Playback, slide
to .
Camera Menus
Menus allow you to adjust camera settings, work with
images, and access camera help.
•Within a menu, use to move to specific
selections.
• To exit the menu, press at any time.
Picture Capture Menu—Allows you to adjust camera
settings that affect the characteristics of future images you
capture with your camera. To access this menu, slide
to , then press . You can select from the
following options:
•Self-Timer
• Steady Photo (R840 series)
• Adaptive Lighting
• Image Quality
20 HP Photosmart R830/R840 series Digital Camera
English
Other manuals for R837 - Photosmart 7MP Digital Camera
4
This manual suits for next models
3
Table of contents
Languages:
Other HP Digital Camera manuals

HP
HP ProSignia 318 User manual

HP
HP M415 Installation instructions

HP
HP Photosmart 318 User manual

HP
HP SB360 User manual

HP
HP PhotoSmart M547 User manual

HP
HP Visualize c200 - Workstation User manual

HP
HP Photosmart Mz60 Series User manual

HP
HP s510 User manual

HP
HP Photosmart 215 User manual

HP
HP SB360 - 12 MP, 3IN LCD User manual