HP Pavilion HDX9200 User manual

Notebook Tour
User Guide

© Copyright 2007 Hewlett-Packard
Development Company, L.P.
Microsoft and Windows are U.S. registered
trademarks of Microsoft Corporation.
Bluetooth is a trademark owned by its
proprietor and used by Hewlett-Packard
Company under license. SD Logo is a
trademark of its proprietor.
The information contained herein is subject
to change without notice. The only
warranties for HP products and services are
set forth in the express warranty statements
accompanying such products and services.
Nothing herein should be construed as
constituting an additional warranty. HP shall
not be liable for technical or editorial errors
or omissions contained herein.
First Edition: November 2007
Document Part Number: 459806-001

Safety warning notice
WARNING! To reduce the possibility of heat-related injuries or of overheating the computer, do not
place the computer directly on your lap or obstruct the computer air vents. Use the computer only on a
hard, flat surface. Do not allow another hard surface, such as an adjoining optional printer, or a soft
surface, such as pillows or rugs or clothing, to block airflow. Also, do not allow the AC adapter to contact
the skin or a soft surface, such as pillows or rugs or clothing, during operation. The computer and the
AC adapter comply with the user-accessible surface temperature limits defined by the International
Standard for Safety of Information Technology Equipment (IEC 60950).
iii

iv Safety warning notice

Table of contents
1 Identifying hardware
2 Components
Product notice ...................................................................................................................................... 2
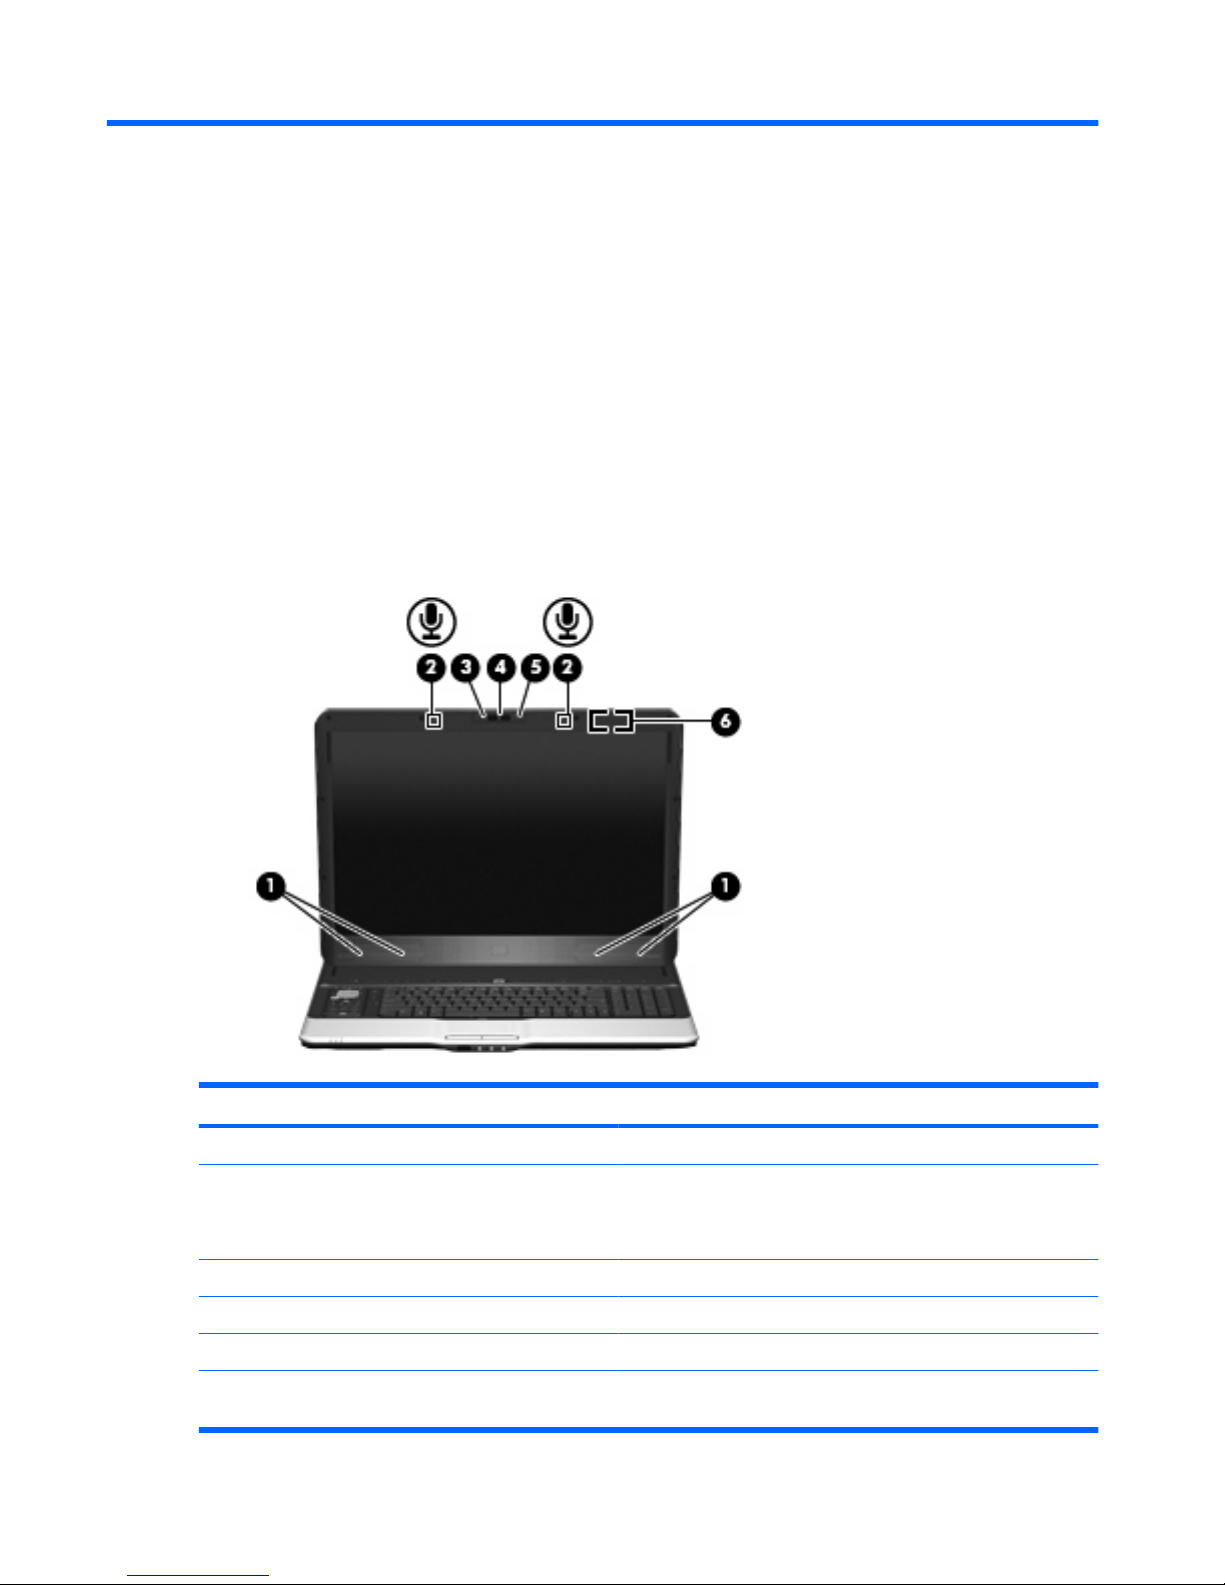
Display components ............................................................................................................................. 2
Top components ................................................................................................................................... 3
Top-left buttons and lights ................................................................................................... 3
Top-right buttons, lights, and fingerprint reader ................................................................... 4
HP Dockable Media Center remote control ......................................................................... 5
TouchPad .......................................................................................................................... 12
Keys ................................................................................................................................... 13
Front components .............................................................................................................................. 14
Rear components ............................................................................................................................... 15
Rear left-side components ................................................................................................. 15
Rear right-side components ............................................................................................... 16
Right-side components ....................................................................................................................... 17
Left-side components ......................................................................................................................... 18
Bottom components ........................................................................................................................... 19
Wireless antennae .............................................................................................................................. 20
Additional hardware components ....................................................................................................... 21
3 Labels
Index ................................................................................................................................................................... 23
v

vi

1 Identifying hardware
To see a list of hardware installed in the computer, follow these steps:
1. Select Start >Computer >System properties.
2. In the left pane, click Device Manager.
You can also add hardware or modify device configurations using Device Manager.
NOTE: Windows® includes the User Account Control feature to improve the security of your computer.
You may be prompted for your permission or password for tasks such as installing applications, running
utilities, or changing Windows settings. Refer to Windows Help for more information.
1

2 Components
Product notice
This user guide describes features that are common to most models. Some features may not be
available on your computer.
Display components
Component Description
(1) Speakers (4) Produce sound.
(2) Internal microphones (2) Record sound.
NOTE: If there is a microphone icon next to each microphone
opening, your computer has internal microphones.
(3) HP Webcam light On: The integrated camera is in use.
(4) HP Webcam Records video and captures still photographs.
(5) HP Webcam rotator Tilts the camera vertically.
(6) Internal display switch Turns off the display if the display is closed while the computer is
on.
2 Chapter 2 Components

Top components
Top-left buttons and lights
Component Description
(1) Power button* ●When the computer is off, press the button to turn on the
computer.
●When the computer is on, press the button to initiate Sleep.
●When the computer is in the Sleep state, press the button
briefly to exit Sleep.
●When the computer is in Hibernation, press the button briefly
to exit Hibernation.
If the computer has stopped responding and Windows® shutdown
procedures are ineffective, press and hold the power button for at
least 5 seconds to turn off the computer.
To learn more about your power settings, select Start >Control
Panel >System and Maintenance >Power Options.
(2) Power light ●On: The computer is on.
●Blinking: The computer is in the Sleep state.
●Off: The computer is off or in Hibernation.
(3) Media button ●Opens the QuickPlay program (for models with QuickPlay
preinstalled).
●Opens the DVDPlay program (for models with DVDPlay
preinstalled).
NOTE: If the computer has been set up to require a logon
password, you may be asked to log on to Windows. QuickPlay or
DVDPlay opens after you log on. Refer to the QuickPlay or
DVDPlay software Help for more information.
Top components 3

Component Description
(4) DVD button Opens the DVD playback feature of the QuickPlay program.
NOTE: If the computer has been set up to require a logon
password, you may be asked to log on to Windows. QuickPlay
opens after you log on. Refer to the QuickPlay software Help for
more information.
(5) TV play button Opens the TV module within the QuickPlay program.
(6) Previous/rewind button ●Plays the previous track or chapter when the button is pressed
once.
●Rewinds media when the button is pressed simultaneously
with the fn key.
(7) Stop button Stops playback.
(8) Play/pause button Plays or pauses media.
(9) Next/fast forward button ●Plays the next track or chapter when the button is pressed
once.
●Fast forwards media when the button is pressed
simultaneously with the fn key.
(10) Theater mode button Dims the lights on the computer.
(11) Remote control eject button Ejects the remote control.
(12) Caps lock light On: Caps lock is on.
*This table describes factory settings. For information about changing factory settings, refer to the user guides located in Help
and Support.
Top-right buttons, lights, and fingerprint reader
Component Description
(1) Fingerprint reader Allows a fingerprint logon to Windows, instead of a password logon.
4 Chapter 2 Components

Component Description
(2) Wireless button Turns the wireless feature on or off, but does not create a wireless
connection.
NOTE: To establish a wireless connection, a wireless network
must already be set up.
(3) Wireless light ●Blue: An integrated wireless device, such as a wireless local
area network (LAN) device and/or a Bluetooth® device, is
turned on.
●Amber: An integrated wireless device is turned off.
(4) Volume mute button Mutes and restores speaker sound.
(5) Volume mute light ●Blue: Computer sound is turned on.
●Amber: Computer sound is turned off.
(6) Volume down light Blinking: The volume scroll zone is being used to decrease speaker
volume.
(7) Volume scroll zone Adjusts speaker volume. Slide your finger to the left to decrease
volume and to the right to increase volume. You can also tap the
minus sign on the scroll zone to decrease volume, or tap the plus
sign on the scroll zone to increase volume.
(8) Volume up light Blinking: The volume scroll zone is being used to increase speaker
volume.
(9) Treble or bass volume down light (select models
only)
Blinking: The volume scroll zone is being used to decrease treble
or bass volume.
(10) Treble or bass volume scroll zone (select models
only)
Adjusts treble or bass volume. Slide your finger to the left to
decrease volume and to the right to increase volume. You can also
tap the minus sign on the scroll zone to decrease volume, or tap
the plus sign on the scroll zone to increase volume.
(11) Treble or bass volume up light (select models
only)
Blinking: The volume scroll zone is being used to increase treble
or bass volume.
(12) Optical drive button Releases the media tray.
(13) Optical drive light Blinking: The optical drive is being accessed.
(14) Treble light (select models only) On: The treble volume function is on.
(15) Bass light (select models only) On: The bass volume function is on.
(16) Treble/bass button (select models only) Alternates between treble and bass volume controls.
(17) Num lock light On: Num lock is on or the embedded numeric keypad is enabled.
HP Dockable Media Center remote control
NOTE: Refer to the illustration that most closely matches your remote control.
Top components 5

Button Description
(1) Power ●If the computer is off, press the Power button to turn the
computer on.
●If the computer is on, press the Power button to initiate Sleep.
NOTE: Press the Power button again to exit the Sleep state.
6 Chapter 2 Components

Button Description
(2) Recorded TV Opens the Recorded TV window where all your recorded TV
programs are stored. From this window, you can search for and
play back a recorded program.
(3) Arrow, OK ●Press an arrow to move between menus, windows, or
activities. Pressing an arrow button also moves the pointer to
select actions within the Windows Media Center windows.
●Press the OK button to select a desired action. The OK button
functions like the Enter button. If you are watching live TV,
press the OK button to go to the previous channel. Press the
OK button again to switch back to the original channel you
were watching.
(4) Guide Opens the electronic television Program Guide. Internet access
may be required.
(5) Enter Enters or selects the desired action, menu, or window option.
(6) Mute Turns off computer sound. The word “Mute” is displayed on the
screen when Mute is turned on.
(7) Volume Increases and decreases computer sound.
(8) Replay ●Moves backward 7 seconds in live TV.
●Moves backward 12 hours in the Program Guide.
(9) Play Plays the selected media.
(10) Rewind ●Rewinds the selected media. To increase the rewinding
speed, press the button again.
NOTE: The Rewind button does not work with MP3 files and
may not work with some video files.
●Moves the video backward.
●Moves a live TV program to the beginning of the 30-minute
pause buffer.
●Moves the television Program Guide back 3 hours.
●When you press the Rewind button and then press the Play
button, instant replay is deactivated.
(11) Keypad Changes channels or enters text into a text box.
NOTE: Each time you press a number button, a different
character (letter) is displayed. Press the Enter button to select a
character.
(12) Clear Clears or deletes the last character entered.
(13) Print Prints pictures that you select in the My Pictures window. This
button does not print files from Windows Explorer.
(14) Switch screens Switches the computer image between the computer display and
an external display.
(15) Snapshot Captures a picture of the computer screen and saves it to the
clipboard.
(16) Theater mode Dims the lights on the computer.
(17) QuickPlay Opens QuickPlay.
Top components 7

Button Description
(18) Live TV ●Moves a TV program forward to the end of the pause buffer
and resumes playing live TV. When you pause a TV program,
press the button to move forward to live TV.
●Opens the media software and then begins playing live TV in
full-screen mode.
(19) DVD menu Opens the main menu on a DVD movie, if available.
(20) Information ●Displays available information about a selected media file,
such as a TV program summary or music artist information.
●Displays options to rotate or print your pictures.
NOTE: You may need to be connected to the Internet to receive
some media information.
NOTE: Some media may not include this information.
(21) Start Opens the Windows Media Center main menu.
(22) Change/page ●Changes TV channels or moves pages up (+) and down (–),
depending on the available options.
●Moves to the next DVD chapter.
(23) Skip ●Advances 30 seconds in live TV or in a recorded program.
●Advances one music track in a CD.
●Advances 12 hours in the television Program Guide.
(24) Stop Stops the selected media. When you press the button while you
are watching TV, the Windows Media Center pause buffer
continues to record in the background.
(25) Forward ●Moves the selected video media forward. To increase the fast
forwarding speed, press the Forward button up to 3 times.
NOTE: The Forward button may not work with some video
files.
●Moves MP3 music files forward.
●Moves a video forward.
●Moves the television Program Guide forward 3 hours.
(26) Enter Enters or selects the desired action, menu, or window option.
8 Chapter 2 Components

Button Description
(1) Power ●If the computer is off, press the Power button to turn the
computer on.
●If the computer is on, press the Power button to initiate Sleep.
NOTE: Press the Power button again to exit the Sleep state.
(2) Recorded TV Opens the Recorded TV window where all your recorded TV
programs are stored. From this window, you can search for and
play back a recorded program.
Top components 9

Button Description
(3) Arrow, OK ●Press an arrow to move between menus, windows, or
activities. Pressing an arrow button also moves the pointer to
select actions within the Windows Media Center windows.
●Press the OK button to select a desired action. The OK button
functions like the Enter button. If you are watching live TV,
press the OK button to go to the previous channel. Press the
OK button again to switch back to the original channel you
were watching.
(4) Guide Opens the electronic television Program Guide. Internet access
may be required.
(5) Enter Enters or selects the desired action, menu, or window option.
(6) Mute Turns off computer sound. The word “Mute” is displayed on the
screen when Mute is turned on.
(7) Volume Increases and decreases computer sound.
(8) Replay ●Moves backward 7 seconds in live TV.
●Moves backward 12 hours in the Program Guide.
(9) Play Plays the selected media.
(10) Rewind ●Rewinds the selected media. To increase the rewinding
speed, press the button again.
NOTE: The Rewind button does not work with MP3 files and
may not work with some video files.
●Moves the video backward.
●Moves a live TV program to the beginning of the 30-minute
pause buffer.
●Moves the television Program Guide back 3 hours.
●When you press the Rewind button and then press the Play
button, instant replay is deactivated.
(11) Keypad Changes channels or enter text into a text box.
NOTE: Each time you press a number button, a different
character (letter) is displayed. Press the Enter button to select a
character.
(12) Clear Clears or deletes the last character entered.
(13) Teletext buttons Shortcut buttons that allow retrieval of information.
(14) QuickPlay Opens QuickPlay.
(15) Live TV ●Moves a TV program forward to the end of the pause buffer
and resumes playing live TV. When you pause a TV program,
press the button to move forward to live TV.
●Opens the media software, and then begins playing live TV in
full-screen mode.
(16) Teletext Displays the teletext menu.
10 Chapter 2 Components

Button Description
(17) Information ●Displays available information about a selected media file,
such as a TV program summary or music artist information.
●Displays options to rotate or print your pictures.
NOTE: You may need to be connected to the Internet to receive
some media information.
NOTE: Some media may not include this information.
(18) Start Opens the Windows Media Center main menu.
(19) Change/page ●Changes TV channels or moves pages up (+) and down (–),
depending on the available options.
●Moves to the next DVD chapter.
(20) Skip ●Advances 30 seconds in live TV or in a recorded program.
●Advances one music track in a CD.
●Advances 12 hours in the television Program Guide.
(21) Stop Stops the selected media. When you press the button while you
are watching TV, the Windows Media Center pause buffer
continues to record in the background.
(22) Forward ●Moves the selected video media forward. To increase the fast
forwarding speed, press the Forward button up to 3 times.
NOTE: The Forward button may not work with some video
files.
●Moves MP3 music files forward.
●Moves a video forward.
●Moves the television Program Guide forward 3 hours.
(23) Enter Enters or selects the desired action, menu, or window option.
Top components 11

TouchPad
Component Description
(1) TouchPad light ●Blue: TouchPad is enabled.
●Amber: TouchPad is disabled.
(2) TouchPad* Moves the pointer and selects or activates items on the screen.
(3) Left TouchPad button* Functions like the left button on an external mouse.
(4) TouchPad on/off button Enables/disables the TouchPad.
(5) TouchPad scroll zone* Scrolls up or down.
(6) Right TouchPad button* Functions like the right button on an external mouse.
*This table describes factory settings. To view and change pointing device preferences, select Start >Control Panel >
Hardware and Sound >Mouse.
12 Chapter 2 Components

Keys
Component Description
(1) esc key Displays system information when pressed in combination with the
fn key.
(2) fn key Executes frequently used system functions when pressed in
combination with a function key or the esc key.
(3) Windows logo key Displays the Windows Start menu.
(4) Windows applications key Displays a shortcut menu for items beneath the pointer.
(5) Integrated numeric keypad keys Can be used like the keys on an external numeric keypad.
(6) Function keys Execute frequently used system functions when pressed in
combination with the fn key.
Top components 13

Front components
Component Description
(1) Power light ●On: The computer is on.
●Blinking: The computer is in the Sleep state.
●Off: The computer is off or in Hibernation.
(2) Battery light ●On: A battery is charging.
●Blinking: A battery that is the only available power source has
reached a low battery level or a critical battery level.
●Off: If the computer is plugged into an external power source,
the light is turned off when all batteries in the computer are
fully charged. If the computer is not plugged into an external
power source, the light stays off until the battery reaches a low
battery level.
(3) Drive light Blinking: The hard drive or optical drive is being accessed.
(4) Consumer infrared lens Receives a signal from the remote control.
(5) Audio-in (microphone) jack Connects an optional computer headset microphone, stereo array
microphone, or monaural microphone.
(6) Audio-out (headphone) jacks (2) Produce sound when connected to optional powered stereo
speakers, headphones, ear buds, a headset, or television audio.
14 Chapter 2 Components
This manual suits for next models
2
Table of contents
Other HP Laptop manuals

HP
HP Mini 2140 - Notebook PC User instructions

HP
HP nx6315 User manual

HP
HP Compaq nc8000 Manual

HP
HP Compaq NX7400 User manual

HP
HP OmniBook VT6200 User guide

HP
HP Pavilion 15-bc300 Manual

HP
HP 2230s - Compaq Business Notebook User manual

HP
HP Pavilion dv9000 User manual

HP
HP Pavilion DV6-1030 Manual

HP
HP Pavilion TouchSmart Notebook PC Manual

HP
HP ProBook 470 G3 Manual

HP
HP Pavilion dm4 Entertainment PC Manual

HP
HP ZBook 15 Manual

HP
HP 8530w - EliteBook Mobile Workstation User manual

HP
HP 396853-001 User manual

HP
HP dv5100 Manual

HP
HP Pavilion zd7000 - Notebook PC Installation instructions

HP
HP LW350UA#ABA Manual

HP
HP Compaq Presario User manual

HP
HP Laptop User manual