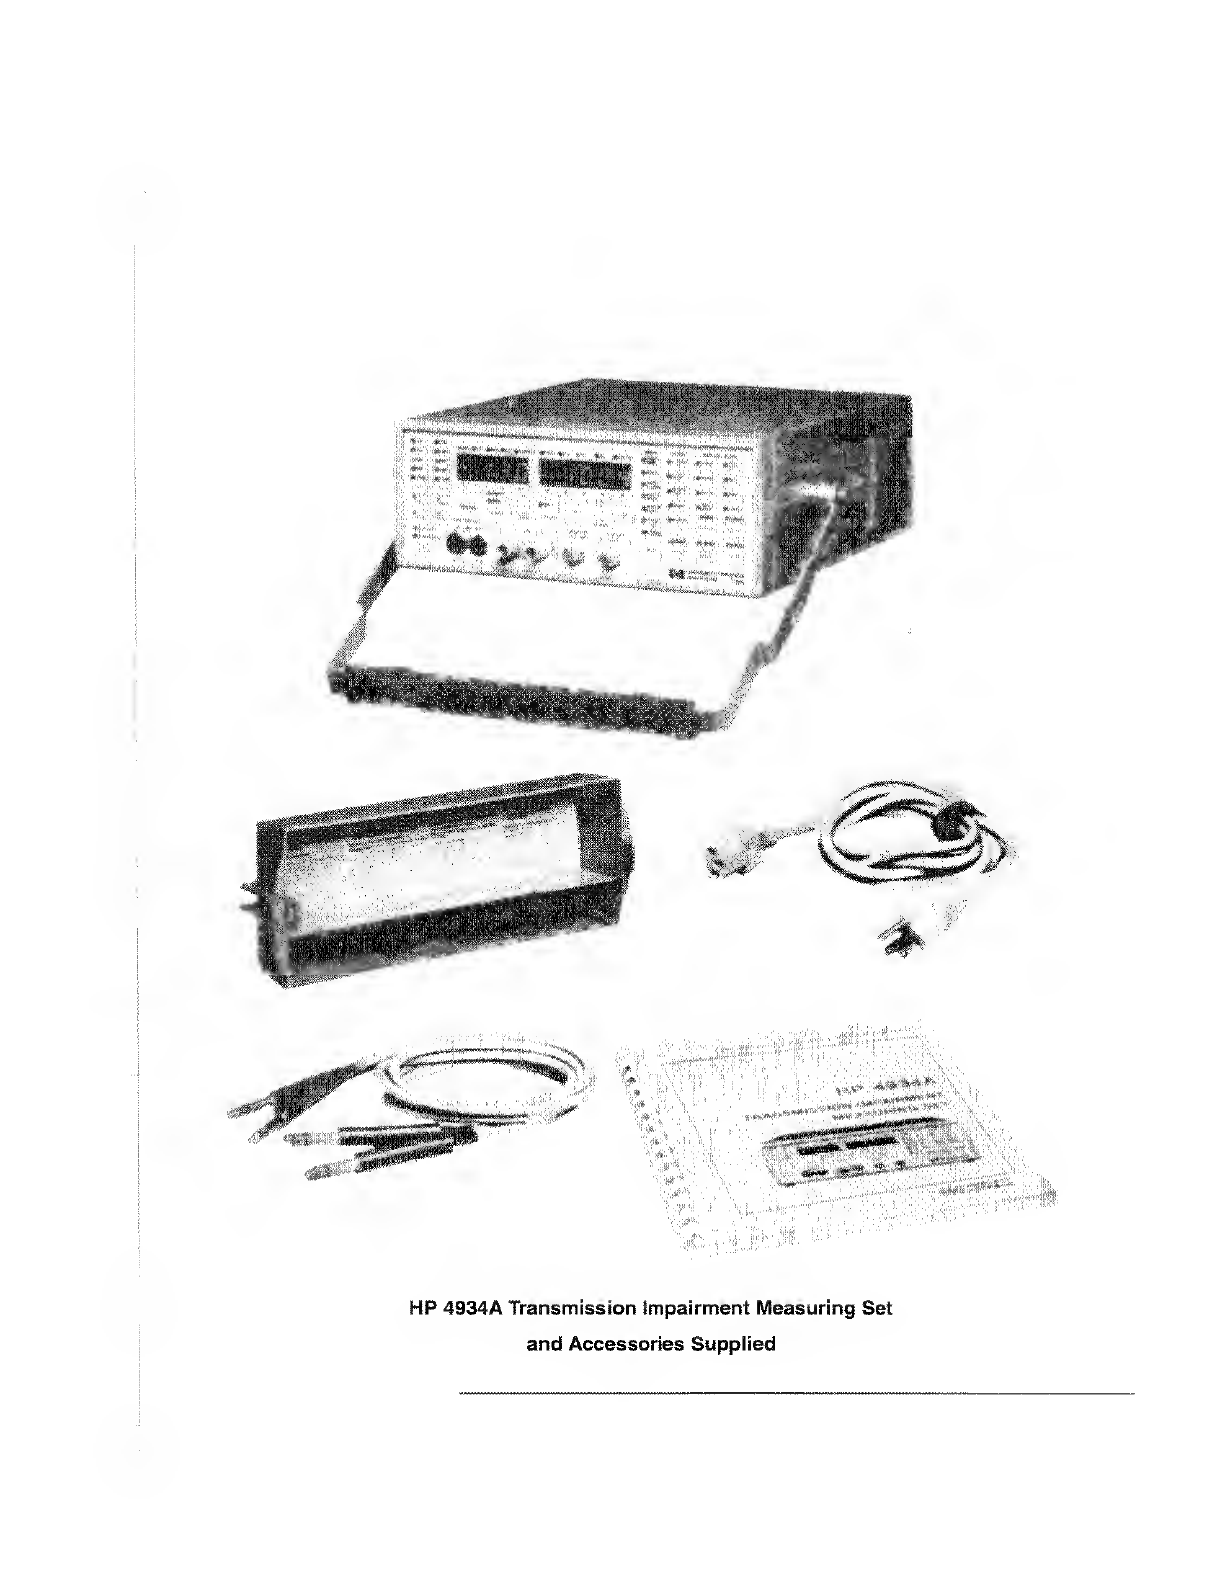
HP 4934A Use and care manual

SERIAL
NUMBERS
This
manual
applies
directly
to
instruments
with
serial
numbers
prefixed
3648U.
For
additional
important
information
about
serial
numbers,
see
INSTRUMENTS
COVERED
BY
MANUAL
in
Chapter
3.
HEWLETT®
PACKARD
HP
Part
No.
04934-90054
Printed
in
U.K.
November
1998
Copyright
©
Hewlett-Packard
Ltd.
1998

HP
4934A
Transmission
impairment
Measuring
Set
and
Accessories
Supplied

The
HP
4934A
is
a
wideband
(20
Hz
to
110
kHz),
(20
Hz
to
200
kHz
option
021)
Transmission
Impairment
Measuring
Set
(TIMS).
The
transmission
impairment
measurements
which
can
be
made
are
listed
below.
Level
Frequency
Noise
Noise
with
Tone
Signal
to
Noise
Impulse
Noise
P/AR
(Peak
to
Average
Ratio)
1
J
Noise
to
Ground
J
*;j
The
HP
4934A
can
make
measurements
directly
on
leased
lines
or
on
dial-up
lines.
It
has
loop
holding
capability,
a
monitor
speaker
and
butt-in
connection
(useful
for
talking
to
the
far
end
of
the
test
line).
There
are
four
permanently
stored
frequencies:
404
Hz,
1004
Hz,
2804
Hz
and
2713
Hz.
Any
other
'
*
four
frequencies
may
be
temporarily
assigned
or
stored
by
the
user.
(:
J
The
HP
4934A
can
test
circuits
using
single
frequency
(SF)
signaling
-
use
the
SF
SKIP
feature,
j
,
SF
SKIP
prevents
the
HP
4934A
from
transmitting
signaling
frequencies
in
the
range
i
i
2600
Hz+150
Hz.


Contents
1
Getting
Started
Introduction
1-1
Switch-On
1-1
Front
Panel
Features
1-2
Demonstrating
the
HP
4934A
1
-5
Demonstration
1
1-5
Demonstration
2
1-6
Error
Codes
1-7
2
Making
Measurements
Preliminary
Setup
2-1
Connecting
the
HP
4934A
to
the
Test
Circuit
2-1
Dial
and
Hold
2-2
Dialing
using
the
HP
4934A
and
a
Bott-in
2-3
Receiving
an
Incoming
Call
and
Holding
the
Line
2-4
Level
and
Frequency
2-5
Principles
2-5
Instrument
Operation
2-7
Message
Circuit
Noise
2-10
Principles
2-10
How
it
is
Measured
2-11
Instrument
Operation
2-12
Noise
with
Tone
(Notched
Noise)
2-13
Principles
2-13
How
it
is
Measured
2-13
Instrument
Operation
2-14
Signal
to
Noise
2-15
Principles
2-15
How
it
is
Measured
2-15
hi

Contents
Instrument
Operation
2-16
Impulse
Noise
2-17
Principles
2-17
Instrument
Operation
2-18
P/AR
(Peak
to
Average
Ratio)
2-21
Principles
2-21
How
it
is
Measured
2-22
Instrument
Operation
2-22
Noise
to
Ground
2-23
Principles
2-23
How
it
is
Measured
2-23
Instrument
Operation
2-24
3
General
Information
Introduction
3-1
About
this
Version
3-1
Specification
3-2
Safety
Information
3-2
General
3-2
Safety
Symbols
3-3
Statement
of
Compliance
3-5
Electromagnetic
Compatibility
(EMC)
Information
3-5
Instruments
Covered
by
Manual
3-7
Options
Available
3-8
Accessories
Supplied
3-9
Accessories
Available
3-9
Specifications
3-10
IV

Contents
4
Installation
Introduction
4-1
Initial
Inspection
4-1
Preparation
for
Use
4-2
Power
Requirements
4-2
Line
Fuse
4-2
Power
Cable
4-3
Battery
(Option
001
or
Retrofit)
4-3
Battery
4-3
Mating
Connectors
(Front
Panel)
4-4
Operating
Environment
4-4
Cleaning
4-4
Noise
Declaration
4-5
Storage
and
Shipment
4-5
Environment
4-5
Packaging
4-5
5
Performance
Tests
Introduction
5-1
Calibration
Cycle
5-1
Recommended
Test
Equipment
5-2
Operational
Verification
5-3
Receiver
Frequency
5-4
Receiver
Level
5-5
Weighting
Filters
5-6
Impulse
Noise
Count
5-9
Loss
of
Holding
Tone
5~10
Hold
Circuit
5-11
Dynamic
Hold
Circuit
5-13
Performance
Tests
5-18

Contents
Transmitter
Frequency
Accuracy
5-19
Transmitter
Level
Range
5-20
Transmitter
Level
Accuracy
5
-21
Transmitter
Flatness
at
+10
dBm
5-22
Transmitter
Flatness
at
-40
dBm
5-24
Receiver
Frequency
Range/Accuracy
5-30
Receiver
Level
Accuracy
5-32
Message
Circuit
Noise
Accuracy
5-34
Notch
Filter
Rejection
5-36
Signal
to
Noise
Ratio
Accuracy
5-37
Impulse
Noise
Threshold
Accuracy
5-39
Noise
to
Ground
Accuracy
5-41
Peak
to
Average
Ratio
(P/AR)
Accuracy
5-43
6
Software
Downloading
Introduction
6-1
Quick
Download
Procedure
6-2
About
the
DOWNLOAD
Program
6-3
7
Remote
Control
Introduction
7-1
The
Serial
Port
7~2
Serial
Port
Type
7-2
Baud
Rates
7-2
Cable
Pinout
7-3
Null
Modem
7-3
Setting
up
for
Remote
Control
7-4
Connecting
the
TIMS
to
a
Controller
7-4
VI

Contents
Setting
the
Baud
Rate
7-4
Activating
Remote
Mode
7-4
Deactivating
Remote
Mode
7-4
Control
Commands
1-5
Query
Commands
7-8
Results
Display
(DISP?)
Format
7-8
Range
Error
Messages
7-9
A
Service
Accessory
1
(SAl)
20
dB
Amplifier/4
kHz
Filter
Performance
Test
A-1
B
Service
Accessory
2
(SA2)
Power
Splitter/Adder
Performance
Test
B-1

Contents

1
Introduction
This
chapter
aims
to
get
you
ready
to
make
measurements.
It
takes
you
through
switch-on,
introduces
operating
features
and
provides
simple
proce¬
dures
to
demonstrate
how
easy
the
HP
4934A
is
to
use.
Switch-On
CAUTION
Before
switching
on
this
instrument,
make
sure
that
the
line
voltage
selector
switch
is
set
to
the
voltage
of
the
power
supply
and
the
correct
fuse
installed.
Assure
the
power
supply
voltage
is
in
the
specified
range.
Switch
on
the
HP
4934A
by
pressing
the
ON/STBY
key.
The
instrument
automatically
does
a
self-test
check
at
power
on
(takes
approximately
10
seconds).
During
this
time
all
front
panel
indicators
and
displays
will
light
(except
for
the
CHARGING
and
BATTERY
indicators).
When
the
self-test
is
complete
the
instrument
starts
measuring
LEVEL
FREQ.
Both
display
windows
momentarily
blank,
then
a
minus
sign
and
period
appear
in
the
left
window,
followed
by
the
transmitter
level
(in
dBm).
The
right
window
displays
1004
Hz.
If
any
of
the
self
tests
fail
at
power-on,
an
error
code
(see
Page
1-7)
is
dis¬
played
briefly
in
the
right
window
during
self-test.
Getting
Started
1-1

Front
Panel
Features
13
IS
11
1
ON/STBY
powers
up
the
complete
instrument.
In
the
STBY
(standby)
mode,
only
some
circuits
have
power.
When
a
battery
is
fitted
the
ON/STBY
key
has
the
following
indicators
associated
with
it:
BATTERY
-
indicates
the
instrument
is
powered
from
the
internal
battery.
During
battery
operation,
connect
the
chassis
terminal
on
the
side
panel
to
earth
ground.
CHARGING
-
indicates
the
instrument
is
in
the
STBY
(standby)
mode
with
AC
power
connected
and
the
battery
is
charging.
2
HOLD
(RCV)
connects
the
receive
hold
circuit
to
the
RCV
port
when
testing
dial-up
lines.
3
HOLD
(TRMT)
connects
the
transmit
hold
circuit
to
the
TRMT
port
when
testing
dial-up
lines.
4
BRDG
selects
a
high
input
impedance
(>50
kO)
for
testing
lines
that
are
already
terminated.
In
BRDG
(bridged)
mode,
it
is
still
necessary
to
use
the
RCV
key
to
select
the
terminating
impedance
for
the
line
you
are
testing.
This
ensures
that
the
HP
4934A
will
display
the
correct
results.
5
DIAL
connects
the
T
(tip)
and
R
(ring)
binding
posts
to
the
TRMT
port
(transmitter
disconnected).
To
test
a
dial-up
line
or
talk
over
the
test
line,
connect
a
butt-in
to
the
T
and
R
DIAL
binding
posts.
1>2
Getting
Started

6
TRMT
selects
the
transmitter
source
impedance.
7
RCV
selects
the
receiver
terminating
impedance
or,
in
bridged
mode,
selects
the
impedance
of
the
circuit
under
test.
8
REVERSE
interchanges
the
TRMT
and
RCV
function
of
the
two
310
ports.
The
indicators
above
the
ports
show
the
current
function.
9
DISPLAY
selects
either
the
received
or
transmitted
parameters
for
display.
The
TRMT
and
RCV
indicators
above
the
DISPLAY
key
show
which
parameters
are
being
displayed.
10
ME
AS
selects
the
following
measurements;
LEVEL
FREQ
(level
frequency
measurements)
NOISE
(noise
measurements)
NOISE
W
TONE
(noise
with
tone
measurements)
SIG
TO
NOISE
(signal-to-noise
measurements)
IMPULSE
NOISE
(impulse
noise
measurements)
P/AR
(peak
to
average
ratio
measurements)
N.T.
GND
(noise
to
ground
measurements)
11
OUTPUT
LEVEL
sets
the
transmitter
output
level.
12
LEVEL
ZERO
allows
relative
level
measurements
in
the
LEVEL
FREQ
mode.
The
displayed
received
signal
becomes
the
0
dB
reference
when
you
press
LEVEL
ZERO.
All
subsequent
results
are
relative
to
this
reference.
The
displayed
results
are
a
measure
of
loss,
that
is
a
higher
level
than
the
reference
is
indicated
by
a
sign.
This
is
standard
in
the
telephone
industry.
13
SF
SKIP
prevents
the
instrument
from
transmitting
signaling
frequencies
in
the
range
2600
Hz
±150
Hz.
If
SF
SKIP
is
enabled
the
instrument
automatically
prevents
the
selection
of
frequencies
in
this
range.
You
can
also
change
the
SF
SJQP
center
frequency,
see
Page
2-9.
14
STEP
UP,
STEP
DOWN,
—
>
and
change
the
transmit
frequency
value
in
the
LEVEL
FREQ
mode
or
the
low
threshold
in
the
IMPULSE
NOISE
mode.
Use
—>
and
<—
to
select
the
digit
to
change.
The
selected
digit
is
highlighted
by
a
lit
pointer.
Change
the
value
of
the
selected
digit
using
the
STEP
UP
and
STEP
DOWN
keys.
15
PERIOD
selects
one
of
the
four
Impulse
Noise
measurement
periods.
16
DISPLAY
displays
the
Impulse
Noise
measurement
time
or
threshold/count
values.
Only
the
LOW
(SET)
threshold
value
can
be
changed,
see
Page
2-20.
17
STOP
allows
the
Impulse
Noise
measurement
to
be
stopped
without
affecting
the
Impulse
Noise
counter.
Getting
Started
1-3

18
START
RESET
sets
the
Impulse
Noise
counter
to
zero
and
starts
the
Impulse
Noise
measurement.
19
FILTER
selects
one
of
the
filters
in
the
noise
measurement
modes.
C-MSG
3
kHz
FLAT
15
kHz
FLAT
PRGM
SOkBIT
20
MONITOR
VOLUME
controls
the
volume
of
the
monitor
speaker.
21
In
the
LEVEL
FREQ
mode,
the
blue
keys
FI
to
F4
select
preset
frequencies.
At
switch-on
these
frequencies
are:
FI:
404
Hz
F2:
1004
Hz
F3;
2804
Hz
F4:
2713
Hz
New
frequencies
can
be
assigned
to
FI
to
F4,
see
Page
2-9.
1-4
Getting
Started

Demonstrating
the
HP
4934A
The
following
demonstrations
show
how
easy
the
HP
4934A
is
to
use.
A
detailed
explanation
of
the
HP
4934A
measurement
capability
is
given
in
Chapter
2.
The
HP
4934A
TRMT
and
RCV
ports
are
connected
by
a
looping
cable
in
these
demonstrations.
Demonstration
1
A
single
tone
measurement
with
the
transmitter
set
to
-10
dBm
and
the
fre¬
quency
set
to
1804
Hz.
6
5
1
Use
MEAS
to
select
LEVEL
FREQ.
TRANSMITTER
2
Use
the
TRMT
key
to
set
the
transmitter
impedance
to
600£1
3
Display
the
transmitted
level
and
frequency
u.sing
the
DISPLAY
key
(TRMT
indicator
lit).
4
Use
the
OUTPUT
LEVEL
control
to
adjust
the
transmitted
level
to
-10
dBm.
5
Change
the
transmitted
frequency
to
1804
Hz
using
the
—,
STEP
UP
and
STEP
DOWN
keys.
Getting
Started
1-5

RECEIVER
6
Use
the
RCV
key
to
set
the
receiver
impedance
to
600fl
7
Display
the
received
level
and
frequency
using
the
DISPLAY
key
(RCV
indicator
lit).
Demonstration
2
A
noise-with-tone
measurement
with
the
holding
tone
set
to
-13
dBm
and
the
C-Message
filter
selected.
2,4
1
Use
the
MEAS
key
to
select
NOISE
W
TONE.
TRANSMITTER
2
Display
the
transmitted
level
and
frequency
using
the
DISPLAY
key
(TRMT
indicator
lit).
Level
in
dBm
is
in
the
left
window.
The
frequency
(fixed
at
1004
Hz)
is
in
the
right
window.
3
Set
the
level
to
-13
dBm
using
the
OUTPUT
LEVEL
control.
RECEIVER
4
Display
the
received
noise
level
using
the
DISPLAY
key
(RCV
indicator
lit).
5
Select
the
C-MSG
filter
using
the
FILTER
key.
6
Read
the
weighted
noise
in
dBmC
in
the
left
window.
The
received
frequency
is
in
the
right
window.
1-6
Getting
Started

Error
Codes
The
error
codes
are
described
in
the
following
table:
Code
Description
Err
1
to
Err
6
Instrument
faulty,
see
Service
Manual.
Err
7
Received
holding
tone
level
too
high
or
too
low-
check
transmitted
level
or
circuit
under
test.
Err
8
Impulse
Noise
threshold
set
too
high
-
adjust.
sign
in
right
Loss
of
holding
tone
during
pulse
Noise
measurement
-
only
window
a
warning,
the
instrument
continues
counting.
Getting
Started
1-7


2
Making
Measurements
Preliminary
Setup
Connecting
the
HP
4934A
to
the
Test
Circuit
CAUTION
Ensure
no
more
than
200
V
dc
or
10
V
rms
at
60
Hz
is
connected
between
tip
and
ring
of
the
TRMT
or
RCV
jacks.
1
The
two
310-type
jacks
of
the
HP
4934A
can
function
as
a
Transmitter
output
or
Receiver
input.
Pressing
the
REVERSE
key
causes
the
function
of
the
two
310-
type
jacks
to
be
reversed.
The
current
function
of
the
ports
is
indicated
by
the
indicators
below
the
REVERSE
key.
2
If
the
line
to
be
tested
is
already
terminated,
press
BRDG.
3
Select
the
receiver
input
impedance
using
the
RCV
key
-
135,150,600,
900
or
12000.
When
operating
in
BRDG
(bridged)
mode,
still
ensure
the
correct
impedance
is
selected.
Making
Measurements
2-1

4
Select
the
transmitter
output
impedance
using
the
TRIWT
key
-135,150,600,900
or
1200Q.
Dial
and
Hold
The
HP
4934A
can
be
used
with
a
butt-in
to
dial
up
lines
or
for
talking
along
a
line.
The
HP
4934A
can
hold
lines
which
require
a
DC
current
to
maintain
the
connection
once
the
butt-in
is
disconnected.
The
diagram
below
shows
how
the
hold,
dial
and
reverse
functions
work.
2-2
Making
Measurements
Table of contents
Other HP Measuring Instrument manuals
Popular Measuring Instrument manuals by other brands

Vencon
Vencon UBA Series manual

AirGuide
AirGuide 2025 Installation and operation

Brandson Equipment
Brandson Equipment 303240/20191018SZ231 user manual

Sper scientific
Sper scientific 800052 instruction manual

Gigahertz Solutions
Gigahertz Solutions HFW35C manual

Teledyne Lecroy
Teledyne Lecroy ZD500 user manual

NIVELCO
NIVELCO NIVOROTA EL 7 Series user manual

Lenze
Lenze E82ZBR020 Mounting instructions

Campbell
Campbell 109B instruction manual

Malvern
Malvern NANOSIGHT NS300 operating manual

GREISINGER
GREISINGER GTF 103-Ex Series operating manual

KBR
KBR multimess F144-0-LED-EP 4 Series User Manual Technical Parameters