HTC GL 40 D User manual

Contact Information
HTC Sweden AB
Box 69
SE-614 22 Söderköping - Sweden
Tel: +46 (0) 121-294 00
Fax: +46 (0) 121-152 12
You can find addresses for our retailers and service partners on our website:
www.htc-floorsystems.com
Always specify the model and serial number when asking questions about your product.
Trademarks
HTC is a trademark owned by HTC Sweden AB. Other names and products mentioned
in this manual may be registered trademarks owned by the relevant companies.
© 2012 HTC Sweden AB. All rights reserved.

EC Declaration of conformity
Manufacturer: HTC Sweden AB
Box 69
SE-614 22 Söderköping
Sweden
+46 (0)121-29400
Type of equipment: Dust extractor
Make: HTC
Model: HTC GL 40 D
Year of manufacture: See machine name plate
Serial number: See machine name plate
As the manufacturer, we hereby declare under our sole responsibility that the above
product with serial numbers from 2010 onward conforms to the applicable regulations
in directives MD 2006/42/EC, EMC 2004/108/EC and LVD 2006/95/EC. The following
standards have been used as a basis: ISO 5349-1:2001, ISO 5349-2:2001, ISO
20643:2005, ISO 3741.
This product was CE-marked in 2010. The technical documentation is available from
the manufacturer.
Original of the EC declaration of conformity (Swedish). Other languages are
translations of the original of the EC declaration of conformity.
Söderköping 12/05/2010
Peter Lundgren
Development Manager,
HTC Sweden AB
Kåre Kilgren
Product Manager,
HTC Sweden AB


HTC GL 40 D Table of contents
i
1 Introduction
1
1.1 General Information .........................................................
1
1.2 Responsibility ..................................................................
1
1.3 Manual .............................................................................
1
1.3.1 Safety Instructions – Explanation of Symbols ....
1
1.4 Transportation .................................................................
2
1.5 On delivery ......................................................................
2
1.6 Unpacking the dust extractor ...........................................
3
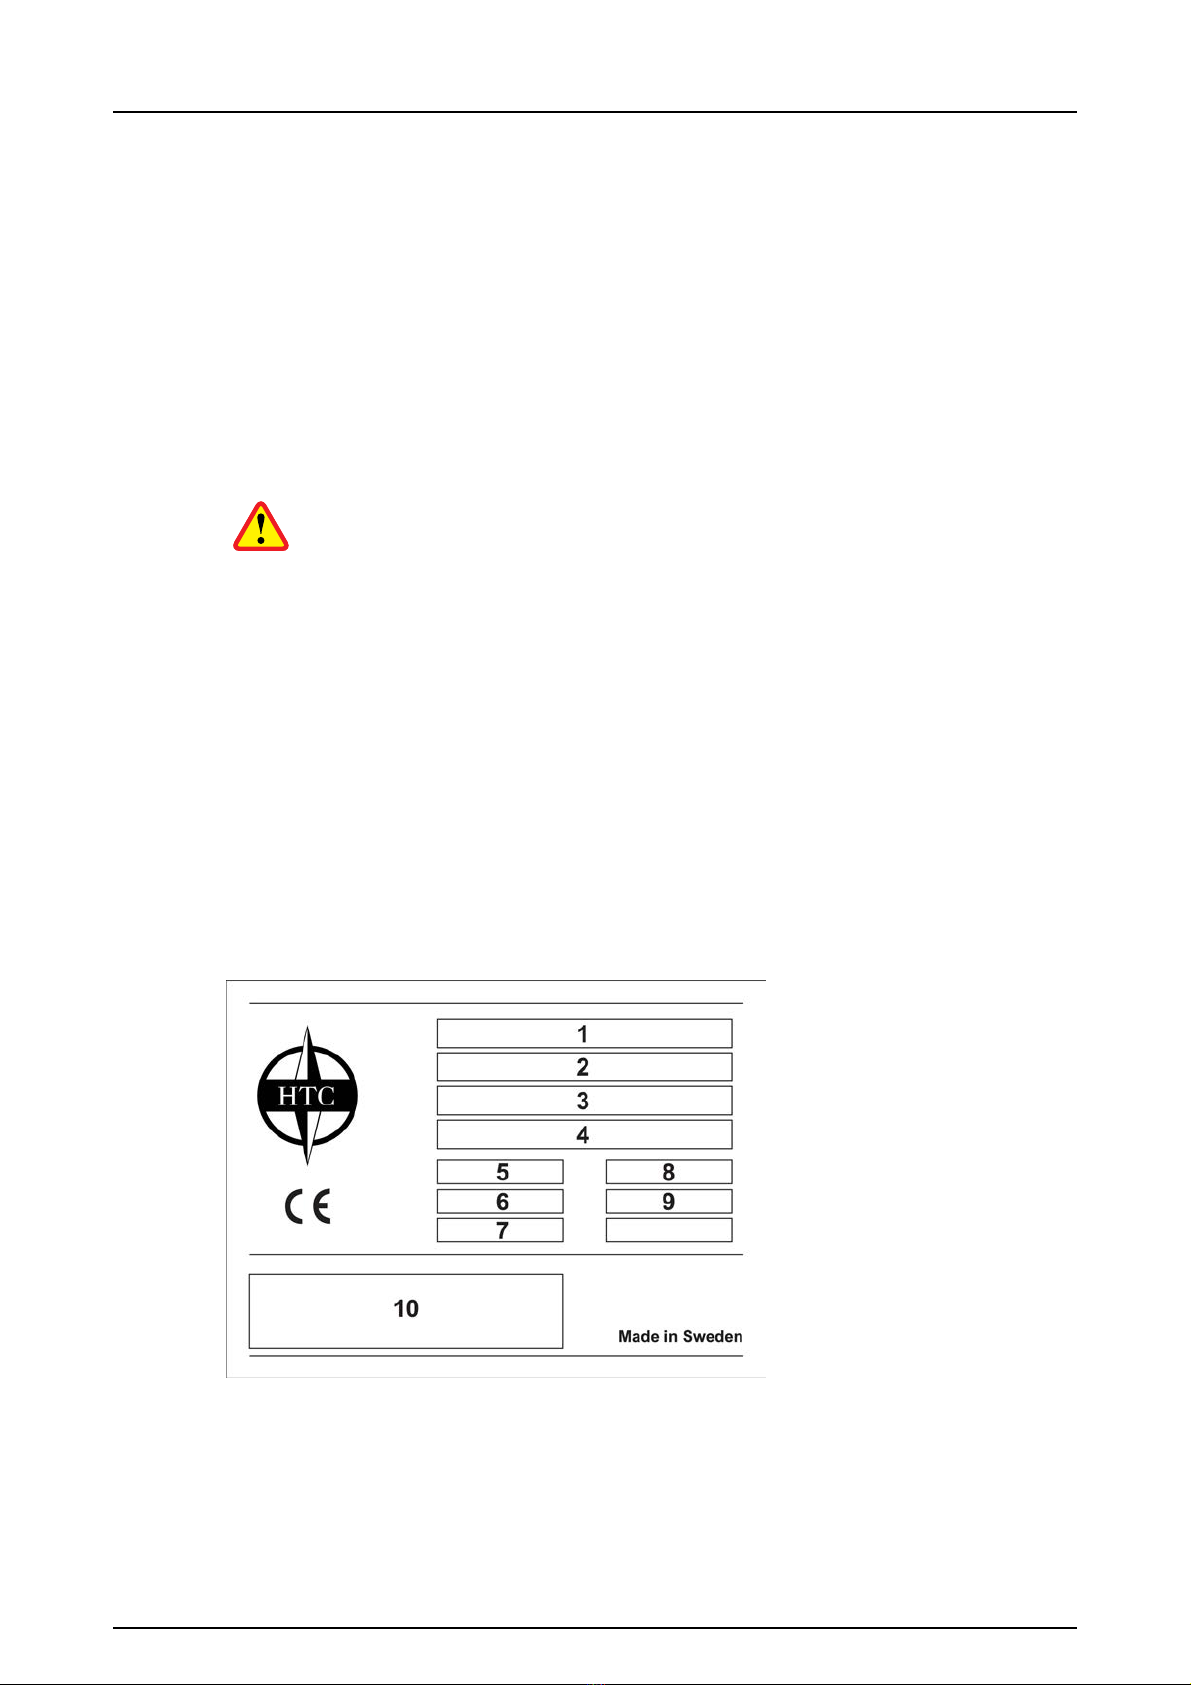
1.7 Machine name plate ........................................................
3
1.8 Handling and storage ......................................................
4
1.9 Noise ...............................................................................
4
1.9.1 Sound pressure level ..........................................
4
2 Safety
5
2.1 General Information .........................................................
5
2.2 Warnings .........................................................................
5
2.3 Notes ...............................................................................
6
3 Machine description
8
3.1 General machine description ...........................................
8
3.2 Description of controls - Keypad .....................................
9
4 Usage
11
4.1 General Information .........................................................
11
4.2 The positions for the dust extractor .................................
11
4.2.1 Lowering the dust extractor to the transport
position ...............................................................
11
4.2.2 The dust extractor's operating position ...............
12
4.2.3 Lower the dust separator to the service position
13
4.3 Lifting the machine ..........................................................
14
4.4 Handling Longopac .........................................................
15
4.4.1 Removing the full waste bag ..............................
15
4.4.2 Fitting Longopac .................................................
16
4.5 Installing extra ventilation hose .......................................
17
4.6 Operation .........................................................................
17
4.6.1 Starting and stopping the dust extractor .............
17
4.6.2 Manual cleaning of the filter using the slide gate
17
4.7 Making operation easier ..................................................
20
4.8 Control cabinet ................................................................
22
4.8.1 Resetting the motor protection ...........................
22
4.8.2 Changing the fuse ..............................................
23

Table of contents HTC GL 40 D
ii
5 Maintenance and repairs
24
5.1 General Information .........................................................
24
5.2 Cleaning ..........................................................................
24
5.3 Daily ................................................................................
24
5.3.1 Check the absolute filter .....................................
24
5.3.2 Check the sock filter ...........................................
26
5.4 Every week ......................................................................
26
5.4.1 Check the side duct fan ......................................
26
5.5 Every month ....................................................................
27
5.5.1 Check the condition of the hoses. ......................
27
5.6 Every six months (or 600 hours) .....................................
27
5.6.1 Check the fastening of the bolts .........................
27
5.7 Every year .......................................................................
27
5.7.1 Replace the absolute filter ..................................
27
5.7.2 Change the sock filter cassette ..........................
27
5.7.3 Servicing the sock filter cassette ........................
29
5.8 Repairs ............................................................................
31
5.9 Spare parts ......................................................................
31
6 Faultfinding
32
6.1 General Information .........................................................
32
6.1.1 The dust separator will not start .........................
32
6.1.2 The dust extractor stops after starting ................
32
7 Technical data
33
8 Environment
36
9 Warranty and CE marking
37
9.1 Warranty ..........................................................................
37
9.2 CE marking ......................................................................
37

HTC GL 40 D Introduction
2.0 1
1 Introduction
1.1 General Information
The HTC GL 40 D (Greyline 40 Dust extractor) is a dust extractor that is best used
together with HTC's smaller grinding machines in connection with dry grinding of stone
and concrete floors, and in accordance with HTC's recommendations. The HTC GL 40
D is constructed with sock filter and absolute filter. The dust sucked up is collected in a
bag under the dust extractor.
Read the manual carefully so that you know how to use and maintain the dust extractor
before using it. Contact your local retailer for further information. For contact
information, see Contact Information at the start of the manual.
1.2 Responsibility
Even though every effort has been made to make this manual as complete and accurate
as possible, we bear no responsibility for incorrect or missing information. HTC
reserves the right to change descriptions in this manual without giving prior notice.
This manual is protected by the Copyright Act and no part of it may be copied or used
in any other way without the written approval of HTC.
1.3 Manual
In addition to the general functions, this manual deals with the areas of application and
the maintenance of the machine.
1.3.1 Safety Instructions – Explanation of Symbols
A number of symbols are used in the manual to highlight the most important sections,
see below. It is important that you carefully read through the descriptions of the symbols
in order to avoid the risk of both material damage and personal injury. There are other
symbols indicating practical tips. These are to help you use the machine in the easiest
and most effective way.
The following symbols are used in the document to indicate where special attention is
needed.
Warning!
This symbol means Warning! and indicates a risk of personal injury or material
damage in the event of incorrect use of the machine. If you see this symbol next
to a section of text, you must pay particular attention when reading through the
text and not carry out any operations of which you are unsure. This is for your
own and other users’ safety and to avoid damage to the machine.

Introduction HTC GL 40 D
2 2.0
Note!
This symbol means Note! and indicates a potential risk of material damage in
the event of incorrect use of the machine. If you see this symbol next to a
section of text, you must pay particular attention when reading through the text
and not carry out any operations of which you are unsure. This is to avoid
damage to the machine.
Tip!
This symbol means Tips! and implies the inclusion of tips and advice on
effective use of the machine or ways of reducing wear and tear to the machine.
If you see this symbol next to a text, you should read through the text to make
your work easier and to extend the service life of the machine.
1.4 Transportation
Always ensure that the machine is emptied of dust and other particles before it is
transported, lifted or hoisted.
Always make sure that the machine is securely anchored to its surrounding during
transport to prevent it from coming into motion. Make sure that securing straps or other
equipment used for anchoring during transport are tightened over non-moving parts, e.g.
the machine's chassis.
When lifting the machine, do so according to chapter Lifting the machine, page14.
Do not transport the machine on steep sloping surfaces, e.g. loading ramps, without
securing it properly, for example with a winch. This is a safety measure in case the
machine starts to roll out of control. Also make sure that people (including operator) in
the vicinity are at a safe distance in order to prevent personal injury, in the event that the
machine starts to roll out of control.
When the machine is to be hoisted, it must be securely anchored in the notches for
secure lifting (position 4 Figure3-2, page9), which are found on both of the chassis'
long sides. To prevent the machine from tipping, make sure to pull with equal force so
the machine does not twist askew and end up on its side.
The swivelling wheel must be pointing forwards in the direction of travel.
1.5 On delivery
The following items are included in the delivery. Contact your retailer if anything is
missing.

HTC GL 40 D Introduction
2.0 3
• Dust extractor
• Manual disc
• Suction hose with couplings
• Locking key for control cabinet
1.6 Unpacking the dust extractor
Warning!
Read carefully through the safety instructions and user manual before using the
equipment.
• Check carefully to see if the packaging or the dust extractor has been damaged
during delivery. If there is any sign of damage, contact your retailer and report it.
• Check that the delivery matches the order. If there are any discrepancies, contact
your retailer.
1.7 Machine name plate
The dust extractor's model number is punched on the back of the motor's fixing plate.
The serial number is shown on the machine plate that is located in the electrical cabinet.
The machine name plate provides the following information. The model and serial
number must be specified when ordering spare parts for the machine.
Figure 1-1. Machine name plate
1. Model
2. Model number
3. Serial number

Introduction HTC GL 40 D
4 2.0
4. Year of manufacture
5. Power (kW)
6. Voltage (V)
7. Current (A)
8. Frequency (Hz)
9. Weight (kg)
10. Address field
1.8 Handling and storage
The dust extractor should be stored in a heated, dry area when not in use. Otherwise it
may be damaged by condensation and cold.
In the operating position, the dust extractor is 189 cm high, but it can be lowered so it is
only 154 cm high, which makes transport and maintenance work easier.
Warning!
If handled carelessly, the dust extractor can overturn and cause both personal
injury and damage to the equipment.
1.9 Noise
Warning!
Always use hearing protection when using the dust extractor.
1.9.1 Sound pressure level
This dust extractor has been tested for noise in accordance with ISO 3741. For
information on the sound pressure level for each model, see the table in chapter
Technical data, page33.

HTC GL 40 D Safety
2.0 5
2 Safety
2.1 General Information
This chapter contains all the warnings and notes that must be considered for the dust
extractor.
2.2 Warnings
Warning!
Read carefully through the safety instructions and user manual before using the
equipment.
Warning!
Always use hearing protection when using the dust extractor.
Warning!
The dust extractor may only be used or repaired by personnel who have
received the requisite theoretical and practical training and who have read the
user manual.
Warning!
Always use the dust extractor in an environment where there is no risk of
explosion and fire. Familiarise yourself with and follow the relevant fire safety
regulations when using the dust extractor.
Warning!
Use protective equipment such as safety shoes, safety goggles, protective
gloves, breathing mask and hearing protection.
Warning!
During use, some surfaces on the dust extractor become very hot. Use
protective gloves and let the dust extractor cool a little before you touch it.
Warning!
The dust that is sucked up is harmful if inhaled. Follow local regulations and
use breathing protection.
Warning!
During maintenance and repairs, the power to the dust extractor must be
disconnected.

Safety HTC GL 40 D
6 2.0
Warning!
Do not rinse off the dust extractor, as moisture can penetrate to the electrical
parts and damage the side duct fan.
Warning!
Do not rinse off the dust extractor, as moisture can penetrate into the absolute
filter and the sock filter.
Warning!
The dust extractor may only be used and moved on level surfaces. There is a
risk for crush injuries, if it should start to roll.
Warning!
Connect the dust extractor to an earth fault breaker.
Warning!
If handled carelessly, the dust extractor can overturn and cause both personal
injury and damage to the equipment.
Warning!
There is a risk of crush injuries while lowering to the transport position. Make
sure your hands are not in the way when the guide packet drops into the slot.
Warning!
There is a risk for crush injuries when the dust extractor is lowered to the
service position. Make sure your hands are not in the way when the upper
cylinder sections tips against the handle.
2.3 Notes
Note!
The dust extractor is best used together with HTC's grinding machines in
connection with dry grinding of stone and concrete floors, and in accordance
with HTC's recommendations.
Note!
Never use a dust extractor in connection with wet grinding, as it may cause
blockages in the dust extractor's suction hose and damage the sock filter,
absolute filter and side duct fan.
Note!
Only use original spare parts from HTC for the dust extractor. Otherwise,
neither the CE marking nor the warranty will be valid.

HTC GL 40 D Safety
2.0 7
Note!
For the CE marking to be valid, the instructions in this manual must be
followed.
Note!
The dust extractor should be stored in a dry, warm (above zero) location when
not in use.
Note!
If the dust extractor is stored in a cold location (below zero), it must be placed
in a warm location (above zero) for at least two hours before use.
Note!
Discolouration on the top of the absolute filter indicates that the sock filter is
not functioning as it should. If the absolute filter is dirty on the underside, the
filter is broken.
Note!
The absolute filter holder must be removed before the dust extractor can be
lowered to the service position, since the hose between the upper cylinder
section and the absolute filter holder will otherwise make this impossible.
Note!
When checking the absolute filter, the dust extractor must be placed in the
operating position.

Machine description HTC GL 40 D
8 2.0
3 Machine description
3.1 General machine description
HTC GL 40 D is constructed from a number of main components, such as chassis,
electrical cabinet, etc, seeFigure3-1, page8andFigure3-2, page9. Several
different designs are available, adapted for different markets. For model variants, see the
table in Technical data, page33. The dust that is vacuumed up is captured in a
Longopac bag, which can be sealed when the desired quantity of dust has been reached.
Figure 3-1. The front of the dust extractor
1. Upper cylinder section
2. Lower cylinder section
3. Slide gate
4. Longopac holder
5. Gas shock-absorber
6. Collection plate for dust bags
7. Control cabinet
8. Inlet, suction hose connection
9. Chassis
10. Absolute filter
11. Absolute filter holder

HTC GL 40 D Machine description
2.0 9
Figure 3-2. The back of the dust extractor
1. Valve handle
2. Handle
3. Electrical connection
4. Side duct fan
5. Outlet, ventilation hose connection
6. Guide
7. Valve
3.2 Description of controls - Keypad
The picture below shows the keypad for the dust extractor.

Machine description HTC GL 40 D
10 2.0
Figure 3-3. Keypad
1. I (ON)- Start the dust extractor: Press the button to start the dust extractor.
2. LED Light- Tripped motor protection: When the light is illuminated, the dust
extractor's motor protection has tripped. To reset the motor protection, see
Resetting the motor protection, page22.
3. O (OFF)- Switch off the dust separator: Press the button to switch off the dust
extractor.

HTC GL 40 D Usage
2.0 11
4 Usage
4.1 General Information
The following section describes the different positions for the dust extractor and how to
change the waste bag (Longopac). The section also deals with the operation of the dust
extractor.
Warning!
The dust extractor may only be used or repaired by personnel who have
received the requisite theoretical and practical training and who have read the
user manual.
Warning!
Use protective equipment such as safety shoes, safety goggles, protective
gloves, breathing mask and hearing protection.
Warning!
The dust extractor may only be used and moved on level surfaces. There is a
risk for crush injuries, if it should start to roll.
Tip!
Check the minimum recommended cable area before using an extension cord.
You will find the recommended cable area under Technical data, page33.
4.2 The positions for the dust extractor
The dust extractor can be placed in three positions; transport position, operating position
and service position (replacement of sock filter), see Figure4-1, page12, Figure4-2,
page13 and Figure4-3, page14.
Warning!
If handled carelessly, the dust extractor can overturn and cause both personal
injury and damage to the equipment.
Note!
The absolute filter holder must be removed before the dust extractor can be
lowered to the service position, since the hose between the upper cylinder
section and the absolute filter holder will otherwise make this impossible.
4.2.1 Lowering the dust extractor to the transport position
The dust extractor can be lowered to the transport position, see Figure4-1, page12.

Usage HTC GL 40 D
12 2.0
When the dust extractor is in the operating position, and you want to lower it to the
transport position, do as follows:
• Lift up the cylinder packet a little and then allow the whole guide packet,
including the cylinder packet, to drop down in the guide slot provided.
When the dust extractor is in the operating position, and you want to lower it to the
transport position, do as follows:
Figure 4-1. Transport position
Warning!
There is a risk of crush injuries while lowering to the transport position. Make
sure your hands are not in the way when the guide packet drops into the slot.
4.2.2 The dust extractor's operating position
When the dust extractor is in use, it must be in the operating position, see Figure4-2,
page13.
• Raise the cylinder packet up from the transport position, by gripping it under the
cylinder section and pushing up the whole guide packet in the guide slot. Make
sure that the cylinder packet drops in and lies in the guide slot's upper position,
see position A in Figure4-2, page13.

HTC GL 40 D Usage
2.0 13
Figure 4-2. Operating position
4.2.3 Lower the dust separator to the service position
The dust extractor can be lowered to the service position by releasing the upper cylinder
section from the lower cylinder section, see Figure4-3, page14.
Start with the dust extractor in the operating position, see Figure4-2, page13. Then
follow the instruction below:

Usage HTC GL 40 D
14 2.0
1.
Release the two quick fasteners (see position A in Figure4-3, page14) that
hold the absolute filter in place. Let the holder and hose hang freely behind the
side duct fan, see Figure4-3, page14.
2.
Release the quick fastener (see position B in Figure4-3, page14) that holds
the upper and lower cylinder sections together, and then carefully tip the upper
section towards the handle, see Figure4-3, page14.
Figure 4-3. Lower to the service position
Warning!
There is a risk for crush injuries when the dust extractor is lowered to the
service position. Make sure your hands are not in the way when the upper
cylinder sections tips against the handle.
Warning!
The dust that is sucked up is harmful if inhaled. Follow local regulations and
use breathing protection.
4.3 Lifting the machine
When lifting the dust extractor, lifting straps are used that are fastened in the notches on
the chassis, see Figure4-4, page15. Only use straps approved for lifting equipment.
Table of contents
Other HTC Vacuum Cleaner manuals
Popular Vacuum Cleaner manuals by other brands

Tineco
Tineco PURE ONE MINI S4 user manual

Harbor Freight Tools
Harbor Freight Tools 94683 Assembly and operating instructions

Scheppach
Scheppach Woova 3.0 manual

Parkside
Parkside PNTS 1300 B2 translation of original operation manual

Black & Decker
Black & Decker BDH1600PL user manual

Benchmark
Benchmark 18 L ASH VACUUM manual