Husky POWERWASHER H2000 User manual

Warranty Registration by Internet
Registro Garantía mediante Internet
Internet Address: www.huskypowerwasher.com
Sitio Internet: www.huskypowerwasher.com
SEE OUR WEB SITE FOR REPLACEMENT, MISSING PARTS AND TROUBLESHOOTING
VISITEN NUESTRO SITIO WEB PARA SUSTITUCIONES Y/O PARTES FALTANTES
READ AND SAVE THESE INSTRUCTIONS
LEER Y CONSERVAR ESTA INSTRUCCIONES
This product is covered by US Patents and other international patents.
Copyright. All Rights Reserved.
Este producto se encuentra cubierto por patentes de EE.UU. y otras internacionales.
Copyright. Todos los derechos reservados
R
H

2
You can conveniently register
your new online at:
www.huskypowerwasher.com
Your Model Number is: H2000
IMPORTANT
Attention Valued Customer: The serial number of your machine
and date of purchase is necessary information to facilitate
warranty claims and the ordering of replacement parts.
For ease of reference, please record this information
in the space provided below.
Date of Purchase: / /200
Serial Number: ...............................................................................

3
Número de Serie: ...........................................................................
Fecha de Compra: / /200
El Número de su Modelo es: H2000
IMPORTANTE
Atención Estimado cliente: el número de serie de su lavado-
ra de presión y la fecha de compra es información necesaria
para facilitar los derechos de garantía y la petición de partes
de recambio.
Para consultas más fáciles, registre el número de serie y la
fecha de compra en el siguiente espacio
Si lo desea, se puede registrar cómodamente
su nuevo en nuestra página web
www.huskypowerwasher.com

4
REMOVE THE SHIPPING PLUGS FROM THE
MACHINE INLET AND OUTLET.
RETIRE LAS CLAVIJAS DE ENVÍO DE LA
TOMA Y LA SALIDA DE LA MÁQUINA.
3
4
FOR EASY INSTALLATION INSTALACIÓN FÁCIL
CONNECT THE HIGH PRESSURE HOSE. MAKE
SURE THREADS ARE ALIGNED PROPERLY.
CONECTE LA MANGUERA DE ALTA PRESIÓN.
ASEGURARSE QUE TODOS LOS TUBOS ESTÉN
ALINEADOS CORRECTAMENTE.
4
1AFFIXTHEHANDLE TOTHEBASE WITH
THE SIX SCREWS PROVIDED.
FIJE EL MANGO A SU BASE CON
LOS SEIS TORNILLOS SUMINI-
STRADOS
INSERT THE
HANDLE INTO THE
HANDLE BASE
INSERTE EL
MANGO DENTRO
DE SU BASE
2INSERT THE HANDLE
INTO THE HOSE REEL
INSERTE EL MANGO
EN EL DEVANADOR
DE MANGUERA
SMALL/PEQUEÑO
(ST 3.5)
LARGE/GRANDE
(ST 4.8)
HD2000-pag abbondanze.indd 2 27/01/2009 8.45.39

5
7
CONNECT THE GARDEN
HOSE.
CONECTE LA MANGUERA
PARA JARDÍN.
5
Note: Use cold water only
Nota: Utilizar sólo agua fría
5
CONNECT THE GARDEN HOSE TO WATER
SUPPLY AND OPEN THE VALVE FULLY.
CONECTAR LA MANGUERA A UNA TOMA
DE AGUA Y ABRIR TOTALMENTE LA VÁL-
VULA.
INSERT THE WAND INTO THE SPRAY GUN
INTRODUZCA EL TUBO EN LA PISTOLA
ROCIADORA
NOTE: Make sure wand is locked.
NOTA: Asegúrese de que el tubo esté cerrado.
6
8PLUG GFCI INTO POWER RECEPTACLE. FIRMLY PRESS AND RELEASE THE
TEST BUTTON, THEN PRESS AND RELEASE THE RESET BUTTON. THE LIGHT
ON THE GFCI SHOULD BE ILLUMINATED.
ENCHUFE EL GFCI A UNA TOMA DE CORRIENTE. PRESIONE CON FIRMEZA Y SUELTE
EL BOTÓN DE PRUE-
BA (TEST). A CONTI-
NUACIÓN, PULSE Y
SUELTE EL BOTÓN DE
REINICIO (RESET). SE
ENCENDERÁ LA LUZ
DEL GFCI.

6
10
PULSE EL BOTÓN “ON”. SEENCENDERÁ LA LUZ VERDE “LISTO”
(READY). APRIETE EL ACCIONADOR PARA PONER EN MARCHA
EL MOTOR Y EL CAUDAL DE AGUA.
IMPORTANT
IMPORTANTE
CAREFULLY READ THE OPERATORS INSTRUCTIONS BEFORE
USING THE PRESSURE WASHER FOR THE FIRST TIME.
ALWAYS STORE YOUR PRESSURE WASHER IN A LOCATION
WHERE THE TEMPERATURE WILL NOT FALL BELOW 40°F.
FREEZE DAMAGE IS NOT COVERED BY THE WARRANTY.
LEA ATENTAMENTE EL MANUAL DE INSTRUCCIONES ANTES DE
PONER EL EQUIPO POR PRIMERA VEZ EN FUNCIONAMIENTO.
TIENE QUE PONER SIEMPRE LA MÁQUINA DE LAVAR A PRE-
SIÓN EN UN SITIO DONDE LA TEMPERATURA NO DIMINUE
BAJO 40°F. LOS DAÑOS QUEL EL HIELO PROVOCA NO SON
REMBOLSDADO DE LA GARANTIA.
SQUEEZE AND HOLD TRIGGER
UNTIL WATER FLOW IS STEADY.
THEN RELEASE THE TRIGGER.
APRETAR Y SOSTENER EL GA-
TILLO HASTA QUE HAYA UN
FLUJO CONSTANTE Y ESTABLE
DE AGUA. A CONTINUACIÓN
SOLTAR EL GATILLO.
9
6
DEPRESS THE “ON” BUTTON. THE GREEN “READY” LIGHT SHOULD BE ILLUMI-
NATED. SQUEEZE THE TRIGGER TO START MOTOR AND WATER FLOW.

7
ÍNDICE
1.0 IMPORTANTES INSTRUCCIONES
DE SEGURIDAD.................................. pag. 8
1.1 ILUSTRACIÓN DE PIEZAS............ pag. 10
2.0 CARACTERÍSTICAS RELATIVAS
A LA SEGURIDAD............................ pag. 11
3.0 INSTALACIÓN................................. pag. 12
3.1 MANGUERA DE
ALTA PRESIÓN .......................... pag. 12
3.2 CONEXIÓN DEL AGUA.............. pag. 12
3.3 EMPALME DE LA
POTENCIA DE ALIMENTACIÓN........ pag. 13
4.0 INSTRUCCIONES DE USO................ pag. 14
4.1 PROCEDIMIENTO DE
PUESTA EN MARCHA.................. pag. 14
4.2 CLICK-N-CLEAN TM .................... pag. 15
4.3 USO DE PRODUCTOS
DETERGENTE .............................. pag. 17
4.4 TÉCNICAS DE LIMPIEZA.............. pag. 18
4.5 LANZA TURBO SPRAY ................ pag. 19
4.6 FLEXI-LANCE .............................. page 19
4.7 FINALIZACIÓN
DE LA OPERACIÓN ..................... pag. 19
5.0 MANTENIMIENTO USUARIO ........... pag. 20
5.1 CONEXIONES............................ pag. 20
5.2 BOQUILLA.................................. pag. 20
5.3 LUBRICACIÓN............................ pag. 20
5.4 FILTRO DE AGUA ....................... pag. 20
5.5 SISTEMA DE REFRIGERACIÓN..... pag. 21
6.0 MANIPULACIÓN Y
ALMACENAMIENTO ........................ pag. 21
6.1 KIT ENROLLADOR....................... pag. 22
6.2 DESPUÉS DE UN ALMACENAMIENTO
PROLONGADO........................... pag. 22
7.0 SOLUCIÓN DE PROBLEMAS............. pag. 28
8.0 DATOS TÉCNICOS .......................... pag. 33
INDEX
1.0 IMPORTANT SAFETY
INSTRUCTIONS ............................... page 8
1.1 PARTS DRAWING ...................... page 10
2.0 SAFETY FEATURES........................... page 11
3.0 INSTALLATION ................................ page 12
3.1 HIGH PRESSURE HOSE .............. page 12
3.2 WATER CONNECTION............... page 12
3.3 POWER SUPPLY
CONNECTION........................... page 13
4.0 OPERATING INSTRUCTIONS............ page 14
4.1 START-UP PROCEDURE............... page 14
4.2 CLICK-N-CLEAN TM ..................... page 15
4.3 USE OF CLEANING DETERGENTS page 17
4.4 CLEANING TECHNIQUES ........... page 18
4.5 TURBO SPRAY LANCE................. page 19
4.6 FLEXI-LANCE .............................. page 19
4.7 END OF OPERATION ................. page 19
5.0 USER MAINTENANCE ..................... page 20
5.1 CONNECTIONS......................... page 20
5.2 NOZZLE..................................... page 20
5.3 LUBRICATION............................. page 20
5.4 WATER SCREEN......................... page 20
5.5 COOLING SYSTEM..................... page 21
6.0 MOVING AND STORAGE
INSTRUCTIONS ............................... page 21
6.1 HOSE REEL KIT .......................... page 22
6.2 AFTER EXTENDED STORAGE....... page 22
7.0 TROUBLESHOOTING....................... page 23
8.0 TECHNICAL DATA ........................... page 33

8
1.0 IMPORTANTES INSTRUCCIONES
DE SEGURIDAD
Cuandosetratadeunequipomecánico,lasprecaucionesinherentes
alaseguridadsonesenciales. Porelloesnecesarioadoptardichas
precaucionesduranteeluso,elalmacenamientoylamantenimiento
del equipo mecánico. Utilizando los aparatos con el respeto y la
cautelarequeridos,lasposibilidadesdeprovocarlesionespersonales
disminuiránnotablemente.Si sepasan poraltoo noseconsideran
estas precauciones de seguridad, podrían producirse lesiones en
las personas o daño al equipo. Los símbolos que describiremos a
continuación son utilizados ampliamente en el presente manual.
Tenga siempre en cuenta dichas precauciones puesto que son
esenciales cuando se utiliza el equipo mecánico.
1.0 IMPORTANT SAFETY
INSTRUCTIONS
Safety precautions are essential when any mechanical
equipment is involved. These precautions are necessary
when using, storing, and servicing mechanical equipment.
Using this equipment with the respect and caution demanded
will considerably lessen the possibilities of personal injury.
If safety precautions are overlooked or ignored, personal
injury or property damage may occur.
The following symbols shown below are used extensively
throughout this manual.
Always heed these precautions, as they are essential when
using any mechanical equipment.
WARNING
CAUTION
Thiscautionsymbolidentifiesspecificinstructions
or procedures which, if not strictly observed,
could result in damage to, or destruction of
equipment and/or property.
This warning symbol identifies specific instruc-
tions or procedures which if not correctly fol-
lowed could result in personal injury or death.
When using this product basic precautions
should always be followed, including the
following:
This unit was designed for specific applications. It should not
be modified and/or used for any application other than that
which it was designed.
WARNING
PELIGRO
IMPORTANTE
Esta señal de precaución identifica las
instrucciones o procedimientos específicos
que, si no se cumplen rigurosamente,
pueden provocar daños o la destrucción
del equipo y/o bienes materiales.
Es el símbolo que identifica las instruccio-
nes para procedimientos específicos; si no
son seguidas, pueden provocar lesiones
personales o la muerte.
Cuando el equipo es utilizado, hay que seguir
precaucionesbásicas, entrelascualesse encuen-
tran las siguientes:
Estaunidadhasidodiseñadaparaaplicaciones específicas.No
se debería modificar y/o utilizar para aplicaciones diferentes
de aquellas para las cuales ha sido pensada.
PELIGRO
1. Read all the instructions before using the product.
2. To reduce the risk of injury, close supervision is neces-
sary when a product is used near children.
3. Know how to stop the product and bleed pressures
quickly. Be thoroughly familiar with the controls.
4. Stay alert - watch what you are doing.
5. Do not operate the product when fatigued or under the
influence of alcohol or drugs.
6. Keep operating area clear of all persons.
7. Do not overreach or stand on unstable support. Keep
good footing and balance at all times.
8. Follow the maintenance instructions specified in the
manual.
9. This product is provided with a Ground Fault Circuit
Interrupter built into the power cord plug. If replace-
ment of the plug or cord is needed, use only identical
replacement parts.
10.Outlets with a third prong ground are required. Do not
use without grounded prong.
11.Do not touch plug or outlet with wet hands.
12.Avoid accidental starts. Move switch on unit to “OFF”
position before connecting or disconnecting cord to
electrical outlets.
13.Water spray must never be directed towards any electric
wiring or directly towards the pressure washer machine
itself or fatal electric shock may occur.
14.Never carry your pressure washer by the cord. Do not
pull on the cord to disconnect from the outlet.
15.To prevent damage, the cord should not be crushed,
placed next to sharp objects or near a heat source.
1 Lea todas las instrucciones antes de utilizar el equipo.
2 Para reducir el riesgo de lesiones, es necesario prestar
mucha atención cuando se utilice un producto cerca de
niños pequeños.
3 Aprenda a detener el producto y purgar la presión
rápidamente. Familiarícese con los controles.
4 Esté siempre atento: preste atención a lo que está
haciendo.
5 No utilice el equipo si se encuentra fatigado, ha bebido
alcohol o ha consumido drogas.
6 Mantenga la zona de trabajo despejada de personas.
7 No se extralimite ni se coloque sobre un soporte inestable.
Adopte siempre una posición de estabilidad y equilibrio.
8 Respete las instrucciones de mantenimiento que se
detallan en este manual.
9. Este producto es suministrado con un interruptor de circuito
con conexión a tierra insertado en el enchufe del cable de
alimentación. Si fuera necesario cambiar el enchufe o el
cable, utilicen piezas de repuesto del mismo tipo.
10. Se necesitan enchufes con una tercera punta con toma a
tierra. No utilice enchufes sin la toma de tierra.
11.No toque el enchufe o la toma con las manos mojadas.
12.Eviten encendidos accidentales. Coloque el interruptor
en APAGADO antes de conectar o desconectar el cable
eléctrico a una toma.
13.No dirija nunca el chorro del agua sobre instalaciones
eléctricas o sobre la misma máquina de lavar a presión, con
el fin de evitar descarga eléctrica.
14.No utilice el cable para mover la máquina de lavar a
presión. No tire del cable para desconectar el equipo
de la toma.
15.Con el fin de evitar daños, el cable no debe ser apla-
stado, no debe ser colocado cerca de objetos cortantes
ni de fuentes de calor.

9
16.Check power cords before using. Damaged cords can
reduce performance of pressure washer or cause a fatal
electric shock.
17.The narrow pin point stream is very powerful. It is
not recommended for use on painted surfaces, wood
surfaces or items attached with an adhesive backing.
18.Keep operating area clear of all persons and ani-
mals.
19.Always use both hands when operating pressure washer
to maintain complete control of the wand.
20.Do not touch nozzle or water spray while operating.
21.Wear safety goggles while operating.
22.Disconnect power plug from the outlet when not in use
and prior to the detaching of the high pressure hose.
23.Never tie knots or kink the high pressure hose as da-
mage could result.
24.Do not operate or store this product in temperatures
below 40°F. Freeze damage is not covered by the
warranty.
25.Carefully observe all chemical instructions and warnings
before using.
26.The pressure washer should not be used in areas where
gas vapors may be present. An electric spark could
cause an explosion or fire.
27.To minimize the amount of water getting into the pres-
sure washer, the unit should be placed as far as possible
from the cleaning site during operation.
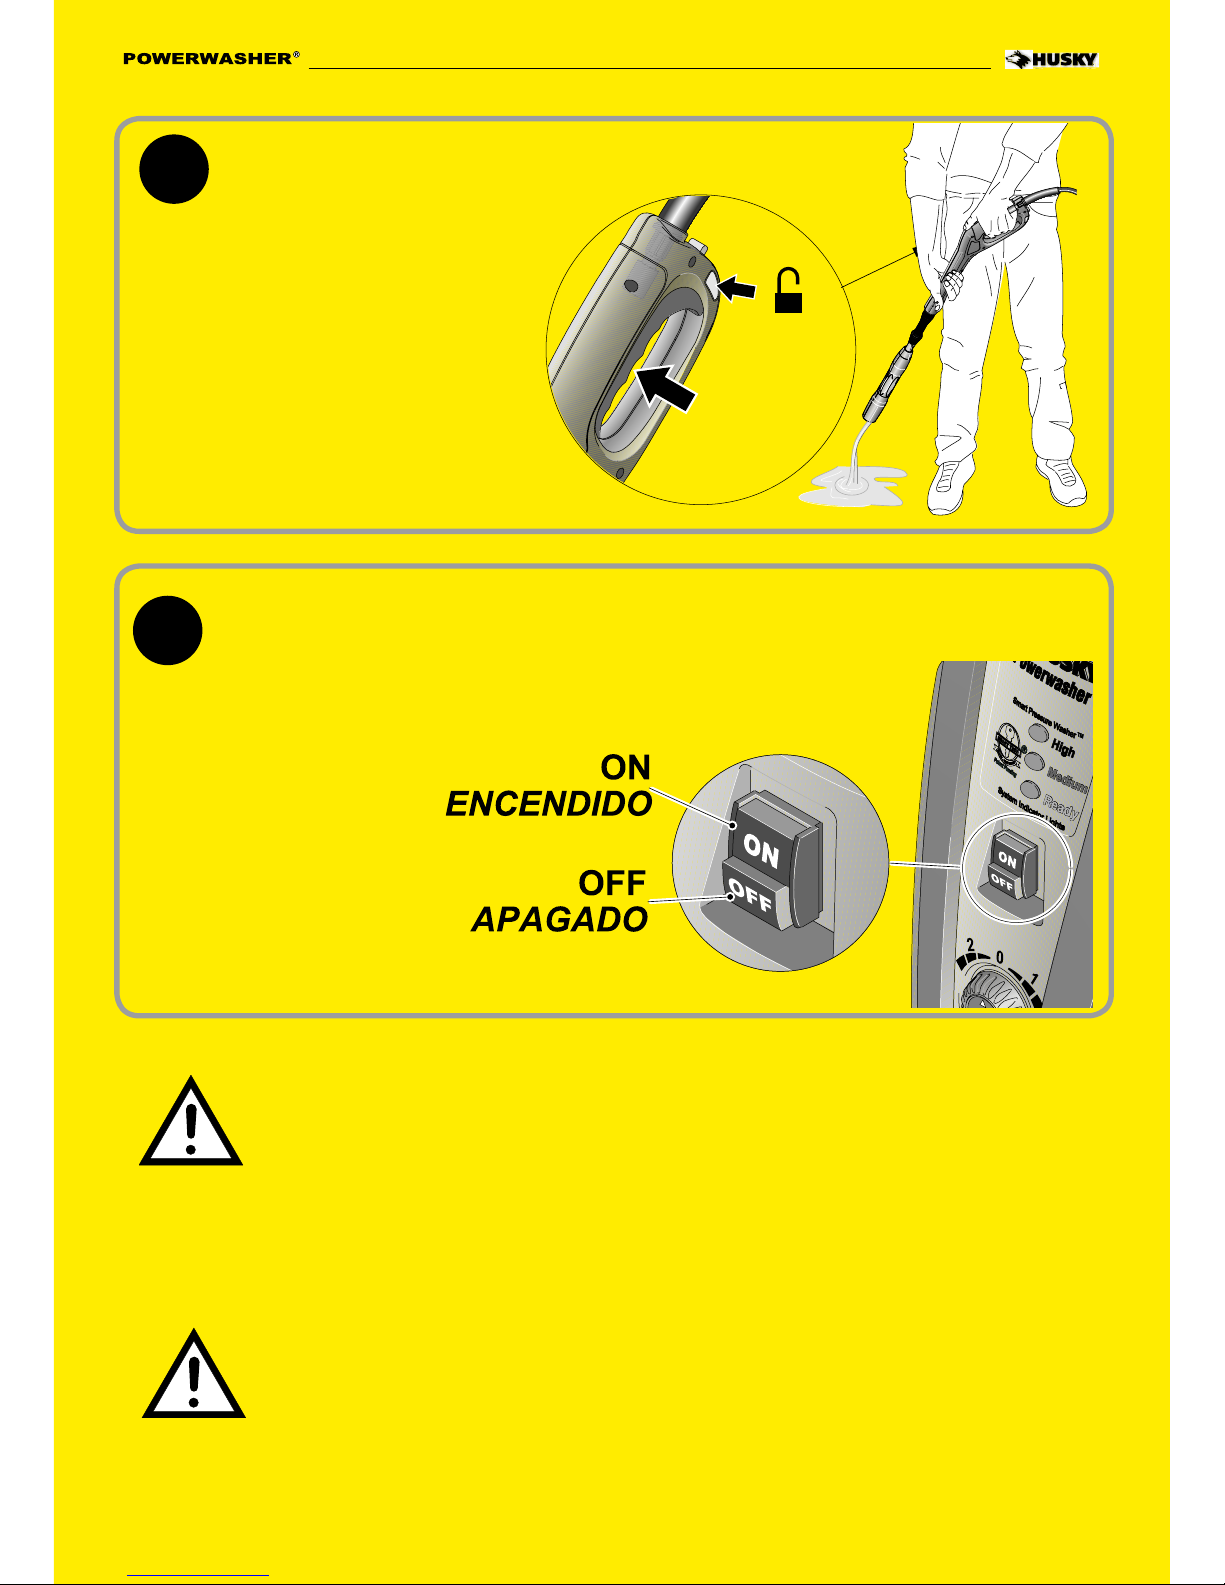
28.To prevent accidental discharge, the spray gun should
be secured by locking the trigger when not in use.
29.To allow free air circulation, the pressure washer should
NOT be covered during operation.
WARNING: Risk of injection or injury-Do not
direct discharge stream at persons.
“SAVE THESE INSTRUCTIONS”
16.Antes del uso revise los cables eléctricos.
Los cables dañados no sólo reducen los rendimiento
de la máquina de lavar a presión, sino que pueden
provocar descargas eléctricas.
17.El pequeño chorro de punta de alfiler es muy potente.
No se aconseja su uso sobre superficies pintadas, sobre
superficies de madera o sobre objetos con revestimiento
adhesivo
18.Aleje a las personas y animals del área de trabajo.
19.Use siempre ambas manos cuando se utiliza la máquina
de lavar a presión, con el fin de mantener un completo
control del tubo/de la manguera.
20.No toque el boquilla o el chorro de agua cuando está
en funcionamiento.
21.Durante el uso, utilice gafas de protección.
22.Desconecte el enchufe eléctrico de la toma cuando
no está en uso e, igualmente, antes de desconectar la
manguera de alta presión.
23.Nunca anude o doble la manguera de alta presión ya
que podría dañarla.
24.No hagan funcionar este producto a temperaturas
inferiores a 40°F. Los daños provocados por el hielo
no están cubiertos por la garantía.
25.Siga cuidadosamente todas las instrucciones con respecto
a productos químicos y las advertencias antes del uso.
26.No hay que utilizar la máquina de lavar a presión en
áreasdondehayanvaporesgaseosos.Una eventualchispa
eléctrica podría provocar una explosión o un incendio.
27.Parareduciralmáximolacantidaddeaguaquepodríaentrar
enla máquinadelavarapresión,duranteeluso,colóquelalo
más lejos posible de la zona que debe ser limpiada.
28.Con el fin de evitar escapes accidentales, cuando no
está en uso, la pistola rociadora debe estar asegurada
con el gatillo de bloqueo.
29.Durante el uso, NO cubra la máquina de lavar a presión
con el fin de permitir una ventilación adecuada.
ATENCIÓN Riesgo de inyección o de daños.
No orienten el flujo contra las personas.
“CONSERVE LAS PRESENTES INSTRUCCIONES”
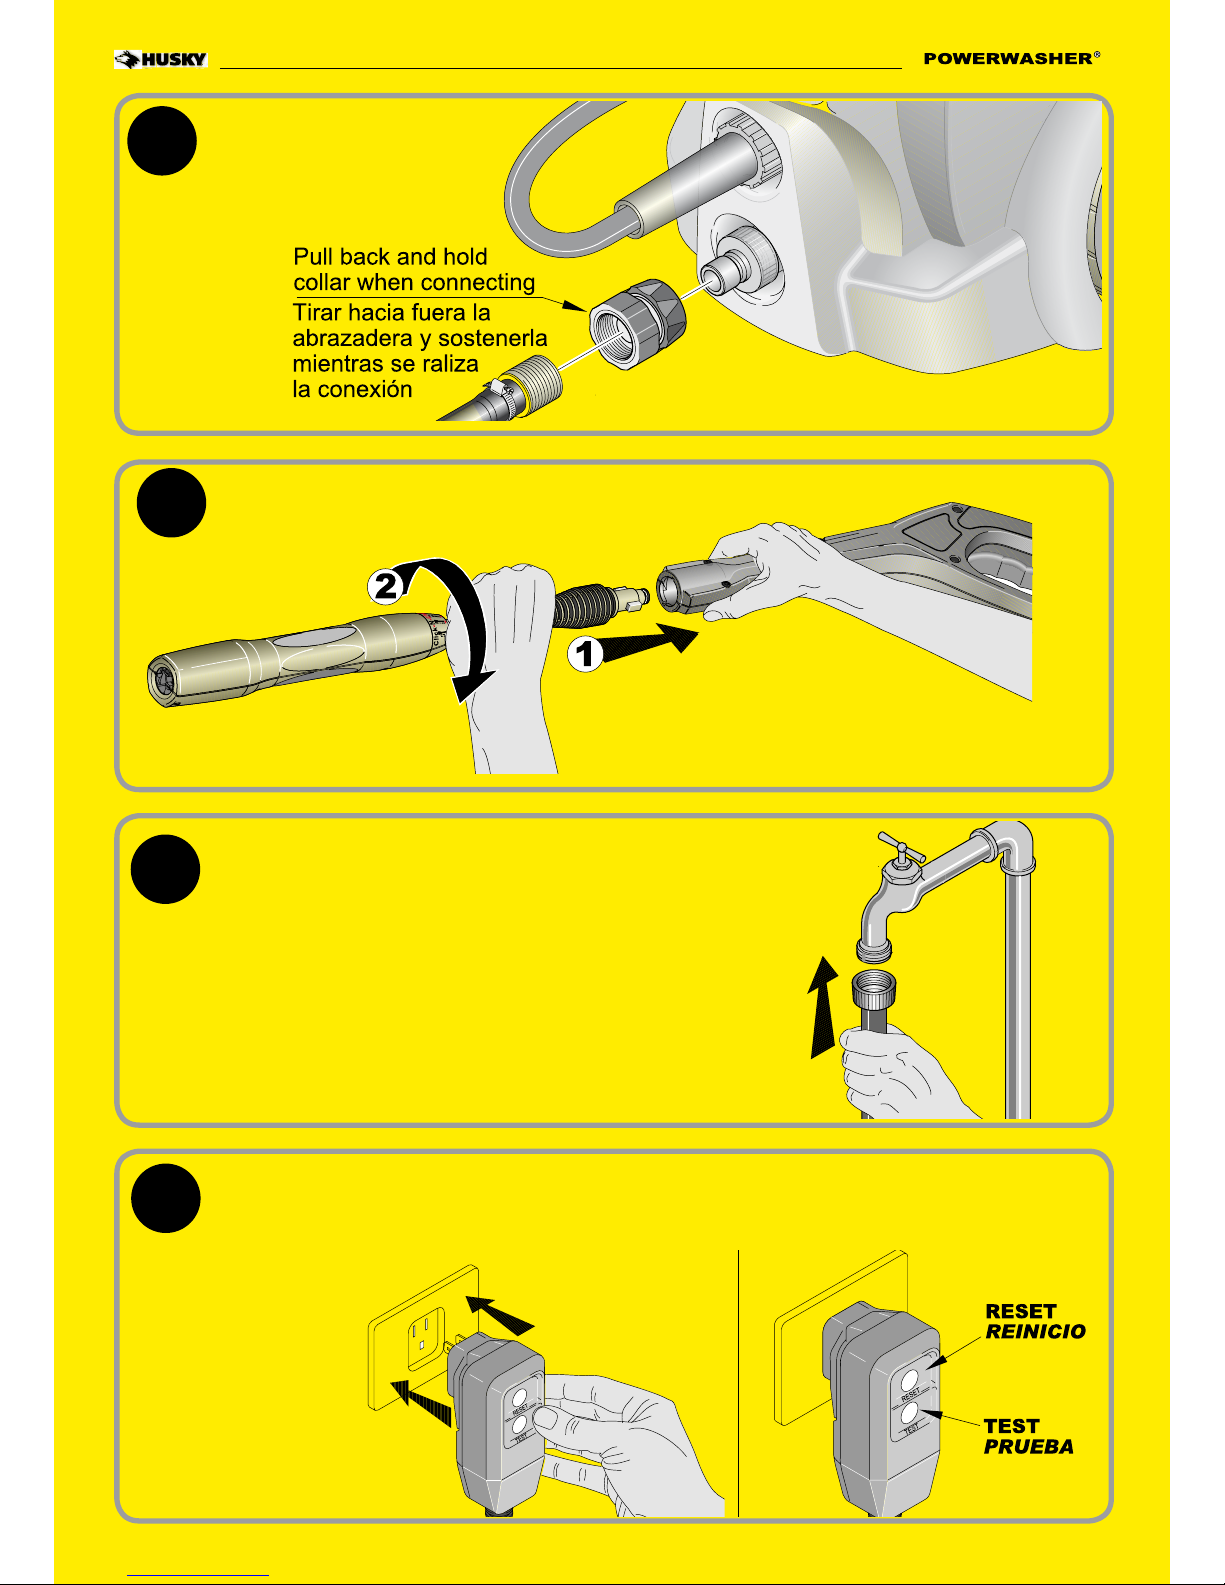
WARNING ATENCIÓN
GROUND FAULT CIRCUIT INTERRUPTER
PROTECTION
This pressure washer is provided with a Ground-Fault Circuit-In-
terrupter (GFCI) built into the plug of the power supply cord. This
deviceprovidesadditionalprotectionfromtheriskofelectricshock.
Shouldreplacementoftheplugorcordbecomenecessary,useonly
identical replacement parts that include GFCI protection.
SERVICING A DOUBLE-INSULATED APPLIANCE
In a double-insulated product, two systems of
insulation are provided instead of grounding.
No grounding means is provided on a dou-
ble-insulated product, nor should a means for
grounding be added to the product.
Servicingadouble-insulatedproductrequiresextreme careand
knowledge ofthe system, and should bedoneonlybyqualified
service personnel. Replacement parts for a double-insulated
product must be identical to the parts they replace.
Adouble-insulatedproductismarkedwiththewords“DOUBLE-
INSULATION”or “DOUBLE-INSULATED”.The symbol above
may also be marked on the product.
MANUTENCIÓN DE UN EQUIPO CON DOBLE
AISLAMIENTO
Un equipo con doble aislamiento está dotado de
dos sistemas de aislamiento en lugar de la puesta
a tierra. No es montada ninguna puesta a tierra
sobre un artículo de doble aislamiento, ni puede
serañadidaalahidrolimpiadora.Lamanutención
deeste tipo deinstalaciónrequiere sumocuidado, un buencono-
cimientodelsistemaydebeserefectuadasolamenteporpersonal
cualificado. Las piezas de repuesto de una instalación de doble
aislamientodebenseridénticasalaspiezasquehayquecambiar.
Estosequiposestánidentificadosporlaspalabras“DOBLEAISLA-
MIENTO” (DOUBLE-INSULATION o DOUBLE-INSULATED). El
equipo puede estar identificado también con el símbolo.
INTERRUPTOR DE CIRCUITO CON TOMA DE
TIERRA
La máquina de lavar a presión está dotada de un interruptor
de circuito con toma de tierra (GFCI) montado en el enchufe
del cabledealimentacióneléctrica.Dichodispositivosuministra
unaprotecciónadicionalcontraelriesgodedescargas. Sifuere
necesariosubstituirelenchufeoelcable, utilicenexclusivamente
repuestos similares provistos de protección GFCI.

10
1.1 ILUSTRACIÓN DE PIEZAS1.1 PARTS DRAWING
PARTS LIST
1Turbo Nozzle with Lance
2Spray Gun
3Holder for Power Cable
4ON/OFF Switch
5Detergent Dial
6Machine Inlet
7Click-N-CleanTM Variable Spray Lance
8Holder for Accessories
9Ground Fault Circuit Interrupter (GFCI)
10 Shipping Plug
11 Water Inlet Filter Screen (factory installed)
12 Inlet Nipple (factory installed)
(shown on page 12, figure 2)
13 High-Pressure Hose
14 Upper tank cap
15 Lower tank cap
16 High Pressure outlet
17 Smart Tech Indicator Lights
18 Quick Connector (in a plastic bag)
19 Screws
20 Handle
21 Hose reel
22 Hose reel handle
23 Flexi-lance
LISTA DE PIEZAS
1Tubo con Boquilla Turbo
2Pistola rociadora
3Portacable de alimentación
4Interruptor de encendido y apagado
5Dosificador de detergente
6Entrada de agua con rosca
7Lanza de pulverización variable Click-N-CleanTM
8Porta-accesorios
9Interruptor diferencial automático de seguridad (GFCI)
10 Tapón para el agua
11 Filtro (instalado)
12 Niple de entrada (instalado)
(Representado à la figura 2de la página 12)
13 Manguera de alta presión
14 Tapón de estanque superior
15 Tapón de estanque inferior
16 Salida de alta presión
17 Indicadores luminosos Smart Tech
18 Conexión rápida (en un saco de plástica)
19 Tornillos
20 Mango
21 Devanador de manguera
22 Mango del devanador
23 Flexi-lance

11
ATENCIÓN:Lamáquina delavarapresión
está también dotada de un interruptor
eléctrico principal de encendido y apagado.
Cuando la hidrolimpiadora no está en
uso, es necesario que dicho interruptor
esté colocado siempre en apagado para
prevenir posibles accidentes o daños.
SOBRECARGA DEL MOTOR
Elmotoreléctricodelahidrolimpiadoraposeeundispositivode
proteccióncontralasobrecargaquebloqueaautomáticamente
el motor en el caso de exceso de corriente o en el caso de
recalentamiento.
2.0 CARACTERÍSTICAS RELATIVAS
A LA SEGURIDAD
AUTOMATIC TOTAL STOP
Lamáquinadelavarapresiónestádotadadeundispositivo
de detención que detecta cuándo está desenganchado el
gatillo de la pistola. Abre el circuito eléctrico al motor y
bloquea la máquina de lavar a presión.
2.0 SAFETY FEATURES
AUTOMATIC TOTAL STOP
The pressure washer is equipped with a stop device
which will sense when the trigger on the gun is released.
It will open the power circuit to the motor and cause the
pressure washer to stop.
WARNING
WARNING: The pressure washer is also
equipped with a main power ON/OFF
switch located on the unit. It should always
be moved to the OFF position when the
pressure washer is not being used to
prevent possible injury or damage.
MOTOR OVERLOAD
The electric motor in this pressure washer is equipped with
an overload protection device which will automatically
shut off the motor in the event the motor draws excessive
current or overheats. The device will automatically
reset itself and resume normal operation after a short
period of time.
GROUND-FAULT CIRCUIT -
INTERRUPTER PROTECTION
This pressure washer is provided with
a Ground-Fault Circuit-Interrupter
(GFCI) built into the plug of the power
supply cord. This device provides
additional protection from the risk of
electric shock. Should replacement of
the plug or cord become necessary,
use only identical replacement parts
that include GFCI protection.
ATENCIÓN
EXTENSION CORDS
Use only extension cords that are intended for outdoor
use. These extension cords are identified by a marking
“Acceptable for use with outdoor appliances; store
indoors while not in use”.
Use only extension cords having an electrical rating
not less than the rating of the product.
Do not use damaged extension cords. Examine exten-
sion cord before using and replace if damaged. Do
not abuse extension cord and do not yank on any cord
to disconnect.
Keep cord away from heat and sharp edges. Always
disconnect the extension cord from the receptacle before
disconnecting the product from the extension cord.
WARNING: To reduce the risk of
electrocution, keep all connections dry
and off the ground. Do not touch plug
with wet hands.
EXTENSIONES
Use exclusivamente extensiones para uso exterior.
Dichas extensiones están marcadas por la frase “Aptas
para uso exterior si no las utiliza, colóquelas en un
lugar cubierto”.
Utilice solamente alargadores que tengan una potencia
eléctrica igual o superior a la del producto.
No utilice extensiones dañadas.
Antes del uso, revise la extensión y si está dañada
sustitúyala.
Utilice el alargador correctamente y no tire del cable
para desconectar el aparato.Mantenga las extensiones
lejos de fuentes de calor y de ángulos cortantes.
Antes de desconectar el equipo de la extensión, desco-
necte siempre esta última de la toma corriente.
IMPORTANTE: Para reducir la posibili-
dad de electrocución, mantengan la ex-
tensión seca y fuera de tierra. No toquen
el enchufe con las manos mojadas.
WARNING ATENCIÓN
INTERRUPTOR DE CIRCUITO
CON TOMA DE TIERRA
La máquina de lavar a presión está
dotada de un interruptor de circuito
con toma de tierra (GFCI) montado en
el enchufe del cable de alimentación
eléctrica. Dicho dispositivo suministra
una protección adicional contra el
riesgo de descargas. Si fuere necesario
substituir el enchufe o el cable, utilicen
exclusivamente repuestos similares
provistos de protección GFCI.
WARNING
If Automatic Total Stopfails to operate,
DO NOT USE THE MACHINE. Contact our
Customer Service department. Further use
will damage the machine and/or cause
personal injury.
ATENCIÓN
Si la opción de Automatic Total Stopdeja
de funcionar, NO UTILIZAR LA MÁQUINA.
Contactar con el Departamento de Atención
al Cliente. Si, por el contrario, continua
utilizándola, pueden resultar dañadas
personas o la propia máquina.
Eldispositivosereiniciaautomáticamente
y reactiva las condiciones normales de
funcionamiento después de un breve
período.

12
When using an extension cord, observe the specification
below:
Cable Length Wire Gauge
Up to 25 ft. 12 AWG Outdoor
WARNING: To reduce the risk of
electrocution, keep all connections dry
and off the ground. Do not touch plug
with wet hands.
Cuando se utilizan extensiones, respeten las siguientes
características:
Longitud del cable Calibres del cable
Hasta 25 pies 12 AWG Fuera
IMPORTANTE:Para reducir la posibilidad
de electrocución, mantengan la extensión
seca y fuera de tierra. No toquen el enchufe
con las manos mojadas.
WARNING ATENCIÓN
3.0 INSTALLATION
3.1 HIGH PRESSURE HOSE
Remove and discard the water plug (Fig. 1) before
attaching the high pressure hose. Carefully insert the
fitting with the o-ring into the high pressure outlet and
tighten the threaded nut by hand. (Fig. 1)
3.0 INSTALACIÓN
3.1 MANGUERA DE ALTA PRESIÓN
Extraiga y deseche el tapón para el agua (Fig. 1)
antes de acoplar el tubo de alta presión. Introduzca
con cuidado el accesorio con la junta tórica dentro
de la salida de alta presión y apriete manualmente
la tuerca roscada. (Fig. 1).
Fig. 2
Fig. 1
3.2 WATER CONNECTION (Cold water)
Before connecting, run water through the garden
hose (not supplied) to flush out any foreign matter.
Attach garden hose to the pressure washer water inlet
connection (Fig. 2). If your water source is a well, the
garden hose length can only be 30 ft. Max.
3.2 CONEXIÓN DEL AGUA (Agua fría)
Antes de efectuar la conexión, haga correr el agua en
la manguera para jardín (no incluida en el suministro)
para hacer salir los materiales extraños. Conecte la
manguera para jardín a la conexión para la entrada
del agua de la máquina para lavar a presión (Fig. 2).
Si su fuente hídrica es un pozo, la largura del tubo de
jardín puede ser sólo 30 ft. Máx.
Fig. 2

13
3.3 CONEXIÓN CON LA POTENCIA DE
ALIMENTACIÓN
La máquina de lavar a presión está dotada de
fábrica de un cable eléctrico y de un enchufe de
alimentación con interruptor de circuito con toma
de tierra (GFCI).
El cable deberá ser conectado únicamente a una toma
corriente eléctrica instalada en conformidad con las
normativas locales de seguridad.
NOTA: La corriente eléctrica deberá ser de 120V,
60 Hz con un circuito de por lo menos 15 amperios.
(Dedicado).
3.3 POWER SUPPLY CONNECTION
The pressure washer is factory-equipped with an
electrical cord and a Ground Fault Circuit Interrupter
(GFCI) power plug.
This cord should only be connected to an electrical outlet
installed in accordance with local safety regulations.
NOTE: The power supply must be 120v, 60hz and a
minimum 15 amp circuit. (Dedicated)
A. Inspect cord before using. Do not
use if cord is damaged.
B. Keep all connections dry and off
the ground.
C. Do not touch plug with wet hands.
D. The pressure washer is provided with a ground
fault circuit interrupter built into the power plug.
If replacement of the plug or cord is needed, use
only identical replacement parts. Contact Customer
Service for proper replacement parts via e-mail at:
customerservice@huskypowerwasher.com. or order
online at www.huskypowerwasher.com
Extension cords are not recommended unless they are
plugged into a receptacle protected by a ground fault
circuit interrupter.
Any extension cord used must be 12 AWG outdoor
with maximum length of 25 feet to prevent excessive
voltage loss.
Use only extension cords intended for outdoor use.
These extension cords are identified by a marking
“Acceptable for use with outdoor appliances; store
indoors when not in use”.
A. Revise el cable antes del uso. Si está
dañado, no lo utilice.
B. Mantenga secas y fuera de tierra todas las
conexiones
C. No toque el enchufe con las manos mojadas
D. La máquina delavar a presión essuministrada con un
interruptor de circuito con toma de tierra instalado en
el enchufe de alimentación. Si es necesario substituir
el enchufe o el cable, usen sólo piezas de repuesto del
mismo tipo. Para una substitución correcta, contacte
al Servicio al Cliente por e-mail:
customerservice@huskypowerwasher.com. o haga
un pedido por Internet enwww.huskypowerwasher.com.
Noseaconsejaelusodeextensionessinoestánintroducidas
enunatomacorrienteprotegida por elinterruptordecircuito
con toma de tierra.
Cualquier extensión utilizada debe ser del tipo 12 AWG
fuera y la longitud no debe superar los 25 pies con el
fin de prevenir una excesiva dispersión de voltaje.
Utilice sólo extensiones para uso exterior. Tales
extensiones están señaladas con la siguiente frase:
“Adecuadas para uso exterior; almacenar en lugar
cerrado cuando no es utilizada.”
WARNING: Test GFCI before each
use. DO NOT use pressure washer if
test below fails.
GFCI Test Procedures:
1. Plug GFCI into power receptacle. Indicator light
should be illuminated.
2. Press test button. Light should turn off.
3. Press reset button for use. Indicator light should be
illuminated.
Do not use if above test fails and contact us at
replacement.
NOTE: The GFCI must be reset each time the pressure
washer is connected to an electrical outlet. Reset by simply
pushing the reset button on the GFCI power plug.
WARNING ATENCIÓN
ATENCIÓN
WARNING
ATENCIÓN: Controlen el interruptor de
circuitocontomadetierra(GFCI)antesdeluso.
No utilicenla máquinade lavar apresión siel
control efectuado da un resultado negativo.
Procedimientos de prueba del GFCI:
1. Enchufe el GFCI a la toma de corriente. El indicador
luminoso se enciende.
2. Pulse el botón de prueba (test). El indicador lumi-
noso se apaga.
3. Pulse el botón de reinicio (reset) para utilizar el
equipo. El indicador luminoso se enciende.
Silapruebafalla,noutiliceelequipoycontacteconnosotros
en la dirección customerservice@huskypowerwasher.com
para su sustitución.
NOTA: El GFCI debe resetearse todas las veces que se
conecta la hidrolimpiadora a una toma eléctrica. Para
resetear, basta con pulsar la tecla Reset en el enchufe
de corriente del GFCI.

14
4.1 START-UP PROCEDURE
1. Connect the high pressure hose to the machine outlet.
Ensure that the threads are aligned properly and that
the connection is secure.
2. Connect the garden hose to the machine inlet using
the quick connect. Make sure that the garden hose
is connected to a water supply that is turned on.
3. Insert the Click-N-CleanTM or Turbo lance into the
gun by pushing firmly and simultaneously twisting
a ¼ of a turn until locked into place (Fig.5).
4. Plug the GFCI into the power receptacle.
5. Ensure that the gun safety is unlocked (Fig. 3) and
squeeze the trigger until the air has escaped and a
steady flow of water is coming from the nozzle.
6. Depress the ON button (Fig.6 - page 16). Note
that the motor will momentarily start then stop.
The green “Ready” light should be illuminated
(Fig.4).
7. Squeeze the trigger to start motor and water flow.
NOTE: Make sure wand is locked (Fig.5).
4.0 OPERATING INSTRUCTIONS
WARNING: Risk of injection or injury.
Do not direct discharge stream at self or
others.
4.0 INSTRUCCIONES DE USO
IMPORTANTE: Riesgo de ingerirlo o
de lesiones. NO dirija el chorro hacia sí
mismo o hacia otras personas.
Safety lock “locked”
Bloqueo de seguridad “cerrado”
Safety lock “unlocked”
Bloqueo de seguridad “abierto”
ATENCIÓNWARNING
Fig. 3
Fig. 5
Fig. 4
4.1 PROCEDIMIENTO DE PUESTA EN MARCHA
1. Conecteel tubode altapresiónala salidadela máqui-
na.Asegúresedequelosconductosestáncorrectamente
alineados y de que la conexión es segura.
2. Conecte la manguera del jardín a la entrada de la
máquina mediante el dispositivo de conexión rápi-
da. Asegúrese de que la manguera del jardín está
conectada a una toma de agua que esté activa.
3. Introduzca la lanza Click-N-CleanTM o Turbo en la
pistola. Para ello, presione con firmeza al tiempo
que gira un cuarto de vuelta hasta que queda fijada
en su lugar (Fig.5).
4. Enchufe el GFCI a la toma de corriente.
5. Asegúrese de que el dispositivo de seguridad de
la pistola está desbloqueado (Fig. 3) y apriete el
accionador hasta que salga aire y se genere un
caudal de agua constante desde la boquilla.
6. Pulse el botón ON (Fig.6-pág.16). Recuerde que
el motor se encenderá momentáneamente y, a
continuación, se detendrá. La luz verde “Listo”
(Ready) se encenderá (Fig.4).
7. Apriete el accionador para poner en marcha el
motor y el caudal de agua.
NOTA:Asegúrese de que la varilla está bloqueada (Fig.5).
Listo

15
The High Pressure Fan Spray
position is intended for cleaning with
maximum pressure. (Fig. 7)
IMPORTANTE: Si el lanzador no está
bien bloqueado, cuando se utiliza la
pistola, podría ser expulsada debido a la
alta presión, provocando lesiones o daños
y perjuicios.
ATENCIÓN
WARNING: If the wand is not securely
locked into place, it could be ejected under
high pressure when operating the gun,
possibly causing injury or damage.
WARNING
4.2 CLICK-N-CLEANTM
(see Fig.7)
CAUTION: Do not move the nozzle
to adjust pressure while the trigger is
squeezed.
The Click-N-CleanTM nozzle has three adjustments. Turn
the collar 120° to set the desired selection.
WARNING
Fig. 6
Fig. 7
The Medium Fan Spray position
is intended for cleaning with medium
pressure. (Fig. 7)
The Detergent Spray position is
intended for dispensing detergent
(Fig. 7).
La posición de Pulverización en
abanico a alta presión está
indicada para limpiar con la máxima
presión. (Fig. 7).
4.2 CLICK-N-CLEANTM
(consulte la Fig.7)
PRECAUCIÓN: No mueva la boquilla
para ajustar la presión mientras esté pul-
sado el accionador.
La boquilla Click-N-CleanTM puede ajustarse en tres
posiciones. Gire el cuello 120° para ajustarla a la
posición que desee.
ATENCIÓN
LaposicióndePulverización en aba-
nico media está indicada para limpiar
con una presión media. (Fig. 7).
La posición de Pulverización con
detergente está indicada para
suministrar detergente (Fig. 7).

16
PRECAUCIÓN: El ajuste de pulveriza-
ción en abanico a alta presión es muy
agresivo. Le recomendamos que utilice
un ángulo de pulverización de veinte
grados (20°) para la mayoría de las
aplicaciones de limpieza. De este modo
evitará que se produzcan daños en la
superficie que se va a pulverizar.
CAUTION
Fig. 8
NOTE: The pressure of the spray on the surface you
are cleaning increases as you move the wand closer
to the surface.
CAUTION: The high pressure fan
spray adjustment is very aggressive.
We recommend that for most cleaning
applications, a twenty degree (20°)
spray angle be used to avoid damage
to the surface being sprayed.
The green “Ready” light should be illuminated when
the “ON” button is depressed and power is supplied
to the machine.
NOTE: The green “Ready” light should remain illuminated
until the ON/OFF switch is moved to the OFF position.
When using the Click-N-CleanTM lance set in the “Me-
dium Fan Spray” or ”Detergent Spray” position, the
yellow “Medium” light should be illuminated.
NOTE: The yellow “Medium” light should be illuminated
when the gun trigger is depressed, motor is running
and water is spraying from the nozzle.
The blue “High” light should be illuminated when using
the Click-N-CleanTM lance set in the “High Pressure Fan
Spray” position, when using the Turbo lance, or when
using the Flexi-lance.
NOTE: The blue “High” light should be illuminated
when the gun trigger is depressed, motor is running
and water is spraying from the nozzle.
ATENCIÓN
NOTA: La presión que ejerce el pulverizador sobre la
superficie que está limpiando aumenta a medida que
acerca la varilla a la superficie.
l indicador luminoso verde “Listo” (Ready) se encenderá
cuando se pulse el botón “ON” y la máquina reciba
alimentación eléctrica.
NOTA: La luz verde “Listo” (Ready) permanecerá en-
cendida hasta que se coloque el interruptor ON/OFF
en la posición OFF.
Al utilizar la lanza Click-N-CleanTM en la posición
“Pulverización en abanico media”, “Pulverización con
detergente”, o al utilizar la lanza Turbo, se encenderá
el indicador amarillo “Media” (Medium).
NOTA: La luz amarilla “Media” (Medium) se encenderá
cuando se pulse el accionador de la pistola, el motor
esté en funcionamiento y el agua salga pulverizada
por la boquilla.
La luz azul “Alta” (High) se encenderá cuando se
utilice la lanza Click-N-CleanTM ajustada a la posición
“Pulverización en abanico a alta presión”.
NOTA: La luz azul “Alta” (High) se encenderá cuando
se pulse el accionador de la pistola, el motor esté en
funcionamiento y el agua salga pulverizada por la
boquilla.
Smart Tech Indicator Light System (Fig.8). Sistema de indicadores luminosos Smart Tech
(Fig.8).

17
4.3 USE OF CLEANING DETERGENTS
CAUTION: Only use cleaning detergents
recommended for pressure washers.
CAUTION: Fill and flush the detergent
tanks with clear water after use.
4.3 USO DE DETERGENTE
ATENCIÓN
CAUTION
Fig. 10
1. Remove the tank caps (1-2) located on the back of
the machine. (Fig. 10)
2. Fill the tanks with suitable cleaning solution. Use
only approved pressure washer cleaners. Do not
use bleach, chlorine, or any cleaners containing
acids (Fig.10).
NOTE: Tank #1 is removable and can be released
by shifting left or right and then pulling out.
3. Turn dial (3) to choose the desired tank and increase/
decrease detergent flow(Fig.9).
4. Set the Click-N-CleanTM to the “Detergent Spray“
position. The detergent will automatically be mixed
with the water and discharged through the nozzle.
NOTE: WHEN THE Click-N-CleanTM NOZZLE IS
MOVED TO THE HIGH PRESSURE OR MEDIUM
FAN SPRAY POSITION, DETERGENT WILL NOT
BE DISCHARGED.
Fig. 9
El aparato incorpora dos depósitos de detergente
Dial-N-Wash®.El dosificador de detergente (3-Fig. 9)
se utiliza para seleccionar entre ambos depósitos de
detergente (1-2-Fig. 9) y para dosificar la cantidad
de detergente.
This product is equipped with dual Dial-N-Wash®
detergent tanks. The dial (3-Fig. 9) is used to control
the suction between detergent tanks (1-2-Fig. 9) and
increase/decrease detergent flow.
CUIDADO:Usetansolodetergentesespecíficos
para máquina de lavar a presión.
CUIDADO: Limpie con agua clarificada el
estanque luego de haber utilizado productos
químicos.
1. Retire los tapones de los depósitos (1-2) situados
en la parte trasera de la máquina. (Fig. 10).
2. Llene los depósitos con la solución de limpieza ade-
cuada.Utilice sóloagentes limpiadores paralimpieza
a presión homologados. No utilice lejía, cloro ni
ningún limpiador que contenga ácido (Fig.10).
NOTA: El Depósito #1 es desmontable y, para
sacarlo, sólo tiene que girarlo a la izquierda o a
la derecha y extraerlo.
3. Gire la rueda (3) para elegir el depósito deseado y
aumentar/disminuir el caudal de detergente (Fig. 9).
4. Ajuste la lanza Click-N-CleanTM a la posición de
“Pulverización con detergente”. El detergente
se mezclará automáticamente con el agua y se
descargará a través de la boquilla.
NOTA: CUANDOLA BOQUILLA Click-N-CleanTM
SE COLOCA EN LA POSICIÓN DE PULVERIZA-
CIÓN EN ABANICO A ALTA PRESIÓN O A MEDIA
PRESIÓN, NO SALDRÁ DETERGENTE.

18
2. Antes de enjuagar, dejen el detergente sobre la
superficie durante un breve lapso de tiempo.
ATENCIÓN: Si se deja secar el jabón, las
superficies pintadas podrían dañarse. Lave
y seque una pequeña sección por vez. No
trabaje sobre superficies calientes o bajo
la luz directa del sol.
2. Allow detergent to remain on the surface for a short
time before rinsing.
CAUTION: Damage may occur to painted
surface if detergent is allowed to dry on the
surface. Wash and rinse a small section at
a time. Avoid working on hot surfaces or
in direct sunlight.
APPLICATION OF DETERGENT
1. Apply the solution to a DRY work surface.
NOTE: WETTING THE SURFACE FIRST IS NOT
RECOMMENDED, AS IT DILUTES THE DETERGENT
AND REDUCES ITS CLEANING ABILITY.
On a vertical surface, apply horizontally from
side to side starting from the bottom to avoid
streaking.
APLICACIÓN DE DETERGENTE
1. Aplique la solución de jabón de la máquina de lavar
a presión sobre una superficie de trabajo SECA.
NOTA: NO SE ACONSEJA MOJAR LA SUPERFICIE
ANTES, PUESTO QUE DILUYE EL DETERGENTE Y
REDUCE SU CAPACIDAD DE LIMPIEZA.
Ante la presencia de una superficie vertical, aplique
el jabón horizontalmente comenzando por la parte
baja para evitar estriados.
CAUTION ATENCIÓN
3. Rinse with clean water under high pressure. On
a vertical surface, first rinse from the bottom up,
then rinse from the top down. Hold nozzle 6 to 8
inches from the work surface at a 45° angle using
the flat spray as a peeling tool rather than a scrub
brush.
NOTE: Ensure that the detergent injection system is
completely clean prior to switching from one detergent
to another.
APPLICATION OF LIQUID VEHICLE WAX
1. Immediately after cleaning, apply pressure washer
liquid vehicle wax using low pressure. Pour wax
into detergent tank.
2.Apply the wax sparingly in an even layer.
Apply to wet surfaces from the bottom up for even
distribution and to avoid streaking.
3. Rinse off the surplus wax. NOTE – IF SURPLUS
WAX IS NOT REMOVED, A HAZY FINISH MAY
RESULT.
4. Wipe dry to reduce water spotting.
3. Enjuague con agua limpia y con alta presión. Sobre
las superficies verticales, comience a enjuagar antes
desde la parte baja hacia la parte alta y luego
viceversa. Tenga la boquilla a 6/8 pulgadas de la
superficie de trabajo con un ángulo de 45° utilizando
el chorro turbo como si fuera una herramienta para
pelar en lugar de cepillo de acero.
NOTA: Asegúrese de que el sistema de inyección de
detergente esté completamente limpio antes de cambiar
detergente.
APLICACIÓN DE LA CERA
1. Después de haber limpiado, apliquen la cera con
la hidrolimpiadora regulada sobre la baja presión.
Coloquen la cera dentro el depósito del liquido
detergente.
2. Apliquen la cera en un estrato uniforme.
Apliquen sobre superficies mojadas desde abajo
hacia arriba, para distribuirla uniformemente y
para evitar los estriados.
3. Elimine el exceso de cera del aparato. NOTA: SI EL
EXCESO DE CERA NO ES EXTRAÍDO, SE PUEDE
OBTENER UN RESULTADO OPACO.
4. Seque la superficie para disminuir las manchas de
agua.
4.4 CLEANING TECHNIQUES
When cleaning with the pressure washer, some cleaning
tasks can be solved with water alone, but for most tasks
it is advantageous to use a detergent. A detergent
ensures a quick soaking of the dirt allowing the high
pressure water to penetrate and remove the dirt more
effectively.
The low pressure position provides a gentle application
of detergents.
This position is also recommended to rinse a surface
after wax application or for other applications which
require the low pressure of a garden hose. Low pressure
is the equivalent of a garden hose set at the lowest
output to properly apply detergent. FOR DETERGENT
APPLICATION, TURN COLLAR ACCORDING TO
SECTION 4.2.
4.4 TÉCNICAS DE LIMPIEZA
Cuando se procede a la limpieza con la máquina de lavar
a presión, se pueden efectuar diferentes operaciones sólo
conelagua; enmuchos casos,sinembargo,esconveniente
utilizar también un detergente.
El uso de un detergente asegura un tratamiento inmediato
de la suciedad, permitiendo al agua con alta presión
penetrar y eliminar eficazmente la suciedad.
La posición de baja presión permite una aplicación
delicada del detergente. Recomendamos esta posición
también para enjuagar una superficie después de la
aplicación de cera y de otras aplicaciones que requieran
la baja presión de una manguera de jardín.
La baja presión equivale a una manguera de jardín
programada en el rendimiento más bajo para aplicar
en modo correcto el producto químico.
PARA APLICACIONES CON DETERGENTE, GIRAR
LA ABRAZADERA COMO SE ESPECIFICA EN LA
SECCIÓN 4.2.

19
4.7 FINALIZACIÓN DE LA OPERACIÓN
Cuando haya terminado de utilizar el sistema de inyec-
ción de detergente, haga funcionar aún a baja presión y
haga pasar agua limpia por el depósitodellíquido deter-
gente hastaqueesté completamentelimpio.NOTA:la falta
de una limpieza a fondo puede provocar una obturación
en el sistema de inyección y será inutilizable.
Detenga el equipo presionando el botón on/off.
Desconecte la toma eléctrica.
Cierre el agua y depresurice el equipo presionando
el gatillo.
ATENCIÓN: Cierren la suministro de agua
y presione el gatillo para depresurizar el
equipo. La falta de despresurización puede
provocar daños a las personas debido a la
descarga del agua de alta presión.
Desconecte la manguera de descarga de la alta
presión y la manguera de introducción del agua.
4.7 END OF OPERATION
When you have completed use of the detergent injection
system, continue to run in low pressure position and flush
clean water through the detergent tank until it is thoroughly
cleaned. NOTE: Failure to clean properly will cause the
injection system to become clogged and inoperable.
Stop the unit by pressing the ON/OFF button.
Disconnect electrical plug.
Turn off water and depressurize unit by squeezing
trigger.
WARNING: Turn off water supply and
squeeze trigger to depressurize the unit.
Failure to do so could result in personal
injury due to discharge of high pressure
water.
Disconnect the high pressure discharge hose and
the water inlet hose.
ATENCIÓN
CAUTION
Fig. 11
4.5 TURbO SPRAy LANCE
CAUTION: Do not move the nozzle to
adjust pressure. The turbo nozzle head is
not adjustable.
The Turbo Lance high pressure spray pattern delivers
the optimal cleaning effect.
Keep the Turbo Lance a minimum of 8” away from the
cleaning surface at all times.
NOTE: When using the Turbo Lance, the blue “High”
light on the Smart Tech display should be illuminated.
4.5 TURbO LANCE SPRAy
ATENCIÓN: No actúe sobre la boquilla
paramodificar lapresión.Larueda regulable
turbo no se puede ajustar.
El sistema de atomizar de alta presión con lanza Turbo
Lance ofrece un resultado de limpieza perfecto.
Mantenga en todo momento la Turbo Lance a una distan-
cia de por lo menos 20 cm de la superficie a limpiar.
NOTA: Cuando se utiliza la Turbo Lance, el indicador
luminoso azul “High” de la unidad de representación
visual Smart Tech tiene que estar encendido.
CAUTION ATENCIÓN
4.6 FLEXI-LANCE
CAUTION: The red nozzle portion of the
Flexi-lance pivots 360°. This adjustment
can only be made when the gun trigger is
completely released. Do not attempt to adjust
the Flexi-lance nozzle when the machine is in operation.
Failure to follow this instruction could result in personal injury.
The Flexi-lance pivots 360° and delivers a high pressure
fan spray pattern to clean the hard to reach areas.
NOTE: When using the Flexi-lance, the blue “High” light
on the Smart Tech display should be illuminated.
4.6 FLEXI-LANCE
ATENCIÓN: La boquilla Flexi se puede
regular a 360°; el ajuste solamente se
puede modificar con el accionador de la
pistola completamente soltado. No inten-
tar ajustar la boquilla Flexi de plástico rojo cuando
la máquina está funcionando. El no respeto de esta
advertencia podría provocar daños personales.
La lanza Flexi-lance gira sobre 360° y suministra un
chorro vaporizado de alta presión en forma de abanico
que permite limpiar zonas difíciles de alcanzar.
NOTA: Cuando se utiliza la Flexi Lance, el indicador
luminoso azul “High” de la unidad de representación
visual Smart Tech tiene que estar encendido.
ATENCIÓN
CAUTION

20
Para limpiar la pantalla de agua interior, retire
en secuencia el dispositivo de conexión rápida, el
niple de entrada y saque la pantalla del filtro de
la entrada de la bomba.
El filtro de retorno del flujo debe estar limpio.
Reemplace de inmediato el filtro y la unión
rápida para evitar que entre material extraño
en la bomba.
ATENCIÓN: No dañe el filtro cuando lo
lo extraiga y limpie. Cualquier partícula
extraña que pudiera entrar en las bombas,
podría dañarla.
To clean inner water screen, remove quick connector
and the inlet nipple in order to remove the filter
screen from the pump inlet.
Backflush screen to clean.
Replace screen and quick connect immediately
toprevent any foreign matter from entering the
pump.
CAUTION: Do not damage the screen
while removing or cleaning. Any foreign
particles entering the pump may damage
the pump.
CAUTION ATENCIÓN
5.4 WATER SCREEN
The pressure washer is equipped with a water inlet
screen to protect the pump.
CAUTION: If the screen is not kept clean,
the flow of water to the pressure washer
will be restricted and the pump may be
damaged.
5.4 FILTRO DE AGUA
La máquina de lavar a presión está dotada de un filtro
de introducción de agua para proteger la bomba.
ATENCIÓN: Si no se mantiene limpio el
filtro, el flujo del agua hacia la máquina de
lavar a presión se ve limitado y la bomba
puede dañarse.
5.3 LUBRICATION
The pressure washer is designed with a permanent
lubrication system. Conventional oil check and oil
changes are not necessary.
NOTE: IN CASE OF OIL LEAKAGE, CONTACT
OUR CUSTOMER SERVICE DEPARTMENT AT:
A SMALL AMOUNT OF OIL LEAKAGE IS NORMAL.
5.3 LUBRICACIÓN
La máquina de lavar a presión ha sido creada con un
sistema de lubricación permanente. No son necesarios
controles convencionales ni la substitución de aceites.
NOTA: EN CASO DE PÉRDIDA DE ACEITE, CONTACTE
VÍAE-MAILCONEL DEPARTAMENTODE ATENCIÓNAL
CLIENTE EN customerservice@huskypowerwasher.com.
UNA PEQUEÑA PÉRDIDA DE ACEITE ES NORMAL.
2.Backflush the nozzle with water.
Restart the pressure washer and depress the trigger on
the spray gun. If the pressure is still too high, repeat
above items 1-2.
2. Dejen pasar el agua a través la boquilla
Reinicie arrancar nuevamente la máquina de lavar
a presión y oprimir el gatillo de la pistola de chorro.
Si la boquilla está aún bloqueada o parcialmente
bloqueada, repita dichas operaciones desde el punto
1 hasta el punto 2.
CAUTION ATENCIÓN
5.2 NOZZLE
The nozzles should be lubricated with non-water soluble
grease or light oil regularly. Clogging of the nozzle
causes the pump pressure to build up too high and
cleaning is immediately required.
1. Clear blockage in nozzle by forcing stiff wire
through center hole.
5.2 BOQUILLA
Las boquillas deben lubricarse periódicamente con una
grasa que no sea soluble al agua o aceite ligero.La
obturación de la boquilla provoca el aumento de la presión
de la bomba. Se requiere una limpieza inmediata.
1. Eliminen el bloqueo en la boquilla forzando el cable
rígido a través el agujero central.
5.0 MAINTENANCE
5.1 CONNECTIONS
Connections on Pressure Washer hoses, gun and spray
wand should be cleaned regularly and lubricated with
non-water soluble grease to prevent leakage and damage
to the o-rings.
5.0 MANTENIMIENTO
5.1 CONEXIONES
Las conexiones a mangueras, la pistola y el tubo de
chorro de la hidrolimpiadora, deberían ser limpiados
regularmente y lubricados para prevenir las pérdidas
y la rotura de los aros tóricos.
Table of contents
Other Husky Pressure Washer manuals

Husky
Husky POWERWASHER H1600 User manual

Husky
Husky 1550 PSL User manual

Husky
Husky 1750 User manual

Husky
Husky HU80215 User manual

Husky
Husky HU80709 User manual

Husky
Husky HU80709A User manual

Husky
Husky HU80215 User manual

Husky
Husky 1650 PSL User manual

Husky
Husky Powerwasher 1800 psi User manual

Husky
Husky 2000PSI User manual

Husky
Husky HD1300 User manual

Husky
Husky HD1500 User manual

Husky
Husky HU80833 User manual

Husky
Husky 1750 PSL User manual

Husky
Husky HU80530 User manual

Husky
Husky HU1550CA User manual

Husky
Husky HD1300 User manual

Husky
Husky POWERWASHER 1800 CA User manual

Husky
Husky HU80432 User manual

Husky
Husky HU80220 User manual