HXM HD-008-X User manual

USER SMANUAL
DIGITALDRUM
HD-008-X

CAUTION
Any changes or modifications inconstruction ofthisdevice which arenot expresslyapproved by
thepartyresponsibleforcompliance couldvoidtheusersauthoritytooperatethe equipment.
WARNING
When using electricalproducts,basicsafetyprecautions shouldalways be followed,including the
following:
NOTE:Thisequipment hasbeen testedandfound tocomplywiththe limitsforaClassBdigital
device,pursuanttoPart 15 of the FCC Rules.
Also, thisequipment hasbeentestedand found tocomplywiththelimitsfor followingstandard:
EN55022-2006
EN55024:1998/+A1:2001/+A2:2003
EN55013:2001/+A1:2003/+A3:2006
EN55020:2007
EN61000-3-2:2006
EN61000-3-3:1995/+A1:2001/+A2:2003
Theselimitsaredesignedtoprovide reasonableprotectionagainstharmfulinterferenceinaresi-
dentialinstallation.Thisequipment generates, uses, andcanradiateradiofrequencyenergyand,if
not installedandusedinaccordancewiththeinstructions, maycauseharmfulinterference toradio
communications. However, thereisno guaranteethatinterference will not occurinaparticular
installation.Ifthisequipmentdoes cause harmfulinterferencetoradioor televisionreception,which
canbedeterminedbyturningtheequipment offand on, theuserisencouragedtotrytocorrectthe
interferencebyoneormoreofthefollowingmeasures:
-Reorientorrelocatethe receiving antenna.
-Increase the separationbetween theequipmentand receiver.
-Connectthe equipment intoan outlet onacircuitdifferent fromthattowhichthe receiveris
connected.
-Consult thedealer oran experiencedradio/TV technician for help.
CAUTION

wdirect sunlight(nearawindow),
whightemperatures(near aheatsource,
outside, orinacarduring thedaytime),
wexcessivehumidity,
wexcessivedust,
wstrong vibration.
wThedrumcontainsdigitalcircuitryand may
causeinterference ifplacedtoo close to
radioor television receivers. If interference
occurs,move thedrum furtherawayfrom
theaffectedequipment.
POWER
wTurnthepowerswitchoff whenthe drum is
notinuse.
wToavoiddamagetothedrumandother
devices towhich it isconnected,turnthe
power switches of all related devices off
priortoconnectionordisconnectionof
audiocables.
wTurnthepoweroff ifthemaincableis
damagedortheinstrumentisspatteredwith
liquid.
wDonotswitchtheunit onandoffinquick
succession, thisplaces an undue load on
the electroniccomponents.
wUnplugtheACpowercordduring an
electrical storm.
wAvoidpluggingtheACadaptor intothe
sameAC outletasapplianceswithhigh
powerconsumption, suchas electric
heatersor ovens.
SERVICE AND MODIFICATION
Thisproduct shouldbe serviced by qualified
service personnelwhen,
wthe power supplycordor theplughasbeen
damaged,
wliquidhasbeenspatteredintotheunitorit has
been exposedtorain,
wtheinstrumentdoesnotappeartooperate
normallyorexhibitsamarked changein
performance,
wtheinstrumenthasbeendroppedorthe
cabinethasbeendamaged.
wDonotattempttoopentheunit ormakeany
change inthecircuitsor partsofthe unit.
HANDLINGAND TRANSPORT
wNeverapplyexcessive force tothe controls,
connectors,pads or otherpartsof the
instrument.
wAlwaysunplug cablesby gripping the plug
firmly, notbypullingonthecable.
wPhysicalshockscaused bydropping,
bumping,orplacingheavy objectson the
instrument can result inscratches and/or
moreseriousdamage.
wCarefullycheck the amplifiervolumecontrol
beforestating toplay. Excessivevolumecan
cause permanenthearing loss.
CLEANING
wCleantheunitwithadryor light-wet soft cloth.
Donotuse paintthinner or petrochemical
based polishes.
LOCATION
Donotexposethe drumtothefollowing condi-
tionstoavoiddeformation, discoloration,or
moreseriousdamage,
DO NOTATTEMPTTOOPEN THEUNITOR MAKE ANYCHANGEINTHECIRCUITS OR
PARTS OFTHEUNIT.
!
TAKINGCAREOFYOURDRUM

CONTENTSTABLE
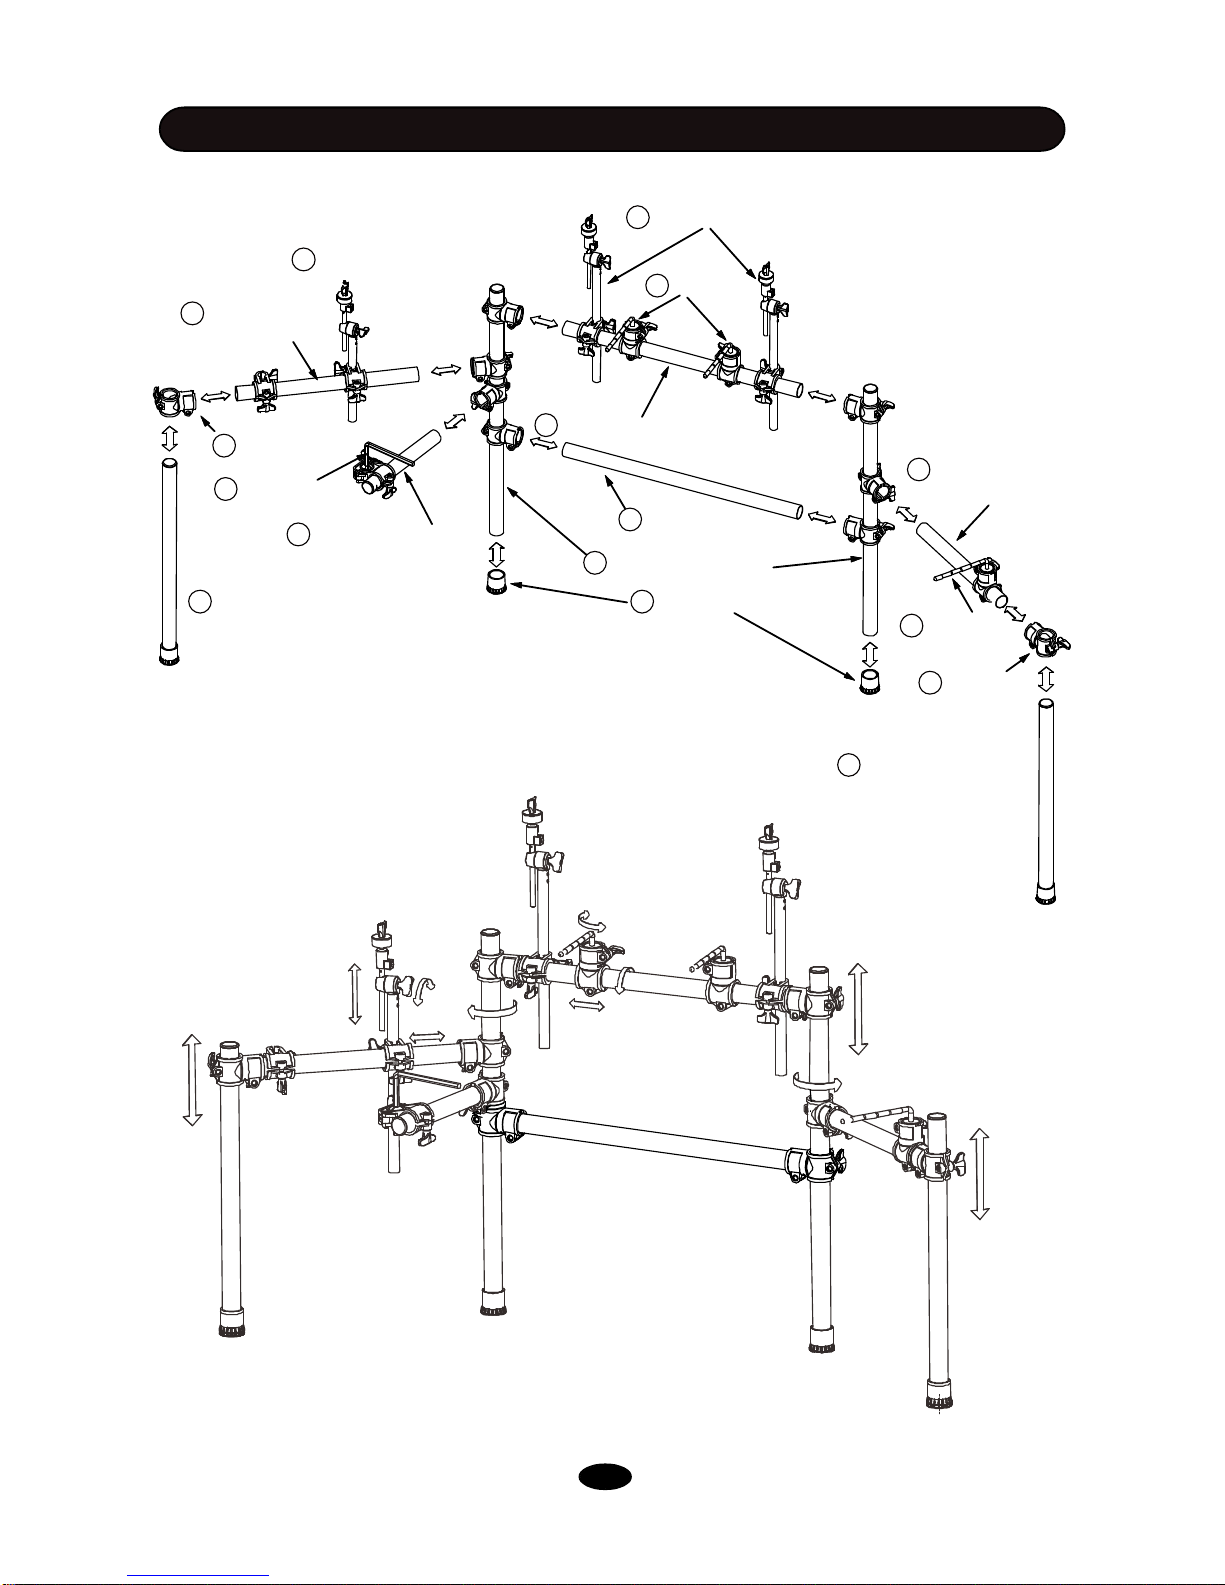
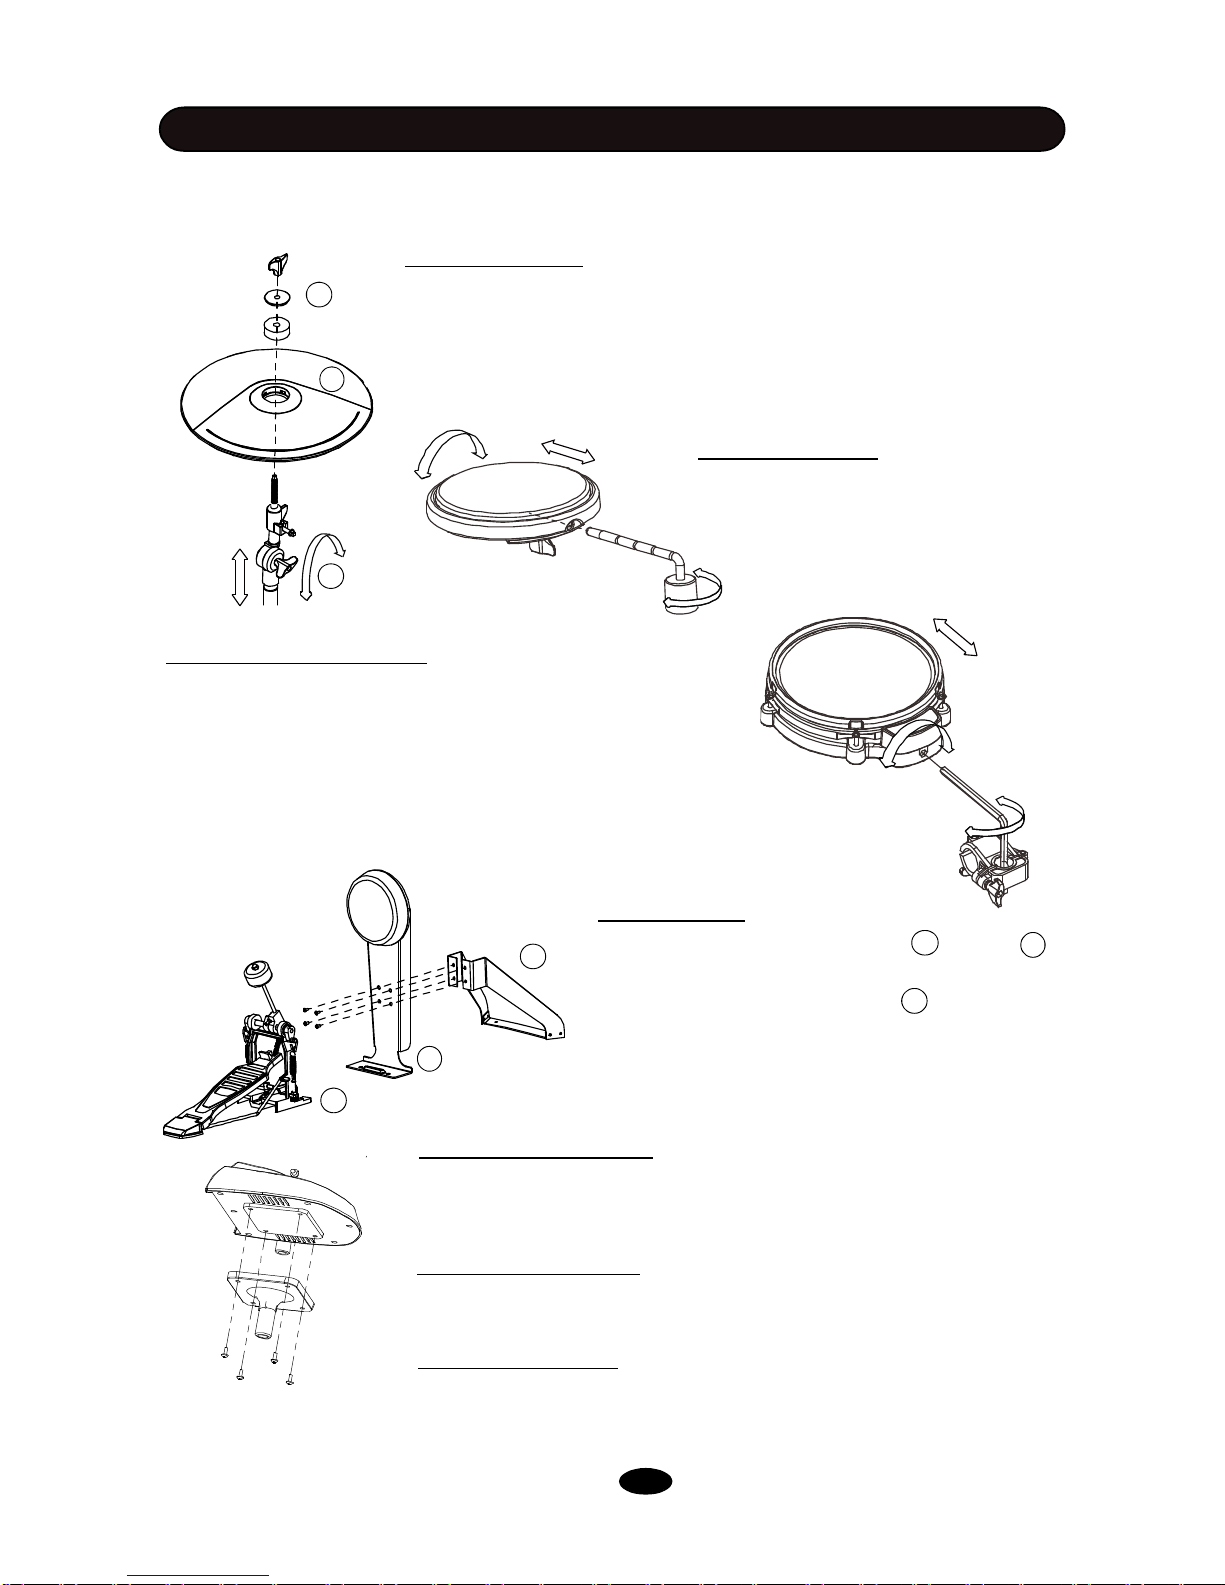
INSTALLATION ................................................................................................
SOUNDMODULE .............................................................................................
ControlPanel.....................................................................................................
Connectors.........................................................................................................
PLAYIN PAD .......................................................................................................
BEFORE STARTPERFORMANCE ................................................................
BASICOPERATION .........................................................................................
SelectKit............................................................................................................
EditaKit..................................................................................................................
PlayaDrumDemosong.........................................................................
RecordaDrumTrack...............................................................................
RestoreFactorySettings .................................................................................
SETUP ...............................................................................................................
Back Volume.....................................................................................................
Tune...................................................................................................................
Local..................................................................................................................
Advanced Settings............................................................................................
Sesitivity.......................................................................................................
Headroom.......................................................................................................
Sense Time.....................................................................................................
TriggerCurve..................................................................................................
CrossTalk......................................................................................................
NoteSend.......................................................................................................
RimVelocity....................................................................................................
PedalVelocity.................................................................................................
Calibration........................................................................................................
SplitPoint.......................................................................................................
Reset.................................................................................................................
DRUMKITEDIT ................................................................................................
Voice Type ........................................................................................................
Voice..................................................................................................................
Volume...............................................................................................................
Reverb...............................................................................................................
Pitch...................................................................................................................
Pan ....................................................................................................................
APPENDIX ..........................................................................................................
KitList.................................................................................................................
SongList..........................................................................................................
Voice List............................................................................................................
SPECIFICATIONS ..............................................................................................
1
5
5
7
8
9
10
10
10
11
11
11
12
12
12
12
13
13
13
13
13
13
13
13
14
14
14
14
15
15
15
15
15
15
15
17
17
17
18
22

1
INSTALLATION
Thediagramshowscompletedrum kitafterinstallation.
Poweradaptorandconnection cables arenotshowninthediagram.
SOUNDMODULE
HI-HAT
CRASH
RIDE
TOM1
TOM2
SNARE
KICK PEDAL
HI-HATCONTROLPEDAL
KICK
TOM3

2
INSTALLATION
Thisisthe view ofall separated componentswhichyou can find inpackage. Match eachpart toits
numberandsetup thedrumsaccordingtothe diagramon nextpage.
Extraarespareparts.
RACKINSTALLATION-1
10
Legclamp CrashandRiderod Hi-Hatrod
Longlegwithclamp
s
Shortlegwithclamps Centrebeamwithclamps
Sidebeamwithclamps(1)
Sidebeamwithclamps(2)
Snarearmwithclamp
3
1
87
6
5
4
2
9
Sparepartclamp
Rubberfoot
Tomrod
12
11
10
Snarehexrod
13
Reinforcebeam
14

INSTALLATION
Thisdiagram showshowtoassemblethe drum rack system.
Donnotfastenallwing nutstootightlybeforefinishingfinaladjustment.
RACKINSTALLATION-2
RACKINSTALLATION-3
Adjustthe positionofthearm, beams,installationrods,thenfastenthewing nuts.
Legclamp
CrashandRiderod
Hi-Hatrod
Longlegwithclamps
Shortlegwithclamps
Centrebeamwithclamps
Sidebeamwith
clamps(1)
Sidebeamwith
clamps(2)
Snarearmwithclamp
3
1
8
7
6
5
4
2
9
Rubberfoot
Tomrod
12
11
Snarehexrod
13
Tomrod
12
Legclamp
9
Shortlegwithclamps
1
Reinforcebeam
14
3

INSTALLATION
1.Alignholesinthesupport standandpad,
then insertboltsandfastenwithdrumkey(attached).
2. Inserttongue ofthe kick stand intoslot ofthe
pedal .
3.Adjust toasuitableposition,and then fastenthe
wingnut on the kickpedal.
Kick Installation
1.Alignholes inthesound moduleand the modelmounttheninsert
screwsand fastenit.
2.Insert rod ofthe modelmountintotheclamp,thentightenthewingnut.
Sound module Installation
Connectthetriggerconnectorcableplugtothe bottomofthe sound
module,andthen connectall cableheads accordingtotheir nametags.
Electronic Connection
Finalizing the Installation
Afterinstallallcomponents,fine adjustthearm,clampsandrods tothe
bestposition you desire.
1.Removethe wingnut, washer andfeltpadfromthetop of therod.
3.Adjustthepadpositionthenre-tightenthewingnut.
CymbalInstallation
COMPONENTSINSTALLATION
2.Put the cymbalpad intothe rod, then place back partsremoved inthe
step 1. Fasten the wing nut but nottoo tightly. It allowsthe pad alittlebit
wobbling like real acousticcymbal.
2
1
3
1.Adjust thesupporthexrod tosuitableposition.
2.Loosenthebottomwingnutofthepadandinsert ittothe
support hex rod.Push thewingnutup alittlebitand shakethe
pad toinsert it successfully.
3.Fastenthebottom wingnutafter thepadisadjusted tothe
suitableposition
Snare&Tom pad Installation
1.Pllace thepad on the installation L-Rod.
2.Adjusttheangleand heightofthe pad
thentightenthewingnut.
Tom pad Installation
12
3
4
2
1
3

1.DRUMOFF: Pressthisbutton tomutethe drumtrack ofademosong
2. CLICK: Pressthisbutton tosetmetronomeon/off,volume,tempo,timesignatureand voice.
Use PAGE / button toswitch betweenoptions.
3.TEMPO: Press this button at a desired rate to get a new tempo for demo song and metronome.
You can alsochange the tempousing scroll wheel(7)after youhave pressed TEMPO button.
4.:Plays or Stops the current demo song.
5. : Recordadrumsequence.Pressbutton(4)or button (5)againtofinishrecordingand
save the sequence toauser song. And then press ENTER toconfirm.
Youcanalso recordalongwithademosong insongmode.
6.PAGE : Switch tolast optionincurrentmenu.Can be used when you see on screen.
7.SCROLL WHEEL/ENTER: Turnthiswheeltoincreaseordecreasevalues orchangekitsquickly.
Rotateitclockwise toincrease.
Pressthewheeltoproceedtosubmenu ortoconfirm operation whenneeded.
8.PAGE : Switch tonextoption incurrent menu.Can be usedwhenyou see onscreen.
9.EXIT:Proceedtorootmenuor tocancel operation.
10.SETUP: PressSETUPbuttontoadjustsystemsettings, includingBACKVOLUME, MASTER
TUNE,LOCAL,ADVANCEandRESET.(SeechapterSETUP).
ControlPanel
SOUNDMODULE
1 2 3
45678910
5

11.SONG: Press thisbutton toenterdemosong mode, whereyou can play demosongs, exercise
withsongsordosomedrumrecording.
12-20.DRUM PADBUTTONS: InEDITandSETUP-ADVANCEmenu,thesebuttonswillflashre-
sponding towhich pad you play. You can also pressthese buttons toselect and listen towhich pad
you wanttoedit inthese circumstances.
21.EDIT:Press EDITbuttontoeditthecurrent drum kit, includingvoicetype,voice, volume, reverb,
level,pitch and pan. (See chapterEDIT).
22.MODE: Changeplaying modes fordemosongs.
Play One: Play asinglesong once.
Repeat One:Loop asinglesong.
Play All: Play all songs once.
Repeat All:Loop all songs.
SOUNDMODULE
11
12
13
14
15 16 17 18
19
20
22
21
6

23.TRIGGER INPUTS: Trigger inputssocket islocated at the rear side ofsoundmodule. Connect
the multi-triggerconnector (AKA 25pinconnector) tothissocket and lockit.
24.LINE OUT:Stereomainoutput. Connectthisoutput toanyamplifierusing1/4”TRS cable.
25.LINEIN: Analog input socketofthesound module,1/4”TRS.
Tip
Anextra1/4”maletomalecablewillbeneeded ifyouwantconnectyoursoundmodule
toanysoundsourcesuchasiPod,iPad,CDplayer,mobilephoneorcomputer.Playandpracticewith
your favoritemusic.
26.VOLUME: Adjustthe outputlevelofthe module. Rotateitclockwise toincreasevolume.
27.PHONE:Connectyourheadphone here.1/4”TRSoutput.Anextra1/8”femaleto1/4"male
adaptormightbeneededif yourheadphoneisusing1/8"input.
28.USB:ConnectstandardBtypeUSBcabletothissocketforupdating firmware,gaming,recording
midiandusing plug-insformoresound oncomputer.
Tip
Connect USB2.0AmaletoBmalecabletothissocket, such cableisverycommon in
homeprinters.
29.ON/OFF:Turnsthemoduleonandoff.Themodulewillbeautomaticallyshutdownifthereisno
operationortriggeringinabout30minutestosaveenergy.
30.POWER: Connectthe attached DC 12Vpower adaptertothissocket.
Connectors
SOUNDMODULE
23 24 25 26 27 28 29 30
7

PLAYINGPAD
PLAYINGPADS Playing SnareDrum
Strikethe central position (head) ofthepad to
make headsound,strikethe rim of thepad to
make rimsound.Therim triggering isvelocity
layered.
Playing Cymbal
Strike thecentral position(bow)of the cymbal
tomake cymbal bowsound,strike the edgeof
thecymbal tomakeedgeshotsound.
Note
OnlytheCrash cymbalhas this
feature.
Cymbal Choke
Strike acymbal, itssound will sustain. Then
squeezetheedge portiontomutethesound.
Note
Onlythe Crash cymbalhas
thisfeature.
Bow
All pads have striking force sensitivityfeature.
Strikethe padhardertomakehighervolume
andstrikethepad softer tomake lower
volume.
Playing TomDrum
Strikethe central position (head) ofthepad to
make head sound.
Playing Kick Drum
PresstheKickdrumpedal to
makekick drumsound.
Edge
PlayingHi-Hat
(1) Strike the Hi-Hatpad withoutpressing the
Hi-Hat controlpedal tomakeopenHi-Hat
sound.
(2) Strike theHi-Hatpad withfullypressing
the Hi-Hat control pedaltomake close Hi-Hat
sound.
(3)Incertainposition whileyou press theHi-
Hatcontrolpedal,playing Hi-Hat cymbalwill
triggerhalf opensound.
(4) Press the Hi-Hatpedaldownquicklyto
make Hi-Hat pedalchicksound.
(5)Press andreleasethe Hi-Hat pedaldown
veryquick tomake Hi-Hat foot splashsound.
Rim
8

procedures.
-PressSETUPbutton.
-Press the PAGE / button untilthesub menu AD-
VANCEappears.
-PressENTERbuttontoconfirm, then press thePAGE /
button toselectitemofXtalk.
-Strikeapadyoudesirewithmaximumstrengthrepeatedly
until “OK”isshownon the screen.
-Thenchange toanotherpad and repeatthe thirdprocedure
(Notincluding HihatPedal).
-Also,youcanset theHEADROOM(aka VelocityDynamic
range)ofeachpad.To reach aloud soundeasier, simply
lowertheHEADROOM value.
- PressEXITtoquit,when“SaveSetups”appears,press
ENTERtoconfirm orselectNotocancelsaving . Thedis-
playwill show “SaveOK”after saving.
Note
All the systemsettings inSETUPisglobal
parameter, they willaffectall thekitsand can besaved even
whenrebooted.Iftheadjustmentresultisnotgood,doa
crosstalkreset according tonext pages.
-Make surethe drum kitisstableandallthe partsarewelllocked.
-Connectall the cablestothedrummoduleaccordingtotheirtags.
BEFORESTARTPERFORMANCE
TOM1ADV
XtalkAuto
SaveSetups
NO YES
SETUP
BACK VOLUME50
SETUP
ADVANCE [ENTER]
-Powerthesoundmoduleup.
Duetothe differenceof installationandenvironment,if
cross talkproblem occurs,please follow the following
----SaveOK----
--------------------
Part tosetup
SNARE-HeadADV
Xtalk OK
- Connect the multi-trigger connectortoitssocketat the bot-
tomofthesound moduleandlockit.
9

TOSELECTAKIT
-Stay atthe KITmode and use the scrollwheel to selecta
kit, you will see KITat top-left corner on screen. Ifyou are
notatthismode,press EXITbuttonseveraltimes togoback
tothis mode.
Tip
Whileadjusting parameters,you canchange
itsvalue byrotating the scroll wheel.
Pressthewheeltoproceedtosubmenuor toconfirmop-
erationwhenneeded.
TO EDITAKIT
-PressEDITtoenterEDITMODE, whereyou can assign
different voices and adjust otherparameterstomakeyour
ownkit. Strike on differentpart on each pad toselectamong
triggers,oruseDRUMbuttontoswitch betweendrum
instruments.
-Use PAGE / button toenterVOICETYPE menuand
usescroll wheeltochooseavoicecategory.Choose “---”
forablank voice.
-Use PAGE / button toenterVOICE menuand use
scrollwheeltochooseavoicewithintheselectedcategory
referring toVoice Listin<APPENDIX> .
Tip
Themeaningofshortenedvoice names:R
standsforRimshot, XforCrossstick,EforEdge,Bfor
Bell,CforClose,OforOpen,HalfforHalfOpen,PforPedal
Chick, Spfor Pedal FootSplash.
-UsePAGE / buttontoenterVOLUMEmenutoadjust
thevolumelevel for asingletrigger.
-PressEXITtoquitthecurrent menuandselectaplaceto
saveit usingscrollwheel.Youcan eithersaveit toapreset
kitor auser kitifyoudontwant tooverwritethe presetkit.
PressENTER againtoconfirm orpress EXITtocancel.
SNARE-Rim
VOLUME80
Voicename
SelectorChange
BASICOPERATION
KIT 120 4/4
Rock 1
KitNo.
Kit name
Time signatureTempo
SNARE-Rim
VOICETYPESNARE
Voicecategory
Part toedit
SNARE-Rim
VOICE RockR
Save Kits to
Rock
----SaveOK----
--------------------
10

TOPLAYADRUMDEMOSONG
-Press SONGbutton,usescroll wheeltoselectademo,
andusethePlay/Stopbutton buttontoplayademo.
Thedisplay showsinformationabout demo.
-Press CLICK button,usethe scrollwheeltoactivate
metronome. Use PAGE / buttontoadjust metronome
volume,tempo,timesignatureandsound.
-Tap tempo buttonatadesired ratetogetanewtempo.
You can alsochange the tempo byscrollwheelafteryou
presstempobutton.
-Dontneed the drumtrack inthe demosong? Simplypress
DRUMOFFbutton tomuteit.
TORECORDADRUMTRACK
- Pressthe recordbutton inKITmode,set the tempo for
recording,andpress the recordbutton againtostart
recording.
-UseStop orRecordbutton tofinish yourrecording.
-Whilesaving yourrecording,on the screen will show ”Save
thesongto”,usescrollwheeltolocatetheplaceforsaving,
and press Enter toconfirm.
-If you areinSONGmode,you canrecordalong withdemo
song.
TORESTORE FACTROYSETTINGS
- Press SETUP, and use PAGE / button to locate RE-
SETmenu.
- Use scrollwheel to select what you want to restore.
Kits: Initialize allthe kits, including user kits.
Settings: Initialize allsystem settings.
Xtalk: Initialize cross talkto default.
Songs: Initialize all usersongs.
All: Initialize everything to factory settings.
-Press ENTER toconfirm. ThescreenwillshowRESETOK.
-Reboot the module tocomplete.
BASICOPERATION
SETUP
RESET Kits
----ResetOK----
--------------------
SONG1204/4
01WalkWithTree
SongNumber
Playing statusTempo
Song Name
TimeSignature
11

SETUP
BACKVOLUME53
SETUP
PressontheSETUPbuttontoadvancetosystemsettings.
Use PAGE / button toselect an item toset.
If theitem withblinkingparameter, use thescroll wheelto
change it directly.If the itemhas [ENTER]markafter, press
theENTERtoenterthe sub-menu forfurther options.
Aftersetting, press the EXITtoexitand thescreen shows
“Save Setup”. Press the ENTER tosave orpresstheEXIT
togive up.
Allitemscanbe setup are:
BACKVOLUME
Controlsthevolume ofdemo songsandloops.
MASTERTUNE
Controlstheoverall pitch.It isA4,440Hzby default.
LOCAL
Decides whether the moduleread the sound files ornot. If
switched toOFF,the sound modulewill function as amidi
drum,whichproduce no sound butsendmidimessages.
Tip
If youwanttoconnectthe soundmoduleto
computerforgaming orusingdrumplug-ins,switchLOCAL
toOFF will lower latency.
SETUP
MIDI SET[ENTER]
Change parameterdirectly
PressENTERto enterthesub-menu
SETUP
BACK VOLUME53
SETUP
MASTER TUNE 0
SETUP
LOCAL ON
12

TOM1ADV
Headroom87
TOM1ADV
SenseTime 50
TOM1ADV
TriggerLinear
ADVANCEDSETTINGS
Includes all the physical settings for pads/triggers.
- Sensitivity: Thehigherthevalue is, theeasieritwillbeto
trigger. Butifthisvalue istoohigh,will cause somecrosstalk
problems.
- Headroom: Setthevelocitydynamicrange.Thisvalueis
thevelocityneededtogetmaxvolume,sothelowerthe
value is,theeasiertogetloudersounds.
- SenseTime: Setsthe interval between twotriggering. In-
creasethisvaluebycertainamount mayavoidbeingtrig-
gered multipletimesbyvibrationinveryshort time.
-Trigger: Setsthevelocitycurveforpads,including Linear,
EXP1&2,LOG1&2andSpline. Refertothe following
diagram, onhorizontalisthevelocityyoustrike,andonver-
ticalisthe volumeafter processedby the trigger curve.
-Xtalk: Setsthe crosstalkforpads.Use max powertostrike
apadrepeatedlyuntilthescreenshowsOK,and then
TOM1ADV
Sensitivity77
SETUP
ADVANCE[ENTER]
Vol-
ume
Vol-
ume
Vol-
ume
Vol-
ume
LinearExp Log Spline
Strength Strength
Strength Strength
Diagram of 4types of the velocitycurve
SETUP
TOM1ADV
Note Send 48
change toanotherpadand repeattheprocedure.Velocity
dataonother padswill beloadedautomaticallyforreference
inorder toavoidcrosstalk.
-NoteSend: SettheMIDI noteforeachtrigger.Whenthe
midinoteisdifferentbetweenthismoduleand other sound
sources, byadjustingthisvaluetheycanbeeasilymatched.
TOM1ADV
XtalkAuto
13

Pedal
Pedal Vel. 60
-RimVelocity: Rim velocitycorrectionoptionwill appear
when you strike on the rimoredge parts.The higherthe
value is, thelouder itwillbecome. Cymbaledgesarealso
included inthissetting.
-PedalVel.: Decidesthevelocitytriggeredbyhi-hatpedal.
Thehigherthe valueis,the louderPedal ChickandPedal
Splash sounds you get.
- Calib: Calibration forthe pedalrange. Select thisoption,
press downtothe floorand then releasethe pedal slowly.
Repeatthe procedureseveraltimestogetmoreprecise
rangeandfinishthecalibration.
-Spilt Point: Setsthe velocitysplitpoint ofSnareRim&
X-Stick. If you playthe snarerimsofterthan thisvalue, it
will trigger cross stick sound. Above that value it will
triggerrimshotsound.
Note
Someuniquesettings,suchandRim
Velocity, SpiltPoint.,Pedal Vel., Calibandetc.,theywill ap-
pearonlyifthe matching part isstruck.Or you can find them
using DRUMbutton.
Tip
UseDRUMPADbuttoncanswitch between
triggersquicklyinSETUP menu.
RESET: Restoretofactorysettings.It isstronglyrecom-
mendedtorebootthesoundmoduleafterresetincompleted,
in ordertoavoid some unexpected behavior.
Kits: Initialize all the kits, including user kits.
Settings: Initialize allsystem settings.
Xtalk: Initialize cross talk to defaultvalue.
Songs: Initialize alluser songs..
All: Initialize everything to factory settings.
TOM1-RimADV
RimVelocity 50
Pedal
Calib751-3900
SETUP
RESET Kits
SETUP
SNARE-X-StickADV
Split Point 50
14

DRUMKIT EDIT
First,selectakit forediting.PressontheEDITbutton to
enterdrumkit editmenu.Thereare6itemsavailableforkit
editing.
Thechapter<BASICOPERATION>instructshowtoen-
tertheEditmode,selectpartand itemindetails;thischap-
teroffersmoreinformation.
VOICETYPE: Selectthecategoryofthevoice, including
KICK,SNARE,TOM,RIDE,CRASH, HIHAT,PERC
(Percussions and FXs), METRO(Metronome), --- (Blank).
Note
Select “---”forPedalSplash if youdon t
needit.
VOICE: Select avoiceinitscategory.Createyour ownkit
withvoices you like.
Note
Forhi-hatsdon thave amatching Half-
Open sound,pleasesettheHalfOpenvoice the sameto
HIHAT-Open sound.
VOLUME: Adjustthe volumeof currenttrigger. Thehigher
thevolume,thelouderitwill be.
REVERB: Adjust the reverblevelofcurrent trigger.
PITCH: Adjustthepitchofcurrenttrigger,measuredinsemi-
tones.
PAN: Adjustthe panning ofcurrenttrigger.Minusvalue
standsforleft and0standsformiddleposition.
Tip
Use DRUMPAD buttoncan switchbetween
triggersquicklyinEDITmenu.
Note
FordrumkitsettingsinEDITmenu,each
settingaffectsonetrigger. Formulti-triggeringpads,they
may have many triggers.For example, snarehead, snare
rimandsnareX-stickcan have differentvolumesettings.
SNARE-Rim
VOICETYPESNARE
Editableparametr
Part toedit
SNARE-Rim
VOLUME80
SNARE-Rim
VOICE RockR
SNARE-Rim
VOICETYPESNARE
Itemname
SNARE-Rim
PAN 25
SNARE-Rim
PITCH 0
SNARE-Rim
REVERB 120
15

Seetothe picturebelow fortriggernames:
DRUMKIT EDIT
HIHAT-Open
HIHAT-Close
HIHAT-HalfOpen
CRASH
RIDE
SNARE-Rim
SNARE-X-Stick
PEDAL-Chick
PEDAL-Splash
TOM3
CRASH-Edge
TOM2
SNARE-Head
TOM1
16
KICK
Table of contents
Other HXM Drum manuals