Hydreon RG-9 User manual

Hydreon Rain Gauge Model RG-9
Visit our product page for updated documentation and technical
drawings: www.rainsensors.com/rg-9
Installation and Mounting
1. Set DIP switches.
2. Mount the Rain Gauge
Mount the rain Gauge where it gets a clear measurement of
precipitation– away from overhangs, etc. The mounting arm is
designed to fit over a strap 0.75” (19 mm) wide. Two holes 0.25”
(6.35 mm) are placed 0.75” (19 mm) apart. The gland style
connector goes in the bottom hole. Be sure to use wire rated for
outdoor (high-UV) use. For conduit applications, the mounting arm
may be removed, and the wiring hole drilled out using a step drill
to accommodate a ½” EMT compression connector or similar style
of conduit connector.
3. Assemble the Rain Gauge as shown above. The silicone O-ring
fits nicely in the lens groove, but it can fall or slip out during
assembly. After the unit is assembled, visually verify that the
O-ring is properly seated all the way around.
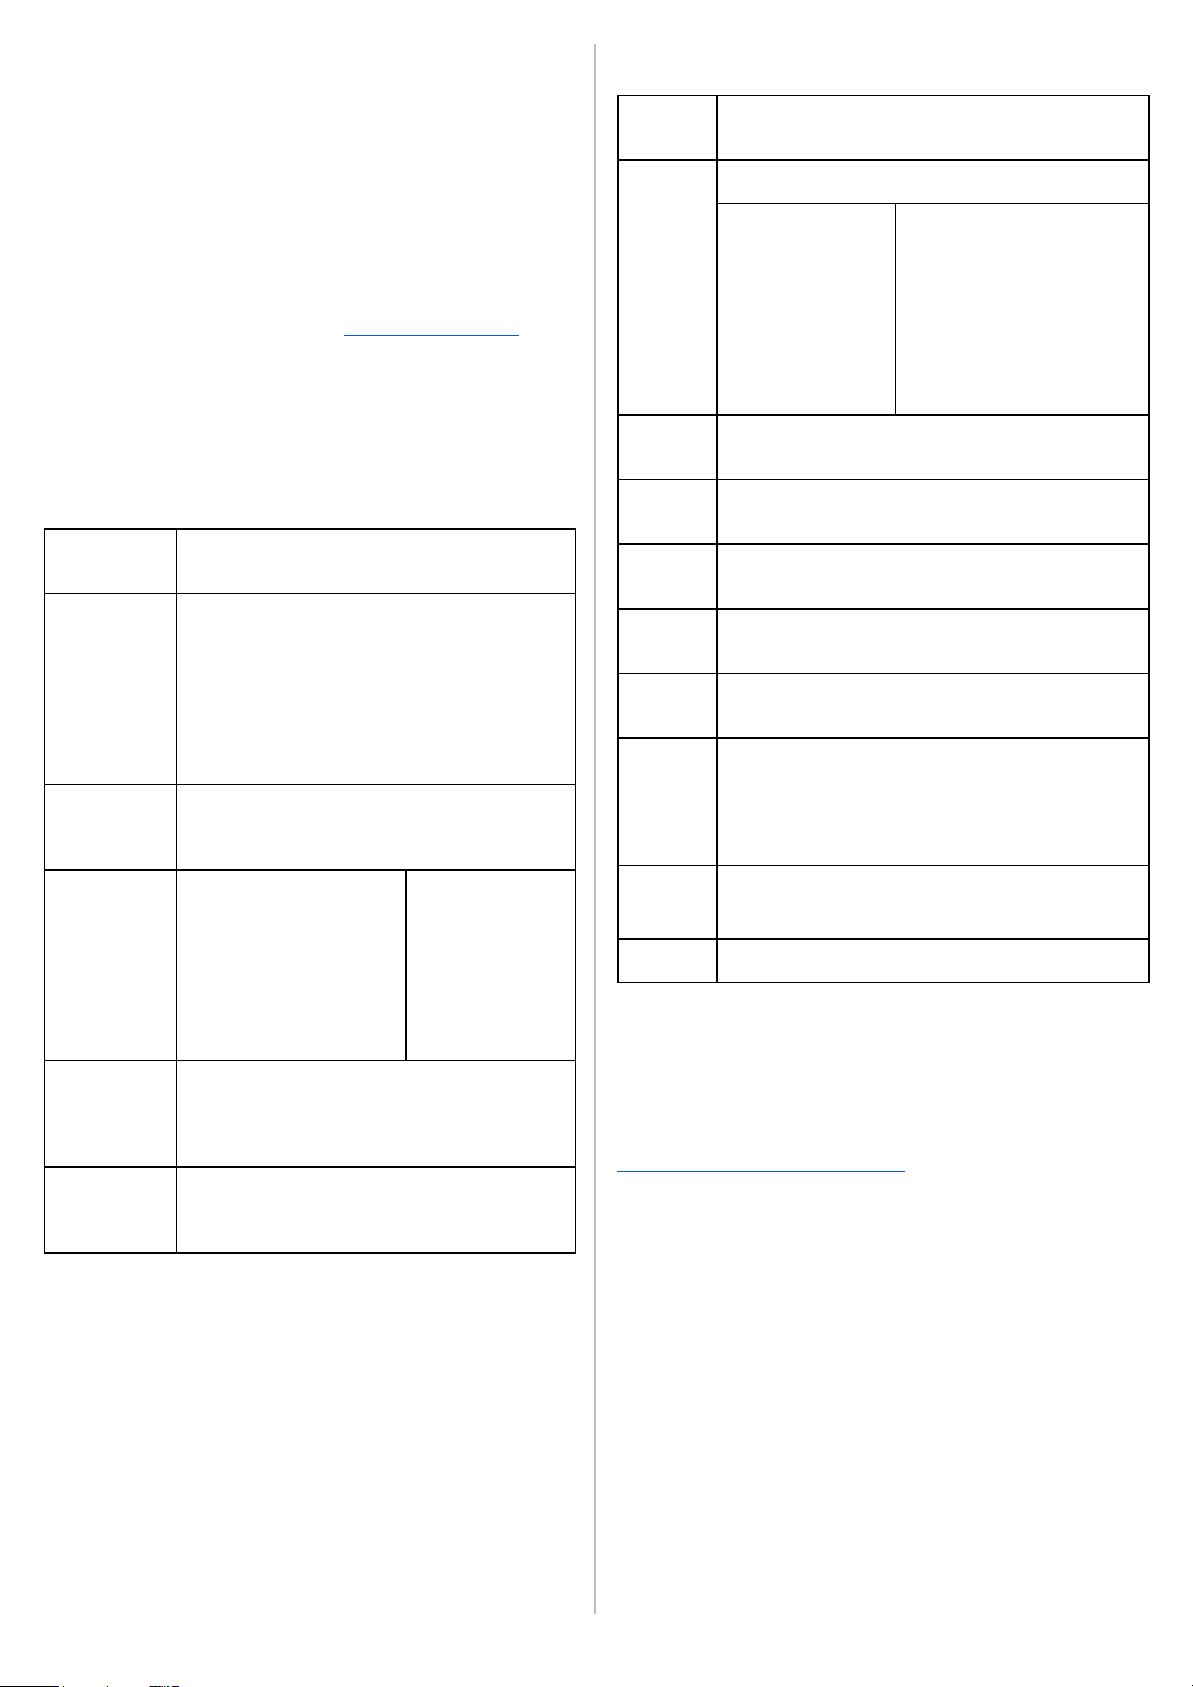
Specifications
Parameter
Value
Input Voltage
Range 5-16 VDC on J1
Reverse polarity protected to 50V
Alternative
3.3V though pin 8 on J2. Note if this isn’t
a stable supply it could induce false
indications or affect accuracy. An
overvoltage to this pin will destroy the
device.
Current Drain
110 μA nominal. (No outputs on, dry not
raining)
2-4 mA when raining
Output
NPN Open Collector Output
100 mA / 80V Max
Operating
Temperature range
-40°C to +60°C
LED
The LED in the center of the circuit board turns on at power up
and when OUT is on, as an aid to debugging.
On power up:
3 Flashes => Normal Power Up
4 Flashes => Lens is not very transmissive, but can still run at a
reduced accuracy
5 Flashes => The Lens is not able to get sufficient light through for
reasonable readings, it will still try to run but at a significantly
reduced accuracy. This will also print a LensBad message to the
Serial interface.
J1 Connector
OUT - Open Collector Output, Pulled to ground during rain event
V+ - Input Voltage, 5 - 16 VDC
GND - Ground
J2 Connector
J2 is a pin-field on 0.1” centers, used for Serial communication,
and optionally powering the RG-9.
Connector field is 0.025” square pins on 0.1” centers. An example
compatible connector is Molex part number 22-01-3067. This is
available from Digi-Key as part number WM2004-ND. The
necessary crimp-on wire terminals are Molex 08-55-0131 /
DigiKey WM4591-ND.
J2 Pin assignments
1 - GND, Same as J1 GND
2 - V+ 5-16V, Same as J1 V+
3 - OUT, Same as J1 OUT
4 - Serial OUT
5 - Serial IN
6 -
7 - MCLR
8 - V+ 3.3V
DIP Switches
1 = On, 0 = Off
Switch
Behavior
1
2
3
4
0
0
Sensitivity 1 (Rain Drops)
0
1
Sensitivity 2 (Very Light)
1
0
Sensitivity 4 (Medium)
1
1
Sensitivity 6 (Heavy)
0
0
Monostable Extend - None
0
1
Monostable Extend - 5 min
1
0
Monostable Extend - 10 min
1
1
Monostable Extend - 15 min
Rain Gauge Model RG-9 Instructions Manual for SW rev 1.000
Sensitivity
This is a qualitative value relative to other intensities.
Monostable Extend
This extends the Open Collector output to hold for X mins after the
intensity has ended.
Accuracy
We do not claim an accuracy spec for the RG-9.
Maintenance
This is designed to be a low maintenance rain gauge. After
several years (typically 7-10) the lens will need to be replaced.
Replacement lenses are available on www.rainsensors.com.
RS232 Communication
The RG-9 supports communication through 3.3V TTL Serial
(RS232).
All lines are terminated with a carriage return followed by a new
line, this is used for all output. But only the new line is required for
commands. The command is processed following the new line.
Cmd (case
insensitive)
Description, example response
R
Read available data.
Responses:
“R 0”
“R 1”
“R 0 TooCold”
TooCold = appended to message if it is too
cold to reliably sense, this will also set the R
value to 0.
K
(Kill) Restarts the device, this will output the
header, readjust the emitters and read the DIP
switches again.
B <baud
Code>
Set the baud rate, if none
is specified responds with
the current baud rate.
Response:
“Baud <baud rate>”
sent just before it is
changed
Ex: “Baud 9600”
Baud Codes:
0 = 1200
1 = 2400
2 = 4800
3 = 9600 (Default)
4 = 19200
5 = 38400
6 = 57600
P
Set to polling only mode, outputs a new R
message only when requested by the ‘R’
command.
Response: “p”
C
Set to continuous mode, outputs a new R
message when the intensity changes.
Response: “c”
Sensitivity Levels
Sensitivity 0 (None)
Sensitivity 1 (Rain Drops)
Sensitivity 2 (Very Light)
Sensitivity 3 (Medium Light)
Sensitivity 4 (Medium)
Sensitivity 5 (Medium Heavy)
Sensitivity 6 (Heavy)
Sensitivity 7 (Violent)
The output keywords can be comma delimited such as
“Emitters 9 10, Emtotal 19”, with a space following the comma.
Output
Keyword
Description, example output
Reset
Shows the reason the device was reset.
Possible variations:
Reset N
Reset M
Reset W
Reset O
Reset U
Reset B
Reset D
N = Normal Power Up
M = MCLR
W = Watchdog Timer Reset
O = Stack Overflow
U = Stack Underflow
B = Brownout (Low Voltage/
disconnected)
D = Other
SW
Firmware version & build date
Ex: SW 1.000 2020.06.05
Emitters
Emitter 1 & 2 Levels
Ex: Emitters 9 10
EmTotal
Sum of emitters
Ex: EmTotal 19
DIP
DIP Switch positions 1234
Ex: DIP 1010
PwrDays
How many days the device has been powered on
Ex: PwrDays 13
;
The semicolon is used to indicate that this line
doesn’t include any data, this is not always
followed by a space.
;*********************************************************
; HYDREON MODEL RG-9 RAIN GAUGE
LensBad
The Lens is not able to get sufficient light through
for reasonable readings.
EmSat
Emitter is saturated. Can be useful for diagnostics.
SAFETY, LIMITS OF RAIN GAUGE LIABILITY,
AND WARRANTY
Only the rain sensor is covered-- absolutely no consequential
damages. If this policy is unacceptable in your installation, do not
use the RG-9. Full policy can be found at
www.rainsensors.com/rg-9-warranty.
Apply engineering judgment: Hydreon does not claim the RG-9 is
a perfect rain sensor. It is what it is, and senses what it senses.
CASE and COSMETIC POLICY
Some amount of yellowing or discoloration of the case is
considered normal cosmetic aging of the device, and sensors so
affected will not be replaced under warranty. Tiny cracks or
crazing within the lens is also considered cosmetic, and units so
affected will be replaced only if they are deemed by Hydreon
corporation to be considered to be of a functional nature.
Rain Gauge Model RG-9 Instructions Manual for SW rev 1.000
Other Hydreon Accessories manuals


