manuals.online logo
Brands
  1. Home
  2. •
  3. Brands
  4. •
  5. hylite
  6. •
  7. Heater
  8. •
  9. hylite SLIMLINE ECO HEATER User manual

hylite SLIMLINE ECO HEATER User manual

Assembly & Fitting Instructions
Hylite tries to improve its products for the benefit of its
customers. For this reason we reserve the right to make
changes to any product at any time without notice.
Please note that this equipment and its components have
no user serviceable parts. If you experience any difficulties
installing this product please call our helpline or write to
F4 Enterprises Limited.
F4 Enterprises Limited
7 Abbey Square, Chester
CH1 2HU.
Tel: 01352 736120
www.f4enterprises.co.uk
SLIMLINE ECO HEATER
WITH BUILT-IN
THERMOSTAT
• Ensure the power cable is pushed fully into the heaters power socket before
switching power on.
• Turn the thermostat knob in a clockwise
direction until it reaches the maximum
setting (Fig.8).
• When the room has reached the desired
temperature, turn the thermostat knob
in an anti-clockwise direction just until
the appliance switches off (amber yellow light goes out)
and not beyond.
• The temperature will then be regulated and kept at a constant level by the thermostat.
• The heater is fitted with a safety device which will switch off the heater in case of accidental
overheating (please see safety notes).
• To reset, disconnect the heater from the power source for a few minutes to allow the unit
to cool down.
• Make sure that any causes of overheating, such as obstructions, are removed and plug the
appliance in again.
• DO NOT DIRECTLY EXPOSE TO WATER
2. OPERATION
Fig.8
70mm
95mm
A
PLEASE READ THESE INSTRUCTIONS CAREFULLY BEFORE ATTEMPTING TO INSTALL AND OPERATE THIS
HEATER
WHILST MEETING THE REQUIREMENTS OF BS:EN90335-2-30, THE SURFACE OF THIS TUBULAR
HEATER CAN STILL GET HOT. IT IS THEREFORE RECOMMENDED THAT THE AGED, INFIRM,
CHILDREN AND ANIMALS ARE NOT LEFT UNSUPERVISED IN THE VICINITY OF THE HEATER UNLESS
A SUITABLE GUARD IS FITTED.
DUE TO THE HIGH SURFACE TEMPERATURES, IT IS ESSENTIAL THAT COMBUSTIBLE OR FLAMMABLE
OBJECTS SUCH AS FABRICS OR CLOTHING DO NOT COME INTO CONTACT WITH THE HEATER.
IF A TUBULAR HEATER IS TO BE INSTALLED IN A PLACE USED BY THE PUBLIC A WARNING NOTE
SHOULD BE PLACED ADJACENT TO THE HEATER AVISING THAT THE SURFACE IS HOT.
ENSURE THE POWER CORD IS PUSHED FULLY INTO THE POWER SOCKET IN THE HEATER WHEN IN
OPERATION. IF THE CORD IS DAMAGED DISCONTINUE USING THE PRODUCT AND CONTACT
THE MANUFACTURER FOR FURTHER INSTRUCTIONS.
ALWAYS SWITCH THE HEATER OFF AT THE MAINS WHEN NOT IN USE AND ENSURE THE POWER CORD
IS NOT IN CONTACT WITH THE SURFACE OF THE HEATER.
THE HEATER MUST ALWAYS BE POSITIONED HORIZONTALLY USING THE MOUNTING BRACKETS
SUPPLIED AND ALLOWING FREE MOVEMENT OF AIR AROUND THE HEATER. DO NOT COVER THE
HEATER AS THIS MAY CAUSE OVERHEATING.
THE HEATER IS WATER RESISTANT (IPX4 RATED) AND IS SUITABLE FOR USE IN LOFTS, GARAGES,
UTILITY ROOMS, AIRING CUPBOARDS, SHEDS, DISPLAY WINDOWS ETC. HOWEVER IT IS NOT
WATERPROOF AND SHOULD NOT BE USED IN ENVIRONMENTS WHERE CONTINUOUS OR EXCESSIVE
WATER-SPRAYING MAY OCCUR.
DO NOT USE THE HEATER IN BATHROOMS, SHOWERS OR SWIMMING POOLS.
IMPORTANT SAFETY INSTRUCTIONS
IMPORTANT SAFETY ADVICE
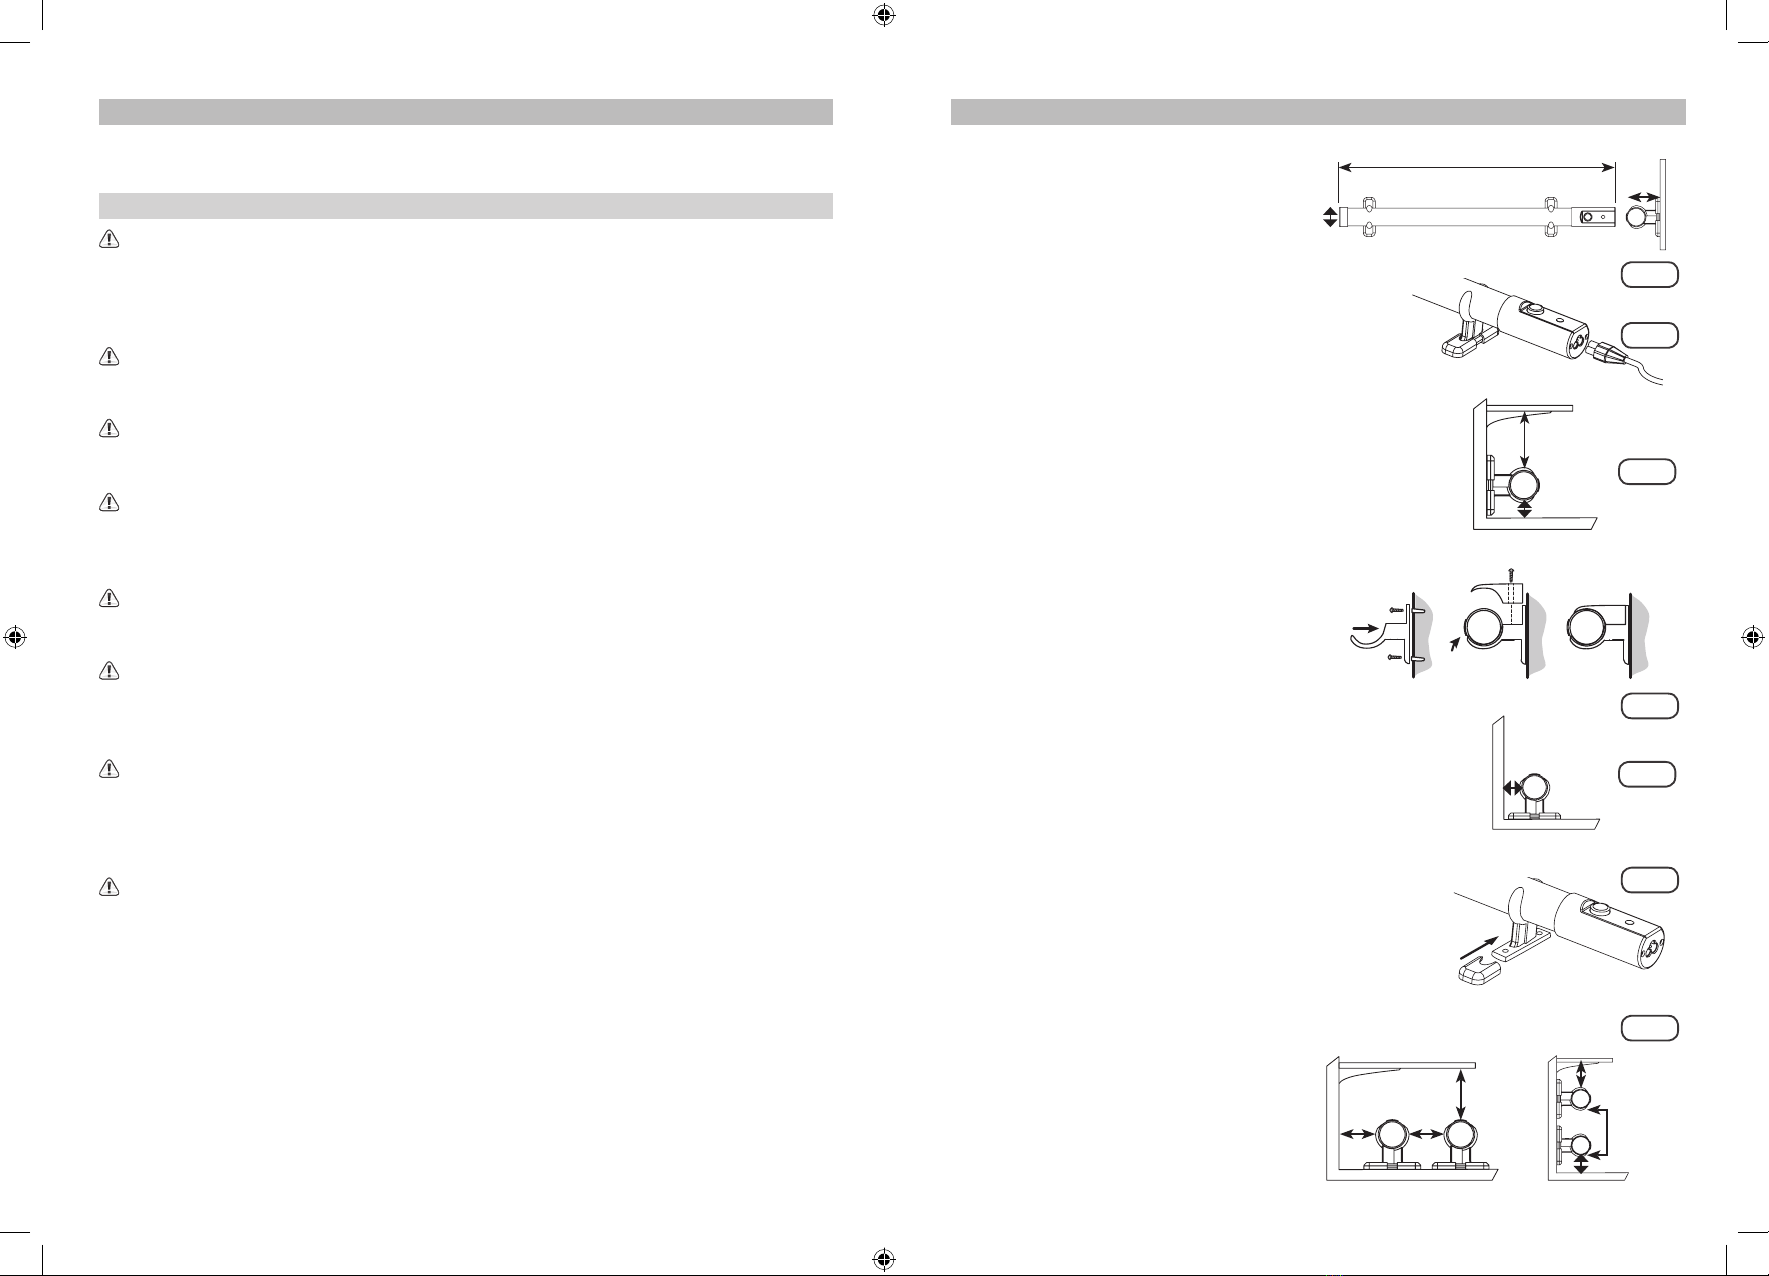
IMPORTANT: The heater should only be
operated in the horizontal plane, using
the mounting brackets provided.
• Dimensions of the heaters are shown
in Fig.1.
Wattage A
55 500mm
120 1000mm
190 1500mm
• Before installing the heater it is recommended
that the power cable is attached by pushing it
fully into the heaters power cable socket (Fig.2).
IMPORTANT: The heater should be installed and operated
in the horizontal plane, using the mounting brackets
provided.
IF FITTING TO A WALL
• Follow minimum clearances below and above
the heater as shown in Fig.3
• Once a suitable location has been found, screw
the two bottom halves of the bracket to the wall
(Fig.4)
• Place the Eco Heater on the brackets and then
fasten top part of the brackets over tube to secure.
DO NOT SWITCH ON THE HEATER
UNTIL IT IS SECURED.
FIXING TO A FLOOR OR OPERATING
THE HEATER FREESTANDING.
• Follow the minimum clearances
around the heater as shown in Fig.5.
• If operating as a freestanding heater,
fix brackets along the length of the heater
to adequately support the unit and ensure
it is stable.
• Attach rubber boots to the feet of the
bracket (Fig.6) to increase stability.
INSTALLING MORE THAN ONE HEATER
• Minimum clearances as shown in Fig.7
must be observed when the heater
is in use.
1. INSTALLING THE SLIMLINE ECO HEATER
Fig.6
Fig.7
Fig.2
Fig.1
Fig.3
50mm min.
30mm min.
50mm min.
30mm min.
175mm
min.
30mm min.
Floor Mounting
Wall Mounting
30mm min.
200mm min.
Fig.5
Fig.4

Other hylite Heater manuals

hylite SLTH030 User manual

hylite

hylite SLTH030 User manual

hylite IP55 User manual

hylite

hylite IP55 User manual

hylite HHT010 User manual

hylite

hylite HHT010 User manual

Popular Heater manuals by other brands

L.B. White I17 Owner's manual and instructions

L.B. White

L.B. White I17 Owner's manual and instructions

Soleus Air MS-14R owner's manual

Soleus Air

Soleus Air MS-14R owner's manual

EnergoLine EL200 Mounting and installation

EnergoLine

EnergoLine EL200 Mounting and installation

TREVIDEA G3 FERRARI TEPOR user manual

TREVIDEA

TREVIDEA G3 FERRARI TEPOR user manual

SMARTFOX Pro Heater 6K Installation & operating instructions

SMARTFOX

SMARTFOX Pro Heater 6K Installation & operating instructions

Heatlight HLWA15-LV Series instructions

Heatlight

Heatlight HLWA15-LV Series instructions

Sinus Jevi SR-8600 manual

Sinus Jevi

Sinus Jevi SR-8600 manual

USSC Nashua 3600PB owner's manual

USSC

USSC Nashua 3600PB owner's manual

Easylife EL6755 instruction manual

Easylife

Easylife EL6755 instruction manual

VEAB BX 20E User instructions

VEAB

VEAB BX 20E User instructions

Nordson SCH-1 product manual

Nordson

Nordson SCH-1 product manual

Finlux FCH-1820 BG manual

Finlux

Finlux FCH-1820 BG manual

ARDES AR4W08P Instructions for use

ARDES

ARDES AR4W08P Instructions for use

ARDES AR4R09BTT Instructions for use

ARDES

ARDES AR4R09BTT Instructions for use

Beurer IL 50 Instructions for use

Beurer

Beurer IL 50 Instructions for use

Thermix KPH 1300-B Installation & user guide

Thermix

Thermix KPH 1300-B Installation & user guide

solamagic S1 Installation and instruction manual

solamagic

solamagic S1 Installation and instruction manual

EOS P1 W Installation and operation manual

EOS

EOS P1 W Installation and operation manual

manuals.online logo
manuals.online logoBrands
  • About & Mission
  • Contact us
  • Privacy Policy
  • Terms and Conditions

Copyright 2025 Manuals.Online. All Rights Reserved.