hylite IP55 User manual

Assembly & Fitting Instructions
Hylite tries to improve its products for the benefit
of its customers. For this reason we reserve the
right to make changes to any product at any time
without notice.
Please note that this equipment and its
components have no user serviceable parts.
If you experience any difficulties installing this
product please call our helpline or write to
F4 Enterprises Limited.
F4 Enterprises Limited
Unit 40, Manor Industrial Estate,
Flint, Flintshire
CH6 5UY.
Tel: 01352 736120
www.f4enterprises.co.uk
ECO HEATER
IP55 RATED
• Wiping over with a damp cloth and finishing with a soft dry cloth can maintain the finish
of your Hylite Eco Heater
• Cleaning should only be carried out when tube is cold and switched off.
• DO NOT use abrasive cleaning powders or metal polish on any part of the tube.
3. CARE AND MAINTENACE
PLEASE READ THESE INSTRUCTIONS CAREFULLY BEFORE ATTEMPTING TO INSTALL AND OPERATE THIS
HEATER
WHILST MEETING THE REQUIREMENTS OF BS:EN90335-2-30, THE SURFACE OF THIS TUBULAR
HEATER CAN STILL GET HOT. IT IS THEREFORE RECOMMENDED THAT THE AGED, INFIRM,
CHILDREN AND ANIMALS ARE NOT LEFT UNSUPERVISED IN THE VICINITY OF THE HEATER UNLESS
A SUITABLE GUARD IS FITTED.
DUE TO THE HIGH SURFACE TEMPERATURES, IT IS ESSENTIAL THAT COMBUSTIBLE OR FLAMMABLE
OBJECTS SUCH AS FABRICS OR CLOTHING DO NOT COME INTO CONTACT WITH THE HEATER.
IF A TUBULAR HEATER IS TO BE INSTALLED IN A PLACE USED BY THE PUBLIC A WARNING NOTE
SHOULD BE PLACED ADJACENT TO THE HEATER AVISING THAT THE SURFACE IS HOT.
ENSURE THE POWER CORD IS PUSHED FULLY INTO THE POWER SOCKET IN THE HEATER WHEN IN
OPERATION. IF THE CORD IS DAMAGED DISCONTINUE USING THE PRODUCT AND CONTACT
THE MANUFACTURER FOR FURTHER INSTRUCTIONS.
ALWAYS SWITCH THE HEATER OFF AT THE MAINS WHEN NOT IN USE AND ENSURE THE POWER CORD
IS NOT IN CONTACT WITH THE SURFACE OF THE HEATER.
THE HEATER MUST ALWAYS BE POSITIONED HORIZONTALLY USING THE MOUNTING BRACKETS
SUPPLIED AND ALLOWING FREE MOVEMENT OF AIR AROUND THE HEATER. DO NOT COVER THE
HEATER AS THIS MAY CAUSE OVERHEATING.
THE HEATER HAS AN IP55 RATING FOR WATER RESISTANCE AND IS SUITABLE FOR USE IN LOFTS,
GARAGES, UTILITY ROOMS, CONSERVATORIES, GREENHOUSES, AIRING CUPBOARDS, SHEDS, DISPLAY
WINDOWS ETC. HOWEVER IT IS NOT WATERPROOF AND SHOULD NOT BE USED IN ENVIRONMENTS
WHERE CONTINUOUS OR EXCESSIVE WATER-SPRAYING MAY OCCUR.
DO NOT USE THE HEATER IN BATHROOMS, SHOWERS OR SWIMMING POOLS.
IMPORTANT SAFETY INSTRUCTIONS
IMPORTANT SAFETY ADVICE
IMPORTANT : THE HEATER SHOULD ONLY BE INSTALLED AND OPERATED IN THE HORIZONTAL PLANE,
USING THE MOUNTING BRACKETS PROVIDED. IT SHOULD BE MOUNTED TO A WALL AT LOW-LEVEL
AND NOT BELOW A SOCKET OUTLET
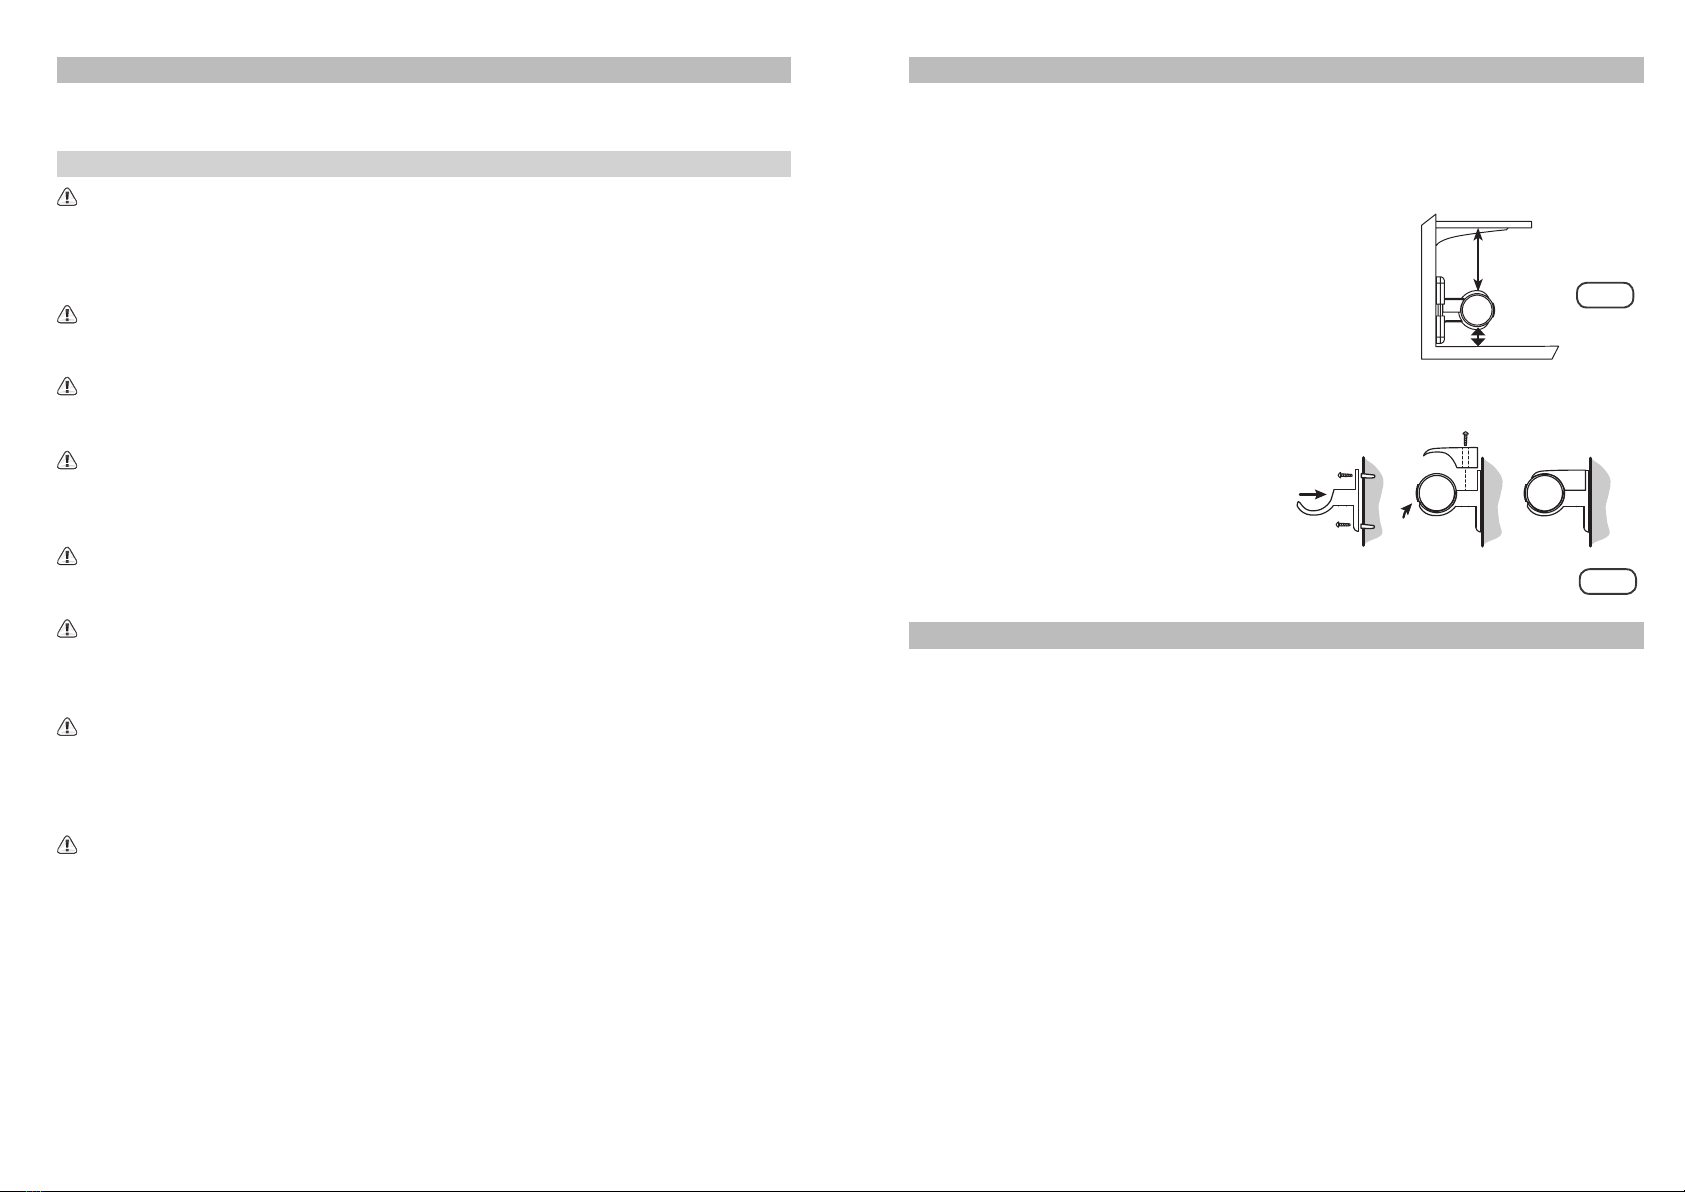
• Ensure that the Eco Heater is positioned at least 30mm
from floor level and that any shelving placed above the
heater is at a distance of at least 200mm (Fig.1)
• The fixing bracket should be mounted according
to the heater length and at a distance to adequately
support the Eco Heater.
• To attach to the wall, first screw the two bottom halves
of the bracket to the wall (Fig. 2)
• Then place the Eco Heater onto the brackets and fasten the top brackets
over the tube heater body, as shown.
NOTE: DO NOT SWITCH THE HEATER ON
UNTIL IT IS SECURED.
IMPORTANT: THE ELECTRICAL INSTALLATION OF THIS ECO HEATER MUST BE CARRIED OUT BY
A COMPETENT ELECTRICIAN, IN ACCORDANCE WITH THE CURRENT IEE REGULATIONS FOR ELECTRICAL
EQUIPMENT IN BUILDINGS
• The Eco Heater is suitable for operation on a 50Hz AC supply voltage as shown on the identity label.
• Before connecting the heater check that the supply voltage is the same as that stated on the identity label.
• The input wiring, if connected to fixed wiring, must have a fused double pole switch in the power circuit.
• After switching on the appliance for the first time the element will emit a vapour for approximately two
minutes. This is no cause for alarm, but is merely preservative burning out from the element.
• The unit is fitted with a safety device, which will automatically cut off the heat source should the unit
overheat. The heater will re-energise once the temperature has reduced to the desired level.
NOTE: THIS APPLIANCE MUST BE EARTHED.
1. INSTALLING THE ECO HEATER
Fig.1
Wall Mounting
30mm min.
200mm min.
Fig.2
2. ELECTRICAL
Other hylite Heater manuals


Popular Heater manuals by other brands

oventrop
oventrop Regucor Series quick start guide

Blaze King
Blaze King CLARITY CL2118.IPI.1 Operation & installation manual

ELMEKO
ELMEKO ML 150 Installation and operating manual

BN Thermic
BN Thermic 830T instructions

KING
KING K Series Installation, operation & maintenance instructions

Empire Comfort Systems
Empire Comfort Systems RH-50-5 Installation instructions and owner's manual


Empire Heating Systems
Empire Heating Systems WCC65 Installation and owner's instructions

Wetekom
Wetekom 92 86 43 Original instructions

Desa
Desa SPC170-F owner's manual

Watlow
Watlow Watrod Electric Tubular Heaters Specifications

Haverland
Haverland ECO-DRY GPS Series Instruction & installation manual

Stelpro
Stelpro ASILVC2060 Series user guide