manuals.online logo
Brands
  1. Home
  2. •
  3. Brands
  4. •
  5. hymatik
  6. •
  7. Jack
  8. •
  9. hymatik Compac A1,6T-77 User manual

hymatik Compac A1,6T-77 User manual

1/7
4986-(EN) BETJENINGSVEJLEDNING A16-77 A10 2018-12-17 R1 S12018-12-17 R1 S1
User guide & instructions for Compac
air-operated workshop jack
A1,6T-77 A10T-C
1600kg 10000kg
This user guide & instructions is
also available upon request
in other languages at no charge.
Before using the product:
Read and understand this
manual.
2/7
4986-(EN) BETJENINGSVEJLEDNING A16-77 A10 2018-12-17 R1 S12018-12-17 R1 S1
Thank you for choosing a Compac product.
Warranty:
A 3-year warranty is furnished with the product,
provided that the product is handled in accordance with
the directions below. Please see page 7 for complete
warranty information.
Note: Do not undertake constructive changes.
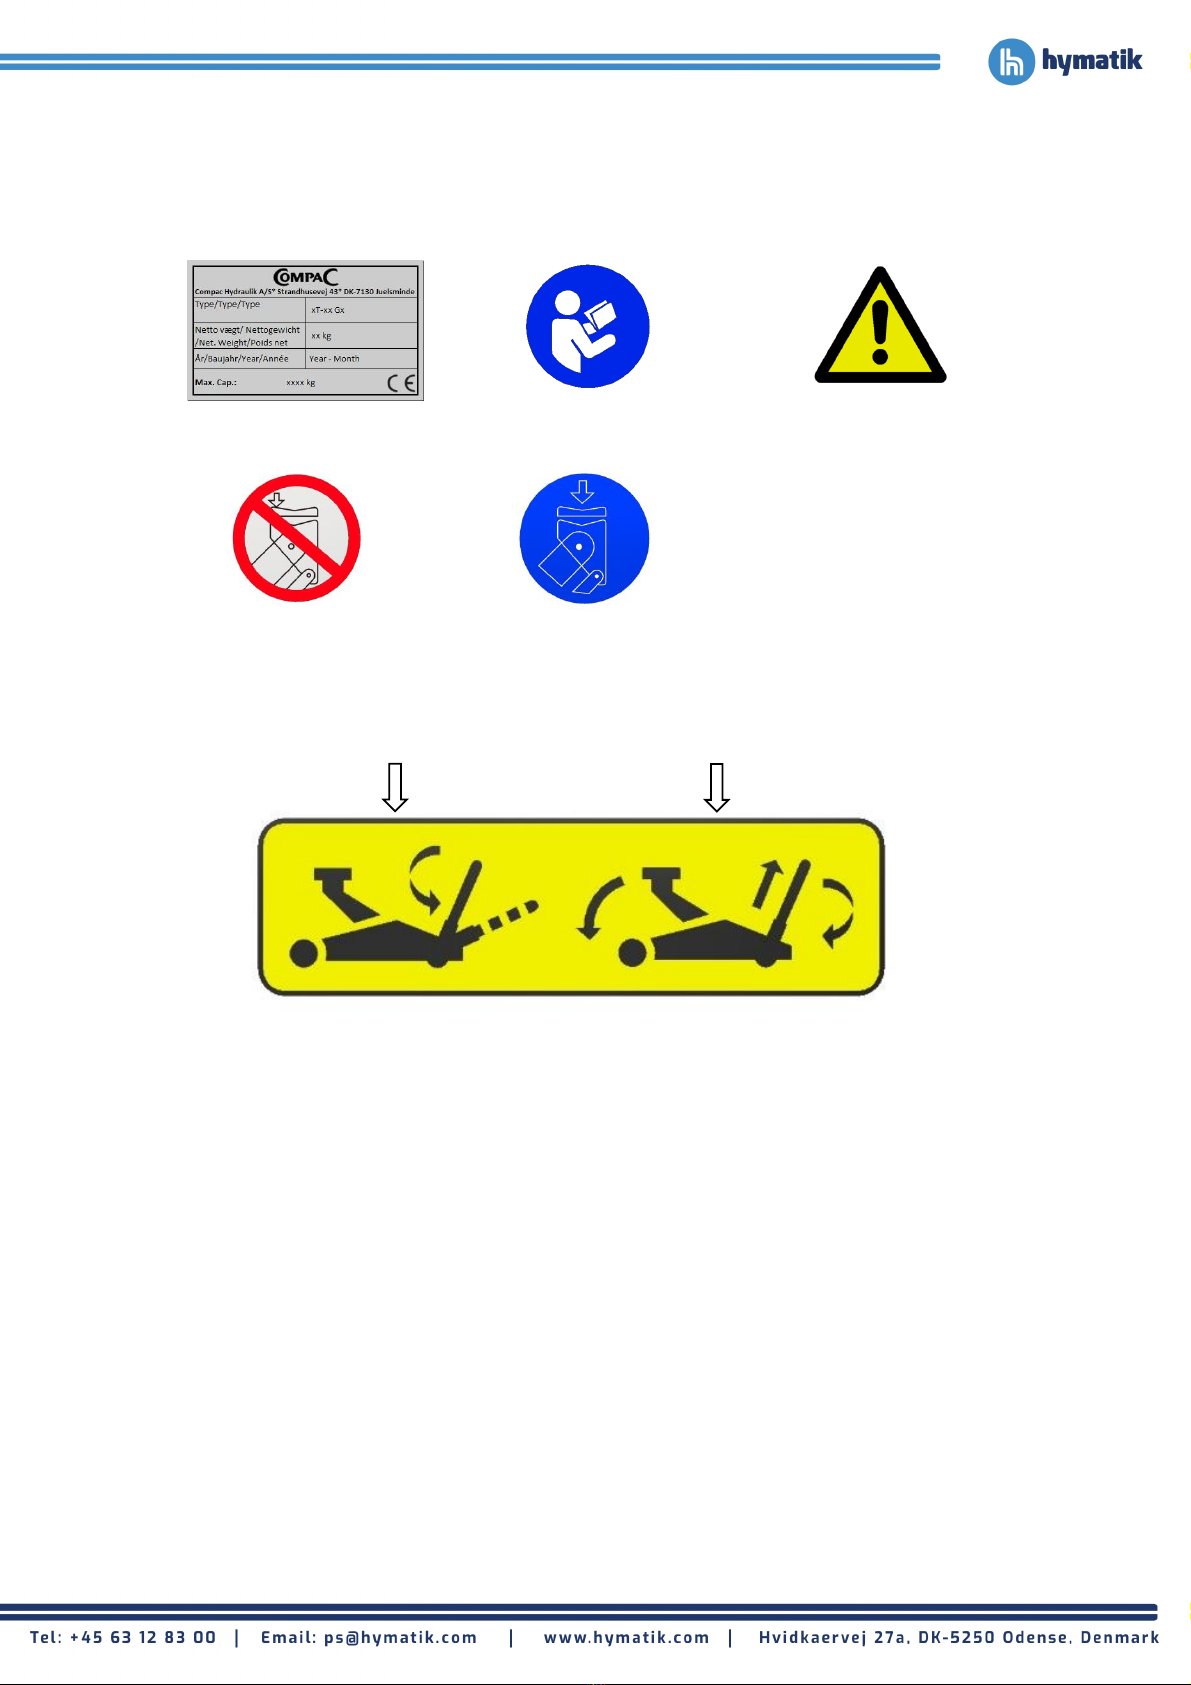
Cautions - safety measures
1. The jack must only be used by trained personnel who
have read and understood this manual.
2. Avoid overloading. The capacity must not be exceeded.
3. The jack must only be used on a horizontal, level and
structurally stable substrate.
4. The vehicle's wheels must be pointed forward and
braked or blocked.
5. The jack is solely a lifting tool. Always support the vehicle
with approved jack stands before working underneath the
vehicle.
6. Lift only at the vehicle's lifting points as prescribed by the
manufacturer, and only centrally on the saddle.
7. Being in, on or under a vehicle that is lifted or solely
supported by a jack is forbidden.
8. The jack may be used with a maximum of 1 standard
extension piece.
9. The jack - including the pressure relief valve - must not
be modified.
10. Maximum allowable air pressure: 10 bar/145 psi,
minimum 300l/min.
11. Min. distance to walls min. 0.5m wrt/ emergency
escape routes.
12. Lacking compliance with these warnings can cause the
load to fall down or the jack to malfunction, which may
result in personal injuries or material damage.
The jack must only be used from -5° to + 40°
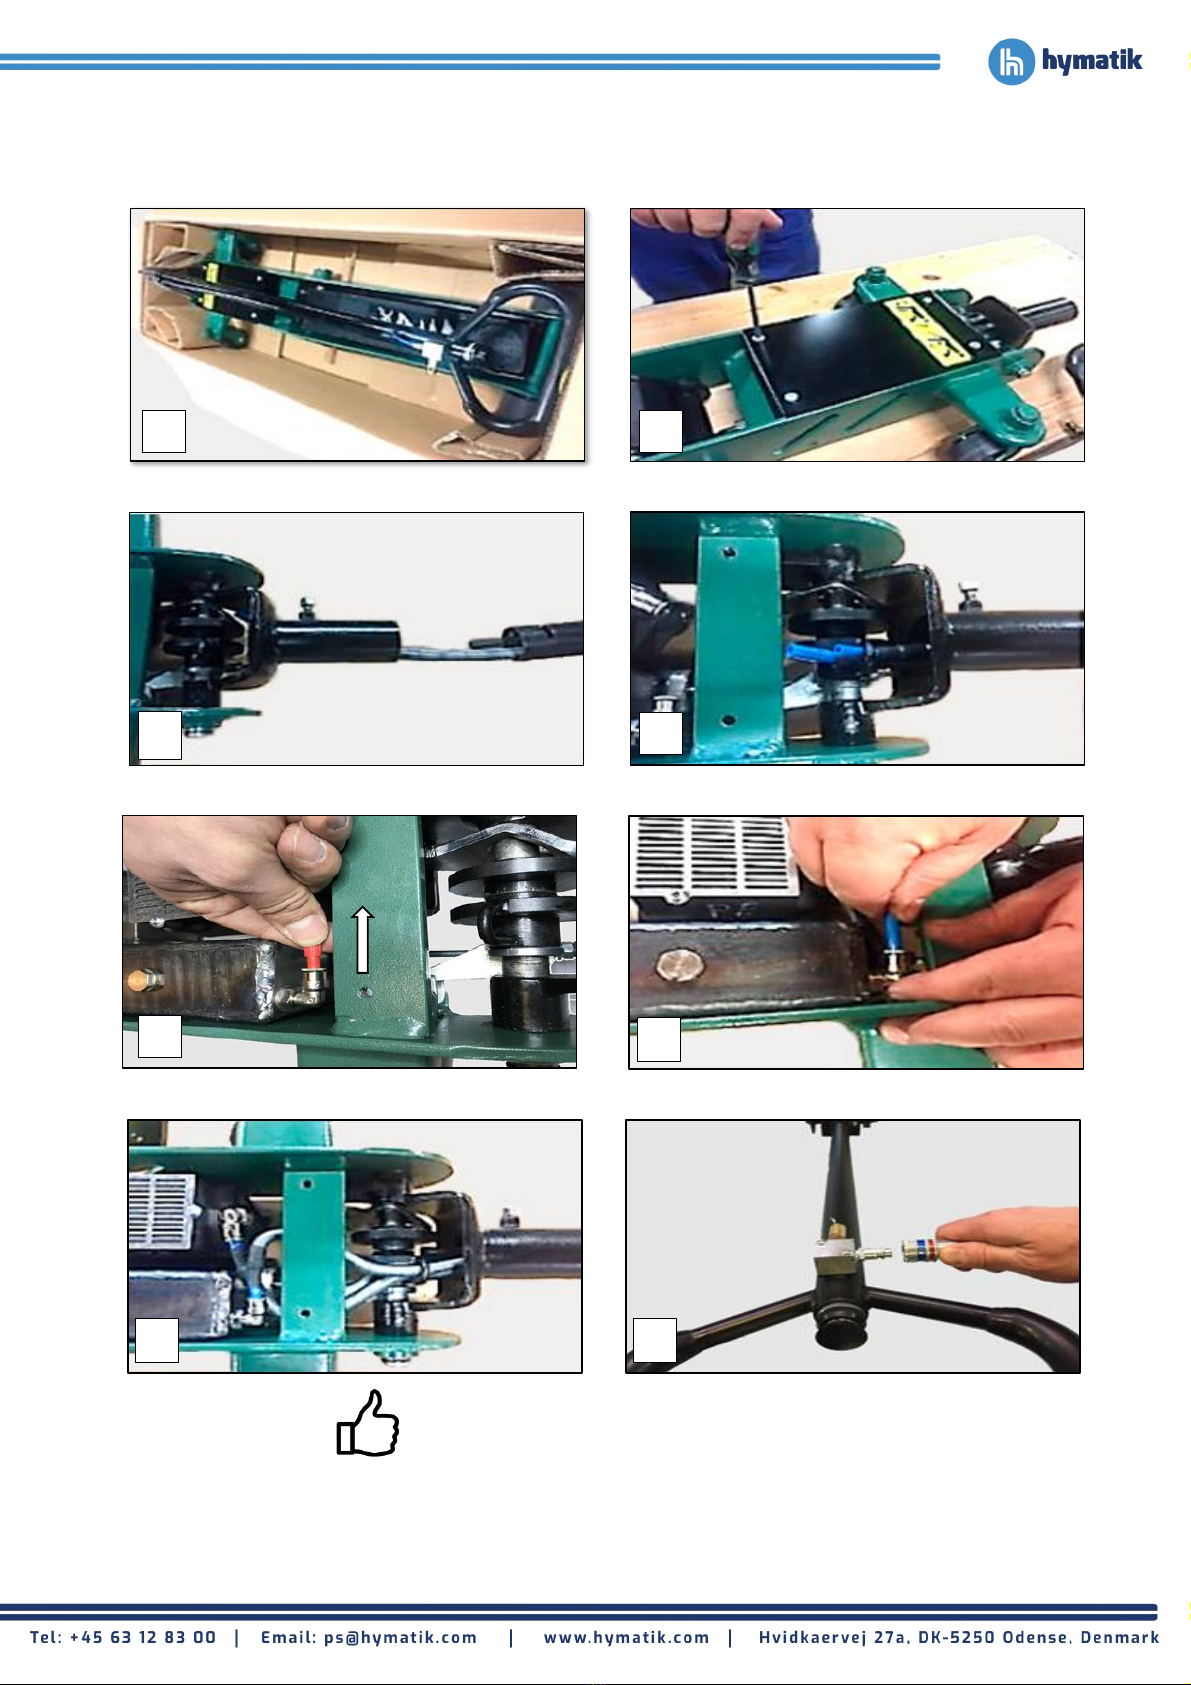
Mounting: See page 3
For mounting of joystick, see picture (1-7).
IMPORTANT: The hoses must go through the eye at the pull
handle head, large hose at the bottom and small hose at
the top (see picture 4). Remove the red plug (see picture 5).
CAUTION:
Before placement into service and subsequently at periodic
intervals, lubricate all movable parts with oil. Air
connection: 1/8”RG (see picture 7). Full capacity is achieved
from 8 bar. Maximum air pressure :10 bar/145 psi.
Operating manual:
Transport and store the jack standing on its wheels.
Raising: Press on the operating valve at the top of the
handle (see picture 11), the pump will start, and the jack
will rise.
Lowering: Pull the handle up and turn it clockwise (see
picture 12.13).
The handle can be set in 3 different positions (see picture
8-10) by turning the handle clockwise and tilting it up or
down to the desired position.
Maintenance:
Maintenance and repairs must be performed by qualified
personnel.
As with all other pneumatic tools, the air motor requires oil
for lubrication of moving parts. It is recommended that an
air supply be used with a filer/water trap and oil lubrication
mechanism.
Monthly: Empty the air supply's water trap and fill the
lubrication mechanism up with oil. Lubricate all movable
parts with oil. At the same time, check jacks and extension
pieces for damage and abnormal wear. For obvious wear of
moving parts, replace them at an authorized workshop with
original spare parts.
Annually: Replace filter (see picture 14,17,18)
Check the safety valve by pulling in the eye or air to whistle
out of the valve 2-3 times (see picture19)
Oil filling: Fill up with oil (see picture 14-16). The correct oil
level is 25 mm below the top edge of the hole, when the
jack is standing horizontally, and the lifting arm is
completely down.
Oil quantity: A1,6T-77 = 0.4 l ; A10T-C = 1.2l.
Oil type: Hydraulic oil with viscosity ISO VG 15, for example
Castrol Hyspin AWH 15, Mobil DTE 10 Excel 15 or the
equivalent.
Never use brake fluid!
Safety inspection:
With respect to national rules - however at least every year
- the following must be checked for by a qualified expert:
Damage, abnormal wear, the saddle for incipient fractures,
pressure relief valve's adjustment, cylinder and pump for
leaks. And also, that labels of safety-related significance are
readable.
If anomalies appear, the jack must not be used
Troubleshooting:
1. The jack cannot lift completely up to the top even though
the pump is running: Fill up the oil, see the oil quantity!
2. The air motor is running slowly or halts: The air pressure
from outside is not sufficient, check the air supply!
3. The load is dropping: check for leaks. Introduce press ball
with mandrel (only authorized personnel).
4. Oil spills from cylinder: Replace cylinder gaskets. Sudden
oil spills from air motor and handle may be due to incorrect
handling, for example if the jack has been laying on its side.
If so, the oil spill (from the oil tank) will stop when the jack
is standing on its wheels again - but the oil will continue to
drip for some hours.
Spare parts:
Always replace worn or defective parts with original spare
parts.
Destruction:
When the jack is to be disposed of after many years of use,
the oil must be drained out and disposed of in a lawful
manner.
3/7
4986-(EN) BETJENINGSVEJLEDNING A16-77 A10 2018-12-17 R1 S12018-12-17 R1 S1
Mounting of pull handle + air connection
Now ready for use
1
2
3
4
5
6
7
8
4/7
4986-(EN) BETJENINGSVEJLEDNING A16-77 A10 2018-12-17 R1 S12018-12-17 R1 S1
Change the pull handle's position, 3 positions
Raise and lower the jack
Oil filling / filter replacement / check safety valve
8
9
10
11
12
13
14
16
15
17
18
19
5/7
4986-(EN) BETJENINGSVEJLEDNING A16-77 A10 2018-12-17 R1 S12018-12-17 R1 S1
Signs
Rating plate Read manual Warning
Avoid lopsided loads on saddle Correct load on saddle
Change pull handle position, Lower the load, 1 lift handle 2 turn clockwise
turn counter-clockwise
6/7
4986-(EN) BETJENINGSVEJLEDNING A16-77 A10 2018-12-17 R1 S12018-12-17 R1 S1
Pneumatic / hydraulic diagram
1. Air pump
2. Safety valve
3. Valve
4. Exhaust filter
5. Press ball
6. Relief brake valve
7. Cylinder
8. Relief valve
9. Pressure regulator
10. Suction ball
11. Suction filter
12. Tank
7/7
4986-(EN) BETJENINGSVEJLEDNING A16-77 A10 2018-12-17 R1 S12018-12-17 R1 S1
Warranty:
The Compac A1,6T-77 and A10T-C have a 3-year warranty from date of purchase by the end user.
The warranty is only valid if all the recommendations on safety, operation, service and maintenance have been followed.
What is covered by the 3-year warranty?
The warranty covers faulty material and workmanship only. The components covered by the 3-year warranty are the key
components: Chassis, lifting arm, oil tank, operating valve and cylinder. All other parts subject to 1 year warranty.
What is not covered by the 3-year warranty?
Problems due to improper maintenance, service and wear are not covered by warranty. This warranty does not cover defects
caused by wear, lack of lubrication, improper maintenance, improper use, modifications, use with improper fluids or fluid levels,
improper or contaminated air supply, accident, shipping damage, or any other cause not resulting from defective materials or
workmanship. Functional problems without any leakage like jack losing height, unable to lift load, etc. are often due to improper
service and calibration.
Wear parts are not covered by Compac´s 3-year warranty:
The replacement intervals for these parts depend on the extent to which the product is used and how well it is maintained.
These parts can be considered equivalent to the brake pads, wipers, oil filters, etc. on a new car, which are not covered by the
warranty of the car either.
Any equipment that is repaired or replaced within the warranty period shall not extend the original warranty period. Any
purchased service parts that prove defective with respect to materials or workmanship will be repaired or replaced by the
factory, if said defect occurs within 90 days of purchase. Repair or replacement is the exclusive remedy for defective equipment
under this warranty. Claims can be accepted only where the fully assembled equipment is submitted to the repair facility.

This manual suits for next models

1

Popular Jack manuals by other brands

CLAS OH 0237 manual

CLAS

CLAS OH 0237 manual

Simplex 54212 Operational manual

Simplex

Simplex 54212 Operational manual

Daytona DS400S Owner's manual & safety instructions

Daytona

Daytona DS400S Owner's manual & safety instructions

Stromberg Carlson Products JET-2500 installation instructions

Stromberg Carlson Products

Stromberg Carlson Products JET-2500 installation instructions

kincrome P12067 Assembly and operating manual

kincrome

kincrome P12067 Assembly and operating manual

Mega BR2 Operation and maintenance instructions

Mega

Mega BR2 Operation and maintenance instructions

BrandTech Scientific BOCHEM B11115 operating manual

BrandTech Scientific

BrandTech Scientific BOCHEM B11115 operating manual

Omega Lift Equipment 18127 Operating instructions & parts manual

Omega Lift Equipment

Omega Lift Equipment 18127 Operating instructions & parts manual

MAG TOOLS JS300A Operating instructions & parts manual

MAG TOOLS

MAG TOOLS JS300A Operating instructions & parts manual

K Tool International KTI61202 owner's manual

K Tool International

K Tool International KTI61202 owner's manual

BGS technic 1977 instruction manual

BGS technic

BGS technic 1977 instruction manual

Tractel hydrofor H 5 Operation and maintenance manual

Tractel

Tractel hydrofor H 5 Operation and maintenance manual

Sealey HSJ07 instructions

Sealey

Sealey HSJ07 instructions

Cornwell Tools CSEBJ20T operating manual

Cornwell Tools

Cornwell Tools CSEBJ20T operating manual

Omega 18207 Operating instructions & parts manual

Omega

Omega 18207 Operating instructions & parts manual

Cornwell Tools CTJ35BK operating manual

Cornwell Tools

Cornwell Tools CTJ35BK operating manual

Esco 70131 Assembly & operation instructions

Esco

Esco 70131 Assembly & operation instructions

Sealey 2200HL.V2 instructions

Sealey

Sealey 2200HL.V2 instructions

manuals.online logo
manuals.online logoBrands
  • About & Mission
  • Contact us
  • Privacy Policy
  • Terms and Conditions

Copyright 2025 Manuals.Online. All Rights Reserved.