32
Correct disposal of this product: This symbol indicates that this product should not be disposed of with your household waste, according to the
WEEE directive (2012/19/EU) and your national law. This product should be handed over to an authorized collection site for recycling waste
electrical and electronic equipment (EEE). Improper handling of this type of waste could have a possible negative impact on the environment
and human health due to potentially hazardous substances that are generally associated with EEE. At the same time, your cooperation in the
correct disposal of this product will contribute to the effective usage of natural resources. For more information about where you can drop off
your waste equipment for recycling, please contact your local city office, waste authority, or your household waste disposal service.
Do not use this apparatus near water.
Clean only with a dry cloth.
Natural convection should not be impeded by covering the
module (apart from the end applications housing). Do not
block any ventilation openings. Install in accordance with
the manufacturer’s instructions.
Do not install near any heat sources such as radiators,
heat registers, stoves, or other apparatus (including
amplifiers) that produce heat.
Do not defeat the safety purpose of the protective earth
/ grounding mains inlet. Protective earth is provided for
your safety.
Protect the power cord from being walked on or pinched
particularly at plugs, convenience receptacles, and the
point where they exit from the apparatus.
Only use attachments/accessories specified by the
manufacturer.
Unplug this apparatus during lightning storms or when
unused for long periods of time.
Refer all servicing to qualified service personnel.
Servicing is required when the apparatus has been
damaged in any way, such as power-supply cord or plug
is damaged, liquid has been spilled or objects have
fallen into the apparatus, the apparatus has been
exposed to rain or moisture, does not operate normally,
or has been dropped.
This apparatus shall not be exposed to dripping or
splashing, and no object filled with liquids, such as
vases or beer glasses, shall be placed on the apparatus.
Do not overload wall outlets and extension cords as this
can result in a risk of fire or electric shock.
This apparatus has been designed with Class-I
construction and must be connected to a mains socket
outlet with a protective earthing connection.
This apparatus has been equipped with a rocker-style
AC mains power switch. This switch is located on the
rear panel and should remain readily accessible to the
user.
The MAINS plug or an appliance coupler is used as the
disconnect device, so the disconnect device shall remain
readily operable.
Do not run any cables across the top or the bottom of the
module. Apply fixtures to cables to ensure that this is not
compromised.
Before using this product, ensure all cables are correctly
connected and the power cables are not damaged. If you
detect any damage, do not use the product.
Changes or modifications not expressly approved by
Hypex Electronics will void compliance and therefore the
user's authority to operate the equipment.
Service or modifications by any person or persons other
than by Hypex Electronics authorized personnel voids the
warranty.
Gebruik voor dit apparaat een geaard stopcontact.
Verwenden Sie für dieses Gerät eine geerdete
Steckdose.
Utilisez une prise électrique mise à la terre pour cet
appareil.
Utilice un tomacorriente con conexión a tierra para
este aparato.
Use a grounded electrical outlet for this appliance.
The exclamation point within an equilateral triangle is
intended to alert the user of the prescence of important
operating and maintaining (servicing) instructions in
the literature accompanying the appliance.
The lightning flash with arrowhead symbol within an
equilateral triangle is intended to alert the user to the
prescence of uninsulated “dangerous voltage” within
the product’s enclosure, that may be of significant
magnitude to constitute a risk of electric shock to
persons.
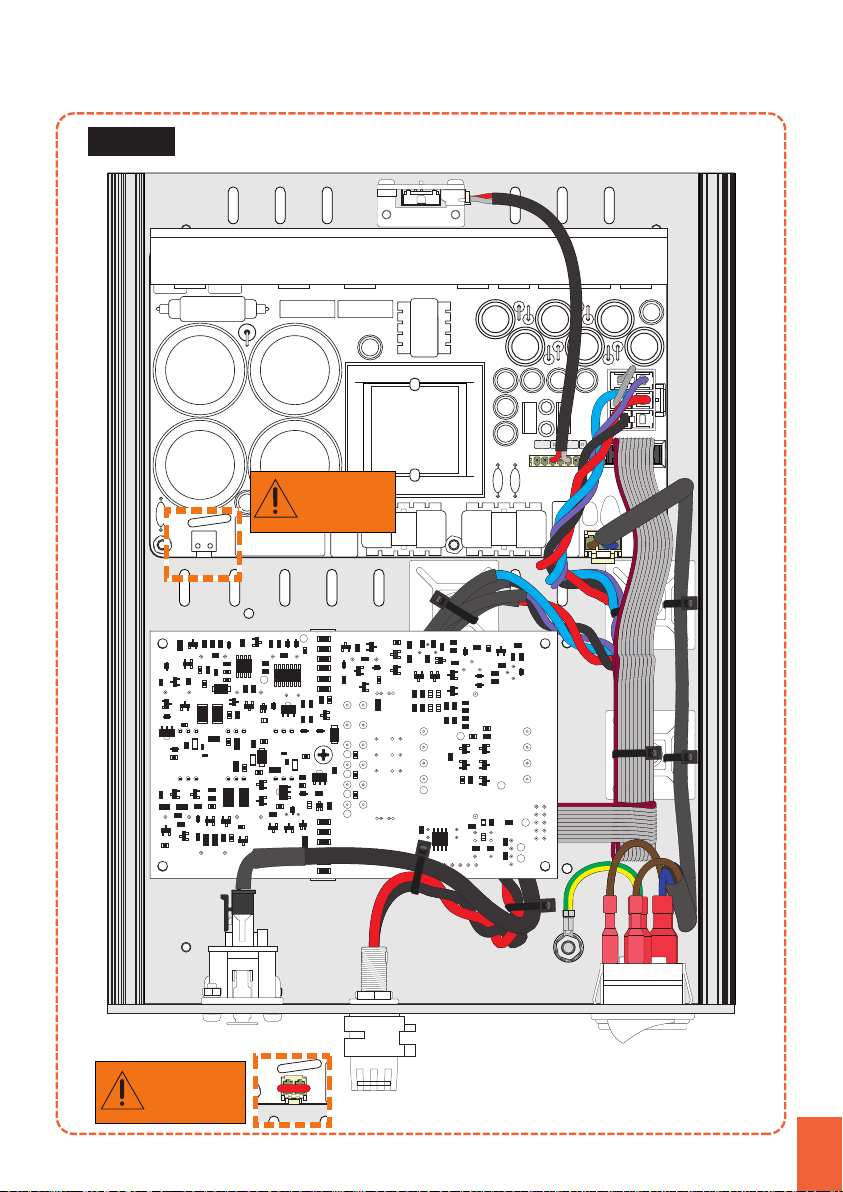
Attention: Observe precautions for handling
electrostatic sensitive devices. This module uses
semiconductors that can be damaged by electrostatic
discharge (ESD).
Avertissement: Pour réduire les risques de choc électrique, ne
pas exposer cet appareil à la pluie ou l'humidité.
Précautions de sécurité
Les dommages causés par un usage non approprié sont
exclus de la garantie.
Ce unité est sous tension secteur et certaines de ses
pièces accessibles sont sous une tension dangereuse.
Ces pièces doivent dans tous les cas être protégées
contre contacts accidentels. Lors de l'installation, une
prudence extrême s'impose. Ne jamais toucher les pièces
du module quand celui-ci est relié au secteur. Isoler
l'appareil du secteur et attendre 10 minutes pour laisser
à tous les condensateurs le temps de se décharger avant
de le manipuler.
Ce produit ne contient aucune pièce devant être
entretenue par l'utilisateur.
Damage due to inappropriate handling is not covered by
warranty. This product has no user-serviceable parts.
This unit operates at mains voltage and carries
hazardous voltages at accessible parts. These parts may
never be exposed to inadvertent touch. Observe extreme
care during installation and never touch the internal
modules while the unit is connected to the mains.
Disconnect the unit from the mains and allow all
capacitors to discharge for 10 minutes before handling it.
Warning: To reduce the risk of fire or electric shock, do not
expose this device to rain or moisture.
Safety precautions
Introduction, Table of contents
Advanced System Information
Table of Contents
Included in the kit
Full Hypex DIY case
Power cable
All required connectors
This assembly instruction
Full internal cable harness
All required mounting materials
Not included in the kit
Switch Mode Power Supply
Loudspeaker cables
UcD® amplifier
Tools as described on page 4
Interconnects
UcD700HG with HxR (1x)
Thank you for purchasing the Hypex UcD700 mono
kit, powered by our UcD® technology.
Please note the different models. This assembly
instruction describes how to assemble one of these
models. Both models only offer balanced inputs. If
your source only offers unbalanced outputs you can
use one of our interconnects to connect them
properly.
Please read the safety instructions on the next page
before assembling, installing and/or operating the
UcD® mono kit.
SMPS1200A700 (1x)
This mono kit can be a power amp for your passive
loudspeaker. We offer two kinds of mono kits:
The UcD® amplifier and the Switch Mode Power
Supply used in this kit are:
NC400 mono kit 1x400W
This assembly instruction covers the general
assembly instructions for this specific model. For
detailed technical information about the used
modules please refer to the datasheet on our website.
UcD700 mono kit 1x700W
UcD700 mono kit, a brief introduction