Hyster B238 User manual

FRAME AND MAIN
COMPONENTS
PART NO. 4147656 0100 SRM 1978

SAFETY PRECAUTIONS
MAINTENANCE AND REPAIR
•The Service Manuals are updated on a regular basis, but may not reflect recent design changes to the
product. Updated technical service information may be available from your local authorized Hyster®
dealer. Service Manuals provide general guidelines for maintenance and service and are intended for
use by trained and experienced technicians. Failure to properly maintain equipment or to follow in-
structions contained in the Service Manual could result in damage to the products, personal injury,
property damage or death.
•When lifting parts or assemblies, make sure all slings, chains, or cables are correctly fastened, and
that the load being lifted is balanced. Make sure the crane, cables, and chains have the capacity to
support the weight of the load.
•Do not lift heavy parts by hand, use a lifting mechanism.
• Wear safety glasses.
•DISCONNECT THE BATTERY CONNECTOR before doing any maintenance or repair on electric lift
trucks. Disconnect the battery ground cable on internal combustion lift trucks.
•Always use correct blocks to prevent the unit from rolling or falling. See HOW TO PUT THE LIFT
TRUCK ON BLOCKS in the Operating Manual or the Periodic Maintenance section.
• Keep the unit clean and the working area clean and orderly.
• Use the correct tools for the job.
• Keep the tools clean and in good condition.
•Always use HYSTER APPROVED parts when making repairs. Replacement parts must meet or ex-
ceed the specifications of the original equipment manufacturer.
•Make sure all nuts, bolts, snap rings, and other fastening devices are removed before using force to
remove parts.
•Always fasten a DO NOT OPERATE tag to the controls of the unit when making repairs, or if the unit
needs repairs.
•Be sure to follow the WARNING and CAUTION notes in the instructions.
•Gasoline, Liquid Petroleum Gas (LPG), Compressed Natural Gas (CNG), and Diesel fuel are flamma-
ble. Be sure to follow the necessary safety precautions when handling these fuels and when working
on these fuel systems.
•Batteries generate flammable gas when they are being charged. Keep fire and sparks away from the
area. Make sure the area is well ventilated.
NOTE: The following symbols and words indicate safety information in this
manual:
WARNING
Indicates a hazardous situation which, if not avoided, could result in death
or serious injury.
CAUTION
Indicates a hazardous situation which, if not avoided, could result in minor
or moderate injury and property damage.
On the lift truck, the WARNING symbol and word are on orange back-
ground. The CAUTION symbol and word are on yellow background.

©2015 HYSTER COMPANY
TABLE OF CONTENTS
Series Code / Model Designation Reference Table ................................................................................................ 1
General .....................................................................................................................................................................1
Description ...............................................................................................................................................................2
Remove and Install ..................................................................................................................................................3
Air Filter Assembly (Tier 3/Stage IIIA) .............................................................................................................3
Remove ............................................................................................................................................................3
Install ..............................................................................................................................................................3
Air Filter Assembly (Tier 4F/Stage IV) ..............................................................................................................4
Remove ............................................................................................................................................................4
Install ..............................................................................................................................................................4
Exhaust System (Tier 3/Stage IIIA) ...................................................................................................................5
Remove ............................................................................................................................................................5
Install ..............................................................................................................................................................5
Exhaust System (Tier 4F/Stage IV) ...................................................................................................................6
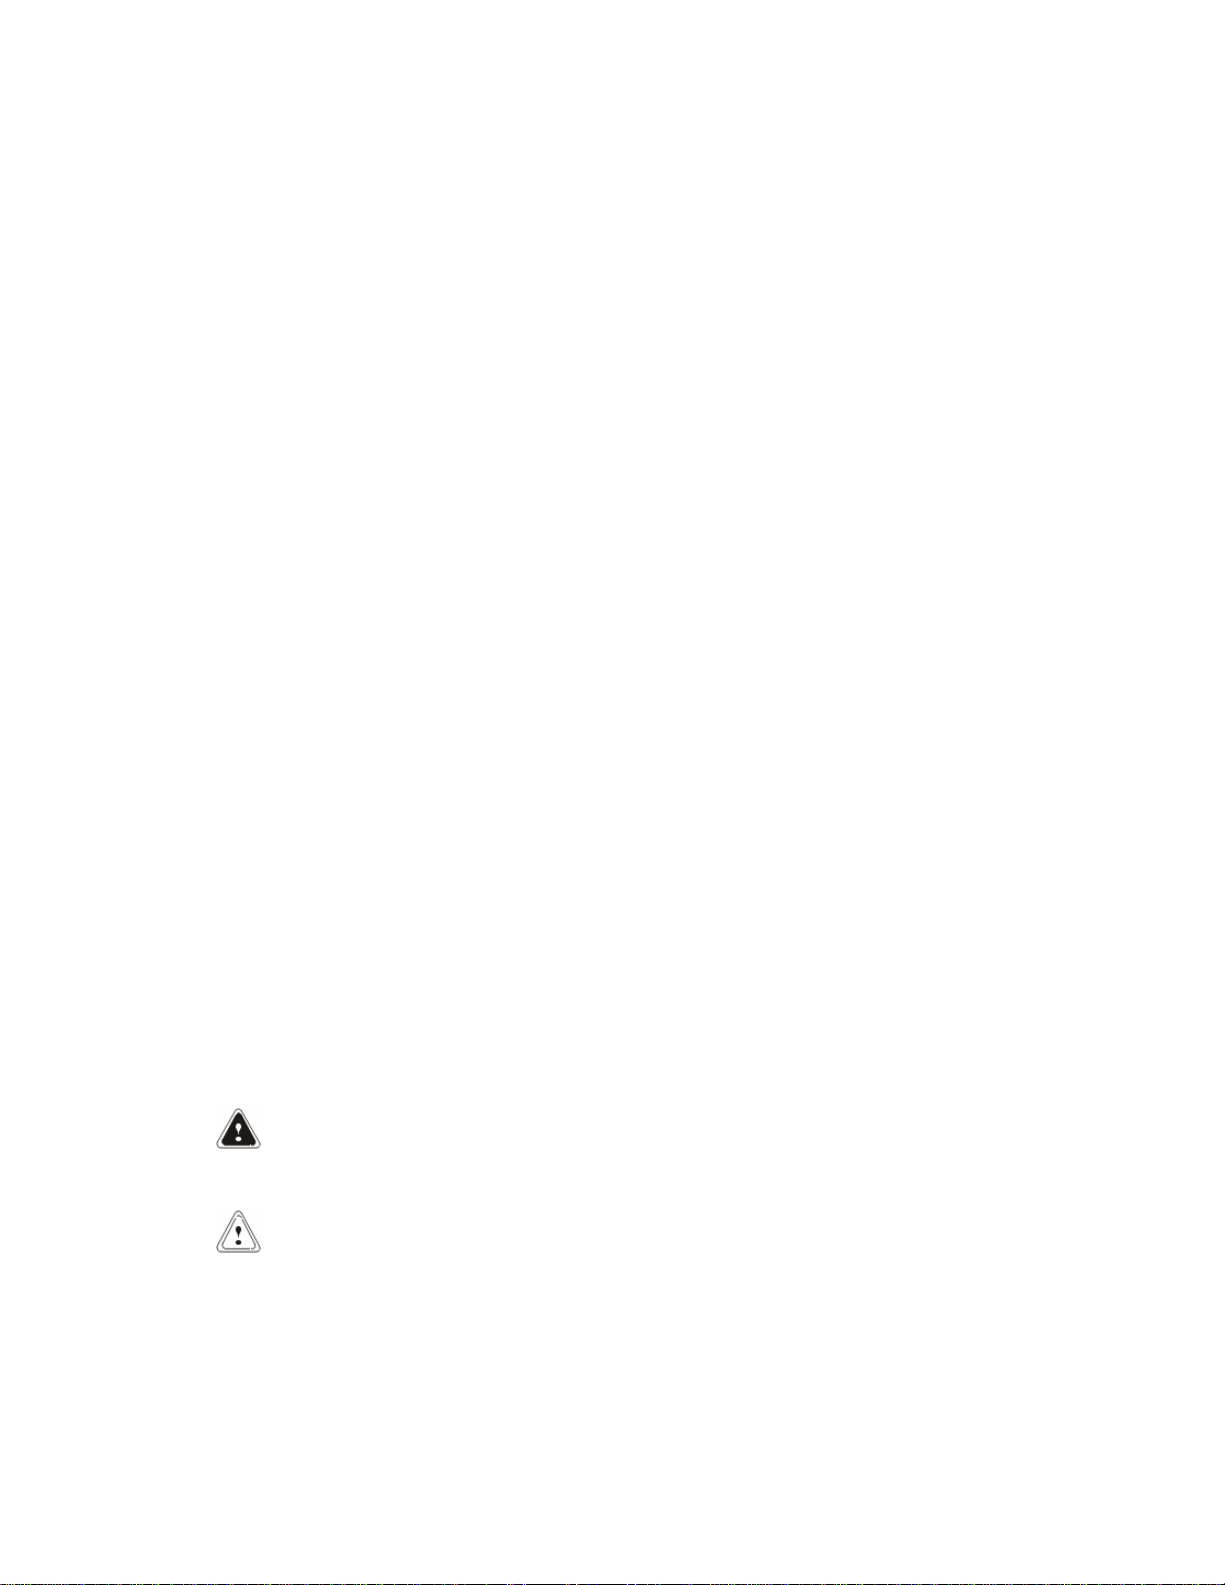
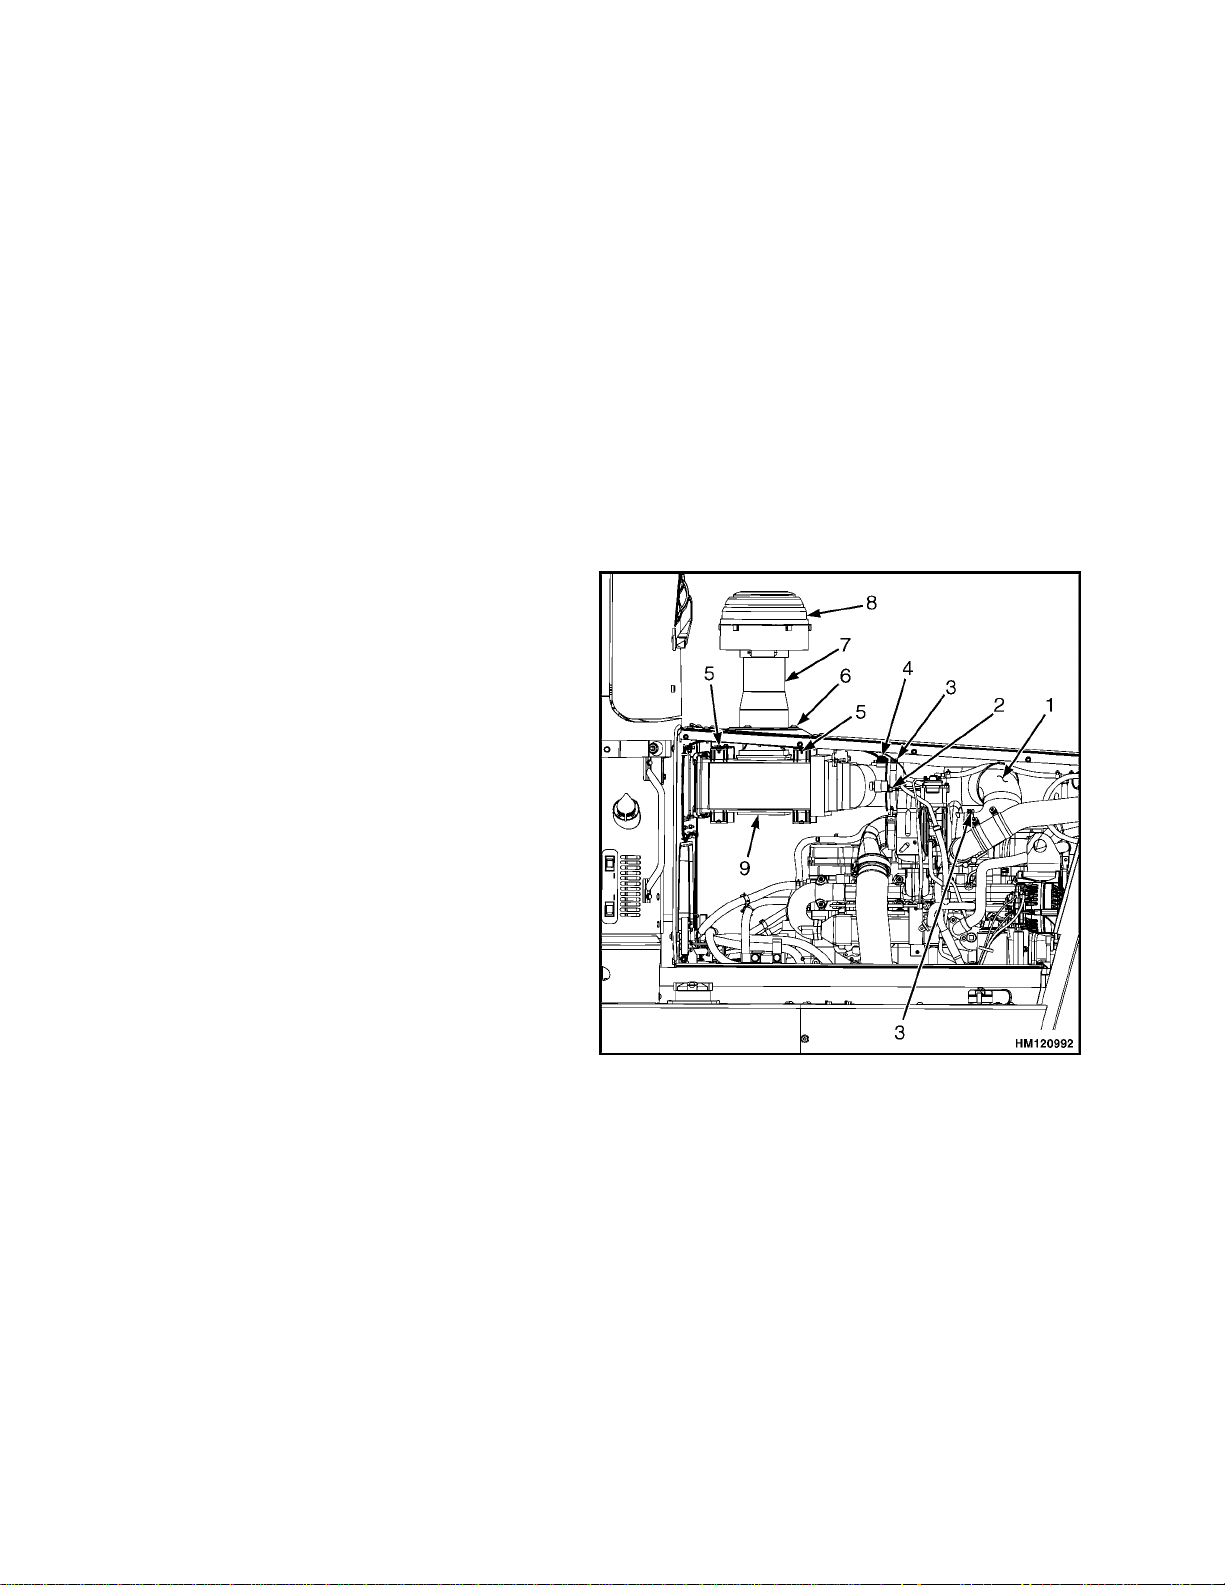
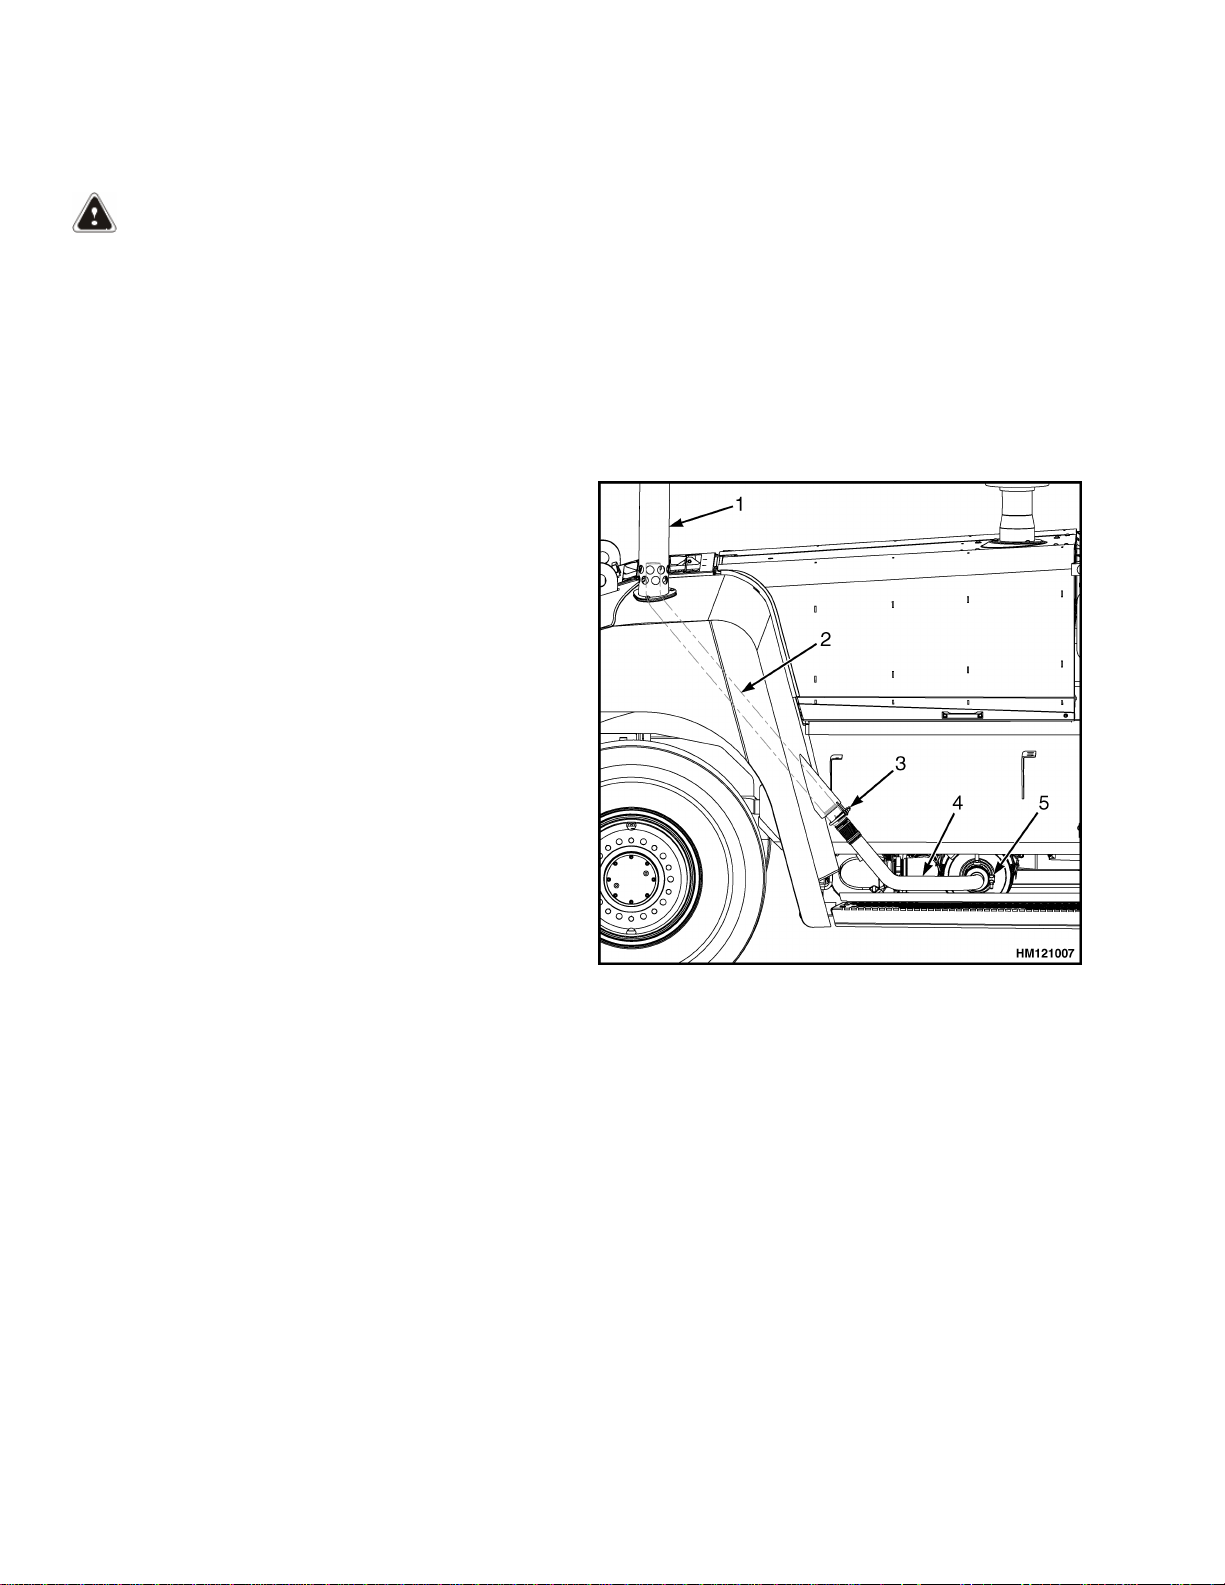
Exhaust Pipes High Mount ............................................................................................................................6
Remove ........................................................................................................................................................6
Install ..........................................................................................................................................................6
Exhaust Pipes and Diffuser Low Mount ....................................................................................................... 8
Remove ........................................................................................................................................................8
Install ..........................................................................................................................................................8
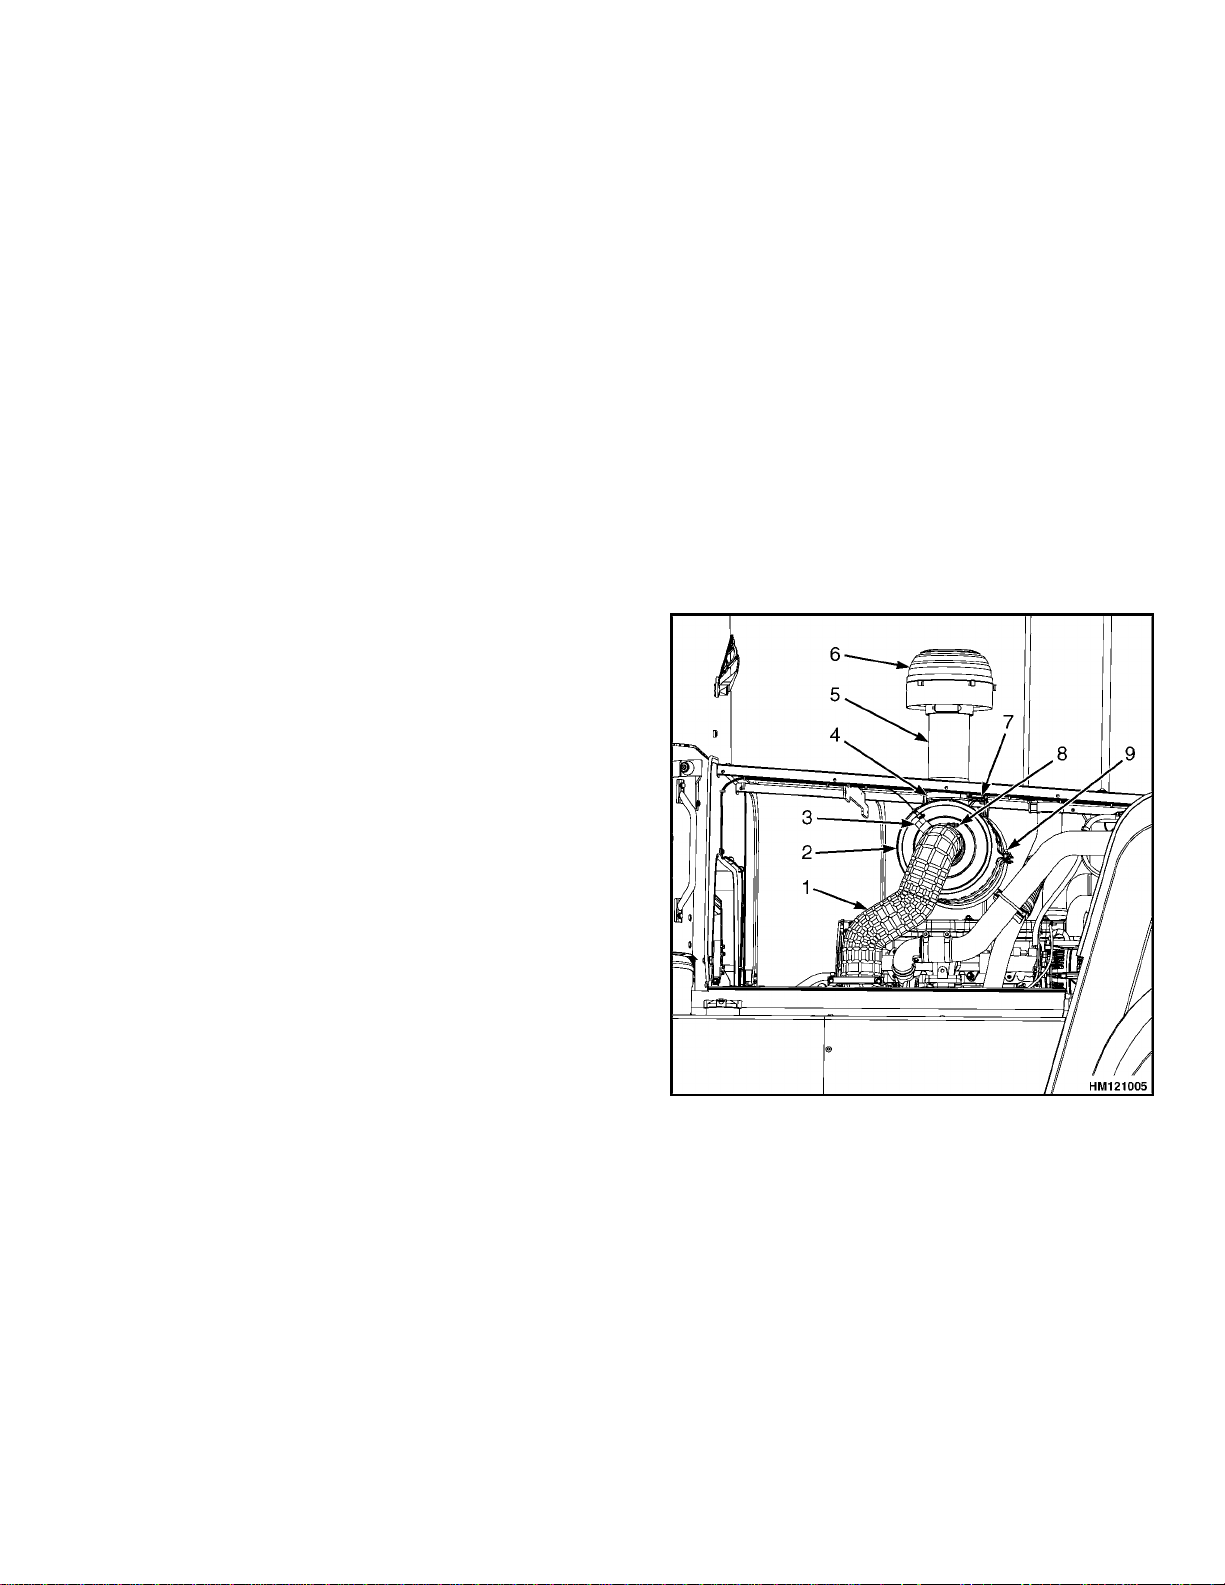
Engine After Treatment (EAS) System (Tier4F\Stage IV) ..............................................................................8
Preparation .....................................................................................................................................................8
Remove ............................................................................................................................................................9
Install ............................................................................................................................................................10
Exhaust Seal Rings .......................................................................................................................................10
Selective Catalytic Reducer (SCR) ...............................................................................................................11
Remove ......................................................................................................................................................11
Install ........................................................................................................................................................11
Decomposition Reactor Tube (DRT) ............................................................................................................ 12
Remove ......................................................................................................................................................12
Install ........................................................................................................................................................12
Diesel Oxidation Catalyst (DOC) .................................................................................................................12
Remove ......................................................................................................................................................12
Install ........................................................................................................................................................12
Hood Assembly ..................................................................................................................................................12
Remove ..........................................................................................................................................................12
Install ............................................................................................................................................................14
Running Boards, Steps and Mud Flaps ...........................................................................................................14
Hydraulic Tank .................................................................................................................................................16
Remove ..........................................................................................................................................................16
Inspect ...........................................................................................................................................................18
Clean ..............................................................................................................................................................18
Steam Cleaning Method ...........................................................................................................................19
Chemical Solution Cleaning Method .......................................................................................................19
Repair ............................................................................................................................................................19
Small Leaks ..............................................................................................................................................19
Large Leaks ..............................................................................................................................................19
Inspection after Repair .................................................................................................................................20
Install ............................................................................................................................................................20
Fuel Tank ..........................................................................................................................................................22
Table of Contents
i

TABLE OF CONTENTS (Continued)
Remove ..........................................................................................................................................................22
Clean and Repair ..........................................................................................................................................24
Install ............................................................................................................................................................24
Engine and Transmission (Tier 3/Stage IIIA) .................................................................................................24
Remove ..........................................................................................................................................................24
Precautions ...............................................................................................................................................24
Remove Air Conditioning Compressor ....................................................................................................25
Drain the Engine Cooling System ...........................................................................................................25
Drain Hydraulic Oil ................................................................................................................................. 26
Drain Transmission Oil ........................................................................................................................... 26
Disconnect Drive Shaft, Fan Clutch, Tubes, Pipes, Cables, Wires and Lines ......................................26
Remove Engine and Transmission ..........................................................................................................28
Install ............................................................................................................................................................30
Install Engine and Transmission ............................................................................................................30
Install Air Conditioning Compressor ......................................................................................................30
Connect Drive Shaft, Fan, Tubes, Pipes, Cables, Wires and Lines .......................................................30
Refill the Systems .....................................................................................................................................31
Starting the Engine ..................................................................................................................................31
Engine and Transmission (Tier 4F/Stage IV) ..................................................................................................32
Remove ..........................................................................................................................................................32
Precautions ...............................................................................................................................................32
Remove Air Conditioning Compressor ....................................................................................................32
Drain the Engine Cooling System ...........................................................................................................33
Drain Hydraulic Oil ................................................................................................................................. 33
Drain Transmission Oil ........................................................................................................................... 34
Disconnect Drive Shaft, Fan Clutch, Tubes, Pipes, Cables, Wires and Lines ......................................34
Remove Engine and Transmission ..........................................................................................................36
Install ............................................................................................................................................................38
Install Engine and Transmission ............................................................................................................38
Install Air Conditioning Compressor ......................................................................................................38
Connect Drive Shaft, Fan, Tubes, Pipes, Cables, Wires and Lines .......................................................38
Refill the Systems .....................................................................................................................................39
Starting the Engine ..................................................................................................................................39
Operator's Cab ...................................................................................................................................................40
Remove ..........................................................................................................................................................40
Install ............................................................................................................................................................42
Cab Tilt System Oil Filling ..........................................................................................................................43
Counterweight ...................................................................................................................................................44
Remove ..........................................................................................................................................................44
Install ............................................................................................................................................................45
Label Replacement ............................................................................................................................................46
Capacities and Specifications ...............................................................................................................................47
Torque Values for Frame and Main Components ...........................................................................................47
This section is for the following models:
Table of Contents
ii

Series Code / Model Designation Reference Table
This section is for the following models:
Series Code Model Designation Europe Model Designation America
B238 H16XM-9, H16XM-12, H18XM-7.5,
H18XM-9 H360-36HD, H360-48HD
General
This manual contains the procedures for removal
and installation of main components mounted on
the frame of the B238 lift truck series. The manual
includes air filter assembly, exhaust system, hood
assembly, handrails and steps, hydraulic tank, fuel
tank, engine, transmission, operator’s cab and
counterweight.
For information on the drive axle, steering axle and
mast refer to:
•Kessler Drive Axle 1400SRM1667
•Steering System 1600SRM1932
•Mast 4000SRM1664
For information on torque values, see the section
Metric & Inch Fasteners 8000SRM0231.
0100 SRM 1978 Series Code / Model Designation Reference Table
1

Description
CAUTION
DO NOT initiate repairs to the frame without con-
sulting a Hyster service representative or damage
to the lift truck may occur.
The frame is a one-piece weldment that has mounts
for the main and/or additional components: coun-
terweight, engine, transmission, drive and steer
axles, hydraulic and fuel tanks, operator's compart-
ment, and other parts. See Figure 1.
1. COUNTERWEIGHT MOUNT
2. TIE DOWN EYES
3. COOLING ASSEMBLY MOUNT
4. (DEF TANK) EXTENSION PLATE (TIER 4F)
5. DEF TANK MOUNT
6. FUEL TANK MOUNT
7. DEF FILTER MOUNT
8. CAB LOCK MOUNT
9. DRIVE AXLE MOUNT
10. FRAME
11. MAST MOUNT
12. HYDRAULIC TANK MOUNT
13. CAB SIDE TILT
14. EXTENSION PLATE
15. AFTER TREATMENT FRAME MOUNT
16. ENGINE MOUNT
17. TRANSMISSION MOUNT
18. TILT CYLINDER MOUNT
19. CAB TILT BRACKET
20. MAIN CONTROL VALVE MOUNT
Figure 1. Frame Mounts
Description 0100 SRM 1978
2

Remove and Install
AIR FILTER ASSEMBLY (TIER 3/STAGE
IIIA)
Remove
1. Open left-hand hood door. See Hood Assembly.
2. Tag and disconnect the electrical connector
from vacuum switch by pressing the metal clip.
3. Loosen the air duct clamp at the filter housing.
See Figure 2.
4. Close left-hand hood door to access the Pre-
cleaner.
5. Remove the Precleaner, with the air duct at-
tached, from the air filter housing.
6. Open left-hand and right-hand hood doors.
7. Loosen the hose clamps on the air filter hose
and remove the hose. See Figure 2.
8. Place a cap on the air inlet of the turbocharger
to avoid dirt entering the turbocharger.
9. Place a support under the air filter assembly.
10. Remove the cap screws and washers from the
mounting clamps that hold the air filter assem-
bly.
11. Rotate the air filter until the air duct connec-
tion clears the center of the hood opening and
move the air filter to the right-hand side of the
truck.
12. Remove the retaining hardware from the
mounting clamps and remove the clamps from
the hood by removing the hardware.
Install
1. Install the retaining hardware to the mounting
clamps and install the clamps under the hood.
2. Position the air filter housing into the mount-
ing clamps with the air intake aligned with the
hole in the mounting plate.
3. Install cap screws and washers and tighten to
38 N•m (28 lbf ft).
4. Remove the cap from the turbocharger.
5. Rotate and connect air filter hose to air filter
housing and the turbocharger and tighten hose
clamps to 8 N•m (6 lbf ft).
6. Close the hood doors. See Figure 15.
7. Install the Precleaner, with the air duct at-
tached, on the air cleaner.
8. Open left-hand hood door.
9. Install and tighten the air duct clamp.
10. Connect electrical connector to vacuum switch.
11. Close the hood door.
1. AIR FILTER HOSE
2. AIR FILTER HOUSING
3. VACUUM SWITCH
4. AIR DUCT CLAMP
5. AIR DUCT
6. PRECLEANER
7. AIR FILTER BRACKETS
8. HOSE CLAMP
9. FILTER HOUSING MOUNTING CLAMP
Figure 2. Air Filter Assembly (Tier 3/Stage IIIA)
0100 SRM 1978 Remove and Install
3

AIR FILTER ASSEMBLY (TIER 4F/STAGE
IV)
Remove
1. Open left-hand and right-hand hood door. See
Hood Assembly.
2. Tag and disconnect the connectors to the vac-
uum switch and to the TBAP sensor (Tempera-
ture and Barometric Air Pressure sensor).
3. Remove the three cap screws, nuts and washers
from the air duct bracket on the center hood.
See Figure 3.
4. On trucks with High Mount Precleaner, remove
the U-clamp from the support bracket. See Fig-
ure 4.
5. Remove the Precleaner, with the air duct at-
tached, from the air filter housing.
6. Open left-hand and right-hand hood doors. See
Figure 15.
7. Loosen the hose clamps on the air filter hose
and remove the hose from the air filter and the
turbocharger.
8. Place a cap on the air inlet of the turbocharger
to avoid dirt entering the turbocharger.
9. Remove the four cap screws that retain the
brackets of the air filter unit to the hood.
10. Lower the air filter unit until it is clear from
the hood.
11. Remove the air filter to the right-hand side of
the truck.
Install
1. Open left-hand and right-hand hood doors.
2. Position the air filter housing with the air in-
take aligned with the hole in the mounting
plate.
3. Install the air filter housing with the four
washers and cap screws and tighten to
65 N•m (48 lbf ft).
4. Remove cap from the air inlet on the turbo-
charger.
5. Connect air filter hose to the turbocharger and
to the air filter housing and tighten the hose
clamps to 8 N•m (6 lbf ft).
6. Connect the connectors to the vacuum switch
and to the Temperature and Barometric Air
Pressure (TBAP) sensor according the tags.
7. Close the hood doors.
8. Install the Precleaner, with the air duct at-
tached, to the center hood.
9. On trucks with High Mount Precleaner, install
the U-clamp to the support bracket.
1. AIR FILTER HOSE
2. VACUUM SWITCH
3. HOSE CLAMP
4. TBAP SENSOR
5. HOUSING BRACKET
6. AIR DUCT BRACKET
7. AIR DUCT
8. PRECLEANER
9. AIR FILTER HOUSING
Figure 3. Air Filter Assembly with Low Mount
Precleaner (Tier 4F/Stage IV)
Remove and Install 0100 SRM 1978
4

A. HIGH MOUNT PRECLEANER FOR CABS WITH-
OUT AIRCO
B. HIGH MOUNT PRECLEANER FOR CABS WITH
AIRCO
1. PRECLEANER
2. PRECLEANER CLAMP
3. AIR DUCT
4. U-CLAMP
5. SUPPORT BRACKET
6. AIR DUCT CLAMP
Figure 4. Air Filter Assembly with High Mount
Precleaner (Tier 4F/Stage IV)
EXHAUST SYSTEM (TIER 3/STAGE IIIA)
Remove
WARNING
Exhaust system must be at room temperature be-
fore starting disassembly or personal injury may
occur.
1. Open left- and right-hand hood doors. See Hood
Assembly.
2. Remove V-band clamp from turbocharger See
Figure 5.
3. Remove V-band clamp from the muffler.
4. Remove the exhaust pipe assembly.
1. MUFFLER
2. CAP SCREW AND WASHER
3. CLAMP
4. EXHAUST PIPE ASSEMBLY
5. V-BAND CLAMP
Figure 5. Exhaust System (Tier 3/Stage IIIA)
5. Place a cap on the air inlet of the turbocharger
to avoid dirt entering the turbocharger.
6. Remove the hardware that retains the muffler
to the center hood and remove the muffler.
Install
1. Place the muffler on the center hood and attach
the hardware.
2. Remove the cap from the air inlet of the turbo-
charger.
3. Install the exhaust pipe assembly.
4. Tighten the band clamp on the muffler to 54 -
81 N•m (40 - 60 lbf ft).
5. Tighten the band clamp on the turbocharger to
5.6 N•m (4 lbf ft).
6. Close the hood doors.
0100 SRM 1978 Remove and Install
5

EXHAUST SYSTEM (TIER 4F/STAGE IV)
WARNING
Exhaust system must be at ambient temperature
before starting disassembly or personal injury
may occur.
Wait at least 100 seconds after the engine has
been switched off then move the battery discon-
nect switch to the disconnected position. Discon-
nect the ground cable from the batteries.
Exhaust Pipes High Mount
Remove
1. Loosen the clamp at the connection between ex-
haust pipe assembly and end pipe. See Fig-
ure 6.
2. Remove the band clamp from the Selective Cat-
alic Reducer (SCR) outlet.
3. Remove the exhaust pipe assembly.
4. Remove the cap screws from the diluter to
counterweight connection. See Figure 7.
5. Remove the diluter.
6. Remove the end pipe retainer bracket on the
counterweight.
7. Remove the U-clamp from the end pipe.
8. Remove the end pipe from the counterweight
tube at the top of the counterweight.
Install
1. Insert the end pipe in the counterweight tube
at the top of the counterweight. See Figure 8.
2. Install the U-clamp on the lower end of the end
pipe.
3. Install the retainer bracket at the top of the
end pipe.
4. Install the diluter.
5. Install the exhaust pipe assembly in the end
pipe and to the outlet of the SCR. See Figure 8.
6. Tighten the band clamp that retains the ex-
haust frame to the SCR to
4.95 N•m (3.65 lbf ft).
1. DILUTER ASSEMBLY
2. EXHAUST END PIPE
3. U-CLAMP
4. EXHAUST PIPE ASSEMBLY
5. V-BAND CLAMP
Figure 6. Exhaust Pipe High Mount (Tier 4F/Stage
IV)
Remove and Install 0100 SRM 1978
6

1. COUNTERWEIGHT
2. CAP SCREW
3. WASHER
4. DILLUTER
5. CAP SCREW
6. WASHER
7. END PIPE RETAINER BRACKET
8. END PIPE
Figure 7. Diluter Assembly (Tier 4F/Stage IV)
1. DILUTER
2. EXHAUST END PIPE
3. EXHAUST PIPE ASSEMBLY
4. AFTER TREATMENT SYSTEM SUBFRAME
5. HEAT SHIELD
6. INSULATION PIPE ASSEMBLY
Figure 8. Exhaust System High Mount (Tier 4F/
Stage IV)
0100 SRM 1978 Remove and Install
7

Exhaust Pipes and Diffuser Low Mount
Remove
1. Remove the clamp from the Selective Catalytic
Reducer (SCR) outlet. See Figure 9.
2. Place a support under the diffuser.
3. Remove the cap screws and washers from the
isolators.
4. Remove the diffuser and exhaust assembly out
of the SCR outlet.
Install
1. Install the diffuser and exhaust assembly by in-
serting the exhaust assembly in the SCR outlet.
2. Install the isolators, washer and cap screws to
the bottom side of the frame and tighten the
cap screws to 35 N•m (26 lbf ft).
3. Tighten clamp to 54 - 81 N•m (40 - 60 lbf ft).
1. DIFFUSER
2. ISOLATOR MOUNTS
3. EXHAUST PIPE ASSEMBLY
4. CLAMP
5. CAP SCREW
Figure 9. Exhaust Pipe Connections Low Mount
(Tier 4F/Stage IV)
ENGINE AFTER TREATMENT (EAS)
SYSTEM (TIER4F\STAGE IV)
NOTE: Due to difficult accessibility of wire and
hose connections it is advised to first remove the
entire EAS assembly, followed by the replacement
of individual EAS components. When replacing
components of the EAS make sure to replace the
exhaust seals and obtain the correct and final as-
sembly position, before tightening clamps.
Preparation
1. Place the truck on a solid, level surface.
2. Lower the mast completely.
3. Apply the parking brake.
4. Switch the engine OFF.
5. Put the lift truck on blocks. See Periodic
Maintenance 8000SRM1983.
6. Remove the V-band clamps from the flanges of
the insulated exhaust pipe. See Figure 13, Item
8 and 9.
7. Remove the insulation pipe from the engine
and remove the flange seals.
8. Remove the exhaust pipes.
a. For High Mount System, see Exhaust
Pipes High Mount.
b. For Low Mount System, see Exhaust
Pipes and Diffuser Low Mount.
Remove and Install 0100 SRM 1978
8

Remove
1. Disconnect the electrical connections from the
After Treatment System, mounted on the
frame, on the left-hand side:
a. Disconnect the ECM/EAS Harness con-
nector from the Frame Harness connec-
tor. See Figure 10.
b. Disconnect the ECM/EAS Harness con-
nectors from the engine. See Figure 11.
2. Put caps on the connectors to prevent from
damage.
1. ECM/EAS HARNESS CONNECTOR
2. SELECTIVE CATALYTIC REDUCER (SCR)
3. COOLANT SOLENOID VALVE
4. INJECTOR COOLING SUPPLY HOSE
5. INJECTOR COOLING RETURN HOSE
6. TRANSMISSION
7. FRAME
Figure 10. Coolant Solenoid Valve Connections
(Tier 4F/Stage IV)
3. Disconnect the cooling hoses from the Coolant
Solenoid valve.
4. Put plugs on the hoses and caps on the hose
connections.
5. Disconnect the DEF pressure hose from the
DEF pump. See Figure 12.
6. Use a forklift truck with a pallet to support the
after treatment system.
7. Remove the cap screws that retain the after
treatment system to the frame.
8. Gently lower the pallet with the after treat-
ment system and move it away from the truck.
1. CPS133 FAN CLUTCH
2. CRP12 ECM CROSS OVER
3. CRP03 ECM TIER 4
4. CPP03 ENGINE ECM SIGNALS
Figure 11. ECM/EAS Harness Connectors (Tier 4F/
Stage IV)
0100 SRM 1978 Remove and Install
9

1. DEF PUMP
2. DEF PRESSURE HOSE TO INJECTOR
Figure 12. DEF Supply Hose (Tier 4F/Stage IV)
Install
1. Move the pallet with the after treatment sys-
tem under the truck.
2. Install the cap screws that retain the after
treatment system to the frame.
3. Re-connect the hoses and electrical connections.
4. Install a new seal and move the flanges of the
insulated exhaust pipe and the Diesel Oxida-
tion Catalyst (DOC) against each other. See
Figure 13, item 8 and 9.
5. Tighten the V-band clamp to 13.5 ± 1.5
N•m (10 ± 1 lbf ft).
6. Install the flange seals and install the insula-
tion pipe to the engine.
7. Tighten the V-band clamp to 7 ± 1 N•m (5 ±
0.7 lbf ft).
8. Install the exhaust system.
a. For High Mount System, see Exhaust
Pipes High Mount.
b. For Low Mount System, see Exhaust
Pipes and Diffuser Low Mount.
Exhaust Seal Rings
In the high pressure part of the exhaust system,
the tubes and pipes are sealed by means of metal
seal rings. These seal rings deform when V-band
clamps are tightened and will stick to one of the ex-
haust components at disassembly. Remove the used
seal and replace by a new one at re-assembly. Pay
attention to the different sizes and shapes of seals
at the different locations. Pay attention to the dif-
ferent torque value of the V-band clamp at the con-
nection with the turbo. See Figure 13.
1. BAND CLAMP
2. V-BAND CLAMP AND SEAL RING 5” – SPHERI-
CAL
3. V-BAND CLAMP AND SEAL RING 4” – SPHERI-
CAL
4. V-BAND CLAMP AND SEAL RING 4” – SPHERI-
CAL
5. BAND CLAMP
6. V-BAND CLAMP AND SEAL RING 4” – SPHERI-
CAL
7. V-BAND CLAMP AND SEAL RING 4” – SPHERI-
CAL
8. V-BAND CLAMP AND SEAL RING 4” – STAND-
ARD
9. V-BAND CLAMP AND SEAL RING 3.5" – 70°
Figure 13. Exhaust Seal Rings
Remove and Install 0100 SRM 1978
10
Table of contents
Other Hyster Forklift manuals

Hyster
Hyster E4.0-5.5XN User manual

Hyster
Hyster H135FT Operating instructions

Hyster
Hyster F108 Operating instructions

Hyster
Hyster B218 User manual

Hyster
Hyster H40-60XT User manual

Hyster
Hyster H2.0-2.5CT User manual

Hyster
Hyster T5Z Manual

Hyster
Hyster W60-80XT User manual

Hyster
Hyster R30XMF3 Operating instructions

Hyster
Hyster C455 Operating instructions

Hyster
Hyster D435 Series Manual

Hyster
Hyster J40-65Z Guide

Hyster
Hyster H70XM User manual

Hyster
Hyster D117 Operating instructions

Hyster
Hyster N35ZDR User manual

Hyster
Hyster E470 Operating instructions

Hyster
Hyster E210 Operating instructions

Hyster
Hyster W40Z Manual

Hyster
Hyster B234 Operating instructions

Hyster
Hyster R005 Operating instructions