Hytera PD985i User manual

PD98Xi Digital Portable Radio
Preface
Thanks for your favor in our product. This manual provides guidance for you to quickly know how to use
the product. For detailed features and operations, see the DMR Conventional Radio Feature Description
and Operation Manual along with the product.
To avoid bodily injury or property loss caused by misoperations, please carefully read the Safety
Information Booklet before using the product.
This manual is applicable to the following product:
(X may represent 2, 5, 6 or 8)

Icon Conventions
z: indicates features that are available in digital mode only.
z: indicates features that are available in analog mode only.
Features with no icon marked are available in both analog mode and digital mode.
Copyright Information
Hytera is the trademark or registered trademark of Hytera Communications Corporation Limited (the
Company) in PRC and/or other countries or areas. The Company retains the ownership of its trademarks
and product names. All other trademarks and/or product names that may be used in this manual are
properties of their respective owners.
The product described in this manual may include the Company's computer programs stored in memory
or other media. Laws in PRC and/or other countries or areas protect the exclusive rights of the Company
with respect to its computer programs. The purchase of this product shall not be deemed to grant, either
directly or by implication, any rights to the purchaser regarding the Company's computer programs. Any
of the Company's computer programs may not be copied, modified, distributed, decompiled, or
reverse-engineered in any manner without the prior written consent of the Company.
Disclaimer
The Company endeavors to achieve the accuracy and completeness of this manual, but no warranty of
accuracy or reliability is given. All the specifications and designs are subject to change without notice
due to continuous technology development. No part of this manual may be copied, modified, translated,
or distributed in any manner without the prior written consent of the Company.
We do not guarantee, for any particular purpose, the accuracy, validity, timeliness, legitimacy or
completeness of the Third Party products and contents involved in this manual.
If you have any suggestions or would like to learn more details, please visit our website at:
http://www.hytera.com.
FCC Regulations
Federal Communication Commission (FCC) requires that all radio communication products should meet
the requirements set forth in the FCC Radio Frequency (RF) exposure limits before they can be
marketed in the U.S., and the manufacturer shall post an RF label on the product to inform users of
operational instructions, so as to enhance their occupational health against exposure to RF energy.
FCC Statement
This equipment has been tested and found to comply with the limits for a Class B digital device, pursuant to part 15
of FCC Rules. These limits are designed to provide reasonable protection against harmful interference in a
residential installation. This equipment generates and can radiate radio frequency energy. If not installed and used in
accordance with the instructions, it may cause harmful interference to radio communications. However, there is no

guarantee that interference will not occur in a particular installation. Verification of harmful interference by this
equipment to radio or television reception can be determined by turning it off and then on. The user is encouraged to
try to correct the interference by one or more of the following measures:
Reorient or relocate the receiving antenna. Increase the separation between the equipment and receiver.
Connect the equipment into an outlet on a different circuit to that of the receiver's outlet.
Consult the dealer or an experienced radio/TV technician for help.
Operation is subject to the following two conditions:
This device may not cause harmful interference.
This device must accept any interference received, including interference that may cause undesired operation.
Note: Changes or modifications to this unit not expressly approved by the party responsible for compliance could
void the user's authority to operate the equipment.
RF Exposure Compliance and Control Guidelines and
Operating Instructions
To control your exposure and ensure compliance with the occupational/controlled environmental exposure limits,
always adhere to the following procedures.
Guidelines:
Do not remove the RF Exposure Label from the device.
User awareness instructions should accompany device when transferred to other users.
Do not use this device if the operational requirements described herein are not met.
Operating Instructions:
Transmit no more than the rated duty factor of 50% of the time. To transmit (talk), push the Push-To-Talk (PTT)
key. To receive calls, release the PTT key. Transmitting 50% of the time, or less, is important because the radio
generates measurable RF energy only when transmitting (in terms of measuring for standards compliance).
Keep the radio unit at least 2.5 cm away from the face. Keeping the radio at the proper distance is important as
RF exposure decreases with distance from the antenna. The antenna should be kept away from the face and
eyes.
When worn on the body, always place the radio in a Hytera-approved holder, holster, case, or body harness or
by use of the correct clip for this product. Use of non-approved accessories may result in exposure levels which
exceed the FCC's occupational/controlled environmental RF exposure limits.
Use of non-approved antennas, batteries, and accessories causes the radio to exceed the FCC RF exposure
guidelines.
Contact your local dealer for the optional accessories of the product.

EU Regulatory Conformance
As certified by the qualified laboratory, the product is in compliance with the essential requirements and
other relevant provisions of the following directives:
z1999/5/EC or 2014/53/EU
z2006/66/EC
z2011/65/EU
z2012/19/EU
Please note that the above information is applicable to EU countries only.

Contents
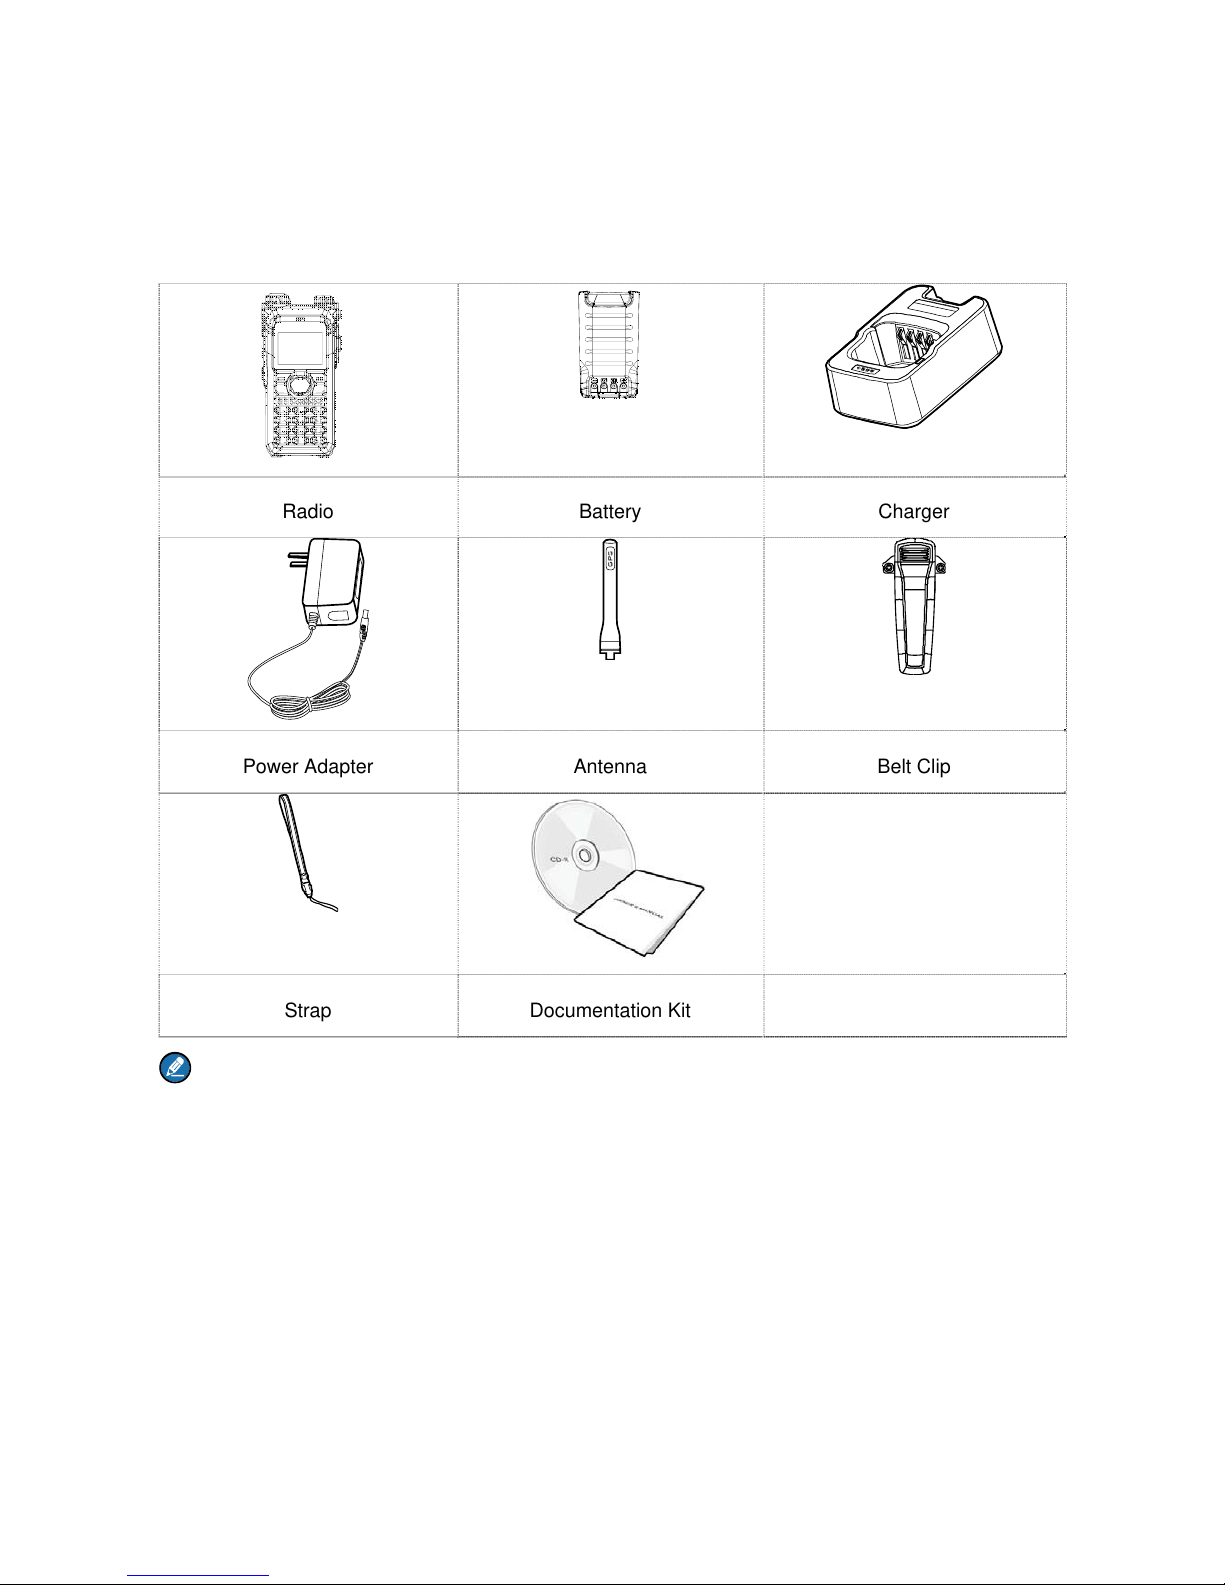
1. Items in the Package..........................................................................................................................1
2. Product Overview ...............................................................................................................................2
2.1 Product Controls .............................................................................................................................2
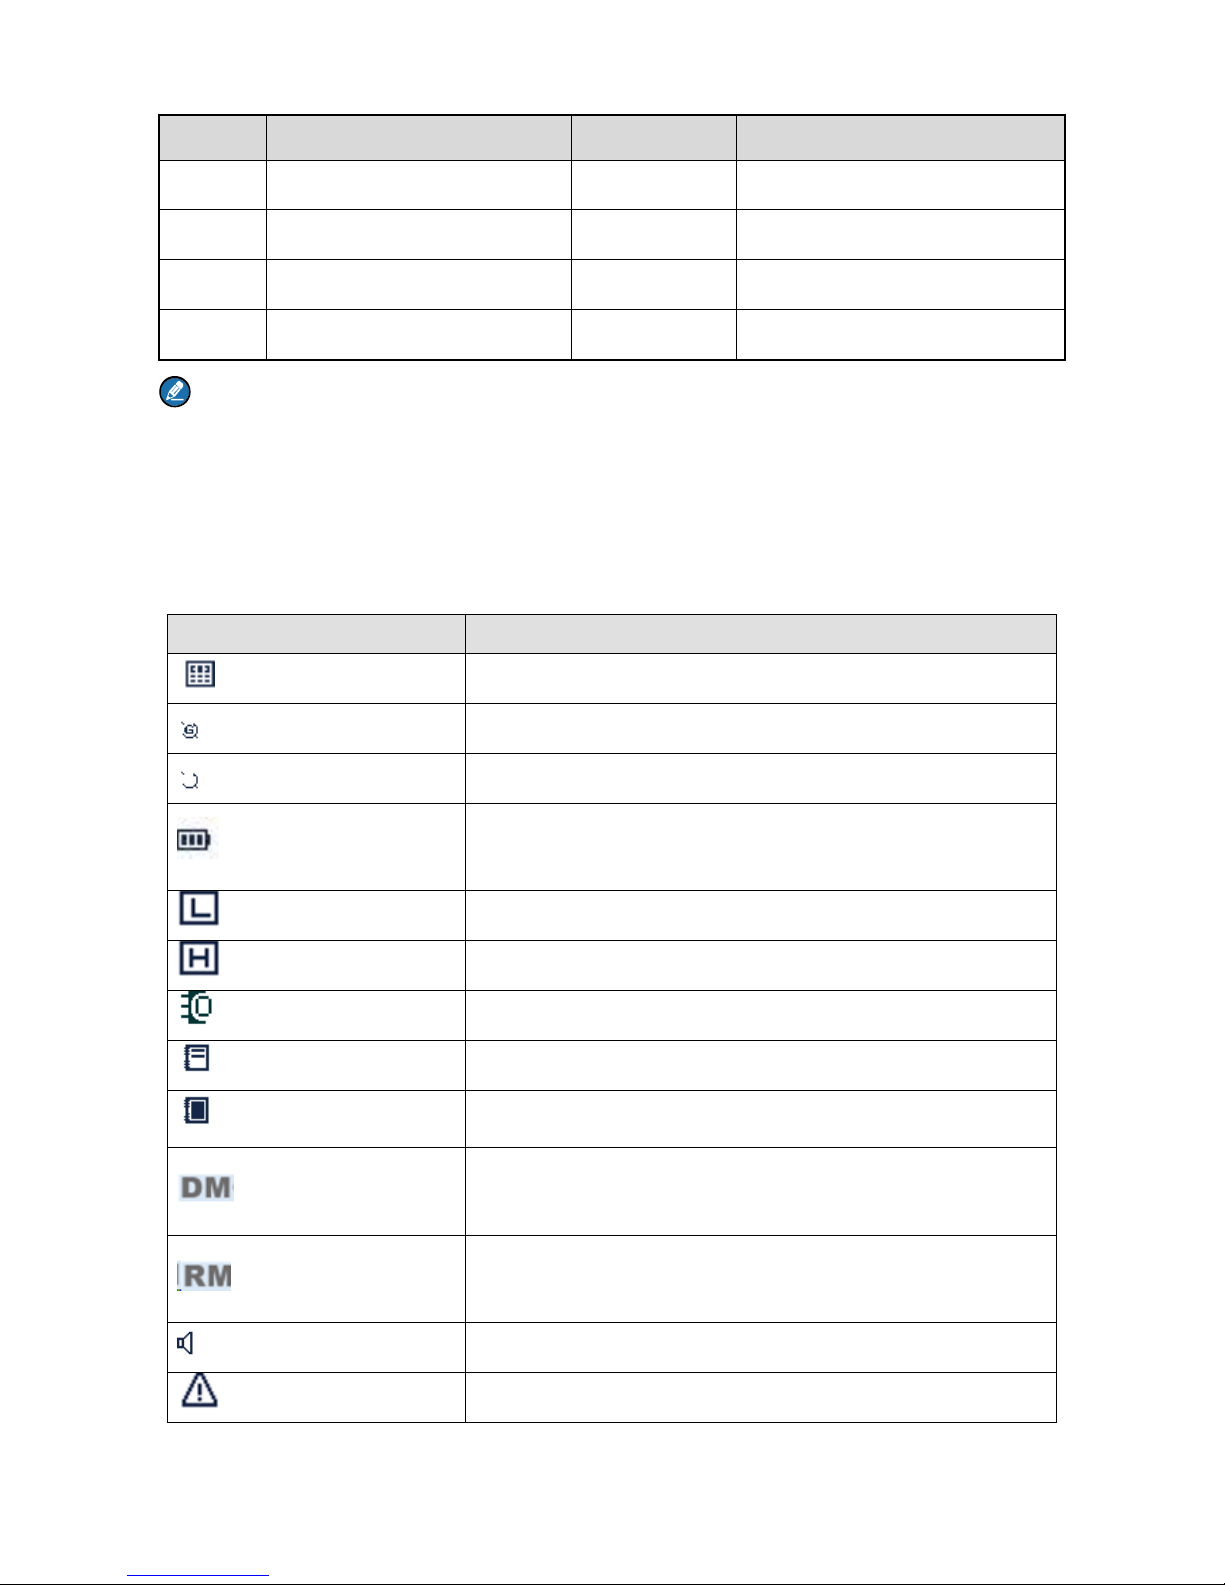
2.2 LCD Icon.........................................................................................................................................3
2.3 LED Indicator ..................................................................................................................................4
3. Before Use ..........................................................................................................................................6
3.1 Attaching the Antenna.....................................................................................................................6
3.2 Installing the TF Card......................................................................................................................6
3.3 Attaching the Battery.......................................................................................................................7
3.4 Attaching the Belt Clip.....................................................................................................................7
3.5 Attaching the Accessories...............................................................................................................7
3.6 Charging the Battery.......................................................................................................................8
4. Basic Operations..............................................................................................................................10
4.1 Turning On/Off the Radio..............................................................................................................10
4.2 Checking the Battery.....................................................................................................................10
4.3 Checking the Battery Power .........................................................................................................10
4.4 Adjusting the Volume ....................................................................................................................11
4.5 Selecting a Zone...........................................................................................................................11
4.6 Selecting a Channel......................................................................................................................11
4.7 Inputting via Keypad .....................................................................................................................11
4.8 Locking or Unlocking Keys and Knobs..........................................................................................12
4.9 Creating a Private Contact ......................................................................................................12
5. Call Services .....................................................................................................................................13
5.1 Private Call ..............................................................................................................................13
5.2 Group Call ...............................................................................................................................13
5.3 Call on Analog Channel without Signaling ...............................................................................14
5.4 Emergency Call ............................................................................................................................14
6. Message Services ......................................................................................................................15
7. Troubleshooting ...............................................................................................................................16
8. Care and Cleaning............................................................................................................................18
9. Optional Accessories.......................................................................................................................19

1
1. Items in the Package
Please unpack carefully and check if all items listed below are received. If any item is missing or
damaged, please contact your dealer.
Radio Battery Charger
Power Adapter Antenna Belt Clip
Strap Documentation Kit
Note
¾The pictures in this manual are for reference only.
¾The frequency band is marked on the label of antenna; if it is unavailable there, see the label on
the radio.

2
2. Product Overview
2.1 Product Controls
No. Part Name No. Part Name
1 Side Key 1 (SK1) 12 LED Indicator
2 Push-to-Talk (PTT) Key 13 Antenna
3 Side Key 2 (SK2) 14 On-Off/Volume Control Knob
4 Top Key (TK) 15 Accessory Connector
5 Channel Selector Knob 16 Back Key
6 Microphone 17 P2 Key
7 LCD Display 18 Up Key

3
No. Part Name No. Part Name
8 OK/Menu Key 19 Down Key
9 P1 Key 20 Battery Latch
10 Speaker 21 Belt Clip
11 Numeric Keypad 22 Battery
Note
For enhanced convenience, you may request your dealer to program the TK, SK1, SK2, P1, and P2
as shortcuts to radio features. For the detailed introduction, see the DMR Conventional Radio
Feature Description and Operation Manual along with the product.
2.2 LCD Icon
Icon Radio Status
The DTMF keypad is enabled.
The GPS feature is enabled, and the radio receives GPS data.
The GPS feature is enabled, but the radio receives no GPS data.
The number of bars (0–3) indicates the charge remaining in the
battery.
The radio is set at Low power.
The radio is set at High power.
An accessory is connected.
One or more new work orders are received.
The maximum number of saved work orders is reached.
Direct Mode: In this mode, radios communicate with each other
directly.
Repeater Mode: In this mode, radios communicate with each
other via a repeater.
The Monitor feature is enabled.
The radio is in emergency mode (excluding silent emergency

4
Icon Radio Status
mode) or an emergency call is received.
The radio is roaming.
The Scrambler or Encrypt feature is enabled.
The radio is scanning.
The radio stays on a non-priority channel.
The radio stays on priority channel 1.
The radio stays on priority channel 2.
The VOX feature is enabled.
There is/are missed call(s).
There is/are unread message(s).
The Inbox is full.
The BT feature is enabled.
The wireless device is connected.
There is no signal.
The number of bars (1–4) indicates the radio signal strength.
The speaker is unmuted.
The radio operates in silent mode.
The LQO feature is enabled.
No TF card is detected.
A private call is in progress or a private contact is in the contact
list.
A group call is in progress or a group contact is in the contact list.
An all call is in progress or an all call contact is in the contact list.
2.3 LED Indicator
LED Indication Radio Status

5
LED Indication Radio Status
Flashes green Being turned on.
Glows green Receiving.
Glows red Transmitting.
Flashes orange
slowly Scanning or roaming.
Flashes orange
rapidly Working in emergency mode.
Glows orange Call hang time: No voice is being transmitted or received on the channel
during a call. Within such a period, you can hold down the PTT key to speak.
Glows blue The BT feature is being enabled.
Flashes blue every 3s The BT feature is enabled, but no wireless device is connected.
Flashes blue every
1.5s The wireless device is connected.
Flashes blue every
0.1s The BT feature is being disabled.

6
3. Before Use
3.1 Attaching the Antenna
Caution
Do not hold the radio by its antenna; otherwise, the radio performance may be reduced and the life span
of the antenna may be shortened.
3.2 Installing the TF Card
Install the TF card as follows if required:
Step 1 Loosen the screw fixing the TF card cover, remove the cover, and then place the card in the
holder properly as shown below.
1
2
Step 2 Replace the cover and tighten the screw as shown below.

7
3.3 Attaching the Battery
Note
To remove the battery, make sure that the radio is turned off, and then slide the battery latch upwards to
unlock the battery.
3.4 Attaching the Belt Clip
Step 1 Unfasten the two screws on the back of the radio.
Step 2 Align the screw holes on the belt clip with those on the back of the radio, as shown below.
Step 3 Tighten the screws.
3.5 Attaching the Accessories
Caution
For optimal waterproof and dustproof performance:

8
¾Do not scrape the silicone waterproof pad surrounding the screw hold of the accessory connector.
¾Do close the accessory connector cover and fasten the screw after removing the accessory.
Step 1 Loosen the screw fixing the accessory connector cover, and open the cover as shown below.
Step 2 Align the accessory (such as an audio accessory or a programming cable) plug with the
accessory connector.
Step 3 Tighten the screw on the accessory plug.
3.6 Charging the Battery
Caution
Use the charger specified by the Company to charge the battery.
Be sure to charge the battery fully before initial use, since reduction of state of charge (SoC) may lead to
low battery alarm. You can charge the standalone battery or the radio with battery attached. It is

9
recommended that your radio remain powered off during charging.
The LED indicator on the charger shows the charging status. For details, see the following table.
LED Indication Charging Status
Flashes red slowly The battery is inserted incorrectly.
Glows red The battery is charging.
Glows orange The battery is charged to 90% or more.
Glows green The battery is fully charged.
Flashes red rapidly The battery fails to be charged.

10
4. Basic Operations
4.1 Turning On/Off the Radio
Note
Upon power-on, the radio automatically checks whether the battery is approved by the Company. If
yes, "Certificated Battery" (for an anti-fake battery) or "Smart Battery" (for a smart battery) appears
on the screen; if no, "Not Certificated Battery" appears.
4.2 Checking the Battery
Using a battery not approved by the Company disables the Battery Save feature, makes the battery
power indication inaccurate, and reduces the radio performance.
To check the battery, go to "Menu -> Settings -> Radio Set -> Battery". If "Not Certificated Battery"
appears, it is recommended that you replace the battery with one approved by the Company.
4.3 Checking the Battery Power
You can check the current battery power by holding down the Battery Power Indicator key
programmed by your dealer, and release the key to exit. Battery power indications and alert tone are
listed below:
LED Indication/Tone Icon
The LED indicator glows green.
The LED indicator glows orange.
The LED indicator glows red.
The LED indicator glows red and an alert tone
sounds.
The battery runs low. Please recharge or
replace the battery.

11
4.4 Adjusting the Volume
4.5 Selecting a Zone
A zone is a group of channels with the same property. The radio supports up to 64 zones, with a
maximum of 128 channels per zone.
To select a zone, do one of the following:
zMenu: Go to "Menu -> Zone", press the Up or Down key to select an appropriate zone, and then
press the OK/Menu key to switch to the selected zone.
zShortcut key: Switch to an appropriate zone by pressing the Zone Up or Zone Down key
programmed by your dealer.
4.6 Selecting a Channel
Data and voices are received and transmitted on a channel. You can rotate the Channel Selector knob
to select the channel.
4.7 Inputting via Keypad
You can use the keypad to enter user aliases or IDs and text messages. Here are some useful tips:

12
zTo switch the input method between alphabetic mode and numeric mode, press .
zTo enter special characters, press in the alphabetic mode or in the numeric mode.
zTo enter the space, press in the alphabetic mode.
4.8 Locking or Unlocking Keys and Knobs
When the keypad is not in use, it is recommended that you lock it to avoid misoperations. To lock or
unlock the keypad, do one of the following:
zAutomatically lock or unlock the keypad
The Keypad Lock feature allows the keypad to be locked automatically if no operation is performed
within the preset time period.
To enable this feature, go to "Menu -> Settings -> Radio Set -> Keypad Lock", select "Enable", and
set "Delay Time(s)" by pressing the Up or Down key.
To disable this feature, select "Disable" under the "Keypad Lock" menu.
zManually lock or unlock the keypad
To manually lock or unlock the keypad, do one of the following on the home screen:
¾Press the Keypad Lock key programmed by your dealer.
¾Press the OK/Menu key and then press .
Note
You can go to "Menu -> Settings -> Radio Set -> Optional Key” to set whether the following keys and
knobs will be locked when the keypad is locked: TK, P1, P2, SK1, SK2, Channel Selector knob,
On-Off/Volume Control knob, and PTT.
4.9 Creating a Private Contact
To add a new contact to the private contact list, go to “Menu -> Contact -> New Contact", enter the ID
and alias of the new contact, and save it.
Note
¾The ID and alias of a new contact must be unique.
¾You can also save the IDs from the Call Logs into the contact list.

13
5. Call Services
Once you have selected the required channel, you can make or receive calls on that channel. To ensure
optimal voice quality of the receiving radio, keep the microphone about 2.5 to 5 centimeters away from
your mouth when the radio is transmitting.
5.1 Private Call
A private call is a call from an individual user to another individual user.
5.1.1 Initiating a Private Call
On the home screen, hold down the PTT key to initiate a call to the private contact preset for the current
channel. In this case, the radio displays on the screen.
For other ways to initiate a private call, see the DMR Conventional Radio Feature Description and
Operation Manual along with the product.
5.1.2 Receiving and Responding to a Private Call
When you receive a private call, the radio displays on the screen. Then you can listen to it without
any operation.
You can hold down the PTT key to speak within the preset time period. Otherwise, the call ends and the
radio displays missed call indications.
5.2 Group Call
A group call is a call from an individual user to a group of users.

14
5.2.1 Initiating a Group Call
On the home screen, hold down the PTT key to initiate a group call to the group contact preset for the
current channel. In this case, the radio displays on the screen.
For other ways to initiate a group call, see the DMR Conventional Radio Feature Description and
Operation Manual along with the product.
5.2.2 Receiving and Responding to a Group Call
When you receive a group call, the radio displays on the screen. Then you can listen to it without
any operation.
You can hold down the PTT key to speak within the preset time period. If there is no voice activity within
the preset time period, the call ends.
5.3 Call on Analog Channel without Signaling
To transmit on the analog channel, hold down the PTT key and speak into the microphone. To receive,
release the PTT key.
For descriptions and operations of calls on the analog channel with signaling, see the DMR Conventional
Radio Feature Description and Operation Manual along with the product.
5.4 Emergency Call
In case of emergency, you can use the Emergency Call feature to ask for help from your companion or
the control center.
This feature needs to be configured and enabled by your dealer. For details, see the DMR Conventional
Radio Feature Description and Operation Manual along with the product.

15
6. Message Services
Message services allow you to edit a new message and send it directly or save it to the Drafts, directly
send a quick text message, and forward the messages saved in the Inbox and Outbox.
New Message
New Message allows you to create a message. You can send the new message to a private contact or
group contact, or save it to the Drafts.
Quick Text
Quick Text allows you to send the frequently used messages preset by your dealer. You can send the
quick text message directly or edit it before sending it.
Inbox
The Inbox saves the received messages and marks each message with a corresponding icon to indicate
its status.
When the Inbox is full, the earliest message will be overwritten by the latest one automatically.
Outbox
The Outbox saves the sent messages and marks each message with a corresponding icon to indicate its
status.
When the Outbox is full, the earliest message will be overwritten by the latest one automatically.
Drafts
The Drafts saves the edited messages. When the Drafts is full, the earliest message will be overwritten
by the latest one automatically.
If the message in the Drafts is sent successfully, it will be moved from the Drafts to the Outbox.
Otherwise, the message will remain in the Drafts and be saved into the Outbox as well.
This manual suits for next models
3
Table of contents
Other Hytera Portable Radio manuals

Hytera
Hytera PD500 User manual

Hytera
Hytera PD562i User manual

Hytera
Hytera BD502i User manual

Hytera
Hytera H Series User manual

Hytera
Hytera PD75X User manual

Hytera
Hytera PD502 User manual

Hytera
Hytera PD60X User manual

Hytera
Hytera PD71XIS User manual

Hytera
Hytera PD46X User manual

Hytera
Hytera PD40X User manual

Hytera
Hytera PD502 User manual

Hytera
Hytera PD98X User manual

Hytera
Hytera TF-515 User manual

Hytera
Hytera PD68X UL913 User manual

Hytera
Hytera BP51X User manual

Hytera
Hytera HP60X User manual

Hytera
Hytera PD48X User manual

Hytera
Hytera PD70X Series User manual

Hytera
Hytera PD78X Series User guide

Hytera
Hytera PD70XI User manual