DAH-1300
DAH-1300
DAH-1300
DAH-1300
DAH-1300
DAH-1300
DAH-1300
DAH-1300
DAH-1300
DAH-1300
DAH-1300
DAH-1300
DAH-1300
DAH-1300
DAH-1300
DAH-1300
DAH-1300
DAH-1300
DAH-1300
DAH-1300
DAH-1300
DAH-1300
DAH-1300
DAH-1300
DAH-1300
DAH-1300
DAH-1300
DAH-1300
DAH-1300
DAH-1300
DAH-1300
DAH-1300
DAH-1300
DAH-1300
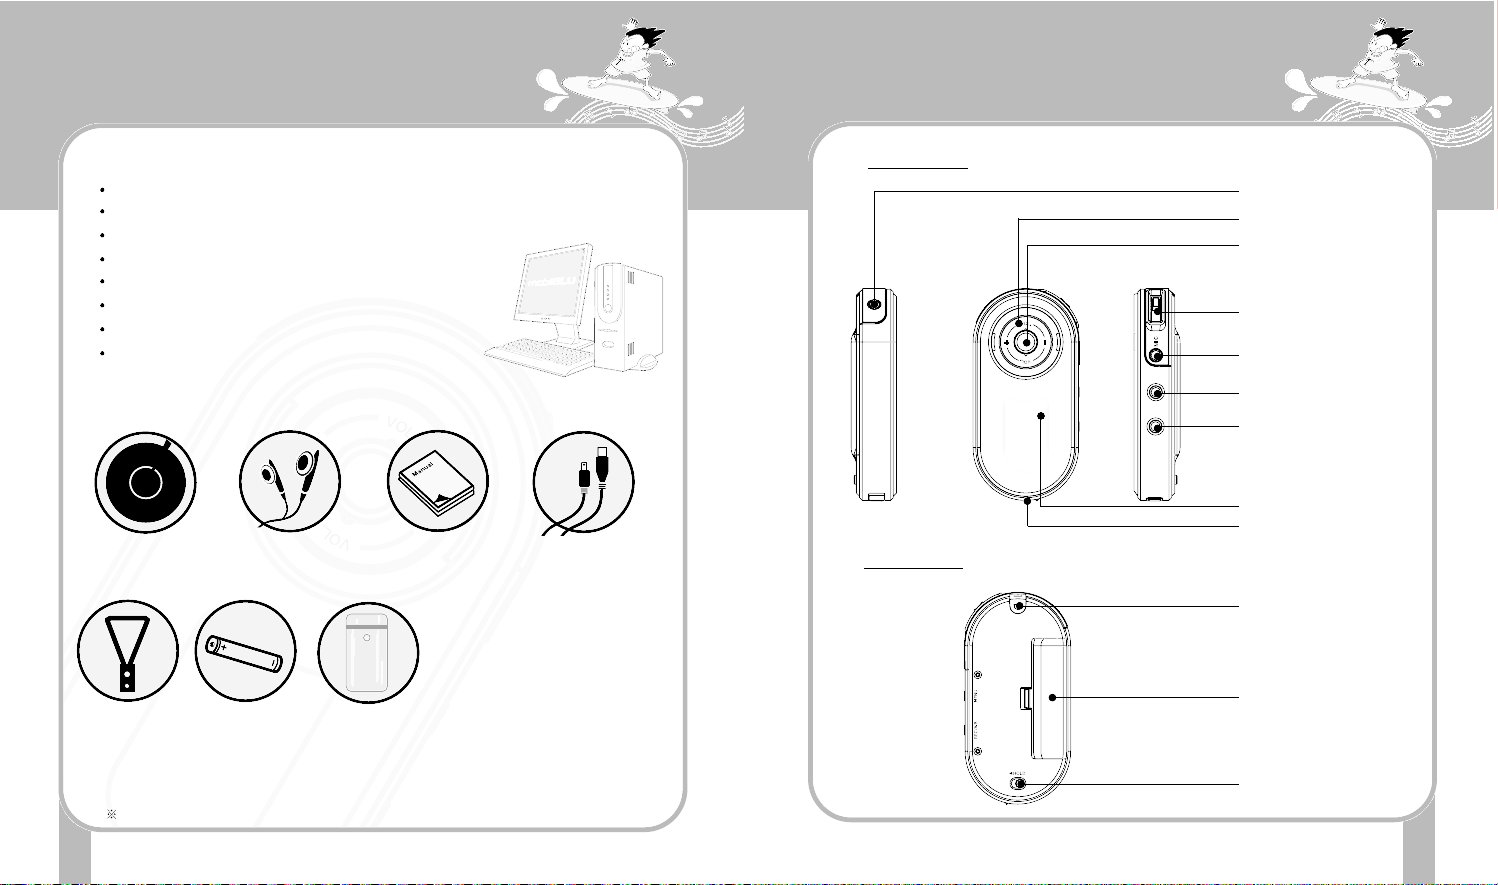
Digital Audio Player(MP3+WMA)
Voice Recorder
FM Radio
Negative Graphic LCD
Digital Audio Player(MP3+WMA)
Voice Recorder
FM Radio
Negative Graphic LCD
Digital Audio Player(MP3+WMA)
Voice Recorder
FM Radio
Negative Graphic LCD
Digital Audio Player(MP3+WMA)
Voice Recorder
FM Radio
Negative Graphic LCD
Digital Audio Player(MP3+WMA)
Voice Recorder
FM Radio
Negative Graphic LCD
Digital Audio Player(MP3+WMA)
Voice Recorder
FM Radio
Negative Graphic LCD
Digital Audio Player(MP3+WMA)
Voice Recorder
FM Radio
Negative Graphic LCD
Digital Audio Player(MP3+WMA)
Voice Recorder
FM Radio
Negative Graphic LCD
Digital Audio Player(MP3+WMA)
Voice Recorder
FM Radio
Negative Graphic LCD
Digital Audio Player(MP3+WMA)
Voice Recorder
FM Radio
Negative Graphic LCD
Digital Audio Player(MP3+WMA)
Voice Recorder
FM Radio
Negative Graphic LCD
Digital Audio Player(MP3+WMA)
Voice Recorder
FM Radio
Negative Graphic LCD
Digital Audio Player(MP3+WMA)
Voice Recorder
FM Radio
Negative Graphic LCD
Digital Audio Player(MP3+WMA)
Voice Recorder
FM Radio
Negative Graphic LCD
Digital Audio Player(MP3+WMA)
Voice Recorder
FM Radio
Negative Graphic LCD
Digital Audio Player(MP3+WMA)
Voice Recorder
FM Radio
Negative Graphic LCD
Digital Audio Player(MP3+WMA)
Voice Recorder
FM Radio
Negative Graphic LCD
Digital Audio Player(MP3+WMA)
Voice Recorder
FM Radio
Negative Graphic LCD
Digital Audio Player(MP3+WMA)
Voice Recorder
FM Radio
Negative Graphic LCD
Digital Audio Player(MP3+WMA)
Voice Recorder
FM Radio
Negative Graphic LCD
Digital Audio Player(MP3+WMA)
Voice Recorder
FM Radio
Negative Graphic LCD
Digital Audio Player(MP3+WMA)
Voice Recorder
FM Radio
Negative Graphic LCD
Digital Audio Player(MP3+WMA)
Voice Recorder
FM Radio
Negative Graphic LCD
Digital Audio Player(MP3+WMA)
Voice Recorder
FM Radio
Negative Graphic LCD
Digital Audio Player(MP3+WMA)
Voice Recorder
FM Radio
Negative Graphic LCD
Digital Audio Player(MP3+WMA)
Voice Recorder
FM Radio
Negative Graphic LCD
Digital Audio Player(MP3+WMA)
Voice Recorder
FM Radio
Negative Graphic LCD
Digital Audio Player(MP3+WMA)
Voice Recorder
FM Radio
Negative Graphic LCD
Digital Audio Player(MP3+WMA)
Voice Recorder
FM Radio
Negative Graphic LCD
Digital Audio Player(MP3+WMA)
Voice Recorder
FM Radio
Negative Graphic LCD
Digital Audio Player(MP3+WMA)
Voice Recorder
FM Radio
Negative Graphic LCD
Digital Audio Player(MP3+WMA)
Voice Recorder
FM Radio
Negative Graphic LCD
Digital Audio Player(MP3+WMA)
Voice Recorder
FM Radio
Negative Graphic LCD
Digital Audio Player(MP3+WMA)
Voice Recorder
FM Radio
Negative Graphic LCD
User Manual
www.mobiblu.com
P/N : M1000-031118