Hyundai Lighting HYUSTR001R User manual

Imported/Distributed by Azoogi Pty Ltd
Smart RGBW LED Strip
Installation Manual

Imported/Distributed by Azoogi Pty Ltd
Product Code
CCT
Colour Rendering Index
Total Power
IP Rating
Lumen Output
Voltage Rating
Dimmable
Rated Average Design Life
WiFi Frequency
Dimensions
3 years limited warranty.
Visit https://hyundailighting.com.au/terms-and-conditions/
for detailed warranty information.
Email: [email protected]
3m (HYUSTR001R) or
5m (HYUSTR002R)
LED Strip.
12V DC Power Adaptor
with 2m adaptor lead.
LED controller
compatible with RF
remote and TUYA app.
RF remote controller
with battery.
HYUSTR001R
RGB + 3000K
>80
18W
IP44
1050lm (3000K)
12V DC
Yes
36,000 Hrs
2.4GHz
10 x 3000mm
HYUSTR002R
RGB + 3000K
>80
24W
IP44
1050lm (3000K)
12V DC
Yes
36,000 Hrs
2.4GHz
10 x 5000mm
Specications
Package contents
Warranty information
a
b
c
d
Smart RGBW LED Strip Installation Manual
Swallowing may lead to serious injury in as little as 2 hours, due to chemical burns
and potential perforation of the oesophagus.
If you suspect your child has swallowed or inserted a button battery, immediately
call the 24-hour Poisons Information Centre on 13 11 26 (in Australia) for fast, expert
advice.
Examine devices and make sure the battery compartment is correctly secured. Do
not use if compartment is not secure.
Dispose of used button batteries immediately and safely.

Imported/Distributed by Azoogi Pty Ltd
Before the installation, please ensure the power is off.
Ensure that surface is clean and dry prior to
applying LED Strip. It is recommended to use
rubbing alcohol and not any household cleaners
or water.
Peel off the double-sided tape and apply to the
surface. Carefully consider placement of the
product due to strong adhesive qualities.
Plug power adaptor into power point.
To control the Smart RGBW LED Strip, you can
use Smart Life – Smart Living app on your phone
or tablet or alternatively use the remote control
(refer to the following sections for details).
To start using the RF remote, pull the insulation
strip and make sure the remote is pointed in the
line of sight to all the receivers.
Installation
1
2
3
4
5
If the LED strip is longer than what you need, you can cut
the LED strip to your desired length. However, note that
you can cut the strip only at intervals where the “scissor”
symbols are provided (see example in the following image).
You must not cut the LED strip from the power end as it
would cut off the supply of power to the strip.
Attach the strip to the controller
using it’s 5-pin connector and
make sure that the arrows
are pointing at each other as
shown in the image below.
Subsequently, attach the DC
jack to the adapter. You may
then plug the adapter into the
outlet and switch it on.
Cutting the strip
Powering the strip
NOTE: Do not sharply bend or twist the LED strip. The strip
can only be bent in the gaps between the components.
Smart RGBW LED Strip Installation Manual

Imported/Distributed by Azoogi Pty Ltd
Download “Smart Life – Smart Living” app from Apple
store or Google Play and install it into your smart phone
or tablet device. Alternatively, scanning the QR code
below will take you to the app’s download page.
Download App
Registration and Login
Open the “Smart Life – Smart Living” app from your
smart phone.
Follow the prompts to register and login
1
2
Connect the Smart RGBW LED Strip to a power
source. Once connected, the strip will start blinking
rapidly indicating it is in pairing mode. If not, to enter
pairing mode, turn the strip on and then off 3 to 5 times
with one second wait between turning on and off.
Finally, it must be on. The strip should start blinking
rapidly by now.
1
Add device
The frequency of blinking in pairing mode is approx. 2 times
a second. If it is blinking much slower, repeat step 1 until it
starts blinking correctly.
NOTE: Smart RGBW LED Strip must be connected to 2.4
GHz (not 5 GHz) WiFi connection for smart control. Visit
https://hyundailighting.com.au/switching-your-wi-from-
5ghz-to-2-4ghz/ for steps to switch your Wi-Fi network from
5 GHz to 2.4 GHz.
Both the mobile phone/tablet and the strips must be
in the same Wi-Fi network while pairing. Once paired,
they can be controlled remotely using the mobile
device.
In the Smart Life – Smart Living app, press the (+)
symbol on the top right-hand corner. When device
window pops up with the light to add, press “Go to
add”. If the device window does not pop up, add the
device manually by selecting “Lighting” tab on the
left panel and choosing “Light Source (BLE + WiFi)”
option. If a pop-up window asking for SSID and
password for your Wi-Fi connection appears, enter the
details (see examples below and in the next page, for
reference).
2
3
While pairing multiple strips at the same time, if some strips
are left unpaired, disconnect the power supply to the paired
ones and then pair the remaining ones following the same
process. Once paired, all the strips can be re-connected to
the power supply and controlled.
Smart RGBW LED Strip Installation Manual

Imported/Distributed by Azoogi Pty Ltd
1
2
3
4
Automatic detection of device and pairing
1
2
3
Manual detection of device and pairing
Smart RGBW LED Strip Installation Manual

Imported/Distributed by Azoogi Pty Ltd
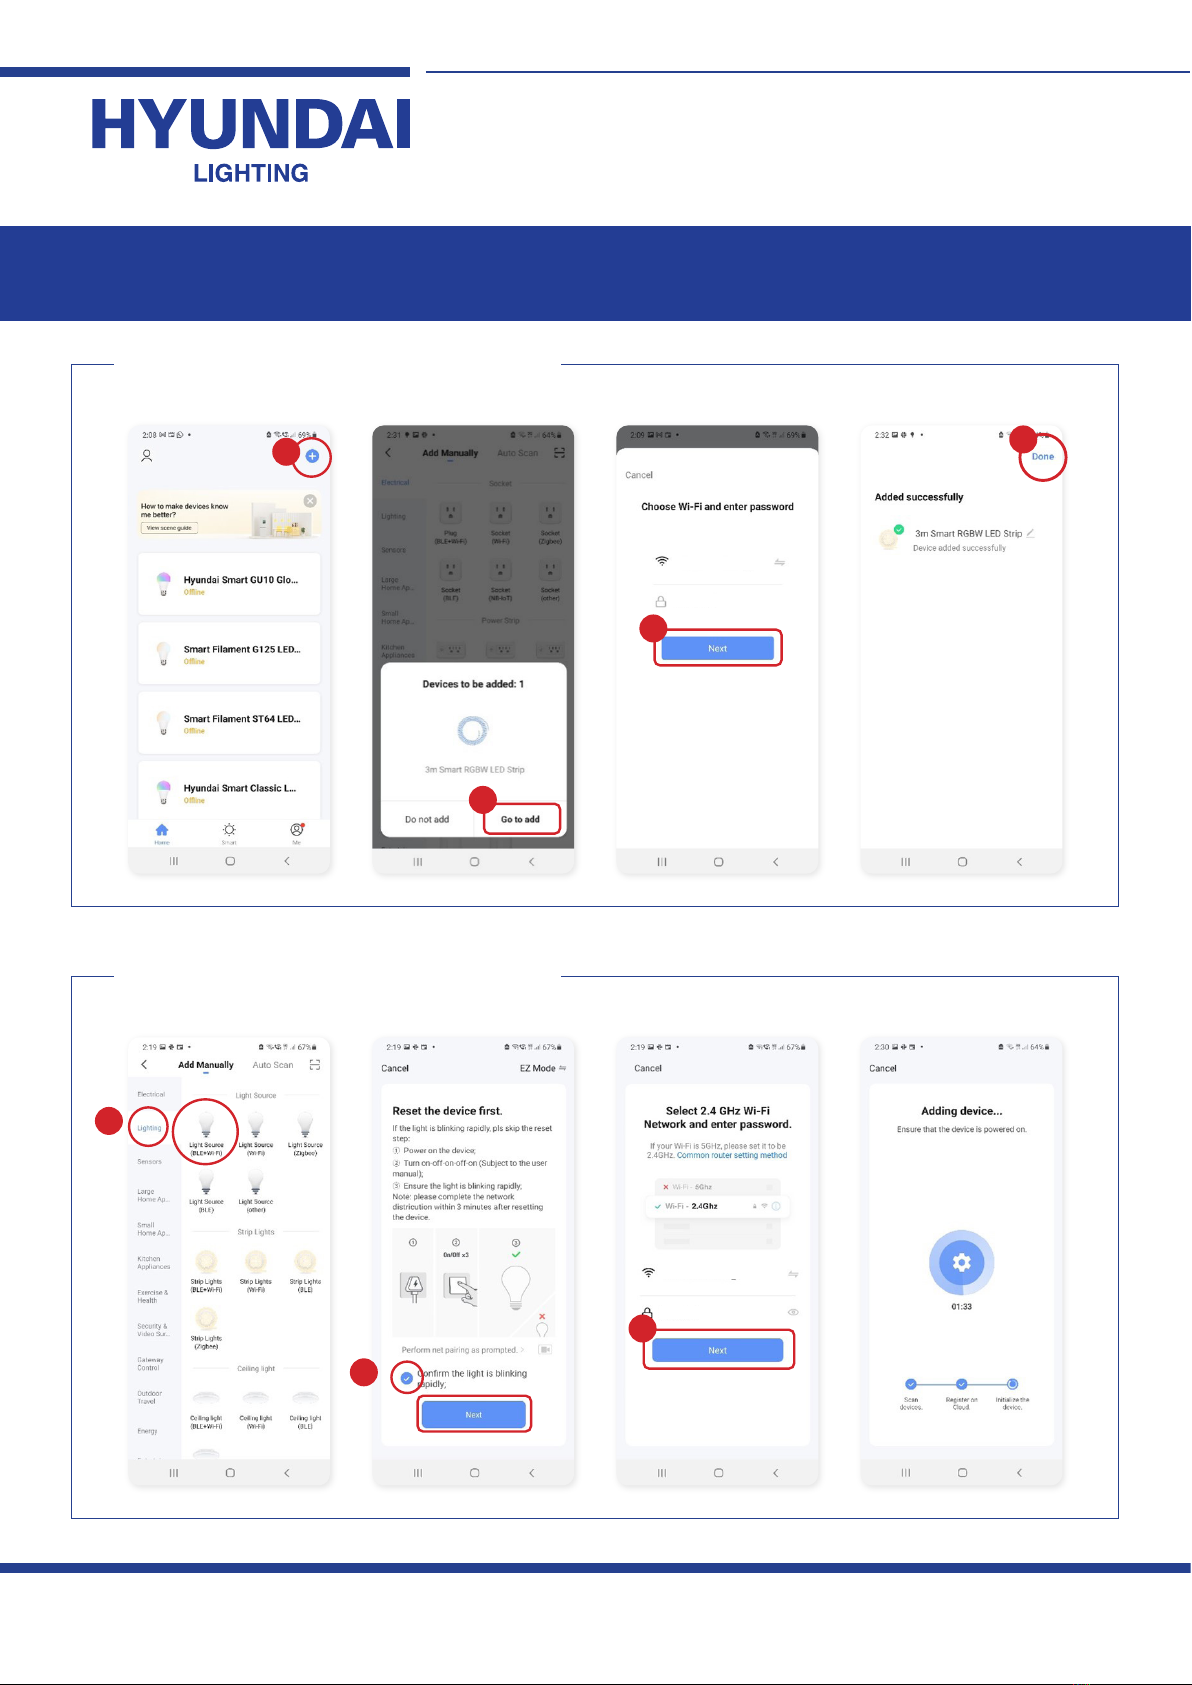
Pairing process will begin. Do not turn off the strip
while pairing and wait for the pairing process to
complete. If you get a message that says - “Failed
to Add”, repeat the steps from 1 to 3 to pair the
device.
Once the device has been successfully added, you
can begin using it.
4
5
With Smart Life – Smart Living, you can control all your
smart lights remotely from your smartphone app. Whether
you’re in a different room, at work, or halfway across
the world, you can control your smart lights using just a
wireless connection and your smartphone app.
You can congure the Smart Life – Smart Living app
using voice commands through Amazon Alexa or Google
Assistant. This means that you can control all your
lights using voice commands, so you don’t even need to
manually access your Smart Life – Smart Living app. To
control the devices through voice commands, you’ll need
to congure your Smart Life – Smart Living app voice
commands.
Functionalities
Control remotely
Control using voice commands
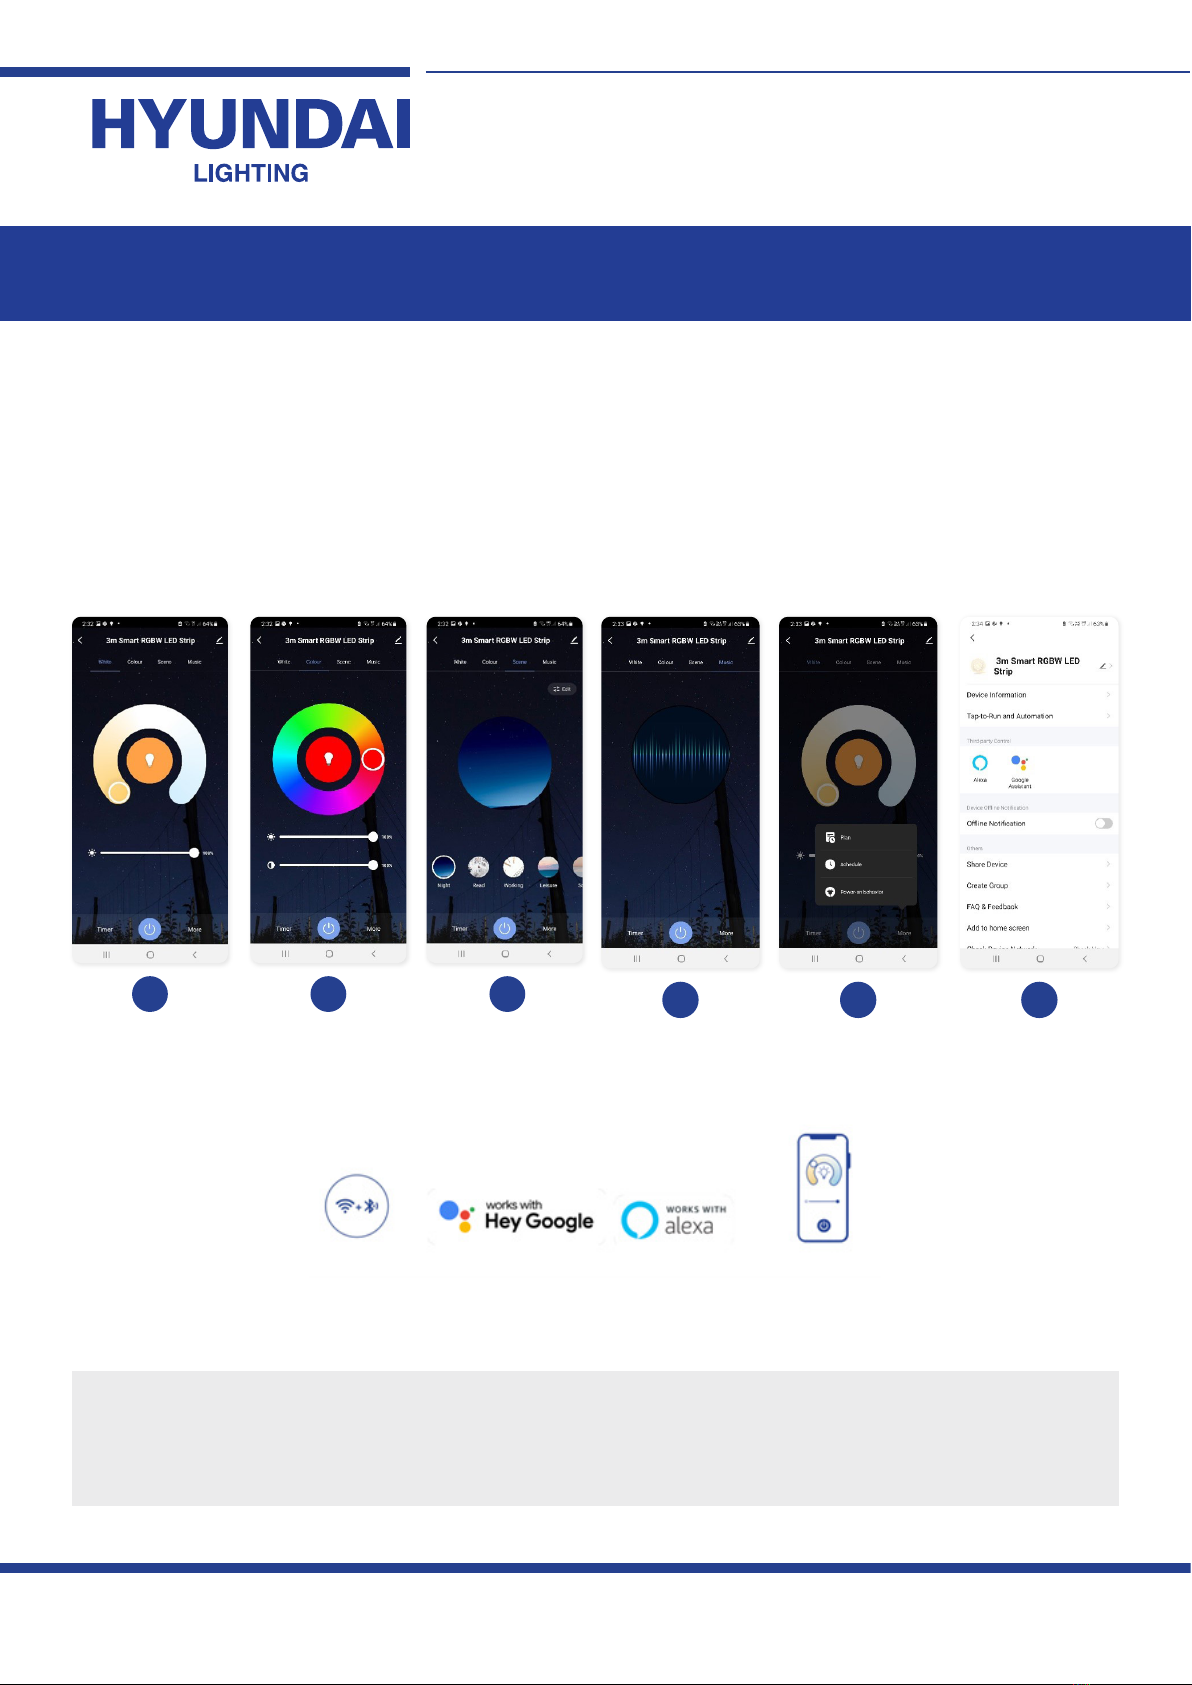
In “White mode”, you can change the colour temperature
from warm white to daylight using the colour temperature
wheel and the brightness of strip using the scroll bar below
the colour temperature wheel. See example [1] in the next
page for reference.
Tune white colour
Visit https://hyundailighting.com.au/using-google-home-or-
amazon-alexa-to-control-your-lights/ for steps to configure
voice commands for Amazon Alexa or Google Home.
If you have multiple smart LED strips or other smart lights,
you can group and control them simultaneously with a
single tap or voice command. Add all the smart lights to
your Smart Life app individually and select one light. Select
the edit button on the top right corner and “Create Group”.
Then add all the lights you want to add to the group and
press “Save”. Next, name the group for easy recognition
and “Save”. The group will now show up on the home
screen of the app. See example [6] in the next page for
reference.
You can schedule your strip to turn on or off at certain times
of the day using the “schedule” tab on the bottom right
corner. See example [5] in the next page for reference.
You can choose from several pre-dened smart
automations scenes or create your own automation scenes
to control the strips. Select “Smart” tab on the bottom
centre of the app home screen to access the smart scenes.
See example [6] in the next page for reference.
Group
Schedule
Tap-to-Run and Automation
Smart RGBW LED Strip Installation Manual
There are different pre-set scene modes to choose from
or you can create your own by pressing “Add scene”. See
example [3] in the next page for reference.
In “Colour mode”, you can choose up to 16 million different
colours using the colour wheel and control the brightness
and contrast using the scrolls below. See example [2] in the
next page for reference.
The “Music tab” will enable the lights to change colours
according to the beats of music. See example [4] in the
next page for reference.
Lighting scenes
Choose colours
Sync with Music

Imported/Distributed by Azoogi Pty Ltd
[1] [2] [3] [5] [6][4]
The RCM marking of this product applies to AS/NZS CISPR15 (EMC) “Limits and methods of measurement of radio disturbance
characteristics of electrical lighting and similar equipment”. This product is designed to conform to AS/NZS60598 “Luminaires,
general requirements and tests”.
Smart RGBW LED Strip Installation Manual
You can share the management controls with your friends
and family members so that they can also control the
lights using their smartphones. See example [6] below for
reference.
From the home screen, select the device you want
to remove. Then select the edit button and press the
“Remove Device” button at the bottom.
Share device Remove device
This manual suits for next models
1
Table of contents
Other Hyundai Lighting Lighting Equipment manuals
Popular Lighting Equipment manuals by other brands

LDPI
LDPI LEHL1 Installation, operation and maintenance instructions

Clevertronics
Clevertronics CLP CCFPRO Series Installation & maintenance instructions

JB Systems
JB Systems Radiant Operation manual

Chauvet
Chauvet Scorpion Storm RGX user manual

Bestway
Bestway Flowclear 58367E owner's manual

Qazqa
Qazqa Suplux SL 2 Black 103061 instruction manual