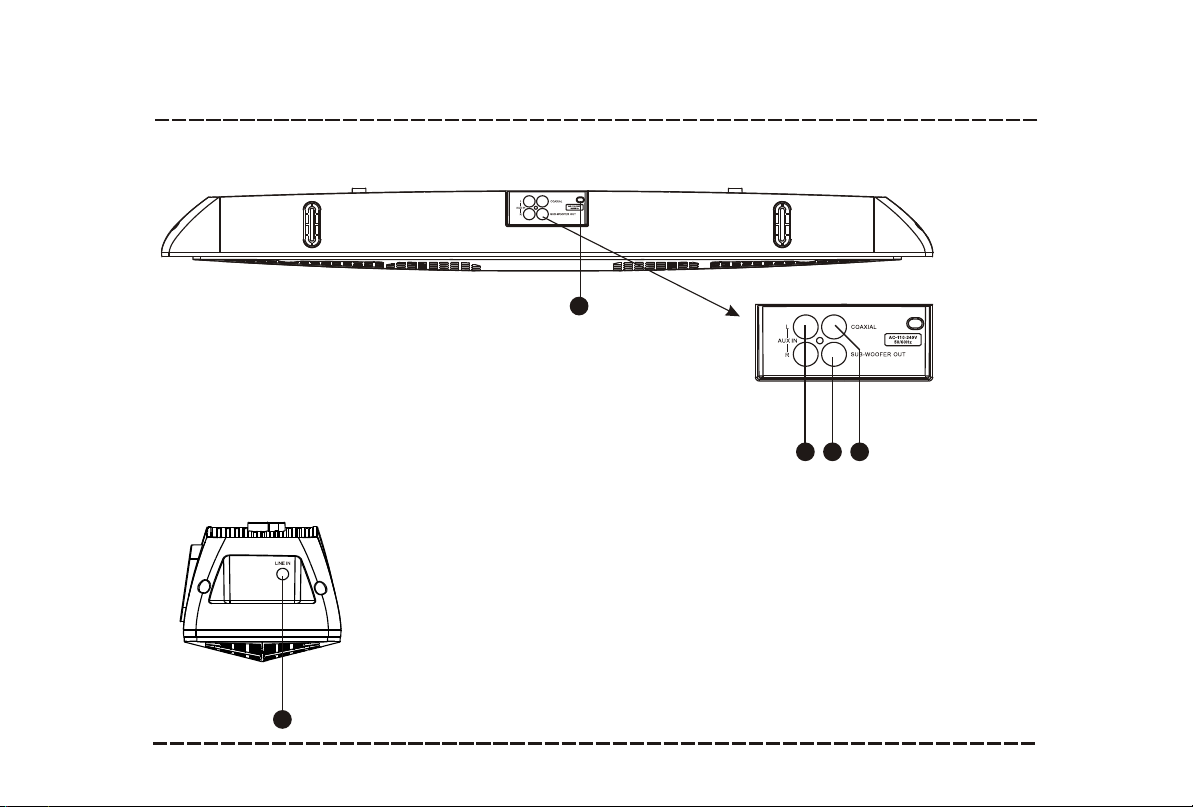
Hyundai HSB18003 User manual

USER MANUAL
HSB1803
SOUND BAR SYSTEM

IMPORTANT SAFETY INSTRUCTIONS:
For Your Attention
1. Read theseinstructions -All the safetyand operating instructionsshould be readbefore this productis operated.
2. Keep theseinstructions- The safety and operatinginstructions should beretained for futurereference.
3. Heed allwarnings -All warnings onthe appliance andin the operatinginstructions should beadhered to.
4. Follow allinstructions -All operating anduse instructions shouldbe followed.
5. Do notuse this apparatusnear water -Theappliance should notbe used nearwater or moisture- for example,in
a wet basementor near aswimming pool, andthe like.
6. Clean onlywith dry cloth.
7. Do notblock any ventilationopenings. Install inaccordance with themanufacture-s instructions.
8. Do notinstall near anyheat sources suchas radiators, heatregisters, stoves, orother apparatus (including
amplifiers) that produceheat.
9. Do notdefeat the safetypurpose of thepolarized or groundingplug. Apolarized plug hastwo blades withone
wider than theother.A groundingplug has twoblades and athird grounding prong.The wide blade or thethird
prong is providedfor your safety. If theprovided plug doesnot fit intoyour outlet, consultan electrician for
replacement of theobsolete outlet.
10. Protect thepower cord frombeing walked onor pinched particularlyat the plugs,convenience receptacles, and
at the pointwhere they exitfrom the apparatus.
11. Only use attachments/accessoriesspecified by themanufacturer.
12. Use onlywith the cart,stand, tripod, bracket,or table specifiedby the manufacturer, or sold with the apparatus.
When a cartor rack isused, use cautionwhen moving thecart/apparatus combination toavoid injury fromtip-over.
-1-

For Your Attention
-2-
13. Unplug theapparatus during lightningstorms or whenunused for longperiods of time.
14. Refer allservicing to qualifiedpersonnel. Servicing isrequired when theapparatus has beendamaged in any
way, such as powersupply cord orplug is damaged,liquid has beenspilled or objectshave fallen intothe
apparatus has beenexposed to rainor moisture, doesnot operate normally, or hasbeen dropped.
15. CAUTION: These servicing instructionsare for useby qualified servicepersonnel only. To reduce therisk of
electric shock, donot perform anyservicing other thanthat contained inthe operating instructionsunless you
are qualified todo so.
18. Do notinstall this equipmentin a confinedor building-in spacesuch as abook case orsimilar unit, andremain a
well ventilation conditionsat open site.The ventilation should not beimpeded by coveringthe ventilation openings
with items suchas newspaper,table-cloths, curtains etc.
19. WARNING-To reduce the risk of fire or electric shock, do not expose this apparatus to rain or moisture. The
apparatus shall notbe exposed todripping or splashingand that objectsfilled with liquids,such as vases,shall
not be placed on apparatus.
20. WARNING: The battery (battery or batteries or battery pack) shall not be exposed to excessive heat such as
sunshine, fire orthe like.
21. WARNING: The mains plug is used as disconnect device, the disconnect device shall remain readily operable.
16. This lightning flash witharrowhead symbol withinan equilateral triangleis intended toalert the userto the
presence of non-insulated“dangerous voltage” withinthe product’s enclosure that maybe of sufficient
magnitude to constitute a risk of electric shock.
- Warning: To reduce the risk of electric shock, do not remove cover (or back) as there are no user-serviceable
parts inside. Referservicing to qualifiedpersonnel.
- The exclamation point withinan equilateral triangleis intended toalert the userto the presenceof important
operating and maintenanceinstructions in theliterature accompanying theappliance.
17. This equipment is aClass II ordouble insulated electricalappliance. It hasbeen designed insuch a
way that itdoes not requirea safety connectionto electrical earth.

For Your Attention
-3-
FCC STATEMENT
1. This device complies withPart 15 ofthe FCC Rules. Operation is subject to the following two conditions:
(1) This device may notcause harmful interference.
(2) This device must acceptany interference received,including interference that may cause undesired operation.
2. Changes ormodifications not expresslyapproved by theparty responsible for compliance could void the user's
authority to operatethe equipment.
NOTE: This equipment has beentested and foundto comply with the limits for a Class B digital device, pursuant to
Part 15 ofthe FCC Rules.These limits are designed to provide reasonable protection against harmful interference
in a residentialinstallation.
This equipment generatesuses and canradiate radio frequency energy and, if not installed and used in
accordance with theinstructions, may causeharmful interference toradio communications. However, there is no
guarantee that interferencewill not occurin a particularinstallation. If this equipment does cause harmful
interference to radioor television reception,which can bedetermined by turning the equipment off and on, the user
is encouraged totry to correctthe interference byone or moreof the following measures:
Reorient or relocatethe receiving antenna.
Increase the separationbetween the equipmentand receiver.
Connect the equipmentinto an outleton a circuitdifferent from that to which the receiver is connected.
Consult the dealeror an experiencedradio/TV technician forhelp.

For your Attention.....................................................................................................1-3
Panel.......................................................................................................................6-7
Connections...............................................................................................................8
Remote Control.......................................................................................................9-10
Basic Playback......................................................................................................11-12
Trouble shooting........................................................................................................13
Specifications............................................................................................................14
Contents.....................................................................................................................4
Features.....................................................................................................................5
Contents
Contents
-4-

Features
-5-
Thanks for your purchase of our product. Please read through this manual before making
connections and operating this product. Retain this manual for future reference.
Blue tooth playback
Line input
Full function remote control
Package Contents:
User manual
User manual
Remote control
MUTE
STANDBY
RC36E1
COAXIAL
AUX
Bluetooth
LINE
REPEAT
LOUDNE
ROCK
FLAT
POPS JAZZ
VOCAL DISCO

TOP PANEL:
Panel
-6-
1 STANDBY
2 FUNCTION
3 VOLUME+/-
4 EQUALIZER
FRONT PANEL:
11
1 DISPLAY SCREEN
11223344

SIDE PANEL:
Panel
-7-
11
1 LINE INPUT
REAR PANEL:
1 AC INPUT
2 AUX INPUT
3 SUBWOOFER OUTPUT
4 COAXIAL DIGITAL AUDIO OUTPUT
2233
11
44

Connections
-8-
LINE IN/AUX IN
This unit has an extra group of audio input terminals. You
can input theanalogue stereo audio signals from extra
devices such as VCD, CD, VCR,MP3player, etc.
Use the audiocable (red for right, white for left) to
connect the stereo audio output terminals of a VCD, CD,
VCR player tothe stereo input terminals (LINE IN/AUX IN)
of this unit.
Its corresponding signal source is LINE IN/AUX INwhich
can be available by pressing [FUNCTION] on the top
panel or pressing [AUX]/[LINE] on the remote control.
Subwoofer Output
Use speaker cable to connect the subwoofer output of this
unit .
SUBWOOFER
Speaker Output
Bluetooth Connection
The model of the unit is ,press [FUNCTION] on
the top panel or press [Bluetooth] on the remote control
to switch to the corresponding signal source, use your
mobile phone tosearch the bluetooth signal of the unit,
then input thepassword 0000 ,the unit will synchronize
play songs on your mobile phone while them connected
successfully.
HSB180X
Coaxial Digital Audio
Use a coaxial cable to connect the coaxial output of this
unit to the coaxial input of a power amplifier.
Digital Audio Input
COAXIAL
COAXIAL
Digital Audio Output

Remote control
-9-
Insert the batteries into the remote control. Point the remote control at the remote sensor on the front
panel. The remote control works within a distance of about 8 metres from the sensor and within an
angle of about 30 degrees from the left and right side.
Note:
Remove the batteries when you do not intend to use the remote control for a long time.
Weak batteries can leak and severely damage the remote control.
The batteries must not be exposed to excessive heat source, such as sunshine, fire or any other
things like that.
Be environmentally friendlyand dispose of batteries according to your government regulations.
Remote Control Operation
Battery Installation
Remove the battery
compartment cover on
the back ofthe remote
control.
Load aAAA/1.5V battery into the battery
compartment making sure that the
battery have been inserted with the
correct polarity matchingthe symbols +, -
as indicated insidethe battery
compartment.
Replace the cover.

Remote Control
-10-
1 STANDBY
2 PLAY/PAUSE
3 COAXIAL/AUX IN
4 STO P
5 PREVIOUS
6 LOUDNESS ON/OFF
7 EQUALIZER MODE
(FLAT/ROCK/POPS
JAZZ/VOCAL/DISCO)
8 MUTE
9 BLUTOOTH/LINE IN
10 NEXT
11 CHANNELLEVEL
12 VOLUME+/-
MUTE
STANDBY
RC36E1
COAXIAL
AUX
Bluetooth
LINE
REPEAT
LOUDNE
ROCK
FLAT
POPS JAZZ
VOCAL DISCO
3
1
5
4
6
7
9
8
11
10
12
2

STANDBY
Press to switchon the unit.Press it againto put theunit in standbymode.
Press to temporarilypause a playback.Press it againto resume theplayback.
Press to stopa playback .
Basic Playback
-11-
OPERATION
Press to skipto the nextchapter/track.
Press to returnto the previouschapter/track.
Press [VOLUME+] toturn up thevolume.
Press [VOLUME-] toturn down thevolume
MUTE
Press to temporarilyswitch off the sound .Press it againto switch iton.
Press repeatedly toswitch between BLUETOOTH and LINEIN mode.
BLUETOOTH/
LINE IN
Press repeatedly toswitch between COAXIALand AUX IN mode.
COAXIAL/AUX IN
VOL+
VOL-

Basic Playback
-12-
Press to selectthe equalizer modes, FLAT, ROCK, POPS, JAZZ, VOCAL, DISCO.
on/off loudness .Press to switch
LOUDNESS
FLAT/ROCK/POPS
JAZZ/VOCAL/DISCO
Press this keyrepeatedly to select a channel or the overall volume, then press [VOLUME+]/
[ VOLUME-] toadjust its level.
CH-LEVEL

-13-
Troubleshooting
Before resorting tomaintenance service, pleasekindly check byyourself with thefollowing chart.
Sound
There is nosound or
the sound is
distorted.
The audio cablesaren't connected securely.
The volume isset to theminimum level.
The sound isswitched off.
Connect the audiocables securely.
Turn up the volume.
Press [MUTE] onthe remote controlto
switch on thesound.
Press [PLAY/PAUSE].
The remote
control does not
function.
There is nobattery in theremote control.
The batteries areout of charge.
The remote controlisn't pointed tothe remote
sensor.
The remote controlis out ofits operating area.
The unit isshut down.
Install aAAA/1.5V battery init.
Replace the batterieswith new ones.
Make sure thatthe remote controlis
pointed to theremote control sensor.
Make sure theremote control iswithin
the operating area.
Switch off theunit and disconnect it from
the ACoutlet. Then poweron the unit again.
Unable to playa
disc
This disc isplaced in thedisc tray ina wrong way.
The unit isn'tcompatible with thedisc.
The disc isdirty.
Check that thedisc is placedin the disc
tray with itslabel side upwards.
/
Clean the disc.
Symptom Cause(s) Remedy
The buttons onthe
unit doesn't work.
Switch off andunplug the unit.
Then connect theplug to the power supply
and switch iton again.
The unit isbeing interfered withstatic electricity
etc.
The ACpower cord isnot connected tothe power
supply or isnot connected toa power supply
securely.
Please check thatthe ACpower cord
is connected securely.
No Power

15WX2+30W
-14-
Specifications
Power supply
AC ~110-240V,50/60Hz
Working
environment
Temperature -10~+35
Relative humidity
5%~90%
Power output (Max)
Power consumption 20W
Frequency response
1.5dB(20Hz~20kHz)

Table of contents
Other Hyundai Speakers System manuals