Hyundai HYWT5200X User manual

HYWT5200X

Page 2

Page 3
SAFETY
ASSEMBLY
MIXING 2-STROKE OIL
ADDING FUEL
STARTING PROCEDURE
STOPPING PROCEDURE
USING THE MACHINE
MAINTENANCE
TROUBLESHOOTING
SPECIFICATION
PART LOCATIONS
DECLARATION OF CONFORMITY
CONTACT DETAILS
MANUAL UPDATES
WARRANTY
4 - 7
8-16
16
16
17-18
19
20
21-24
25
26
27
28
29
30
30
CONTENTS

Page 4
1.1. General safety notes.
1.1.1. The operator of the machine is
responsible for, and has a duty of care in
making sure that the machine is operated
safely and in accordance with the instructions
in this user manual. Keep the manual safe and
pass it on if the machine is loaned or sold to
another user.
1.1.2. Please note the following safety
points.
1.1.2.1. The machine should never be left it in
a condition which would allow an untrained or
unauthorised person/s to operate this
machine.
1.1.2.1.1. All due care and diligence
should be taken by the operator for the safety
of, and with regard to those around whilst
using the machine.
1.1.2.1.2. Some or all of the following -
warning signs, symbols and/or PPE pictograms
may appear throughout this manual. You
MUST adhere to their warning/s. Failure to do
so may result in personal injury to yourself or
those around you.
Indicates a hazard, which, if not avoided, could
result in serious injury or death.
Indicates a hazard, which, if not avoided, could
result in serious injury.
Indicates a hazard which, if not avoided, might
result in minor or moderate injury.
Indicates a situation that could easily result in
equipment damage.
READ and keep the manual safe and pass it on
if the machine is loaned or sold to another
user. You MUST fully read instructions to make
sure you use and operate machine safely.
Appropriate Personal Protective Equipment
(PPE), MUST be worn at all times when
Machine is in use or being repaired.
1.2. Carbon monoxide (where applicable).
1.2.1. Carbon monoxide is a colourless and
odourless gas. Inhaling this gas can cause
death as well as serious long term health
problems such as brain damage.
1.2.2. The symptoms of carbon monoxide
poisoning can include but are not limited to
the following; Headaches, dizziness, nausea,
breathlessness, collapsing or loss of
consciousness.
1.2.2.1. Carbon monoxide poisoning
symptoms are similar to flu, food poisoning,
viral infections and simply tiredness. It is quite
common for people to mistake this very
dangerous poisoning for something else.
1.2.2.2. To avoid carbon monoxide poisoning
DO NOT use Petrol/Diesel- powered
equipment inside any of the following; Home,
garage, tent, camper van, mobile home,
caravan or boat.
This list is not exhaustive and if you are in any
doubt contact your dealer.
1.2.3. If you think you have or someone
around you has been affected by carbon
monoxide poisoning;
1.2.3.1. Get them fresh air immediately, by
leaving the affected area or by opening doors
and windows. If safe and practical to do so
1. SAFETY

Page 5
make sure that the machine is turned off. DO
NOT enter a room you suspect of having
carbon monoxide present –instead call the
emergency services.
1.2.3.2. Contact a doctor immediately or go to
hospital - let them know that you suspect
carbon monoxide poisoning.
1.2.4 DO NOT use in an enclosed area or a
moving vehicle.
1.3. General fuel safety (where applicable).
ALL FUELS ARE FLAMMABLE
1.3.1. Fire hazard - keep fuel away from all
sources of ignition for example heaters, lamps,
sparks from grinding or welding.
1.3.2. DO NOT carry out hot work on tanks
that have contained fuel it is extremely
dangerous.
1.3.3. ALWAYS keep work area clean and
tidy.
1.3.4. ALWAYS clean up all spills promptly
using correct methods i.e. absorbent granules
and a lidded bin.
1.3.5. ALWAYS dispose of waste fuels
correctly.
1.4. Fueling/De-fueling (where applicable).
ALL FUELS ARE FLAMMABLE
1.4.1. ALWAYS fuel and defuel in a well-
ventilated area outside of buildings.
1.4.2. ALWAYS wear correct, suitable and fit
for purpose Personal Protective Equipment
(PPE), suggested items are but not limited to
safety gloves and overalls.
1.4.3. When fueling/de-fueling ALWAYS
avoid inhaling fumes
1.4.4. When de-fueling ALWAYS use a
propriety fuel retriever.
1.4.5. ALWAYS carry fuel in the correct and
clearly marked container.
1.5. Electrical safety (where applicable).
1.5.1. Electricity can kill - NEVER work on
LIVE/ENERGISED equipment.
1.5.2. Prior to carrying out any maintenance
work you MUST Identify electrical isolation
methods and isolate all electrical supplies,
1.5.3. Prior to use and with all electrical
supplies isolated You MUST check all electrical
cables, plugs and connections for the
following;
1.5.3.1. Are intact and have no signs of
damage, to include but not limited to bare
wires, chaffing, cuts and loose wiring.
1.5.3.2. If there are any signs of damage, the
damaged item MUST be taken out of service
until the damage has been repaired by an
electrically competent person.
1.5.3.3. All trailing cables should be routed so
as not to cause any kind of trip hazard.
1.5.3.4. NEVER work on or near electricity with
wet hands, wet clothing, and wet gloves.
1.6. Batteries (where present).
1.6.1. Batteries present a risk if they become
damaged by the possible leaking of electrolyte.
This electrolyte is an acid and can cause
serious burn injuries. Care should be taken
when working on or near them. NOTE the
electrolyte may be in liquid or gel form.
1.6.2. Should you come into contact with
electrolyte you should;

Page 6
1.6.2.1. Remove all clothing contaminated
with electrolyte. If you cannot remove then
saturate in water.
1.6.2.2. Get medical assistance as soon as
possible. You must advise the medical staff of
the type acid.
1.6.2.2.1. Lead/acid battery = dilute
sulphuric acid
1.6.2.2.2. Nickel/cadmium = potassium
hydroxide alkali electrolyte.
1.6.2.3. Use fresh running water to wash off
excess electrolyte, continue this until medical
assistance arrives. Make sure that you do not
wash the electrolyte to another part of the
face or body.
1.6.2.4. If electrolyte comes into contact with
Eyes the electrolyte needs to be immediately
washed away with large amounts of water.
Make sure that you do not wash the
electrolyte to another part of the face or body.
1.6.3. Gasses from charging batteries are
highly flammable and great care should be
taken to charge in well ventilated areas.
1.6.4. There is an explosion risk if the battery
terminals are short circuited, when
connecting/dis-connecting ALWAYS exercise
great care so that the terminals or battery
leads are NOT allowed to touch and cause a
spark. ALWAYS use suitable insulated tools.
1.7. Vibrations (where applicable).
1.7.1. Prolonged use of hand held (operated)
machines will cause the user to feel the effects
of/from vibrations. These vibrations can lead
to white finger (Raynaud's phenomenon) or
carpal tunnel syndrome. This condition
reduces the ability of the hand to feel and
regulate temperature, causing numbness and
heat sensations and may cause nerve damage
and circulatory tissue death.
1.7.2. Not all factors that lead to white finger
disease are known, but cold weather, smoking
and other diseases that affect blood vessels
and blood circulation as well as large and long-
lasting impact of shocks are considered factors
in the formation of white finger. Note the
following to reduce the risk the white finger
and carpal tunnel syndrome:
1.7.2.1. Wear gloves and keep your hands
warm
1.7.2.2. Take regular breaks
1.7.3. All of the above precautions may help
reduce the risk of white finger disease but not
rule out carpal tunnel syndrome. Long-term
and regular users are therefore recommended
to observe the condition of your hands and
fingers. Seek medical attention immediately if
any of the above symptoms should occur.
1.8. Noise (where applicable).
1.8.1. The operating noise of the machine
can damage your hearing. Wear hearing
protection such as earplugs or ear defenders
to protect your hearing. Long- term and
regular users are advised to have hearing
checked regularly. Be especially vigilant and
cautious when wearing hearing protection
because your ability to hear alarm warnings
will be reduced.
1.8.2. Noise emissions for this equipment is
unavoidable. Carry out noisy work at approved
times and for certain periods. Limit the
working time to a minimum. For your personal
protection and protection of people working
nearby it is also advisable for them to wear
hearing protection.
1.8.3. See CERTIFICATE of CONFORMITY
section for Outdoor Noise declaration of
conformity.

Page 7
1.9. Additional safety labels.
Keep all children, bystanders and helpers 15
meters from the machine.
Warning against flying objects wear helmet,
goggles and ear protection.
Warning: Danger from hot components,
especially exhaust - Keep clear of combustible
materials.
1.10. Additional safety instructions.
1.10.1. This machine may only be used for
trimming grass. NEVER use for other purposes,
as this may result in serious injury! Safety
instructions must be observed. DO NOT
EXPOSE YOURSELF OR OTHERS TO THE RISKS.
Follow these general instructions -
ALWAYS wear safety goggles for eye
protection.
Long hair must be tied back.
DO NOT wear loose clothing or jewelry that
could get caught in moving parts of the
machine. Safe, strong, non-slip safety shoes
should be worn.
It is recommended that the legs and feet
are fully protected, to protect themselves
during the operation against flying objects.
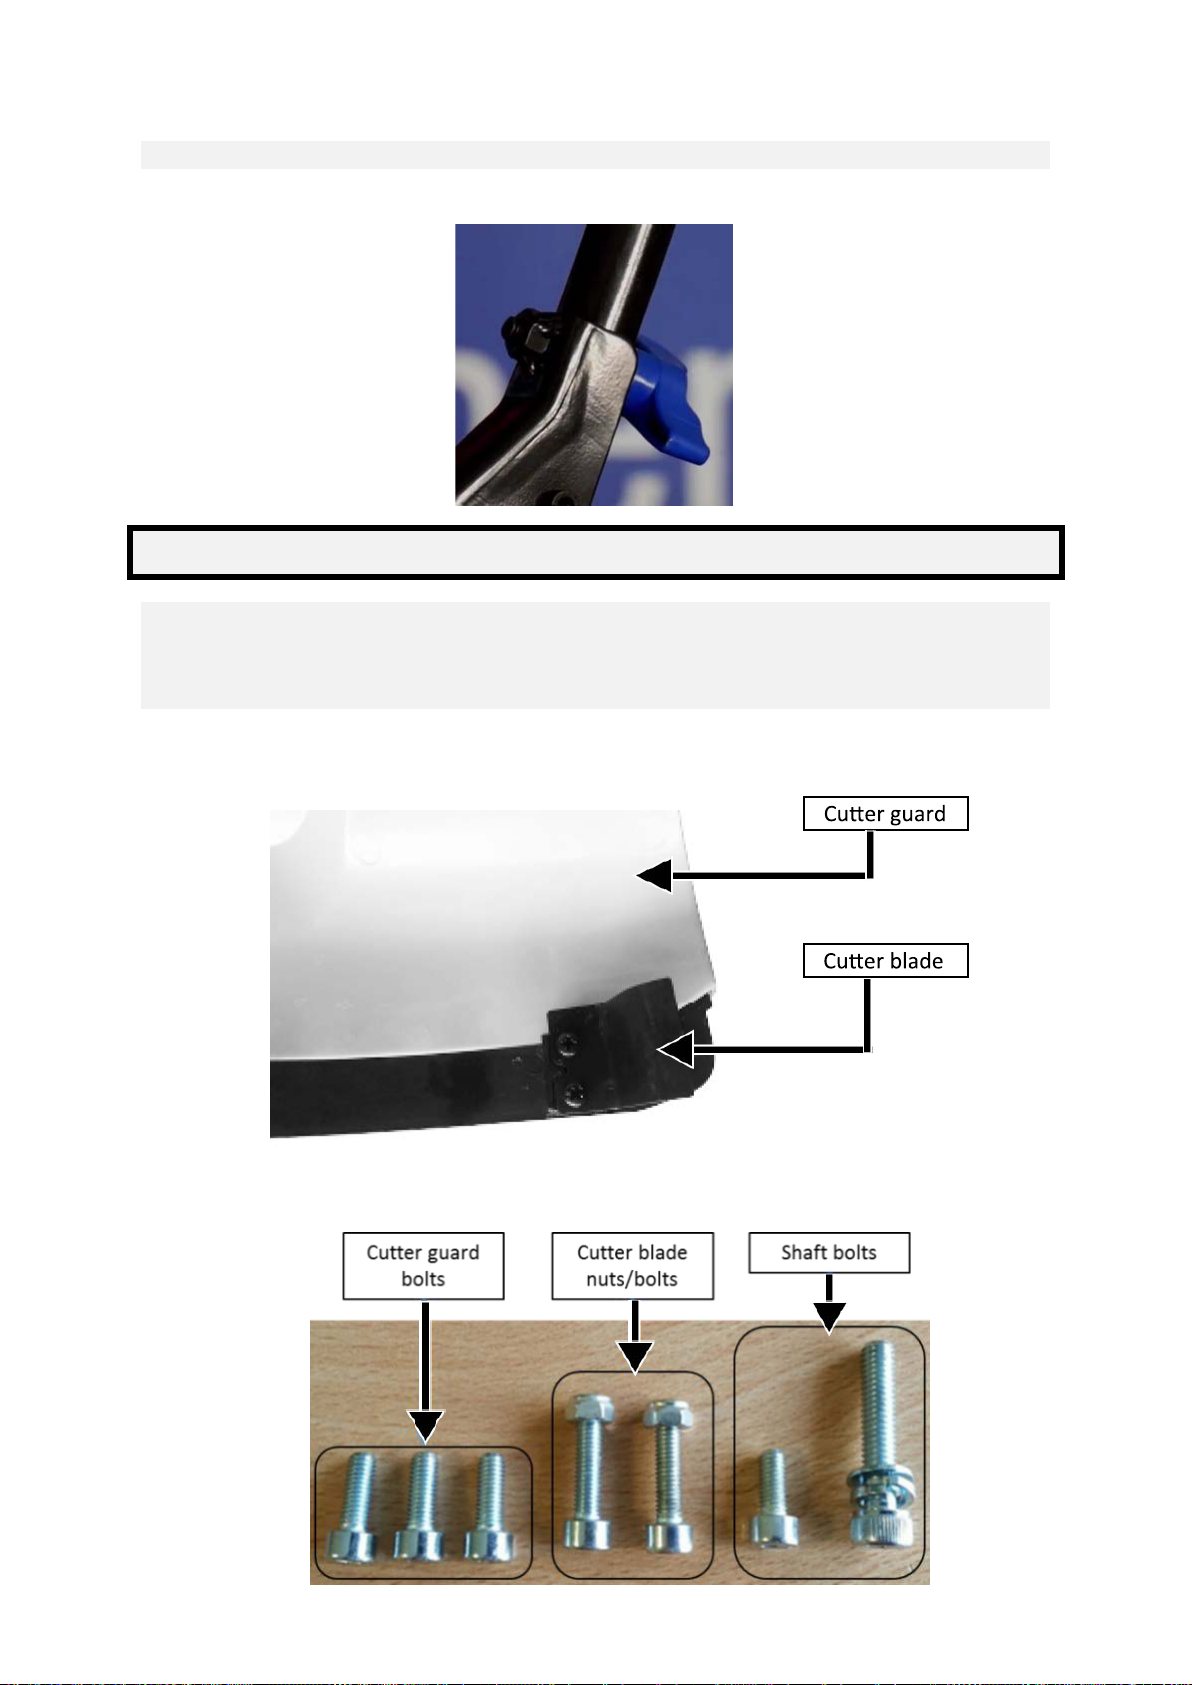
1.10.2. Check the entire machine for
loose/missing parts (nuts, bolts, screws, etc.).
Tighten/ replace before using the machine. DO
NOT use accessories with this machine other
than those recommended/supplied by the
manufacturer. Otherwise serious injuries to
the user or bystanders as well as damage to
the machine will result.
NEVER use the machine
with a saw blade attachment it is STRICTLY
FORBIDDEN.
Keep the handles free of oil and fuel.
ALWAYS use the correct interface handles
and shoulder strap.
DO NOT smoke when mixing fuel or when
filling the tank.
DO NOT mix fuel in an enclosed area or
near open fires.
Make sure there is sufficient ventilation.
Mix and store the fuel mixture in a
correctly marked container, which is
allowed by local regulations.
1.10.3. During and after use the engine and
exhaust will be very HOT you must keep all
your all parts of your body and clothing
including all combustible materials clear of the
engine and exhaust.
1.10.4. DO NOT use the machine during or
after rain, snow or sleet. The floor will become
slippery. DO NOT use the machine on a slope
or uneven ground or if there is the chance of
slipping or losing the stability.
1.10.5. If you trip or fall whilst machine is in
use you MUST immediately release the
throttle, and turn off the ignition switch.
1.10.6. If you hit any obstacles you must stop
the machine and remove the HT lead so that
you can inspect the machine. IF the machine is
damaged in any way you MUST get it repaired
before restarting work.
1.10.7. DO NOT use a damaged machine or a
machine with a blunt, cracked or damaged
cutter blade or trimmer head.
1.10.8. If any trimmed materials get tangled in
the nylon cord or cutting blade you MUST stop
the machine and remove the HT lead. Onley
then can you clear any blockages.
1.10.9. DO NOT wear rings and jewelry or
loose, dangling clothing that could get caught
in the machine. DO NOT wear footwear with
unprotected toes and DO NOT work barefoot
or without leg protection. In certain situations,
you have to wear head protection.
1.10.11.DO not use the brush cutter for
trimming trees.

Page 8
2.1. This guide is meant to serve as a quick reference for operating your Hyundai Wheeled
trimmer it is for convenience and the user should read the safety section first.
FOR OUTDOOR USE ONLY.
This Wheeled trimmer produces carbon monoxide - a poisonous, colourless & odourless gas that can
cause death or serious injury. Petrol is highly flammable, always handle with extreme care and in a
well ventilated area.
Always remove HT lead from spark plug when checking machine or changing parts.
Take the 3 handle fixing bolts from the tool kit bag
Unfold the handle bars as shown in following images
2. ASSEMBLY
2.4. HANDLE ASSEMBLY

Page 9

Page 10
Take the cuer guard from the box and the cord cuer from the tool kit bag along with the two cuer
blade nuts/bolts. You are advised to wear safety gloves to prevent injury.
Pass the bolts through the blade and then through the cuer guard into the locknuts on the other side
–once both nuts and bolts have been fied make sure they are fully ghtened.
Screw handlebar bolts (clockwise) in each secon of handle as shown in image below.
2.5. CORD CUTTER ASSEMBLY

Page 11
Take the cuer guard and place it over the sha, then using the three cuer guard bolts and the spacer
ring. Fix the guard to the shaassembly. Tighten the three bolts using the supplied Allen key.
6. ATTACHING CUTTER GUARD TO THE SHAFT ASSEMBLY

STEP 1 : Rotate the blue centre piece to align
the arrow mark with the holes.
STEP 2 : Check the two holes are aligned.
STEP 3 : Pass the nylon rope through the
two holes until you have 2m each side.
STEP 4 : Use 4m or 2.4mm nylon trimmer line.
STEP 5 : Turn the blue centre piece clockwise
until there is 20cm of line remaining.
2.7. FITTING / REPLACING SPOOL LINE
Page 12

Take spacer from the tool bag and place it over the sha, then using the one of the supplied Allen keys
lock the shaand spacer.
2.8. TRIMMER HEAD ASSEMBLY - NEVER USE A SAW BLADE
Page 13

Page 14
Take the trimmer head and screw it onto the shaft in an anti-clockwise direction until fully tightened.
Remove the Allen key before use.

Page 15
Take the shaft assembly and push it into the drive shaft hole. N.B. you will need to remove the transit
bung. Keep the bung safe for use when machine is stored. Make sure to align the hole on the shaft with
the hole on the drive shaft. Once aligned screw and tighten the shorter of the two shaft bolts and then
tighten the longer shaft bolt until it is fully tightened. You may have to rotate the shaft to align holes
and drive.
2.8. HEAD ASSEMBLY

Page 16
Fill the mixing bottle with fresh unleaded petrol to the fuel marker line use a 40:1 ratio. Then top up
with 2 stroke oil to 40:1 ratio line shake until fuel/oil has mixed.
2.10. MIXING 2-STROKE OIL
2.11. Adding fuel.
Unscrew the fueltank cap andcarefully adda 2-stroke fuel/oil mixture as in secon
DO NOT overfill and allow a 25 mm gap at the top of the tank. Once full replace and correctly
ghten the fuelcap. Fuel tank capacity is 1200ml.
DO NOT use straight unleaded petrol.
Remove fuel filter cap
Fuel tank
2.11. ADDING FUEL

Page 17
Pump the primer bulb about 8 to 10 mes unl fuel shows in the bulb.
Fill with fuel/oil mixture, make sure the fuel cap is secure – see secon 2.11. - Set the power switch on
the handle to the ON posion.
3. STARTING PROCEDURE
Primer bulb

Page 18
For COLD start move choke lever UP to start posion.
N.B. For a WARM/HOT start you will not need to do this.
Place one hand on the machine, and using the other hand pull the recoil unl you feel a resistance, then
pull briskly. Repeat unl machine starts.
When the engine starts and move the choke to the OFF posion. DO NOT let go of the recoil handle
instead allow the recoil cord to return gently. Once started you need to reduce the choke by slowly
moving lever to RUN posion if engine falters move choke between START/RUN posions and adjust
unl engine runs smoothly.
Pull to start
Pull recoil starter

Page 19
4.1. Before stopping the machine allow the engine to cool down for a few minutes, by
allowing it to run without throttle.
4.2. You MUST allow the cutting head to come to a full stop before carrying out any
maintenance on the machine.
To STOP the machine release the throttle lever, allow the machine to cool down with no throttle then
move the power switch to the OFF position.
If not already in OFF position move the choke to the OFF position.
4. STOPPING PROCEDURE

Page 20
5.1. Trimming techniques.
If you are not familiar with this type of machine you should practice in a safe place.
5.1.1. ALWAYS clear the work area of cans, bottles, rocks, etc. Flying or whirling objects may
cause serious injury and damage to users or bystanders. If an object is accidentally flung out
from machine, immediately stop and check the machine
5.1.2. Always trim at high speeds.
5.1.3. Maneuverer the cutting head of the trimmer horizontally from one side to the other.
5.1.4. Keep cutting deck parallel with the ground.
5.1.5. DO NOT tilt the nylon cutting head during operation.
5.1.6. For correct cutting height carry out a test trim in advance in a test area. 5.1.7. NEVER
let the machine run with damaged or defective parts.
5.1.8. Trimmer is to be used for trimming grass only.
5.1.9. NEVER raise the nylon cutting head above knee height during operation. 5.1.10. DO NOT
use the machine on a slope or uneven ground or if there is the chance of slipping or losing the
stability. 5.1.11. NEVER over cut –instead cut short lengths then cut successively lower heights.
ALWAYS stop the machine before removing grass deposits. To prevent overheating of the drive
axle remove all tangled grass and weed fibre. The tangled grass and weed fibre/s prevent the
shaft from cooling properly. Remove grass deposits with a screwdriver or similar tool.
5.2. Trimming around trees.
5.2.1. Trim around trees carefully this will prevent damage to the tree, and tree bark.
5.2.3. Move around the tree in a clockwise direction. Approach grass/weeds with the tip of the
cutting cord.
5.2.4. To replace worn out cord refer to section
5.USING THE MACHINE
Table of contents
Other Hyundai Trimmer manuals

Hyundai
Hyundai HYPHT550E User manual

Hyundai
Hyundai HYMT33 User manual

Hyundai
Hyundai HYFT56 User manual

Hyundai
Hyundai HYTR600E User manual

Hyundai
Hyundai 35701 User manual

Hyundai
Hyundai HYBCF31 User manual

Hyundai
Hyundai HYTR60Li User manual

Hyundai
Hyundai HYHT60Li User manual

Hyundai
Hyundai HYHT2600X User manual

Hyundai
Hyundai HYMT264-4 User manual

Hyundai
Hyundai HYHT36Li User manual

Hyundai
Hyundai HCBE350 User manual

Hyundai
Hyundai HYT2622-II User manual

Hyundai
Hyundai HY2191 User manual

Hyundai
Hyundai HYT2622-II User manual

Hyundai
Hyundai HDBT521T User manual

Hyundai
Hyundai HY4HT26 User manual

Hyundai
Hyundai HY4TR26 User manual

Hyundai
Hyundai HTH20V User manual

Hyundai
Hyundai HDBT52-A User manual