i-nstruments DJ-I Operating manual

DJ-I Analog Midi Controller / Sequencer.!
!
USER AND INSTALLATION MANUAL
ver 1.2
Page of 1 8
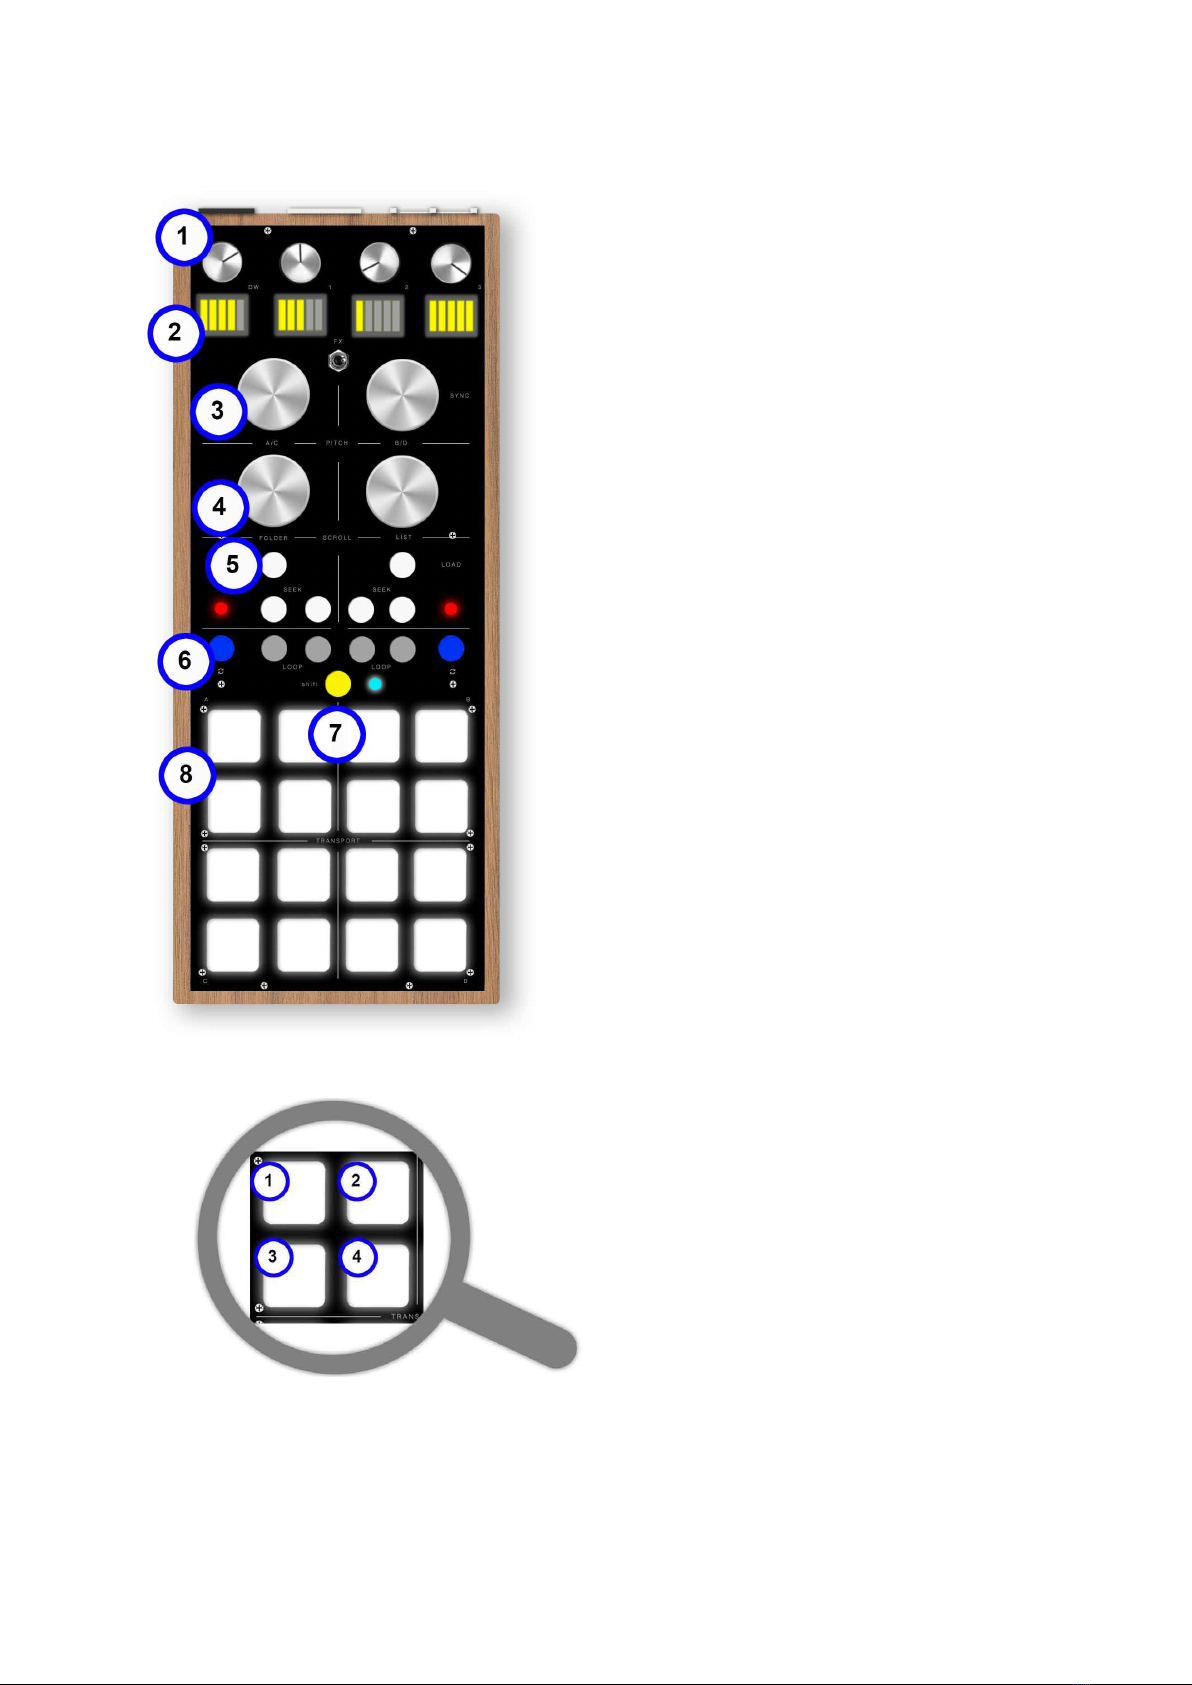
1.0 FRONT PANEL
1. ALPS potentiometers. (Traktor: functions of
effects’ workbenches DW, Knob 1, 2, 3).
2. LED indicators on potentiometer’s use.
(Traktor: The central toggle switch commutes the
effect’s workbench FX1 and FX2).
3. Infinite Encoder with pressure switch.
(Traktor: it edits BPM and if pressed it activates the
Sync).
4. Infinite Encoder with pressure switch.
(Traktor: the left encoder runs between the folders and,
if pressed, it can open them. The right encoder runs
between the tracks and, if pressed, it opens the
browser view).
5. Tactile buttons and LED indicator.
(Traktor: LOAD charges tracks in the corresponding
deck. SEEK activates the “Time Bend” function moving
the track forward or backward), the LED indicators
indicates an active LOOP on the corresponding active
deck.!
6. Tactile buttons. (Traktor: the button with the
loop’s logo activates or deactivates a selected loop in
the corresponding deck. The buttons with the item
“loop” move the active beats’ selection).
7. Switch button with LED indicator. It
activates the additional functions, if pressed it
changes the MIDI channel of all the tactile
buttons. The MIDI channel nr. #8
corresponds to the blue led. The MIDI
channel nr. #9 corresponds to the green led.
For additional functions look at sections
“sequencer mode” and “battery”.(Traktor: It
allows the switch of all tactile buttons from DECK A/B to
the C/D one).
8. PAD LED RGB. In the controller mode, it
has normal functions of command. (Traktor: the
16 pad are subdivided in 4 sections. The two upper
sections command the A/B Deck. The two lower
sections command C/D Deck. As shown in the picture
1. it activates/deactivates the scratch mode (if the
scratch mode is active, it lights green) 2. it runs through
the cue positioning in the following cue (if the track of
the relative deck is going to end, it lights red) 3. play/
stop of the relative deck (if the track is playing, it lights
green) 4. it runs through the cue positioning in the
previous cue).!
In the sequencer mode, it is highlighted
indicating the scrolling point of the pattern and, if pressed, it activates and memorizes the note
for the next passages.
Page of 2 8

1.1 CONNECTORS PANEL
1. MIDI IN input.
2. MIDI OUT output.
3. USB connection (MIDI Class Compliant).
The USB connector is used also to recharge.!
4. Power button I.O. It activates or
deactivates the battery so, if used via USB, the
controller will turn on also if the button is set up
on “O”. Set up on “I” to recharge the battery
when a USB source is connected.!
5. Access hole to the switch “program” for
the firmware updates.!
6. MIDI activities indicator (both IN and OUT
also during a Bluetooth connection).
2.0 INSTALLATION.
DJ-I is compatible with all the OSX and MacOS versions that support the MIDI device Class
Compliant and with Microsoft Windows 7 and later. It doesn’t need driver installation neither via
USB connection nor via Bluetooh connection.!
Compatible MIDI mappings with the use of NI Taktor Pro and Traktor Scratch Pro are available on
www.i-nstruments.com
2.1 Installation via BLUETOOTH on MacOS:
-open “Audio Midi Configuration”.
-click on “Window” and “Show Studio Midi”.
-click on “Bluetooth”.
-make sure that the DJ-I controller is turned on.
-click on the MD-BT01 device.
-click on “connect”.
The connection between computer and controller should be done before the opening of the DAW
application, for example before the opening of Traktor, Ableton or Serato.
2.2 Mapping’s importation of the use in NI Traktor:
-make sure that the controller is connected to the USB.
-open NI Traktor.
-click on “Preference Button” top right.
-click on “Controller Manager”.
-in the “Device Setup” section, click on “Add..”.
-in the dropdown menu first select “Import TSI.” then “Import Other.”.
Page of 3 8
-select the file containing maps, the operation should be repeated for both the maps (controller
mode and sequenced mode).
-at the end of the importation make sure that, in the “Device Setup” section, the ports “In-Port &
Out-Port” are set up on “All Ports”.
When all the mappings are imported, it is necessary to reboot Traktor.
3.0 SEQUENCER MODE.
There are 3 different Sequencer’s mode:
Sequencer Sample Deck allows to use preloaded samples in the Sample Deck “C” of the Traktor.
This function can be activated only if the connection between computer and controller is via USB.
!
Sequencer Slave allows to use the external machines (synthesizers or others) through the
analogic midi connections present on the DJ-I’s panel. In this mode, the controller uses the clock
that comes from the Traktor to command the sequencer’s pattern and to send externally the
command in analogic midi. Time, start and stop are generated by Traktor and they are controllable
by the controller. This function can be activated only if the connection between computer and
controller is via USB.
!
Sequencer Master the DJ-I becomes a pure stand-alone sequencer, so not connected to the
Traktor, and it allows to use the external machines (synthesizers or others) through analogic midi
connection available on the DJ-I’s panel. It is not necessary any connection via computer.
N.B. The Sequencer Sample Deck and Slave modes use Traktor’s clock to control the Sample
Deck or the external MIDI machines and it can be activated only when the controller’s connection
is via USB, it is not supported for Bluetooth connections.
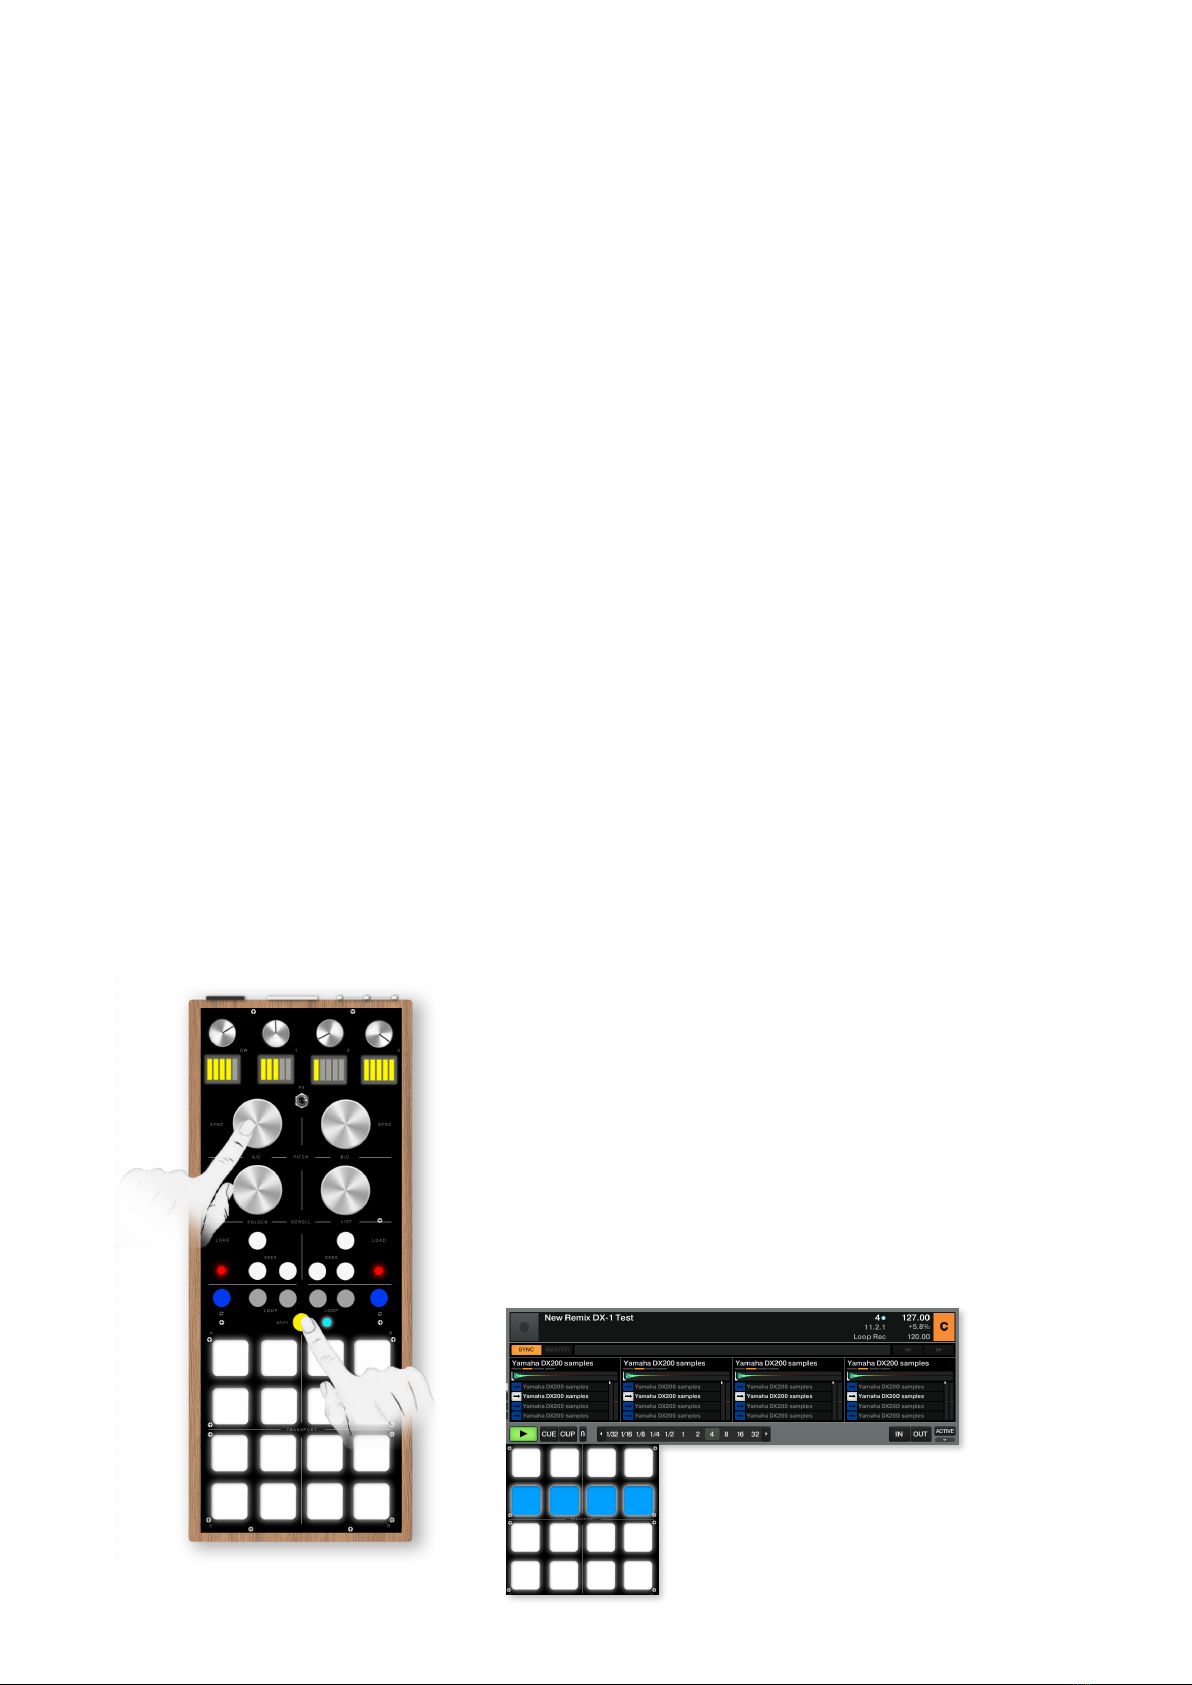
3.1 Sequencer Sample Deck
To activate, as for deactivate, this function, it is necessary
to press the “Switch” button and the “A/C” encoder in
contemporary as shown in the next picture. To confirm
that the passage in this mode is done, the red led loop
will flesh briefly and the switch led will become red.
Charge the samples that you want to command from the
sequencer in the Sample Deck “C” of Traktor, each box of
the sample corresponds to the relative button on the pad.
!
In the next picture, as example, you can see 4 samples
(colored white) which are just been played from the
relative pad’s button on the sequencer (colored blue).
Page of 4 8

3.2 Play / Stop
Press the “B/D” encoder to activate or deactivate the pattern’s scrolling, in the
specific this commands the Pay/Stop in the MIDI section of Traktor.
3.3 Play a sample or set up a writing.
Press the pad’s buttons corresponding to the sample that you want to play, the pad will be
highlighted. Every time the pattern’s scrolling arrives to the highlighted button, the sound will be
reproduced.!
To play samples without memorizing them in the pattern’s writing but only in the exact moment that
you press, the pad should be pressed in contemporary with the “switch” button.
3.4 Select the samples’ pages.
DJ-I allows to use 4 pages of samples available in the Sample Dock. To each page corresponds a
PAD’s color: page 1 blue, page 2 green, page 3 red, page 4 azure. To change the page, it is
sufficient to rotate the “A/C” encoder forward or backward.
The pages’ scrolling keeps the pattern’s writing unchanged, this allows to play different samples of
different pages with the same rhythmic.
3.5 Sample Deck’s effects.
The original mapping of DJ-I allows to use the potentiometers and the EFX toggle switch also in
Sample Deck mode, so it is possible to use effects both on the tracks in execution and on the
samples played by the sequencer.
3.6 Pattern’s speed.!
It is possibly to edit the pattern’s speed using the “B/D” encoder. Turning clockwise, the writing
speed will increase, vice versa it will decrease if turned counterclockwise. This command doesn’t
interact with the clock’s speed, but it quantizes the number of played notes inside clock’s quarters,
so all the samples will play times but with slower and faster repeats.
3.7 Additional commands.
In the Squencer Sample Deck mode, it is possible to command the loops of Deck A and B using
loop’s tactile buttons. “LOAD” buttons charge the remix set in the corresponding Sample Deck. The
“FOLDER” and “LIST” encoders keep the same functionalities of the controller mode: “FOLDER” to
navigate inside the folders and “LIST” to navigate inside the playlist’s browser.
Attention: “SEEK” tactile buttons are disabled or they activate different functions from those
available in Controller Mode.
4.0 Offset MIDI’s configuration.
To play the controller perfectly and in time it is necessary to set up the right “Sending Offset MIDI”.
This value varies in relation to the audio device used and to the sampling’s frequency.
Page of 5 8
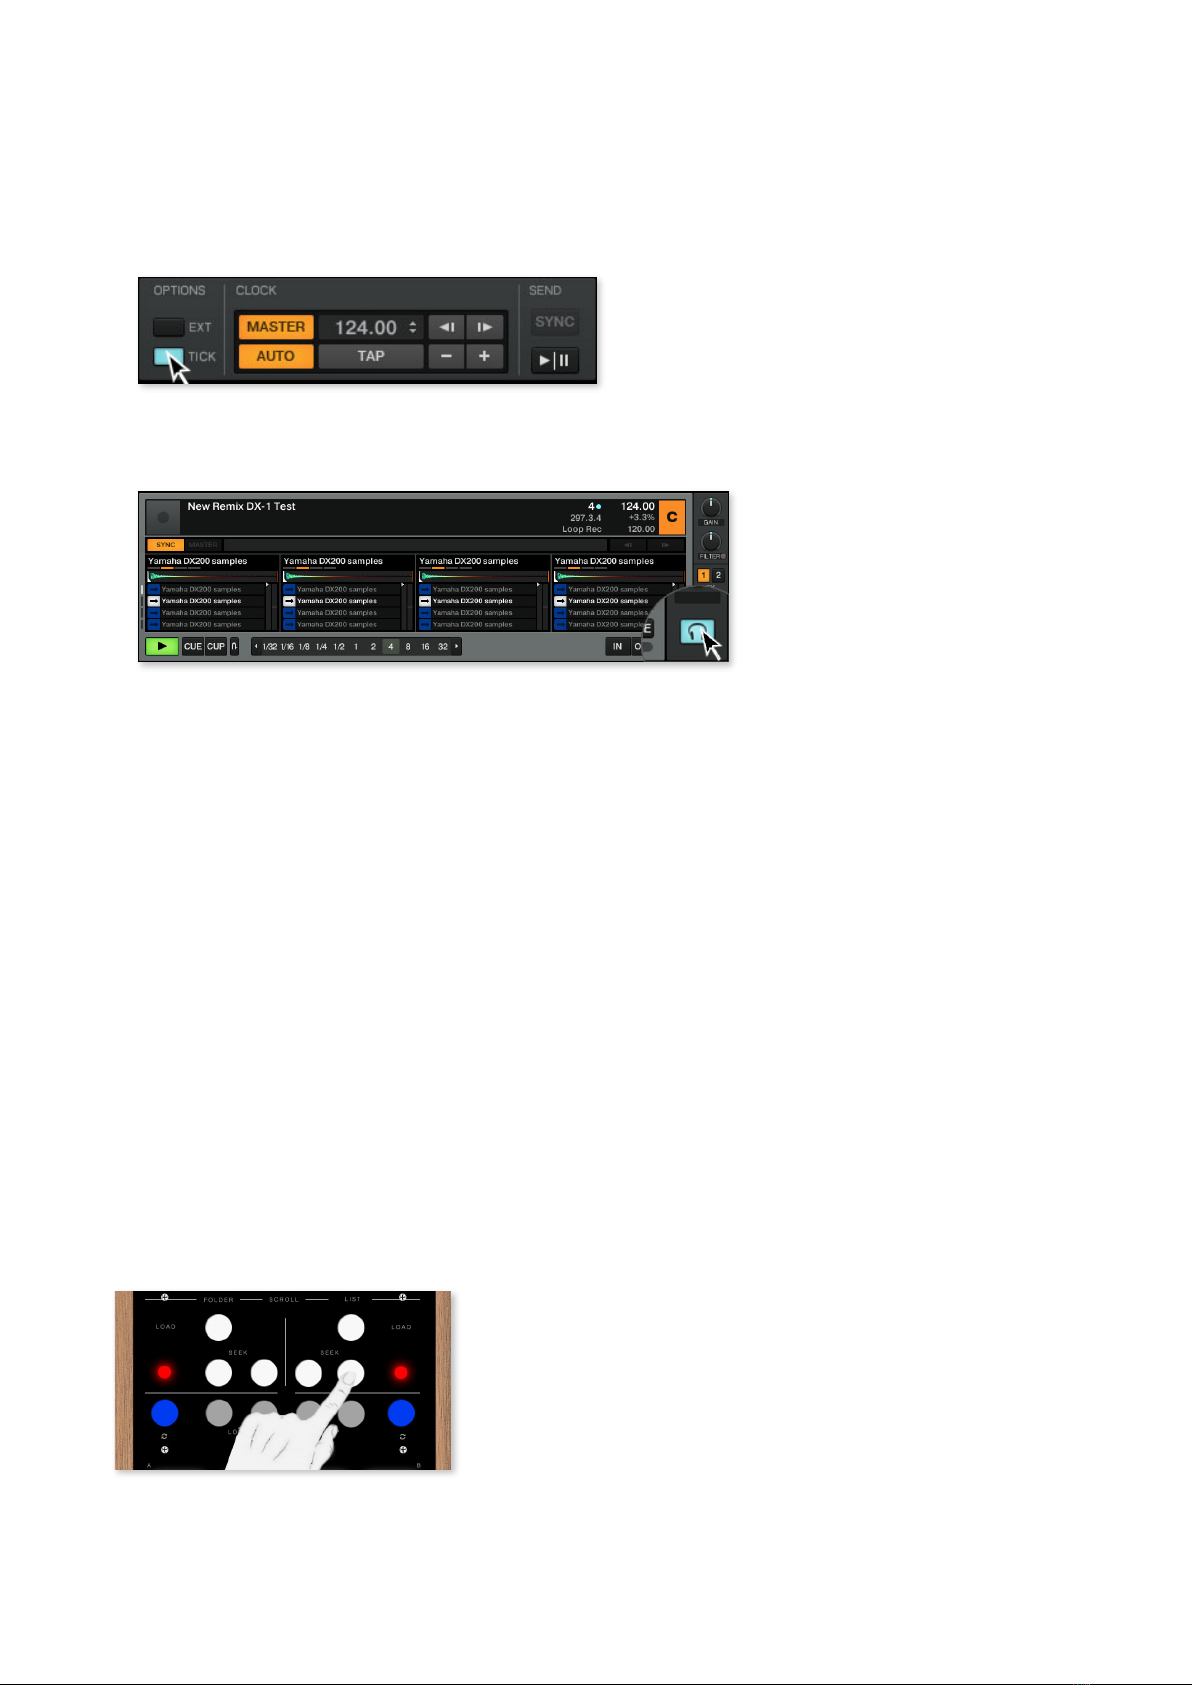
“Sending Offset MIDI” Configuration on Traktor:
-Load 16 identical samples, possibly from a very brief sound (we recommend to use a snare
without effects) on the Sample Deck “C”.
-Activate “Tick” clicking on the right button as in the next picture:
-Be sure that you can hear “Tick” reproduction clicking on the “headphones” button of the Sample
Deck “C” as indicated in the next picture:
Now the “Tick” of Traktor metronome should be audible.
-Click on “Preference Button” top right.
-Click on “Midi Clock”.
-Be sure that “Send MIDI Clock” is activated.
-Press all the 16 buttons of the controller’s pad.
-Press the “B/D” encoder to start the reproduction.
-Move the cursor relative to the Sending Offset value until the tick sound corresponds exactly to
the sound reproduced by the Sample Deck.
-Press the “B/D” encoder to stop and press it again to resume the reproduction.
-Repeat the repositioning of the “Sending Offset” cursor and the “play/stop” until the tick and the
Sample Deck’s sound are perfectly overlying.
The standard value required for a reproduction with sampling’s frequency of 44.100 Hz is 30ms.
(Native Instrument AUDIO 10 MKII a 44.100 Hz / MacOS Sierra).
5.0 Sequencer Slave.
Enter in the sequencer mode as indicated in the point 3.1 (press the switch button with the A/C
encoder), then press the second button SEEK of the right section as indicated in the picture:
To confirm that the passage has been done in this mode, the switch led will become green.
Page of 6 8

5.1 Play / Stop
Press the “B/D” encoder to activate or deactivate the pattern’s scrolling, in the specific this
commands the Pay / Stop of the MIDI section of Traktor. In the Sequencer Slave mode, the Midi
Clock’s information coming from Traktor are sent to the commands of Play and Stop to the
connected machines on the analogic MIDI OUT of the controller.
5.2 Select the midi channel used by the sequencer. !
It is possible to vary the midi channel used in the controller’s pad to command external machines
using the “A/C” encoder. The available commands are nr. #1,2,3 and 5. To each channel
corresponds a Pad’s color: Blue 1, Green 2, Red 3, Azure 4.
5.3 Select the Midi NOTE sent to the external machine.
It is possible to
vary the note sent from the sequencer to the external machine using the “FOLDER” encoder, an
increment of the encoder corresponds to an increment of the played note and vice versa. As for the
note, it is possible to vary the eight using the “LIST” encoder with the same modalities.
5.4 Pattern’s speed.!
See point 3.6.
5.5 Additional commands.
In the Sequencer Salve mode, it is possible to command loop of Deck A and B using loop’s tactile
buttons. The potentiometers and the relative toggle command EFX have the same modality of the
Controller Mode, so they command the effect’s workbench of Traktor.
Attention: the tactile buttons “seek” are deactivated or they activate different function from those
available in the Controller Mode, as well as the encoder.
6.0 Sequencer Master.
To go into the sequencer mode, as indicated at the point 3.1 (press the switch button in
contemporary with the A/C encoder). Then press the first button SEEK of the right section as
indicated in the picture:
To confirm that passage happened in this mode, the switch led will become white.
Page of 7 8

6.1 Play / Stop. !
!
Press the “B/D” encoder to activate or deactivate the pattern’s scrolling and the sending of the
command MIDI start or MIDI stop and of the MIDI Clock. In the Sequencer Master mode, the Midi
Clock’s information come directly from the controller/sequencer.
6.2 Midi Clock and editing of the time.
To edit the Clock and the pattern’s execution BPM, it is necessary to work on the A/C encoder. To
an encoder’s increase corresponds a bpm’s increment and vice versa.
6.3 Pattern’s velocity.!
See point 3.6.
6.1.4 Selection of the midi channel used by the sequencer.
It is possible to vary the midi channel used by the controller’s pad to command the external
machine keeping pressed and rotating the “A/C” encoder in contemporary. The used channels are
nr. #1,2,3 and 4. To each channel corresponds a Pad’s color: Blue 1, Green 2, Red 3, Azure 4.
6.4 Selection of the MIDI NOTE sent to the external machines.
See point 5.3
6.5 Additional commands.
In the Sequencer Master mode, all the potentiometers and commands not used by the function of
this mode correspond to MIDI NOTE or CC MIDI totally mappable.
7.0 BATTERY
When the battery’s level is not sufficient, the led of the switch button will start to blink. The DJ-I
battery ensures approximately 12 hours of functioning. The recharge should be done through a
USB connection (from a computer or from a charger) and it needs approximately 8 hours to be
completed. !
In the case of inactivity longer than two hours, the controller will automatically go in standby. To go
back to the utilization, it is necessary to turn off the power button and to disconnect the USB cable.
To recharge the controller, the power button should be set up on I.
NOTE:
______________________________________________________________________________
______________________________________________________________________________
______________________________________________________________________________
______________________________________________________________________________
Page of 8 8
Table of contents


