i-Vac SM-10 User manual

Pure Fresh Steam Mop
Lightweight design
Ready In 30 Seconds
1200W Powerful Steam

2
1
2
4
3
5
6
7
8
9
12
13
14
10
11

3
Features:
1. Steam Control Button
2. Handle
3. Cable Restraint Hook
4. Cable Storage Hook
5. Rod
6. Power Cable
7. Water Tank Max Line
8. Power Indicator
9. Swivel Mop Head
10. Power On/Off Button
11. Water Tank Lid
SM-10
Congratulations on the purchase of your new i-Vac Steam Mop. There are many useful features built
into your steam mop. We recommend that you carefully read this instruction manual so you can make
the most of all the features this machine has to offer.
Specications:
Voltage: 220-240VAC
Wattage: 1200W
Water Tank Capacity: 190ml
Cable Length: 5m
Net Weight: 1.92kg
Accessory:
12. Carpet Glider
13. Mop Pad
14. RellCup
Features
Please contact Godfreys Customer Care Australia on 1800 815 270
or New Zealand on 0800 282 288 to nd your local spare parts provider.

4
Before You Begin
Please read this manual before operating cleaner
Thiswillensureyouobtainfullbenetfromyournewsteammop.KeepthisInstructionManualinahandy
place for future reference.
Important
Always switch the cleaner off and remove the plug from the electricity supply before cleaning your
appliance, when not in use, or attempting any maintenance task. The cleaner must only be connected to
an AC supply at the voltage shown on the rating plate. This cleaner should only be used for its intended
purpose as described in these instructions.
Ensure the power cable is secured into the Cable Hook.
IMPORTANT: Do not operate the cleaner over the power cable.
Precautionary measures:
1. Do not operate the steam mop too close to heaters, radiators or other hot surfaces.
2. Before inserting the power plug into the power supply, make sure your hands are dry.
3. When unplugging the power plug from the power supply, do not use the power cable,
gently pull the power plug from the power supply.
BEFORE YOU CLEAN, TEST FIRST
Yoursteammopisdesignedtocleanhardooringsuchasceramictiles,vinyl,laminate,
marble,stoneandsealedhardwoodoors.Useofyoursteammoponwaxedorsome
unwaxedoorsmayresultinadiminishedgloss.
Thesteammopisnotforuseonunsealedwoodoors.Forthebestresultstestinan
inconspicuousareaandcheckthecareinstruc tionsfromyourooringmanufac turer.

5
1. This appliance is not intended for use by
persons (including children) with reduced
physical, sensory or mental capabilities or lack
of experience and knowledge, unless they
have been given supervision or instruction
concerning use of the appliance by a person
responsible for their safety.
2. Children should be supervised to ensure that
they do not play with the appliance.
3. To prevent electrical shock, do not immerse
the appliance, power cable or power plug into
water or other liquids.
4. Always check the power cable before use, the
power cable and the plug should be in a good
condition and must not be damaged. If the
power supply cable is damaged or defective,
it must be replaced by the manufacturer, its
serviceagentorsimilarlyqualiedpersonsin
order to avoid a hazard.
5. Do not unplug by pulling on the power cable.
To unplug, grasp the plug not the power
cable. Do not use extension cables or outlets
with inadequate current carrying capacity.
6. Do not handle or operate the appliance
with wet hands and follow electrical safety
precautions at all times, i.e., never operate
without shoes.
7. Do not aim steam directly at people, animals,
parts containing electrical components or
electrical components such as elements inside
ovens.
8. The force and heat of the steam may damage
certain materials. Some fabrics may react to
the temperature of the steam.
9. Do not hold the steam in the direction of one
spot for long periods. This can cause damage
to materials.
10. Neveroverllthetank/boiler.Overlling
may result in a possible electrical shock,
emission of boiling water; scalding and steam
generation may be affected.
11. Donotcleanoveroorelectricaloutlets.
12. Exposure to hot steam can cause scalding.
13. Extreme caution should be exercised when
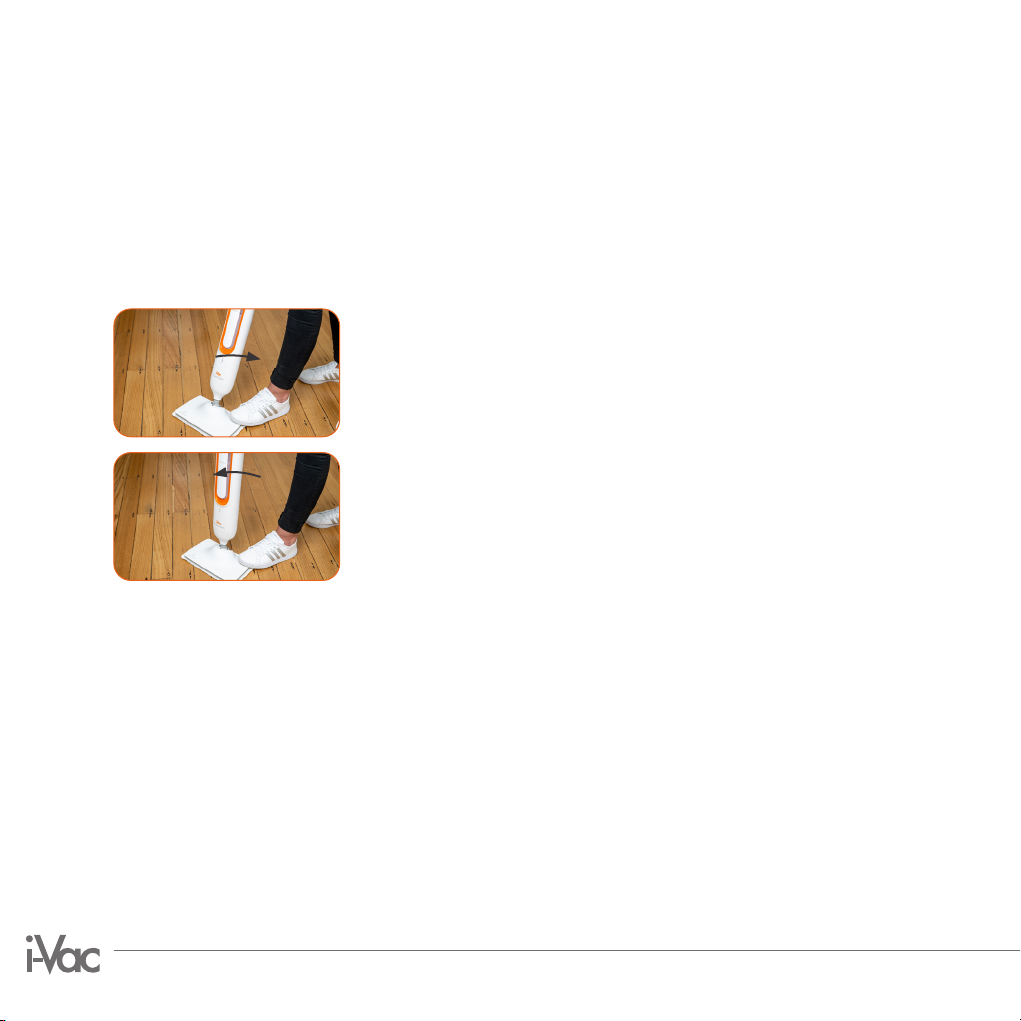
using the appliance to clean stairs.
14. Burns can occur from touching hot parts, hot
waterorsteam.Usecautionwhendrainingthe
appliance after use as there may be hot water
in the appliance.
15. Do not attempt to change the attachments
while the appliance is emitting steam. Change
the attachments only when the attachment
has cooled down.
16. Useonlymanufacturer’srecommended
accessories.
17. Do not leave the appliance unattended
when it is connected to a power supply or an
electrical outlet.
18. Never attempt to steam clean clothes.
19. Ensure that the appliance does not operate on
an empty tank.
20. Do not apply steam directly to very cold glass
surfaces.
21. Do not use without water tank cap in place.
Check that the water tank cap is completely
screwed down before use.
22. Only water should be used in this appliance.
Usedistilled/puriedwaterifthetapwaterin
the water in your area is very hard.
23. Damage caused by improper use of steam on
objects, materials, persons or animals or by
not observing the instructions in this manual
will void warranty.
WARNING!Toreducetheriskofre,electricshockorinjurywhenusinganelectricalappliance,basic
precautions should always be followed, including the following:
Before You Begin

6
24. Always store the appliance indoors in a cool and
dry place.
25. Forapplianceswithoutsolutiontank,donotadd
cleaning solutions, scented perfumes, oils or any
other chemicals to the appliance, as cleaning
agents may damage the appliance or make it
unsafe for use.
26. Do not touch any hot areas on the steam cleaner.
It is normal for the steam cleaner to heat up during
operation.
DANGER:
This appliance is for use on nominal 220-240VAC circuit.
Make sure the appliance is connected to an outlet with
thesamecongurationastheplug.Noadaptershould
be used with this appliance.
WARNING: Danger of scalding. Please use the steam mop with caution.
The steam emitted from the steam mop is very hot.
CAUTION: Recently cleaned surfaces may be hot, please avoid contact.

7
Assembly
1. Insert the handle into the main body until it locks into position.
2. Attach the mop pad onto the base of the mop head.
IMPORTANT! The appliance should be disconnected from the power supply before you start to
assemble.
Before You Begin & Assembly

8
Instructions For Use
1. PulldownthewatertanklidandusetheRellCuptopourwater
intothewatertankuntiltheMaxLine.Pressthewatertanklidrmly
to close it.
IMPORTRANT: Never put alcoholic, or detergent produc ts into
the steam mop, as this may damage it or make it unsafe for use.
2. Ensurethatthecleanerisstandingverticallyandinthexed
position. With your foot placed onto the mop head, push the
handleforwardtoplacethecleanerintothexedposition.
3. Ensure the power cable is secured into the Cable Restraint Hook.
IMPORTANT: Do not operate the cleaner over the power cable.
4. Connect the power plug to the power supply.
WARNING! Do not add any cleaning solution, detergent, vinegar or bleach into the water tank. This
will cause damage to the steam mop. Do not use hot or boiling water to ll the water tank. Only rell
the water tank with cold tap water.
WARNING! Disconnect the power plug from the power supply before lling the water tank. Ensure
that the water tank lid is installed securely into the cleaner before connecting the power plug to the
power supply.

9
5. Turn on the power switch, the steam mop will be in standby
mode and is ready to use.
Note: Upon initial use, please allow the water to ow through
the system for approximately 30 seconds to prime the unit.
6. To select the steam mode, continue to press the steam control
button for Low steam mode (Light Cleaning), Medium steam
(regularcleaning),orHighsteam(Deepcleaningheav ytraf c
areas). Wait 30 seconds for it to heat up and emitting steam.
The indicator light will glow in Low, Med or Hi modes.
7. Begincleaningbyslowingpassingtheunitonoorsurface.
8. The steam will be cut off when the steam mop body is in the
upright position. To continue to clean, use the mop handle to
directthemopheadacrosstheoor.
9. Afteryounishcleaning,turnoffthesteammopandunplug
the power plug from power supply.
Instructions For Use
upright
position

10
Steam Cleaning Sealed Hard Floors
NOTE: Before using the steam mop, sweep or vacuum the oor to remove any loose dirt or debris.
IMPORTANT: Do not use the cleaner without a mop pad attached to the mop head.
WARNING: Hard oor wax may be removed by the heat and steam ac tion. Do not use the cleaner on
unsealed wood oors or operate the cleaner in a stationary position for an extended period of time.
1. With your foot placed onto the mop head, pull the handle
backwards to unlock the cleaner. The cleaner will emit steam in the
unlocked position. When steam is emitting from the cleaner slowly
pass over the surface to be cleaned.
2. With your foot placed onto the mop head push the handle forward
toplacethecleanerinthexedposition.Thecleanerwillstop
emittingsteaminthexedposition.
release steam
stop steam

11
Steam Cleaning Carpets
NOTE: Before using the steam mop, vacuum the oor to remove any loose dirt or debris.
IMPORTANT: Do not use the cleaner without a mop pad and carpet glider attached to the mop
head.
1. Place the cleaner onto the carpet glider.
2. Plug the cleaner into the power supply.
3. Withyourfootplacedontotheoorhead,pullthehandle
backwards to unlock the cleaner. The cleaner will emit steam in
the unlocked position.
4. Move the cleaner slowly backwards and forwards paying
particularattentiontohightrafcareas.
Withyourfootplacedontotheoorheadpushthehandle
forward to lock the cleaner. The cleaner will stop emitting steam
in the locked position.
Instructions For Use

12
Maintenance
WARNING! The cleaner should be in the xed position and disconnected from the power supply before
performing any maintenance tasks.
IMPORTANT: Always ensure that cleaner has cooled before performing any maintenance tasks.
1. Unplugthecableandandplacethesteammopinuprightposition.
Let it cool for 3-5 minutes.
2. Empty water tank before storing. To empty the tank, hold the
Steam Mop beside a sink. Open the water tank lid, then lean the
unit over the sink. Let the water drain out, then close the lid.
Emptying the Water Tank

13
1. Let machine cool down for 3-5 minutes.
2. Carefully remove the pad from mop head.
3. Wash the mop pad in a washing machine with a mild detergent
at a max temperature of 40°C.
IMPORTANT: Do not use bleach or fabric softener when
washing the mop pad.
Removing and cleaning the Mop Pad
Maintenance

14
Troubleshooting
Problems and Solutions
If you come across a problem, please use this checklist before contacting Godfreys Customer Care on
1800815270(AUS)or0800282288(NZ).
Fault Solution
The steamer will not switch
on.
- Check the steamer is plugged in
- Plug the steamer to different socket
The steamer will not
produce the steam.
- Check there is enough water in the clean water tank
Water leaks from the back
of the steam mop.
- There may be a blockage in the mop head. Contact Godfreys
Customer Care for further assistance.
The steamer leaves too
much water on the oor
- Attach a dry Mop Pad

15
Spare Parts
Part Part Number
Steam Mop Pad 31400300
Carpet Glider 31155608
Troubleshooting & Spare Parts

Your i-Vac Steam Mop, in the case of domestic use, has a
one year parts and labour warranty against product defects
and failures when the product is used in accordance with the
terms and conditions of this warranty statement.
This warranty commences from the original date of purchase
and is not transferable; please retain your original proof of
purchase for any warranty claims. This warranty is valid only in
the country where the cleaner is purchased.
The cleaner must be operated in accordance with these
instructions and used only for domestic household cleaning
to remove dirt and dust from household carpets, flooring
and fabrics. This cleaner is not fit to be used as an industrial
cleaner, hence will void the manufacturer’s warranty if used
inappropriately.
Accessories and consumables, unless defective in
manufacture, are not subject to this warranty. In order to
prolong the life of accessories and consumables, regular care
and maintenance is recommended.
When properly used and cared for, your cleaner will render
excellent service; refer to the instruction manual for further
details, as misuse or failure to follow the instructions makes
this warranty void.
In the event of service or advice being needed, please
contact Electrical Home-Aids Pty. Limited, Level 1, Building
3, Brandon Office Park, 530 Springvale Road, Glen Waverley
Victoria 3150, or on 1800 815 270 (AUS) or 0800 282 288
(NZ), Monday-Friday 9am-5pm EST. The decision to repair or
replace the cleaner is at the sole discretion of Electrical
Home-Aids Pty. Limited. If Electrical Home-Aids Pty. Limited
decide to repair or replace the cleaner, it will do so at its
own cost.
Electrical Home-Aids Pty. Limited is unable to accept
responsibility under this warranty for any repair work not
carried out by an authorised Service Agent or from the use
of non-genuine parts. If any part is no longer available or
manufactured, Electrical Home-Aids Pty. Limited will replace
it with a genuine functional replacement part. This warranty
does not apply to the cost of replacing any parts of the
product due to normal wear and tear, alterations, improper
installation, physical abuse, misuse or accidental damage. Any
transportation costs involved in the repair of defective parts
shall be borne by the claimant.
If proof of purchase cannot be provided at the time of a
warranty claim or service, any work carried out on the cleaner
is chargeable.
The repair of the cleaner under this warranty does not extend
the original period of warranty.
The benefits conferred by this warranty are in addition to
all other rights and remedies in respect of the product as
outlined under the Competition and Consumer Act and other
State and Territory laws.
“Our goods come with guarantees that cannot be
excluded in the Australian Consumer Law. You are entitled
to a replacement or refund for a major failure and for
compensation for any other reasonably foreseeable loss or
damage. You are also entitled to have the goods repaired or
replaced if the goods fail to be of acceptable quality and the
failure does not amount to a major failure.”
Conditions of warranty
V2 02 /2 1
Call Godfreys Customer Care
with any product queries
Australia 1800 815 270
New Zealand 0800 282 288
To find out more about our range,
visit: www.godfreys.com.au
www.godfreys.co.nz
email: customerservice@godfreys.com.au
SM-10
Steam Mop
Table of contents
Other i-Vac Steam Cleaner manuals