ICARO paragliders Apus User manual

Page 1

Page 2
Verification of Checks and repairs
APUS
Serial number: ……………………….……………
First check by ICARO / date: ….…………………
………………………….
Name/ Stamp
Check (C)
Repair (R)
Which repair/ Check?
Check valid until? Performed by/ date
Check (C)
Repair (R)
Which repair/ Check?
Check valid until? Performed by/ date
Check (C)
Repair (R)
Which repair/ Check?
Check valid until? Performed by/ date
Check (C)
Repair (R)
Which repair/ Check?
Check valid until? Performed by/ date

Page 3
TABLE OF CONTENTS
VERIFICATION OF CHECKS AND REPAIRS .................................... 1
TO GET TO KNOW YOUR APUS ...................................................... 6
TECHNICAL
DATA ............................................................................. 6
P
ROTECTION SYSTEMS
........................................................................... 6
S
PEED SYSTEM
..................................................................................... 7
R
EVERSIBLE BACK PACK
......................................................................... 8
ADJUSTMENT OF THE HARNESS.................................................... 8
RESERVE PARACHUTE .................................................................. 10
C
OMPATIBILITY CHECK
......................................................................... 12
FLYING WITH THE APUS................................................................ 13
CARE, REPAIR AND INSPECTION.................................................. 13
C
ARE
I
NSTRUCTIONS
........................................................................... 13
R
EPAIRS
............................................................................................. 14
I
NSPECTION
........................................................................................ 14
TERMS OF GUARANTEE ................................................................ 14
ANNEX ............................................................................................. 16
G
UARANTEECARD
................................................................................ 15
C
HECKSHEET
...................................................................................... 15

Page 4
Congratulations on buying your
APUS
harness and welcome the family
of ICARO - pilots!
Before you get to know your system please read the
manual, there is important information inside.
Our products are made with great care and state of the art. Each harness before it
is delivered to the dealer or flight school is checked by ICARO paragliders but test
flights are made only on a random basis.
On that score an approved ICARO dealer or teacher of the flight school must
check a new ICARO harness especially when mounting a rescue system
(compatibility check). This date is entered in the identification plate and as well
guarantee as the first 2-year-check period starts. If this seal is missing, it must be
assumed that this harness is not identical in construction with the model tested at
the specification center.
Your harness is tested according European Standards EN 1651:1999
1
, and
Notification of the Federal Aviation Administration of Germany
2
as a lightweight
harness
but only with mounted airbag- protector!
It is strictly prohibited to fly the harness
•with damaged carbines, belts, buckles or protector,
•outside the specified weight range, and
•in aerobatics, tandem- or motorized flying.
In order to get to know your harness together with your glider, we recommend
ground handling. Here you can find out the reactions of your glider in combination
with the harness without any stress. Ground practice pays off in the air.
This manual gives you information on the entire specific and general
characteristics of the harness.
Should you decide to sell this harness at a later date, please pass on this manual
to the new owner.
No guarantee of any kind can be made against accidents, injury, equipment
failure, and/or death. It is assumed that the pilot is in possession of the necessary
qualifications and provisions of any relevant laws are observed.
The use of this harness is entirely at your own risk.
1
-
EN 1651
Harnesses –Requirements and test methods
2
„Directives about airworthiness for hang- and paragliders (LTF NfL II 91/09)“.

Page 5
Every pilot bears the responsibility of his/her own safety. The manufacturer or
distributor assumes no responsibility for accidents occurring while using it.
Do not fly unless you are personally willing to assume all risks inherent in the sport
of paragliding and all responsibility for any property damage, injury, or death,
which may result from use of this sport.
All technical data and instructions in this manual were drawn up with great care.
ICARO Paragliders cannot be made responsible for any possible errors in this
manual.
Important information in this manual is written in fat cursive writing.
Any important changes to this manual will be published in our homepage
(www.icaro-paragliders.de).
Should you decide to sell this harness at a later date, please pass on this manual
to the new owner.
Each alteration is dangerous and reactions are not predictable. Your harness will
lose its pattern test result and guarantee.
The manufacturer or distributor assumes no responsibility for accidents occurring
while using it.
Every pilot must ensure that the harness is properly checked at regular intervals.
Environmental aspects:
The materials of which a harness is made require a special waste disposal. So
please send disused ICARO - harnesses back to us. We will care about a
professional waste disposal without costing for you.
Please do our nature-near sport in a way which does not stress nature and
environment!
Please do not walk beside the marked ways, do not leave your litter, do not make
unnecessary loud noises and respect the sensitive balance in the mountains.
Especially at the launch site consideration is needed!

Page 6
To get to know your APUS
Allowed for training no
Allowed /certified for aerobatics no/ no
Allowed /certified for flying with passengers no/ no
Allowed /certified for towing yes / no
Allowed /certified for flying with motor drive no / no
Technical data
Designated use Light weight harness
size One size
Height of suspension 45 cm
Maximum loading (kg) 100 kg
Distance between karabiner 37 – 48 cm
Total weight (without rescue system
and protectors) 1,2 kg
Total weight (without rescue system
with all protectors) 1,95 kg
Types of protectors (additionally
mountable)
Foamed rubber protector 3 cm (0,25 kg)
Lexan plate (0,20 kg) mountable in a
separate insertion on the backside;
Airbag- protector (0,30 kg)
Reserve parachute Separate container mountable at the
side or in front of the pilot
Check interval 24 month
This lightweight harness with very low volume is ideal for those who combine flying
with trekking or climbing. It is also very comfortable on long flights. It includes
central stability adjustment. Aluminium adjustment buckles on shoulder straps, to
avoid any problems of accidental breakage and complete with pulleys for the
speed system; Maximum freedom of movement during ground handling, start and
landing is ensured.
The harness is a simple lightweight harness, designed for maximum comfort and
ease of use. It is easy to carry around when not in the air. On the shoulder straps
are attached Velcro and pads for mounting mini-vario meter or life-tracking-
systems. They can be optimally positioned and protected against loss by sewn
Mini loops.

Page 7
Protection systems
There are two different protection systems, a 3cm
foam protector with Lexan plate (unbreakable
plastics) mountable on the back as primary
protection for ground handling and an airbag
which provides excellent protection against the
shock caused by impact.
Only with mounted airbag-
protector the harness is
pattern tested!
This airbag protector is easy to install, and the procedure is obvious. The
protection system has four straps which are fixed to the harness. The two lower
straps are directly fastened to the harness bridle, while the upper straps are
attached to the plastic rings placed near the back regulation components.
Acceleration system
After having adjusted the sitting position to the
optimum configuration, the accelerator must
be adjusted. This harness is compatible with
all normal types of speed-system accelerators.
The speed-bar cords are threaded firstly
through the eyes fixed to the elastic in front of
the board, and then into the harness through
the eyes near the front corners of the seat,
after which they are led through the pulleys
near the rear corners of the seat and brought
directly up to connect to the risers.
To adjust the system correctly, the pilot has to
adopt a flying position in the harness,
suspended from a flight simulator, and hook
into the risers of the paraglider.
If the speed-bar cord is too short, it could
cause a constant force on the bar during flight,

Page 8
so that the accelerator is unintentionally engaged at all times in flight.
Please pay attention that the glider will not be pre-accelerated, while the
accelerator is loosened, when the acceleration ropes are set too short.
It is safest to take off with the speed-bar a little too long, progressively shortening
it during the next flights.
Remember that all adjustments have to be performed symmetrically, on both
sides and with mounted protectors.
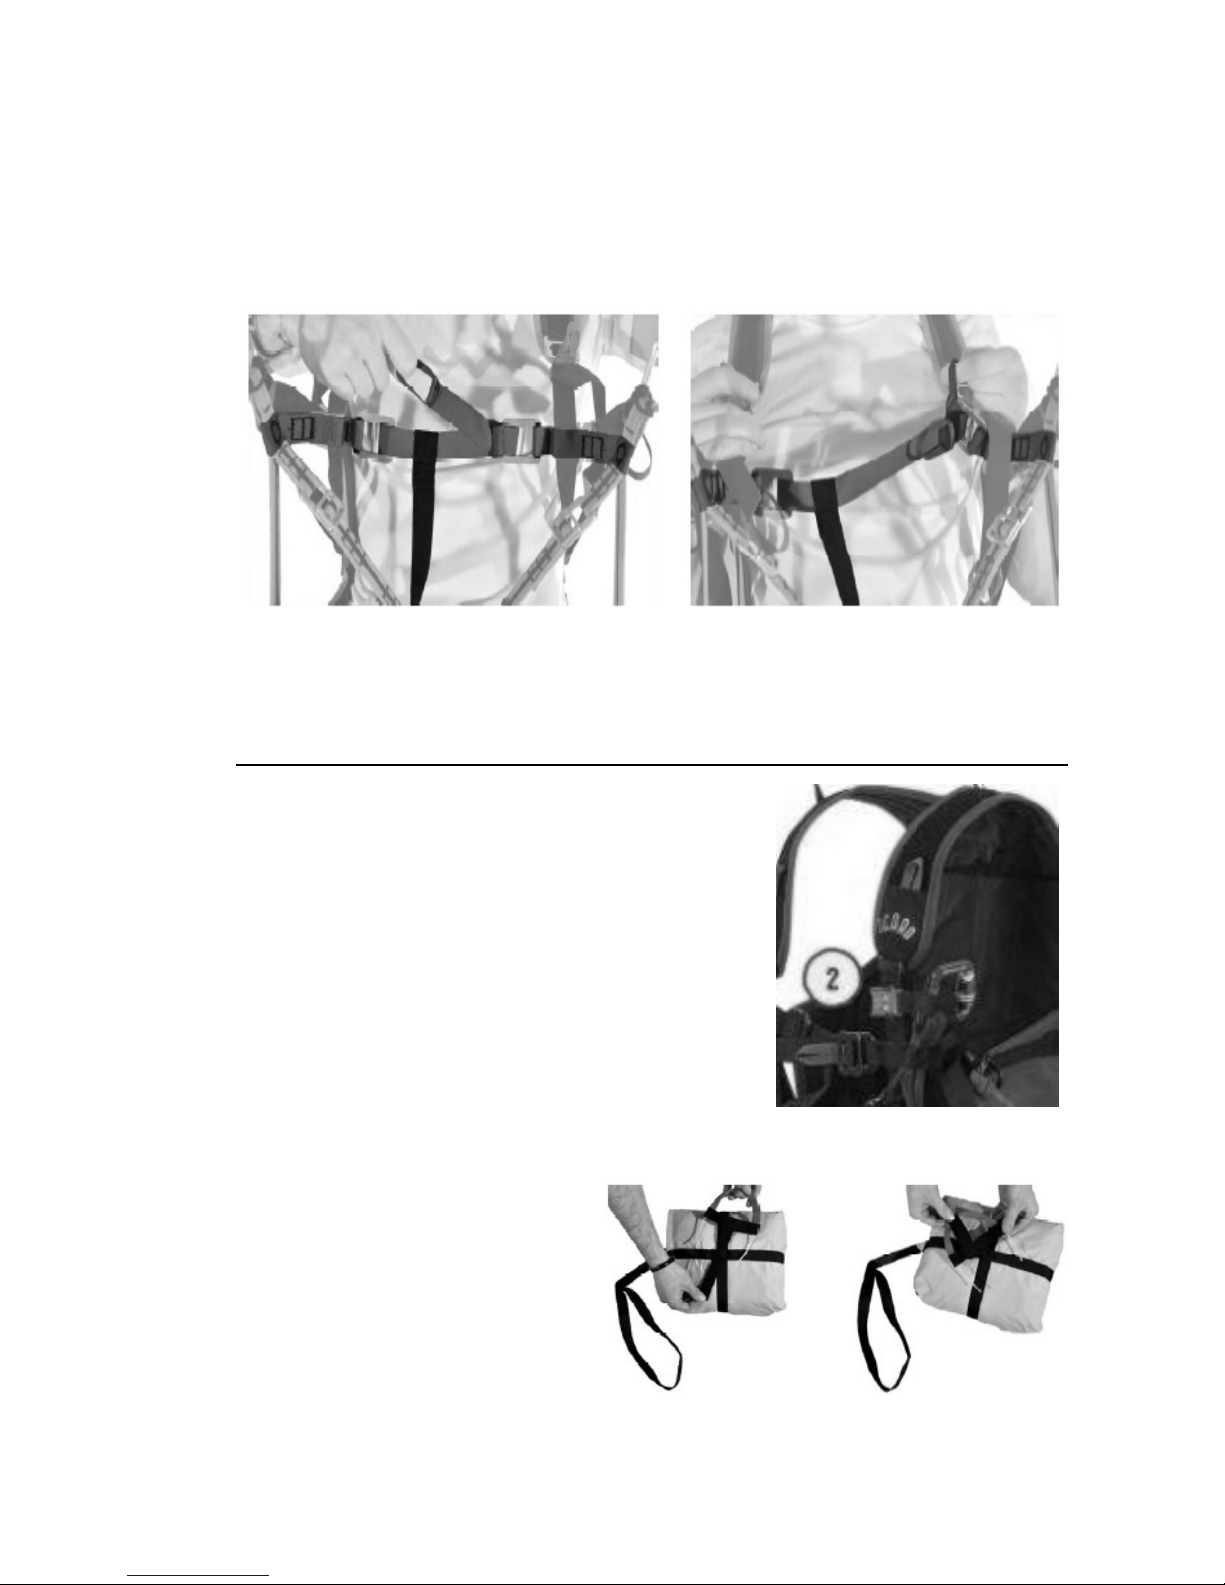
Reversibile back pack
The reversible rucksack provides a
high capacity in combination with
simplicity in use.
To pack flying equipment, open the
zips of the rucksack completely, and
fold it over the back of the harness.
Ensure that the padded section
around the airbag inflation valve
does not suffer any tight folds which
could eventually mar its correct
functioning.
After having folded the paraglider
carefully, place it into the rucksack.
The remaining space above should
be sufficient to store the helmet,
instruments, and extra garments.
When all equipment has been placed inside, the rucksack can be tightened in
order to hold the contents firmly in position. This stabilizes the load and makes
carrying the rucksack more comfortable. The adjustment straps on the rucksack
shoulder straps can be used in the same way.
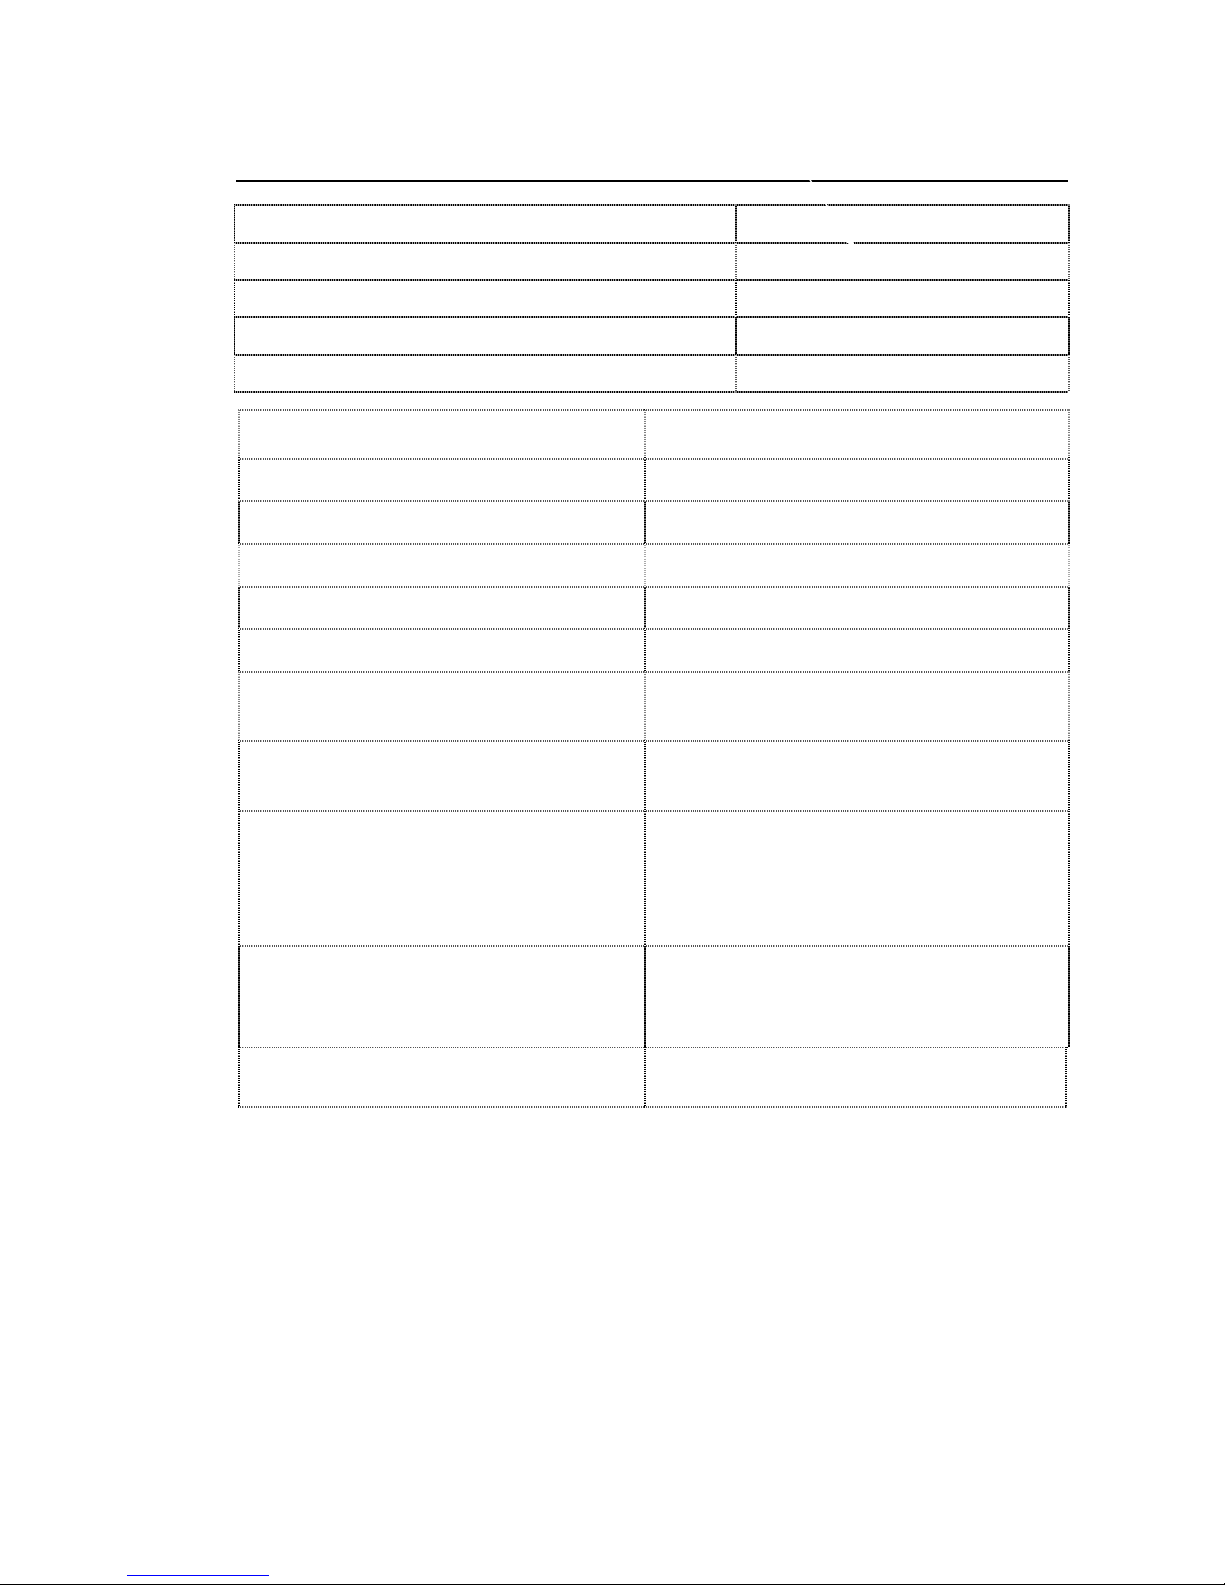
Adjustment of the harness
The harness provides a number of methods of adjustment so that the pilot can fly
in the ideal position. A little time has to be invested in finding the optimum position,
but this effort will be rewarded by exceptional comfort in flight.
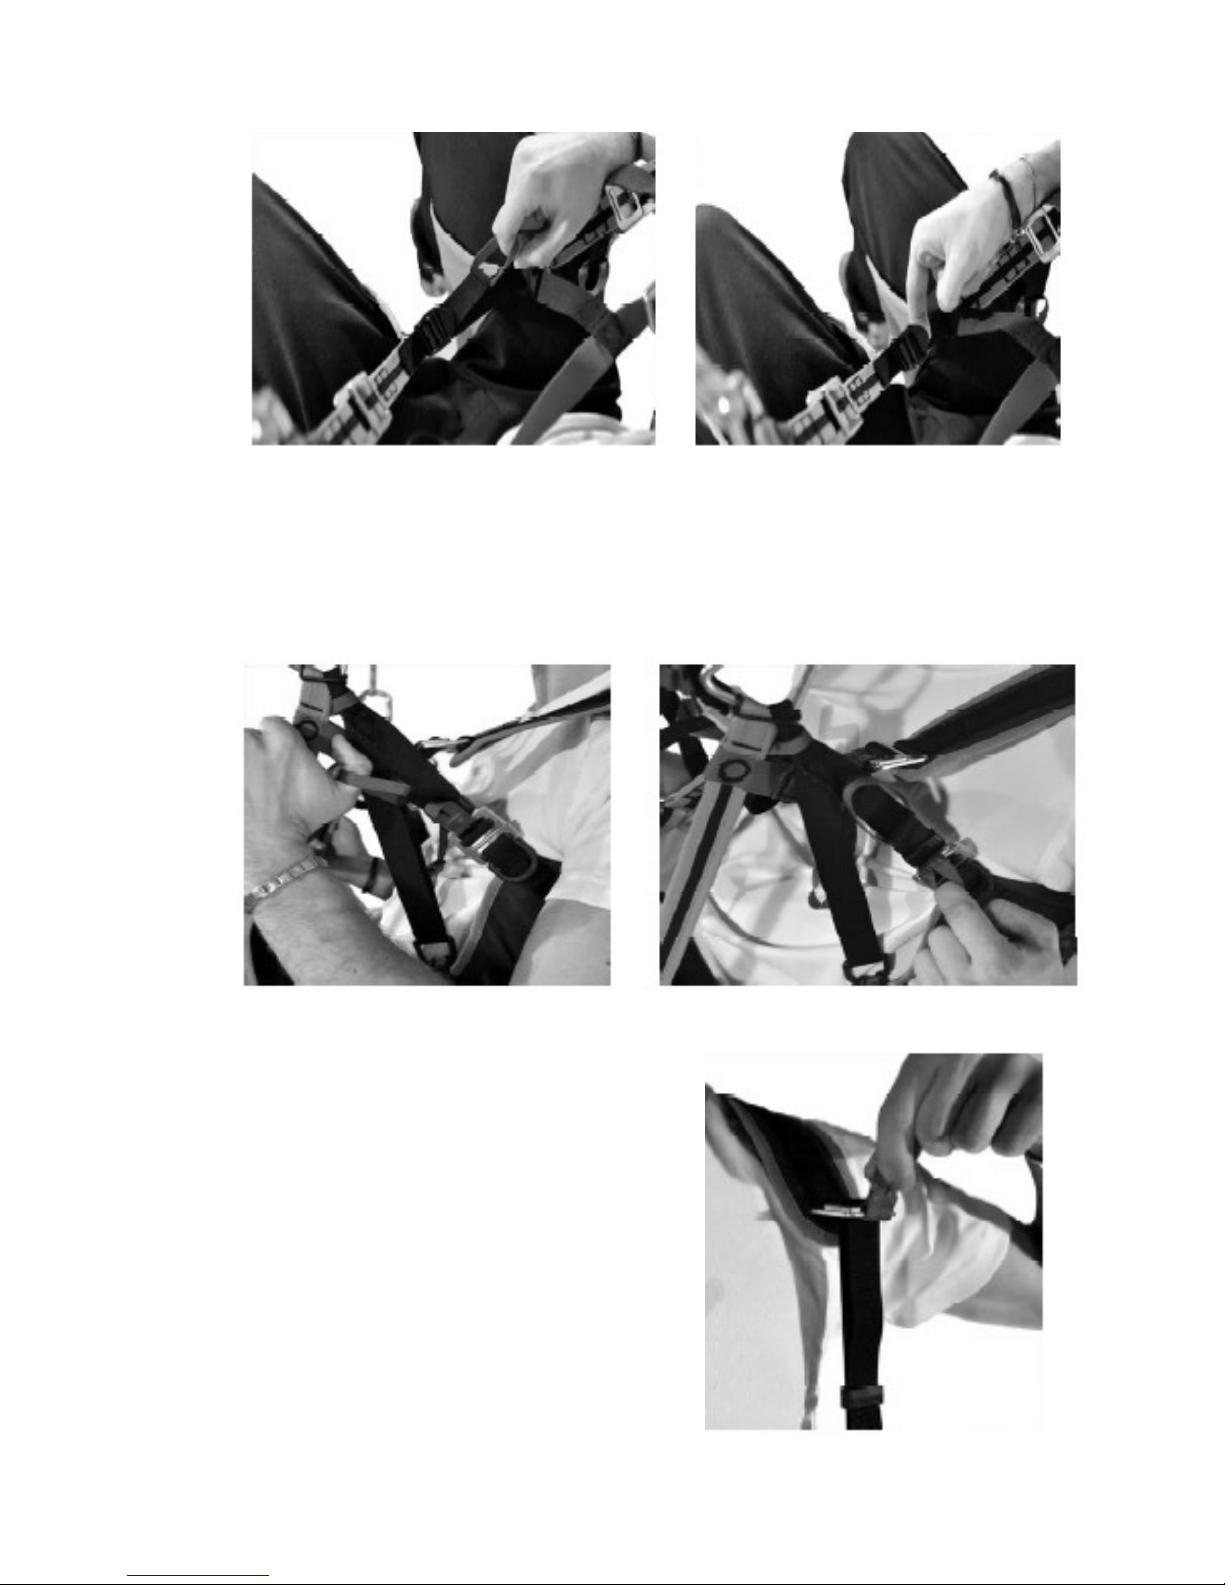
Before making any adjustments, the reserve parachute must be in position. To find
the best position, we suggest hanging in your harness from a suitable point of
support, simulating flying position and conditions.
For this reason, it is best to place all the things that you would normally carry with
you when flying into the back pocket (rucksack, accessories, extra clothing and
other sundry items).
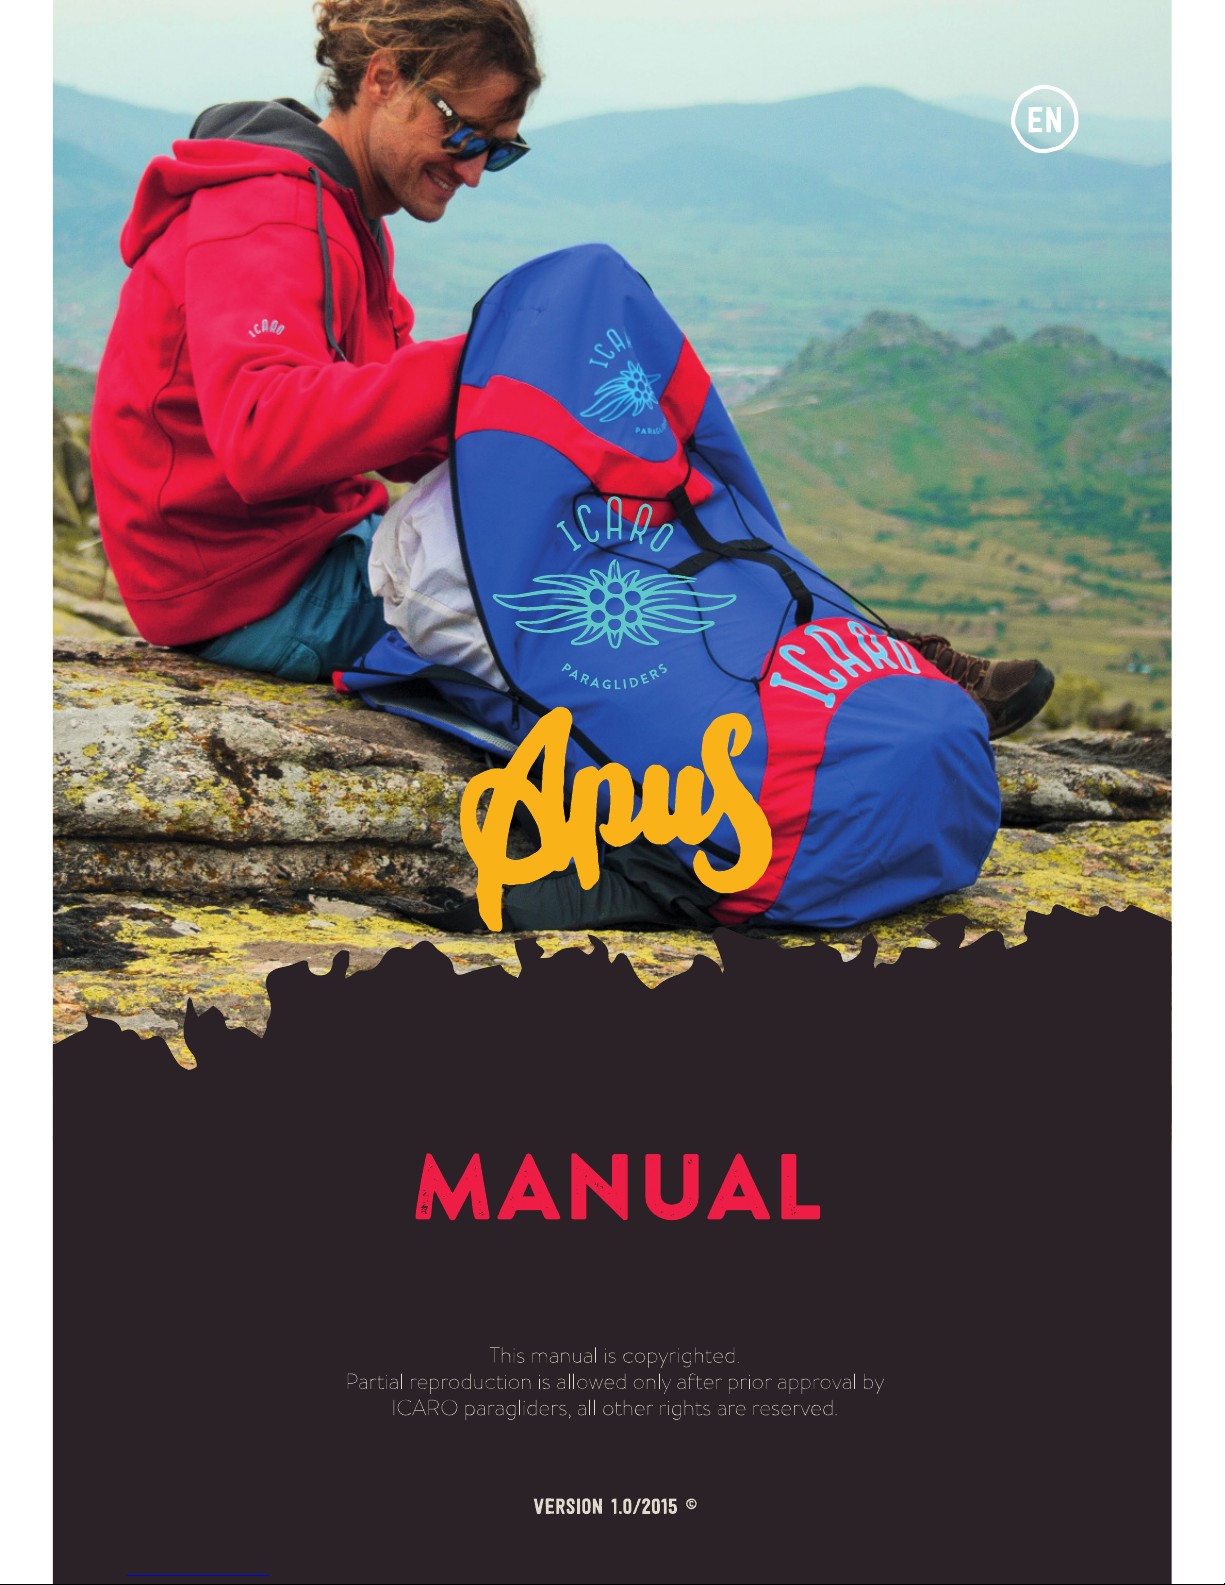
Leg strap adjustment
Because the leg straps are attached relatively high up, the pilot has considerable
freedom in thigh movement. Normally, the manufacturer’s original setting should
be satisfactory.
However it is important to try reaching the correct seated position in the launch
phase without using your hands, by testing the movements in a flight simulator.

Page 9
Back position adjustment
By adjusting the back (using the trimmers higher up on the side), the pilot adjusts
the inclination of the torso with respect to the vertical axis in flight.
A good flying position, improving control of the glider, is obtained by positioning
the face at about 15 cm from an imaginary line between the two karabiners.
Shoulder-strap adjustment
Shoulder-strap adjustment enables the
harness to be adjusted to the pilot’s height.
The adjustment buckle is situated low down,
near the rear edge of the seat.
The shoulder-straps also support part of the
torso weight to improve comfort.

Page 10
Chest strap adjustment
The chest strap adjusts the distance between the two karabiners, and it can be set
between 37 and 48 centimetres. When the chest strap is tighter, stability is
greater.
A wider distance does not improve glider performance, and a smaller distance can
accentuate the effects of a “twist” following an asymmetric collapse.
Each setting the harness must be done with mounted protector,
rescue system and be symmetrical on both sides.
Reserve parachute
The container for the reserve parachute is not
included in the standard harness. It is an optional
extra, and it should be positioned on the harness
attachment strap. The container is large enough for
most of the reserve parachutes available on the
market today. It is connected at two points (2), on
the two hook-in karabiners, in order to distribute
load and to ensure a correct landing position in the
case that the reserve parachute is deployed,
therefore reducing the possibility of injury to a
minimum.
The harness is supplied with a handle for
reserve parachute extraction; this handle alone
should be used for this purpose.
The black loop attached to the
handle itself should be passed
into the loop on the deployment
bag, and then the entire handle
should be passed through its own
loop and pulled tight. For easier
extraction, the loop attached to
the deployment bag should be
positioned to the centre of the
reserve parachute.

Page 11
If in your inner container there is no loop, get in contact with the producer of
your rescue system.
Connecting the reserve parachute to the harness
The harness reserve parachute bridle is passed through the loop at the end of the
reserve parachute bridle. The reserve parachute itself is then passed through the
large loop in the harness bridle.
This connects the two bridles. The loops should be pulled as tight as possible to
avoid any chance of dangerous friction developing between the two bridles during
the shock caused when the reserve parachute opens.
The reserve parachute bridle is not included with the harness.
Inserting the reserve parachute (into original container)
Insert the reserve parachute into the container so that the handle can be seen on
the exterior side, and so the loop connecting the deployment handle to the
deployment bag is facing upwards. Thread a thin cord (such as paraglider riser
cord) through each elastic loop. This will help close the pocket. Thread the elastic
loops into the smallest of the eyelets on the pocket flaps. Close the flaps following
the order shown in the photographs below.Push the plastic pins on the handle into
the elastic loops and under the transparent cover. It is essential to remove the
cord after this operation. Lastly, the handle should be positioned under the two
cover loops.

Page 12
Don´t forget to remove the cords used to help
pack the rescue system!! The cord should be pulled out slowly
in order not to damage the elastic loops by excessive friction.
Compatibility check
A control of every new combination of rescue system and harness/outer container
has to be carried out by either the producer of the harness or the rescue system or
an authorized person (dealer or flight instructor).
The activation of the rescue system in flight position has to be correct and in
conformity to the construction guidelines.
The check has to be recorded in the documentation of the rescue system.
The throwing movement should be practiced every time the rescue system
is repacked.
IMPORTANT POINTS TO LOOK OUT FOR:
Check (steady)
•connection of the rescue system to your harness
•connection of the harness and deployment handle
line from the fixing loops is removed (after each packing)
Check compatibility of rescue system and harness
Before each start with your glider you have to check the container is
closed!!!
Reserve parachute deployment
It is vital to feel periodically for the position of the reserve parachute deployment
handle during normal flight, so that the action of reaching for the reserve
parachute handle becomes instinctive in an emergency. In emergency situations,
the deployment procedure is as follows:
•Look for the reserve parachute handle and grasp it firmly with one hand.
•Pull the handle outwards in order to extract the reserve parachute from the
harness container.
•Look for a clear area, and, in a continuous motion, throw the reserve parachute
away from yourself and the paraglider.
•After the reserve parachute has opened, avoid entanglement by pulling in the
paraglider, gripping at least one back strap of the risers or the brake lines, in
order to collapse the glider. On landing, adopt an upright body position, and
ensure that you perform a PLF (Parachute Landing Fall) to minimize the risk of
injury.

Page 13
Flying with the APUS
Pre-flight checks
For maximum safety, use a complete and consistent system of pre-flight checks
and repeat the same mental sequence every flight. Check that
•all buckles are fastened. Take particular care in the case of ice or snow.
Always clean off snow or ice before fastening buckles;
•the reserve parachute handle is fastened in its correct position, and the pins
are firmly inserted;
•pockets and zips are closed;
•the paraglider is connected correctly to the harness, and that both karabiners
are locked closed by means of their locking system;
•the speed bar is attached correctly to the glider.
Flying dual with this harness is forbidden, because a passenger in front of the pilot
would obstruct the inflation valve, preventing the airbag from reaching its optimum
protective capacity
The harness can be used for towed launches. The tow bridle release should be
hooked directly to the main karabiners, ensuring that the karabiners are positioned
with the opening bar facing the rear. For further details, refer to the documentation
provided with your tow release, or ask a qualified towing instructor at your flying
site.
Before landing, slide your legs out and off the seat surface, so that you take up a
standing position. Never land in the seated position; it is very dangerous for your
back because there is no dorsal protection. Even if you have the optional Airbag,
this is an exclusively passive form of protection, and so landing in the seated
position would be dangerous in any case. Standing up before landing is an active
safety precaution, and it is much more effective than passive forms of protection.
Care, repair and inspection
Care Instructions
To maintain your harness in good condition, please ensure that the harness does
not get dragged along the ground, the karabiner does not get hit against rocks and
avoid over exposure to sunlight, heat or humidity.
If you wish to clean your harness it is best to use warm water and a soft sponge.
Store your harness in a dry and dark place, ideally between 5° and 30° Celsius.
Do not store it near chemicals or petrol.
If you will not fly for longer period, open the pack.
Avoid storing your harness for days at a time in a hot car.
If the harness has become wet, lay it out so that air can get to all areas of the
fabric, also your second chance.
It may take several days for your harness and your rescue system to dry out
completely especially the lines of the rescue system, which take longer than
the fabric. Do not fold and store your rescue system prematurely if it not
completely dry. Mildew may damage your harness and your rescue system.

Page 14
Repairs
The seal of approval can only be preserved if original parts are used. If you
discover any damaged parts to the harness which might impede
deployment, pleases end it back to the manufacturer to be repaired.
Repairs can only be carried out by the manufacturer or from the
manufacturer authorized persons.
Inspection
After 24 months, it is important to have your harness inspected by a trained
ICARO technician.
Without regular certified inspections, your harness will loose its certification
and guarantee.
Only an authorized technician who has been trained by ICARO paragliders is
authorized to sign and date the harness certification label and sign the manual.
Terms of guarantee
ICARO paragliders guarantees 24 month for the proper processing, an operation
within the allowable limits of proper operation and the fulfillment of the eligibility
criteria of harness equipment at the time of first delivery by ICARO paragliders.
Guarantee is only valid for ICARO
products with LTF/ EN certification
3
.
What is covered by the guarantee?
Provided that ICARO paragliders accept the fault the guarantee contains all
necessary spare parts related to the replacement or repair of defective parts and
working time.
ICARO paragliders accept no freight costs (outbound and return transportation).
What are the conditions of the guarantee?
Provided that ICARO paragliders accept the fault the guarantee contains all
necessary spare parts related to the replacement or repair of defective parts and
working time.
•ICARO paragliders needs to be informed immediately after the discovery of a
defect and the defective product must be sent to us for testing.
•The harness was used in normal circumstances and maintained according to
the instructions. This includes in particular the careful drying, cleaning and
storage.
•The harness is used only within the applicable guidelines and all rules have
been complied with all times.
3
- EN 926-1 und EN 926-2 for gliders, EN 1651 for rescue systems , EN 12491 for harnesses,
all at the time guilty version
- LTF/ NfL II 91/09 und NfL 2-60-14

Page 15
•All flights must be accounted for within the flight book.
•There were only original spare parts used and checks, exchange and / or
repairs were conducted by an authorized dealer or by ICARO paragliders
company / person and properly documented.
•A fully and correctly completed guarantee card must be sent at least 6 weeks
after buying the glider to ICARO paragliders commercial. Alternatively can this
be sent via the appropriate online form on www.icaro-paragliders.com.
What is excluded from guarantee?
•Harnesses
•that are used for training purposes, Acro or tandem flying,
•which were involved in an accident,
•which have been changed by yourself,
•that were not purchased from an authorized dealer / flight school,
•where the required inspection intervals were not met and the verification of
the harness was not conducted by a ICARO paragliders authorized
operation / person
•Damage
•which has occurred due to improper treatment (i.e. storage in humidity, heat
or direct sunlight)
•caused by solvents, salt water, insects, sun, sand, humidity or “debag-
jumps”.
•caused by force majeure.
•caused by the paramotor (Oil, fuel, damage in cause of the prop)
•Parts that need to be replaced due to normal wear and tear,
•Discoloration of the cloth material used,
In case of a concluded claim the period of guarantee carries on.
The period of guarantee and the connected claim are not
prolongated and are only valid until the original date of expiry.
The freight costs (transport to and from) are not paid by ICARO
paragliders.
Team ICARO thank you for your trust in our products.
Should you have any questions, ideas or criticism
please contact us.
This paraglider has been developed and produced by modern
technology and will give you years of pleasurable and
unforgettable flight experiences.

Page 16
Annex
Please fill in the guarantee card which you find on our homepage
www.icaro-paragliders,com and send it to us.
Check sheet for harnesses
Client (Name, Address):
Type / size / year of construction : Serial number:
Certification number: Date of last inspection:
Memos yes no
Seat strap
system
Visible damages?
Areas of abrasion?
Seat board Visible damages?
Positioning of the straps ok?
Straps
Visible damages?
Course of the straps?
Seams ok?
Buckles and
carbines
Visible damages?
Condition (closing properties,
operation) ok?
main carbines (condition, age)
Operativeness ok?
Protectors
Airbag -/
Foamed
material
Visible damages?
Seams ok?
Valve ok?
Tightness airbag/ foam protector
sheeting?
Conditions of any reinforcements ok?
Speed bar
Visible damages?
Fixing rubber ok??
Return pulleys ok?
Lines ok?
Rescue system
Visible damages?
Identification plate ok?
V-lines
Handle fitted and connected?
Container properly closed?
Backpack
(reversible
harnesses)
Visible damages?
Zip ok?
Buckles ok?
Seams ok?
Compatibility check effected? Additional repairs carried out? Which?
Type label affixed?
Inspection stamp affixed?
Overall result
Next inspection:
As new
Very good
Next inspection when using
the harness commercial:
Used
Much used
certification only for one year
not airworthy
Date, name and signature of the checker

Page 17
Dispatch protocol / scope of delivery
ICARO check performed
Handle
Rescue container
Airbag
3cm foam protector
Lexan plate
Manual
....................... ..............................
Date Signature
Table of contents
Other ICARO paragliders Accessories manuals
Popular Accessories manuals by other brands

gefran
gefran KS Series manual

Juicy Power
Juicy Power AP4-0003A User reference guide

Cognex
Cognex DataMan 70 Series Quick reference guide

Oregon Scientific
Oregon Scientific Super Guard 58J features and benefits

Siemens
Siemens TA1Q300 installation instructions

Glaziar
Glaziar Predator SO2000UV Instructions for use