Icera St.Thomas iWash CS-20 User manual

Read all operang instrucons before installaon and use.
Please save this instrucon manual and place in an easily accessible locaon.
External appearance and specificaons are subject to change for improvement of product without noce.
Muse iWash CS-20
Integrated Bidet Toilet
Instrucon Manual
l

1
01
READ ALL INSTRUCTIONS BEFORE USING
Important Safeguards
WARNING
To reduce the risk of electrocuon
To reduce the risk of burns, electrocuon, fire or injury
DANGER
●If the power cord is damaged, it must be replaced by the manufacturer, its service
agent or similarly qualied persons in order to avoid a re hazard. Do not use if the
power cord is loose or damaged.
● This product should only be connected to a properly ground outlet.
● Unplug the appliance while cleaning. Do not touch the power plug with wet hands.
●The power cord should be properly connected to an electrical outlet corresponding to
the rated voltage of the product.
● Keep the power cord away from heated surfaces.
● Unplug the power cord before removing the seat top from the toilet bowl.
● Do not connect other electrical appliances to the same outlet as the unit.
●This product is not intended for use by persons (including children) with reduced
physical, sensory or mental capabilies unless under the supervision of a responsible
adult.
● Use this product only for its intended use as described in this manual.
● Do not use any aachments unless recommended by the manufacturer.
● Never operate this product if it has a damaged cord or plug. If it is not working properly,
if it has been dropped or damaged, or dropped into water, call Icera Customer Service
for assistance before use or installaon.
● Never block the air outlets of the product or place it on a so surface, such as a bed
or couch, where the air outlets may be blocked. Keep the air outlets free of lint, hair
and debris.
● Any service or repair should be performed by an authorized service representave.
● Close supervision is necessary when this product is used by or near children or invalids.
● Do not use while bathing.
● Do not place or store seat where it can fall or be pulled into a tub or sink.
● Do not place or drop into water or other liquid.
● Do not reach for a seat that has fallen into water. Unplug immediately.

202
WARNING
To reduce the risk of burns, electrocuon, fire or injury to persons
Important Safeguards
CAUTION
To reduce the risk of injury to persons or damage to product or property
● Do not place heavy objects on or step on the seat. It may cause product damage or
injury.
● When cleaning the unit, do not use any chemicals. Clean the unit with a moist, well-
wrung so cloth.
● For excessive stains, use a so cloth moistened with mild dish detergent. Wipe any
excess uid away with a dry cloth.
● Do not slam down or force close the seat lid.
● Do not lean on the seat lid.
● Do not twist or pull the connecon hoses. This may aect the water supply or cause
leaks.
● If the unit seems to be malfunconing, do not use. Disconnect the power cord and call
Icera Customer Service for assistance. Using a malfunconing seat may be a re and
/ or electric shock hazard.
● Do not dismantle, repair or alter the unit unless under the instrucon of an authorized
service representave.
● Never use while drowsy.
● Never drop or insert any object into any opening or hose.
● Do not use outdoors, or operate where aerosol spray products are being used or
where oxygen is being administered.
● Do not pour water onto the seat.
● Do not use a steam cleaner to clean the unit.
● Keep the unit away from res or ammable substances.
● Do not connect to industrial water supplies.
● To cauon against low-grade burns, do not use the heated seat funcon for long
periods of me.
● Only use the hoses supplied with the appliance. Old hose sets should not be reused.
● Ingress of water protecon: IPX4
● Do not smoke cigarees or other tobacco products nor allow burning material in or
near the toilet.

Parts Idenficaon
Main unit
3
Seat Control
Panel
Floor Bolt
Covers
Non-siable
Seat Lid
Manual
Flush Buons
Deodorizer
Vent
Rear Wash
Spray
Warm Air
Dryer Outlet
Front Wash
Spray
In-bowl
LED Nightlight
Seat
Sensor
Wash Nozzle
Cover

4
Parts Identification
Light sensor
Control Panel
Remote control
Top
Front
04

5
Parts Idenficaon
Included Parts
Required But Not Included Parts & Tools
� The following are pre-installed on the toilet bowl and are not shown above:
◦ Rim jet supply line
◦ Flush jet supply line
� Images are not to scale.
� Parts pictured above may differ slightly in appearance from parts received with actual unit. Any
variaons will not affect product funcon or installaon method.
05
● 7/16” slip joint angle stop (wall valve) with compression nut removed to expose 1/2” MIP
threads x1
●GFCI receptacle x1, wired in wall and tested
● Bowl to ange gasket x1 - a waxless ring is recommended although a bee’s wax ring may
be used
● Pair of 2-1/2” long toilet bowl mounng bolts/nuts
● Open ended wrench that ts toilet bowl mounng nuts x1
● Adjustable wrenches x2
● #2 Phillips screwdriver x1
AAA Baery x3
1/2” Supply line x1
Baery-operated remote
with wall-mount x1
(includes adhesive tabs
on back of wall-mount)
Rear hold-down bolt x1
Seat screw and washer x2
Seat anchor (for top-side of seat) x2
Rubber anchor cap x2
Brass lter adapter x1
Water lter x1
Washer x1
Nut x1
3/4” Transfer hose x1

6
Basic Instrucons
Select either the REAR WASH or the FRONT WASH on the
remote. Each wash cycle operates for 90 seconds.
The seat sensor is triggered by skin touch. The sensor will recognize
that the seat is occupied and the bowl pre-mist will run. You should
hear water running.
A beep will sound inidcang the end of the chosen wash cycle.
Select DRYER ON/OFF on the remote. Dryer cycle will operate for
3 minutes.
A beep will sound indicang the end of the dryer cycle.
Once the STOP buon is pressed, the wash and/or dry funcons
will cease and the nozzle will return to its resng positon.
You can supplement by wiping gently with toilet paper, if desired.
When sing on the seat, sit in the center to ensure the seat sensor detects the user. If the seat sensor is not
acvated, the wash and dry funcons cannot be used.
The seat sensor of this product is located inside the seat. The sensor is acvated by human touch. Seat covers should
not be used as they will not allow the sensor to detect a user.
The buons on the toilet bowl are supplementary controls to be used in case of
emergency. Water pressure and dryer temperature can be controlled via the remote only.
Sit on the seat
Press the REAR WASH or FRONT WASH buon
Press the DRYER buon
Press the STOP buon

7
Funcons & Operaon
Oscillang Wash
Press to move the NOZZLE FORWARD or to move the NOZZLE REARWARD during the wash cycle.
Press to acvate the OSCILLATING WASH. The nozzle moves back and forth while in REAR WASH posion.
This funcon can also be acvated in FRONT WASH posion by pressing FRONT WASH, then press
OSCILLATING WASH. The oscillang wash cycle will automacally stop aer 3 minutes or by pressing
the buon.
Water pressure can be adjusted by pressing the buons during wash.
If you choose not to adjust the water pressure, it will default to the last used seng.
Nozzle Posion Adjustment
Water Pressure Adjustment
Press on the remote to adjust the temperature of the warm air.
If you choose not to adjust the dryer temperature, it will default to the last used seng.
Warm Air Dryer Temperature Adjustment
Seat temperature can be adjusted by pressing the buon on the remote.
Warm Seat Temperature Adjustment
There are 3 temperature sengs to choose from:- Low: 95° F (35° C)
- Medium: 100.4° F (38° C)
- High: 104° F (40° C)
Water temperature can be adjusted by pressing the buon on the remote.
There are 3 temperature sengs to choose from:- Low: 93.2° F (34° C)
- Medium: 98.6° F (37° C)
- High: 104° F (40° C)
Water Temperature Adjustment

8
Funcons & Operaon
08
Press the buon to acvate a 3 minute deodorizer cycle.
Press again to end the deodorizer cycle early.
Deodorizer
Electric power consumpon is lile and use the LED Nightlight funcon without care about the electric charge.
LED Nightlight
USING THE REMOTE: Press the buon at the top of the remote to acvate the flush. This method is
funconal regardless of the Auto Flush sengs.
USING THE SEAT CONTROLS: In the event of a power outage or remote malfuncon, the flush can be acvated
using the flush buons located on the right side of the seat when facing the toilet (see image below).
Manual Flush Opons
Auto Flush
To set the unit to Auto Flush mode, press and hold the buon for at least 4 seconds, then release.
When the Auto Flush mode is set, the toilet will flush automacally when it detects a user has vacated the
seat aer sing for 5 seconds or more.
In the event of a power outage, the Auto Flush will not operate. See below for instrucons on how to flush
manually.
To deacvate Auto Flush mode, press and hold the buon for at least 4 seconds, then release. The
unit should no longer flush automacally.
Manual Flush button
1
2
Hold the buon towards the front of the bowl (buon
1) for 4 seconds to acvate a rim wash. Then, hold
buon towards the rear of the bowl (buon 2) for 4
seconds to acvate the siphon jet to clear any waste.
Then, hold buon 1 for an addional 4 seconds to
acvate a second rim wash to refill the bowl. Note: the
buons on the bowl are not labeled - numbers shown
on the image to the le are for instruconal reference
only.
Acvate the LED NIGHTLIGHT by pressing the buon on the remote control. The nightlight will turn on
only when the sensor reads a dim or dark environment, and will automacally shut off in a lit room.

9
Funcons & Operaon
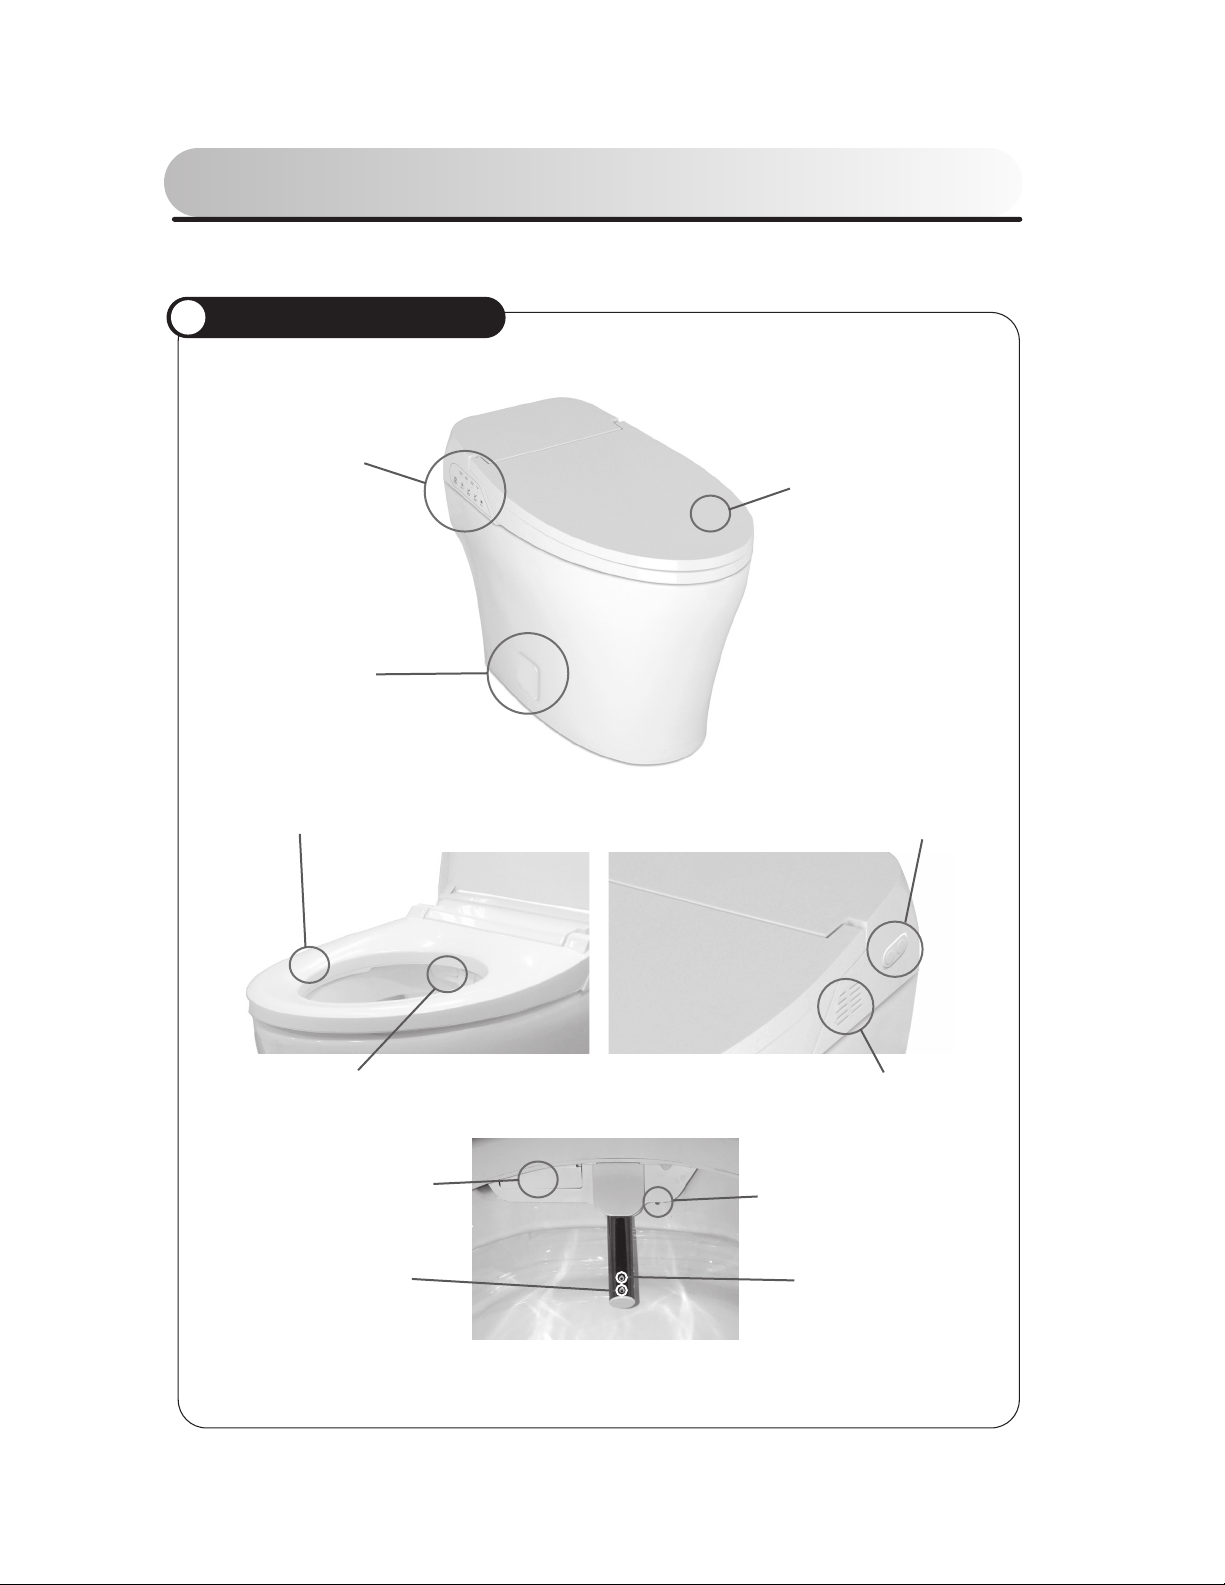
The nozzle system is both sanitary and effecve. The self-cleaning nozzle has separate secons for the front and rear
wash cycles. It is internally treated with an anbacterial nano-silver compound for added sterility. The nozzle is
automacally sanzed before and aer each use.
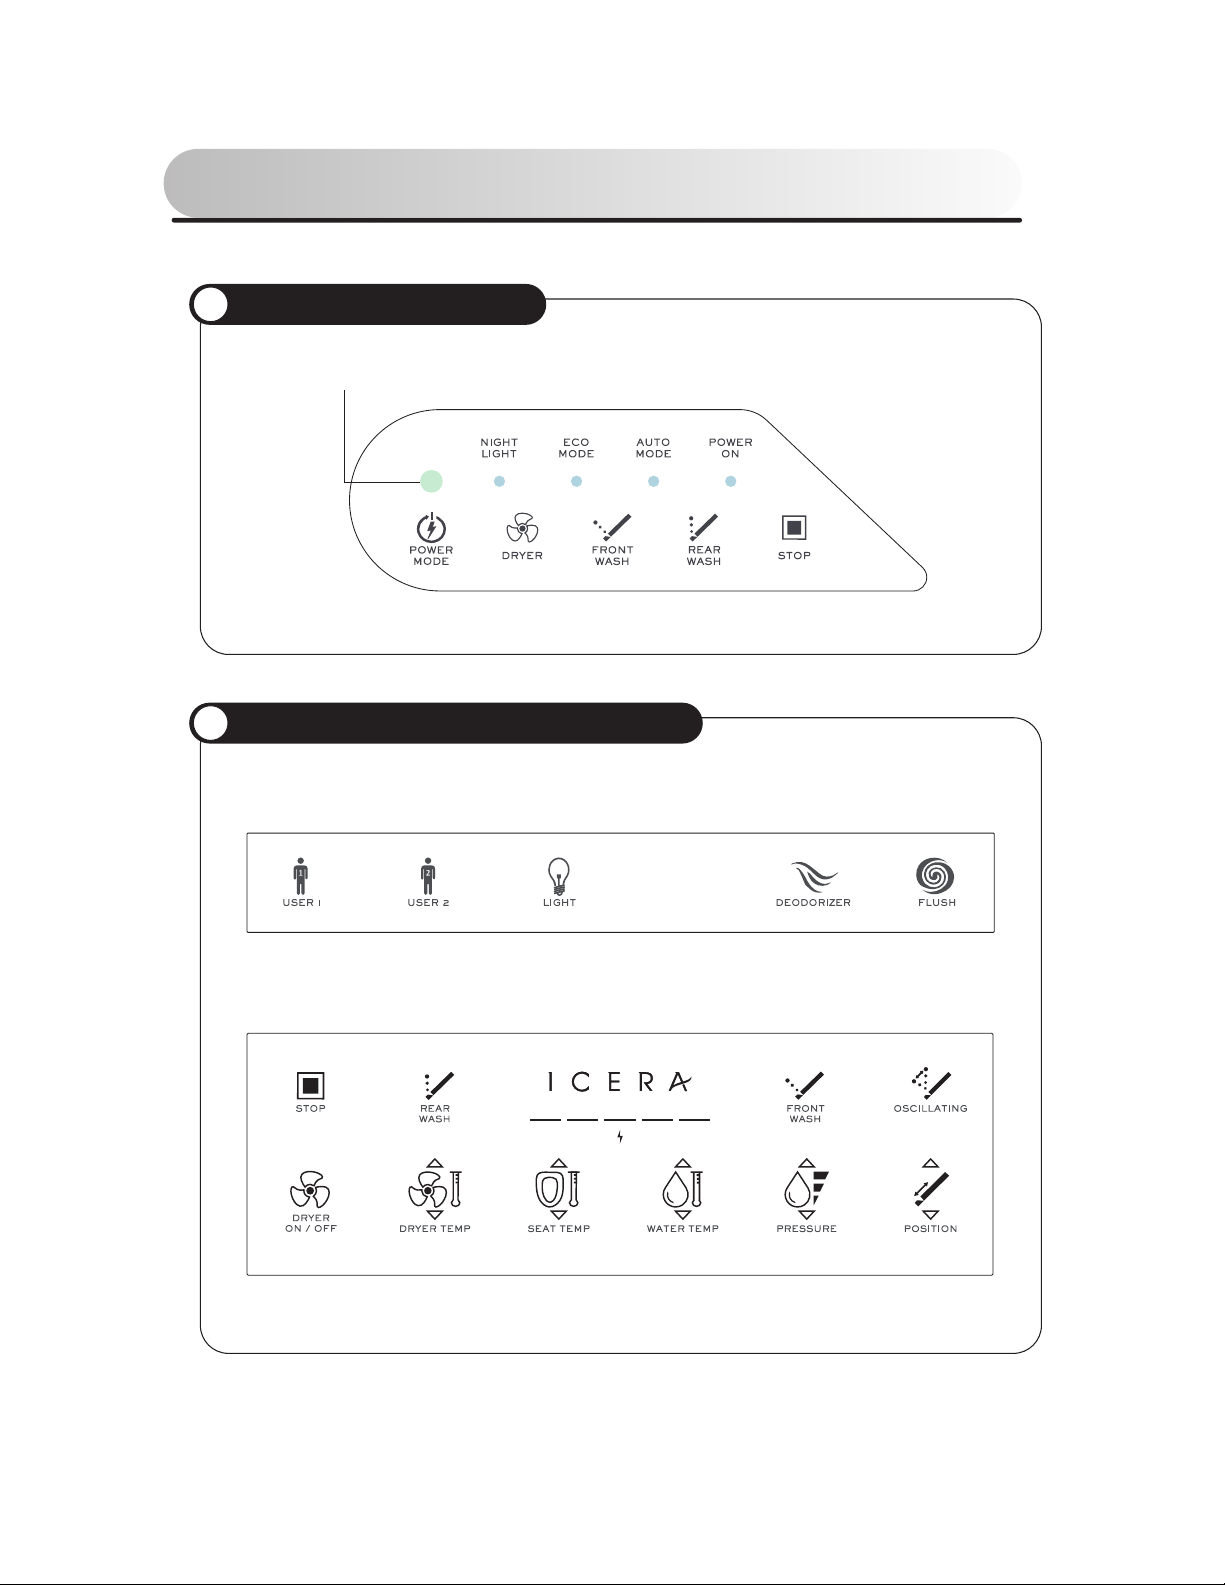
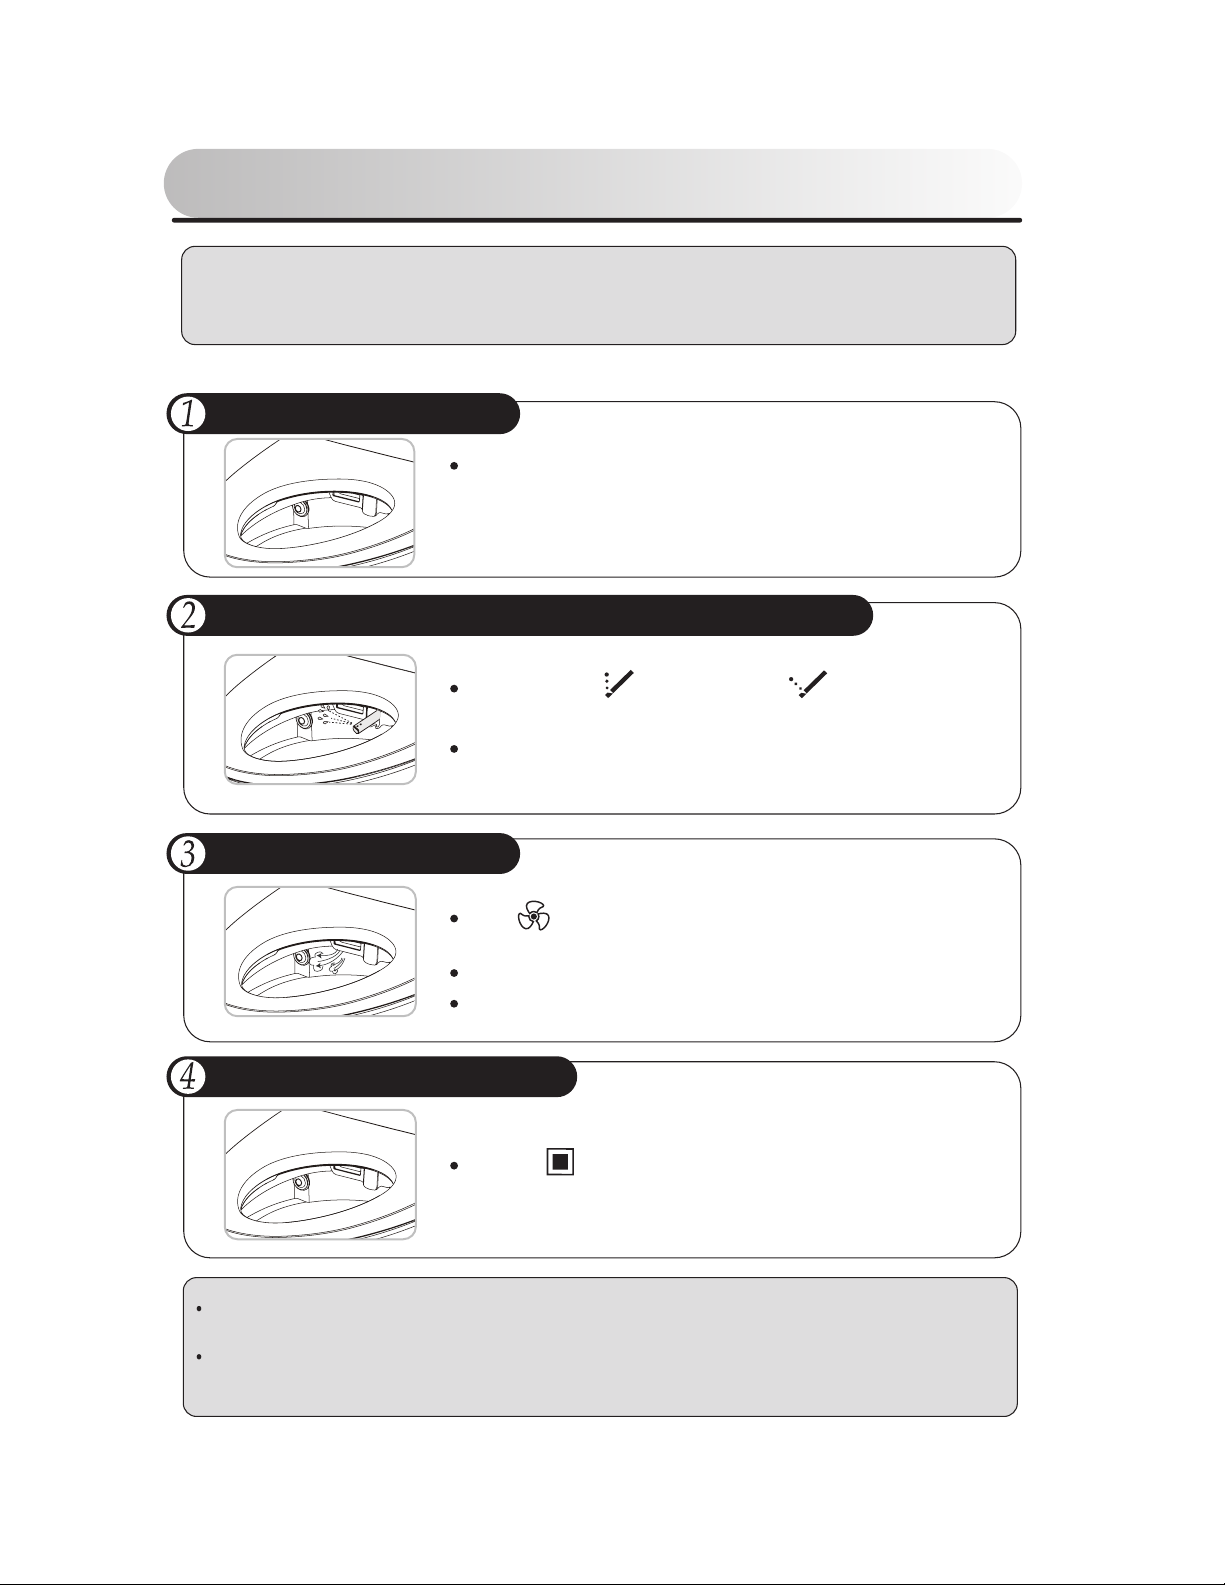
The nozzle should also be cleaned manually periodically. Using the control panel located on the seat, press the
REAR WASH and FRONT WASH buons at the same me. Clean the nozzle manually with a so brush.
Press the STOP buon on the control panel to return the nozzle to its resng posion. The self-cleaning funcon
will then operate.
The seat temperature will automacally lower when set to the highest seng if the seat is occupied for more than 30
minutes to protect the user against low-grade burns.
Burn Protecon
Nozzle Cleaning
09
User Presets
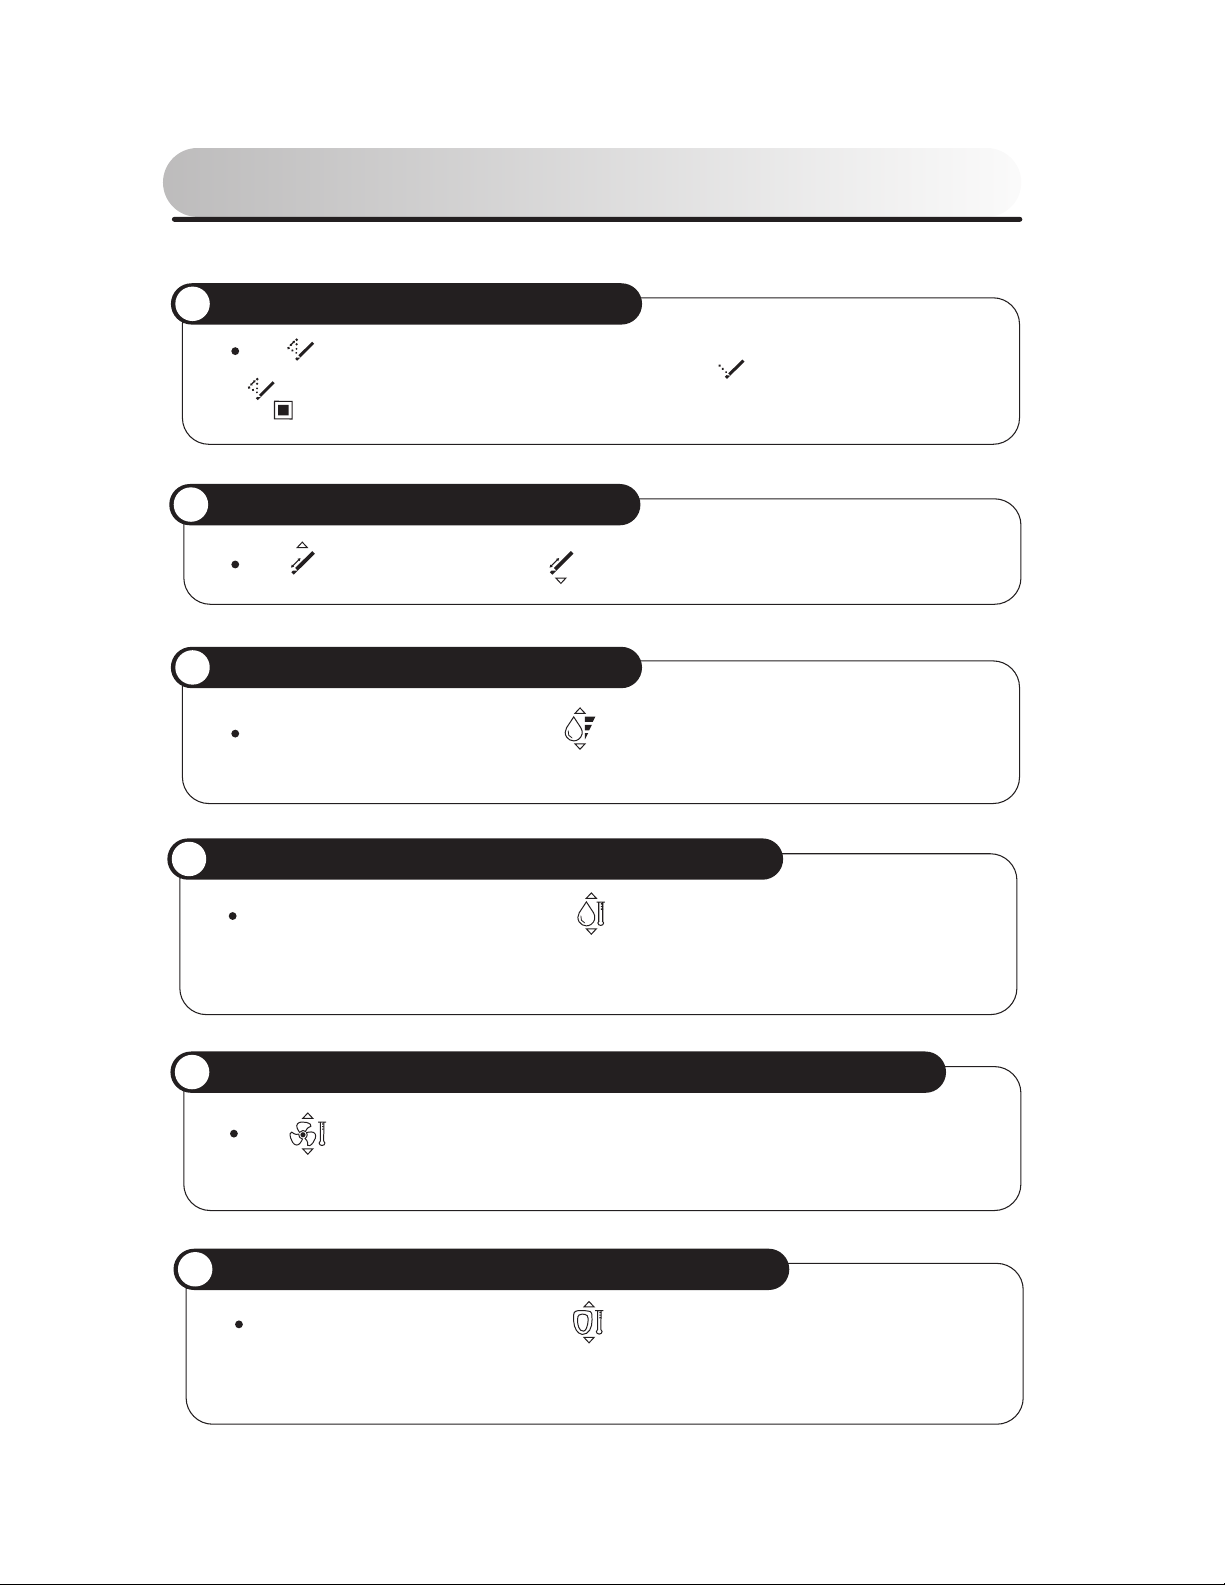
SAVING USER PRESETS: Set water pressure and temperature, nozzle posion, dryer temperature and seat temperature
to the desired sengs, then hold the buon for 4 seconds to save. A long beep will sound once the sengs are saved.
Repeat for .
ACTIVATING USER PRESETS: Quickly press and release the user preset desired to acvate. A short beep will sound
when the user preset is acvated.
STANDARD: In Standard mode, the seat temperature will be maintained at the seng last selected by the user.
AUTO: Press the POWER MODE buon on the seat control panel to acvate the AUTO power saving mode. In
AUTO power saving mode, the seat temperature will be maintained at 86° F (30° C). Once occupied, the seat
temperature is fully adjustable via the remote control.
ECO: For even greater energy-efficiency, press the POWER MODE buon on the seat control panel twice to
acvate the ECO power saving mode. In ECO power saving mode, the seat will be maintained at room temperature.
When a light is turned on in the bathroom, the seat will switch to AUTO power saving mode and revert back to ECO
power saving mode when the light is no longer detected.
Power Saving ModesPower Saving Modes
Power On/Off
To turn the unit off, hold the POWER MODE buon on the seat panel for 4 seconds (unl the LED lights shut off).
To turn the unit on, press any buon on the remote except the water, dryer and nozzle adjustment buons.
Power On/Off
In the event of a power outage or failure, the temp. and pressure sengs will default to the last used sengs when the
seat is powered on again.

Installation
Installation of ceramic
Connect the Angle-valve at the Shut-off valve.
Insert the flange-packing into the flange.
flange-packing
flange
Turn the ceramic over. Place the flange at the bottom of ceramic and insert
the bolts assemble the flange and ceramic with packing nuts.
Lift up the ceramic and fix the flange at a drain.
Set the ceramic at level not to lean when
fixing the flange.
• Ceramic is heavy.
Recommend 2 workers when lifting up the ceramic.
flange
Drain
Bolts
Wax seal
Flange
or
11 10
IMPORTANT NOTE:
Please read through this enre list of instrucons and take an inventory of included
parts before beginning installaon. If you have any quesons at all, please call Customer
Service at 855-444-2372 before you begin your installaon.
INSTALLATION STEPS
• The centerline of the oor drain is to be 12” from nished back wall. Do not
include the thickness of any base board molding when taking this measurement.
• The centerline of the angle stop (wall valve) is to be 8” above the nished oor
and 6” to the le of the centerline of the oor drain. The angle stop will need
to have a 1/2” MIP thread to connect to the included supply line.
Before unpacking product, ensure that rough-in dimensions are as follows:
VERY IMPORTANT: Follow instrucons in order! Connect hoses
and aach seat top to bowl BEFORE pung the down the bowl.
1a. Screw the 1/2” supply line (included) to the angle stop. Hand ghten only.
1b. Open the angle stop and allow water to ow into the oor drain for 60 seconds. DO NOT
SKIP THIS STEP! Construcon debris in the pipes will clog the unit’s lter. This applies to new
construcon as well. Turn o valve and remove supply line when complete.
1a 1b

Installation
Installation of ceramic
Connect the Angle-valve at the Shut-off valve.
Insert the flange-packing into the flange.
flange-packing
flange
Turn the ceramic over. Place the flange at the bottom of ceramic and insert
the bolts assemble the flange and ceramic with packing nuts.
Lift up the ceramic and fix the flange at a drain.
Set the ceramic at level not to lean when
fixing the flange.
• Ceramic is heavy.
Recommend 2 workers when lifting up the ceramic.
flange
Drain
Bolts
Wax seal
Flange
or
11 11
3. Unbox the bowl. Viewing from the back, you’ll noce 2 factory-installed braided
stainless steel lines. One leads to the front of the bowl and operates the bowl ush jet;
the other leads to the rim and operates the rim jet.
2a. Insert toilet mounng bolts (not supplied) into drain ange. IMPORTANT NOTE: Bolts
must be no longer than 2-1/2”.
2b. Posion waxless gasket (recommended, not included) on the oor ange. If a
tradional wax ring is used, ax to the boom of the toilet bowl.
2a
3
2b
Rim jet hose
Flush jet hose

Installation
Installation of ceramic
Connect the Angle-valve at the Shut-off valve.
Insert the flange-packing into the flange.
flange-packing
flange
Turn the ceramic over. Place the flange at the bottom of ceramic and insert
the bolts assemble the flange and ceramic with packing nuts.
Lift up the ceramic and fix the flange at a drain.
Set the ceramic at level not to lean when
fixing the flange.
• Ceramic is heavy.
Recommend 2 workers when lifting up the ceramic.
flange
Drain
Bolts
Wax seal
Flange
or
11 12
4a. Unbox the bidet seat and the rest of the bowl. Hand-ghten the bowl jet supply line
to the 1/2” plasc inlet on the le boomside of the seat.
4b. Hand-ghten the rim jet supply line to the 1/2” plasc inlet on the right boomside
of the seat.
4c. Hand-ghten the 3/4” water supply transfer hose (included) to the center 3/4” inlet,
leaving the opposite end hanging inside the rear cavity of the bowl.
4d. Using an an adjustable wrench, GENTLY ghten each connecon. DO NOT OVER-
TIGHTEN AS THE PLASTIC THREADS OF THE INLET WILL BE DAMAGED AND LEAK.
4a
4c
4b
4d
RIM JET
WATER
SUPPLY
FLUSH JET

Installation
Installation of ceramic
Connect the Angle-valve at the Shut-off valve.
Insert the flange-packing into the flange.
flange-packing
flange
Turn the ceramic over. Place the flange at the bottom of ceramic and insert
the bolts assemble the flange and ceramic with packing nuts.
Lift up the ceramic and fix the flange at a drain.
Set the ceramic at level not to lean when
fixing the flange.
• Ceramic is heavy.
Recommend 2 workers when lifting up the ceramic.
flange
Drain
Bolts
Wax seal
Flange
or
11 13
5a. Install seat anchors (included) in bowl deck holes.
5b. Insert plasc hold-down bolt (included) under the rear of the seat. Align seat with
anchors/rear deck mounng hole.
5c. Ax seat to bowl by using screws/washers threaded into the anchors in front and by
threading washer/plasc nut in the rear.
5d. Insert rubber caps into front screw recesses.
5c
5a
5d
5b
Top-side
anchor screws
Rear
hold-down bolt
Rear
hold-down bolt
Top-side
seat anchors
Rubber
Anchor Caps

Installation
Installation of ceramic
Connect the Angle-valve at the Shut-off valve.
Insert the flange-packing into the flange.
flange-packing
flange
Turn the ceramic over. Place the flange at the bottom of ceramic and insert
the bolts assemble the flange and ceramic with packing nuts.
Lift up the ceramic and fix the flange at a drain.
Set the ceramic at level not to lean when
fixing the flange.
• Ceramic is heavy.
Recommend 2 workers when lifting up the ceramic.
flange
Drain
Bolts
Wax seal
Flange
or
11 14
6a. Hand-ghten 1/2” brass adapter to the water lter (both included).
6b. Hand-ghten lter to 3/4” transfer hose. Using an adjustable wrench, GENTLY ghten
each connecon. DO NOT OVER-TIGHTEN AS THE PLASTIC THREADS WILL BE DAMAGED
AND LEAK.
7a. Hand-ghten 1/2” supply line (included) to the 1/2” brass lter adapter.
7b. Using a wrench (or channel locking pliers) to secure the brass adapter to prevent over-
ghtening the plasc lter threads, ghten the 1/2” supply line with a second wrench.
6a
7a
6b
7b

Installation
Installation of ceramic
Connect the Angle-valve at the Shut-off valve.
Insert the flange-packing into the flange.
flange-packing
flange
Turn the ceramic over. Place the flange at the bottom of ceramic and insert
the bolts assemble the flange and ceramic with packing nuts.
Lift up the ceramic and fix the flange at a drain.
Set the ceramic at level not to lean when
fixing the flange.
• Ceramic is heavy.
Recommend 2 workers when lifting up the ceramic.
flange
Drain
Bolts
Wax seal
Flange
or
11 15
8. GENTLY align bowl over drain ange guiding mounng bolts through the mounng
holes in the base of the bowl.
8
9a. Thread bolt nuts onto bolts and hand-ghten.
9b. Once hand-ghtened, use a wrench to ghten further. DO NOT OVER-TIGHTEN. You
will risk cracking the ceramic. Tighten alternately as follows: Le nut = 1/2 a turn; Right
nut = 1/2 a turn; Le nut = 1/2 a turn; right nut = 1/2 a turn; then STOP.
9c. Snap in cover les.
9b9a
9c

Installation
Installation of ceramic
Connect the Angle-valve at the Shut-off valve.
Insert the flange-packing into the flange.
flange-packing
flange
Turn the ceramic over. Place the flange at the bottom of ceramic and insert
the bolts assemble the flange and ceramic with packing nuts.
Lift up the ceramic and fix the flange at a drain.
Set the ceramic at level not to lean when
fixing the flange.
• Ceramic is heavy.
Recommend 2 workers when lifting up the ceramic.
flange
Drain
Bolts
Wax seal
Flange
or
11 16
10. Hand-ghten 1/2” supply hose to angle stop. Use a wrench to ghten fully. Ensure
supply hose is not kinked or awkwardly bent. The hose should appear as in the picture
below.
11. Turn on water and check for leaks.
12. Plug unit into Ground Fault Circuit Interrupon receptacle (GFCI) (required, not
included).
14. Installaon complete! Enjoy your new integrated bidet toilet!
13. To test the water spray funcons, place your hand on the seat where the sensor is
located and press either FRONT WASH or REAR WASH. You should have another person
present to cover the nozzle while tesng, as the nozzle will spray water if operaonal.
10
12

Troubleshoong
Symptoms
The unit does not operate
Is the power off?
Is there power to the outlet?
Is the power plug disconnected?
Press either the STOP, REAR WASH, FRONT
WASH, or DRYER ON/OFF buons on the
remote control to power on the unit.
Wash or Dry funcons
not working
Is the seat occupied? Most funcons will not operate if the seat is
not occupied. There is a sensor inside of the
seat that recognizes touch. Please make sure
there is nothing on the seat that could block
the sensor (e.g., toilet seat cover, paper,
etc.)
Remote control
not working
Are the baeries old or uncharged? Replace the baery.
Water pressure
is weak
Is the water pressure set at the lowest
level?
Adjust the water pressure seng to a higher
level.
Is the water filter clogged? Clean the water filter.
Is the tap water pressure used under the
minimum pressure suggested
(1.0kgf/㎠ )?
The available water pressure is 1.0~7.5kgf/
㎠ .
Are you using a wash cycle while
aempng to flush the toilet?
Water pressure will fall while the unit is
being flushed. Retry the wash cycle aer the
flush is complete.
Make sure the plug is securely connected.
Unplug the unit and plug another device
into the outlet to make sure there is power.
Check points
Check the followings details before calling for service.
Water is not warm Is the water temperature set to OFF or
LOW?
Adjust the temperature seng to a higher
level.
The seat is not warm
Is the seat temperature set to OFF or
LOW?
Adjust the temperature seng to a higher
level.
Is ECO or AUTO power-saving mode
acvated?
Deacvate any power-saving mode and try
again aer about 5 minutes.
The warm air dryer
is not warm
Is the DRY temperature set at low? Adjust the temperature seng to a higher
level.
AUTO FLUSH
does not operate
Is there power to the outlet? Use MANUAL FLUSH in the event of a power
outage. AUTO FLUSH should funcon again
once power is restored.
Water flows into
the bowl connuously
Did a power outage occur during an
AUTO FLUSH cycle?
If a power outage occurs while the AUTO
FLUSH funcon is in use, the unit may
connue to flush water. Close the water
supply valve and stop use unl electricity is
recovered.
Water does not come out Is the water supply valve closed? Open the water supply valve.
Is the water supply cut off? Wait unl the water supply is turned on.
17
Maintenance
Cleaning the water filter
15
Cleaning the nozzle
17
● Unplug the power cord from the wall outlet.
● Close the water supply by turning the valve clockwise.
● Turn notched end of the lter counterclockwise to open the lter housing and pull
out the inner barrel lter.
● Clean the barrel lter with water and so brush, then push back into the lter
housing and close.
● Turn on the water supply by turning the valve counterclockwise.
If your integrated toilet seems to be experiencing a loss of water pressure, your water lter
may be dirty or clogged and should be cleaned. Follow the steps below to clean the lter. If the
pressure issue is not resolved aer cleaning, see the Troubleshoong secon at the end of this
manual for other possible soluons.
● Press REAR WASH and FRONT WASH on the seat control panel simultaneously to extend
the nozzle.
● Clean the nozzle with a so brush.
● Press STOP on the seat control panel to return the nozzle to its resng posion. The self-
cleaning funcon will cycle through automacally.

18
Troubleshoong
Symptoms
The unit does not operate
Is the power off?
Is there power to the outlet?
Is the power plug disconnected?
Press either the STOP, REAR WASH, FRONT
WASH, or DRYER ON/OFF buons on the
remote control to power on the unit.
Wash or Dry funcons
not working
Is the seat occupied? Most funcons will not operate if the seat is
not occupied. There is a sensor inside of the
seat that recognizes touch. Please make sure
there is nothing on the seat that could block
the sensor (e.g., toilet seat cover, paper,
etc.)
Remote control
not working
Are the baeries old or uncharged? Replace the baery.
Water pressure
is weak
Is the water pressure set at the lowest
level?
Adjust the water pressure seng to a higher
level.
Is the water filter clogged? Clean the water filter.
Is the tap water pressure used under the
minimum pressure suggested
(1.0kgf/㎠ )?
The available water pressure is 1.0~7.5kgf/
㎠ .
Are you using a wash cycle while
aempng to flush the toilet?
Water pressure will fall while the unit is
being flushed. Retry the wash cycle aer the
flush is complete.
Make sure the plug is securely connected.
Unplug the unit and plug another device
into the outlet to make sure there is power.
Check points
Check the followings details before calling for service.
Water is not warm Is the water temperature set to OFF or
LOW?
Adjust the temperature seng to a higher
level.
The seat is not warm
Is the seat temperature set to OFF or
LOW?
Adjust the temperature seng to a higher
level.
Is ECO or AUTO power-saving mode
acvated?
Deacvate any power-saving mode and try
again aer about 5 minutes.
The warm air dryer
is not warm
Is the DRY temperature set at low? Adjust the temperature seng to a higher
level.
AUTO FLUSH
does not operate
Is there power to the outlet? Use MANUAL FLUSH in the event of a power
outage. AUTO FLUSH should funcon again
once power is restored.
Water flows into
the bowl connuously
Did a power outage occur during an
AUTO FLUSH cycle?
If a power outage occurs while the AUTO
FLUSH funcon is in use, the unit may
connue to flush water. Close the water
supply valve and stop use unl electricity is
recovered.
Water does not come out Is the water supply valve closed? Open the water supply valve.
Is the water supply cut off? Wait unl the water supply is turned on.
17

19
Product Specificaons
S-20.C01 (Bidet seat top only)
120V~ , 60Hz
Item
Power Supply
Max. Power Consumpon
Power Cord Length
Water Supply Connecon
Water Supply Pressure
Cleansing
Warm Seat
Dry
Water Supply Temperature
Safety Device
Safety Device
Safety Device
Heater Capacity
Heater Capacity
Heater Capacity
Temp. Adjustment
Temp. Adjustment
Temp. Adjustment
Water Pressure
Adjustment
Front
Wash
Rear
Wash
Direct connecon to the water supply
Thermal Fuse, Thermostat
Thermal Fuse
Thermal Fuse, Bi-metal
Water
Flow
Rate
Ambient Temperature Range
Seat top dimensions
Seat top weight
1460W
3.9 (1.2 M)
22 - 99 PSI ( 1.5 - 7.0 kgf/cm )
0.65L / min
0.65L / min
5 Levels
93.2°F (34°C), 98.6°F (37°C), 104°F (40°C)
1400W
95°F (35°C), 100.4°F (38°C), 104°F (40°C)
55W
37.4°F - 95°F (3°C - 35°C)
37.4°F - 104°F (3°C - 40°C)
122°F (50°C) default (5 levels)
164W
15.9” x 26.9” x 5” (405mm x 685mm x 128mm)
2.2lbs (6.3kg)
Deodorizer Catalyc Deodorizaon
This manual suits for next models
2
Table of contents
Other Icera Toilet manuals
Popular Toilet manuals by other brands

ProFlo
ProFlo PF1500 Series installation instructions

Toto
Toto NEOREST 550 installation instructions

Kohler
Kohler K-3451 Homeowner's guide

Adventure Kings
Adventure Kings Camping Toilet user manual

Toto
Toto CST646F Installation and owner's manual

DURAVIT
DURAVIT ME by Starck 280931 Series operating instructions