Targa CR 3 A1 Product information sheet


English........................................................................................................................ 2
Dansk....................................................................................................................... 53
Deutsch................................................................................................................... 105
V 1.2

CR 3 A1
2 - English
Contents
1. Intended use........................................................................................................... 4
2. Package contents ................................................................................................... 5
3. Technical specifications ........................................................................................... 6
4. Safety instructions .................................................................................................. 7
5. Overview ............................................................................................................. 12
5.1 Controls and displays ...........................................................................................................................13
5.1.1 Buttons ...........................................................................................................................................13
5.1.2 LED indicators................................................................................................................................14
6. Before you start.................................................................................................... 15
6.1 Inserting/removing the memory card................................................................................................... 15
6.2 Car mount.............................................................................................................................................. 16
6.3 Charging the battery.............................................................................................................................17
6.3.1 Charging the battery with a USB cable....................................................................................... 17
6.3.2 Charging with the car charger.....................................................................................................18
7. Getting started ..................................................................................................... 19
7.1 Switching the Dashboard Camera on .................................................................................................19
7.2 Switching the Dashboard Camera off .................................................................................................19
7.3 Setting the menu language................................................................................................................... 20
7.4 Setting the date / time ..........................................................................................................................20
8. Recording videos.................................................................................................. 21
8.1 Loop recording ...................................................................................................................................... 23
8.2 Exposure compensation........................................................................................................................ 24
8.3 Protecting videos from being overwritten during loop recording....................................................... 24

CR 3 A1
English - 3
9. Taking still images ................................................................................................ 25
9.1 Exposure compensation........................................................................................................................ 27
10. Playback ............................................................................................................ 28
10.1 Video playback functions...................................................................................................................28
10.2 Photo playback functions ...................................................................................................................30
11. Menus................................................................................................................. 31
11.1 Video recording menu ........................................................................................................................ 32
11.2 Still image capture menu....................................................................................................................35
11.3 Playback menu.................................................................................................................................... 40
11.4 Setup menu.......................................................................................................................................... 42
12. Connectors and sockets ...................................................................................... 45
12.1 Viewing recordings on a television....................................................................................................45
12.2 Transferring recordings to a computer ..............................................................................................45
12.2.1 Connecting the Dashboard Camera to a computer................................................................. 46
12.2.2 Using a card reader................................................................................................................... 46
12.3 Encoding videos for iOS ....................................................................................................................47
13. Replacing the car charger fuse............................................................................ 47
14. Troubleshooting ................................................................................................. 48
15. After use............................................................................................................. 49
15.1 Storage when not using the product for a longer time.....................................................................49
15.2 Cleaning.............................................................................................................................................. 49
16. Conformity notes ................................................................................................ 49
17. Environmental regulations and disposal information.......................................... 49
18. Warranty and servicing advice........................................................................... 50

CR 3 A1
4 - English
Congratulations!
By purchasing the CR 3 A1 Dashboard Camera, hereinafter referred to as the Dashboard Camera, you
have opted for a quality product. The Dashboard Camera is the ideal vehicle companion. Not only can it
record your trips but thanks to the G-sensor, it can also capture details in the event of a crash.
1. Intended use
Your Dashboard Camera is a Consumer Electronics device and is designed exclusively for recording
movies and pictures. Any use other than that mentioned above does not correspond to the intended use.
The device may only be used for private purposes, not for industrial or commercial ones.
This device fulfils all standards and directives listed in the EU Declaration of Conformity. If any changes
are made to the device other than those endorsed by the manufacturer, compliance with these standards
and directives can no longer be guaranteed. Only use accessories recommended by the manufacturer.
Observe the regulations and laws in the country of use.
Trademarks
HDMI, the HDMI logo and High-Definition Multimedia Interface are trademarks or registered trademarks
of HDMI Licensing, LLC in the USA and other countries.
Microsoft Windows is a registered trademark of Microsoft Corporation, USA.
SD and SDHC are registered trademarks.
USB is a registered trademark.
Apple is a registered trademark of Apple, Inc.
IOS is a trademark or registered trademark of Cisco in the U.S. and other countries and is used under
license.
Other names and products may be the trademarks or registered trademarks of their respective owners.

CR 3 A1
English - 5
2. Package contents
Remove all devices and accessories from the packaging. Remove the packaging material and screen
protector and check whether all the parts are complete and undamaged. If you find anything missing or
damaged, please contact the manufacturer.
Keep the packaging material away from children and dispose of appropriately.
CR 3 A1 Car mount USB cable
Car charger User manual (lineart
illustration)

CR 3 A1
6 - English
3. Technical specifications
Dashboard Camera
Display 960 x 240 pixels, 7.3 cm (2.9 inch) TFT LCD
Video resolution 1920x1080, 30 fps (Full HD)
1280x720, 60 fps
848x480, 30 fps
640x480, 30 fps
Video recording format H.264
Image resolution 12MP (4032x3024)
10MP (3648x2736)
8MP (3264x2448)
5MP (2592x1944)
3MP (2048x1536)*
2MP HD (1920x1080)
1,2MP (1280x960)
VGA (640x480)
Photo recording format JPG
Zoom 4x digital zoom
Interfaces Mini HDMI output
Mini USB port for PC and battery charging
Operating modes Video Recording, Motion Detection, Still image, Playback, PC Camera,
USB Mass Storage
Storage media MicroSD card, 2 to 32 GB, class 6 minimum
Functions Loop recording (3, 5, 10 minutes, Off)
Motion Detection
G-sensor
Built-in battery Rechargeable Li-Ion battery, 3.7 V / 200 mAh
Charging function via USB interface
Charging time approx. 1.5 hours (when powered off) and approx. 2 hours
(when powered on)
Runtime with fully charged battery approx. 15 min.

CR 3 A1
English - 7
Current consumption 625 mA
Operating environment 0 to 40 ºC, max. 85% relative humidity
Storage environment -10 to 55 ºC, max. 85% relative humidity
Dimensions 90 x 53 x 34 mm (W x H x D)
Weight 115 g
* native Dashboard Camera resolution. All other resolutions are interpolated.
Car charger
Manufacturer Targa GmbH
Model name SDC 8512
Input 12 to 24 V , 500 mA
Output 5 V , 1,000 mA
Fuse T2A L, 250 V
Charger cable length 200 cm
The technical data and design may be changed without prior notice.
4. Safety instructions
Before you use this device for the first time, please read the following notes and heed all warnings, even if
you are familiar with handling electronic devices. Keep these operating instructions in a safe place for
future reference. If you sell the device or give it away, pass on the operating instructions at the same time.
The operating instructions are part of the product.

CR 3 A1
8 - English
Explanation of symbols
In this user manual, warnings are used as follows.
DANGER!
This icon and the word “DANGER” alert you to a potentially dangerous situation.
Ignoring it can lead to severe injury or even death.
WARNING!
This symbol and the word “WARNING” denote important information required
for the safe operation of the product and for the safety of its users.
Caution!
This symbol and the word “Caution” denote important information that can lead to
legal actions when ignored.
This symbol denotes further information on the topic.
WARNING! Always make sure that
the device is not exposed to direct heat sources (e.g. radiators);
no direct sunlight or bright artificial light reaches the device;
the Dashboard Camera may be used within the allowed operating temperature range from 0°C to
40 °C only;
contact with water sprays or drops and corrosive liquids is avoided and the device is never operated
near water; in particular the device may never be immersed in liquids (do not place any objects
containing liquids, such as vases or drinks, on or near the device);
the device is never placed near magnetic fields (e.g. speakers);
no naked flames (e.g. burning candles) are placed on or near the device;
no foreign bodies can penetrate into the device;
the device is not exposed to any extreme temperature fluctuations as this can cause moisture through
condensation and cause short-circuits. If the device has been exposed to strong temperature variations,
wait for it to reach the ambient temperature before switching it on (about 2 hours).
the device should not be subjected to excessive shocks and vibrations;
the device and its accessories are not damaged in order to avoid any further risks. Therefore you must
inspect the device and its accessories regularly for any damage. If you find any component damaged,
it must not be used. Never open the Dashboard Camera or the car charger housing and have all
repairs performed by qualified technical staff only;

CR 3 A1
English - 9
If you notice any smoke, unusual noise or strange smells, switch off the device immediately and pull the
car charger from the car cigarette lighter. Never inhale smoke from a possible device fire. If you do
inadvertently inhale smoke, seek medical attention.
Do not modify the Dashboard Camera or the car charger. Maintenance and repairs should only be
carried out by qualified technicians.
Failure to heed the warnings above may result in damage to the device or injury.
DANGER! Children and persons with disabilities
Electrical devices are not suitable for children. Also persons with reduced physical, sensory or mental
capabilities should only use electrical devices within the limits of their abilities. Never allow children or
persons with disabilities to use electrical devices unsupervised, unless they are instructed accordingly and
supervised by a competent person responsible for their safety. Children should always be supervised to
ensure that they do not play with the product. Small parts can represent choking hazards.
DANGER! Risk of suffocation!
Keep small parts and packaging material away from children. Packaging material is no toy. Danger of
suffocation!
Warning! Recordings (Still/Video) of persons and the right to one's own
image
Please note that when recording any persons, whether portraits or groups of persons, every person has
the right to her/his own image/recording. Recording underage people is subject to the consent of the
parents. In order to avoid any legal measures, make sure to respect the legislation of the country of use.
Furthermore, in some jurisdictions it may not be allowed to film or photograph any people (including car
drivers and passengers as well as pedestrians, etc.) without telling them first that you are doing so. Please
make sure to respect the privacy legislation of the country of use.

CR 3 A1
10 - English
DANGER! Using on the road
Please note that using the camera on the road, whether driving a car, riding a bicycle or as a pedestrian
may distract you from the traffic resulting in severe accidents. This may harm your health and/or result in
legal actions. Also, using the Dashboard Camera may incur legal action in some countries. Please make
sure to respect the legislation of the country of use.
When driving in the United Kingdom: The Dashboard Camera may not be installed within the field of sight
of the driver and also not in the area covered by the windscreen wipers. You must also observe the Road
Traffic Act 1988 regulations.
DANGER! Installation / Use in the Car
Road safety first! The driver must never operate the camera while driving.
In the event of an accident there is an increased risk of injury from flying objects. Always secure the
Dashboard Camera so that the vehicle can be operated safely at all times and so that the driver's visibility
is not impaired. Always position all cables in your vehicle so that they do not impede operation of your
vehicle. When positioning the cables, take care to ensure that the cables do not limit your field of vision.
Under no circumstances must the Dashboard Camera, or parts thereof (interface or power cables), be
installed within the airbag deployment area. This constitutes a risk of accident and injury.
DANGER! Battery
Make sure that the Dashboard Camera is not covered while charging its battery. Otherwise there is the
risk of fire and explosion from battery overheating.
Do not throw the Dashboard Camera in fire. Otherwise there is risk of explosion.
The built-in rechargeable battery cannot be removed for disposal.
DANGER! Risk of Explosion
Improper use could cause explosions or leaks.

CR 3 A1
English - 11
DANGER! Screen
Do not apply any pressure to the screen and keep sharp objects away from the display (13). A broken
display represents a risk of injury. Wear gloves when collecting the broken parts and contact the
manufacturer if necessary. Collect the broken parts in a suitable container.
WARNING! Cables
Unplug all cables by holding the plugs and never pull on the cables themselves. Never place pieces of
furniture or other heavy objects on the cables and take care that they do not become damaged,
especially at the plugs and sockets. Never tie knots in a cable and do not tie them to other cables. All
cables must be laid so that nobody can trip over them or be obstructed by them.
Repairs
Repairs are required when the device or its housing has been damaged in any way, for example, when
liquids or objects have entered the product, when the product does not work normally or when the
product has been dropped. If smoke, unusual noises or smells are noticed, power off the device
immediately and disconnect all cables. If this occurs, do not continue to use the device and have it
checked out by an expert. All repairs must be carried out by qualified service personnel.
Copyright
All the contents of this user manual are protected by copyright and provided to the reader for information
only. Copying data and information without the prior explicit written consent of the author is strictly
forbidden. This also applies to any commercial use of the contents and information. All texts and diagrams
are up-to-date at the time of printing.
CR 3 A1
12 - English
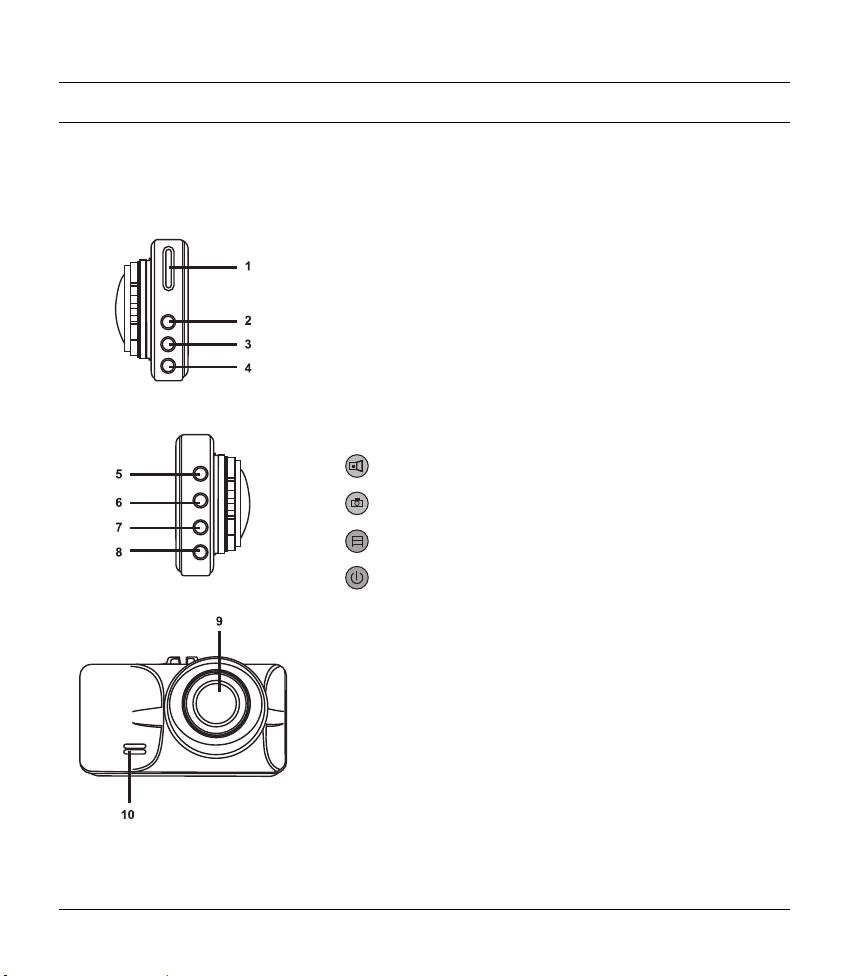
5. Overview
An additional illustration of the items and controls and their corresponding numbers can be found on the
inner page of the fold-out cover of this user manual. You can keep this page folded out whilst reading the
different chapters of this user manual. This allows you to refer to the relevant controls at any time.
Left side
1. microSD card slot
2. Up button : value / increases zoom / up navigation in the
menu
3. Menu button M: opens the operating mode-specific settings
4. Down button : value / decreases zoom / down navigation
in the menu
Right side
5. : OK button
6. : Mode selection button
7. : Protect button: to protect the current video recording
8. : On/Off button
Front
9. Lens
10. Speaker

CR 3 A1
English - 13
Bac
k
11. Recording LED (blue)
12. Charge LED (red)
13. Display
Top
14. Mini USB/charging connector
15. Holding rail for car mount
16. Mini HDMI output
Bottom
17. Reset switch
18. Microphone
5.1 Controls and displays
5.1.1 Buttons
Button Function
,
Up (2) and Down
(4) buttons
Press these buttons during video recording or still image capture to zoom in
or out on the scene.
Press these buttons in playback mode to skip to the next or previous
recording.
Press these buttons with the Menu displayed to navigate between the various
Menu options (up/down).
Press these buttons with a value in the Menu selected to increase or decrease

CR 3 A1
14 - English
the value.
Press these buttons during video playback to adjust the sound volume.
Press the Down button (4) during video recording to mute the microphone or
to reactivate it.
M
Menu button (3)
Press this button with recording or playback paused and no menu displayed
to open the settings menu associated with the current operating mode. Press
this button again to open the general Dashboard Camera setup menu.
While a menu is displayed, press this button to quit the menu.
OK button (5) Press this button in Video mode to start or stop recording.
Press this button in Photo mode to take a picture.
While a menu is displayed, press this button to select a menu item or to
confirm a value and save it.
Press this button in Playback mode to start or pause playback.
Operating mode
button (6)
Press this button multiple times to toggle cyclically between the Video
recording, Photo recording and Playback operating modes.
Protect
button (7)
Press this button during video recording to protect the current video and
prevent it from being overwritten during loop recording.
On/Off
button (8)
Press this button briefly to switch the Dashboard Camera on or to switch the
display (13) off.
Press and hold this button for at least 3 seconds to power the Dashboard
Camera off.
Press this button during video recording to switch off the display (13). Video
recording will continue. Press any button to switch the display (13) back on.
Press this button in Photo mode to switch off the display (13). Press any
button to switch the display (13) back on.
5.1.2 LED indicators
LED Description
Recording LED
(11)
Blue: device is being initialised (after switching on), video recording stopped
Blue flashing: video recording in progress
Charge LED (12) Red: battery is charging

CR 3 A1
English - 15
6. Before you start
6.1 Inserting/removing the memory card
You will need an microSD memory card (not included) to save your photos and
videos. If a memory card is inserted, all the content recorded is saved onto it. If no
memory card is inserted, recording will not be possible. In this case the message "PLEASE
INSERT SD CARD" will appear. Confirm by pressing the OK button (5).
Proceed as follows to insert a memory card:
WARNING!
Power the Dashboard Camera off before you insert or remove a memory card.
Only use Speed Class 6 or faster memory cards.
If you have not inserted a microSD memory card the message "PLEASE INSERT SD CARD" will
appear when the device is switched on.
Before you insert a new microSD memory card you have to format it. For more on this, please
refer to the "Format" section on page 44.
1. Insert the memory card with the contacts facing towards the display (13)
into the microSD card slot (1) until it clicks in place.
To remove the memory card, gently press on the inserted card. The memory
card will protrude a little so that you can get hold of it and remove it.

CR 3 A1
16 - English
6.2 Car mount
The car mount allows the Dashboard Camera to be mounted on the windscreen of your vehicle.
DANGER! Install the car mount so it does not obstruct the driver’s view.
When driving in the United Kingdom: The Dashboard Camera may not be installed within the
field of sight of the driver and also not in the area covered by the windscreen wipers. You
must also observe the Road Traffic Act 1988 regulations.
1. Connect the Dashboard Camera to the car mount. To do this,
slide the fixing rail (15) onto the counterpart (19) of the car
mount.
2. Then press the suction pad (22) of the car mount against the
windscreen and secure by pressing down the lever (21).
As the fixing rail (15) is located at the top of the
Dashboard Camera, you should install the car mount such
that the Dashboard Camera "hangs" off it (see adjacent
image). Otherwise the picture would appear upside
down.
DANGER!
Do not install the car mount (with or without the Dashboard Camera) within the
operating area of the vehicle’s airbag and install the car mount so that the driver’s view is not
obstructed.
3. Loosen the knurled screw (20) to line up the Dashboard Camera in the desired position with the help
of the ball joint. Re-tighten the knurled screw (20).

CR 3 A1
English - 17
4. To remove the car mount from the windscreen, flip the lever (21) up again and then pull on the
release tab (23) on the suction pad.
6.3 Charging the battery
The Dashboard Camera battery can be charged via the USB port on a computer or with the car charger
supplied.
In addition to the following options, you can also connect the Dashboard Camera to an
external USB power adapter (not supplied) in order to charge the Dashboard Camera. You
can purchase a suitable 5V USB power adapter with at least 1A output current from any
electronics retail outlet.
WARNING!
Be sure to familiarise yourself with the optional power adapter before
connecting it. Read the User’s Manual of your optional power adapter.
6.3.1 Charging the battery with a USB cable
WARNING!
If you want to charge the Dashboard Camera battery via the PC, make sure to
leave at least one USB port on the PC free (no devices connected).
1. Use the USB cable to connect the Dashboard Camera to an
available USB port on a computer. Insert the Mini USB plug
(24) of the supplied USB cable into the Mini USB/charging
connector (14) of your Dashboard Camera and the large plug
(25) into a USB port on your computer.
2. The Dashboard Camera will then turn on automatically and you
will be asked to select the "Mass Storage" mode.
Some computers do not supply USB power while they are
turned off. If the Dashboard Camera does not charge,
make sure your computer is switched on.
3. Press the OK button (5) to confirm. On first use we recommend you switch the device off initially,
leave the battery to charge (until the red charge LED (12) goes off) and then define basic settings
such as language, date and time etc. before performing further steps. To power the Dashboard
Camera off, press and hold the On/Off button (8) for approx. 3 seconds.

CR 3 A1
18 - English
The charge LED (12) lights up red while charging. Once charging is complete, the charge LED (12) goes
out.
6.3.2 Charging with the car charger
WARNING!
In order to protect your Dashboard Camera from any sudden voltage surges,
connect the car charger after you have started your car engine.
You can connect the car charger to a 12V or 24V cigarette lighter.
1. Plug the Mini USB connector (28) of the car charger into the
Mini USB/charge port (14) on the Dashboard Camera.
2. Then connect the car charger with the contacts (27) to a
suitable cigarette lighter in your car.
The Dashboard Camera will then switch on and loop recording
will begin. Please note that recording can start only if a
properly formatted microSD memory card has been inserted
into the Dashboard Camera.
If the cigarette lighter in your vehicle can be turned on with the ignition key, this will ensure that recording
begins each time you start your vehicle's engine and thus all journeys will be recorded automatically. The
car charger LED (26) lights while the car charger receives power.
The charge LED (12) lights up red while charging. Once charging is complete, the charge LED (12) goes
out.
If the charge LED (12) does not light up, you may need to replace the car charger fuse. For more on this,
see "Replacing the car charger fuse" on page 47.
WARNING!
If your car's cigarette lighter does not switch off with the ignition key but supplies
power all the time, the car battery discharges if you leave the Dashboard Camera turned on.
Therefore, to avoid discharging the battery to a level where the engine cannot be started
anymore, we recommend you to disconnect the car charger from the cigarette lighter of your car
when leaving the car.
Other manuals for CR 3 A1
2
Table of contents
Languages:
Other Targa Dashcam manuals


