Icom IP100H User manual

©2014 Icom America Inc. Page 1
Icom America, Inc.
12421 Willows Road NE
Kirkland, WA 98034
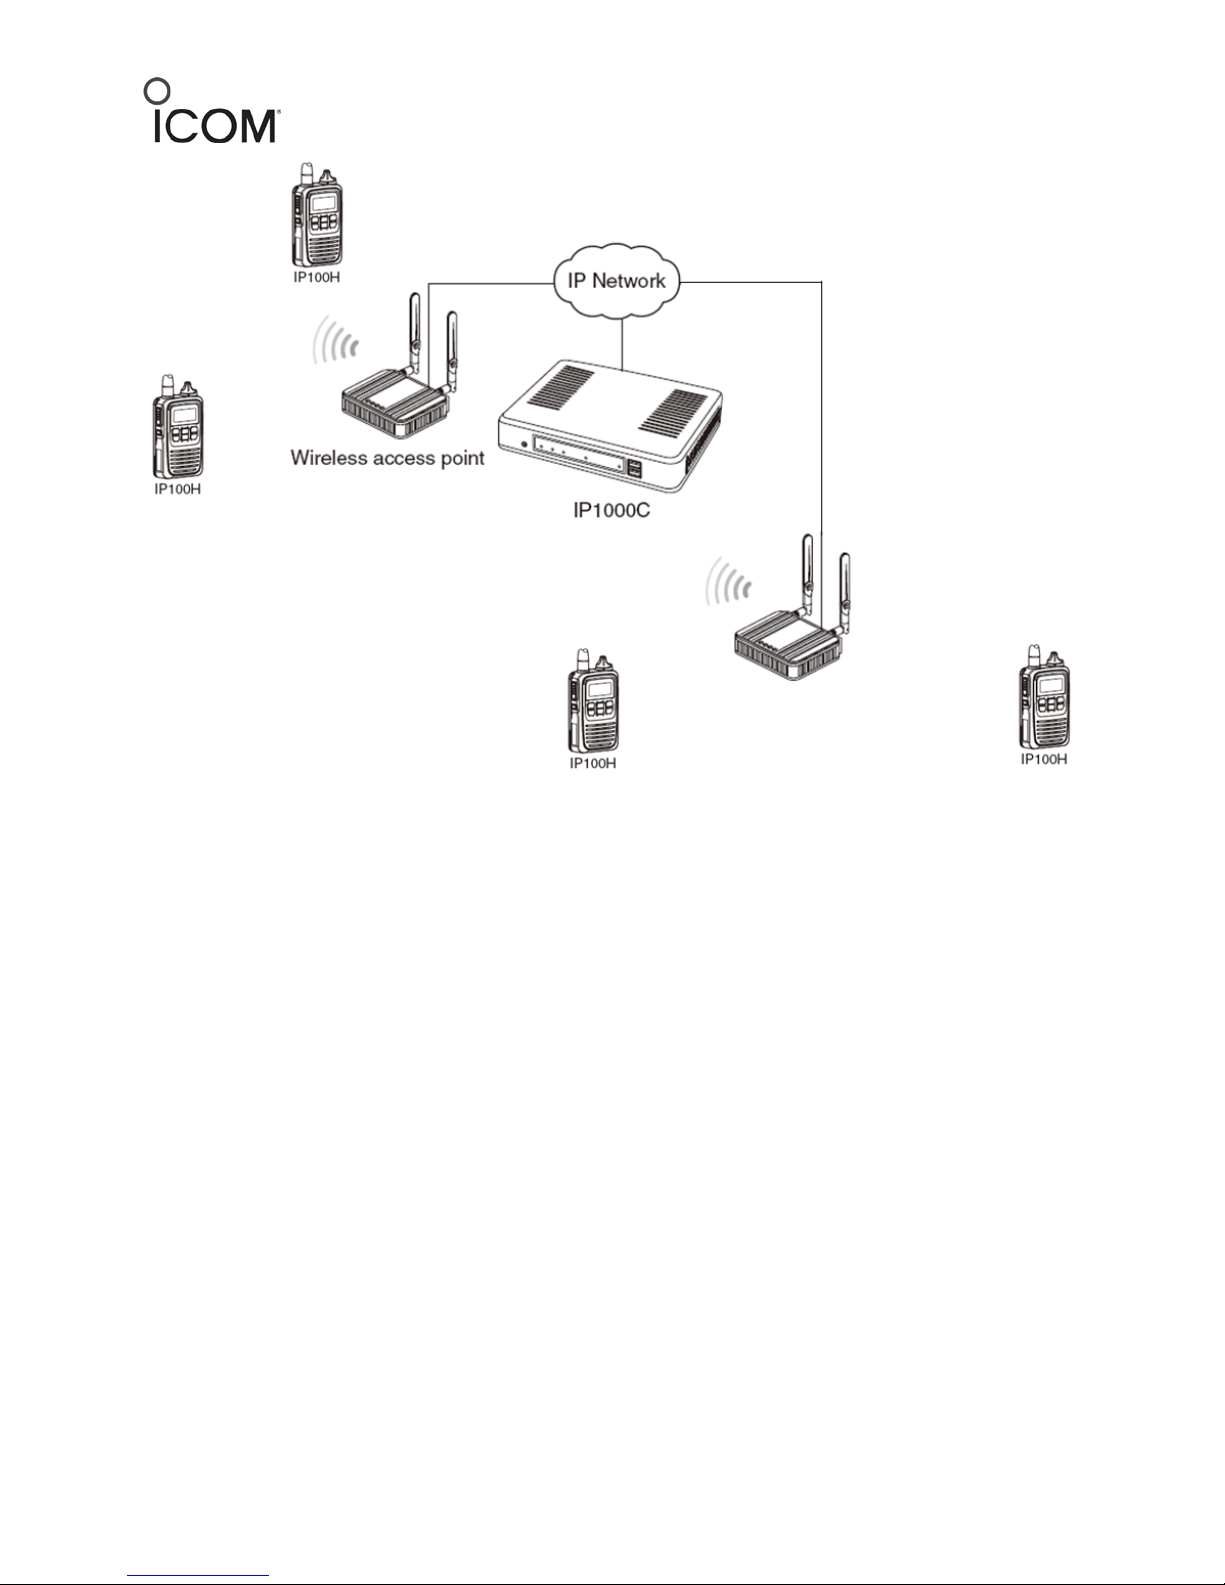
Quick Guide for IP Advanced Radio System over an Existing
Wireless LAN
This application describes all the programming required to configure a working IP Advanced
Radio System that is being connected to an existing customer’s office WLAN (Wireless LAN)
Network.
Contents
What You Will Need........................................................................................................................ 2
Customer’s Current IP Settings....................................................................................................... 2
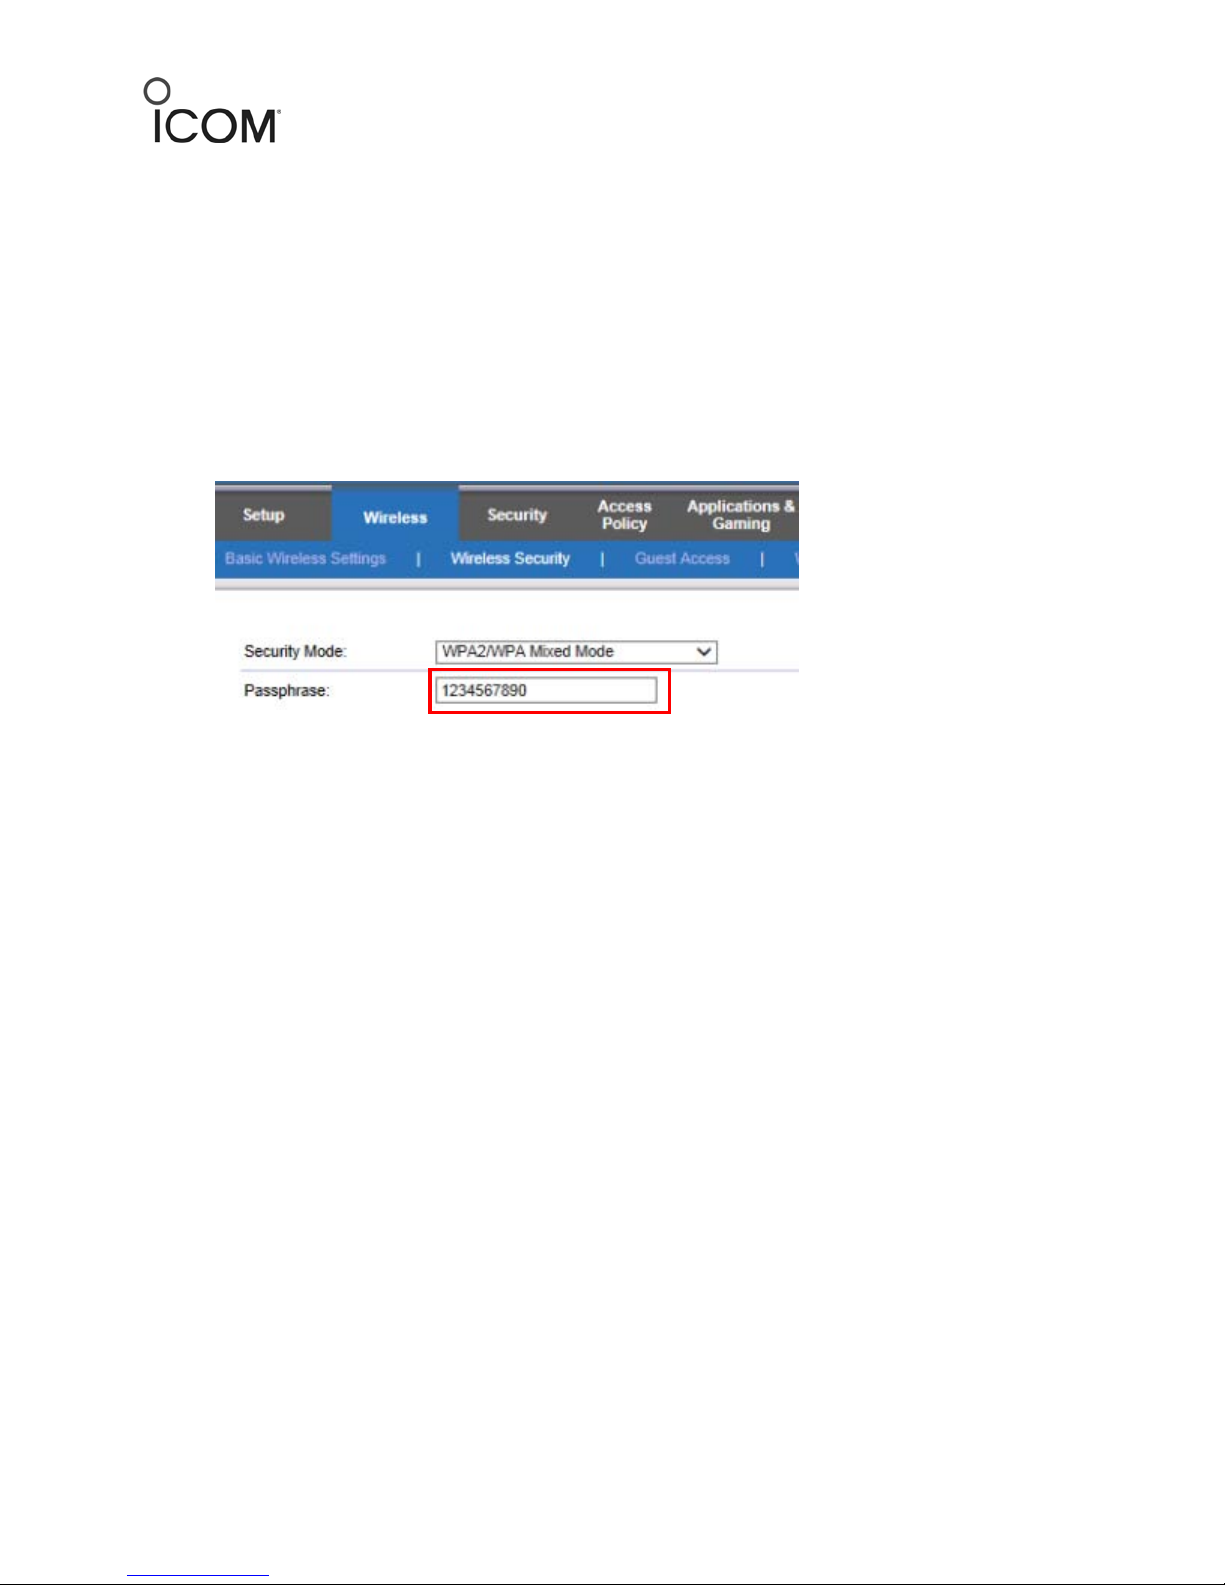
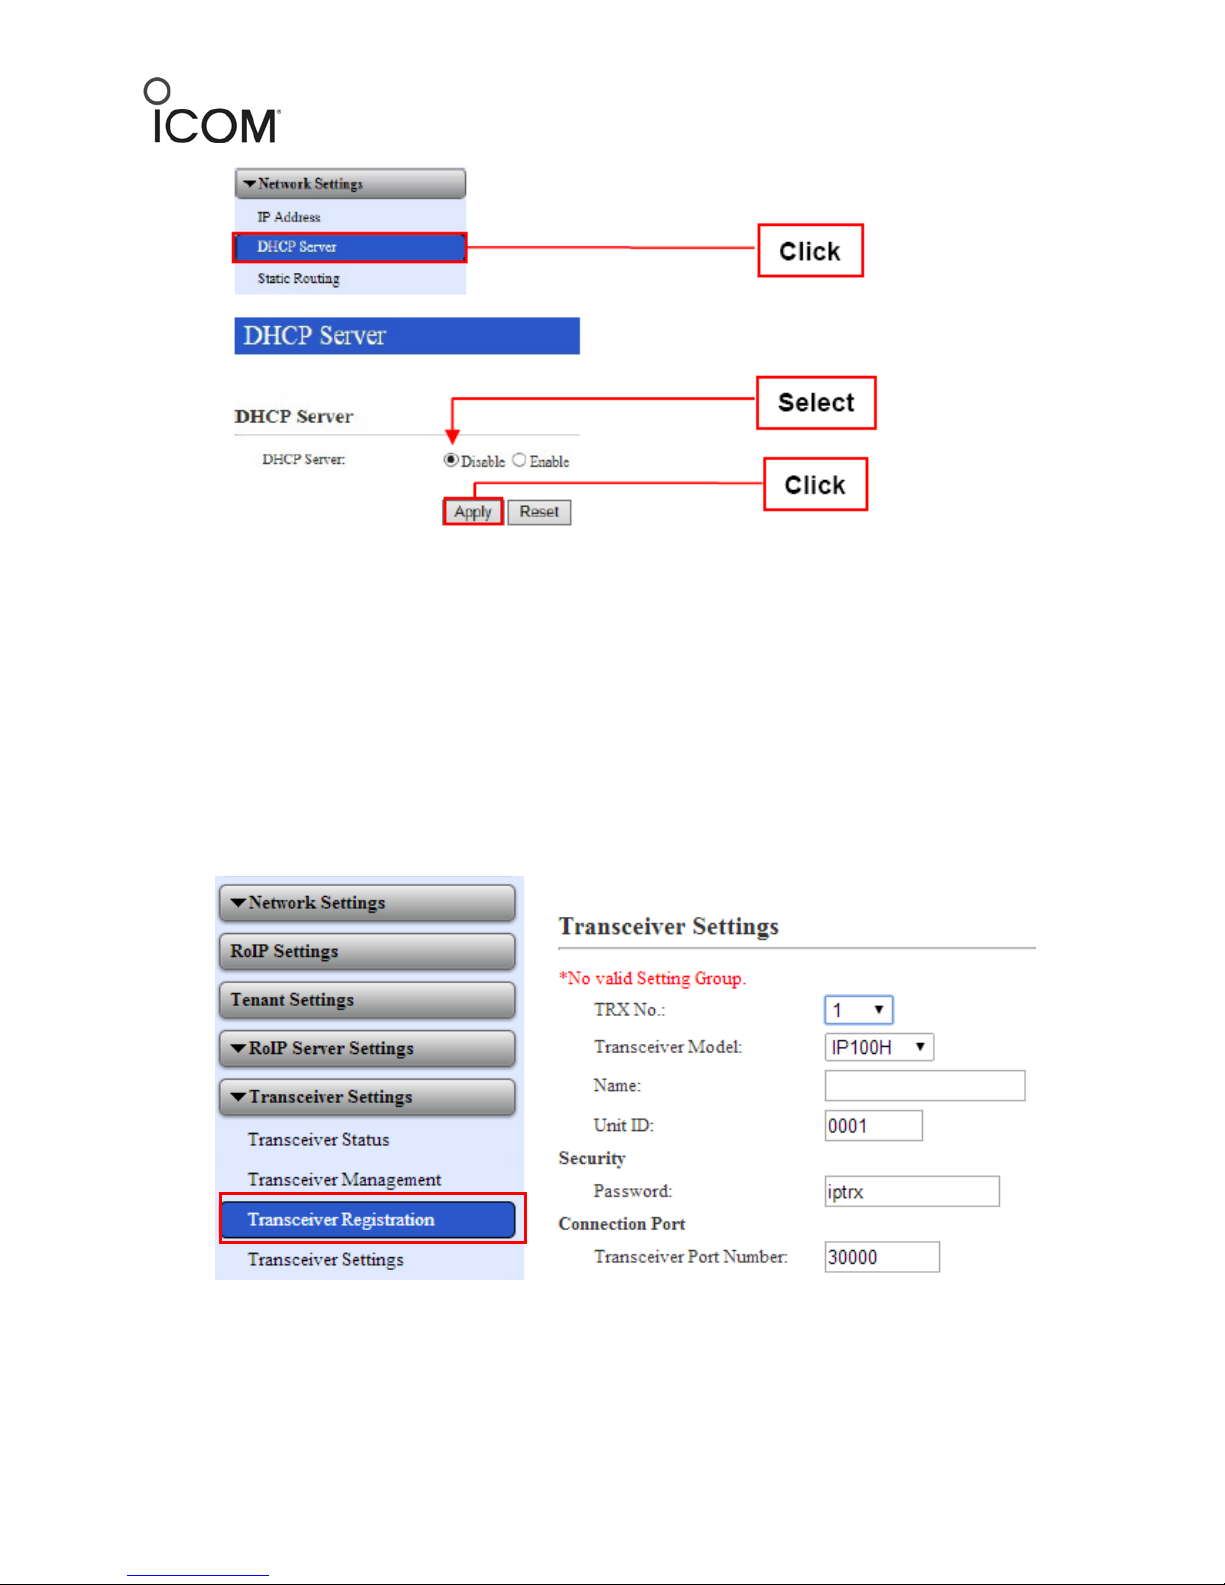
Programming the IP1000C Controller............................................................................................. 3
Creating Unit IDs in the IP1000C Web Interface ............................................................................ 5
Entering IP100H Radio information............................................................................................ 5
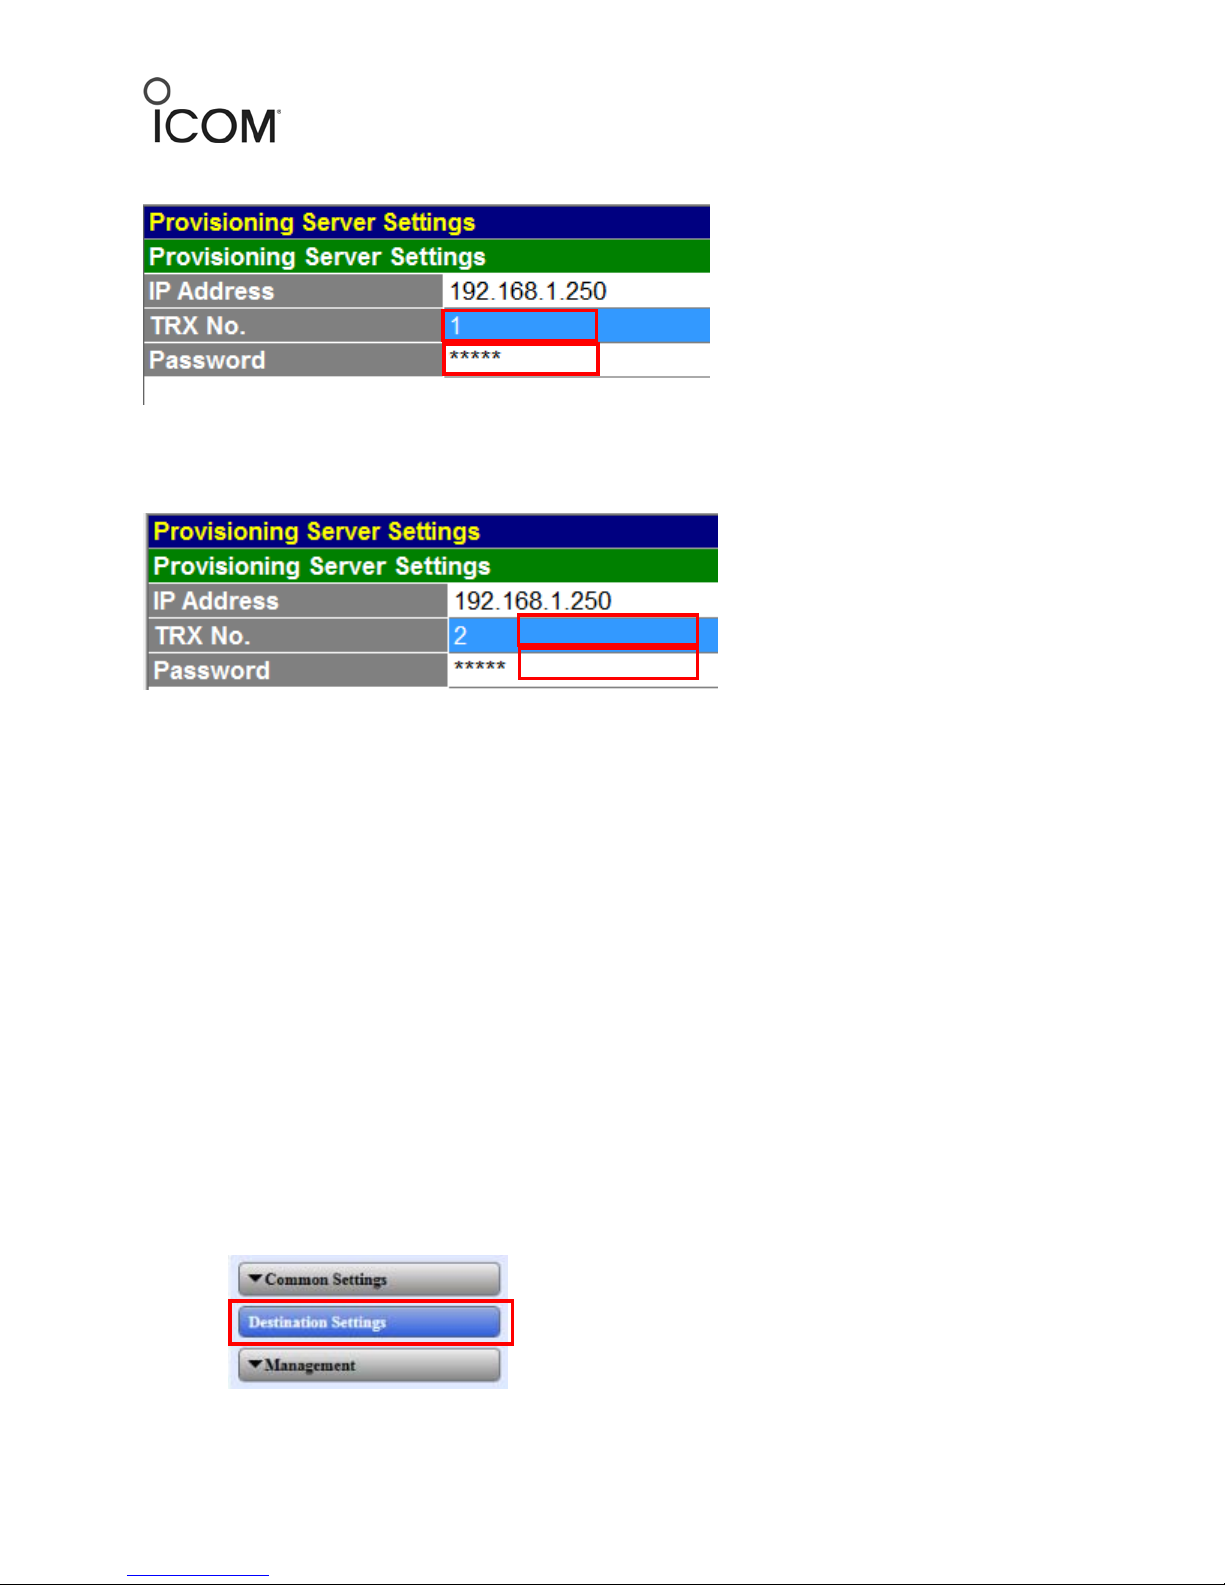
Programming the IP100H Radios with the CS-IP100H Cloning Software ....................................... 7
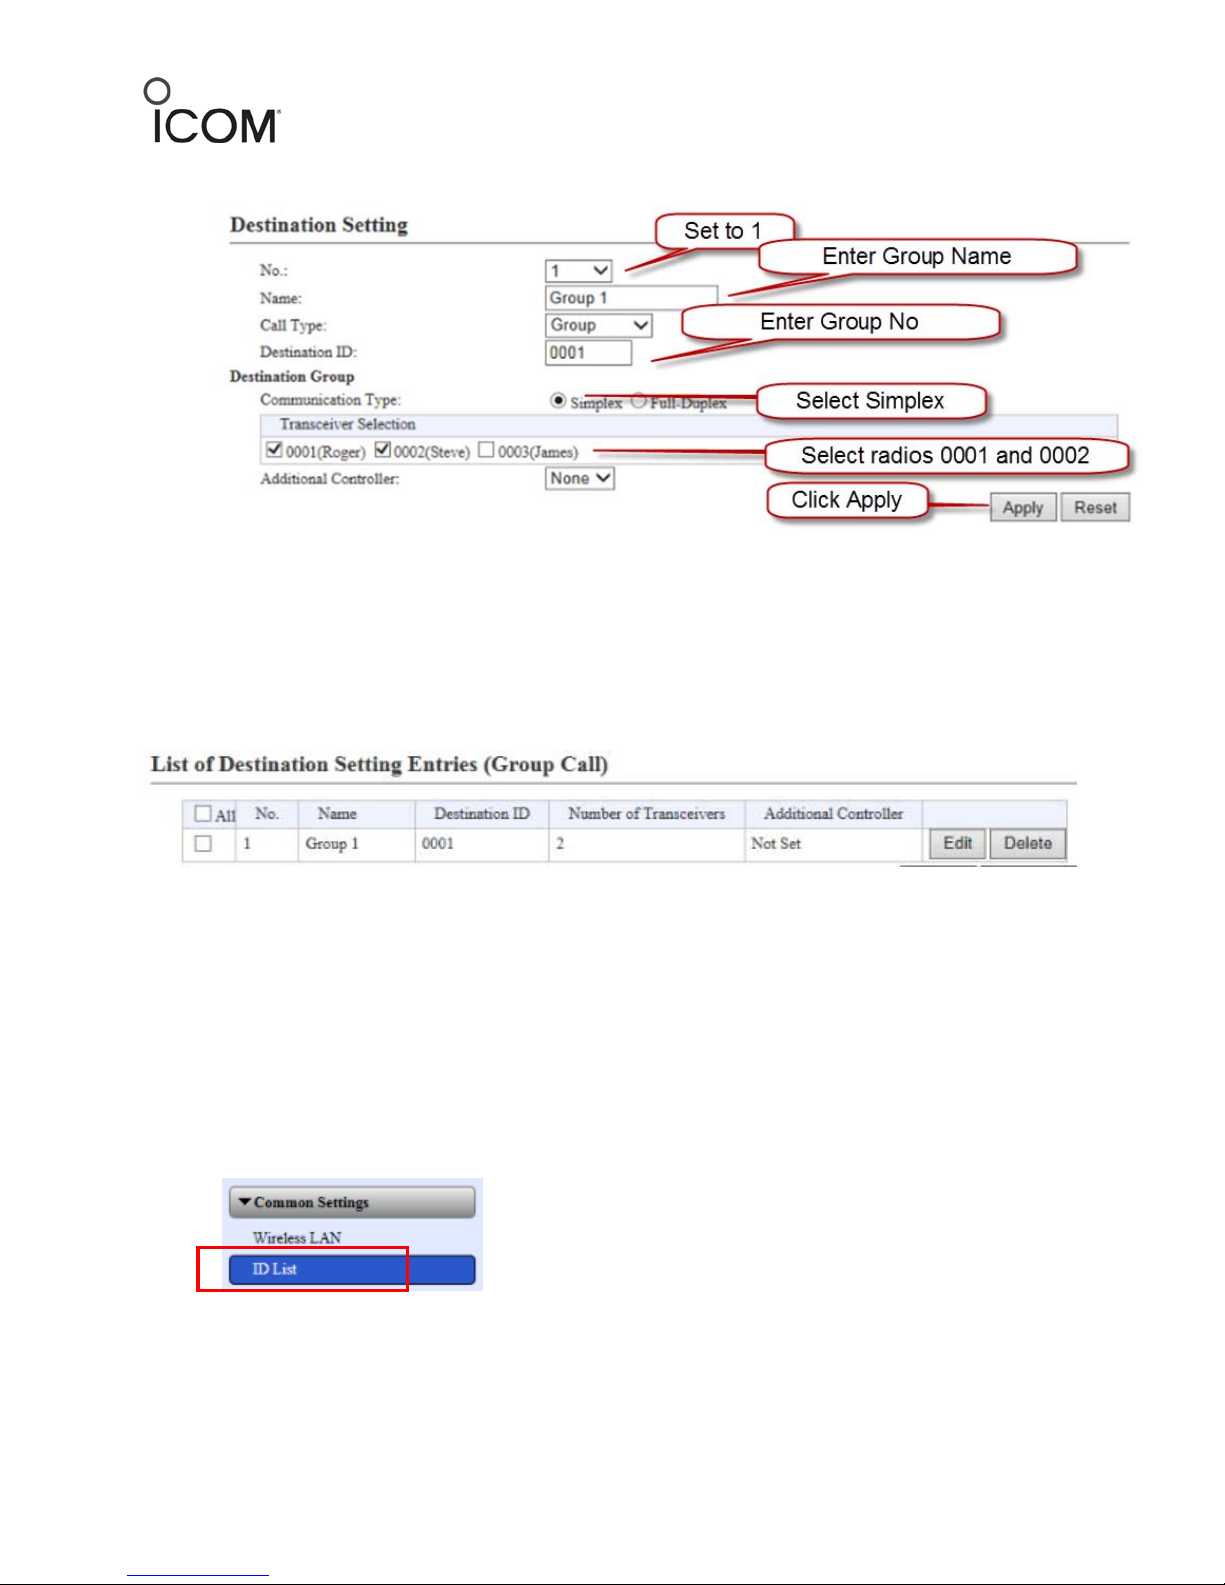
Creating Group IDs in the IP1000C Web Interface ......................................................................... 9
Group ID Information.................................................................................................................. 9
Creating a Radio ID List in the IP1000C Web Interface................................................................. 10
ID List Information .................................................................................................................... 10
Talk Back Timer Setting............................................................................................................. 13
Making a Group Call from your IP100H Radio.............................................................................. 14

©2014 Icom America Inc. Page 2
Icom America, Inc.
12421 Willows Road NE
Kirkland, WA 98034
What You Will Need
•1 IP1000C controller box
•Several IP100H radios
•Access point(s) – Either customer’s existing points or supplied by your Icom Dealer
(Linksys access point used in this guide)
•CS-IP100H cloning software, OPC-478UC (USB only) and the OPC2144 adapter
•Computer with IP100H software and USB drivers installed
•One CAT-5 LAN cable for programming the IP1000C controller and access point (if
required)
Customer’s Current IP Settings
In this example, we assume the following WLAN Network settings are programmed into the
customer’s WLAN Controller/Router prior to setting up the Icom IP Advanced Radio System.
•DHCP Server Enabled. Customer’s WLAN controller will assign all IP addresses to all the
Devices on that WLAN network.

©2014 Icom America Inc. Page 3
Icom America, Inc.
12421 Willows Road NE
Kirkland, WA 98034
•A New Network SSID needs to be created that will refer to all devices on the IP Radio
System. This SSID is designated to Icom IP Radio System only. We are using
“Cisco80915” as the SSID in our example.
•SSID Broadcast should be enabled for this new SSID.
•Add password for the IP Advanced Radio System SSID. Set Security to WPA2/WPA
mode.
•In a standard Controller-based WLAN system, access points will not have to be
programmed.
Note: The password entered in here must match the PSK setting (WLAN Setting screen) in the
IP-100H cloning software.
Programming the IP1000C Controller
The IP1000C is programmed through a web interface.
1. Open your internet browser and type the IP1000C IP address: 192.168.0.1 (default) in
the address bar.
2. Enter the following:
Username – admin
Password –admin
3. Go to the Management tab and then Factory Defaults.
4. Click Restore to reset the IP1000C controller box to factory default settings.

©2014 Icom America Inc. Page 4
Icom America, Inc.
12421 Willows Road NE
Kirkland, WA 98034
5. After the reset is done, go to Network Settings and click the IP Address tab.
6. Change the IP address for the IP1000C to match the Company’s Network IP Scheme. This
will be determined by the Company’s IT Manager.
7. Click the DHCP Server tab and set it to Disable (Company’s Network Controller/Router
will be DHCP Server). Click Apply.

©2014 Icom America Inc. Page 5
Icom America, Inc.
12421 Willows Road NE
Kirkland, WA 98034
Creating Unit IDs in the IP1000C Web Interface
Entering IP100H Radio information
The following example shows programming for three IP100H radios.
1. Click on the Transceiver Settings tab and Transceiver Registration.
2. Enter the Transceiver 1 Radio Information as follows and click Apply.

©2014 Icom America Inc. Page 6
Icom America, Inc.
12421 Willows Road NE
Kirkland, WA 98034
1. Enter the Transceiver 2Radio Information as follows and Click Apply.

©2014 Icom America Inc. Page 7
Icom America, Inc.
12421 Willows Road NE
Kirkland, WA 98034
2. Enter Transceiver 3 Radio Information as follows and Click Apply.
3. Confirm that the transceivers appear under the Transceiver Setting Entry
List
Set up all other Transceivers in the same way. After adding each radio, verify that they appear
in the Transceiver Setting Entry List.
Programming the IP100H Radios with the CS-IP100H Cloning Software
1. Open the CS-IP100H cloning software and connect your IP100H radio using the OPC-
478UC cloning cable and the OPC-2144 plug adapter.
2. Click Wireless LAN settings on the left side on the screen.
3. Enter the SSID in the SSID field (note: this SSID must be enabled in the customer’s WLAN
system).

©2014 Icom America Inc. Page 8
Icom America, Inc.
12421 Willows Road NE
Kirkland, WA 98034
4. Select WPA-PSK/WPA2-PSK in the Authentication field.
5. Enter the Wireless LAN password in the PSK field. In this example, we are using
“1234567890” as shown above in Customer’s IP parameters settings.
6. Verify that the DHCP Client setting is set to Enable. This will allow the Customer’s
controller to assign IP address to the IP100H radio automatically.
7. Click Provisioning Server Settingsand enter your IP1000C IP address in IP address field
(as assigned by the Company’s IT manager).
8. Programming Radio no. 1: Enter “1” in TRX No. Box for Transceiver No. 1.
9. Enter Password (iptrx) same as setup in the IP1000C for Unit ID.

©2014 Icom America Inc. Page 9
Icom America, Inc.
12421 Willows Road NE
Kirkland, WA 98034
Note: This password talks to the controller not the WLAN System.
10. Programming Radio no. 2: Enter “2” in TRX No. Box for Transceiver No. 2.
11. Enter Password (iptrx) same as setup in the IP1000C for Unit ID 2.
12. Click CLONE and Write to upload the file into the Radio.
Repeat these steps for any additional radios.
After rebooting your IP100H radios, the IP1000C will download all information to the radio and
allow it to register.
If they do not connect to the network and show “Setting up” or “Failed”, read through the
previous steps and verify the information.
Creating Group IDs in the IP1000C Web Interface
Group ID Information
This procedure explains how to create Groups and then add existing Radios as programmed in
the Transceiver Registration screen above to one or more of the groups.
1. Click Destination Settings.

©2014 Icom America Inc. Page 10
Icom America, Inc.
12421 Willows Road NE
Kirkland, WA 98034
2. Create Group 1 with 2 IP radios (as an example) as follows.
In our example, Group 1 will only have Unit ID 0001 and 0002 part of its Group. When making a
Group call – anther Unit ID, such as 0003, wouldn’t hear the call because it’s not part of that
Group.
3. Verify List of Destination Setting Entries (Group Call) shows Group 1.
Creating a Radio ID List in the IP1000C Web Interface
ID List Information
This ID list will be downloaded into the Radio over the WLAN network on initial Power up.
Note: You will need to enter in all the desired Group ID’s and Unit ID’s information here in the
order that you want it to appear on the Radio Display.
1. Click Common Setting tab and then ID List.
1. Verify that the ID List Common SettingsNumber is set to “1”. This represents an ID
profile number.

©2014 Icom America Inc. Page 11
Icom America, Inc.
12421 Willows Road NE
Kirkland, WA 98034
2. Enter Group 1 in the Name (No.:) field.
3. Ensure Call Type is set to Group.
4. Enter 0001 as Destination ID and click Apply tab.
5. Enter Roger (example) for Name below No.: 2.
6. Select Individual as the Call Type.
7. Enter 0001 as Destination ID and click Apply.
All other Groups and Radios information should be entered into the IP1000C controller in a
similar way.
8. After adding all Groups and Radio ID information, Verify that ID List Entries (setting
Number1) shows all Group and Radios ID’s that you just added.

©2014 Icom America Inc. Page 12
Icom America, Inc.
12421 Willows Road NE
Kirkland, WA 98034
9. Click Common Settings under Common Setting tab and Click Edit.
10. Select 1 in ID List box.
11. Click Apply.
12. Verify that ID list Number now shows “1”.
13. Click the Transceiver Settings tab and then Transceiver Settings.

©2014 Icom America Inc. Page 13
Icom America, Inc.
12421 Willows Road NE
Kirkland, WA 98034
In the following steps, Each Individual Radio ID will be enabled to accept (Use) that ID List.
14. Choose Unit ID in the Unit field.
15. Click to enable the Use ID List setting and click the Apply tab at the bottom of the page.
All other Radios Unit ID’s need to be set similarly.
16. Verify that all the radio’s Use ID List setting appears as Enable in Transceiver Setting List
at the bottom of the page.
Talk Back Timer Setting
Important: The radio stays in Talk back mode for 5 seconds as a default. This timer can be
changed in Common Settings under Talkback Timer.

©2014 Icom America Inc. Page 14
Icom America, Inc.
12421 Willows Road NE
Kirkland, WA 98034
Important: Each IP100H radios must be REBOOTED after adding/deleting or changing any
setting in the IP1000C controller.
Making a Group/Individual Call from your IP100H Radio
Other manuals for IP100H
6
Table of contents
Other Icom Receiver manuals

Icom
Icom IC-R10 User manual

Icom
Icom IC-R75 User manual

Icom
Icom IC-RX7 Installation and operating instructions

Icom
Icom IC-RSOOCOL User manual

Icom
Icom COMMUNICATION RECEIVER IC PCR100 User manual

Icom
Icom IC-R72 User manual

Icom
Icom IC-PCR1500 User manual

Icom
Icom IC-A25N Installation guide

Icom
Icom IC-R30 Setup guide

Icom
Icom IC-R100 User manual