Icom AT-141 User manual

HF AUTOMATIC
ANTENNA TUNER
AT-141
INSTRUCTION MANUAL

i
FOREWORD
Thank you for purchasing the AT-141 HF AUTO-
MATIC ANTENNA TUNER.
The AT-141 is designed, primarily for use with Icom
HF transceivers.
Refer to your HF transceiver instruction manual for
operation. If you have any questions, contact your
dealer.
IMPORTANT
READ ALL INSTRUCTIONS carefully and com-
pletely before using the AT-141.
SAVE THIS INSTRUCTION MANUAL. This
instruction manual contains important safety and in-
stallation instructions.
EXPLICIT DEFINITIONS
WORD DEFINITION
RDANGER! Personal death, serious injury or an
explosion may occur.
RWARNING! Personal injury, fire hazard or elec-
tric shock may occur.
CAUTION Equipment damage may occur.
NOTE
If disregarded, inconvenience only.
No risk of personal injury, fire or
electric shock.
PRECAUTIONS
RDANGER HIGH VOLTAGE! NEVER touch
the antenna terminal, ground terminal, antenna or
counterpoise while transmitting. Place the AT-141, an-
tenna and counterpoise in positions where no one can
touch them.
RWARNING! NEVER transmit during internal
adjustment. This may cause an electric shock.
NEVER use without a ground connection.
USE the ground terminal for ground connection.
The mounting plate is not connected internally.
Ground terminal
Mounting plate
DO NOT operate your HF transceiver without running
the vessel’s engine. When the transceiver’s power is
ON and your vessel’s engine is OFF, the vessel’s bat-
tery will soon become exhausted.
DO NOT use the AT-141 in areas where the tem-
perature is below –30°C or above +60°C.
SUPPLIED ACCESSORIES
The following accessories are supplied with the AT-141.
Qty. qU-bolts ������������������ 2
wU-bolt plates ���������������� 2
eFlat washers (M6 large) ����������� 8
rFlat washers (M6 small)����������� 4
tSpring washers (M6) ������������ 8
yNuts (M6) ����������������� 8
uHex head bolts (M6×50)����������� 4
iSelf-tapping screws (A0 6×30) �������� 4
oWeatherproof cap ������������� 1
!0 Rubber vulcanizing tape����������� 1
!1 4-pin connector �������������� 1
!2 Connector pins��������������� 4
!3 Ground cable (OPC-412) ���������� 1
Icom, Icom Inc. and the Icom logo are registered trademarks of Icom Incorporated (Japan) in Japan, the United
States, the United Kingdom, Germany, France, Spain, Russia and/or other countries.
q
w
e
r
t
y
u
i
o
!1 !2
!3
!0

ii
MISCELLANEOUS ITEMS
The following parts are additionally required for instal-
lation, but are not supplied with the AT-141.
Purchase these parts locally.
qAWG 14 × 4 conductor shielded cable
•IcomoffersanoptionalOPC-1465controlcable.
Length: 10 m
w50 Ωcoaxial cable
eTwo PL-259 connectors
FEATURES
Weather resistant
The AT-141 is housed in a durable, completely
weather resistant ASA case, with a rubber gasket. The
antenna tuner can be conveniently installed near the
antenna element.
Matches all bands
The AT-141 matches all frequencies on the HF marine
band. For example, the tuner matches a 7 m long-wire
antenna across 1.6–30 MHz.
Full automatic tuning
Just push the [TUNE] key on the transceiver, and the
AT-141 immediately tunes for a minimum SWR on any
frequency in the HF marine band.
HF operation on any size ship
The AT-141 allows HF operation where antenna ele-
ment length is restricted due to space.
Simple installation
Installation is simple. Just connect the control and an-
tenna cables. You never need to open the cover.
45 memories for shorter tuning time
To decrease the tune-up time, the AT-141 automati-
cally stores the matching conditions for up to 45 fre-
quencies. Retuning a memorized frequency takes ap-
proximately 1 second.
Super capacitor for memory backup
Even if the AT-141 is not used for approximately 1
week, the built-in super capacitor backs up the con-
tents of the 45 memories.
Low power tune up
The AT-141 emits low output power during tuning. This
feature reduces the possibility of causing interference
to other stations.
Tuner Through function
The Tuner Through function is built into the AT-141.
This function helps improve receiver gain, depending
on the antenna element length used, and the operat-
ing frequency.
FOREWORD ………………………………………… ii
IMPORTANT…………………………………………… ii
EXPLICIT DEFINITIONS …………………………… ii
PRECAUTIONS ……………………………………… ii
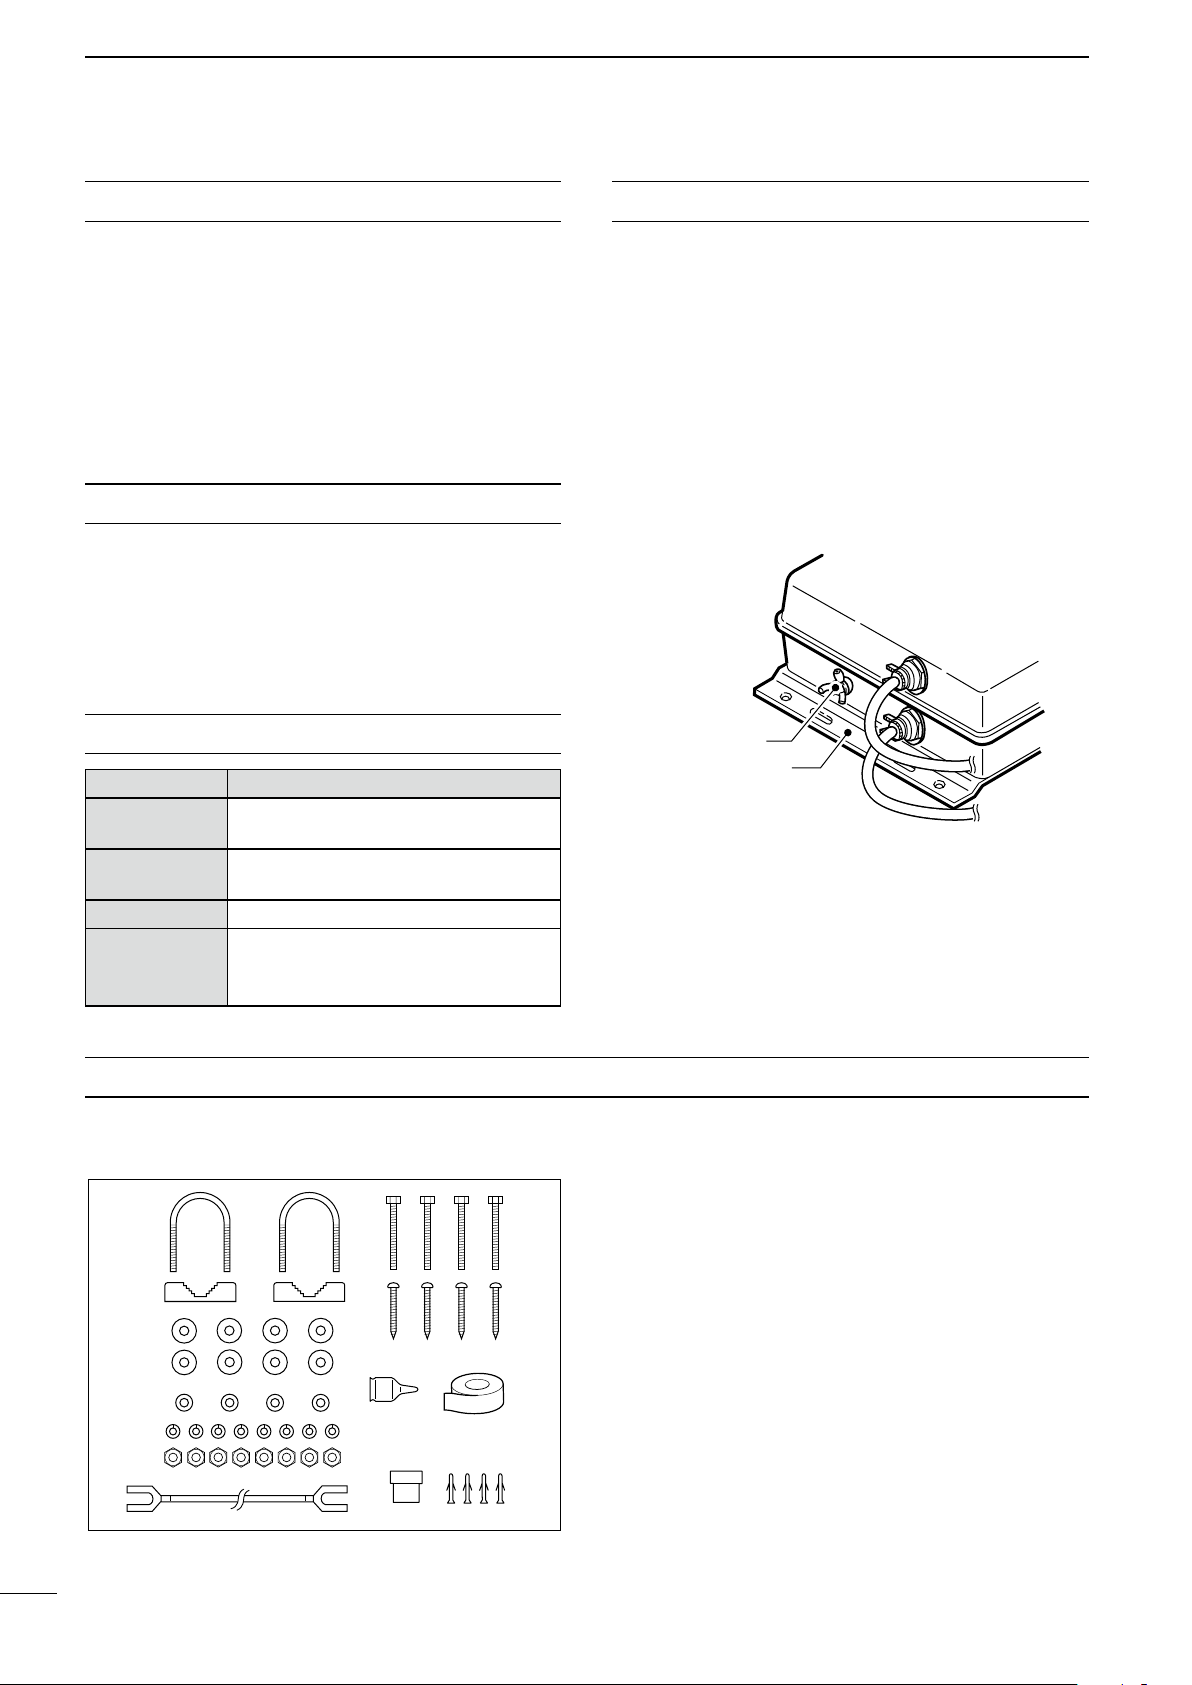
SUPPLIED ACCESSORIES ………………………… ii
MISCELLANEOUS ITEMS………………………… iii
FEATURES ………………………………………… iii
TABLE OF CONTENTS …………………………… iii
1 SYSTEM INSTALLATION ………………………… 1
Five Critical Points for a successful HF■
installation���������������� 1
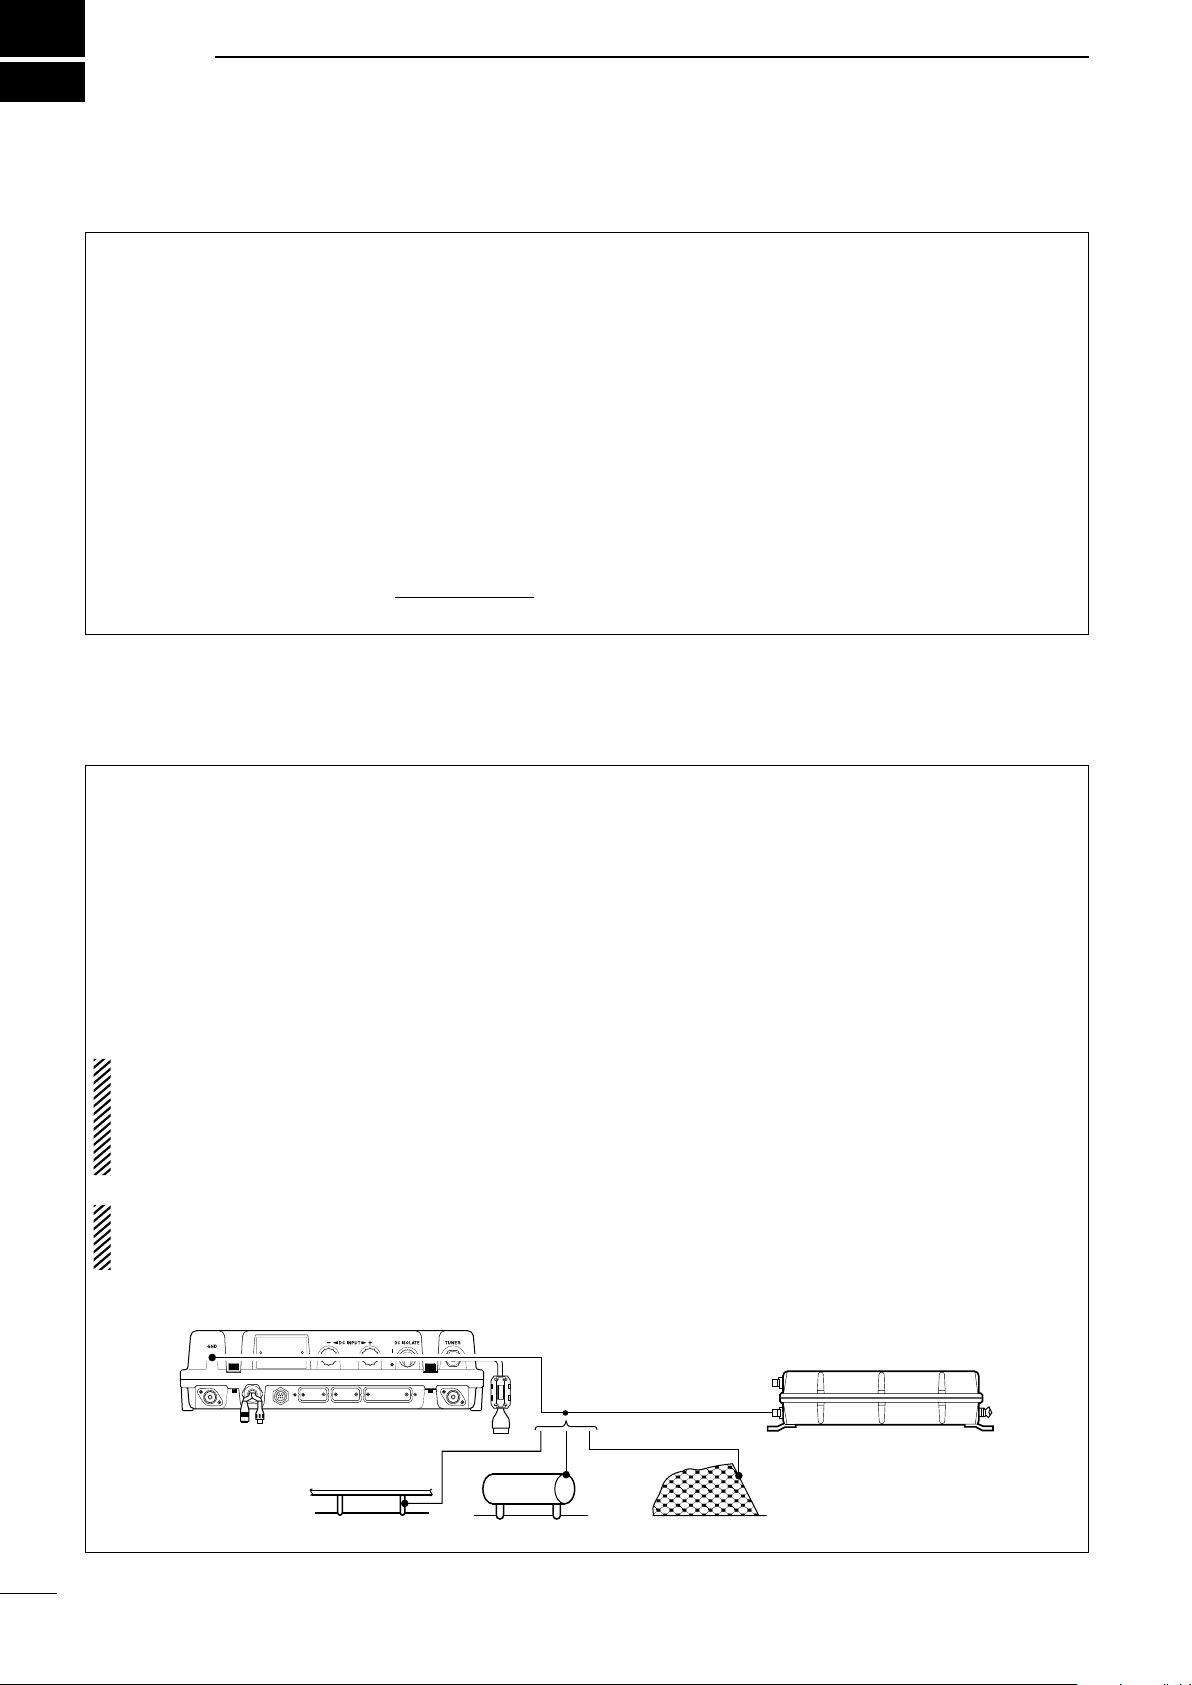
Vessel ground connection■�������� 1
Antenna and tuners■������������ 2
The importance of grounding■������� 2
2 ANTENNA SYSTEM ……………………………… 3
Antenna for ship■������������� 3
Coaxial cable■�������������� 4
Ground and counterpoise■��������� 4
3 INSTALLATIONS ………………………………… 5
Installation outline■������������ 5
Control cable■�������������� 5
PL-259 connector■������������ 5
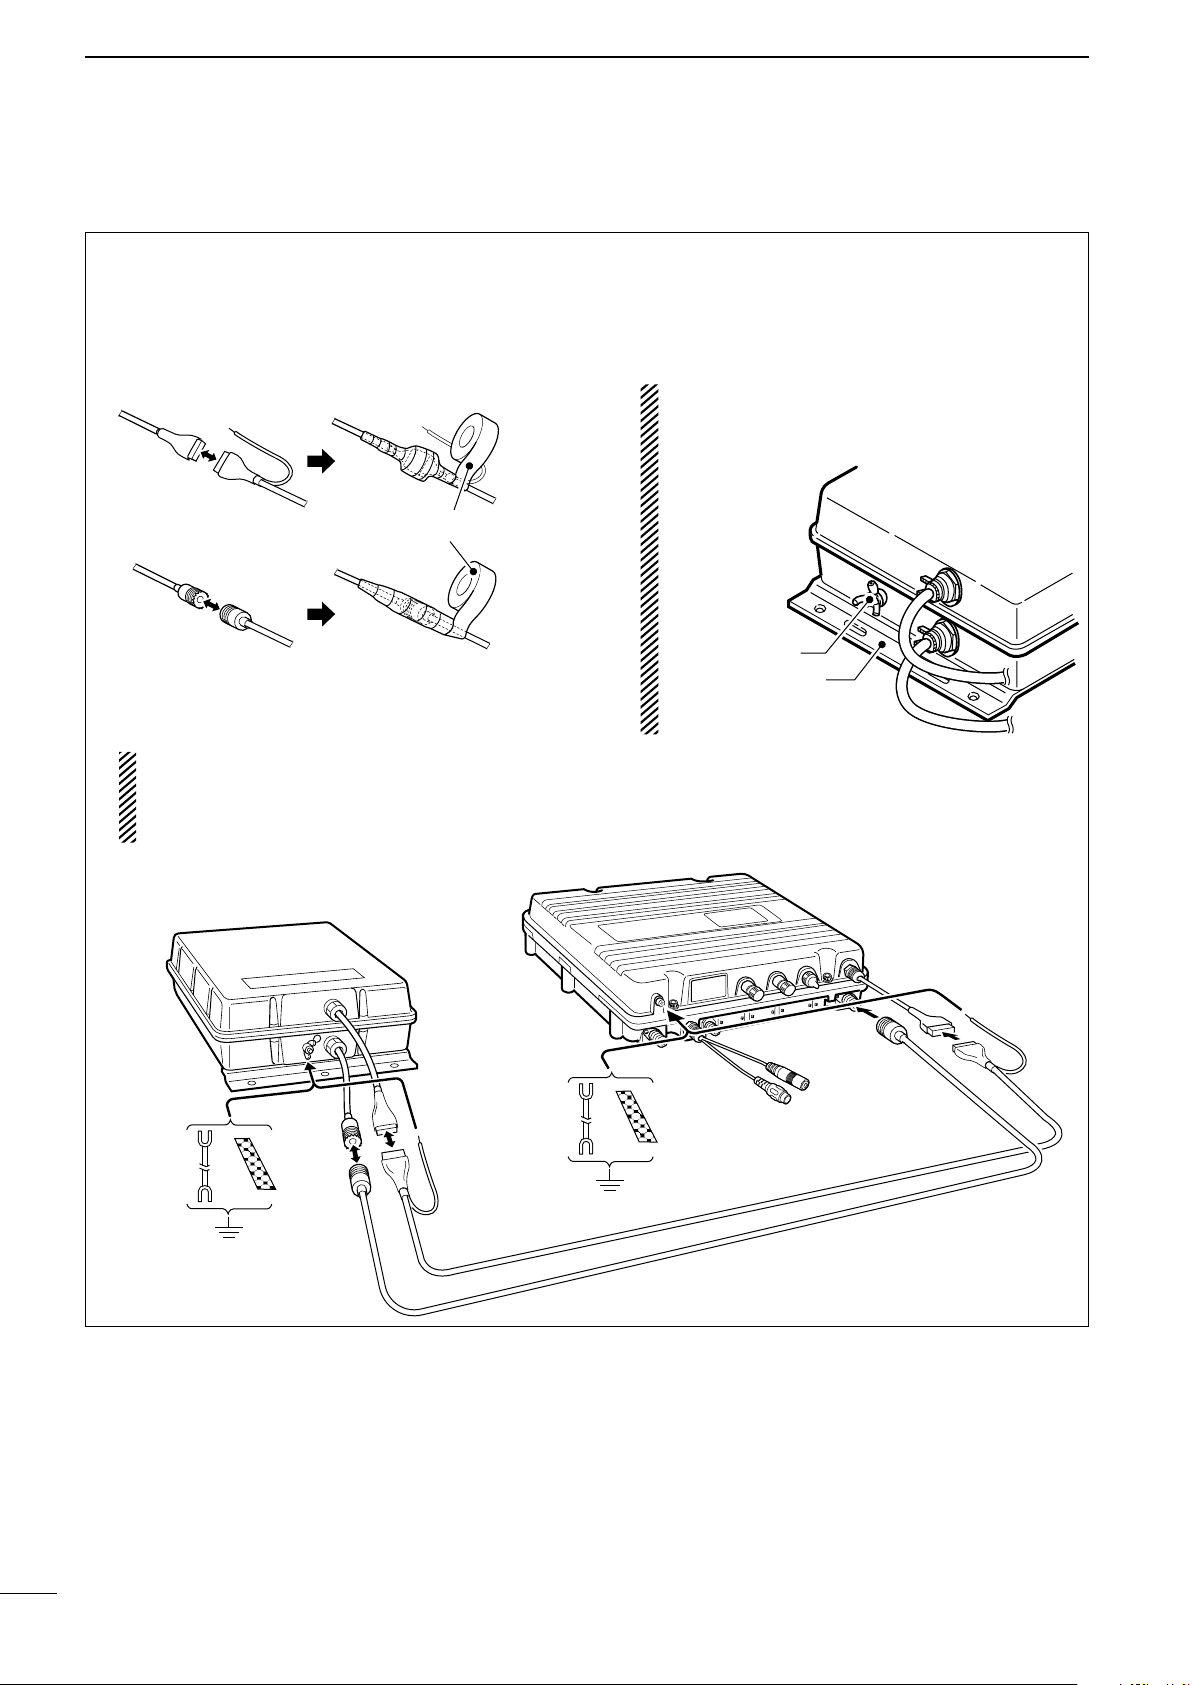
Waterproofing the antenna connection■��� 6
Mounting■���������������� 6
Cable connections■������������ 7
4 CONTROL CABLE SIGNALS …………………… 8
Terminal information■����������� 8
Unit description■������������� 9
Specifications■�������������� 9
5 UNIT DESCRIPTION AND SPECIFICATIONS … 9
6 INSTALLATION EXAMPLE …………………… 10
TABLE OF CONTENTS

1
1
SYSTEM INSTALLATION
*The AT-141 is housed in a durable, completely weather
resistant case. You don’t have to worry a lot about rain,
splash, and so on.
Five Critical Points for a successful HF installation■
These critical points apply to almost any HF installa-
tion, whether it is for a base station, in a vehicle, or
a marine vessel. For the best and most reliable com-
munication capability, use them during the planning
and installation of your HF system.
1. Install transceiver as close as possible to your ves-
sel’s operation location and to your power source,
whether you are using batteries or an external
power supply.
2. Install the antenna in an open location as far as
possible from your operating station.
3. Install the antenna tuner in an open location* as
close to the base of your antenna as possible.
4. Install copper straps or radial wires as your ground
system. These will give you a good solid ground
system, which is critical for reliable communica-
tions.
5. Make all your power source, control and coaxial
cables as short as possible. Do not coil up any
cables that are longer than they should or could
be.
Following these rules will minimize marginal installa-
tions and problem sources such as RF feedback in
the transceiver, power supply or cables and “hot” or
RF burning microphones.
If all 5 above points are followed during the design
and installation of your HF system, the operator can
expect top performance.
Vessel ground connection■
The HF system MUST have an adequate RF ground
connection. Otherwise, the overall efficiency of the
HF system installation will be reduced. Electrolysis,
electrical shocks and interference from other equip-
ment could also occur.
For best results, use 50 or 75 mm wide copper
strap and make the connection as short as possible.
Ground the HF system to one ground point, otherwise
the voltage difference (in RF level) between 2 ground
points may cause electrolysis.
RWARNING— When grounding to a metal hull
Use Zinc anodes to protect the hull from electroly-
sis.
Ask your technical dealer, installer or refer to a
technical book for RF grounding details.
CAUTION: NEVER connect the HF system to a
“positive-grounded ship,” otherwise it will not func-
tion.
Ground system example
Best ground points
•Externalgroundplate
•Copperscreen
•Copperfoil
Acceptable ground point
•Stainlesssteelstanchion
•Throughmast
•Throughhull
•Metalwatertank
Undesirable ground points
•Engineblock
•Ship’sDCbatteryground
Unusable ground points
(these connections may cause an explosion or electrical
shock)
•Gasorelectricalpipe
•Fueltankoroil-catchpan
Copper pipe
Transceiver Antenna tuner
Metal object Copper screen

2
1
SYSTEM INSTALLATION
Antenna and tuners■
If your Icom HF system is going aboard a sailboat,
you may use an insulated backstay to make up your
antenna system. Your best range will be from an in-
sulated backstay because of the long length of the
antenna element which is that portion between the
top and bottom insulators. Have your rigger put the
top insulator about at least 1 meter down from the
tip of the mast. Have your rigger install the bottom
insulator at about eye-level when you’re standing
back aft. (This length between insulators should not
exceed 37 meters or be less than 7 meters.)
This non-resonant antenna can be tuned by the Icom
automatic antenna tuner that matches your trans-
ceiver. The tuner is connected to the transceiver. We
suggest you use “GTO-15” high voltage lead-in wire
from the single wire output of the tuner to your in-
sulated backstay. This high voltage wire won’t break
down in wet weather or sunlight. Use stainless steel
hose clamps to attach the wire to the insulated back-
stay.
The tuner is fed with a coaxial and a control cable
from the Icom transceiver.
Check with your dealer regarding antennas and ca-
bling.
RDANGER: HIGH VOLTAGE!
NEVER touch the antenna element while tuning
or transmitting.
Insulator
Antenna element
Antenna element
Ship’s
ground
Insulator
Insulator
Antenna
tuner
To
transceiver
Antenna
tuner
The importance of grounding■
Surface area to the sea water and the use of copper
foil exclusively throughout your RF ground system is
the combination that gives you reliable long range
communications. The sea water gives your signal a
solid surface to push off from. This is called a “coun-
terpoise,” and it’s the necessary “other-half” of your
antenna system that must be achieved for your over-
all HF transceiver system to work well.

2
3
ANTENNA SYSTEM
2001 NEW 2001 NEW
3
2001 NEW 2001 NEW
Antenna for ship■
Required antenna element lengthD
Required antenna element length to achieve full per-
formance varies, according to the lowest frequency.
The lowest frequency Required antenna element length
1.6 MHz band 7 m; 23.0 feet or longer
4 MHz band 3 m; 9.8 feet or longer
The longer the antenna element, the longer commu-
nication distance.
Undesirable antenna element lengthsD
DO NOT use an antenna element such as mul-
tiples of 1⁄2λ lengths (half wavelength), since tuning
becomes difficult.
L : Undesirable antenna element length [m]
f : Operating frequency [MHz]
n : Natural number (n = 1, 2, 3, ...)
L
=
300
f
×1
2n
×
[Example]
At an operating frequency of 16 MHz, avoid the fol-
lowing antenna element lengths:
L=300
16 ×1
2n
×9.4, 18.8, ...
For example, if 15 m is selected for an antenna ele-
ment length, you have no problem in the 1.6 to 25
MHz marine bands range.
NOTE: Keep antennas as far away from other ob-
jects as possible, especially metal objects.
Insulator
Backstay operates as
a long-wire antenna.
Insulator
Whip antenna

2001 NEW2001 NEW
4
2
ANTENNA SYSTEM
Coaxial cable■
Insulate the lead-in cable of the AT-141 antenna ter-
minal and antenna element from other metal objects.
To prevent interference, keep cables as far as pos-
sible from an antenna, electric pump and other elec-
tronic equipment.
To prevent erroneous indications, keep cables as far
away as possible from the flux gate compass.
Use suitable noise filters for alternators or fluorescent
lights. Ask your dealer for details.
Ground and counterpoise■
Why a ship’s ground is requiredD
The AT-141’s ground terminal MUST be connected
to your ship’s ground. Grounding prevents electric
shocks, interference to other equipment and other
problems. The AT-141 does not properly operate
without the grounding connections.
RDANGER! NEVER connect the ground termi-
nal to the following points. These connections may
cause an explosion or electric shocks:
•Gasorelectricalpipe
•Fueltankoroil-catchpan
IMPORTANT: The mounting plate is NOT con-
nected to the AT-141’s internal ground.
Ideal ground pointsD
One of following points is ideal:
•Ship’sground
•Externalgroundplate
•Externalcopperscreen/foil
Good ground pointsD
If electrically connected to sea water, one of the fol-
lowing points is usable:
•Stainlesssteelstanchion
•Throughmast
•Throughhull
•Metalwatertank
Undesirable ground pointsD
These connections may cause noise or electrolysis:
•Engineblock
•Ship’sDCbatteryground
ElectrolysisD
All ground cables from the AT-141 or HF transceiver
on your ship should be connected to only one ship’s
ground.
DO NOT connect to two or more points. Voltage
difference between two or more ship’s grounds may
cause electrolysis.
DO NOT connect between dissimilar metals where
an electric current is present. These connections may
cause electrolysis.
CounterpoiseD
If your ship is made of FRP, etc. and a good ship’s
ground is not available, connect a counterpoise.
1⁄4λ(quarter wavelength) radial for each band is suit-
able for a counterpoise. Install the counterpoise di-
rectly below the AT-141’s ground terminal. Insulate
the ends of each radial from other metal objects.
Layout the radial horizontally and as straight as pos-
sible.
L :
Counterpoise length for the operating frequency [m]
f : Operating frequency [MHz]
L=
300
f×1
4
[Example]
At an operating frequency of 16 MHz, use a counter-
poise with the following length:
L=300
16 ×1
44.7 [m]
Ground cable
For best results, use the heaviest gauge wire or
metal strap. Make the distance between the AT-141’s
ground terminal and ship’s ground as short as pos-
sible.
The supplied ground cable can be used for ground
connection through a mast. Confirm that the mast is
electrically connected to sea water.
Ground terminal
AT-141
1
⁄
4
λradial for
each band
RWARNING!— When grounding to metal hull
Use a Zinc anode to protect the hull from electroly-
sis. Ask your technical dealer or installer, or refer to
a technical book for RF ground details.

3
5
INSTALLATIONS
2001 NEW 2001 NEW
5
2001 NEW 2001 NEW
qConnect the pins to the control cable and insert
into the supplied connector.
•Referto“Controlcable”asdescribedbelow.
wConnect and solder the PL-259 connector to the
coaxial cable.
Refer to “PL-259 connector” as described below.
eMount the AT-141 in the desired location.
•Refertopage6,“Mounting.”
rConnect the control and coaxial cables between
the transceiver and the AT-141.
•Refertopage7,“Cableconnections.”
tConnect the AT-141’s ground terminal to the ship’s
ground or counterpoise.
•Refer to page 3 “Antenna for ship,” and page 4
“Ground and counterpoise.”
yConnect the antenna element (wire).
•Refertoexamplesonpages2,and10–12.
Installation outline■
Between the AT-141 and HF transceiver, connect
four control signal lines, as shown below.
To prevent RF feedback, use a four conductor
shielded cable.
Connect the shield line to the [GND] terminal on the
transceiver.
Icom offers an optional OPC-1465 control cable.
•Length:10m
Refer to page 8, “Terminal information” for details.
Control cable■
DWhen connecting to an Icom transceiver
[GND]
To the AT-141
[ANTC] : Black
[13.6] : Red
[STAR] : White
[KEY] : Green
Use the optional OPC-1465, or assemble a four conductor shielded
cable of the desired length using the connector kits supplied with the
transceiver and the tuner.
[ANTC] : Black
[13.6] : Red
[STAR] : White
[KEY] : Green
To the transceiver
[GND]
PL-259 connector■
qSlide the coupling ring down.
Strip the cable jacket and tin the shield.
•Tintheexposedbraidandthenpulloutthejacket.
Coupling 30 mm
10 mm (tin)
wStrip the cable as shown below.
Tin the center conductor.
1–2 mm
10 mm tin
eSlide the connector body over the cable and sol-
der it.
Solder Solder
NOTE: Use a soldering iron with enough heating
power to securely solder the ground braid and
body. Otherwise the connection may be loose, and
communication trouble may occur.
rScrew the coupling ring onto the connector body.

2001 NEW2001 NEW
6
3
INSTALLATIONS
Waterproofing the antenna connection■
q Cut off just the top of the weatherproof cap, and
pass the antenna wire through the cap.
Antenna wire
Weatherproof cap
w Insert the antenna wire into the opening of the
crimp-on wire terminal.
•Crimporsoldertheantennawire.
Crimp Solder
ePut the crimp-on wire terminal, star washer, and
wing nut on the base nut, in that order, then,
tighten the wing nut.
•Makesurethebasenutistightenedrmly,beforeyou
tighten the wing nut. (See the Fig.1 to the right.)
•Carefullybendthewireterminalup,afteryoutighten
the wing nut. (See the Fig.2 to the right.)
Fig.1
Wing nut
Crimp-on wire terminal
Star washer
Base nut
Antenna tuner
r Place the weatherproof cap over as much of the
insulator as possible.
•Howfardownitwillgodependsontheheightofthe
wing nut.
t
Start wrapping the rubber vulcanizing tape at the bot-
tom of the insulator, then the weatherproof cap and
finally the antenna wire to prevent water seeping.
•Wrapelectricaltape*overtherubbervulcanizingtape
to secure waterproofing.
*The electrical tape is not supplied with the AT-141.
Fig.2
Insulator
et
r
Rubber
vulcanizing tape
Bend this part
up, AFTER
you tighten
the wing nut.
CAUTION: If you skip the following steps, moisture will get
into the connector, and this could damage the antenna tuner.
Mounting■
Mounting on a Mast/Metal poleD
Using U-bolts
U-bolt
U-bolt plate
Flat washer (L)
Spring washer
Nut
Mast/
Metal pole
32–60 mm
Flat washer (S)
NEVER install the antenna
tuner upside down.
Mounting on a flat surfaceD
Using self-tapping
screws
Using nuts and bolts
Nut
Spring
washer
Flat
washer (L)
Flat
washer (L)
Hex head
bolt
Drill a hole here
Diameter:7–8 mm;
9
⁄
32
–
5
⁄
16
inches
Flat
washer (S)
RWARNING! Mount the AT-141 securely with
the supplied nuts and bolts. Otherwise, vibrations
and shocks due to waves could loosen the antenna
tuner making it fall, causing personal injury.
CAUTION: Mount the AT-141 in a horizontal position
or in a vertical position with the antenna terminal up.

2001 NEW
7
3INSTALLATIONS
2001 NEW 2001 NEW
7
Cable connections■
qConnect the coaxial cable and the control cable to
the AT-141, as shown below.
wWrap both the antenna and the control cable con-
nectors with rubber vulcanizing tape, and then
wrap electrical tape* over the rubber vulcanizing
tape to secure waterproofing.
*The electrical tape is not supplied with the AT-141.
Rubber vulcanizing tape
Coaxial cable
Control cable
eFix both the coaxial and control cable to protect
the inside connections.
DO NOT pull the antenna and control cable re-
ceptacles. This may cause disconnection (in-
side the AT-141), internal connector damage or
a bad connection.
rConnect the coaxial cable and the control cable to
the transceiver as shown below.
tGround the transceiver, AT-141 and shield cable
of the control cable via the ground terminal.
•Seepages1,2and4forgroundingdetails.
IMPORTANT:
NEVER ground the AT-141 via the mounting
plate. It is not internally connected to ground.
Ground terminal
Mounting plate
AT-141
Icom’s HF transceiver
Ship’s ground
Copper
strap,
etc.
Connect to the
ship’s ground.
Connect to the
ship’s ground.
OPC-412
(Supplied)
Ship’s ground
Copper
strap,
etc.
Ground wire
(Purchase separately)

2001 NEW2001 NEW
4
8
CONTROL CABLE SIGNALS
8
Terminal information■
Terminal Description
[KEY] Key voltage. Grounded during tuning.
Maximum current drain 100 mA
[13.6] 13.6 V DC + input terminal.
Maximum current drain 2 A
[STAR] Receives start voltage.
Maximum current drain 1 mA
[ANTC] Antenna current detector output.
[KEY]
[STAR]
[13.6]
[ANTC]
Start voltage [STAR]D
When a start voltage (less than 1 V) is received, the
AT-141 begins automatic tuning.
8
6
4
2
0
Time
More than
350 milliseconds
Approximately 7.5 V
Less than 1 V to
start tuning
Start
voltage
[V]
*For tuner through operation; Less than 250 milliseconds
Key voltage [KEY]D
During automatic tuning, the AT-141 grounds the key
voltage line, and the HF transceiver reduces output
power.
8
6
4
2
0
Time
Key
voltage
[V]
Grounded
Approximately 7.5 V
During automatic tuning

5
9
UNIT DESCRIPTION AND SPECIFICATIONS
2001 NEW
9
Antenna terminal
Mounting plate
Control cable connectorAntenna connector
Mounting plate
Ground terminal
340 mm
230 mm
80 mm
91.5 mm
Unit description■
Specifications■
Frequency coverage : 1.6–30 MHz (with 7 m or longer antenna element)•
Power supply requirement : 13.6 V DC (supplied from the HF transceiver)•
Current drain : Maximum 2 A•
Operating temperature range : –30• °C to +60°C
Weight (approximately) : 2.5 kg•
Antenna connector : SO-239 (50• Ω)
Maximum Input power : 150 W (PEP) 100 W (continuous)•
Automatic tuning time : Approximately 2 to 3 seconds (general condition) Maximum 15•
seconds
Approximately 1 second (retuning for a memorized frequency)
Automatic tuning accuracy : SWR 2.0:1 (after tuning, except for multiples of• 1⁄2 λ)
Usable pole diameter : 32 to 60 mm•
All stated specifications are subject to change without notice or obligation.

6
10
INSTALLATION EXAMPLE
Style of the antenna elementD
When the horizontal element is longer, or made with multiple wires, the effective height of the antenna is high and
communication distance may be improved.
Good —Vertical
This is a basic style with only the verti-
cal element. This style is not effective
for NVIS* communications.
Better —Inverted-L
This style is a good for NVIS* and lon-
ger communications.
Best —Two wire inverted-L
This is an even better element style
than the one to the left.
The following are antenna tuner and antenna installa-
tion examples for a non-sail boat.
They also explain both transmission and reception
performance, for your reference.
•Descriptions
Antenna
tuner
Vertical
element
Horizontal element
Good — High position
This antenna tuner unit position is bet-
ter than others but the length of the ver-
tical element is shorter than the others.
Better — Mid position
This installation is also good.
Best — Low position
This installation is perfect for the length
of the vertical element and the total ele-
ment length.
RDANGER: HIGH VOLTAGE!
NEVER touch the antenna element while tuning or
transmitting.
Antenna tuner location versus the strength of radiation from the antenna elementD
The antenna tuner should be installed outside the vessel as high as possible.
However, the length of the vertical element should also be as long as possible.
*Near Vertical Incidence Skywave. This is a radio-wave propagation method that provides usable signals in the range between
groundwave and skywave distances (usually 30 to 400 miles, or 50 to 650 km).

Good —Horizontal
The antenna tuner is installed at a
higher position and the element is in-
stalled horizontally.
Better —Inverted-L
The element is bent in the middle as an
Inverted-L antenna.
Best —Vertical
If the length of the antenna element is
limited because of installation space, a
longer vertical element will give a lon-
ger communication distance.
Good —Vertical
This is a good style. The vertical ele-
ment radiates waves, but the length of
the element may not be enough for HF
low band operation.
Better —Type-T
The antenna effective height is much
better than other styles. The higher
position of the Antenna tuner provides
longer communication distance.
Best —Inverted-L
This is the best style for HF low band
operation as the vertical element is
long, and the total element length is
also long.
11
6INSTALLATION EXAMPLE
2001 NEW 2001 NEW
Antenna element style versus the strength of radiation from the antenna elementD
When the antenna tuner is installed on the deck, the following installation may be possible. The antenna element
should be as long as possible, especially for the HF low band, such as the 8 MHz marine band.
Antenna tuner location versus the strength of radiation from the same length of theD
antenna element
When the antenna tuner is installed on the deck with the same element length connected.
Style of the antenna element connection versus the strength of the radiation from theD
element
The vertical element should be connected at the end of the horizontal element.
Good —Long
The distance is longer between the
connection of the vertical element and
the end of the horizontal element.
Better —Short
The distance between the vertical element
and the end of the horizontal element is
shorter, compared with the one to the left.
Best —Direct
The vertical element is connected di-
rectly to the end of the horizontal ele-
ment.
RDANGER: HIGH VOLTAGE!
NEVER touch the antenna element while tuning or
transmitting.

2001 NEW
12
6
INSTALLATION EXAMPLE
Thickness of the Antenna element versus the strength of radiation from the elementD
The thickness of the antenna element does not change communication quality much, but it should be as thick as
possible for better radiation from the antenna element.
Good —Regular size Better —Thick Best —Thicker
RDANGER: HIGH VOLTAGE!
NEVER touch the antenna element while tuning or
transmitting.

1-1-32 Kamiminami, Hirano-ku, Osaka 547-0003, Japan
A-6472H-1EU-r
Printed in Japan
© 2005–2013 Icom Inc.
Printed on recycled paper with soy ink.
Other manuals for AT-141
2
Table of contents
Other Icom Tuner manuals