Instructions de montage | Montage instrukties | Montageanleitung | Installation instructions
IDTOLIGHT Rue Saint-Laurent 3A 4970 Stavelot BELGIUM
www.idtolight.com
Protection contre les corps étrangers Ø > 12 mm
Pas de protection contre l’eau
Bescherming tegen vaste vreemde voorwerpen Ø > 12 mm
Geen Bescherming tegen water
Schutz gegen feste Fremdkörper Ø > 12 mm
Kein Schutz gegen Wasser
Protection against solid objects Ø > 12 mm
No protection against water
Classe de protection 3 : alimentation en très basse tension (<50V AC)
Beschermingsklasse 3 : werkt op een extra lage spanning (<50V AC)
Schutzklasse 3 : mit Schutzkleinspannung (<50V AC)
Protection class 3 : with extra low voltage power source (<50V AC)
Homologation ROHS
ROHS overeenstemming
ROHS Genehmigung
ROHS compliance
Homologation CE
CE overeenstemming
CE Genehmigung
CE compliance
L’appareil doit être éliminé dans les centres de recyclage spécialisés
Het toestel moet naar een gescheiden inzamelpunt afgevoerd worden
Das Gerät muß zu einer zuständigen Entsorgungsstelle gebracht werden
The product must be disposed of in a specialized collection center
Garantie 5 ans
5 jaar waarborg
5 Jahre Garantie
5 years warranty
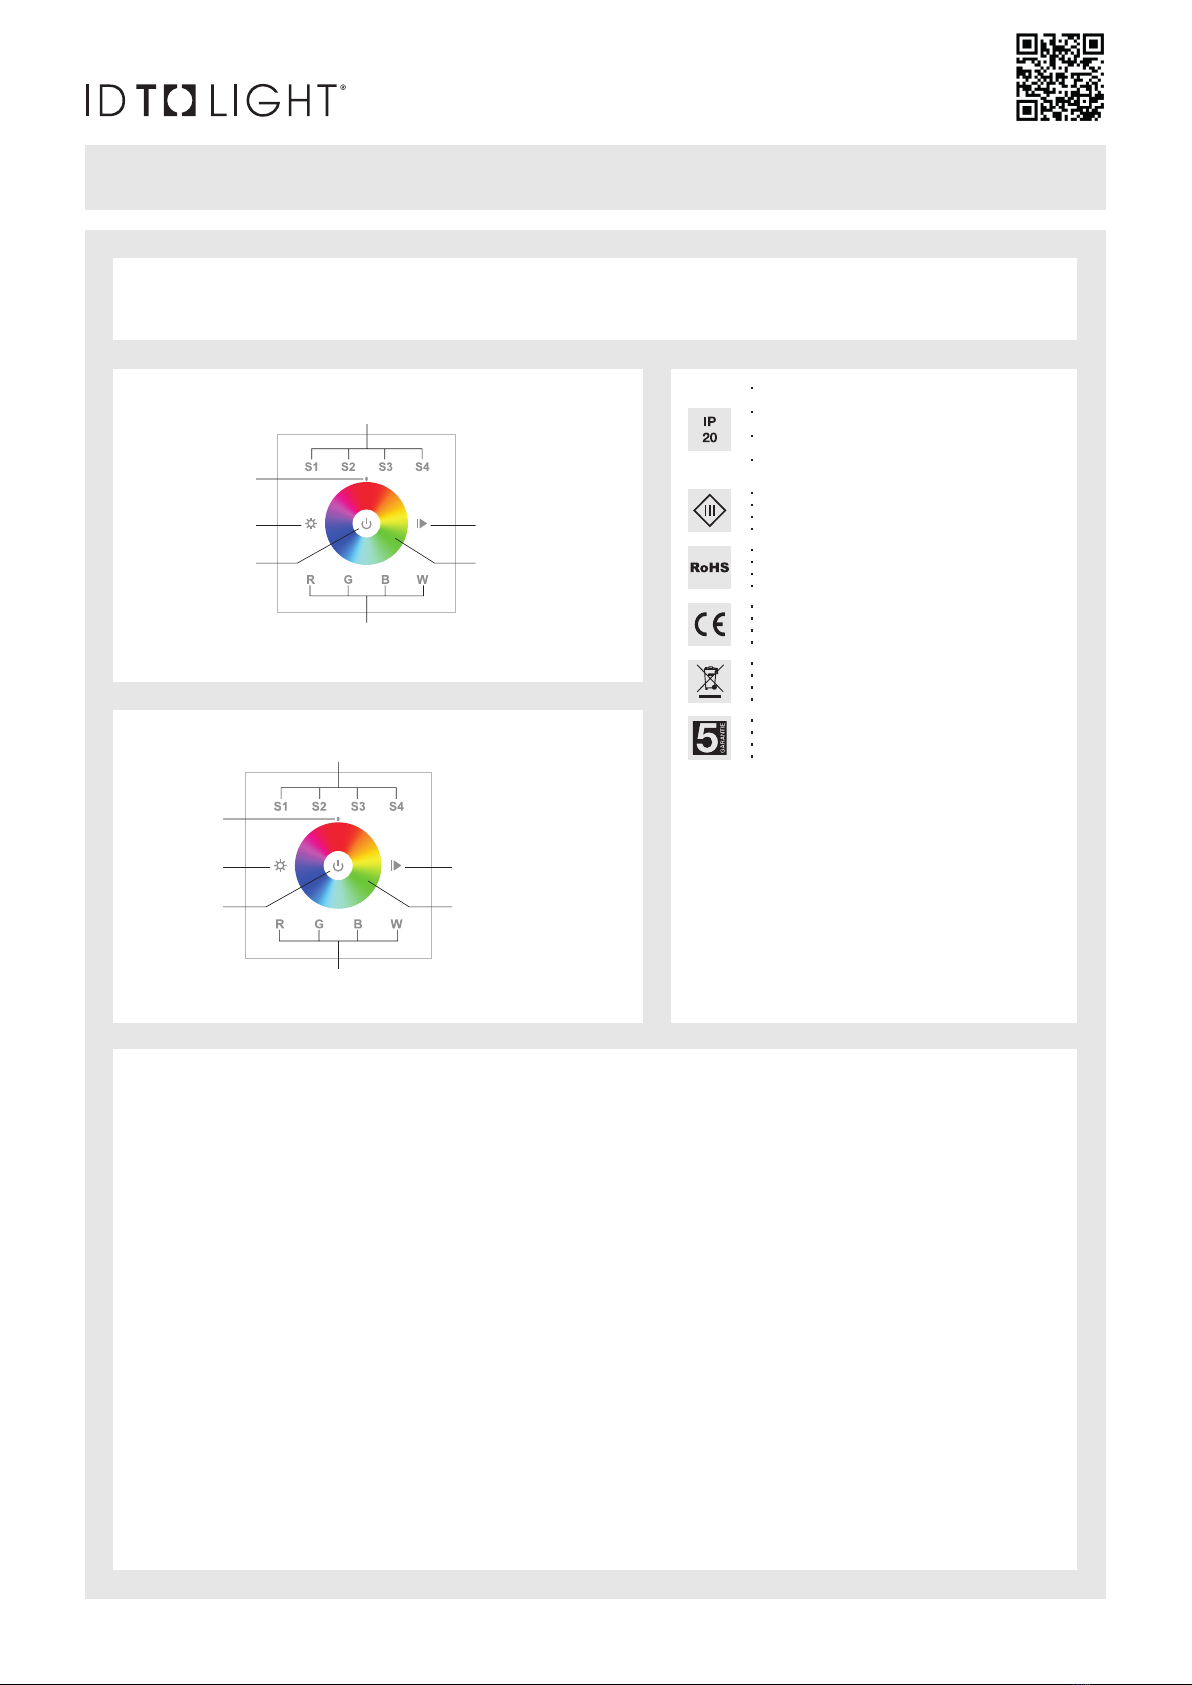
WERCHTER RGB - RGB + W
ID836004ZZZ - ID836005ZZZ
Press and hold to save color/effect;
Click to recall the saved
R / G / B / W 4 channels: Click to turn off/on the channel
Press and hold down to increase/decrease light intensity of each channel
Click to play/pause the 10 built-in effects,
Press and hold down to speed up/down
the running effects
Touch color wheel, touch to select R/G/B color
LED indicator
Press and hold down to
increase/decrease light
intensity
Click to switch on/off
Maintenez enfoncé pour enregistrer la couleur / lʼeffet
Cliquez pour rappeler la sauvegarde
4 canaux R / G / B / W: Cliquez pour activer / désactiver le canal
Appuyez et maintenez enfoncé pour augmenter / diminuer l'intensité lumineuse de chaque canal
Cliquez pour lire / mettre en pause
les 10 effets intégrés,
Appuyez et maintenez enfoncé pour
accélérer / diminuer la vitesse des effets
Touchez la roue chromatique
pour sélectionner une couleur
Indicateur LED
Appuyez et maintenez enfoncé
pour augmenter / diminuer
lʼintensité lumineuse.
Cliquez pour activer / désactiver
CONDITIONS GÉNÉRALES D’UTILISATION
Ce document doit être conservé pendant toute la durée de vie du produit. � L’appareil doit être placé, raccordé et testé par un installateur agréé et selon les réglementations
locales en vigueur. � Ne jamais excéder la puissance maximale indiquée sur l’appareil. � Toutes les sources de chaleurs (ampoule, transformateur, convertisseur, ...) doivent
obligatoirement être susamment espacées et ventilées pour empêcher un incendie. � Veuillez nous contacter lors de cas particulier de montage. � Déconnecter la tension
d’alimentation de l’appareil avant installation ou entretien. � Déconnecter l’appareil et laisser refroidir entièrement avant de remplacer une lampe. � Toute utilisation erronée ou
adaptation de l’appareil annule la garantie. � Les appareils ne peuvent jamais être recouverts, comme par exemple d’un matériau isolant ou équivalent. � Nous nous réservons
le droit de modications au niveau concept, spécications et instructions de montage.
ALGEMENE GEBRUIKSVOORWAARDEN
Dit document moet voor de hele levensduur van het product bewaard worden. � Het toestel moet door een erkend installateur en volgens de plaatselijk geldende reglementering
geplaatst, aangesloten en uitgetest worden. � Het maximaal aangegeven wattage nooit overschrijden. � Alle warmtebronnen (lampen, transformatoren, converter, ...) moeten
voldoende geventileerd worden en op een voldoende afstand zijn om de brand te voorkomen. � Neem contact met ons op in geval van speciale montage. � Voor installatie of
onderhoud van het toestel de voedingsspanning afsluiten. � Bij lampvervanging, het toestel afzetten en volledig afkoelen laten. � Bij verkeerd gebruik of aanpassing van het
toestel, is de garantie ongeldig. � De toestellen mogen nooit bedekt worden zoals bv met een isolerend materiaal of iets dergelijks. � Wijzigingen in ontwerp, specicaties en
instructies zijn mogelijk.
ALLGEMEINE GEBRAUCHSBEDINGUNGEN
Dieses Dokument muss, während die ganze Lebensdauer des Produkts, aufbewahrt werden. � Das Gerät soll von einem anerkannten Installateur und gemäß den Örtlichen
Vorschriften aufgestellt, angeschlossen und getestet werden. � Die maximale Wattleistung, die auf dem Gerät angegeben ist, kann nie überschritten werden. � Alle Wärmequellen
(Lampen, Transformatoren, Konverter, ...) müssen ausreichend belüftet sein und einen genügenden Abstand haben um das Feuer zu verhindern. � Bitte kontaktieren Sie uns bei
einer speziellen Montage. � Für die Installation oder die Wartung des Geräts sollen Sie die Spannung abschalten. � Wenn Sie Lampen ersetzen, sollen Sie das Gerät ausschalten
und völlig abkühlen lassen. � Bei falscher Benutzung oder Anpassung des Geräts, ist die Garantie nicht mehr gültig. � Die Geräte dürfen nie mit z.B. einem isolierendem Material
oder etwas ähnlich bedeckt werden. � Änderungen im Entwurf, in Spezizierungen und Montageanweisungen sind möglich.
GENERAL CONDITIONS FOR USE
This document must be kept during the whole lifetime of the product. � The appliance has to be installed, connected and tested by a certied installer, and in accordance with
the local regulations. � Never use a wattage higher than the maximum wattage mentioned on the appliance. � All heat sources (bulbs, transformers, converters, ...) must be
suciently spaced and ventilated to prevent the re. � Please contact us in case of special installation. � Turn o the power supply before installation or maintenance of the
appliance. � When a lamp must be replaced: switch o the appliance rst and let it cool down completely. � Misuse of, or changes to the appliance voids the warranty. � Never
cover the appliances with e.g. insulating material. � The manufacturer is free to change the design, specications and installation instructions.


