Mi XMDZLZXC01QJ User manual

Mi Smart Electric Folding Bike User Manual . 01
Manuale utente Mi Smart Electric Folding Bike . 33
Manual de instrucciones de Mi Smart Electric Folding Bike . 17
Manuel d'utilisation du Mi Smart Electric Folding Bike . 49
Bedienungsanleitung für das Mi Smart Elektro-Klappfahrrad . 66
Руководство пользователя складного электрического смарт-велосипеда Mi . 84
Inteligentny elektryczny rower składany Mi – Instrukcja obsługi . 102
Mi . 119

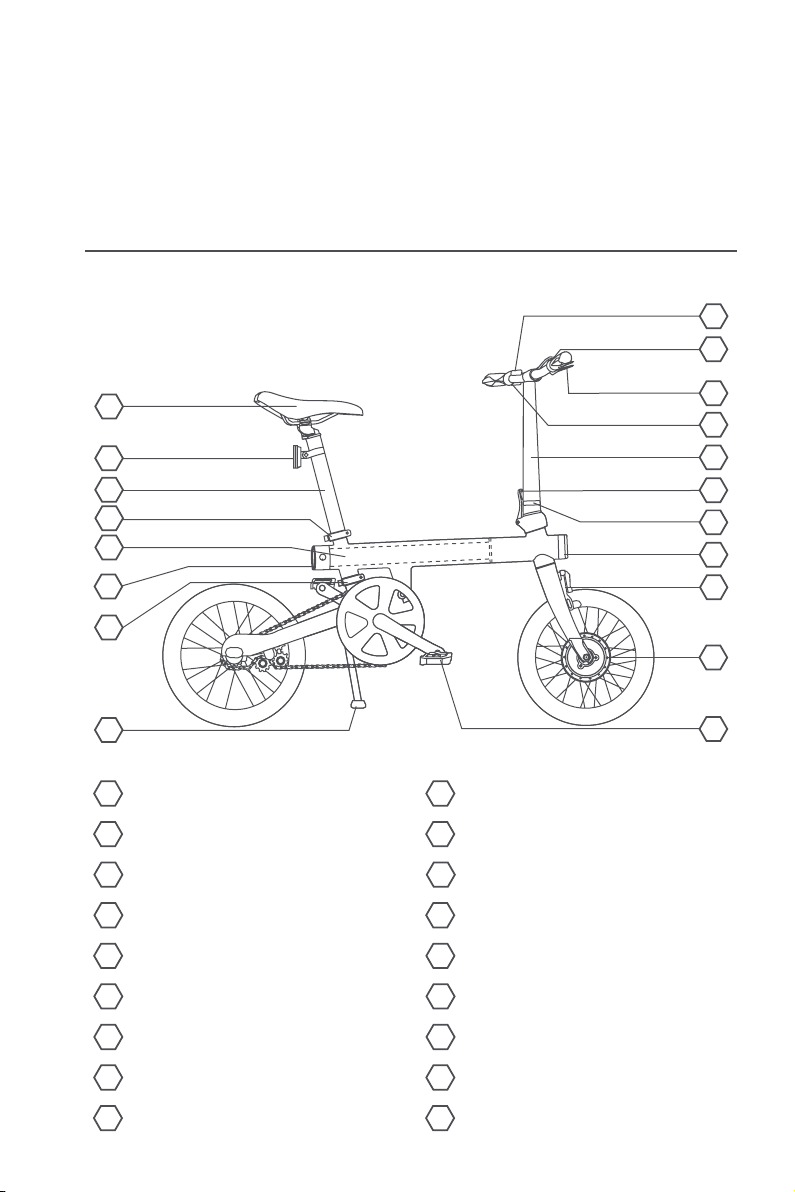
Product Overview
Components
1
12
34
56
78
9 10
11 12
13 14
15
17
16
18
Dashboard Grip Shift
Brake Lever Handle Bar
Handle Post Handle Post Hinge
Clamp Front Light
Front Brake Motor
Pedal Kickstand
Seat Post Clamp Rear Light
Battery Pack Seat Post
Reflector Saddle
WARNING!
Read all safety precautions and instructions, and save them for future reference. Failure to follow any
instructions in the user manual may result in electric shock, fire and/or serious injury.
1
16
17
18
12
13
14
15
13
2
3
4
9
10
11
6
7
5
8
2
Accessories
Quick Start Guide
1
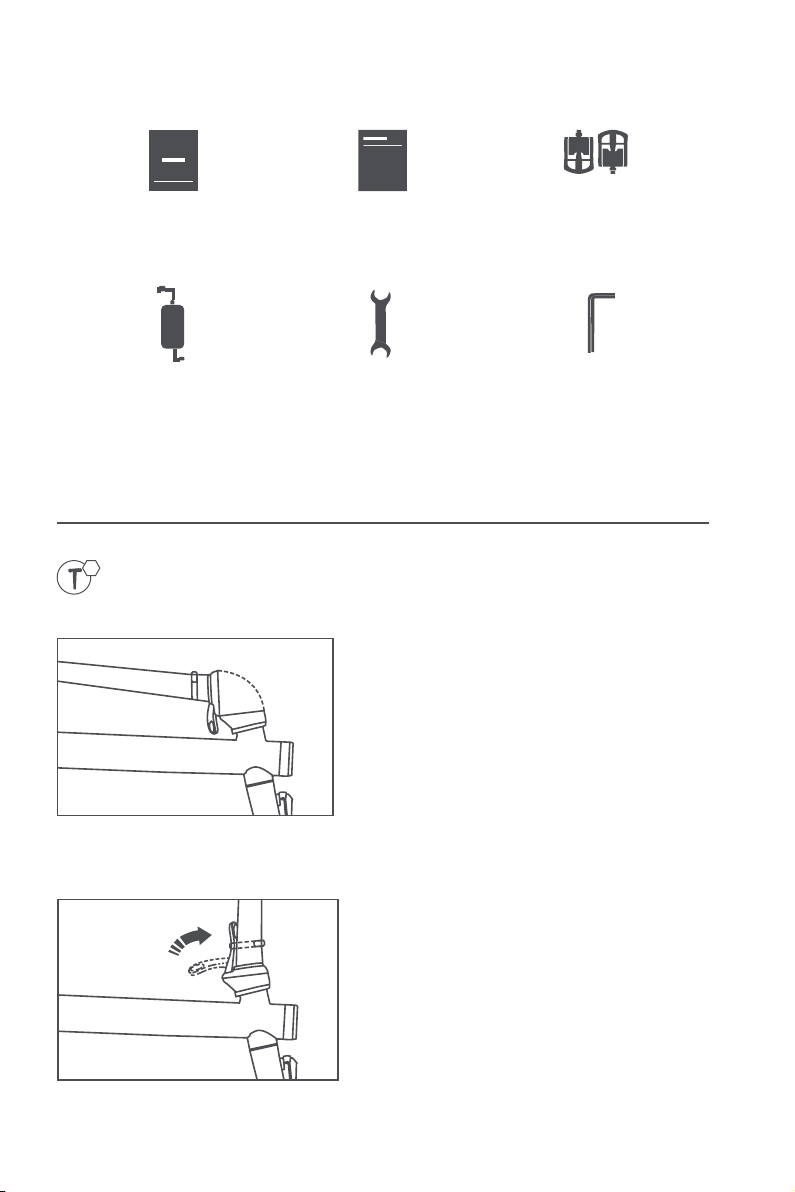
Installing the handle post
1. Erect the handle post
Hold the handle post hinge, then rotate the handle post
to an upright position. Ensure that the handle post is
securely connected with the frame.
2. Install and secure the handle post
Push forward the handle post hinge until it locks tightly.
Rotate the clamp counter-clockwise until it is securely
fastened.
x 1
5 mm Allen
Wrench
x 1
Pedal
x 1
15 mm Open-end
Wrench
x 1
Battery Charger
Warranty Notice
x 1
x 1
User Manual
3
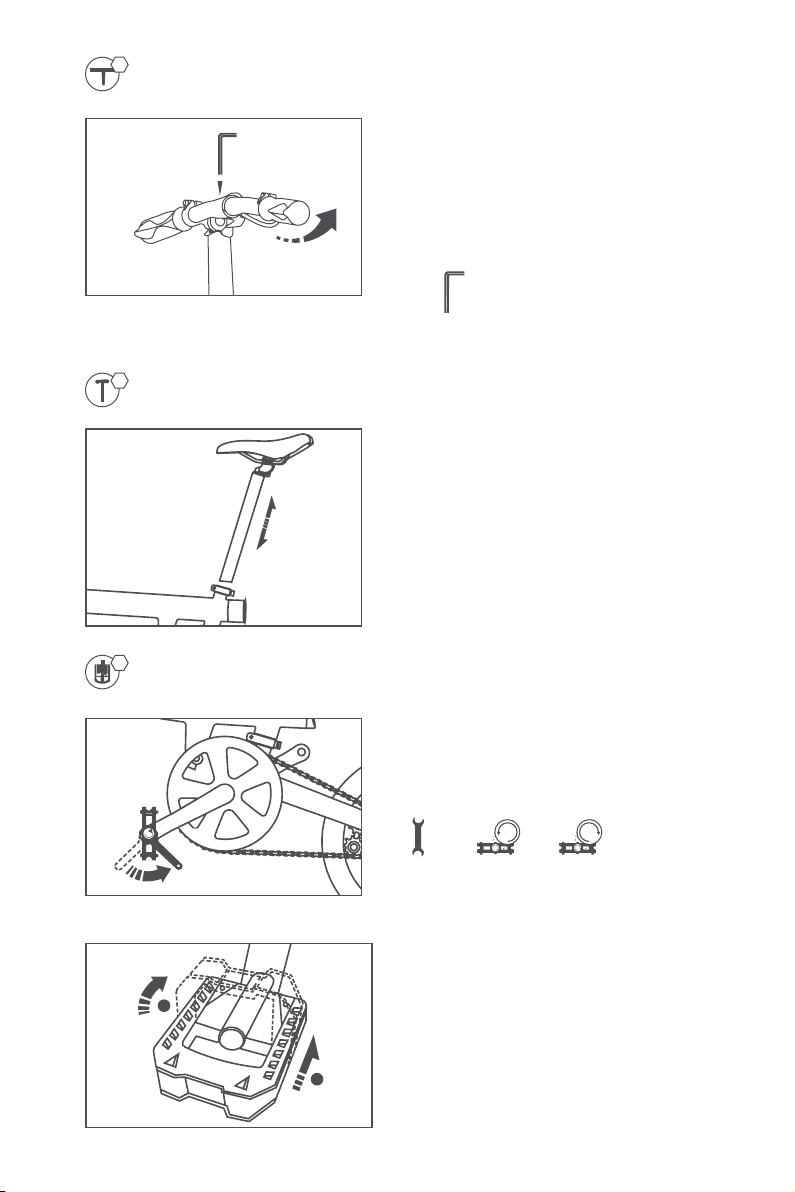
Adjusting the height of the handle bar
2
Use the 5 mm Allen wrench to loosen the two screws
in the handle bar. Adjust the handle bar upward or
downward to the desired position, and then tighten the
screws.
Riders may have different feelings on steering and
braking. Please test the bicycle in a safe environment
before riding it on public roads.
Insert the seat post into the frame, the direction of the
seat should be consistent with the frame, and the height
of the seat post must in between the uppermost and the
lowermost marks.
5 mm
Allen Wrench
Installing and folding pedals
Installing the seat post
L
1. Install pedals
Use the 15 mm open-end wrench to install the pedals. ( Note:
Turn the pedal axle counterclockwise when installing the left
pedal, and the pedal axle clockwise for the right pedal. )
A
B
2. Fold pedals
A. Push the pedals inwards to the bike.
B. Turn the pedals upwards or downwards to fold them.
15 mm Open-end
Wrench
L
L
Left pedal
R
R
Right pedal
4
3

4
Start-up
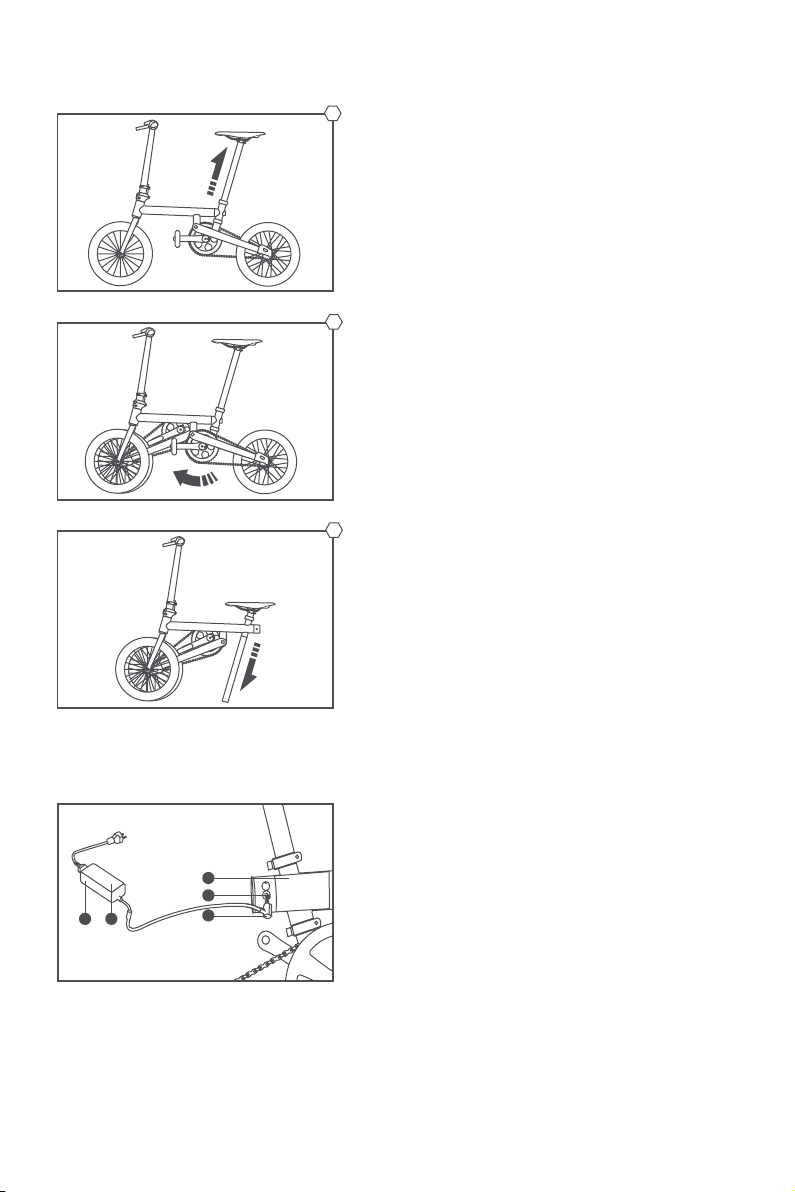
Adjusting the height of the saddle
Loosen the upper and lower seat post clamps to adjust
the seat to the proper height, then securely tighten them
again. When adjusting the seat height, the minimum
insert mark must not be any higher than the upper edge
of the seat post clamp. The seat height and handle
bar should be adjusted before use so as to ensure a
comfortable riding position and reduced fatigue. The
seat height and handle bar height differ from person to
person. At the ideal seat height, the rider should be able
to reliably put one foot down to hold the bicycle upright.
1. Charging
Make sure your bike is fully charged on the first use. Use
the charger included the package to charge your bike. The
indicator is red when charging, and turns into green when
fully charged.
A
2. Turning on
Press and hold the power button (A) at the bottom of the
dashboard for 2 seconds to turn on your bike.
5
Maximum
insertion mark
At the ideal handle bar height, the forearms of riders are nearly level with the handle bars, making the
shoulders and arms relaxed. However, while adjusting the seat height and the handle bar, first make sure
the minimum insert mark must not be any higher than the upper edge of the seat post clamp. Make sure
the seat post clamps are properly tightened after adjusting the seat height. The seat post clamps should
be torqued to more than 7 N ⋅m.
10 30 40 50 60 70 80 90 140 150 19020 180
100 110 120 130 160 170
Body height
Body height
Body height
Body height
Body height
Body height
Body height
Body height
Maximum
insertion mark
Minimum
insertion mark
Power button
195 cm
190 cm
185 cm
180 cm
175 cm
170 cm
165 cm
160 cm

5
Instructions for use
1. Folding and unfolding the handle post
A
B
C
2
1
Step 1. To unfold the handle post, hold the left handle bar
to flip over the handle post. Lift the handle post upward
till the two sides of handle post hinge completely touch
(see fig.1 A).
Step 2. To lock the hinge, hold the lever connected to
the lower part of the hinge, then rotate it upward till the
lever touches the plastic clamp on the bottom of the
handle post (see fig.2 B).
Step 3. To secure the hinge latch, rotate the plastic
clamp on the handle post clockwise till it cannot be
moved anymore. Make sure the hook on plastic clamp
catches the lever completely (see fig.2 C).
3Step 4. For a better packaging, the handle bars are not
firmly locked during shipping. After the handle post hinge
is locked and the latch is secured, adjust the handle bars
to the proper position and lock the 2 bolts on top with
a 5mm Allen Key. The recommended torque is 20-30
Newton Meter (see fig.3).
Step 5. Check to make sure the handle bars are
completely locked.
Step 6. To fold the handle post, rotate the plastic clamp
on the handle post clockwise. Then, rotate the lever
downward until the handle bars touch the front fork.
2. Folding and unfolding the frame
4Loosen the upper and lower seat post clamp. Pull seat
clamp lever counterclockwise (see fig.4).
clamp
handle
post hinge
6
4. Self-discharging precaution
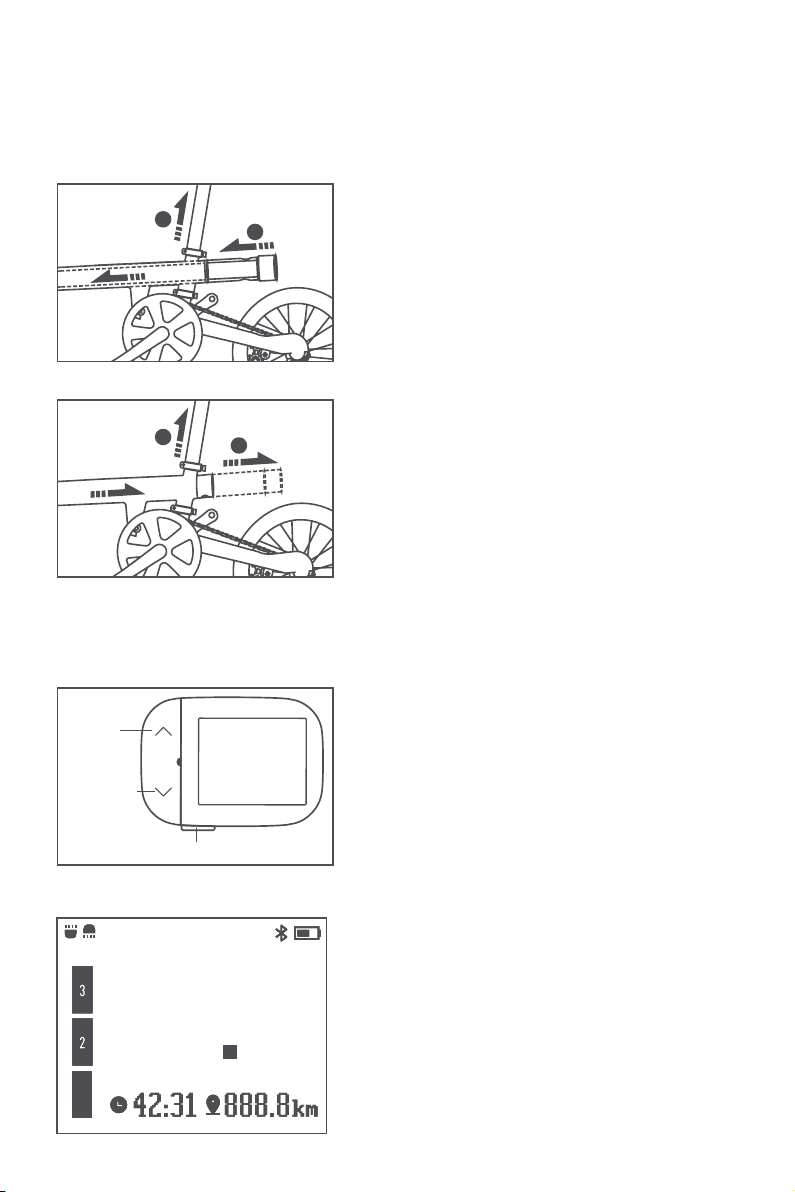
3. Folding the bike
Step 1. Pull the seat post upward till you see the minimum
insertion mark, then lock the upper seat clamp (see fig.5).
Step 2. Hold the seat post, lift the rear wheel off the
ground a bit, then rotate the rear wheel forward (see
fig.6) till the magnet on rear wheel touches the frame on
the front. Avoid hitting the kickstand or pedal.
Step 3. Hold the frame with one hand, then loose the
upper seat post clamp and push the seat all the way
down till the bottom of the seat post touches the
ground (see fig.7).
Step 4. To unfold the bike, reverse these steps.
Note: Make sure the upper and lower seat post clamps
are fastened firmly.
A. Charger
B. Indicator
C. Removable Battery Pack
D. Charging Port
E. Plug
The phenomenon of running out battery is called self-discharge. If battery is discharged too much,
then deep discharging occurs, which may cause permanent damage to the battery pack. So as not to
decrease the service life of the battery pack, it is recommended to charge it every two months when not
in use. When the battery pack is fully charged, the indicator is staying on green. Unplug the charger from
the power supply before each ride.
A B E
D
C
5
6
7

7
Operating Temperature
Battery Charging Specifications
Input Voltage 100 - 240 V~
Max. Output Power 84 W
Max. Output Current 2 A
Charging the battery pack
The removable battery pack can be charged both with or without the bike. Open the rubber cover on the
charging port and the battery pack. Then, plug the connector into the charging port.
Checking the battery level
To check the battery level, press the Power Check Button on the battery pack.
Battery & Indicator status
Press the Power Check Button. You can check the
remaining battery level by the indicators as follows:
• 4 indicators on: approx. 76%-100%
• 3 indicators on: approx. 51%-75%
• 2 indicators on: approx. 26%-50%
• 1 indicator on: approx. 6%-25%
• 1 indicator blinking: about 5%
It takes less than 4 hours to fully charge the battery. When charging the battery pack for the first time,
the charging time should not exceed 6 hours.
If the battery level drops to 30% or below and the bicycle has not been used for 7 days, it
will enter storage mode. To reactive the battery, connect the power adapter to charge it or
press and hold the power check button until the indicator lights up.
Status Minimum ( °C ) Maximum ( °C )
While charging 0 45
During use -15 45
Storage (at least 80% of battery level) -20 35
Power check button
Release button Charging port
8
The bike delivers less pedaling assistance. When the temperature is low ( < 10°C ), the battery dies quickly
and requires longer time to fully charge it. Furthermore, the SoC (state of charge) decreases as the
temperature drops, then the indicators change as well.
5. Installing and uninstalling the battery pack
6. Dashboard functionst
AB
1. Install the battery pack
A. Loosen the upper and lower seat post clamps, and
then pull out the seat post.
B. Insert the battery pack into the frame tube of the
frame until the battery pack is securely fastened.
2. Remove the battery pack
A. Loosen the upper and lower seat post clamps, and
then pull out the seat post.
B. Press the battery pack clip and remove the battery
pack.
AB
Power on/off
Press and hold the power button for 2 seconds. If
the battery is dormant due to low battery, charge the
battery pack for a while before powering on the bike.
Lights
Press and hold the up button to simultaneously turn on
or off the front light and rear light.
Press and hold the down button to simultaneously turn
on or off the front light and rear light.
Assist mode
Press the power button to enable the assist mode. Press
the up/down button on the left side of the dashboard
to switch between the four modes, which are no-assist,
level 1 (low-level assist), level 2 (medium-level assist),
and level 3 (high-level assist).
The mode currently used is displayed in orange.
When the battery level is less than 5%, the assist will
automatically stop.
21 8
1
Up button
Down button
Power button

9
7. Connect with Mi Home/Xiaomi Home App
Troubleshooting
This product works with Mi Home/Xiaomi Home app*.
Control your device with Mi Home/Xiaomi Home app.
Scan the QR code to download and install the app. You
will be directed to the connection setup page if the app
is installed already. Or search "Mi Home/Xiaomi Home" in
the App Store to download and install it.
Open Mi Home/Xiaomi Home app, tap "+" on the upper
right, and then follow prompts to add your device.
* The app is referred to as Xiaomi Home app in Europe
(except for Russia). The name of the app displayed on
your device should be taken as the default.
Note: The version of the app might have been updated,
please follow the instructions based on the current app
version.
Fault
Light is not working
Unable to charge
Pedal cannot be installed
properly
Cannot turned on
Pedal makes a strange
sound
Reduced mileage
No pedal assist
Tire leaks air
Seat post slides down
Display does not function
Unable to remove battery
Solution
Low battery, try to charge it.
Use the original charger.
The pedals are divided into a left and right pedal. The left pedal is
tightened counterclockwise, and the right pedal is tightened clockwise.
Low battery, try to recharge it.
Use a tool to tighten the pedal.
Temperatures below -5°C will greatly affect the battery capacity. Once the temperature
rises, the capacity will return to normal without affecting the battery life.
Battery level equals to or is less than 5%, no assistance.
Tires and 16 inch bicycle parts can be repaired nearby.
Manually tighten the upper and lower seat post clamp screws before
tightening them by a wrench.
Low battery, try to charge it.
After removing the seat post, press and hold the button above
the battery to remove it.

10
Specifications
Name Mi Smart Electric Folding Bike
Front Fork Integrally forged aluminum alloy front fork
Maximum Continuous Rated Power 250 W
Rated Capacity 5800 mAh/208.8 Wh
Net Weight Approx. 15 kg
Wheel Size 16 inches
Cut Off Speed 25 km/h
Screen TFT screen, 1.77'', 160 x 128 pixels
European Standard EN15194: 2017
Crankset 52T steel blade, 170 mm aluminum alloy crank
Rated Output Torque 7.3 N.m
Limited Charge Voltage 42 V
Wheelbase 908 mm
Over-current Protection 15 A
Model XMDZLZXC01QJ
Seat Post Aluminum 33.9 x 680 mm
Rated Rotational Speed 330 r/min
Battery Service Life Approx. 45 km
Weight Capacity Incl. Cyclist 100 kg
Braking System Front wheel: rim brake; rear wheel: Shimano IM31 roller brake
Under-voltage Protection 30 V
Wireless Connectivity Working Frequency: 2402 – 2480 MHz, maximum power 0.1 dBm
Dimensions 1290 x 540 x 1010 mm
Hubs Built-in Shimano 3-speed hub
Rated lnput 36 V 2 A
Charging Time Approx. less than 4 hours
Frame Aluminum alloy folding frame
Motor Type Front hub
Battery Type 18650 lithium-ion battery pack
For further information, please go to www.mi.com
General range: measured when there is no wind and at 25°C, the bike’s fully charged to ride at a constant
speed of 12 km/h on a flat surface with a load of 75 kg.

11
Safety Precautions
Battery Charger
Model
Input
Output
Manufactured by
Address
LI-0844200200NA
100-240 V~, 2.5 A (Max.) 50/60 Hz
42.0 V 2.0 A, 84 W
Shenzhen AMC Technology Co., Ltd.
Building 11, Dragon River Industrial Zone, Yeung Tin Ave, Lung Guang,
Shenzhen, China.
Battery and charging
• The operating temperature for charging is between 0°C to 45°C and for discharging is between -20°C
to 60°C.
• The charger is designed for indoor use only. Do not place the battery in any liquid (acidic or alkaline).
Keep it dry and never expose it to rain and high temperature environment.
• Connecting reversely the polarity of battery is strictly prohibited.
• Do not incinerate, disassemble, reassemble, short circuit batteries or destroy the battery.
• Charge with original or authorized charger. The maximum charging time is 6 hours and the charging
current should be less than 2A. Misuse other types of batteries may burst causing personal injury
and damage.
• Keep the battery in cool and dry place, and charge it for 2 hours every 2 months for a better
maintenance.
• Always follow the instructions in the user manual for charging the battery.
• Do no use the unqualified charger that is not applicable to the specified type and voltage to charge
the battery. The charger can charge Lithium-ion battery (36 Vdc, max. capacitance: 5800 mAh (single
cell), comply with IEC 62133).
• Do not used for non-rechargeable batteries, as they can overheat and break.
• The chargers are not intended to charge automobile batteries.
• Prevent foreign objects from entering the charger during its use and storage. Prevent water and
other liquid from getting in, otherwise a short circuit may occur. Keep the battery well ventilated
when charging. Do not charge the battery in an enclosed area, in high temperature environments,
or under direct sunlight. Prevent flames and sparks, explosive gases. Store the charger in a cool and
dry place when not in use.
• When charging, insert the battery first, and then connect the charger to the power supply. When the
battery is fully charged, cut off the power supply first, and then remove the battery connector.
• When the indicator turns green, cut off the power supply in time. Do not connect the charger to an
AC power without a load for a long time.
• If there is an odor, the indicator displays an error, or the charger shell overheats during charging,
stop charging immediately or go to the official dealer for repairing, or contact the after-sales service
department for help.
• If possible, do not carry the charger with the bike. If required, you can put the charger into a toolbox
with proper shock absorption, and then carry the toolbox with the bike.
• Do not disassemble or replace any components in the charger without authorization. If the supply
cord is damaged, it must be replaced by the manufacturer, its service agent or similarly qualified
persons in order to avoid a hazard.

• Cycling involves risk of personal injury and damage of the bike, you should assume the responsibility
for that risk. For your safety, please follow the cycling rules with properly using the bike, as well as
regularly carry out the maintenance, which can reduce the risk of injury. This user manual contains
warnings and precautions concerning the consequences of failure to maintain or inspect your bike,
and of failure to follow safe cycling practices.
As with all mechanical components, electric bicycles are subject to wear and high stress. Different
materials and components may react to wear or stress fatigue in different ways. If a component's
service life has passed, it may suddenly fail and cause personal injury. Any cracks, scratches, or
color change in the high-stress areas indicate that the component's service life has passed and
should be replaced. If there was any impact on the bicycle due to a collision, it is recommended to
immediately go to an official dealer for inspection and maintenance. The user may not be able to
see the damage caused by impact on the components made of composite materials, which may
result in a second accident and personal injury.
1. Check the front and rear brakes before use, and adjust them if necessary. The front brake is
controlled by the left brake lever and the rear brake is controlled by the right brake lever. After
properly adjusting the brakes, the bicycle should brake reliably when pulling both the left and the
right brake lever halfway. When the brake pads are worn excessively, they must be replaced in time.
2. Check whether the chain is properly lubricated before using the bicycle. Turn the pedal by hand
and check whether the chain links move smoothly and are corrosion-free. If the chain is corrosive
or frozen, add an appropriate amount of lubricant, or replace the chain if necessary.
3. Before riding the bicycle, check the tire pressure, the handle bar movement, the rotation of the
front and rear wheel, the electrical circuit, the battery level and the working condition of the motor,
as well as the lights, bell, and fasteners.
(1) Low tire pressure will increase the friction between the tire and the road surface. This will
increase the tire's wear and thus reduce its total mileage. It will also negatively affect the bicycle's
handling and steering, and thereby reducing comfort and safety. If the tire pressure is too low,
immediately inflate the tires. The recommended tire pressure is 35–45 PSI.
(2) If the handle bar is stuck or does not turn smoothly, it should be adjusted or lubricated in time.
Use calcium-based or lithium-based grease as a lubricant. First loosen the front fork's locknut, then
turn the front fork's upper block. Once it is adjusted as preferred, tighten the front fork’s locknut.
(3) If the front and rear wheel do not rotate smoothly due to friction, the bicycle's power
consumption will increase and its mileage will reduce. To prevent failure, make sure the bicycle
is lubricated and maintained in a timely manner. Use calcium-based or lithium-based grease as a
lubricant. If the hub fails, replace the bearings or the complete hub. If the motor fails, it must be
repaired by an authorized dealer.
(4) Power on the bicycle when checking the electrical circuit for continuity. Check whether all
connectors are firmly plugged in and all fuses are working normally. In particular, check whether the
12
Riding
• Connect the charger directly to a power source. Never use extension cords.
• Avoid reverse charging.
• If the performance of the batteries decrease substantially, it is time to replace the batteries.
• Keep electrical appliances out of reach from Children or infirm persons. Do not let them use the
appliances without supervision.
• This appliance can be used by children aged from 8 years and above and persons with reduced
physical, sensory or mental capabilities or lack of experience and knowledge if they have been given
supervision or instruction concerning use of the appliance in a safe way and understand the hazards
involved.
• These instructions are also available in an alternative format:
http://www.amc.tech/download/

13
output of the battery terminals is optimal and whether the wiring harness is properly connected to
the battery. Solve any issues in a timely manner.
(5) Before riding, check whether the battery level is sufficient for the expected mileage. If the battery
level is insufficient, please supplement by pedaling the bicycle so as to avoid battery undervoltage.
(6) Before riding, check whether the motor works properly. Start the motor and adjust its speed to
visually inspect and listen to the motor. If there is any unusual behavior, it should be repaired in a
timely manner.
(7) Before riding, check whether the lights and bell are working properly, especially when riding at
night. The front light is supposed to be bright and its light beam should fall in a range of 5–10 meters
in front of the bicycle. The bell is supposed to ring loudly, and the dashboard should work normally.
(8) Before riding, check whether all parts are properly fastened. For example, the handle bar, handle
post, saddle, seat post, front wheel, rear wheel, crank axle, locknut, and pedals. If any part is loose or
lost, it should be tightened or replaced immediately. The recommended torque specifications are:
Handle post 18–20 N·m, saddle18–25 N·m, Handle bar 6–8 N·m, Front wheel 50–60 N·m, Rear wheel
35–45 N·m, Crank axle nut 35–50 N·m, Pedals 35–45 N·m.
• As with other sports, bicycling involves risk of personal injury and damage of the bike. By choosing
to ride a bike, you assume the responsibility for that risk, so you need to know and to practice
the rules of safe and responsible riding and of proper use and maintenance. Proper use and
maintenance of your bike reduces risk of injury.
• The combination of the ⚠
️
safety alert symbol and the word WARNING indicates a potentially
hazardous situation which, if not avoided, could result in serious injury or death.
• The combination of the ⚠safety alert symbol and the word CAUTION indicates a potentially
hazardous situation which, if not avoided, may result in minor or moderate injury, or is an alert
against unsafe practices.
• The word CAUTION used without the safety alert symbol indicates a situation which, if not
avoided, could result in serious damage to the bike or the voiding of your warranty.
• Many of the warnings and precautions say “you may lose control and fall”. Since any fall can result in
serious injury or even death, these warning of possible injury or death will not always be mentioned.
• Please read the warning message on the handle bar: Before each ride, make sure the handle post
hinge is properly tightened and safely secured.
• Since it is not possible to predict every situation or condition that may occur during cycling, this
user manual does not represent a safe use of the bike in all situations. There are risks associated
with the use of any bike which cannot be predicted or avoided, and which are the sole responsibility
of the rider.
• Additional safety, performance and service information for specific components such as
suspension or pedals on your bike, or for accessories such as helmets or lights that you purchase,
may also be available. Make sure you are informed all the details of the manufacturers that was
included with your bike or accessories.
• If you have any questions, consult with the bike shop or the manufacturer for the detailed
information.
• You may ride the bike only after you have carefully read this manual and are familiar with the
product performance.
• Untrained individual is not allowed to use this product.
• Before riding, check the voltage meter cable, buttons, and data display.
• Before riding, check the tire pressure (recommended: 35 - 45 PSI).
• Wear a helmet when riding and comply with traffic regulations.
• This bicycle is suitable for riding on paved urban roads. It is not recommended to ride it on other
terrains to avoid danger.

• It is recommended to use warm water and a sponge to clean the bicycle. When using special
cleaning products, please pay attention to the product's instructions. Do not use acid, lubricating
oil, high-temperature grease, brake cleaner, or other harsh cleaning products to clean the bicycle.
• Do not clean the bicycle with high water pressure so as to avoid short-circuiting the electrical system.
• Recommended maintenance interval: at least annually after the first 100 miles. Please check the
integrity and condition of the tires and rims, adjust the brake lines and check the chain drive. Please
carefully check whether the following parts are torqued properly: handle post, saddle, seat post,
front wheel, rear wheel, crank axle nut, pedals.
After 200 to 400 miles, please check the brake pads, chain, sprockets, and rims for wear an tear.
Furthermore, make sure that any bolted parts are properly tightened.
After every 700 miles, carry out a major maintenance to repair, disassemble, inspect, clean, and
apply lubricating oil. It is recommended to replace consumable parts such as hubs, pedals, brakes,
and gears every 700 miles.
• When the bicycle comes into contact with water, especially the meltwater with salt in (In winter,
many cities spread road with salt after snowing to prevent roads from freezing over), clean the
bicycle in a timely manner so as to avoid corrosion of metal parts and aging of painted parts. After
the bicycle is used for a period of time, it should be inspected and adjusted as per the instructions
in the user manual. Tightening and lubrication are essential. Check whether any parts are loose,
and make sure the chain drive moves smoothly. After lubricating the chain, wipe off any excess
lubricant. Add a small amount of lubricating oil on the flywheel. The tires must be inflated to the
correct tire pressure so as not to affect the riding comfort and safety as well as the service life of
the tires. The brakes must be inspected frequently to guarantee the rider's safety. If any issues
occur, immediately carry out the required adjustment or repair.
• After riding, store the bike in a place away from direct sunlight and rain.
• Regularly check the belt. If it is worn, replace the belt.
• Regularly check the screws and connections to ensure all parts are securely installed.
• Recommended torque (Unit: kgf·cm): 60 - 80 for handle bar screws; 175 - 200 for handle post screws;
175 - 250 for saddle screws; 320 - 450 for wheel nuts.
• Typical tension on a chain is roughly 2 cm, when pressing on the chain from the top and from the
bottom. If the movement exceeds 2 cm, adjust the tension or contact the dealer.
• When the motor is not running, try to clean the dust and grease on the surface. Keep the motor
clean and prevent oil and water from entering in it. Do not spray water directly on the motor.
• Check the completeness of the motor leading-out. If the motor overheats, emits an odor, smokes,
makes strange sound, or has any fault, stop using immediately and contact the dealer. Do not
attempt to disassemble the motor by yourself.
• Do not attempt to alter the voltage meter by yourself.
• Do not replace components with non-genuine parts, especially safety-critical components of the
brake system.
• The rims are consumable parts. If a rim is deformed, broken, or damaged, it should be replaced
immediately. After the rim has been used for a certain period of time, the braking surface of the
rims will gradually wear. Once the surface is flush with the rim wear indicator (a black groove ), the
rim should be replaced immediately. The function of the spokes is to connect the hub to the rim
and maintain a certain tension. The spoke tension affects the bicycle's capability to move forward.
Please regularly inspect the spokes.
• Users can prepare consumable spare parts such as tubes, tires, and brake pads. However, due to
the complexity of the electrical circuit, it is not recommended to replace any of its parts by yourself.
• It is not recommended to install non-genuine accessories such as child seats and luggage racks.
This bicycle does not have a trailer connection. Please do not install an external trailer. Damage
to the bicycle or personal injuries caused by installed non-genuine accessories is the sole
14
Storage and maintenance

15
Motor
The following statement:
Brake
• When riding down a slope or on a non-brick pavement, limit the speed to within 15 km/h and do not
use enhanced mode.
• When using the motor, avoid collisions and keep the shaft well lubricated.
• All circuits and connections of the motor are designed and manufactured by professionals. Do not
try to alter them.
• When riding in rain, avoid the places where the motor shaft may immerse in water.
• Before riding, check the brake.
• When there is a need of braking, operate the rear brake first.
• Regularly check the wear of the brake pad. Replace the pad when the wear on the pad exceeds one
third of it.
The surface of the bicycle does not generate high temperatures and has no effect
on the human body.
We hereby state that the A-weighted sound pressure level at the rider's ear is less than 70 dB (A).
Certification
EU Representative : Xiaoma Vacation GmbH
Address: Grünstr. 5,40212 Düsseldorf Germany
Hereby, iRiding (Xiamen) Technology Co., Ltd., declares that the radio equipment type XMDZLZXC01QJ
is in compliance with Directive 2014/53/EU. The full text of the EU declaration of conformity is available
at the following internet address:
http://www.mi.com/global/service/support/declaration.html
Jintong Weng, Quality Engineer, Mar.2019, Xiamen China
responsibility of the user.
• Any replacement, addition or removal of accessories that impact the performance of the bicycle
is deemed as a modification, including but not limited to replacement of the motor, installation of
external batteries, hacking into on-board computer or modification of data. Modifications to the
bicycle must only be made in accordance with local traffic regulations. Please note that you are no
longer entitled to free after-sales service, if any modifications are made to the bicycle.

16
All products bearing this symbol are waste electrical and electronic equipment (WEEE as in directive
2012/19/EU) which should not be mixed with unsorted household waste. Instead, you should protect
human health and the environment by handing over your waste equipment to a designated collection
point for the recycling of waste electrical and electronic equipment, appointed by the government or
local authorities. Correct disposal and recycling will help prevent potential negative consequences to
the environment and human health. Please contact the installer or local authorities for more information
about the location as well as terms and conditions of such collection points.
This product is RoHS-certified.
Manufactured for: Xiaomi Communications Co., Ltd.
Manufactured by: Iriding (Xiamen) Technology Co., Ltd.
(a Mi Ecosystem company)
Address: Unit 01-07, No.97-99 8/F, Anling 2rd, Huli District, Xiamen, Fujian, China
For further information, please go to www.mi.com
The Bluetooth® word mark and logos are registered trademarks owned by Bluetooth SIG, Inc. and any
use of such marks by Xiaomi Inc. is under license. Other trademarks and trade names are those of their
respective owners.
Original instructions

17
¡ADVERTENCIA!
Lea todas las instrucciones de seguridad e instrucciones, y guárdelas para futuras consultas. No seguir
cualquiera de las instrucciones en el manual de usuario puede resultar en electrocución, incendio y/o
lesiones graves.
Descripción del producto
Componentes
1
16
17
18
12
13
14
15
13
2
3
4
9
10
11
6
7
5
8
12
34
56
78
9 10
11 12
13 14
15
17
16
18
Panel Mango de Cambio
Palanca de freno Manillar
Telescopio Cepo del telescopio
Abrazadera Luz frontal
Freno delantero Motor
Pedal Soporte
Cepo de la tija Luz trasera
Pack de batería Tija
Reflector Sillín

18
Accesorios
Manual de inicio rápido
1
Instalación del telescopio
1. Yerga el telescopio
Sujete el cepo del telescopio, después rótelo hasta una
posición vertical. Asegúrese de que el telescopio esté
firmemente unido al cuadro.
2. Coloque y fije el telescopio
Presione el cepo del telescopio hacia delante hasta
que se sujete con firmeza. Rote el cepo en sentido
antihorario hasta que esté firmemente fijado.
x 1
Llave Allen de
5 mm
x 1
Pedal
x 1
Llave de boca de
15mm
x 1
Cargador de
la batería
Aviso de garantía
x 1
x 1
Manual de usuario
Table of contents
Languages:
Other Mi Scooter manuals


