Ikan MB-2Q1Z User manual

www.ikancorp.com 713.272.8822
CHECKED BY
QUICKSTART GUIDE
MB-2Q1Z
What’s Included
2 x Mylo Mini Quarter x 1 Light Fixture
1 x iLED6 Zoom Light Fixture
1 x Dual Charger
1 x IBG-312-3L
3 x Barn Doors
3 x CP Light Stands
3 x Power Supplies with Cable
5 x Sony “L” Style Batteries
Bi-Color 3-Point LED Light Kit

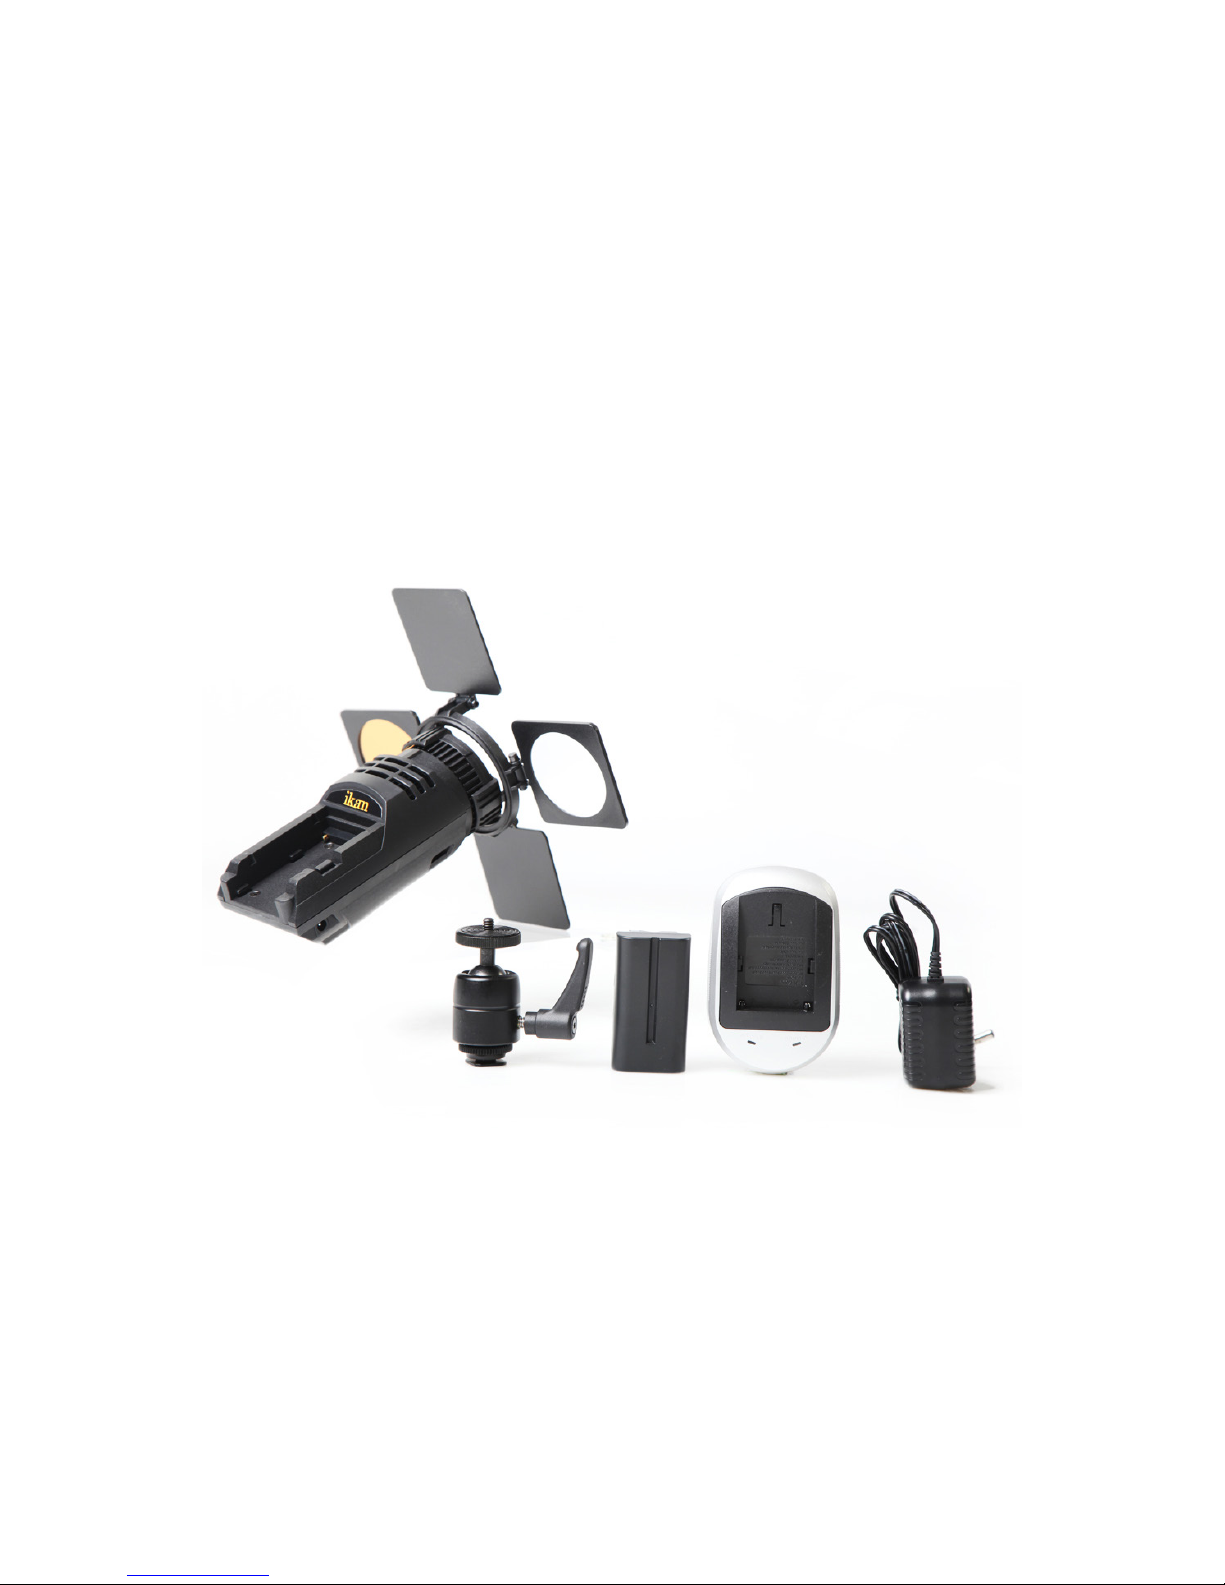
Getting to know your Mylo Mini (MB4)
Thank you for choosing Ikan Mylo Mini Bi-Color LED Light. This product will provide you with bright, portable illumination. It can
be used in a variety of different scenarios. It features ultra-bright 420 LED bulbs with 45° lens. It has 3200K-5600K variable
color temperature. With its removable barn doors and neutral diffusion filter, the Ikan Mylo Mini Light is the best choice for any
working professional.
This fixture has been designed to perform reliably for years when the guidelines in this booklet are followed. Please read and
understand the instructions in this manual carefully and throughly before attempting to operate this unit. These instructions
contain important information regarding safety during use and maintenance.
Every fixture has been throughly tested. Carefully check the shipping carton for damage that may have occurred during shipping.
If the carton appears to be damaged, carefully inspect your unit for damage and be sure all accessories necessary to operate
the unit have arrived intact. In the event damage has been found or parts are missing, please contact our customer support
team for further instructions. Please do not return this unit to your dealer without first contacting customer support at the
number listed below. Please do not discard the shipping carton in the trash. Please recycle whenever possible.
Safety Warnings
To guarantee a smooth operation, it is important to follow the guidelines in this manual. The manufacturer of this device will not
accept responsibility for damages resulting from the misuse of this fixture due to the disregard of the information printed in this
manual.
DO NOT try and disassemble or repair the MB4. The fixture must be returned to Ikan for repair or replacement.
DO NOT expose the water or rain; electric shock may occur.
DO NOT operate near flammable gas or vapors.
DO NOT use if the fixture emits smoke or flames. The power supply must be disconnected immediately to prevent bodily injury.
Handle Unit with care. Use only the recommended batteries.
General Guidelines
Mounting the Mylo Mini to a Camera
The Mylo Mini can be mounted to a camera by attaching the shoe mount supplied with the fixture to any camera that has a cold
shoe adapter. (Hot shoe adapters can be used with caution).
The Mylo Mini has a ¼-20" receiver in the bottom of the fixture that can receive the ¼-20" thread of the shoe mount. After
screwing in the mount and tightening the tension disk, the light is now ready to be attached to the camera. Loosening the
tension disk above the shoe adapter, you can slide the shoe mount into the cold/hot shoe of the camera and tighten down the
tension disk.
Mounting the Mylo Mini to a Stand
The Mylo mini can be attached to a stand as well buy using the supplied shoe mount that come with the fixture. The stands that
work most effectively with the Mylo Mini have a ¼-20 or 3/8-15 thread on the top of them. The shoe mount must be modified
to accept the stand by removing the bottom of the shoe and tightening disk from the mount. This will have a ¼-20 insert in
the mount and that can be screwed down on the top of the stand. (Removing the ¼-20 insert allow for you to use the shoe
mount with a 3/8-15 stand instead) The Mylo Mini can now be attached to the top of the shoe mount on the stand. This allow
movement of 360 degrees for placement of the fixture in any position that is desired.

Powering the LEDs
The Mylo Mini can be powered by AC power supply of from the supplied Sony “L” Style Batteries. The AC power supply has a
4ft length and allows you to plug the lights into any standard 120-240V outlet. The Mylo Mini can be powered by the supplied
Sony “L” Style batteries Either one or two batteries can be used to power up the fixture.
Adjusting the Color & Brightness of the Light
The Mylo Mini LED Light is controlled by the large yellow knob on the rear of the fixture. The knob was designed with the idea
that it could be reached and adjusted when the light is up on a stand. The knob has two push settings.
1. The default setting is the brightness, from 10%-100% brightness.
2. By pressing in on the knob the color temperature can be adjusted. (Bi-Color Lights)
Fixture Overview: (Front)
Fixture Overview: (Back)

General Information:
Thank you for choosing the Ikan iLED6 Zoom LED Light. . This Product will provide you with bright, portable illumination. It can
be used in a variety of different scenarios. It features ultra-bright 10W LED bulb with a multi-degree beam angle adjuster. It has
a CTO (color temperature orange) gel and Neutral Diffusion gel to go along with its removable barn doors. The iLED6 LED Light
is the best choice for any working professional.
This fixture has been designed to perform reliably for years when the guidelines in this booklet are followed. Please read and
understand the instructions in this manual carefully and thoroughly before attempting to operate this unit. These instructions
contain important information regarding safety during use and maintenance.
Every fixture has been thoroughly tested. Carefully check the shipping carton for damage that may have occurred during
shipping. If the carton appears to be damaged, carefully inspect your unit for damage and be sure all accessories necessary
to operate the unit have arrived intact. In the event damage has been found or parts are missing, please contact our customer
support team for further instructions. Please do not return this unit to your dealer without first contacting customer support at
the number listed below. Please do not discard the shipping carton in the trash. Please recycle whenever possible.
Safety Warnings:
To guarantee a smooth operation, it is important to follow the guidelines in this manual. The manufacturer of this device will not
accept responsibility for damages resulting from the misuse of this fixture due to the disregard of the information printed in this
manual.
DO NOT try and disassemble or repair the iLED6. The fixture must be returned to Ikan for repair or replacement.
DO NOT expose to water or rain; electric shock may occur.
DO NOT use if the fixture emits smoke or flames. The power supply must be disconnected immediately to prevent bodily injury.
HANDLE UNIT WITH CARE. USE ONLY THE RECOMMENDED BATTERIES.
General Guidelines:
Mounting the iLED6 to a Camera
The iLED6 Zoom LED Light can be mounted to a camera by attaching the shoe mount supplied with the fixture to any camera
that has a cold shoe adapter. (Hot shoe adapters can be used also but with care.
The Mylo has a ¼-20 receiver in the bottom of the fixture that can receive the ¼-20 thread of the shoe mount. After screwing
in the mount and tightening the tension disk the light is now ready to be attached to the camera. Loosening the tension disk
above the shoe adaptor you can slide the shoe mount into the cold/hot shoe of the camera and tighten down the tension disk.
Mounting the iLED6 to a Stand
The iLED6 can be attached to a stand as well buy using the supplied shoe mount that comes with the fixture. The stands that
work most effectively with the iLED6 have a ¼-20 or 3/8-16 thread on the top of them. The shoe mount must be modified
to accept the stand by removing the bottom of the shoe and tightening disk from the mount. This will have a ¼-20 insert in
the mount and that can be screwed down on the top of the stand. (Removing the ¼-20 insert allow for you to use the shoe

mount with a 3/8-16 stand instead) The Mylo Mini can now be attached to the top of the shoe mount on the stand. This allow
movement of 360 degrees for placement of the fixture in any position that is desired.
Powering the LEDs
The iLED6 can be powered by AC power supply or from the supplied Sony “L” style battery.
The AC power supply has a 4ft length and allows you to plug the lights up into any standard 120-240v outlet. The iLED6 can
be powered by the supplied Sony “L” style battery.
Adjusting the Brightness of the Light
The iLED6 Zoom LED Light is controlled by the knob on the rear of the fixture. The Knob was designed with the idea that it
could be reached and adjusted when the light is up on a stand. The knob turns the fixture on as well as controls the brightness.
1. The default setting starts at 0%-100% brightness.
iLED Fixture

Optional Accessories
Some other products that work well with the Ikan LED Lights available from Ikan include:
CV600
HD-STND
ROLLR-STND10
SW-04
KCP-703
CV600
Heavy Duty Light Stand
2 Stage Roller Stand 10 ft 6 in
Safety Wire
Stage Clamp w/ 16mm Stud
Specifications
Mylo Mini (MB4) Fixture Specifications
Beam Angle 50°
Build Material Heavy Duty Plastic Resin
Cooling System Passive Cooling
Dimming Knob Control
Fixture Size 8 x 5 x 2 in.
Fixture Weight 1 lbs
Head Type Bi-Color 3200k-5600K
Lens 45°
Light Source 420 0.06 watt LEDs
Power Supply Input: 100-240 VAC
Output: 12VDC
Rating 12.6W; 7.4-14.8VDC
iLED6 Specifications
Beam Angle Adjustable Degrees
Build Material Molded Heavy Duty Plastic
Color Temperature Daylight
Control Local Knob Controls
Cooling System Passive Heat Sink
Dimming 10-100%
Fixture Size 6.75 x 2.25 x 2.75 in.
Fixture Weight 11 oz
Focusing Yes
Head Type Daylight
Lens 30-60°
Light Source 1x 80 Watt LED 5600K
Mount Ball Mount
Power Consumption 6W
Power Supply 12V @ 2 Amp
Rating 120V 60Hz

Learn More
More dynamic information at official website: www.ikancorp.com
Support
CONDITIONS OF WARRANTY SERVICE
• Free service for one year from the day of purchase if the problem is caused by manufacturing errors.
• The components and maintenance service fee will be charged if the warranty period is expired.
Free Service will not be Provided in the Following Situations:(*Even if the product is still within the warranty period.)
• Damage caused by abuse or misuse, dismantling, or changes to the product not made by the company.
• Damage caused by natural disaster, abnormal voltage, and environmental factors, etc.
©2017 ikan Corporation. All rights reserved
Ikan: and all affiliated companies hereby disclaim any and all liabilities for property, equipment, building, and
electrical damages, injuries to any persons, and direct or indirect economic loss associated with the use or
reliance of any information contained within this document, and/or as a result of the improper, unsafe, insuffi-
cient and negligent assembly, installation, rigging, and operation of this product.
Table of contents
Other Ikan Lighting Equipment manuals

Ikan
Ikan LLAN-19 User manual

Ikan
Ikan Stryder User manual

Ikan
Ikan Lightstar LSC-008 User manual

Ikan
Ikan WS-F100 User manual

Ikan
Ikan S series User manual

Ikan
Ikan LPAC-002 User manual

Ikan
Ikan LHS-001 User manual

Ikan
Ikan IB 1000 User manual

Ikan
Ikan Lyra Bi-Color LBX20 User manual

Ikan
Ikan RB5-5PT-KIT User manual

Ikan
Ikan LB10-3PT-KIT User manual

Ikan
Ikan CB8 User manual

Ikan
Ikan RB5-2PT-KIT User manual

Ikan
Ikan IFB576 User manual

Ikan
Ikan Stryder SW-IP100 User manual

Ikan
Ikan CB6 User manual

Ikan
Ikan iLED312-v2 User manual

Ikan
Ikan Mylo Mini User manual

Ikan
Ikan LEDLITE-300-DMX User manual

Ikan
Ikan WS-F100A User manual