IKEA Livsgnista User manual

LIVSGNISTA
GB
DE
TR
DE
AT


ENGLISH 4
DEUTSCH 19
TÜRKÇE 35
DE
AT
Language, Sprache, Dil
Country, Land, Ülke

ENGLISH 4
Your safety and the safety of
others are very important.
This manual and the appliance
itself provide important safety
messages, to be read and
observed at all times.
This is the safety alert
symbol, pertaining to safety,
which alerts users to potential
hazards to themselves and
others.
All safety messages will follow
the safety alert symbol and
either the terms:
DANGER Indicates a
hazardous situation which, if
not avoided, will cause serious
injury.
WARNING Indicates a
hazardous situation which, if
not avoided, could cause serious
injury.
All Safety messages will tell you
what the potential hazard is, tell
you how to reduce the chance of
injury, and tell you what
can happen if the instructions are
not followed.
The appliance must be
disconnected from the power
supply before carrying out any
installation work.
Installation and maintenance
must be carried out by a
qualied technician, in
compliance with the
manufacturer’s instructions and
local safety regulations to the
relevant gas standard. Only use
original spare parts. Do not
repair or replace any part of the
appliance unless specically
stated in the user manual.
WARNING If the information
in this manual is not followed
exactly, a re or explosion may
result causing property damage
or injury.
- Do not store or use gasoline or
other ammable vapors and
liquids in the vicinity of this
appliance.
What to do if you smell gas:
- Do not try to light any
appliance.
- Do not touch any electrical
switch.
- Do not use any phone in your
building.
- Immediately call your gas
Safety Information 4
Product description 7
Daily use 7
Helpful hints and tips 8
Maintenance and cleaning 8
What to do if ... 9
Injector table 10
Technical data 11
Installation 11
Environmental concerns 16
IKEA GUARANTEE 17
Safety Information
Table of contents

ENGLISH 5
supplier from a neighbor’s
phone. Follow the gas
supplier’s instructions.
- If you cannot reach your
gas supplier, call the re
department.
- Installation and service must
be performed by a qualied
installer, service agency or the
gas supplier.
- Use appliance in well
ventilated rooms only.
- The electrical and gas
connections must comply with
local regulations.
- When the hob is installed,
provide a multi-pole circuit
breaker with a contact
separation of at least 3
mm, that provides full
disconnection.
- Regulations require that the
appliance is grounded.
- The power cable must be long
enough for connecting the
appliance, once tted in its
housing, to the power supply
- Use only exible or rigid metal
hose for gas connection.
- If necessary, the electrical
power cable must be
replaced exclusively with a
power cable having identical
characteristics to the original
supplied by manufacturer
(type H05V2V2-F 90°C or
H05RR-F). This operation must
be performed by a qualied
electrician.
- The manufacturer cannot
be held responsible for any
injury to persons or animals or
damage to property arising
from failure to comply with
these requirements.
- Do not use multiple plug
adapters or extension cords.
- Do not pull the power cable
to disconnect it from the
electrical supply.
- The electrical components
must not be accessible to the
user after installation.
- Do not touch the appliance
with any wet part of the body
and do not operate it when
barefoot.
- This hob (class 3) is designed
solely for private household
use for cooking food. Do not
use this appliance as a space
heater to heat or warm the
room. Doing so may result in
carbon monoxide poisoning
and overheating of the hob.
- The Manufacturer declines
all responsibility for
inappropriate use or incorrect
setting of the controls.
- The appliance and its
accessible parts become
hot during use. Care should
be taken to avoid touching
heating elements. Children less
than 8 years of age shall be
kept away unless continuously

ENGLISH 6
supervised. This appliance
can be used by children aged
from 8 years and above and
persons with reduced physical,
sensory or mental capabilities
or lack of experience and
knowledge if they have
been given supervision or
instruction concerning use of
the appliance in a safe way
and understand the hazards
involved. They shall not play
with the appliance.
- The use of a gas appliance
produces heat and humidity in
the room. Make sure the room
is well-ventilated, or install an
extractor hood with exhaust
duct.
- Domestic animals should be
kept away from the appliance.
- In case of prolonged use,
additional ventilation may
be necessary (by opening
a window or increasing the
hood extraction speed).
- After use, make sure the knobs
are in off position and close
the main gas supply cock or
the gas cylinder valve.
- Overheated oils and fats
catch re easily. Always
remain vigilant when cooking
foods rich in fat, oil or alcohol
(e.g. rum, cognac, wine).
- Unattended cooking on a
hob with fat or oil can be
dangerous and may result in
re. NEVER try to extinguish a
re with water, but switch off
the appliance and then cover
ame e.g. with a lid or a re
blanket.
Danger of re: do not store
items on the cooking surfaces.
- Keep the packaging materials
out of the reach of children.
- Before cleaning or
maintenance wait for hob to
cool down.
- CAUTION: “In case of hotplate
glass breakage:
- shut immediately off all
burners and any electrical
heating element and isolate
the appliance from the power
supply
- do not touch the appliance
surface,
- do not use the appliance”.
- These instructions are valid
only for those countries whose
symbol is shown on the rating
plate (under cooktop).
- This product is not intended
to be installed and operated
outdoors.
Save these instructions

ENGLISH 7
Product description
1Removable grates
2Rapid burner
3Auxiliary burner
4Semi-rapid burners
5Front left rapid burner control knob
6Rear left semi-rapid burner control knob
7Rear right semi-rapid burner control knob
8Front right auxiliary burner control knob
1
2
3
7 8
4
5 6
1
4
Important: When the hob area is hot do not
spill liquids to avoid glass damages.
Do not let the burner ame extend
beyond the edge of the pan.
Important: when the hob is in use, the entire
hob area may become hot.
- To ignite one of the burners, turn the
relative knob anti-clockwise to the
maximum ame setting.
- Press the knob against the control panel
to ignite the burner.
- After the burner has ignited, keep the
knob pressed for about 5-10 seconds to
allow proper device operation.
This burner safety device shuts off the gas
supply to the burner if the ame goes out
accidentally (because of sudden draught, an
interruption in the gas delivery, boiling over
of liquids, etc.).
- The knob must not be pressed for
more than 15 sec. If, after that time has
elapsed, the burner does not remain lit,
wait at least one minute before trying to
light it again.
NOTE: should particular local conditions
of the delivered gas make the ignition of
burner difcult, it is advisable to repeat
the operation with the knob turned to small
ame setting. The burner might go out when
the knob is released. This means that the
safety device has not warmed up enough. In
this case, repeat the operations described
above.
Daily use
Symbols
Solid disc Tap closed
Large ame Maximum ame
Small ame Minimum ame

ENGLISH 8
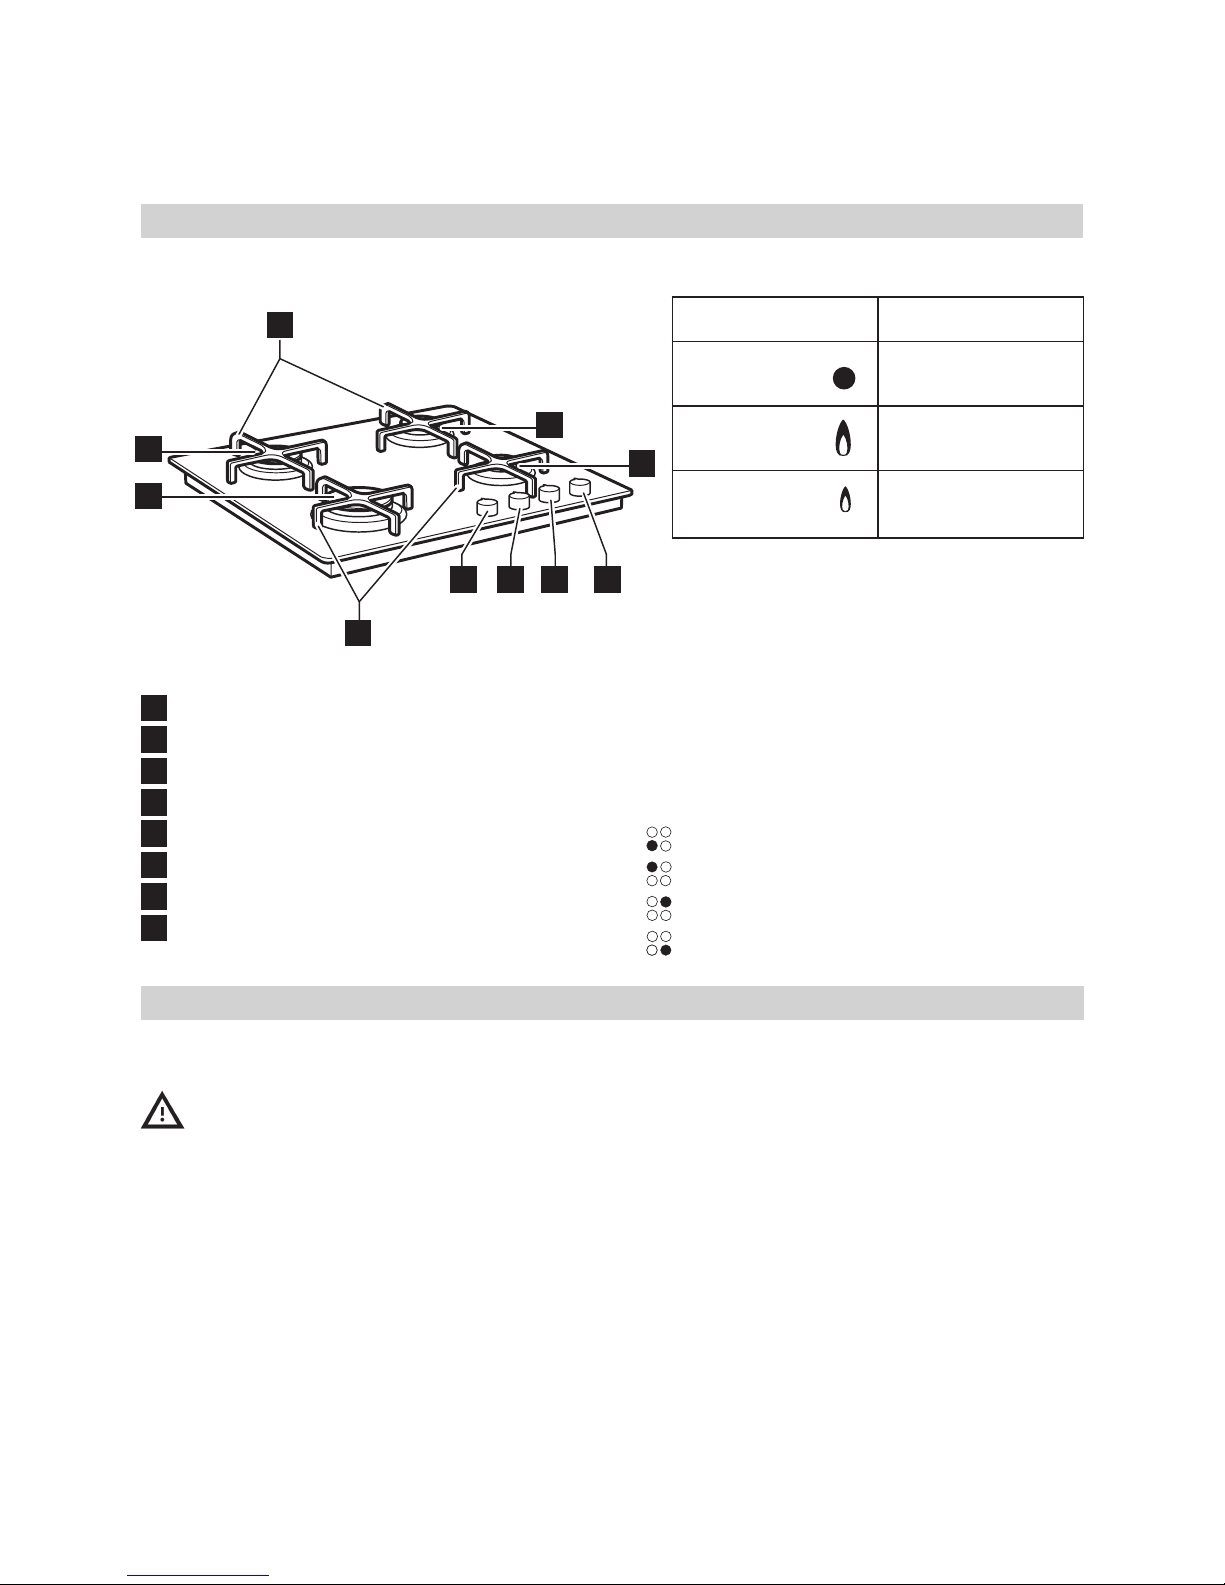
This hob has burners of different diameters.
For better burner performance, please stick
to the following rules:
- Use pots and pans with bottoms the
same width as that of the burners or
slightly larger (see table on the right).
- Only use at-bottomed pots and pans.
- Use the correct amount of water
for cooking foods and keep the pot
covered.
- Make sure pots on the grates do not
protrude beyond the edge of the hob.
IMPORTANT: improper use of the grids can
result in damage to the hob: do not position
the grids upside down or slide them across
the hob. Do not use:
- Cast iron griddles, ollar stones,
terracotta pots and pans.
- Heat diffusers such as metal mesh, or
any other types.
- Two burners simultaneously for one
receptacle (e.g. sh kettle).
Disconnect power before servicing.
- All the enamelled and glass parts
should be cleaned with warm water and
neutral solution.
- Stainless steel surfaces may be stained
by calcareous water or aggressive
detergents if left in contact for too long.
Any food spills (water, sauce, coffee, etc.)
should be wiped away before they dry.
- Clean with warm water and neutral
detergent, and then dry with a soft
cloth or chamois. Remove baked-on dirt
with specic cleaners for stainless steel
surfaces.
NOTE: Clean glass and enamelled parts
only with soft cloth or sponge.
- Do not use abrasive or corrosive
products, chlorine-based cleaners or
pan scourers.
- Do not use steam cleaning appliances.
- Do not use ammable products.
- Do not leave acid or alkaline substances,
such as vinegar, mustard, salt, sugar or
lemon juice on the hob.
CLEANING THE HOB PARTS
- Grids, burner caps and burners can be
removed to be cleaned. Do not wash
them in the dishwasher.
- Clean them by hand with warm water
and non-abrasive detergent, removing
any food residues and checking that
none of the burner openings is clogged.
- Rinse and dry
- Ret burners and burner caps correctly
in the respective housings.
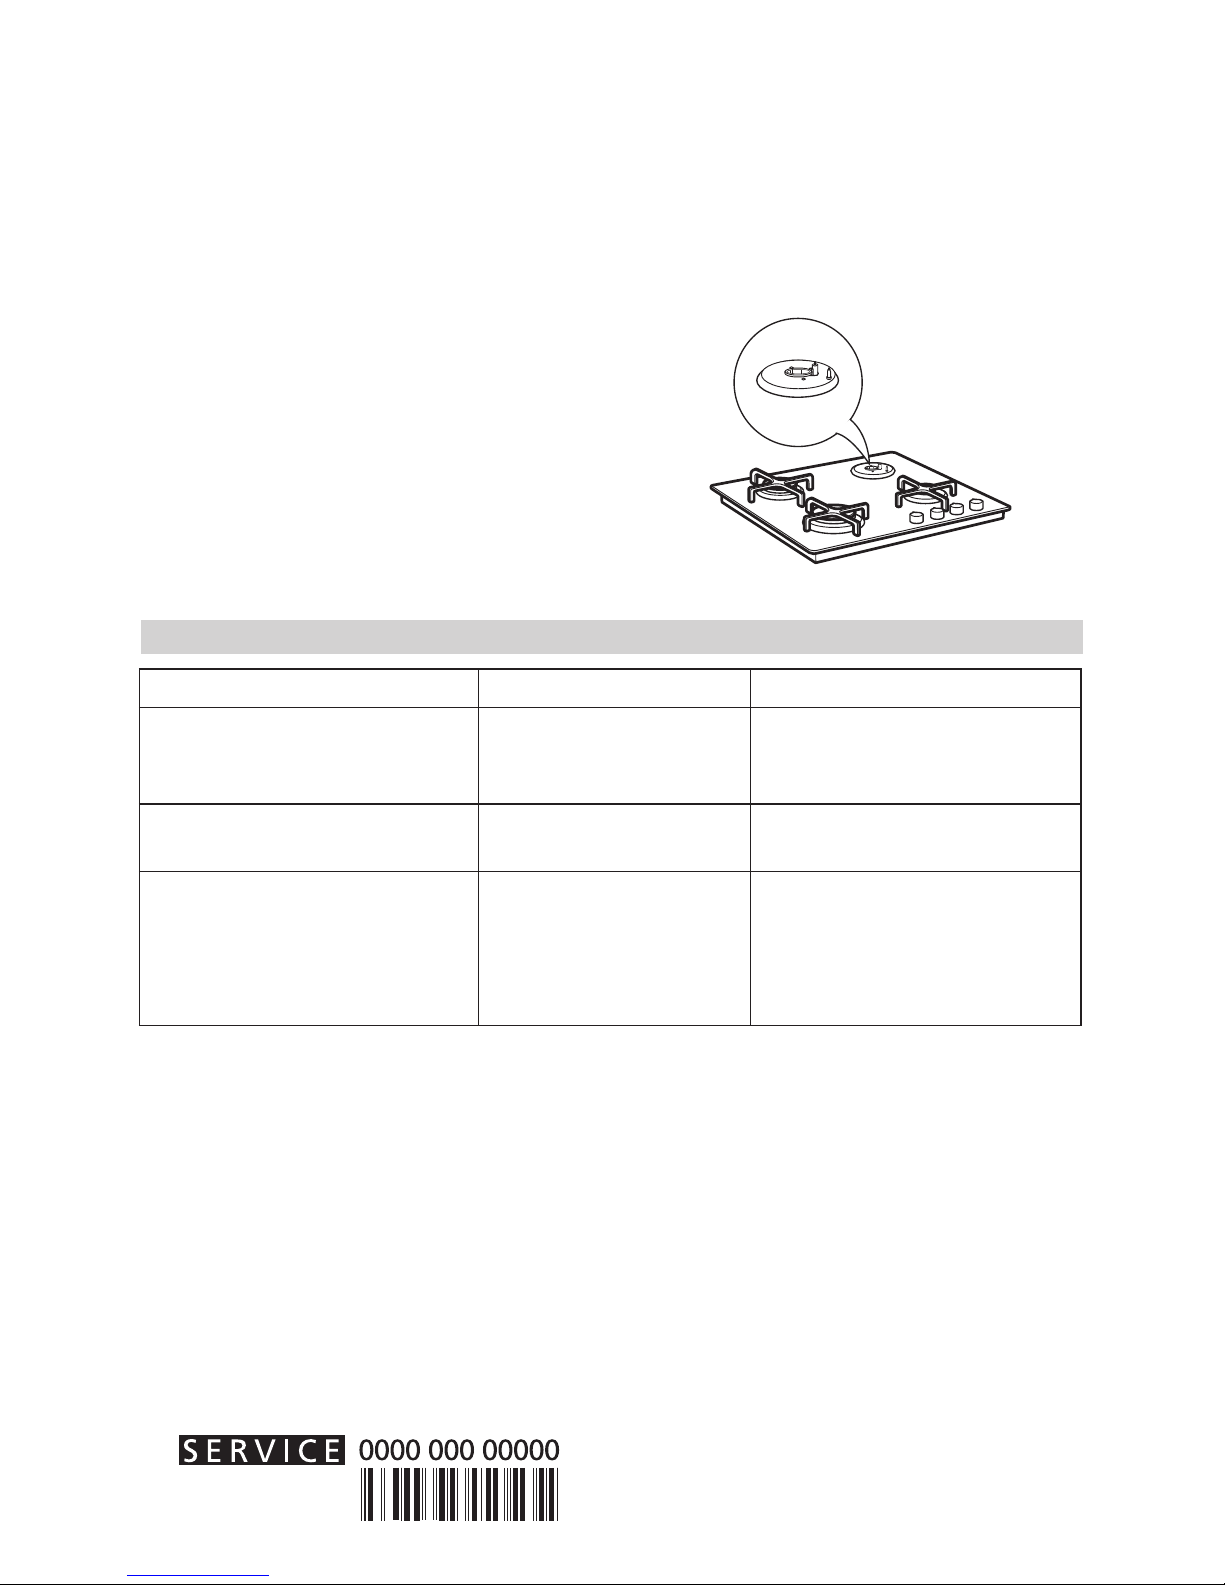
- When replacing the grids, make sure
that the panstand area is aligned with
the burner.
- Models equipped with electrical
ignition plugs and safety device require
thorough cleaning of the plug end in
order to ensure correct operation.
Helpful hints and tips
Maintenance and cleaning
Burner Pot Ø
Rapid from 24 to 26 cm
Semi-rapid from 16 to 22 cm
Auxiliary from 8 to 14 cm

ENGLISH 9
Problem Possible cause Solution
The electric ignition does not
work
There is no electrical
supply
Check the unit is plugged in
and the electrical supply is
switched on.
The burner fails to ignite The gas tap could be
closed
Check that the gas tap is
open
The gas ring burns unevenly Burner crown may
be occluded by food
residues
Clean the burner crown
according to cleaning
instructions to make sure that
the burner crown is clear of
food residues.
What to do if ...
Before calling the After-Sales Service:
1. Check “Troubleshooting guide” to see if
you can eliminate the problem yourself
2. Turn the hob on again to check if correct
operation has been restored.
3. If the problem persists, contact the After-
sales Service.
Give the following information:
• type of fault;
• hob model;
• service number (i.e. the number after the
word SERVICE on the dataplate under
the hob and on the warranty certicate);
• your full address;
• your telephone number.
If any repairs are required, contact an
authorised service centre, indicated in the
warranty.
Failure to comply with these instructions
may compromise the safety and quality of
the product.
Check these items frequently, and if
necessary, clean them with a damp cloth.
Any baked-on food should be removed
with a toothpick or needle.
NOTE: to avoid damaging the electric
ignition device, do not use it when the
burners are not in their housing.

ENGLISH 10
Type of gas used Type of
burner
Injector
marking
Nominal
heating
capacity
kW
Nominal
consum-
ption
Reduced
heat
capacity
kW
Gas pressure
(mbar)
min. nom. max.
NATURAL GAS
(Methane)
G20
rapid
semi-rapid
semi-rapid
auxiliary
125 A
104 B
104 B
78 A
3,00
2,00
2,00
1,00
286 l/h
190 l/h
190 l/h
95 l/h
0,60
0,35
0,35
0,30
17 20 25
NATURAL GAS
(Methane)
G25*
rapid
semi-rapid
semi-rapid
auxiliary
135
110
110
82
3,00
2,00
2,00
1,00
332 l/h
221 l/h
221 l/h
111 l/h
0,60
0,35
0,35
0,30
18 20 25
LIQUEFIED
PETROLEUM GAS
(Butane) G30
(Propane) G31
rapid
semi-rapid
semi-rapid
auxiliary
78 D
62 B
62 B
46
3,00
2,00
2,00
1,00
218 g/h
145 g/h
145 g/h
73 g/h
0,80
0,50
0,50
0,40
42,5 50 57,5
Injector table
Category II2H3B/P (AT) - II2ELL3B/P (DE)
Type of gas
used
4 burners
60 cm
Nominal heating
capacity kW
Total nominal
consumption
Air necessary
(m3) for
combustion
1 m3of gas
G20 20 mbar 1R - 2 SR (2kW) -
1 AUX 8,00 761 l/h 9,52
G25* 20 mbar 1R - 2 SR (2kW) -
1 AUX 8,00 885 g/h 8,187
G30/31 50 mbar 1R - 2 SR (2kW) -
1 AUX 8,00 581 g/h 30,94
* NOT FORESEEN FOR AUSTRIA
Electric Power: 220-240 V ~ 50/60/Hz

ENGLISH 11
Technical data
Dimensions
Width (mm) 590
Height (mm) 44
Length (mm) 510
Voltage (V) 220-240 V ~
The technical information are situated in the
rating plate on the bottom side of the appliance.
Installation
Use protective gloves for handling,
preparing and installing the product.
After unpacking the hob, make sure that it
has not been damaged during transport. In
the event of problems, contact the dealer or
your nearest After-sales Service.
Technical information for the installer
- This product can be embedded in a
worktop 20 to 60 mm thick.
- If there is no oven beneath the hob,
insert a separator panel that has a
surface at least equal to the opening
in the work surface. This panel must be
positioned at a maximum distance of
150 mm below the upper surface of the
work surface but, in no case less than 20
mm from the bottom of the hob.
- Before installation, make sure that:
- the local gas delivery conditions (nature
and pressure) are compatible with the
settings of the hob (see the rating plate
and injector table);
- the outer surfaces of the furniture or
appliances adjacent to the hob are heat
resistant according to local regulations;
- This appliance is not connected to a
fume exhaust device. It shall be installed
in accordance with current installation
regulations. Particular attention shall
be given to the relevant requirement
regarding ventilation.
- Combustion products are discharged
outdoors through specic hoods or wall
and/or window mounted electrical fans.
Gas connection
This operation must be performed by a
qualied technician.
The gas supply system must comply with
local regulations to the relavant gas
standard.
- You can nd specic local regulations for
some countries in the paragraph
- “Reference to Local Regulations”. If no
information concerning your Country is

ENGLISH 12
given, please ask details to a qualied
technician.
- The connection of the hob to the gas
pipe network or gas cylinder must be
made by means of a rigid copper or
steel pipe with ttings complying with
local regulations, or by means of a
continuous-surface stainless steel hose
complying with local regulations. The
maximum length of the hose is 2 linear
metres.
A
B
C
C
D
D
- Connect elbow (A)* or (B)* supplied with
to the hob inlet main pipe and interpose
the washer (C) supplied, in compliance
with EN 549.
- Use elbow (A) for France and elbow (B)
for all other destinations.
-IMPORTANT: if a stainless steel hose
is used, it must be installed so as not to
touch any mobile part of the furniture.
It must pass through an area where
there are no obstructions and where it is
possible to inspect it on all its length.
- After connection to the gas supply, check
for leaks with soapy water. Light up the
burners and turn the knobs from max
position to minimum position to
check ame stability
Electrical connection
WARNING
- This operation must be performed by a
qualied technician.
- The electrical connections must comply
with local regulations.
- The earthing of this appliance is
compulsory by law.
L
N
Earth
(yellow/green)
- Do not use an extension cord.
-IMPORTANT: the data relevant to the
voltage and power absorption are
indicated on the rating plate.
Assembly
Use protective gloves for cleaning the
product perimeter surface, then apply
the supplied gasket to the hob.
After having cleaned the perimeter surface,
apply the supplied gasket to the hob.
Position the hob in the worktop opening
made respecting the dimensions indicated
in the Instruction.
NOTE: the power supply cable must be long
enough to permit its upward extraction.
To secure the hob, use the brackets provided
with it. Fit the brackets into the relevant
bores shown by the arrow and fasten them
by means of their screws in accordance with
the thickness of the worktop.
Make sure that the outlet is near the product
to install. So, if the cable that came with the
product is not long enough, you will need to

ENGLISH 13
replace it with another one having the same
features but with the right length.
Adjustment to different type of gas
WARNING
- This operation must be performed by a
qualied technician.
If the appliance is intended to operate with
a different gas from the gas type stated on
the rating plate and information label on
the top of the hob, change the injectors.
Remove the information label and keep it
with the instructions booklet.
Use pressure regulators suitable for the gas
pressure indicated in the Instruction.
- The gas injectors must be changed
by After Sales Service or a qualied
technician.
- Injectors not supplied with the appliance
must be ordered from After Sales
Service.
- Adjust the minimum setting of the taps.
NOTE: when liquid petroleum gas is used
(G30/G31), the minimum gas setting screw
must be tightened as far as it will go.
IMPORTANT: should you experience
difculty in turning the burners knobs,
please contact the After Sales Service for
the replacement of the burner tap if found to
be faulty.
IMPORTANT: when gas cylinder is adopted,
the gas cylinder or gas container must be
properly settled (vertical orientation).
Replacing the injectors (see paragraph
“injector table”)
- Remove grids (A).
- Extract burners (B).
- Using a socket spanner of the
appropriate size unscrew the injector
(C), unscrew the injector to be replaced.
- Replace it with the injector suitable for
the new type of gas.
- Re-assemble the injector in (D).
Before installing the hob, remember to afx
the gas calibration plate supplied with
the injectors in such a way that it covers
the existing information relating to gas
calibration.
Replacement of the gas injector
Adjusting minimum gas setting of taps
To ensure that the minimum setting is
correctly adjusted, remove the knob (E) and
proceed as follows:

ENGLISH 14
- tighten screw to reduce the ame height
(-);
- loosen screw to increase the ame height
(+).
The adjustment must be performed with the
tap in minimum gas setting position (small
ame ) .
- The primary air of the burners does not
need to be adjusted.
- At this stage, light up the burners and
turn the knobs from max position to
minimum position to check ame
stability.
Upon completion of adjustment, reseal
the work surface using sealing wax or an
equivalent material.
GB Ensure that the installation and gas
connections are performed by a qualied
technician, following the manufacturer’s
instructions and in compliance with current
local safety regulations.

ENGLISH 15
KNOBS REPLACEMENT
1.
Be sure that your hob is switched-off!
All knobs must be in closed position.
2. Pull upwards each knob of the cooktop
and store together after removal.
3. Take the kit with new knobs, which is
located in upper part of packaging and
remove the new knobs from the plastic bag.
4. Push each of knob on the valve shaft until
you feel the end of sliding (sparking may
occur).
5. Make sure that all the knobs are in the
right position.
6. Verify correct installation by switching
each burner separately.

ENGLISH 16
Packing
- The packing materials are 100%
recyclable and marked with the
recycling symbol ( ).
Products
This appliance is marked in compliance with
European Directive 2002/96/EC on Waste
Electrical and Electronic
Equipment (WEEE). By ensuring that this
appliance is correctly scrapped, the user
can help prevent potentially harmful
consequences for the environment and the
health of people.
The symbol on the product or
accompanying documentation indicates
that this product should not be treated as
domestic waste but must be taken to a
suitable centre for collection and recycling
of electrical and electronic equipment.
Disposal must be carried out in compliance
with local regulations on waste disposal.
For further information on the treatment,
recovery and recycling of this product,
contact your competent local ofce, the
household waste collection service or the
shop where you purchased the appliance.
Declaration of Conformity
- This cooking hob has been designed,
constructed and put on the market in
conformity with:
- safety requirements of “Gas”
Directive 2009/142/EEC;
- safety objectives of “Low Voltage”
Directive 2006/95/EC (which
replaces 73/23/EEC as amended).
- protection requirements of “EMC”
Directive 2004/108/EEC;
- This cooking hob (Class 3) has been
designed only for cooking food. Any
other use (such as heating a room) is
improper and dangerous.
Environmental concerns

ENGLISH 17
IKEA GUARANTEE
How long is the IKEA guarantee valid?
This guarantee is valid for ve (5) years from
the original date of purchase of your appliance
at IKEA, unless the appliance is named LAGAN
in which case two (2) years of guarantee
apply. The original sales receipt, is required
as proof of purchase. If service work is carried
out under guarantee, this will not extend the
guarantee period for the appliance.
Which appliances are not covered by the
IKEA ve (5) years guarantee?
The range of appliances named LAGAN and
all appliances purchased in IKEA before 1st of
August 2007.
Who will execute the service?
IKEA service provider will provide the
service through its own service operations or
authorized service partner network.
What does this guarantee cover?
The guarantee covers faults of the appliance,
which have been caused by faulty construction
or material faults from the date of purchase
from IKEA. This guarantee applies to domestic
use only. The exceptions are specied under
the headline “What is not covered under this
guarantee?” Within the guarantee period,
the costs to remedy the fault e.g. repairs,
parts, labour and travel will be covered,
provided that the appliance is accessible for
repair without special expenditure. On these
conditions the EU guidelines (Nr. 99/44/
EG) and the respective local regulations
are applicable. Replaced parts become the
property of IKEA.
What will IKEA do to correct the problem?
IKEA appointed Service Provider will examine
the product and decide, at its sole discretion,
if it is covered under this guarantee. If
considered covered, IKEA Service Provider
or its authorized service partner through its
own service operations, will then, at its sole
discretion, either repair the defective product
or replace it with the same or a comparable
product.
What is not covered under this guarantee?
• Normal wear and tear.
• Deliberate or negligent damage, damage
caused by failure to observe operating
instructions, incorrect installation or by
connection to the wrong voltage, damage
caused by chemical or electrochemical
reaction, rust, corrosion or water damage
including but not limited to damage
caused by excessive lime in the water
supply, damage caused by abnormal
environmental conditions.
• Consumable parts including batteries and
lamps.
• Non-functional and decorative parts which
do not affect normal use of the appliance,
including any scratches and possible color
differences.
• Accidental damage caused by foreign
objects or substances and cleaning or
unblocking of lters, drainage systems or
soap drawers.
• Damage to the following parts: ceramic
glass, accessories, crockery and cutlery
baskets, feed and drainage pipes, seals,
lamps and lamp covers, screens, knobs,
casings and parts of casings. Unless such
damages can be proved to have been
caused by production faults.
• Cases where no fault could be found
during a technician’s visit.
• Repairs not carried out by our appointed
service providers and/or an authorized
service contractual partner or where non-
original parts have been used.
• Repairs caused by installation which is
faulty or not according to specication.
• The use of the appliance in a non-domestic
environment i.e. professional use.
• Transportation damages. If a customer
transports the product to his home or

ENGLISH 18
another address, IKEA is not liable for any
damage that may occur during transport.
However, if IKEA delivers the product
to the customer’s delivery address, then
damage to the product that occurs during
this delivery will be covered by IKEA.
• Cost for carrying out the initial installation
of the IKEA appliance.
However, if an IKEA appointed Service
Provider or its authorized service partner
repairs or replaces the appliance under
the terms of this guarantee, the appointed
Service Provider or its authorized
service partner will reinstall the repaired
appliance or install the replacement, if
necessary.
These restrictions do not apply to fault-free
work carried out by a qualied specialist
using our original parts in order to adapt the
appliance to the technical safety specications
of another EU country.
How country law applies
The IKEA guarantee gives you specic legal
rights, which cover or exceed all the local legal
demands. However these conditions do not
limit in any way consumer rights described in
the local legislation.
Area of validity
For appliances which are purchased in one EU
country and taken to another EU country, the
services will be provided in the framework of
the guarantee conditions normal in the new
country.
An obligation to carry out services in the
framework of the guarantee exists only if
the appliance complies and is installed in
accordance with:
- the technical specications of the country in
which the guarantee claim is made;
- the Assembly Instructions and User Manual
Safety Information.
The dedicated AFTER SALES for IKEA
appliances
Please don’t hesitate to contact IKEA
appointed After Sales Service Provider to:
• make a service request under this
guarantee;
• ask for clarications on installation of the
IKEA appliance in the dedicated IKEA
kitchen furniture;
• ask for clarication on functions of IKEA
appliances.
To ensure that we provide you with the best
assistance, please read carefully the Assembly
Instructions and/or the User Manual before
contacting us.
How to reach us if you need our service
Please refer to the last
page of this manual for the
full list of IKEA appointed
After Sales Service Provider
and relative national phone
numbers.
In order to provide you a quicker
service, we recommend to use the
specic phone numbers listed on this
manual. Always refer to the numbers
listed in the booklet of the specic
appliance you need an assistance for.
Please also always refer to the IKEA
article number (8 digit code) and 12
digit service number placed on the
rating plate of your appliance.
SAVE THE SALES RECEIPT!
It is your proof of purchase and required
for the guarantee to apply. The sales
receipt also reports the IKEA name and
article number (8 digit code) for each of
the appliances you have purchased.
Do you need extra help?
For any additional questions not related
to After Sales of your appliances please
contact your nearest IKEA store call centre.
We recommend you read the appliance
documentation carefully before contacting us.

DEUTSCH 19
Ihre Sicherheit und die Sicherheit
anderer sind von größter Bedeutung.
Dieses Handbuch und das
Gerät selbst sind mit wichtigen
Sicherheitsinformationen versehen, die
Sie lesen und jederzeit beachten sollten.
Dieses Symbol warnt vor möglichen
Gefahren für die Sicherheit des
Benutzers und anderer Personen.
Alle Warnhinweise beginnen mit
diesem Warnsymbol und enthalten
einen der beiden folgenden Begriffe:
GEFAHR Weist auf eine
Gefahrensituation hin, die zu
schweren Verletzungen führt, wenn sie
nicht vermieden wird.
ACHTUNG Weist auf eine
Gefahrensituation hin, die bei
mangelnder Vorsicht zu schweren
Verletzungen führt.
Alle Warnhinweise enthalten
einen Hinweis auf die Art der
potenziellen Gefahr, einen Hinweis zur
Verringerung des Verletzungsrisikos
und einen Hinweis auf die möglichen
Konsequenzen, wenn die Anweisungen
nicht befolgt werden.
Halten Sie das Gerät von der
Stromversorgung getrennt, bis der
Einbau durchgeführt wurde.
Installation und Wartung müssen
von einer Fachkraft laut
Herstellerangaben und gültigen
örtlichen Sicherheitsbestimmungen für
Gasinstallationen durchgeführt werden.
Verwenden Sie ausschließlich Original-
Ersatzteile. Reparieren Sie das Gerät
nicht selbst und tauschen Sie keine Teile
aus, wenn dies im Bedienungshandbuch
nicht ausdrücklich angegeben ist.
ACHTUNG Wenn die
Anweisungen in dieser
Bedienungsanleitung nicht genau
befolgt werden, besteht Brand- und
Explosionsgefahr mit Sachschäden oder
Verletzungen.
- Lagern oder verwenden Sie
kein Benzin und keine sonstigen
brennbaren Gase oder Flüssigkeiten
in der Nähe dieses Geräts.
Vorgehen bei Gasgeruch:
- Schalten Sie keinerlei Geräte ein.
- Betätigen Sie keine elektrischen
Schalter.
- Verwenden Sie kein Telefon im
betroffenen Gebäude.
- Benachrichtigen Sie unverzüglich
Ihren Gasanbieter, und zwar von
einem Telefon in einem anderen
Gebäude aus. Gehen Sie nach den
Sicherheitsinformationen 19
Produktbeschreibung 22
Täglicher Gebrauch 22
Nützliche Tipps und Tricks 23
Pege und Wartung 23
Was tun, wenn... 24
Düsentabelle 25
Technische Daten 26
Installation 26
Umweltschutz 31
IKEA GARANTIE 32
Sicherheitsinformationen
Inhalt

DEUTSCH 20
Anweisungen des Gasanbieters vor.
- Wenn der Gasanbieter nicht
erreichbar ist, rufen Sie die
Feuerwehr.
- Installation und Wartung müssen
von einer Fachkraft, einem
Wartungsunternehmen oder dem
Gasanbieter ausgeführt werden.
- Das Gerät darf nur in gut belüfteten
Räumen betrieben werden.
- Die elektrischen Anschlüsse und die
Gasanschlüsse müssen den örtlichen
Bestimmungen entsprechen.
- Bei der Installation des Kochfeldes
muss ein mehrpoliger Trennschalter
mit einer Kontaktöffnung von
mindestens 3 mm verwendet
werden, der für eine vollständige
Trennung sorgt.
- Die Erdung des Gerätes ist gesetzlich
vorgeschrieben.
- Das Netzkabel muss lang genug
sein, um das Gerät nach der
Montage im Küchenmöbel an die
Stromversorgung anzuschließen.
- Für den Gasanschluss dürfen
ausschließlich exible oder starre
Metallschläuche verwendet werden.
- Falls nötig, darf das Stromkabel
nur durch ein Kabel mit identischen
Dimensionen und Eigenschaften wie
das Originalkabel ersetzt werden
(Typ H05V2V2-F 90°C oder Typ
H05RR-F). Diese Arbeit darf nur
von einem qualizierten Elektriker
durchgeführt werden.
- Der Hersteller haftet nicht für
etwaige durch Missachtung
dieser Vorschriften entstandene
Verletzungen von Personen und
Tieren oder Sachschäden.
- Verwenden Sie keine
Mehrfachstecker oder
Verlängerungskabel.
- Ziehen Sie nicht am Netzkabel des
Gerätes, um den Stecker aus der
Steckdose zu ziehen.
- Nach der Installation dürfen Strom
führende Teile für den Benutzer nicht
mehr zugänglich sein.
- Berühren Sie das Gerät nicht mit
feuchten Händen und benutzen Sie
es nicht, wenn Sie barfuß sind.
- Dieses Kochfeld (Klasse 3) ist
ausschließlich für die Verwendung
im Haushalt zum Kochen von
Lebensmitteln bestimmt. Das Gerät
darf AUF KEINEN FALL als Heizgerät
zum Heizen oder Erwärmen
des Raums verwendet werden.
Andernfalls besteht die Gefahr einer
Kohlenmonoxidvergiftung und einer
Überhitzung des Kochfeldes.
- Der Hersteller haftet nicht bei
Schäden aufgrund unsachgemäßen
Gebrauchs oder fehlerhafter
Bedienung.
- Das Gerät und die zugänglichen
Teile werden bei der Benutzung
heiß. Vermeiden Sie unbedingt das
Berühren der Heizelemente. Kinder
unter 8 Jahren dürfen das Gerät
nur unter ständiger Überwachung
bedienen. Dieses Gerät darf
von Kindern unter und über 8
Jahren und von Personen, deren
Other manuals for Livsgnista
9
Table of contents
Languages:
Other IKEA Hob manuals
Popular Hob manuals by other brands

Bosch
Bosch NKF6 Series user manual

Küppersbusch
Küppersbusch EWI 457.0 Instructions for use and installation instructions

Bush
Bush B5BGHSS instruction manual

EAS Electric
EAS Electric EMIH320-3FL instruction manual

Cookology
Cookology TCH301 instruction manual

Creda
Creda 42251 Installation and operation instruction manual