IKEA FIXA User manual

FIXA


1
2
6
7
3
9
11
8
11
6
4
5
10

A
B
C
0°
90°
45°

ENGLISH
Original instructions
POLSKI
Przetłumaczono z oryginalnych
instrukcji.
EESTI
Originaaljuhiseid
LATVIEŠU
Oriģinālā instrukcija
LIETUVIŲ
Originalių instrukcijų vertimas.
PORTUGUÊS
Traduzido a partir das instruções
originais.
ROMÂNA
Traducere după instrucţiunile
originale.
БЪЛГАРСКИ
Преведено от оригиналните
инструкции.
4
11
18
24
30
36
43
50

FIXA laser spirit level
TECHNICAL SPECIFICATIONS
Working range to approx.: 3 m (10')
Laser type: 635 nm
Laser class: 2
<1 mW laser output power
Levelling accuracy: ≤ ±1.4 mm/m (1/16")
Weight: 100g (3.5 oz)
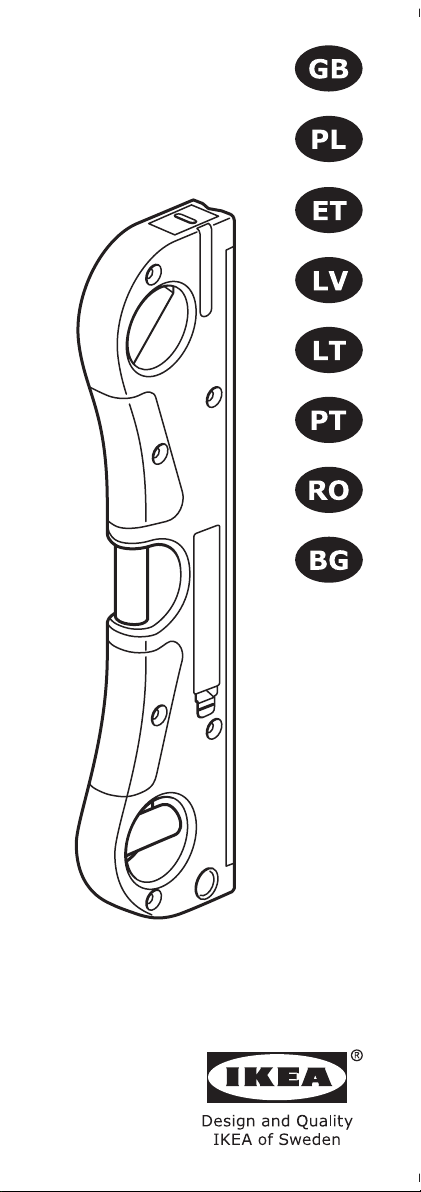
LIST OF FEATURES
The numbering of the product features
shown refers to the illustration of the
laser spirit level on the graphic page.
1. Spirit level for horizontal alignment
2. Aluminium supporting surface
3. Spirit level for vertical alignment
4. Exit opening for laser beam
5. Spirit level for 45 degree alignment
6. Supporting points
7. On & Off Switch
8. Latch of battery lid
9. Battery lid
10. Laser warning label
11. Magnets
AREAS OF USE
This laser spirit level may be used
for determining and indicating exact
horizontal, vertical and 45 degree
lines and is also suitable for checking
plumb lines and horizontal partitions or
surfaces.
The laser spirit level is suitable
exclusively for operation in enclosed
working sites.
GENERAL SAFETY INSTRUCTIONS
Safety instructions for laser spirit
level
Keep the laser spirit level away
from cardiac pacemakers. The
magnets (11) generate a eld that
can impair the function of cardiac
pacemakers.
•Keep the laser spirit level away
from magnetic data medium
and magnetically-sensitive
equipment. The effect of the
ENGLISH 4

5
magnets (11) can lead to irreversible
data loss.
Working safely with the laser spirit
level is possible only when the
operating and safety information
are read completely and the
instructions contained therein
are strictly followed. Never make
warning labels on the laser spirit
level unrecognisable. SAVE THESE
INSTRUCTIONS.
•Caution – The use of other
operating or adjusting equipment
or the application of other
processing methods than those
mentioned here, can lead to
dangerous radiation exposure.
•The laser spirit level is delivered
with a warning label in English
(marked with the number (10) in
the illustration of the laser spirit
level on the graphic page).
•Before putting into operation for
the rst time, attach the supplied
sticker in your national language
over the English warning label.
•Do not direct the laser beam at
persons or animals and do not
stare into the laser beam yourself
(not even from a distance). This
laser spirit level produces class
2 laser radiation according to EN
60825-1. This can lead to other
persons being unintentionally blinded.
•Have the laser spirit level
repaired only through qualied
specialists using original spare
parts. This ensures that the safety of
the laser spirit level is maintained.
•Do not allow children to use
the laser spirit level without
supervision. They could
unintentionally blind other persons.
Battery tool use and care
a. Use laser spirit levels only with
specically designated batteries.
5

Use of any other batteries may create a
risk of injury and re.
b. When batteries are not in use,
keep them away from other metal
objects, like paperclips, coins, keys,
nails, screws or other small metal
objects that can make a connection
from one terminal to another.
Shorting the battery terminals together
may cause burns or a re.
DECLARATION OF CONFORMITY
We declare under our sole responsibility
that this product, FIXA laser spirit
level, is in conformity with the following
standards or standardized documents:
EN 60825-1: 2014, EN:61326-1:2013,
in accordance with the provisions of the
directives 2014/30/EU, 2011/65/EU.
The undersigned is responsible
for compilation of the technical
documentation and makes this
declaration on behalf of IKEA of Sweden
AB.
Älmhult 2017.03.30
Daniel Jimenez
Business Area Manager
IKEA of Sweden AB
ASSEMBLY
Inserting/Replacing the Battery
Use only alkali-manganese batteries.
To open the battery lid (9), press
the latch (8) in the direction of the
arrow and remove the battery lid.
Insert the batteries (sold separately).
Pay attention to the correct polarity
of the batteries according to the
representation in the battery
compartment. Always replace all
batteries at the same time. Only use
batteries from one brand and with the
identical capacity.
•Remove the batteries from the
laser spirit level when you are
not using it for extended periods.
When storing for extended periods,
the batteries can corrode and
discharge themselves.
6

7
INSTRUCTIONS FOR USE
Initial Operation
•Protect the laser spirit level
against moisture and direct sun
irradiation.
•Do not subject the laser spirit
level to extreme temperatures or
variations in temperature. As an
example, do not leave it in vehicles
for longer periods. In case of large
variations in temperature, allow the
laser spirit level to adjust to the
ambient temperature before putting it
into operation.
•Avoid heavy impact to or
dropping of the laser spirit level.
Damage to the laser spirit level can
impair its accuracy. After heavy
impact or shock, compare the laser
line with a known horizontal or
vertical reference line.
Switching On and Off
To switch on the laser spirit level, push
the On/Off switch (7). Immediately
after switching on, the laser spirit level
sends a laser beam out of the exit
opening (4).
•Do not point the laser beam at
persons or animals and do not
look into the laser beam yourself,
not even from a large distance.
To switch off the laser spirit level, push
the On/Off switch (7) again.
•Do not leave the switched on
laser spirit level unattended and
switch the laser spirit level off
after use. Other persons could be
blinded by the laser beam.
MEASURING FUNCTIONS
Note: The specied levelling accuracy
applies for the alignment of the laser
beam with reference to the spirit levels
(1), (3) and (5).
Positioning the laser spirit level
For precise alignment with the spirit
levels, the position of the laser spirit
level is important.
The specied levelling accuracy is only
achieved when the laser spirit level is
correctly positioned:
7

• For horizontal alignment with the
spirit level (1), the aluminium
supporting surface (2) of the laser
spirit level must face downward.
• For vertical alignment with the spirit
level (3), the exit opening for the
laser beam (4) must face downward.
Aligning with the Laser Line
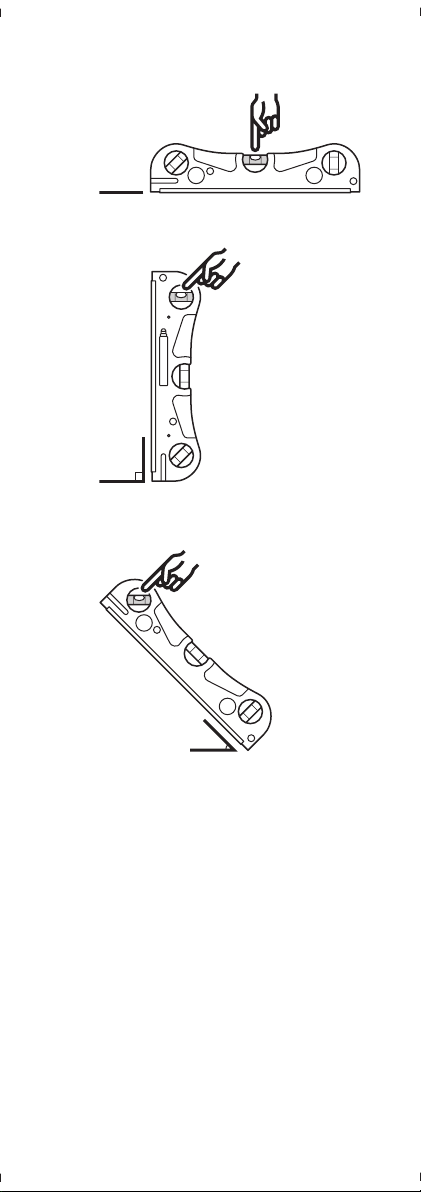
Horizontal Alignment (see gure A):
Position the laser spirit level with the
two supporting points (6) against the
wall with the help of pins (not included)
or on a magnet surface with the help
of the magnets (11). The aluminium
supporting surface (2) of the laser spirit
level must face downward. Align the
laser spirit level horizontally with help
of the spirit level (1). Picture frames
or tiles, as an example, can be aligned
alongside the horizontal laser line.
Vertical Alignment (see gure B):
Position the laser spirit level with the
two supporting points (6) against the
wall with the help of pins (not included)
or on a magnet surface with the help
of the magnets (11). The exit opening
for the laser beam (4) must face
downward. Align the laser spirit level
vertically with help of the spirit level
(3). Top and bottom cabinets, as an
example, can be aligned alongside the
vertical laser line.
Alignment of 45 degree (see gure
C): Position the laser spirit level with
the two supporting points (6) against
the wall with the help of pins (not
included) or on a magnet surface with
the help of the magnets (11). Align the
laser spirit level horizontally with help of
the spirit level (5).
Checking Horizontal/Vertical Lines
with the Spirit Levels without laser
beam
The laser spirit level can be used as a
contractors level for checking horizontal
or vertical lines, e.g., for the level set-
up of a washer or a refrigerator. Position
the laser spirit level with the aluminium
supporting surface (2) facing against
the surface to be checked. When
positioning against horizontal surfaces,
the aluminium supporting surface (2)
must face downward. When positioning
8

9
against vertical surfaces, the exit
opening for the laser beam (4) must
face downward.
MAINTENANCE AND CLEANING
Check the laser spirit level before
each time you use it. In case of
visible damage or loose components in
the interior of the laser spirit level,
the safe function is no longer ensured.
Keep the laser spirit level clean and dry
at all times to ensure proper and safe
operation.
Wipe off any debris using a soft cloth,
moistened with water. Do not use any
cleaning agents or solvents.
ENVIRONMENTAL DISPOSAL
INSTRUCTIONS
Help to protect the environment
Information (for private households)
about the environmentally sound
disposal of electrical and electronic
equipment in accordance with the
WEEE directive (Waste Electrical and
Electronic Equipment).
This symbol on electrical and electronic
products and the documentation that
accompanies them indicates that
these products may not be discarded
together with ordinary household waste.
Instead the products must be taken
to a designated collection point where
they will be received free of charge for
disposal, treatment, reuse and recycling
as appropriate. In certain countries
products may also be returned to
the point of sale when purchasing an
equivalent new product. By disposing
of this product in the proper manner
you are helping to save valuable
natural resources and to eliminate the
negative effects that the irresponsible
disposal and management of waste can
have on health and the environment.
Please contact the relevant authorities
where you live for information about
your nearest WEEE collection point.
Disposing of this type of waste in an
unapproved manner may render you
liable to ne or other penalty according
to the law.
9

Disposing of damaged or exhausted
batteries
Do not dispose of discarded batteries
together with ordinary household waste.
In accordance with the law, damaged or
exhausted batteries must be taken to
the nearest collection point for batteries
or a battery management company.
Failure to comply with these regulations
may render you liable to ne or other
penalty.
Information about disposal for
users in countries outside the
European Union
This symbol applies only within the
European Union. Please contact the
relevant authorities or retailer in your
country for information about the
correct method of disposal for this
product.
10

11
Poziomica laserowa FIXA
PARAMETRY TECHNICZNE
Zasięg około: 3 m
Typ lasera: 635 nm
Klasa lasera: 2
Moc wyjściowa lasera <1 mW
Dokładność: ≤ ±1.4 mm/m
Waga: 100g
LISTA WŁAŚCIWOŚCI
Umieszczone na liście numery
odnoszą się do ilustrowanej strony
instrukcji obsługi poziomicy.
1. Poziom cieczy do
kalibrowania w poziomie
2. Aluminiowy wspornik
3. Poziom cieczy do
kalibrowania w pionie
4. Otwór, przez który wychodzi
wiązka lasera
5. Poziom cieczy do kalibrowania
pod kątem 45 stopni
6. Wsporniki
7. Włącznik/wyłącznik
8. Przedział na baterie
9. Pokrywa przedziału na baterie
10. Naklejka ostrzegawcza
11. Magnesy
ZASTOSOWANIE
Laserowa poziomica pomaga
dokładnie określić pion, poziom i
kąt 45 stopni. Można jej również
użyć do sprawdzenia położenia rur
i poziomych ścianek działowych.
Laserow poziomica nadaje
się wyłącznie do użycia w
pomieszczeniach zamkniętych.
Zasady dotyczące bezpieczeństwa
Zasady dotyczące
bezpieczeństwa dla poziomicy
Poziomica nie powinna znajdować
się blisko rozruszników
serca. Magnesy (11) wytwarzają
pole magnetyczne, które może
wpłynąć na działanie rozrusznika
i doprowadzić do zawału serca.
POLSKI 11

•Poziomica nie powinna
znajdować się w pobliżu
danych lub sprzętu wrażliwego
na działanie promieniowania
magnetycznego. Działanie
magnesów (11) może doprowadzić
do nieodwracalnej utraty danych.
Bezpieczne korzystanie z
poziomicy jest możliwe po
dokładnym przeczytaniu informacji
dotyczących zasad bezpieczeństwa
i postępowaniu zgodnie z
instrukcją. Dbaj o umieszczone
na poziomicy naklejki określające
zasdy bezpieczeństwa. ZACHOWAJ
POWYŻSZE INSTRUKCJE.
•Uwaga – użycie innego
sprzętu lub metod może
doprowadzić do narażenia się na
niebezpieczne promieniowanie.
•Na poziomicy umieszczono
naklejkę z zasadami
bezpieczenstwa w języku
angielskim (na ilustracji
oznaczono ją numerem (10)).
•Przed pierwszym użyciem
poziomicy, umieść na niej
znajdującą się komplecie
naklejkę w Twoim języku.
•Nie kieruj wiązki lasera na innych
ludzi ani na zwierzęta. Nie patrz
na promień lasera (nawet z dużej
odległości). Poziomica emituje 2
rodzaje promieniowania, określone
przez EN 60825-1. Nieprawidłowe
użycie poziomicy może doprowadzić
do uszkodzenia wzroku.
•Naprawy poziomicy powinny
być dokonywane przez
specjalistów, korzystających
z oryginalnych części. Dzięki
temu korzystanie z poziomicy
gwarantuje bezpieczeństwo.
•Nie pozwól, aby z poziomicy
korzystały dzieci nie znajdujące
się pod nadzorem dorosłych.
Nieprawidłowe użycie poziomicy może
to doprowadzić do uszkodzeń wzroku.
12

13
Użycie i pielęgnacja baterii
a. Używaj wyłącznie odpowiednich
baterii. Użycie nieodpowiednich
baterii może doprowadzić do
wypadków lub pożaru.
b. Jeśli nie korzystasz z baterii,
nie pozostawiaj ich w pobliżu
metalowych przedmiotów, takich
jak spinacze do papieru, monety,
klucze lub inne drobiazgi, które
mogą doprowadzić do spięcia
dwóch biegunów baterii. Spięcie
biegunów baterii może doprowadzić
do poparzeń lub pożaru.
ŚWIADECTWO ZGODNOŚCI
Deklarujemy z pełną
odpowiedzialnością, że product: FIXA
poziomica laserowa, jest zgodny z
postanowieniami następujących norm
lub dokumentów normatywnych: EN
60825-1: 2014, EN:61326-1:2013,
zgodnie z warunkami dyrektyw
2014/30/EU, 2011/65/EU.
Niżej podpisany jest odpowiedzialny
za sporządzenie dokumentacji
technicznej i składa deklarację w
imieniu IKEA of Sweden AB.
Älmhult 2017.03.30
Daniel Jimenez
Business Area Manager
IKEA of Sweden AB
MONTAŻ
Instalowanie/wymiana baterii
Używaj wyłącznie alkalicznych
manganowych baterii. Aby otworzyć
przedział na baterie (9), naciśnij
przycisk (8) i przesuń przykrywkę
przedziału na baterie w kierunku
zgodnym z umieszczoną na niej
strzałką. Włóż baterie (sprzedawane
oddzielnie). Zwróć uwagę na poprawne
ułożenie biegunów, zgodne z rysunkiem
wewnątrz przedziału na bateria.
Wymieniaj wszystkie baterie.
Używaj baterii tej samej rmy i
o tych samych parametrach.
13

•Usuń baterie z poziomicy, jeśli
nie korzystasz z niej przez
dłuższy czas. Przy dłuższym
przechowywaniu, baterie mogą
zardzewieć i ulec rozładowaniu.
INSTRUKCJE UŻYCIA
Pierwsze uruchomienie
•Chroń laser przed wilgocią i
promieniowaniem słonecznym.
•Chroń laser przed ekstremalnymi
temperaturami i przed zmianami
temperatury. Nie zostawiaj na długo
wewnątrz pojazdów. W przypadku
dużych wahań temperatury,
przed ponownym uruchomieniem,
laser musi dostosować się do
temperatury otoczenia.
•Unikaj dużych wstrząsów lub
nagłych spadków poziomu
cieczy w laserowe poziomicy.
Uszkodzenie cieczy może wpłynąć
na dokładność poziomicy. W
przypadku silnego wstrząsu, sprawdź
dokładność lasera porównując
jego strumień do innej poziomej
lub pionowej linii odniesienia.
Włączanie i wyłączanie
Aby włączyć laserową poziomicę,
włącz przycisk On/Off (7).
Bezpośrednio po włączeniu laserowa
poziomica wysyła wiązkę lasera
poprzez otwór wyjściowy (4).
•Nawet z dużej odległości, nie
kieruj lasera na siebie, na
innych lub na zwierzęta.
Aby wyłączyć laserową poziomicę,
ponownie wciśnij przycisk On/Off (7).
•Nie pozostawiaj włączonej
poziomicy bez nadzoru i
pamiętaj, aby wyłączyć ją po
każdym użyciu. Wiązka lasera
może oślepić inne osoby.
FUNKCJE MIERZENIA
Uwaga: Dokładność poziomicy jest
powiązana z poziomem znajdującej
się w niej cieczy. (1), (3) i (5).
Jak umiescić poziomicę
Poprawne wykalibrowanie poziomicy
jest powiązane z odpowiednim
poziomem płynu w poziomicy.
Dokładność pomiaru zależy od
poprawnego umieszczenia poziomicy.
14

15
• Aby wykalibrować poziomicę
w poziomie (1), aluminiowa
podstawa (2) laserowej poziomicy
powinna być skierowana w dół.
• Aby wykalibrować poziomicę w
pionie (3), otwór, przez który
wychodzi wiązka lasera (4)
musi być skierowany w dół.
Kalibrowanie wiązki lasera
Poziome kalibrowanie (zobacz
rysunek A): Przy pomocy szpilek
(nie załączone w komplecie) umieść
poziomicę przy ścianie, na dwóch
wspornikach (6). Możesz też umieścić
poziomicę na namagnesowanej
powierzchni, przy pomocy magnesów
(11). Aluminiowa powierzchnia
wspierająca laser (2) musi być
skeirowana w dół. Wykalibruj poziomicę
przy pomocy umieszczonej w niej cieczy
(1). Ramy obrazów lub kafelki można
układać wzdłuż poziomej linii lasera.
Pionowe kalibrowanie (zobacz
rysunek B): Przy pomocy szpilek
(nie załączone w komplecie) umieść
poziomicę przy ścianie, na dwóch
wspornikach (6). Możesz też umieścić
poziomicę na namagnesowanej
powierzchni, przy pomocy magnesów
(11). Otwór, przez który wychodzi
wiązka lasera (4) musi być skierowany
ku dołowi. Wykalibruj poziomicę przy
pomocy umieszczonej w niej cieczy
(3). Dolne i wiszące szafki można
umieszczać wzdłuż pionowej lini lasera.
Wykalibrowanie kąta 45 stopni
(zobacz rysunek C): Przy pomocy
szpilek (nie załączone w komplecie)
umieść poziomicę przy ścianie, na
dwóch wspornikach (6). Możesz też
umieścić poziomicę na namagnesowanej
powierzchni, przy pomocy magnesów
(11). Wykalibruj poziomicę przy pomocy
umieszczonej w niej cieczy (5).
Sprawdzanie poziomu/
pionu bez użycia lasera.
Poziomica moze być wykorzystana
do sprawdzania poziomu lub pionu,
na przykład przy ustawianiu pralki
lub lodowki. Umieść poziomicę na
aluminiowym wsporniku (2), w kierunku
powierzchni, którą chcesz sprawdzić.
Przy sprawdzaniu poziomu, aluminiowy
15

wspornik (2) powinien być skierowany
ku dołowi. Przy sprawdzaniu pionu,
otwór, przez który wychodzi wiązka
lasera (4) musi być skierowany w dół.
EKSPLOATACJA I CZYSZCZENIE
Sprawdź poziom płynu w poziomicy
przed każdym użyciem. Nie korzystaj
z poziomicy jeśli zauważysz jakiekolwiek
uszkodzenia lub obluzowane
elementy wewnątrz poziomicy. Jej
użycie może być niebezpieczne.
Aby zagwarantować poprawne
i bezpieczne działanie, trzymaj
poziomicę w czystym i suchym miejscu.
Wytrzyj jakiekolwiek zabrudzenia
miękką ściereczką, zmoczoną wodą.
Nie korzystaj z żadnych środków
czyszczących lub rozpuszczalnika.
INSTRUKCJE EKOLOGICZNEJ
UTYLIZACJI
Pomóż zadbać o środowisko
Informacje (dla prywatnych
użytkowników) na temat przyjaznej
dla środowiska utylizacji sprzętów
elektrycznych i elektronicznych,
w zgodzie z dyrektywą WEEE
(Waste Electrical and Electronic
Equipment/Zużyty sprzęt
elektryczny i elektroniczny).
Powyższy symbol umieszczony na
sprzęcie elektrycznym i elektronicznym
lub na towarzyszacej mu dokumentacji
oznacza, że sprzętu nie należy wyrzucać
do zwykłych pojemników na śmieci,
razem z innymi odpadami. Zużyty
sprzęt należy oddać do specjalnych
punktów, gdzie zostanie przyjęty
bez dodatkowej opłaty, a następnie
przetworzony, ponownie wykorzystany
lub poddany procesowi recyklingu.
W niektórych krajach zużyty sprzęt
można oddać do sklepu, w którym
kupuje się nowy, podobny sprzęt.
Pozbywając się zużytego sprzętu w
odpowiedni sposób, przyczyniasz
się do ochrony cennych surowców
naturalnych oraz do wyeliminowania
nagatywnego wpływu elektrośmieci na
zdrowie i środowisko. Skontaktuj się
z odpowiednim urzędem, aby uzyskać
informacje na temat najbliższego
16

17
punktu przyjmującego zużyty sprzęt
elektryczny lub elektroniczny.
Zgodnie z prawem, pozbywanie
się elektrośmieci w niewłaściwy
sposób podlega karze grzywny.
Utylizacja zużytych lub
uszkodzonych baterii
Nie wyrzucaj zużytych baterii do
zwykłych pojemników na śmieci.
Zgodnie z obowiązującym prawem,
zużyte lub uszkodzone baterie
należy oddać do najbliższego
punktu zajmującego się utylizacją
baterii lub do fabryki produkującej
baterie. Niezastosowanie się do
powyższych regulacji podlega karze.
Informacje na temat utylizacji
dla użytkowników mieszkających
poza Unią Europejską.
Powyższy symbol obowiązuje tylko
w Unii Europejskiej. Skontaktuj
się z odpowiednim urzędem lub
z producentem w celu uzyskania
informacji na temat odpowiedniej
utylizacji produktu.
17

18EESTI 18
FIXA laservesilood
TEHNILISED ANDMED
Töökauguse ulatus u: 3 m
Laseri tüüp: 635 nm
Laseri klass: 2
<1 mW laseri väljundvõimsus
Loodimistäpsus <= ± 1,4 mm
(1/16’’)/m
Kaal: 100g
OSADE LOETELU
Tooteosade numeratsioon viitab la-
ser-vesiloodi joonisele.
1. Vesilood horisontaaljoonduseks
2. Alumiiniumist aluspind
3. Vesilood vertikaaljoonduseks
4. Laserikiire väljumisava
5. Vesilood 45 kraadi all joonduseks
6. Toetuspunktid
7. On & Off (sisse ja välja) lüliti
8. Aku kaane riiv
9. Aku kaas
10. Laseri hoiatussilt
11. Magnetid
KASUTUSALA
Seda laserloodi võite kasutada selleks,
et määrata kindlaks horisontaalseid,
vertikaalseid ja 45 kraadiseid pindu, sa-
muti sobib see torude kontrollimiseks ja
horisontaalsete vaheseinte või pindade
kontrollimiseks.
Laser-vesilood sobib kasutamiseks ai-
nult siseruumides asuvatel tööpindadel.
ÜLDISED OHUTUSJUHISED
Laser-vesiloodi ohutusjuhend
Hoidke laser-vesilood eemal süda-
mestimulaatoritest. Magnetid (11)
loovad välja, mis võib segada südames-
timulaatoreid.
•o Hoidke laser-vesilood eemal
andmekandjate magnetväljast ja
magnetiliselt tundlikest seadme-
test. Magnetite mõju (11) võib kaasa
tuua pöördumatu andmete kadumise.
Ohutu töötamine laser-vesiloodiga
on võimalik ainult siis, kui täpselt
Other manuals for FIXA
36
Table of contents
Languages:
Other IKEA Laser Level manuals