IKEA FINSMAKARE User manual

FINSMAKARE GB

ENGLISH
Please refer to the last page of this manual for the full list of
IKEA appointed After Sales Service Provider and relative
national phone numbers.

ENGLISH 4

Contents
Safety information 4
Safety instructions 6
Installation 9
Product description 10
Control panel 10
Before rst use 12
Daily use 13
Clock functions 18
Automatic programmes 19
Using the accessories 19
Additional functions 21
Hints and tips 23
Care and cleaning 27
Troubleshooting 32
Technical data 33
Energy eciency 34
Environmental concerns 35
IKEA guarantee 35
Subject to change without notice.
Safety information
Before the installation and use of the appliance, carefully read
the supplied instructions. The manufacturer is not responsible
if an incorrect installation and use causes injuries and
damage. Always keep the instructions with the appliance for
future reference.
Children and vulnerable people safety
•This appliance can be used by children aged from 8 years
and above and persons with reduced physical, sensory or
mental capabilities or lack of experience and knowledge if
they have been given supervision or instruction concerning
the use of the appliance in a safe way and understand the
hazards involved. Children of less than 8 years of age and
persons with very extensive and complex disabilities shall be
kept away from the appliance unless continuously
supervised.
•Children should be supervised to ensure that they do not
play with the appliance.
•Keep all packaging away from children and dispose of it
appropriately.
ENGLISH 4

•WARNING: The appliance and its accessible parts become
hot during use. Keep children and pets away from the
appliance when in use and when cooling down.
•If the appliance has a child safety device, it should be
activated.
•Children shall not carry out cleaning and user maintenance
of the appliance without supervision.
General Safety
•Only a qualied person can install this appliance and replace
the cable.
•WARNING: The appliance and its accessible parts become
hot during use. Care should be taken to avoid touching
heating elements.
•Always use oven gloves to remove or insert accessories or
ovenware.
•Before any maintenance, cut the power supply.
•WARNING: Ensure that the appliance is switched o before
replacing the lamp to avoid the possibility of electric shock.
•Do not use the appliance before installing it in the built-in
structure.
•Do not use a steam cleaner to clean the appliance.
•Do not use harsh abrasive cleaners or sharp metal scrapers
to clean the glass door since they can scratch the surface,
which may result in shattering of the glass.
•If the mains power supply cable is damaged, it must be
replaced by the manufacturer, its Authorised Service Centre
or similarly qualied persons to avoid an electrical hazard.
•Before pyrolytic cleaning, remove all accessories and
excessive deposits/spills from the oven cavity.
•To remove the shelf supports rst pull the front of the shelf
support and then the rear end away from the side walls.
Install the shelf supports in the opposite sequence.
ENGLISH 5

•Use only the food sensor (core temperature sensor)
recommended for this appliance.
Safety instructions
Installation
Warning! Only a qualied person
must install this appliance.
• Remove all the packaging.
• Do not install or use a damaged
appliance.
• Follow the installation instructions
supplied with the appliance.
• Always take care when moving the
appliance as it is heavy. Always use safety
gloves and enclosed footwear.
• Do not pull the appliance by the handle.
• Install the appliance in a safe and suitable
place that meets installation
requirements.
• Keep the minimum distance from other
appliances and units.
• Before mounting the appliance, check if
the oven door opens without restraint.
Cabinet minimum
height (Cabinet under
the worktop mini‐
mum height)
580 (600) mm
Cabinet width 560 mm
Cabinet depth 550 (550) mm
Height of the front of
the appliance
589 mm
Height of the back of
the appliance
571 mm
Width of the front of
the appliance
595 mm
Width of the back of
the appliance
559 mm
Depth of the appli‐
ance
569 mm
Built in depth of the
appliance
548 mm
Depth with open door 1022 mm
Ventilation opening
minimum size. Open‐
ing placed on the bot‐
tom rear side
560x20 mm
Mains supply cable
length. Cable is
placed in the right
corner of the back
side
1500 mm
Mounting screws 4x25 mm
Electrical connection
Warning! Risk of re and electric
shock.
• All electrical connections should be made
by a qualied electrician.
• The appliance must be earthed.
• Make sure that the parameters on the
rating plate are compatible with the
electrical ratings of the mains power
supply.
• Always use a correctly installed
shockproof socket.
• Do not use multi-plug adapters and
extension cables.
• Make sure not to cause damage to the
mains plug and to the mains cable.
Should the mains cable need to be
replaced, this must be carried out by our
Authorised Service Centre.
• Do not let mains cables touch or come
near the appliance door or the niche
below the appliance, especially when it
operates or the door is hot.
ENGLISH 6

• The shock protection of live and insulated
parts must be fastened in such a way that
it cannot be removed without tools.
• Connect the mains plug to the mains
socket only at the end of the installation.
Make sure that there is access to the
mains plug after the installation.
• If the mains socket is loose, do not
connect the mains plug.
• Do not pull the mains cable to disconnect
the appliance. Always pull the mains plug.
• Use only correct isolation devices: line
protecting cut-outs, fuses (screw type
fuses removed from the holder), earth
leakage trips and contactors.
• The electrical installation must have an
isolation device which lets you disconnect
the appliance from the mains at all poles.
The isolation device must have a contact
opening width of minimum 3 mm.
• Fully close the appliance door before you
connect the mains plug to the mains
socket.
Use
Warning! Risk of injury, burns
and electric shock or explosion.
• Do not change the specication of this
appliance.
• Make sure that the ventilation openings
are not blocked.
• Do not let the appliance stay unattended
during operation.
• Deactivate the appliance after each use.
• Be careful when you open the appliance
door while the appliance is in operation.
Hot air can release.
• Do not operate the appliance with wet
hands or when it has contact with water.
• Do not apply pressure on the open door.
• Do not use the appliance as a work
surface or as a storage surface.
• Open the appliance door carefully. The
use of ingredients with alcohol can cause
a mixture of alcohol and air.
• Do not let sparks or open ames to come
in contact with the appliance when you
open the door.
• Do not put ammable products or items
that are wet with ammable products in,
near or on the appliance.
Warning! Risk of damage to the
appliance.
• To prevent damage or discoloration to the
enamel:
– do not put ovenware or other objects
in the appliance directly on the
bottom.
– do not put aluminium foil directly on
the bottom of cavity of the appliance.
– do not put water directly into the hot
appliance.
– do not keep moist dishes and food in
the appliance after you nish the
cooking.
– be careful when you remove or install
the accessories.
• Discoloration of the enamel or stainless
steel has no eect on the performance of
the appliance.
• Use a deep pan for moist cakes. Fruit
juices cause stains that can be
permanent.
• Always cook with the appliance door
closed.
• If the appliance is installed behind a
furniture panel (e.g. a door) make sure
the door is never closed when the
appliance operates. Heat and moisture
can build up behind a closed furniture
panel and cause subsequent damage to
the appliance, the housing unit or the
oor. Do not close the furniture panel
until the appliance has cooled down
completely after use.
Steam Cooking
Warning! Risk of burns and
damage to the appliance.
• Released Steam can cause burns:
– Do not open the appliance door
during the steam cooking operation.
– Open the appliance door with care
after the steam cooking operation.
ENGLISH 7

Care and Cleaning
Warning! Risk of injury, re, or
damage to the appliance.
• Before maintenance, deactivate the
appliance and disconnect the mains plug
from the mains socket.
• Make sure the appliance is cold. There is a
risk that the glass panels can break.
• Replace immediately the door glass
panels when they are damaged. Contact
the Authorised Service Centre.
• Be careful when you remove the door
from the appliance. The door is heavy!
• Clean regularly the appliance to prevent
the deterioration of the surface material.
• Fat and food remaining in the appliance
can cause re.
• If you use an oven spray, obey the safety
instructions on the packaging.
Pyrolytic cleaning
Warning! Risk of Injury / Fires /
Chemical Emissions (Fumes)
during the pyrolytic mode.
• During pyrolytic cleaning, fumes are
released that are not harmful to humans,
including infants or persons with medical
conditions.
• Unlike all humans, some birds and
reptiles can be extremely sensitive to
potential fumes emitted during the
cleaning process of all pyrolytic ovens.
Small pets can also be highly sensitive to
the localized temperature changes in the
vicinity of all pyrolytic ovens when the
pyrolytic self-cleaning program is in
operation.
• Before carrying out a pyrolytic self-
cleaning function or the First Use please
remove from the oven cavity:
– Any excess food residues, oil or
grease spills / deposits.
– Any removable objects (including
shelves, side rails / telescopic
runners, etc. provided with the
product) particularly any non-stick
pots, pans, trays, utensils etc.
• Non-stick surfaces on pots, pans, trays,
utensils etc., can be damaged by the high
temperature pyrolytic cleaning operation
of all pyrolytic ovens and can be also a
source for low level harmful fumes.
• Read carefully all the instructions for
pyrolytic cleaning.
• Keep children away from the appliance
while the pyrolytic cleaning is in
operation. The appliance becomes very
hot and hot air is released from the front
cooling vents.
• Pyrolytic cleaning and rst maximum
temperature use are high temperature
operations that can release fumes from
cooking residues and construction
materials, as such consumers are strongly
advised to:
– Provide good ventilation during and
after each pyrolytic cleaning.
– Provide good ventilation during and
after the rst use at maximum
temperature operation.
• Ensure that any pets (especially birds) are
taken as far as possible from the vicinity
of the appliance location during and after
the pyrolytic cleaning and rst use
maximum temperature operation.
Keeping them in a dierent room would
be the preferred option during the
pyrolytic cycle and until appliance has
cooled down again to room temperature.
Good ventilation has to be provided
during and after (till appliance cool down)
operations of the pyrolytic cycle and rst
maximum temperature use cycle.
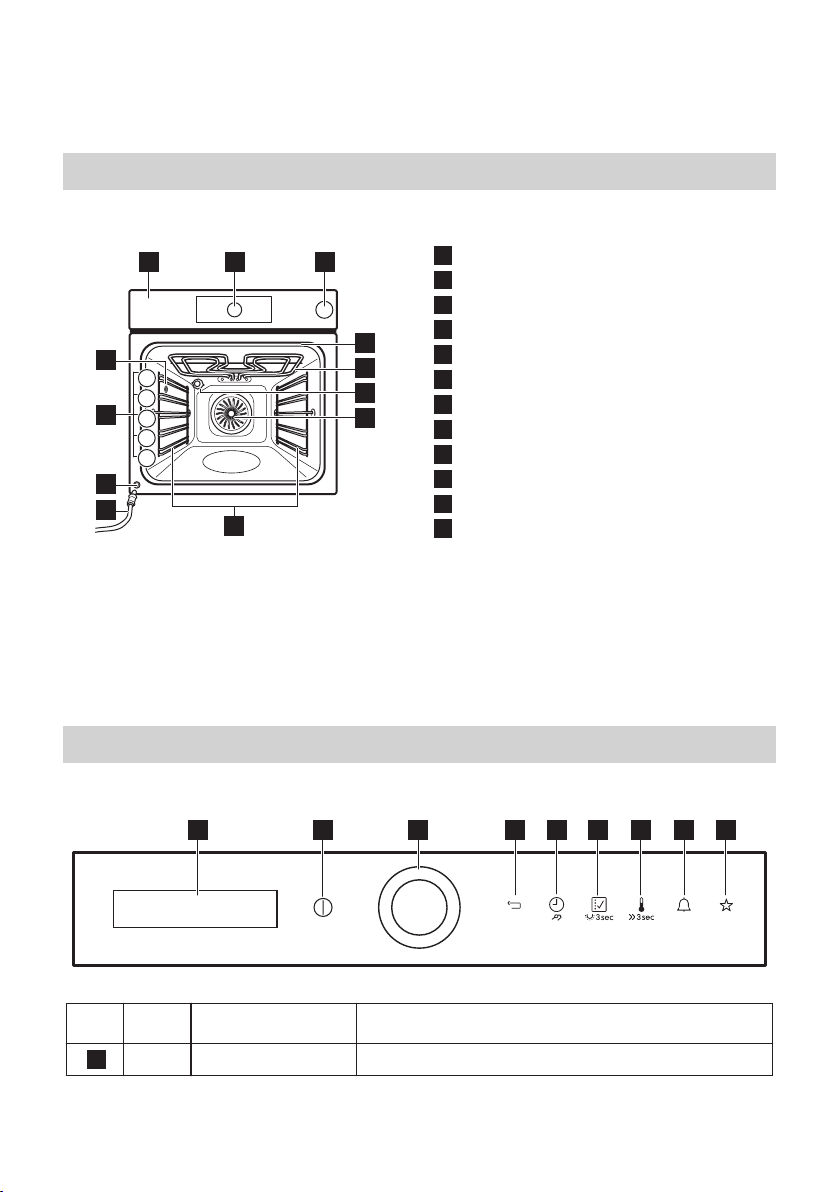
Internal lighting
Warning! Risk of electric shock.
• Concerning the lamp(s) inside this
product and spare part lamps sold
separately: These lamps are intended to
withstand extreme physical conditions in
household appliances, such as
temperature, vibration, humidity, or are
intended to signal information about the
operational status of the appliance. They
are not intended to be used in other
ENGLISH 8

applications and are not suitable for
household room illumination.
• This product contains a light source of
energy eciency class G.
• Use only lamps with the same
specications.
Service
• To repair the appliance contact the
Authorised Service Centre.
• Use original spare parts only.
Disposal
Warning! Risk of injury or
suocation.
• Disconnect the appliance from the mains
supply.
• Cut o the mains electrical cable close to
the appliance and dispose of it.
• Remove the door to prevent children and
pets to get closed in the appliance.
•Packaging material:
The packaging material is recyclable.
Plastic parts are marked with
international abbreviations such as PE,
PS, etc. Dispose of the packaging material
in the containers provided for this
purpose at your local waste management
facility.
Installation
Warning! Refer to Safety
chapters.
Assembly
Refer to the Assembly
Instructions for the installation.
Electrical installation
Warning! Only a qualied person
must do the electrical installation.
The manufacturer is not
responsible if you do not follow
the safety precautions from the
Safety chapters.
This oven is only supplied with a main cable.
ENGLISH 9

Product description
General overview
6
12
10
9
5
4
11
8
5
4
1
2
3
2 3
7
1
1Control panel
2Electronic programmer
3Water drawer
4Socket for the core temperature sensor
5Grill
6Lamp
7Fan
8Shelf support, removable
9Draining pipe
10 Water outlet valve
11 Shelf positions
12 Steam inlet
Accessories
•Wire shelf x 2
For cookware, cake tins, roasts.
•Baking tray x 1
For cakes and biscuits.
•Grill- / Roasting pan x 1
To bake and roast or as pan to collect fat.
•Core temperature sensor x 1
To measure how far the food is cooked.
•Telescopic runners x 2 sets
For shelves and trays.
Control panel
Electronic programmer
31 2 4 5 6 7 8 9
Use the sensor elds to operate the oven.
Sensor
eld
Function Description
1- Display Shows the current settings of the oven.
ENGLISH 10

Sensor
eld
Function Description
2ON / OFF To turn the oven on and o.
3OK and shuttle To conrm the selection or setting. Rotate the shuttle
to navigate.
4Back key To go back one level in the menu. Press for 3 seconds
to show the main menu.
5
Time and additional
functions
To set dierent functions. When a heating function
works, press the sensor eld to set the timer or the
functions: Function Lock, Favourites, Heat + Hold, Set
+ Go. You can also change the settings of the core
temperature sensor.
6
Heating Functions
or Assisted Cooking
Press once to enter to the Heating Functions Menu.
Press again to switch to Assisted Cooking. To activate
or deactivate the light, touch for 3 seconds.
7
Temperature selec‐
tion
To set the temperature or show the current tempera‐
ture in the oven. Press for 3 seconds, to turn on or
turn o the function: Fast Heat Up.
8Minute Minder To set the function: Minute Minder.
9Favourites To save and access your favourite programmes.
Display
A
DE
B C
A. Heating function
B. Time of day
C. Heat-up indicator
D. Temperature
E. Duration time or end time of a function
Other indicators of the display:
Symbol Function
Minute Minder The function works.
Time of day The display shows the current time.
ENGLISH 11

Symbol Function
Duration The display shows the necessary time
for cooking.
End Time The display shows when the cooking
time is complete.
Temperature The display shows the temperature.
Time Indication The display shows how long the heat‐
ing function works.
Calculation The oven calculates the time for cook‐
ing.
Heat-up Indicator The display shows the temperature in
the oven.
Fast Heat Up The function works. It decreases the
heat up time.
Weight Automatic The display shows that the automatic
weight system works or that weight
can be changed.
Heat + Hold The function works.
Before rst use
Warning! Refer to Safety
chapters.
Initial Cleaning
Remove all accessories and removable shelf
supports from the oven.
Refer to "Care and cleaning" chapter.
Clean the oven and the accessories before
the rst use.
Put the accessories and the removable shelf
supports back to their initial position.
First Connection
When you connect the oven to the mains or
after the power cut, you have to set the
language, the display contrast, the display
brightness and the time of the day.
1. Use the shuttle to set the values.
2. Press to conrm.
Preheating
Before rst use preheat the oven with only
wire shelves and baking trays inside.
1. Set the function: Conventional Cooking
and the maximum temperature.
2. Let the oven operate for 1 hour.
3. Set the function: True Fan Cooking
and the maximum temperature.
4. Let the oven operate for 15 minutes.
Accessories can become hotter than usual.
The oven can emit an odour and smoke
during preheating. Make sure that the
airow in the room is sucient.
ENGLISH 12

Using the Mechanical child lock
The oven has the child lock installed. It is on
the right side of the oven, below the control
panel.
To open the oven door with the child lock:
1. Pull and hold the child lock handle up as
shown in the picture.
2. Open the door.
Close the oven door without pulling the child
lock.
To remove the child lock, open the oven door
and remove the child lock with the torx key.
The torx key is in the oven tting bag.
Screw back the screw into the hole after
removing the child lock.
Warning! Be careful not to
scratch the control panel.
Daily use
Warning! Refer to Safety
chapters.
Navigating the menus
1. Turn on the oven.
2. Use the shuttle clockwise or
counterclockwise to select the menu
option.
3. Press to move to the submenu or
accept the setting.
At each point you can go back to
the main menu with .
The menus in overview
Main menu
Symbol / Menu
item
Application
Heating Func‐
tions
Contains a list of heat‐
ing functions.
Symbol / Menu
item
Application
Recipes
Contains a list of auto‐
matic programmes.
The recipes for these
programmes can be
found in the recipe
book.
Favourites
Contains a list of fa‐
vourite cooking pro‐
grammes created by
the user.
Cleaning
Pyrolytic cleaning.
Basic Settings
Used to set the appli‐
ance conguration.
Specials
Contains a list of addi‐
tional heating func‐
tions.
ENGLISH 13

Symbol / Menu
item
Application
Assisted Cooking
Contains recommen‐
ded oven settings for a
wide choice of dishes.
Select a dish and start
the cooking process.
The temperature and
time are only guide‐
lines for a better result
and can be adjusted.
They depend on the
recipes and the quality
and quantity of the
used ingredients.
In the Recipe Book you
can nd the submenu
for: Assisted Cooking.
Submenu for: Basic Settings
Symbol / Menu
item
Description
Set Time of Day
Sets the current time
on the clock.
Time Indication
When ON, the display
shows the current time
when you deactivate
the appliance.
Fast Heat Up
When ON, the function
decreases the heat-up
time.
Set + Go
To set a function and
activate it later with a
press of any symbol on
the control panel.
Heat + Hold
Keeps the prepared
food warm for 30 mi‐
nutes after a cooking
cycle nished.
Time Extension
Activates and deacti‐
vates the time exten‐
sion function.
Symbol / Menu
item
Description
Display Contrast
Adjusts the display con‐
trast by degrees.
Display Bright‐
ness
Adjusts the display
brightness by degrees.
Set Language
Sets the language for
the display.
Buzzer Volume
Adjusts the volume of
press-tones and signals
by degrees.
Key Tones
Activates and deacti‐
vates the tone of the
touch elds. It is not
possible to deactivate
the tone of the ON /
OFF touch eld.
Alarm / Error
Tones
Activates and deacti‐
vates the alarm tones.
Cleaning Remind‐
er
Reminds you when to
clean the appliance.
DEMO mode
For retailer use only.
Service
Shows the software
version and congura‐
tion.
Factory Settings
Resets all settings to
factory settings.
ENGLISH 14

Heating Functions
Heating
function
Application
True Fan
Cooking
To bake on up to three shelf
positions at the same time
and to dry food.
Set the temperature 20 - 40 °C
lower than for Conventional
Cooking.
True Fan +
Steam
To steam dishes. Use this
function to decrease the
length of the cooking time
and to preserve the vitamins
and nutrients in the food. Se‐
lect the function and set the
temperature between 130 °C
to 230 °C.
Conven‐
tional
Cooking
To bake and roast food on
one shelf position.
Pizza Func‐
tion
To bake pizza. To make inten‐
sive browning and a crispy
bottom.
Select the function and set
the temperature between
130 °C to 230 °C.
Slow Cook‐
ing
To prepare tender, succulent
roasts.
Bottom
Heat
To bake cakes with crispy bot‐
tom and to preserve food.
Heating
function
Application
Moist Fan
Baking
This function is designed to
save energy during cooking.
When you use this function,
the temperature in the cavity
may dier from the set tem‐
perature. The residual heat is
used. The heating power may
be reduced. For more infor‐
mation refer to "Daily Use"
chapter, Notes on: Moist Fan
Baking.
Frozen
Foods
To make convenience food
(e.g., french fries, potato
wedges or spring rolls) crispy.
Grill
To grill thin pieces of food and
to toast bread.
Fast Grill‐
ing
To grill thin pieces of food in
large quantities and to toast
bread.
Turbo Grill‐
ing
To roast large meat joints or
poultry with bones on one
shelf position. To make gra‐
tins and to brown.
Steam Re‐
generating
Food reheating with steam
prevents surface drying. Heat
is distributed in a gentle and
even way, which allows to re‐
cover taste and aroma of food
as just prepared. This function
can be used to reheat food di‐
rectly on a plate. You can re‐
heat more than one plate at
the same time, using dierent
shelf positions.
ENGLISH 15

Specials
Heating function Application
Bread Baking
To bake bread.
Au Gratin
For dishes such as lasa‐
gna or potato gratin. To
make gratins and to
brown.
Dough Proving
To rise the yeast dough
before baking. When
you use this function
the lamp automatically
turns o after 30 sec‐
onds.
Plate Warming
To preheat plates for
serving.
Preserving
To preserve vegetables
(e.g., pickles).
Dehydrating
To dry sliced fruit, veg‐
etables and mush‐
rooms.
Keep Warm
To keep food warm.
Defrost
To defrost food (vege‐
tables and fruit). The
defrosting time de‐
pends on the amount
and size of the frozen
food. When you use
this function the lamp
automatically turns o
after 30 seconds.
Notes on: Moist Fan Baking
This function was used to comply with the
energy eciency class and ecodesign
requirements (according to EU 65/2014 and
EU 66/2014). Tests according to:
For EU: EN 60350-1
For UK: BS EN 60350-1
The oven door should be closed during
cooking so that the function is not
interrupted and the oven operates with the
highest energy eciency possible.
When you use this function the lamp
automatically turns o after 30 sec.
For the cooking instructions refer to "Hints
and tips" chapter, Moist Fan Baking.
Setting a heating function
1. Turn on the oven.
2. Select the menu: Heating Functions.
3. Press to conrm.
4. Select a heating function.
5. Press to conrm.
6. Set the temperature.
7. Press to conrm.
Setting a steam function
The water drawer cover is in the control
panel.
Warning! Use only cold tap water.
Do not use ltered
(demineralised) or distilled water.
Do not use other liquids. Do not
put ammable or alcoholic liquids
into the water drawer.
1. Press the cover of the water drawer to
open it.
2. Fill the water drawer with 900 ml of
water.
The water supply is sucient for
approximately 55 - 60 minutes.
3. Push the water drawer to its initial
position.
4. Turn on the oven.
5. Set a steam heating function and the
temperature.
6. If necessary, set the function: Duration
or: End Time .
When the steam generator is
empty, the signal sounds.
ENGLISH 16

The signal sounds at the end of the cooking
time.
7. Turn o the oven.
8. Empty the water tank after the steam
cooking is completed. Refer to the
cleaning function:Tank Emptying.
Caution! The oven is hot.
There is a risk of burns. Be
careful when you empty the
water tank.
9. After steam cooking steam can
condensate on the bottom of the cavity.
Always dry the bottom of the cavity when
the oven is cool.
Let the oven dry fully with the door open.
Warning! Wait a minimum of 60
minutes after each use of the
steam cooking in order to prevent
hot water from exiting the water
outlet valve.
Tank Empty indicator
The display shows: Water required and a
signal sounds when the tank is empty and
must be relled.
For more information refer to "Daily use"
chapter, Setting a steam function.
Tank Full indicator
When the display shows: Water tank full, you
can use the steam cooking.
A signal sounds when the tank is full.
If you put too much water into
the tank, the safety outlet moves
the excess water to the bottom of
the oven.
Remove the water with a sponge
or cloth.
Emptying the water tank
Caution! Make sure that the oven
is cool before you start to empty
the water tank.
1. Prepare the draining pipe (C), included in
the same package with the user manual.
Put the connector (B) onto one of the
ends of the draining pipe.
B
C
A
2. Put the second end of the draining pipe
(C) into a container. Put it at a lower
position than the outlet valve (A).
3. Open the oven door and put the
connector (B) into the outlet valve (A).
4. Push the connector again and again
when you empty the water tank.
The tank can have some water
when the display shows:
Water required.
Wait until the water ow from
the water outlet valve stops.
5. Remove the connector from the valve
when the water stops owing.
Do not use the drained water to
ll the water tank again.
Heat-up indicator
When you turn on a heating function, the
bar on the display comes on. The bar shows
that the temperature increases. When
temperature is reached the buzzer sounds 3
times and the bar ashes and then
disappears.
Fast Heat Up
This function decreases the heat-up time.
Do not put food in the oven when
the Fast heat up function works.
To turn on the function, hold for 3
seconds. The heat-up indicator alternates.
ENGLISH 17

This function is not available for some oven
functions. Residual heat
When you turn o the oven, the display
shows the residual heat. You can use the
heat to keep the food warm.
Clock functions
Clock functions table
Clock function Application
Minute Mind‐
er
To set a countdown
(max. 2 h 30 min). This
function has no eect
on the operation of the
oven.
Press to turn on the
function. Use the shuttle
to set the minutes and
to start.
Duration To set how long the
oven works (max. 23 h
59 min).
End Time To set the switch-o
time for a heating func‐
tion (max. 23 h 59 min).
If you set the time for a clock function, the
time starts to count down after 5 seconds.
If you use the clock functions:
Duration, End Time, the oven
turns o the heating elements
after 90 % of the set time. The
oven uses the residual heat to
continue the cooking process
until the time ends (3 - 20
minutes).
Setting the clock functions
Before you use the functions:
Duration, End Time, you must set
a heating function and
temperature rst. The oven turns
o automatically.
You can use the functions:
Duration and End Time at the
same time if you want to
automatically turn on and turn o
the oven on a given time later.
The functions: Duration and End
Time do not work when you use
the core temperature sensor.
1. Set a heating function.
2. Press again and again until the
display shows the necessary clock
function and the related symbol.
3. Use the shuttle to set the necessary time.
4. Press to conrm.
When the time ends, a signal sounds. The
oven turns o. The display shows a
message.
5. Press any symbol to stop the signal.
Heat + Hold
Conditions for the function:
• The set temperature is more than 80 °C.
• The function: Duration is set.
The function: Heat + Hold keeps prepared
food warm at 80 °C for 30 minutes. It turns
on after the baking or roasting procedure
ends.
You can turn on or turn o the function in
the menu: Basic Settings.
1. Turn on the oven.
2. Select the heating function.
ENGLISH 18

3. Set the temperature above 80 °C.
4. Press again and again until the
display shows: Heat + Hold.
5. Press to conrm.
When the function ends, a signal sounds.
Time Extension
The function: Time Extension makes the
heating function continue after the end of
Duration.
Applicable to all heating functions
with Duration or Weight
Automatic.
Not applicable to heating
functions with the core
temperature sensor.
1. When the cooking time ends, a signal
sounds. Press any symbol.
The display shows the message.
2. Press to turn on or to cancel.
3. Set the length of the function.
4. Press .
Automatic programmes
Warning! Refer to Safety
chapters.
Recipes online
You can nd the recipes for the
automatic programmes specied
for this oven on the website
www.ikea.com. To nd the proper
Recipe Book check the article
number on the rating plate on the
front frame of the oven cavity.
Recipes
This oven has a set of recipes you can use.
The recipes are xed and you cannot change
them.
1. Turn on the oven.
2. Select the menu: Recipes. Press to
conrm.
3. Select the category and dish. Press to
conrm.
4. Select a recipe. Press to conrm.
Using the accessories
Warning! Refer to Safety
chapters.
Inserting the accessories
Wire shelf:
Push the shelf between the guide bars of the
shelf support and make sure that the feet
point down.
ENGLISH 19

Baking tray/ Deep pan:
Push the baking tray / deep pan between the
guide bars of the shelf support.
Wire shelf and baking tray / deep pan
together:
Push the baking tray / deep pan between the
guide bars of the shelf support and the wire
shelf on the guide bars above.
Small indentation at the top
increase safety. The indentations
are also anti-tip devices. The high
rim around the shelf prevents
cookware from slipping of the
shelf.
Core temperature sensor
There are two temperatures to be set: the
oven temperature and the core temperature.
The core temperature sensor measures the
core temperature of the meat. When the
meat is at the set temperature, the oven
turns o.
Caution! Only use the core
temperature sensor supplied or
the correct replacement parts.
The core temperature sensor
must stay in the meat and in the
socket during the cooking.
1. Put the tip of the core temperature
sensor into the centre of the meat.
2. Put the plug of the core temperature
sensor into the socket at the top of the
cavity.
3. Turn on the oven.
The display shows the core temperature
sensor symbol.
4. Use the shuttle in less than 5 seconds to
set the core temperature.
5. Set the heating function and, if
necessary, the oven temperature.
ENGLISH 20
Other manuals for FINSMAKARE
21
Table of contents
Other IKEA Oven manuals

IKEA
IKEA GÖRLIG User manual

IKEA
IKEA SMAKSAK 704.116.73 User manual

IKEA
IKEA KULINARISK User manual

IKEA
IKEA MATÄLSKARE User manual

IKEA
IKEA MIRAKULOS User manual

IKEA
IKEA SMAKSAK User manual

IKEA
IKEA BRÄNDBO User manual

IKEA
IKEA 105.570.41 User manual

IKEA
IKEA GÖRLIG User manual

IKEA
IKEA EFTERSMAK User manual
Popular Oven manuals by other brands

Electrolux
Electrolux EOG 621 Instruction booklet

ILVE
ILVE 600SVG instruction manual

KitchenAid
KitchenAid KEBS208DBL1 parts list

Jenn-Air
Jenn-Air W2451 Service manual

Amana
Amana Gas Freestanding BIG OVEN Service manual

Ancona
Ancona FREESTANDING RANGE GAS COOKTOP ELECTRIC OVEN User manual and installation instructions