manuals.online logo
Brands
  1. Home
  2. •
  3. Brands
  4. •
  5. Ikelite
  6. •
  7. Camera Accessories
  8. •
  9. Ikelite 5510.35 User manual

Ikelite 5510.35 User manual

CCAAUUTTIIOONN::WWhheenn tthhee ppoorrtt wwiillll nnoott bbee uusseedd ffoorr pprroolloonnggeedd
ppeerriiooddss wwee rreeoommmmeenndd uunnssrreewwiinngg aallll sseettiioonnss ooff tthhee PPoorrtt.. IIff
sseettiioonnss aarree nnoott uunnssrreewweedd ffoorr pprroolloonnggeedd ppeerriiooddss iitt aann mmaakkee
uunnssrreewwiinngg ddiiffffiiuulltt..
For prolonged storage, the port should be removed from the
housing and the port se tions should be uns rewed. All o-rings on
port se tions should be removed, leaned, lightly lubri ated and
reinstalled on ea h port se tion. If you s rew the port se tions ba k
together for storage, only engage a few threads leaving the sealing
o-ring visible.
Cover the Flat Glass Assembly with prote tive over when not in
use.
CCAAUUTTIIOONN: Never use spray lubri ants as the propellant
ingredient an ause ra king in this produ t.
3
PPoorrtt SSeeaall IInnssiiddee VViieeww
Due to the overhang of the port
flange, the port seal is most visible when
viewed by looking inside the housing
before the amera is inserted. After the
port is installed, he k to see that the
o-ring is properly sealed as shown in
Figure 1 and not extruded
as shown in Figure 2.
Fig. 1
Fig. 2
IImmppoorrttaanntt IInnffoorrmmaattiioonn
4
I
Im
mp
po
or
rt
ta
an
nt
t N
No
ot
ti
i
e
e
Port Bodies are engraved with a Maximum Depth Rating,
““RRAATTEEDD 220000 FFTT ((6600mm))””. They are engraved on the flat flange that
rests against the front of the amera housing; see illustration.
Older Standard
and Extended Port
Bodies that are NOT
ENGRAVED, HAVE A
MAXIMUM DEPTH
RATING OF 150 FEET
(45M). The unmarked
Standard or Extended
Port Bodies an be
returned to Ikelite for
a no harge repla ement with the newer 200 ft. (60m) rated
Bodies, SSeenndd PPoorrtt BBooddyy OOnnllyy.
Maximum
Dept Rating
engraved
on flange
SSppeeiiaall RReeqquuiirreemmeenntt ffoorr NNiikkoonn 110055mmmm VVRR LLeennss
Use of the new Modular Flat Port with the Nikon 105 VR
Ma ro lens requires modifi ation to early Port Bodies. This
modifi ation expands the inner diameter of the Port Body to
a ept the larger base of the Nikon 105mm VR lens. Port Bodies
produ ed after 4/15/08 will in lude this modifi ation and will bear
the designation ““RRAATTEEDD 220000FFTT ((6600mm)) LLAARRGGEE DDIIAA..””on the flange
that rests against the housing body. Early Port Bodies without this
designation may be returned dire tly to Ikelite to be modified for
use with the Nikon 105mm VR Lens.
2
Thank you for your pur hase of the Ikelite Flat Modular Port System.
Ikelite produ ts have been designed and built in the USA for over 45
years by Ikelite for both the professional and amateur photographer.
Our modular port system allows you to build a port out of universal
omponents to a ommodate a variety of ma ro, zoom, and wide-
angle lenses. The inter hangeable port bodies and extensions ombine
to reate endless ombinations for maximum versatility and
performan e.
This produ t should re eive the same are and attention as your other
photographi produ ts.
Cover the fa eplate with the prote tive over when not in use.
Flat Modular Port
instru tion manual
#5510.10 and #5510.11 Superwide Port Bodies are “Rated 200 ft.
(60m)“ whether or not they are engraved. DO NOT return
Superwide bodies for ex hange. Superwide bodies are NOT
re ommended for use with the Modular Flat Port system.
SSrreewwiinngg MMoodduulleess TTooggeetthheerr
On e prepared for assembly the modules an be s rewed
together and only need to be hand tight. A strap wren h is supplied
and an be used to assemble or disassemble as required.
PPrreeppaarriinngg tthhee FFllaatt AAsssseemmbbllyy MMoodduullee ffoorr IInnssttaallllaattiioonn
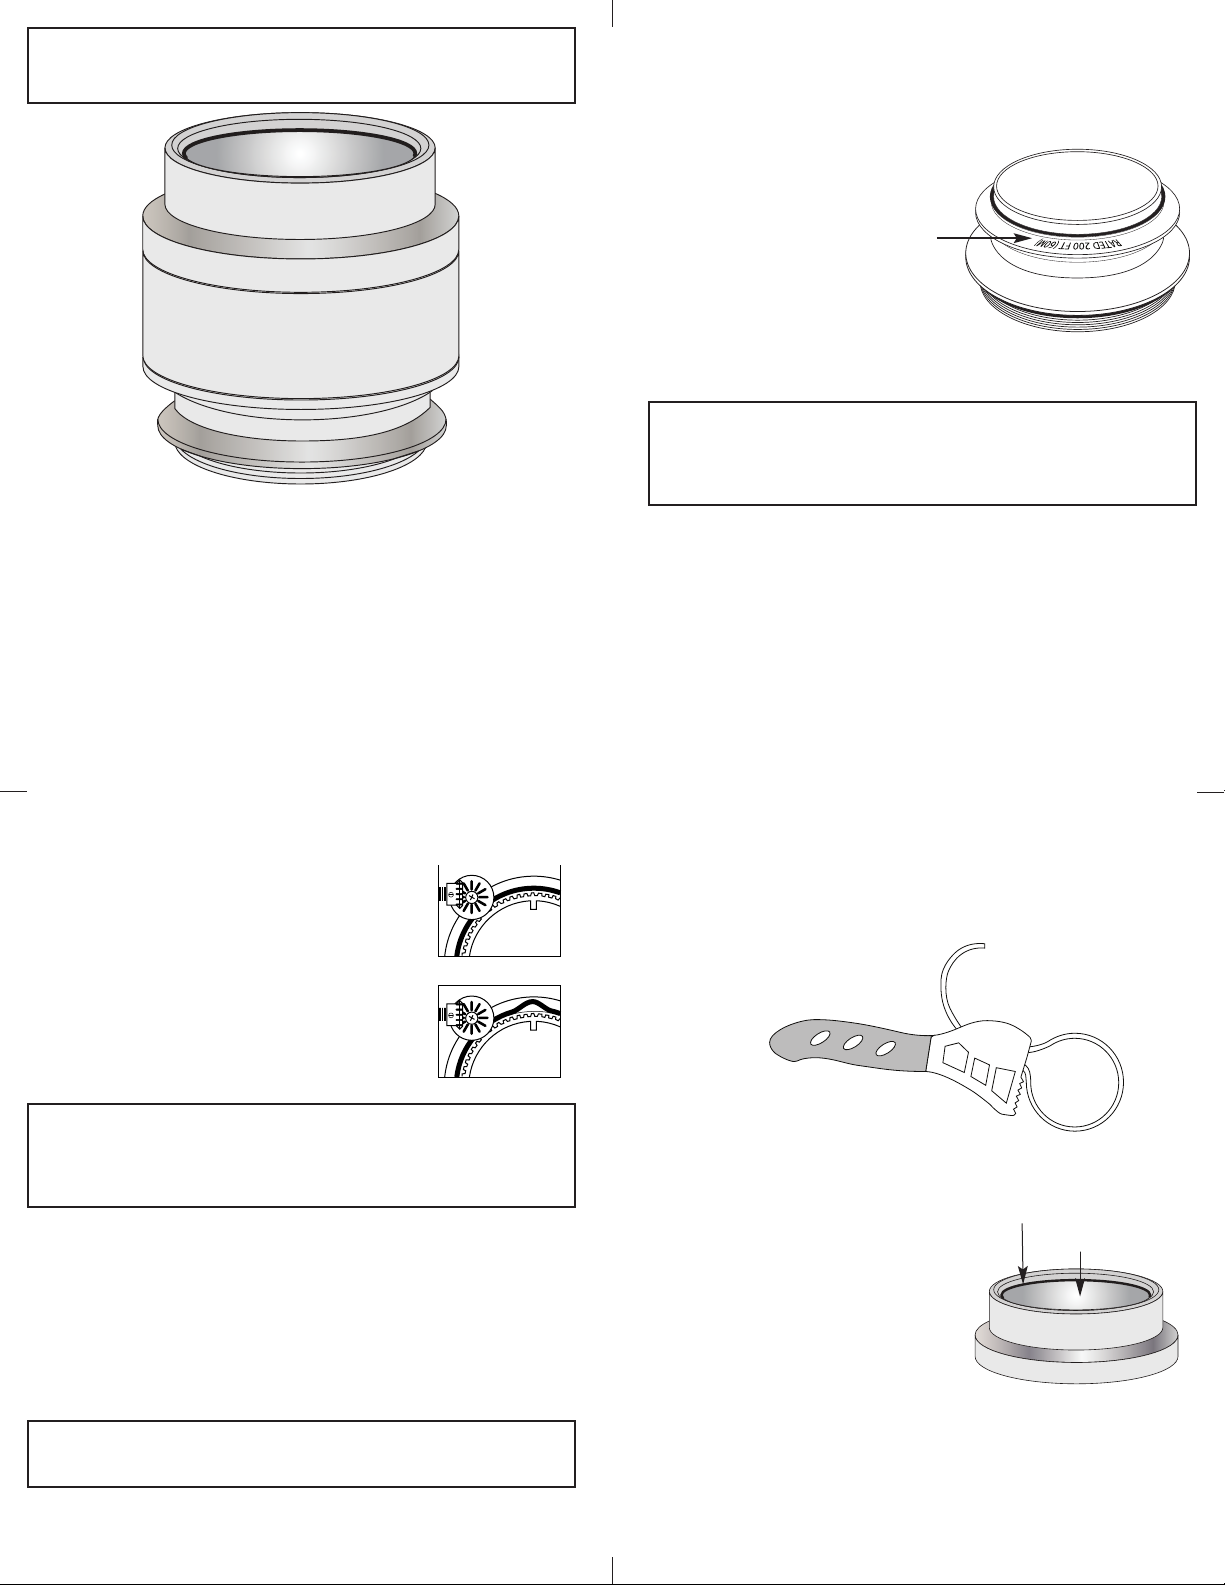
The Flat Assembly Module has an
o-ring that seals and holds the lear
fa eplate in pla e. DDoo NNoottremove
the lear fa eplate o-ring. The
interior and exterior of the lear
fa eplate an be leaned with fresh
water or water with a mild
non-abrasive soap. On the inside of
the Flat Assembly Module just below
the internal threads is a flat sealing
surfa e. This sealing surfa e is where
the o-ring on the Port Body or Extension Ring will seal when they
are s rewed together. Make sure the threads and sealing surfa e
are lean. Use a Q-tip and fresh water, or water with a mild
non-abrasive soap to lean.
Flat Assembly Module
Clear Faceplate
Clear Faceplate o-ring
strap wrenc
5
78
AAsssseemmbblliinngg tthhee FFllaatt PPoorrtt
PPoorrtt oonnssiissttss ooff FFllaatt AAsssseemmbbllyy MMoodduullee aanndd PPoorrtt BBooddyy MMoodduullee
Assemble the Flat Port by s rewing ea h module together as
shown. Modules only need to be hand tight.
#5510.35 Flat Assembly Module
Port Body Module
(varies in lengt )
#5510.16 s own
Housing port opening
Port Lock
FFoouuss EExxtteennssiioonn MMoodduullee ##55551100..7755
5510.75 Focus
Extension Module
P
Pr
re
ep
pa
ar
ri
in
ng
g P
Po
or
rt
t B
Bo
od
di
ie
es
s a
an
nd
d O
O-
-r
ri
in
ng
gs
s f
fo
or
r I
In
ns
st
ta
al
ll
la
at
ti
io
on
n
The Port Body has 2 o-rings. The o-ring on the bottom seals
against the port opening in the SLR-DC housing. The top o-ring
seals against an Extension
Ring or the Flat Port
Assembly. Both o-rings
should be lean and lightly
lubri ated before
installation. To remove the
top o-ring from it’s groove,
use a non-sharp instrument
su h as a small flat bladed
s rewdriver. O-rings an be
leaned with fresh water. To lubri ate the o-ring, put a small
amount of lubri ant on your finger tips and gently pull the o-ring
through your fingers. Use only a small amount of lubri ant. The
o-ring only needs a light oating of lubri ant, just enough to make
it feel sli k. Remove any ex ess lubri ant as it an olle t foreign
parti les su h as sand, whi h an interfere with sealing. When
gently pulling the o-ring through your fingers, do not stret h the
o-ring. Che k the o-ring groove where the o-ring fits on the Port
Body to make sure it is lean. Use Q-tips and fresh water, or water
with a mild non-abrasive soap to lean the groove. Also he k the
port opening in the housing where the housing/port o-ring will seal
to make sure it is lean.
ousing/port
o-ring Port Body
o-ring
#5510.10 and #5510.11 Super-Wide Port Bodies are NOT
re ommended for use with the Modular Flat Port system.
6
PPrreeppaarriinngg PPoorrtt EExxtteennssiioonnss ffoorr IInnssttaallllaattiioonn
N
No
on
n-
-F
Fo
o
u
us
s E
Ex
xt
te
en
ns
si
io
on
n M
Mo
od
du
ul
le
e
If an extension ring is used in your Flat Port system, the o-ring
below the outer threads should be removed, leaned, and lightly
lubri ated before installing the Flat Port Assembly.
On the inside of the Extension
Ring just below the internal
threads is a flat sealing surfa e.
This sealing surfa e is were the
o-ring on the Port Body will seal
when they are s rewed together.
Make sure the threads and
sealing surfa e are lean, use a
Q-tip with fresh water, or water
with a mild non-abrasive soap solution.
For proper o-ring preparation, Refer to page 5 ((PPrreeppaarriinngg PPoorrtt
BBooddiieess aanndd OO--rriinnggss ffoorr IInnssttaallllaattiioonn)).
Extension Module
FFoouuss EExxtteennssiioonn MMoodduullee iiss nnoott
ttoo bbee uusseedd wwiitthh SSuuppeerr--WWiiddee
PPoorrtt BBooddyy ##55551100..1100 oorr ##55551100..1111
If you are using a Fo us Extension Module, please refer to your
Ikelite Manual Fo us Port Extension #5510.75 instru tion manual
for proper installation.
AAsssseemmbblliinngg tthhee FFllaatt PPoorrtt
PPoorrtt oonnssiissttss ooff FFllaatt AAsssseemmbbllyy MMoodduullee,, EExxtteennssiioonn MMoodduullee oorr FFoouuss
EExxtteennssiioonn MMoodduullee,, aanndd PPoorrtt BBooddyy MMoodduullee..
Assemble the Modular Flat Port by s rewing ea h module together
as shown. Modules only need to be hand tight.
#5510.35 Flat Assembly Module
Extension Module
(varies in lengt )
5510.75 Focus
Extension Module
Port Body Module
(varies in lengt )
Housing port opening
Port Lock
RReettuurrnniinngg PPrroodduuttss ffoorr SSeerrvviiee
Ikelite is most interested in preforming any servi e to assure that
all produ ts perform as intended. For repair or servi e, return the
produ t to the address below with your name, address, phone
number and a brief des ription of the problem. Eviden e of
pur hase date must be provided to obtain warranty servi e.
Normal servi e turnaround time is approximately 2-3 weeks.
IIkkeelliittee UUnnddeerrwwaatteerr SSyysstteemmss
5500 WW 3333rrdd SSttrreeeett
IInnddiiaannaappoolliiss,, IINN 4466220088 UUSSAA
WWhheenn rreettuurrnniinngg pprroodduuttss,, sseenndd ““aattttnn.. RReeppaaiirr DDeepptt..””
331177--992233--44552233
““ggeenneerraall qquueessttiioonnss”” ee--mmaaiill:: iikkeelliittee@@iikkeelliittee..oomm
wwwwww..iikkeelliittee..oomm
10
IInnssttaalllliinngg tthhee MMoodduullaarr FFllaatt PPoorrtt
There are four port lo ks on the front of the housing. Ea h Port
Lo k has a Release Button. Lift the release button and slide ea h
Port Lo k away from the
port opening before
installing the port. In the
unlo ked position, the
Release Button will remain
in the up or open position
as shown.
The housing port seal is
a piston seal and requires
that the housing/port
o-ring be lightly lubri ated
for easy installation. Put a
small amount of lubri ant
on your fingers and gently
pull the o-ring through your fingers to lightly lubri ate it. Do not
stret h the o-ring. Che k that the lip of the Port Body where the
o-ring fits and the sealing surfa e on the housing are lean. Pla e
the o-ring ba k onto the Port Body. Pla e the port and o-ring into
the housing’s port opening. Press down on the port firmly and
evenly until you feel the port slide into pla e. Continue to push
down on the port. Using your other hand, push ea h port lo k
forward. The Release Button on the port lo k will drop down and
li k into the lo ked position.
VViissuuaallllyy hheekk tthhee ppoorrtt llookkssbefore ea h dive to make sure they
are in the down and lo ked position. Do not rely solely on the
audible li k when pushing ea h port lo k in.
CChheekk aarroouunndd tthhee ppeerriimmeetteerr ooff tthhee ppoorrtt sseeaallto see that the o-ring
is properly sealed and not extruded.
Slide To Open
Lift To Unlock
Open Position
Port Lock Release Button
in Locked Position
Port Lock Release Button
in Unlocked Position
Push forward
to Lock —Release Button
will drop down and click into
locked position
➜
➜
9
M
Ma
ai
in
nt
te
en
na
an
n
e
e
After ea h dive, the exterior of the housing and Port should be
rinsed thoroughly in fresh water and dried with a soft loth.
Remove any water spots from the port assembly fa eplate as they
an ause blurry spots in the photographs.
After prolonged saltwater use, the exterior of the Port and
housing should be soaked in a mild non-abrasive liquid soap and
water solution. Rinse thoroughly and dry with a soft loth.
MMoodduullaarr FFllaatt PPoorrtt--0022--00221100
IIkkeelliittee LLiimmiitteedd WWaarrrraannttyy
All Ikelite produ ts are warranted against any manufa turing
defe ts for a period of one year from the original date of pur hase.
Defe tive produ ts should be returned prepaid to Ikelite. Ikelite
will, at its dis retion, repair or repla e su h produ ts, and will
return to ustomer prepaid. All other laims of any nature are not
overed. Housing is pressure tested and warranted to 200’ (60m)
maximum underwater depth. Ex ept as mentioned above, no other
warranty expressed or implied, applies to this Ikelite produ t.

Other Ikelite Camera Accessories manuals

Ikelite 6241.26 Owner's manual

Ikelite

Ikelite 6241.26 Owner's manual

Ikelite 6184.7 User manual

Ikelite

Ikelite 6184.7 User manual

Ikelite SLR-DC Housing User manual

Ikelite

Ikelite SLR-DC Housing User manual

Ikelite DSC-RX100M3/B User manual

Ikelite

Ikelite DSC-RX100M3/B User manual

Ikelite 6871.06 User manual

Ikelite

Ikelite 6871.06 User manual

Ikelite 6014.10 Owner's manual

Ikelite

Ikelite 6014.10 Owner's manual

Ikelite 6147.89 User manual

Ikelite

Ikelite 6147.89 User manual

Ikelite DSC-V3 User manual

Ikelite

Ikelite DSC-V3 User manual

Ikelite 6182.78 User manual

Ikelite

Ikelite 6182.78 User manual

Ikelite Olympus D-230 Operating and maintenance manual

Ikelite

Ikelite Olympus D-230 Operating and maintenance manual

Ikelite 5509.20 User manual

Ikelite

Ikelite 5509.20 User manual

Ikelite DS51 User manual

Ikelite

Ikelite DS51 User manual

Ikelite DL1 DS Link Quick start guide

Ikelite

Ikelite DL1 DS Link Quick start guide

Ikelite 6170.12 User manual

Ikelite

Ikelite 6170.12 User manual

Ikelite HDR SR5 Owner's manual

Ikelite

Ikelite HDR SR5 Owner's manual

Ikelite 6148.28 for Canon SX280 HS User manual

Ikelite

Ikelite 6148.28 for Canon SX280 HS User manual

Ikelite 6270.06 Owner's manual

Ikelite

Ikelite 6270.06 Owner's manual

Ikelite 6116.10 DSC-RX100 User manual

Ikelite

Ikelite 6116.10 DSC-RX100 User manual

Ikelite 9295.02 Specification sheet

Ikelite

Ikelite 9295.02 Specification sheet

Ikelite C-750 User manual

Ikelite

Ikelite C-750 User manual

Ikelite WD-3 User manual

Ikelite

Ikelite WD-3 User manual

Ikelite 5510.45 User manual

Ikelite

Ikelite 5510.45 User manual

Ikelite 6147.95 User manual

Ikelite

Ikelite 6147.95 User manual

Ikelite S3 User manual

Ikelite

Ikelite S3 User manual

Popular Camera Accessories manuals by other brands

Sea & Sea VX-2000 Pro instruction manual

Sea & Sea

Sea & Sea VX-2000 Pro instruction manual

Sea & Sea MDX-5D Mark III instruction manual

Sea & Sea

Sea & Sea MDX-5D Mark III instruction manual

Tracer TRAOSW46747 instruction manual

Tracer

Tracer TRAOSW46747 instruction manual

FeiYu Tech SPG LIVE instruction manual

FeiYu Tech

FeiYu Tech SPG LIVE instruction manual

Smart system DigiDRIVE Portable Quick reference guide

Smart system

Smart system DigiDRIVE Portable Quick reference guide

Sea & Sea MDX-X10 instruction manual

Sea & Sea

Sea & Sea MDX-X10 instruction manual

FRO­NIUS 25F operating instructions

FRO­NIUS

FRO­NIUS 25F operating instructions

BlueNova HC user manual

BlueNova

BlueNova HC user manual

I.SOUND PORTABLE POWER MAX manual

I.SOUND

I.SOUND PORTABLE POWER MAX manual

Cine Gears MULTI AXIS FOLLOW FOCUS user manual

Cine Gears

Cine Gears MULTI AXIS FOLLOW FOCUS user manual

EcoPower electron ECP-1006 instruction manual

EcoPower

EcoPower electron ECP-1006 instruction manual

EliteProAV Tab-Tension Pro Series user guide

EliteProAV

EliteProAV Tab-Tension Pro Series user guide

HARDKORR HKPBATTMONBT instruction manual

HARDKORR

HARDKORR HKPBATTMONBT instruction manual

3LeggedThing PUNKS manual

3LeggedThing

3LeggedThing PUNKS manual

pro master LED30 instructions

pro master

pro master LED30 instructions

WalimeXPro Aptaris instruction manual

WalimeXPro

WalimeXPro Aptaris instruction manual

FeiYu Tech WG MINI user manual

FeiYu Tech

FeiYu Tech WG MINI user manual

Fisheye FIX AQUAVOLT 3500 product manual

Fisheye

Fisheye FIX AQUAVOLT 3500 product manual

manuals.online logo
manuals.online logoBrands
  • About & Mission
  • Contact us
  • Privacy Policy
  • Terms and Conditions

Copyright 2025 Manuals.Online. All Rights Reserved.