Ikon IK20 User manual

IK20, IK21, IK22
CEILING UNIT RANGEHOOD
INSTRUCTIONS MANUAL
18 Charlies Way, Frankton, Hamilton, New Zealand, 3204
www.ikoncommercial.co.nz
Published May 2015

2
Resim 1
4220
1
2
3
4
5
6
7
Figure 1
POWER
(A)
(D)
(B)
(C)
TECHNICAL SPECIFICATIONS
4220
Model
Feeding Voltage
Lamp Power (W)
220-240 V 50Hz
6x 50 W
In order to use the cooker hood efficiently;
*Use ducts of 150/120mm diameter and as few bends as possible when you make
the chimney connection.
*Pay attention to aluminum filters' cleaning periods and changing periods of carbon
filters.
*Use the product at middle speed if high suction power is not necessary.
* In order to ensure that ventilation occurs correctly, windows of the kitchen should
be kept closed.
Figure 8
11
INTRODUCTION OF DEVICE Using Remote Control
Your product can be operated by remote control
You may see following instructions to use your remote control
A – On/Off
B – Speed Up
C – Speed Down
D – Lamp On/Off
1. Power supply Cable
2. Illumination
3. Body
4. Split Extraction Sheet
5. Control Panel
6. Metal Filter
7. Remote Control

3
4220
Figure 2
LAMPS: There are 3 groups of lamps in your product. When pressed on lamp button
when lighting is off, two lamps on the middle will illuminate. When pressed again, two
lamps on middle will be deactivated and 4 lamps on the sides will illuminate. All lamps
will be deactivated when pressed on light button again.
st
1 Group Lamp: When pressed on lamp button when lighting is off, two lamps on the
middle will illuminate.
nd
2 Group Lamp: When pressed on lamp button in 3 seconds, two lamps on middle will
be deactivated and 4 lamps on the sides will illuminate.
rd
3 Group Lamp: When pressed on lamp button in 3 seconds, all lamps are
illuminated. In this way, your product has 3 levels for lighting. When pressed on light
button when lights are on, both groups of lamps will be deactivated.
NOTE: Unless any change made in the position of the hood for 4 hours, the hood
will turn-off which means if only the motor is on, it will turn-off; if only lamps are
on, they will turn-off; and if both are on, they will both turn-off.
NOTE: If the remote control or the product breakdowns, you can turn off the
product by using on/off switch in the product.
Cooker-hood does not work
Illumination Lamp
does not work
Cooker-hoods air
suction is weak
X
X
X
X
X
If the product does not work:
Before you contact the technical service:
Make sure that the product is plugged in and the electric fuse of the electric wiring
is running. Do not take any action that will damage the product. Before you contact
with technical service, check your cooker hood according to Table 1. If the problem
goes on, contact the seller or the most authorized service.
10
Check electric connection
(Voltage of the electric network should be
between 220-240V, cooker hood should be
connected to grounded plug.)
Check motor switch
(Motor switch should be at on position)
Check lamp switch
(Lamp switch should be at on position)
Check aluminum filter
(Aluminum Cassette Filter should be
washed once a month at normal
conditions.)
Sized Technical Figure

4
*This product is designed for usage at
home.
*Your products usage voltage is 220-
240 Volts~50Hz
*Grounded plug is used at your
product's electric network cable. This
cable should definitely be plugged in
a grounded socket.
*All electrical networks should be set
by a qualified electrician.
*Installation applied by unauthorized
people may cause the product to
operate at low performance, damage
of the product and accidents.
*Power supply cable should not be
exposed to press or smash during
montage. Network cordon should not
be placed near the cookers; it may
cause fire if it melts.
*Do not plug into the socket before
installation of the product is
completed.
*Keep the plug at a reachable place
so that you can unplug it in case of
any danger.
*Do not touch the lamps when they
are on for long time. Lamps may hurt
your hand as they will be hot.
*Kitchen cooker hoods are designed
for usage during normal and home-
style cooking. If it is used for other
purposes, failure risk occurs and it will
be out of warranty.
*Follow applicable rules and
directions for passing out outlet air.
(This warning is not valid for usage
without chimney.)
WARNINGS AND SAFETY PRECAUTIONS
*Flaming foods should not be cooked
under the product.
*Start your product after you put pot,
fry-pan etc. on the hob. Otherwise high
temperature may cause some parts of
your product to get deformed.
*Before you take pot, fry-pan etc. from
the hob, put their lids on.
*Do not leave hot oil on the hob. Pots
that have hot oil in them may cause
self-ignition.
*Pay attention to curtains and covers
during cooking of meals like frying
because oil may flare up.
*Make sure that filters are changed in
convenience. Filters that are not
changed at appropriate time has risk of
causing fire due to oil that will be
gathered on them.
*Do not use filter materials that are not
flame resistant instead of filter.
*Do not operate your product without
aluminum filter; do not remove filters
when the product is on.
*In case of flame, cut power of the
product and the cooking appliances.
(Cut power of the product by plugging it
off the socket).
*Your product may cause fire risk if
cleaning is not applied periodically.
*Cut power of the product before
maintenance process. (Cut power of the
device by unplugging it)
9
Efficient Ventilation
In order to ensure correct ventilation, keep your kitchen windows closed.
IMPORTANT NOTE
Please pay attention when the product is operated at the same time with a product
which operates using air and fuel (for instance; heater, water heater etc. which
operates using gas, diesel fuel, coal or wood), since cooker hood may affect
burning negatively as it directs the air out.
This warning is not valid for usage without chimney.
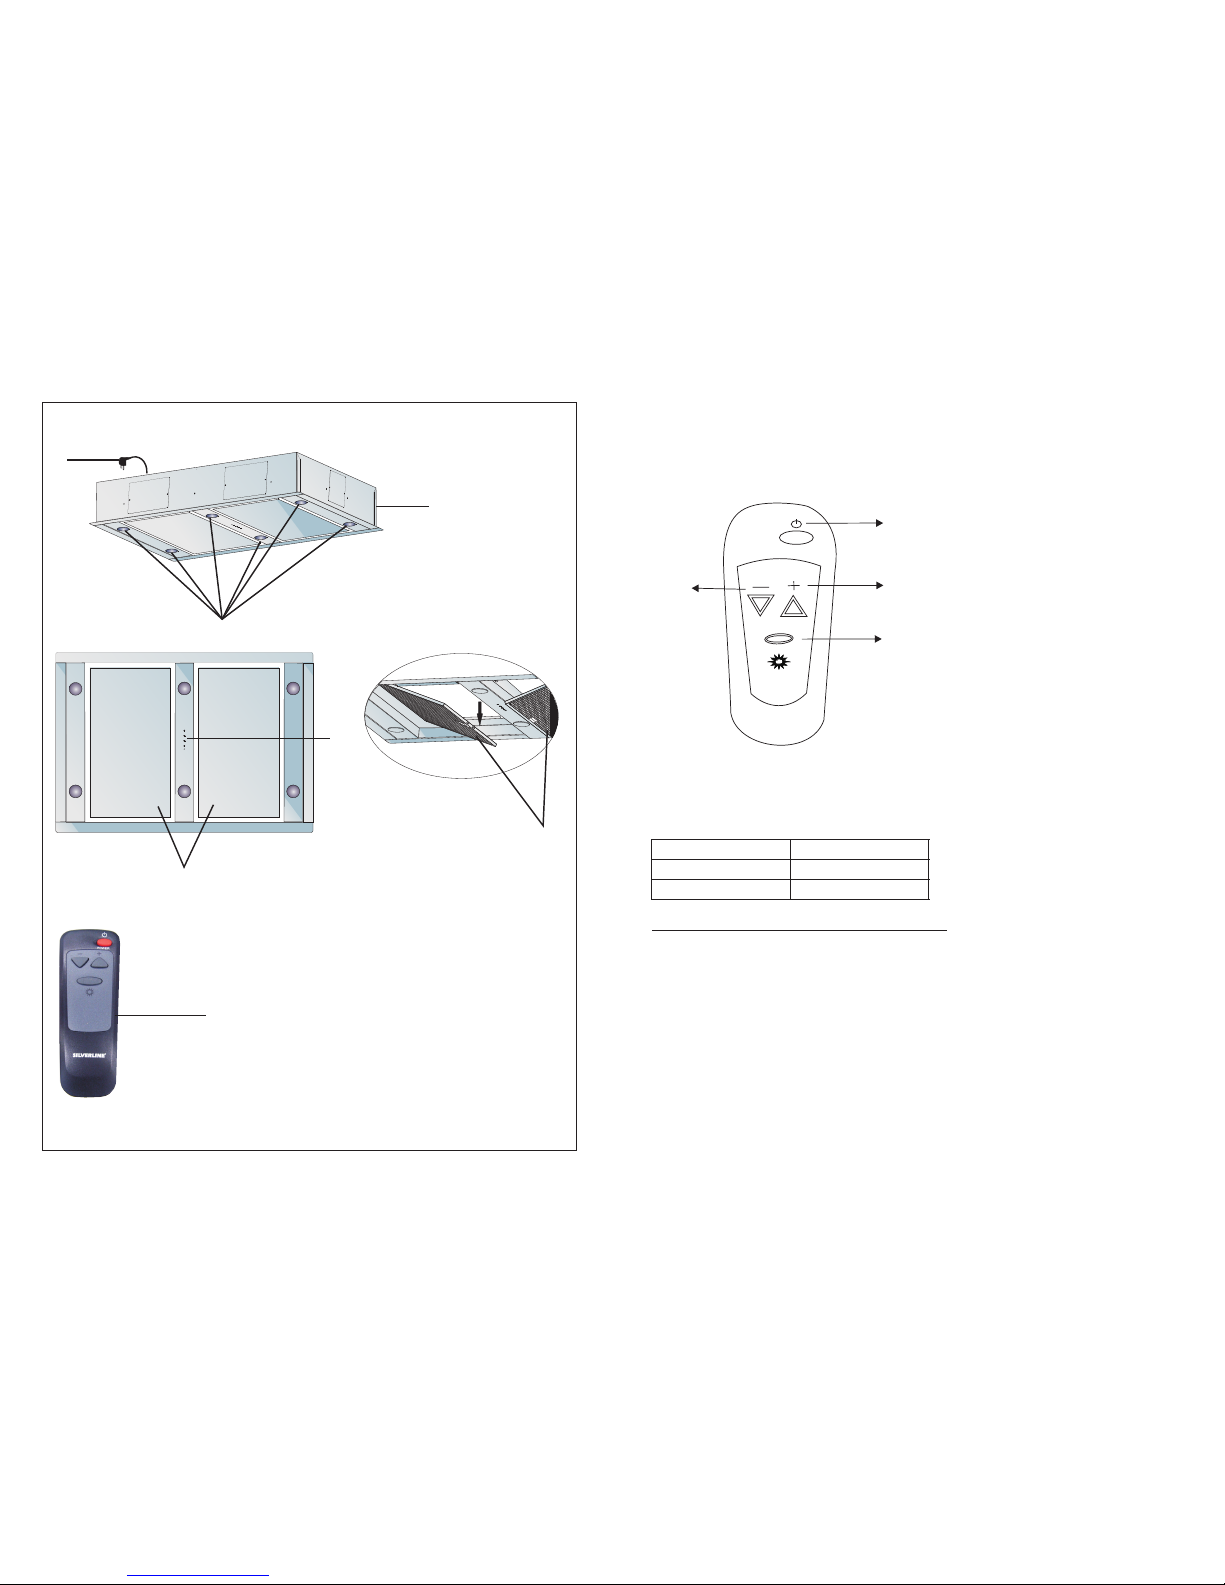
There is no control button on the hood. The hood can only be operated by remote
control.
Functions of Remote Control and Buttons:
Mon/Off: Use this button for activating and deactivating the motor. The starting speed
of the motor is 1. The numbers of motor speeds are shown by LED on the same
st nd
number of operating speeds. In 1 speed, the leftmost LED is on; in 2 cycle, two
LEDs from the left are on, etc.
SPEED –: This option is functional when the motor operates. At each time you press
this button, the motor speed will be reduced to the next lower level (Minimum level is
1).
Timer Feature: Timer can be activated by pressing “speed -” button. This option is
functional when the motor operates. Press and hold (2 seconds) this button to start
the motor operating timing of 15 minutes. The flashing rightmost LED shows that the
timer function is activated. The motor stops when the 15 minutes period is over. The
timer will be deactivated in case of speed change when the timer is active.
SPEED+: This option is functional when the motor operates. Each time you press this
button, the motor speed will be increased to the next up level (maximum level is 4).
Illumination:
This device has three illumination settings. You can light-up two, four or six halogen
lamps simultaneously as you wish.

5
*When chimney hood and the
appliances working with energy other
than electricity are operated at the
same time, negative pressure in the
room should not be more than 4 Pa (4 x
10 bar)
*If there is an appliance working with
fuel or gaseous fuel at the same place
with your hood, this appliance's exhaust
should be isolated from its volume
totally and the appliance should be
hermetic type.
*When chimney connection is applied to
your product, use ducts of 150mm or
120mm diameter. Duct connection
should be as short as possible and
should include few bends.
*Keep package materials away from
children as they may be dangerous for
them.
-5
*Be sure that your child does not play
with the product. Do not allow kids to
use your product.
*If power supply cable is damaged,
this cable should be changed by its
producer or its service agency or a
personnel who is a specialist at the
same level in order to prevent a
dangerous situation.
*In case of flame, cut power of the
cooker hood and the cooking
appliances, cover the flame. Never
use water in order to extinguish it.
Use “MAX 6 A” fuse at cooker hood
installment for your security.
Warning about Transportation and Carriage
*All the materials used at package of your product are suitable for recycling.
*Please comply with the signs on the product's box during transportation.
*Hold the holders placed at sides of the box in order to carry your product.
If you need transportation;
*Keep the original box.
*Carry your product in its original box; comply with the carrying signs on the
product's box.
If there is no original package;
*Do not put heavy material on the chimney hood.
*Keep the external surface from bash.
*Pack your product to avoid damages.
Installation, taking off your product from its package:
*Check if there is any deformation on your product.
*Transportation damages and failures should immediately be reported to the
transportation responsible.
*If you notice any damage please report to the seller.
*Do not allow children to play with packing material!!!
Functions of the Product
Your hood is compatible for use with our without chimney.
Usage with chimney
The product should be connected to a chimney that will direct the air out during usage
with chimney. In order to achieve best performance, pay attention that the duct system
follows the shortest way for connection to the chimney. Your product is produced as it
will be appropriate for usage with chimney.
Attention!!!
Outlet of the product should not be connected to air canals that have other smoke
as well.
Replacing the Lamps
Cut off the connection of the cooker hood with electricity. Take
off the aluminum cassette filter. Take off the failed lamp and
replace it with a new one that is of the same rating. (Please wait
for the lamps to cool as they might hurt your hand.)
Replacing 50W Halogen Lamp
In order to change halogen lamps, take the lamp downwards
pushing back of lamp holder downwards and then turning it a
little bit anti-clockwise take it off downwards.Figure 6
Figure 6
MAINTENANCE
*Disconnect electricity connection before maintenance and
cleaning process.
*Aluminum cassette filter holds the dust and the oil in the air.
*Metal filter should be washed once in a month with hot and
soaped water or, if possible, at dishwasher (60C).
*Take off aluminum cassette filter pressing on springy
latches on end point. After cleaning, do not replace before it
dries.
*Outer surface of the cooker hood should be wiped with a
wet cloth that is wetted with water or alcohol.
*Please avoid contact of electronic parts with water or
similar materials.
*Using Inox cleaning and maintenance products available in
the market will help your product to perform longer.
Warning: Aluminum filters may be washed in the
dishwasher. Color of aluminum filters may change after
several washings. This is normal and it is not necessary to
change the filters.
Washable Aluminum
Cassette Filter
Picture 4
Figure 7
8
-5

6
Picture 1
Figure 3
Figure 4
Pull the cable coming from external ventilation unit, and drive it 30cm into from the
hole located on the upper side of the hood.
Cut off the electrical connection of the hood. For such situations, turn off the fuse of
the hood.
* Place the hood on the section determined on the ceiling, and screw it to the ceiling as
shown in Figure 5.
Picture 2
Figure 5
Picture 3
7
Installation, taking off your product from its package:
*Check if there is any deformation on your product.
*Transportation damages and failures should immediately be reported to the
transportation responsible.
*If you notice any damage please report to the seller.
*Do not allow children to play with packing material!!!
Cable coming from external ventilation unit.
External ventilation units must be used for ceiling model hoods.
Before mounting of ceiling hoods, make the connections of previously selected
external ventilation system, and prepare the air outlet duct of 150 mm diameter and the
part which will be mounted to the ceiling, and fix the plastic chimney to flexi pipe by
using a clamp. After installing the hood on the ceiling, pull the plastic chimney and fix it
with wing nuts.
Air outlet can be provided from any side of the device. Unused air outlet hole should be
closed.
* For installing the hood to the ceiling, there should be a section on the ceiling that
corresponds to sizes given in technical drawing.
Drill an opening for the plastic chimney appropriate to the position of the air outlet.
Connection of External Ventilation Unit with the Hood:
* Open the split-extraction sheet of the device and remove the filter (Figures 3 &
4).
Plastic chimney
Plastic chimney, assembled to air outlet of aspirator
(Picture 1)
In order to have the best performance avoid bends on aluminium flexible duct.
Correct Incorrect
Standard Accessories
INSTALLATION THE HOOD
This manual suits for next models
2
Table of contents
Other Ikon Ventilation Hood manuals