iLive ITB396B User manual

37" HD Soundbar with Bluetooth Wireless and Subwoofer
User’s Guide for Model ITB396B
For the most of this User’s Guide, go to www.iLiveElectronics.com

2
Safety Instructions & Warnings
Important Safety Instructions
• Read these Instructions.
• Keep these Instructions.
• Heed all Warnings.
• Follow all instructions.
• Do not use this apparatus near water.
• Clean only with a dry cloth.
• Do not block any ventilation openings. Install in accordance
with the manufacturer’s instructions.
• Do not install near any heat sources such as radiators, heat
registers, stoves, or other apparatus (including ampliers) that
produce heat.
• Do not defeat the safety purpose of the polarized or ground-
ing - type plug. A polarized plug has two blades with one
wider than the other. A grounding type plug has two blades
and a third grounding prong. e wide blade or the third
prong are provided for your safety. When the provided plug
does not t into your outlet, consult an electrician for replace-
ment of the obsolete outlet.
• Protect the power cord from being walked on or pinched
particularly at plugs, convenience receptacles, and the point
where they exit from the apparatus.
• Only use attachments/accessories specied by the manu-
facturer.
• Unplug this apparatus during lightning storms or when
unused for long periods of time.
• Refer all servicing to qualied service personnel. Servicing
is required when the apparatus has been damaged in any
way, such as power-supply cord or plug is damaged, liquid
has been spilled or objects have fallen into the apparatus, the
apparatus has been exposed to rain or moisture, does not
operate normally, or has been dropped.
• Use only with a cart, stand, tripod, bracket,
or table specied by the manufacturer, or
sold with the apparatus. When a cart is used,
use caution when moving the cart/apparatus
combination to avoid injury from tip-over.
FCC Warnings
-
-
• Reorient or relocate the receiving antenna.
• Increase the separation between the equipment and receiver.
• Connect the equipment into an outlet on a circuit dierent
from that to which the receiver is connected.
• Consult the dealer or an experienced radio/TV technician
for help.
Warning
ATTENTION
RISQUE D' ÉLECTROCUTION
NE PAS OUVRIR
CAUTION
RISK OF ELECTRIC SHOCK
DO NOT OPEN
-
-
-
Warning
FCC Radiation Exposure Statement
This equipment complied with FCC radiation exposure limits set forth for an uncontrolled
environment. This equipment should be installed and operated with minimum distance 20cm
between the radiator & your body.

3
Safety Instructions & Warnings
Additional Warnings and Precautions
Avis: AFIN DE PRÉVENIR LES CHOCS ÉLÉCTRIQUES,
FAITES CORRESPONDRE LA FICHE BLANCHE DE LA
PRISE À LA FENTE LARGE, INSÉREZ TOTALEMENT.
-
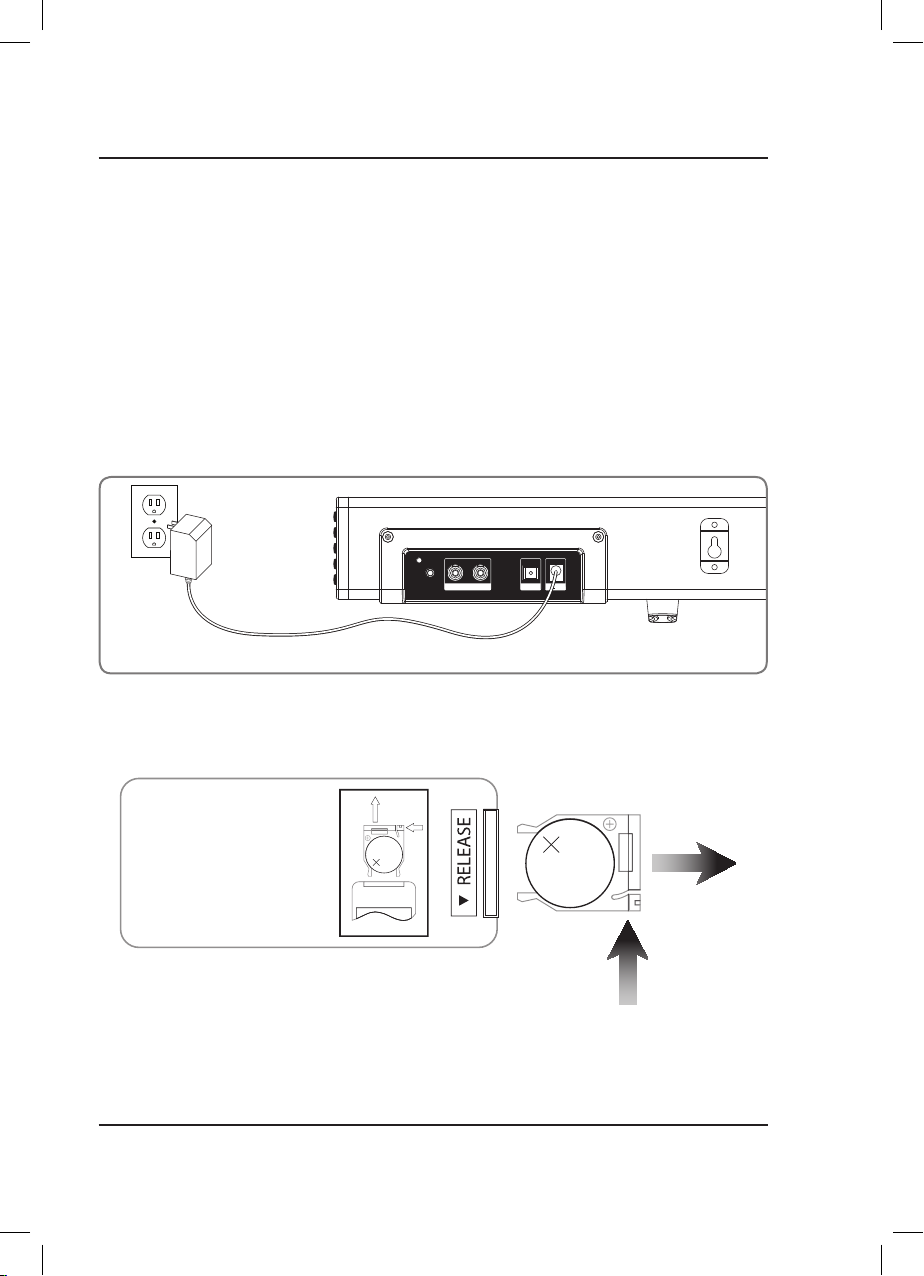
La prise du secteur est utilisé pour déconnecter le système.
La prise du secteur ne doit pas être obstruée ou doit être
facilement accessible pendant son utilisation. Pour être
complètement déconnecté de l’alimentation d’entrée, la prise
doit être débranchée du secteur.
Attention et de marquage des informations est situé sur le
paneau arrière ou inférieur de l’unité.
Avis: Pour réduire le risque d'incendie ou de choc électrique,
n'exposez pas cet appareil à la pluie ou l'humidité ou aux
éclaboussures.
Objets remplis de liquides, comme des vases, ne doivent pas
être placés sur l’appareil.
CaUTiOn
-
aViS: L’utilisation de commande ou l’exécution de procé-
dures autres que celles spéciées ici peuvent aboutir à une
exposition à des radiations dangereuses.
aViS: Des changements ou des modications sur ce produit
non expressément approuvés par la partie responsable de
la conformité peut annuler le droit de l’utilisateur d’utiliser
cet équipement.
-
aViS: Ne placez pas cette unité directement sur des surfaces
de meubles dont la nition serait douce, poreuse ou sensible.
Car, comme tout composé caoutchouc a base d’huiles, les
pieds pourraient laisser des tracs ou des taches à l’endroit ou
ils sont posés. Nous recommandons d’utiliser une protection
comme un linge ou un morceau de verre entre l’unité et la
surface pour réduire le risque de dégât et/ou de tache.
aViS: L’utilisation de cette unité en présence de lumières u-
orescentes peut causer des interférences lors de l’utilisation
de la télécommande. En cas de dysfonctionnement, éteignez
les sources de lumière uorescentes, car celles-ci pourraient
en être la cause.
Un danger d’explosion est présent lorsque les piles
sont remplacées de manière incorrecte. Remplacez seulement
les piles par des piles de type équivalent.
Les piles ne doivent pas être exposées à de forte chaleur,
tel qu’à la lumière du soleil, au feu ou autres choses de
semblable.
Gardez les piles neuves et d’occasion à partir des enfants. Si
le compartiment de la batterie ne pas fermer correctement,
cesser d’utiliser le produit et garder loin des enfants.
-
Ne pas mélanger vieilles et nouvelles batteries.
Remplacer complètement toutes les piles par des neuves.
Ne mélangez pas des piles alcalines, standard (carbone-zinc)
ou rechargeables (Ni-Cd, Ni-MH, etc) batteries.
Piles doivent être recyclées ou éliminées selon les directives
étatiques et locales.

4
Table of Contents
Setup � � � � � � � � � � � � � � � � � � � � � � � � � � � � � � � � � � � � � � � � � � � � � � � � � � � � � � � � � � � � � � � � � � � � � � � � � � � � � � � � � � � � � � � � � � � � � � � � � � 5
Features & Specications
Power
Remote Battery
Includes
Orientation � � � � � � � � � � � � � � � � � � � � � � � � � � � � � � � � � � � � � � � � � � � � � � � � � � � � � � � � � � � � � � � � � � � � � � � � � � � � � � � � � � � � � � � � � � � � 6
Rear View
Speaker Inputs Detail
Speaker Controls (Right Side)
Function/Source Indicator Lights
Remote � � � � � � � � � � � � � � � � � � � � � � � � � � � � � � � � � � � � � � � � � � � � � � � � � � � � � � � � � � � � � � � � � � � � � � � � � � � � � � � � � � � � � � � � � � � � � � � � � 8
Bluetooth Wireless � � � � � � � � � � � � � � � � � � � � � � � � � � � � � � � � � � � � � � � � � � � � � � � � � � � � � � � � � � � � � � � � � � � � � � � � � � � � � � � � � � � � � 9
Pairing a Bluetooth Device for the First Time
Playing Audio Wirelessly
Audio Inputs � � � � � � � � � � � � � � � � � � � � � � � � � � � � � � � � � � � � � � � � � � � � � � � � � � � � � � � � � � � � � � � � � � � � � � � � � � � � � � � � � � � � � � � � � � 10
Stereo RCA Inputs (Aux In)
Optical Input
Line In
Company Information � � � � � � � � � � � � � � � � � � � � � � � � � � � � � � � � � � � � � � � � � � � � � � � � � � � � � � � � � � � � � � � � � � � � � � � � � � � � � � � � � 12
Contact Information
Warranty
International Support

5
Features & Specications
• 37" length
• Supports Bluetooth
• Wireless range: 60 ft.
• 2 channel stereo sound
• Digital volume control
• Full-function remote
• Optical digital audio input
• Line In (3.5mm audio input)
• Aux In (RCA stereo audio inputs)
DC IN
OPTICAL
IN
AUX IN
LR
LINE IN
LITHIUM BATTERY
CR 2025
3V
Slide
Push here
LITHIUM BATTERY
CR 2025
3V
CR2025
PUSH
OPEN
out
Plug the small end of the power cord into the DC Input on the back of the speaker, and the large plug into a
standard wall outlet.
Setup
Includes
• Remote control with 1 CR2025 button cell battery
• Optical audio cable
• AC/DC power adapter
• Wall-mount hardware and instructions
Remote control: requires 1 CR2025 battery (included).
Power
Remote Battery

6
DC IN
OPTICAL
IN
AUX IN
LR
LINE IN
Speaker Inputs Detail
Rear View
Orientation
Stereo RCA Audio Inputs (AUX IN)
Speaker Inputs
Wall Mount Pegs
Optical Input
DC Power Input
Line In ( 3.5mm audio input)
DC IN
OPTICAL
IN
AUX IN
LR
LINE IN

7
Speaker Controls (Right Side)
Power
Press to power
the unit on or off.
Source
Press to switch
between Optical,
Line In, AUX, and
Bluetooth modes.
Volume +/-
Press to adjust the
volume up or down.
Pair
Press and hold to
begin pairing to a
Bluetooth device.
Function/Source Indicator Lights
STATUS INDICATOR
Power Off Red Light
Optical Mode Amber Light
Aux In Mode White Light
Line In Mode Green Light
Bluetooth Pairing Flashing Blue Light
Bluetooth Connected Blue Light
VOLUME +
PAIR
VOLUME
SOURCE
POWER

8
Remote
MOVIEMUSIC
SOURCE
OPTICAL
LINE IN
POWER MUTE
AUX
DIALOG
BASSTREBLE VOLUME
Power
Press to turn
the unit on or off.
Mute
Press to mute
the volume.
Press to switch
to Bluetooth Mode.
Line In
Press to switch
to Line In mode.
Optical
Press to switch
to Optical mode.
AUX
Press to switch
to RCA/Aux mode.
Music
Press to switch to
the EQ optimized
for music.
Movie
Press to switch to
the EQ optimized
for movie sound.
Dialog
Press to switch to
the EQ optimized
for dialog.
Treble
Press to adjust the
treble up or down.
Bass
Press to adjust the
bass up or down
Volume
Press to adjust
the volume.
Skip Back/Fwd
In Bluetooth mode,
press to skip the
selected track.
Play/Pause
In Bluetooth mode,
press to play or
pause the selected
track.

9
Pairing a Bluetooth Device for the First Time
1. Power on the unit by pressing the Power button.
2. Press the button on the remote to switch to Bluetooth Mode, indicated by a slowly flashing blue light.
You can also press the Source button on the side of the unit.
3. Press and hold the Pair button on the side of the unit.
The pairing indicator will flash blue quickly. When pairing, remain within 3 feet of the unit.
4. Use the controls on your Bluetooth device to select ITB396 in your Bluetooth settings to pair.
If your device requests a password, enter the default password 0 0 0 0 .
Refer to the user’s manual for your specific device for instructions on pairing and connecting Bluetooth devices.
5. When successfully paired and connected, a beep will issue from the soundbar and the Pairing Indicator will
display a solid blue light.
After initial pairing, the unit will stay paired unless unpaired manually by the user or erased due to a reset of the
device. If your device should become unpaired or you find it is unable to connect, repeat the above steps.
Playing Audio Wirelessly
1. After pairing to a Bluetooth device, use the controls on the connected Bluetooth Device to select a track.
2. Play, pause or skip a selected track using the controls on the connected Bluetooth Device or the
soundbar's remote.
3. Audio played through the connected Bluetooth device will now be heard through the speakers.
Bluetooth Wireless

10
Audio Inputs
Optical Input
You will need an audio source with an Optical Audio Output and a Digital Optical Audio Cable (included).
1. Connect the Digital Optical Audio Cable to the optical output on the audio source and to the Optical Input
on the speaker bar.
2. Press the Power button to power the unit on.
3. Press the Source button repeatedly to switch to SPDIF Mode, indicated by a amber light.
4. Using the native controls on your connected device, make sure the audio settings are set to PCM or Optical
Audio and are turned On.
5. Audio from the connected audio source will now be played through the speakers.
Important tips for optical audio:
Use the correct toslink cable and make sure that it is firmly seated in both source and sound bar sockets.
Optical output is activated on the source (they should see a red light emitting from the toslink socket).
It may be labeled SPDIF in the setting menu of the source.
The optical output is set to output PCM and not Dolby Digital.
Stereo RCA Inputs (Aux In)
When connecting two products using an RCA cable (not included), match the colored ports to their corresponding plugs.
1. Connect the RCA cables (not included) to the RCA Stereo Inputs located on the back of the unit, and to the audio
outputs on a television or other audio source.
2. Press the Power button to power on the unit.
3. Press the Source button to select Aux In, indicated by a white light.
4. Audio played through the television will now be heard through the speakers.
Line In
3.5 mm audio input cable not included.
1. Plug one end of a 3.5 mm audio input cable into the Line In on the unit and plug the other end of the cable into
the audio output/headphone output on an MP3 Player or other audio source.
2. Press the Power button to power the unit on.
3. Press the Source button to select Line In, indicated by a green light.
4. Audio played through the connected device will now be heard through the speakers. Use the controls on the
connected device to play, pause, or skip selected tracks.

11
Stereo RCA Inputs (Aux In) - Detail
Optical Input - Detail
Line In Line In - Detail
DC IN
OPTICAL
IN
AUX IN
LR
LINE IN
DC IN
OPTICAL
IN
AUX IN
LR
LINE IN
DC IN
OPTICAL
IN
AUX IN
LR
LINE IN
DC IN
OPTICAL
IN
AUX IN
LR
LINE IN

12
International Support
To download this User’s Guide in English, Spanish, and French, or to get answers to frequently asked questions, visit
the support section at: www.iLiveElectronics.com
Para descargar este Manual del Usuario en inglés, español y francés, o para obtener respuestas a preguntas
frecuentes, visite la sección de apoyo en: www.iLiveElectronics.com
Pour télécharger ce guide de l’utilisateur en anglais, espagnol ou français, ou pour obtenir des réponses à des
questions fréquemment posées, consultez la rubrique d’assistance sur: www.iLiveElectronics.com
Contact Information
Website: www.iLiveElectronics.com
Phone Support: 1-888-999-4215
Warranty
For Warranty Information and the most of this User’s Guide, go to:
www.iLiveElectronics.com
Company Information
Copyright © 2016 Digital Products International (DPI, Inc.) All other trademarks appearing herein are the property
of their respective owners. Specifications are subject to change without notice.
Table of contents
Other iLive Speakers manuals

iLive
iLive ISBW326B User manual

iLive
iLive ISB64B-1109-01 User manual

iLive
iLive ISBW240 User manual

iLive
iLive IBP391B User manual

iLive
iLive ISB110 User manual

iLive
iLive ILED75W User manual

iLive
iLive ISB202 User manual

iLive
iLive ILED75-1262-01 User manual

iLive
iLive ISB03W User manual

iLive
iLive ISBW249 v2286-01 User manual

iLive
iLive 2687-02 User manual

iLive
iLive ICB284S User manual

iLive
iLive ITP150B User manual

iLive
iLive PT860 User manual

iLive
iLive ISBW2116B User manual

iLive
iLive ISBV39 User manual

iLive
iLive INL252 User manual

iLive
iLive IKBFV378S User manual

iLive
iLive ISBW101 User manual

iLive
iLive ITPW891B User manual