IMKO SONO-VIEW User manual

Manual
SONO-VIEW
More Information:
www.imko.de
Moisture Sensor Experts

2
Thank you for purchasing this IMKO product
This manual is an original operating manual of the manufacturer.
The described instructions for use and commissioning are part of the products described and must be kept for
future installation or use.
Important!
Please read these instructions carefully to accomplish optimum results with your moisture probe. Please contact
your authorized dealer, distributor or service center for troubleshooting, questions or suggestions on your new
moisture probe. You may contact IMKO directly, too after exploring your local contact.
We look forward to helping you!
For warranty claims, please contact your local dealer, distributor or service center. The warranty does not include
any kind of willful damage to the device or its accessories or an operation outside of the product specification.
Please refer to the information in this manual. If you have any questions, please contact IMKO service. Don’t open
the device and please do not try to repair the device yourself- the guarantee expires when the device is opened
or modified.
In the course of product improvements, we reserve the right to make technical and visual changes to the device.

Content
1 General Notices .......................................................................................................... 4
1.1 Intended Use...........................................................................................................................................................4
1.2 Temperatures and environmental conditions ........................................................................................................4
2 Control Elements / Connections ................................................................................. 5
2.1 Control Elements.....................................................................................................................................................5
2.2 Connections ............................................................................................................................................................5
3 Initial Commissioning ................................................................................................. 6
3.1 Safety Instructions ..................................................................................................................................................6
3.2 Checking the Package Content for Completeness .................................................................................................6
3.3 Connection .............................................................................................................................................................6
4 Operation .................................................................................................................. 8
4.1 Initial and New Installation .....................................................................................................................................8
4.2 Measurement Value Display ..................................................................................................................................9
4.3 Settings..................................................................................................................................................................10
4.3.1 New Installation...........................................................................................................................................10
4.3.2 Language ....................................................................................................................................................10
4.3.3 Unit (Temp.).................................................................................................................................................10
4.3.4 LCD Contrast................................................................................................................................................11
4.3.5 Info...............................................................................................................................................................11
4.3.6 USB/IMP-Bridge...........................................................................................................................................11
4.4 Probe Settings .......................................................................................................................................................12
4.4.1 Sensor Info...................................................................................................................................................13
4.4.2 Material Calibration.....................................................................................................................................13
4.4.2.1 Choose ..........................................................................................................................................13
4.4.2.2 Change ..........................................................................................................................................14
4.4.2.2.1 1-Point .........................................................................................................................14
4.4.2.2.2 -2-Point .......................................................................................................................16
4.4.3 Offset Balancing ..........................................................................................................................................19
4.4.4 Averaging Mode ..........................................................................................................................................19
4.4.5 Averaging Parameters .................................................................................................................................20
4.4.6 Basis Balancing ...........................................................................................................................................22
4.4.7 Analog Parameter........................................................................................................................................23
4.4.8 Analog Simulation .......................................................................................................................................23
5 Technical Data........................................................................................................... 24
6 Safety Notes ............................................................................................................. 25
7 Notes........................................................................................................................ 27
3

4
1 General Notices
1.1 Intended Use
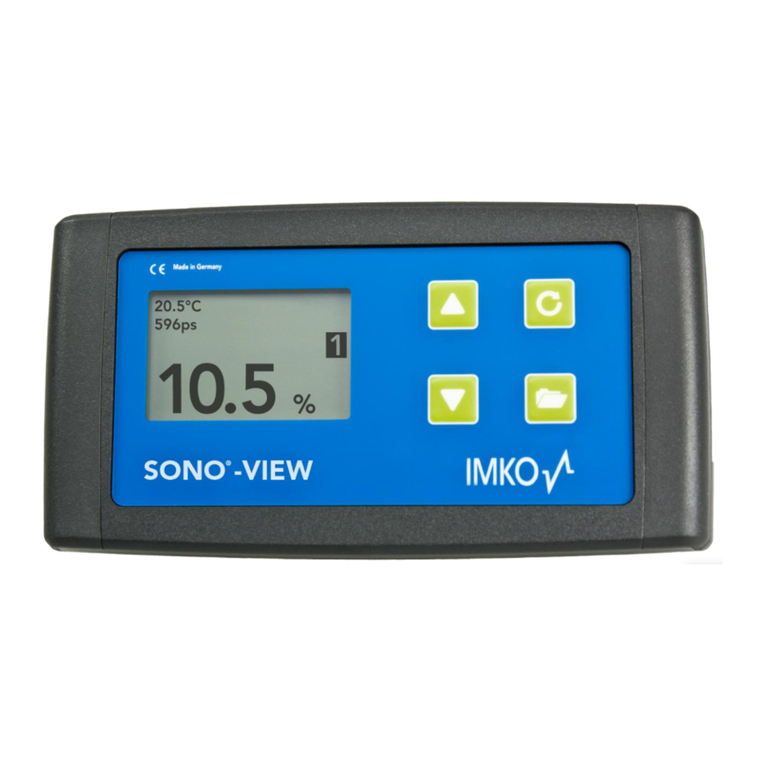
This device was developed as a readout device for various IMKO probes. Only dedicated probes may be connected
to this device. The connection of a probe not intended for this purpose can lead to the destruction of this device
and / or the connected probe.
1.2 Temperatures and environmental conditions
The SONO-VIEW has been developed for operation in harsh environments.
Operation outside of the conditions specified below can damage the device.

5
2 Control Elements / Connections
2.1 Control Elements
2.2 Connections
• USB (Type-Mini B)
• USB-IMP-Bridge
• Supply Voltage
• Bus-Interface

6
3 Initial Commissioning
3.1 Safety Instructions
Attention:
It is strictly necessary to read the General Notices contained under Item 1 at the beginning of the operating
instructions. Any not intended use of the device can lead to damage to this device.
3.2 Checking the Package Content for Completeness
• SONO-VIEW
• Terminal Block
• USB Cable (Type A → Mini B)
• DIN rail
• DIN rail holder
• Manual
3.3 Connection
For operation, the SONO-VIEW requires a supply voltage of 12...24V (approx. 50..30mA). A joint ground wire
together with the probes is required.
NOTE:
The SONO-VIEW is suited for the display and configuration of up to eight probes. Should more than eight
probes be connected, an error message will be generated, and the device cannot operate correctly.
0V
(COM)
IMP-Bus
(RT)
IMP-Bus
+12..24V

7
Connection example:
Connection of the SONO-VIEW with two SONO probes and one joint voltage supply source.

8
4 Operation
4.1 Initial and New Installation
At the initial connection to your probe-network, it is necessary to follow the installation procedure of the
SONO-VIEW.
For this purpose, the device will scan the IMB bus for
connected probes.
Initiate the installation with the button .
After an instant, the serial numbers of all connected
probes are listed in the display.
Start the installation process with the buttom .
In order to maintain the clarity within the administration
of the probes, the SONO-VIEW operates on the basis of
assigned probe numbers (1...8).
These must be allocated to the detected serial numbers
in the next step.
For each probe number, select a serial number using the
/ buttons and subsequently acknowledge the
same with the button .
Repeat this procedure until all serial numbers have been
allocated a probe number.
After completion of the above steps, all probe numbers
will be presented once more together with the
respectively allocated serial numbers in ascending order.
Complete the installation process with the button

9
After completion of the installation process, the SONO-VIEW will re-start, verify the connected probes, and will
immediately commence to call up the measurement values.
4.2 Measurement Value Display
The SONO-VIEW immediately commences to call up and display the measurement values after start-up. This is
performed in a 500 ms cycle. Depending on how many probes are connected, from one to four, the following
displays will be presented.
If between five and eight probes are connected, a second display with four values apeers.
The moisture value in percent and the respective probe number is always presented. If two or three probes are
connected, the temperature measured by the probe is additionally also presented. In the event that only one
probe is connected, the calibrated radar run-time is also presented.
If more than one probe is connected to the SONO-VIEW, there is an option to change the display. For this purpose,
press the buttons / .
With each press, all connected probes are displayed one after the other as individual probes. If the last probe is
displayed as a single probe, the next time the button is pressed, it will be displayed again the display of 4 probe
values.
The probe number always appears in the upper right area of the display. If you remain on a display for a longer
time, this display is set as the “default”. After a restart, the SONO-VIEW starts on the set measurement display.

10
4.3 Settings
Actuate the button while the measurement display is active and you will reach the setup menu. Here, you are
enabled to perform various settings and call up information regarding the SONO-VIEW.
The setup menu features the following structure:
Setting Description
New Installation Enables a new detection of connected probes
Language Setting of the language
Unit (Temp.) Switch between °C and °F
LCD Contrast Setting of the display contrast
Info Serial number and further information regarding your SONO-VIEW
USB/IMP-Bridge Enables the comfortable configuration of your probes via PC
Set the desired setting using the buttons / . By actuating the button you can subsequently enter the
selected setting. Actuate the button again in order to exit the setup menu.
4.3.1 New Installation
See Section 4.1 „Initial and New Installation“
4.3.2 Language
The selection of the language is performed with the buttons / . By actuating the button the selected
language is set as the standard language.
To exit the menu item “Language”, actuate the button .
4.3.3 Unit (Temp.)
Use the / buttons to select the temperature unit.

11
4.3.4 LCD Contrast
A bar containing a grey colour gradation will appear.
Set the contrast using the buttons / in a manner
that enables you to recognise all grades.
Store the set value with the button .
To exit the menu item „LCD Contrast“, actuate the
button .
4.3.5 Info
The device show the serial number, the HW-version, the
IBT version, as well as the firmware version.
By press the button the device will present further
status information such as the currently connected
probes and system voltage values.
To exit the menu item „Info“, actuate the button .
4.3.6 USB/IMP-Bridge
As soon as this menu item is called up, the SONO-VIEW changes into a transparent data mode. All data packets will
be now redirected from the USB interface directly on to the IMP-bus and vice versa. This enables a comfortable
configuration of the probes via a connected PC without the necessity of additional hardware.
For this purpose, please download the free software „SonoConfig“as well as the respective operating instructions
available on the IMKO-homepage www.imko.de/en.
Connect the SONO-VIEW to the PC using the provided USB cable. The SONO-VIEW will connect with the PC as
a virtual serial interface (COM-Port). The respectively required driver is usually automatically installed by all
currently used Windows versions. Should the driver not be automatically installed, please download the driver
under: http://www.ftdichip.com/Drivers/VCP.htm.

12
NOTE:
As long as the SONO-VIEW is in the USB-IMP-Bridge modus, no measurement values are queried by the probe.
The probes however continue to measure and issue the measurement value at the analogue output.
Actuate the button in order to exit the menu item „USB/IMP-Bridge“.
4.4 Probe Settings
The SONO-VIEW offers the option to comprehensively configure the connected probes even without PC. Settings
such as offset displacements or the selection of a material-specific calibration can be simply adjusted with the
buttons / .
The menu “Probe Settings” respectively offers the following options:
Setting Description
Sensor Info Presents information regarding the connected probe
Material Calibration Selection of a material-specific calibration, 1-point calibration and 2-point
calibration
Offset balancing Displacement of the measurement value
Average Mode Setting of the method of averaging
Average Parameter Setting of the parameters of the set averaging method
Basic balancing „Zero Value“ calibration of the probe in ambient air
Analog parameters Set the analog parameters
Analog simulation Simulation of an analog value
To reach the probe settings, select the individual probe display mode for the probe intended for configuration
in the measuring display using the / buttons (also see Item 4.2). By actuating the button the probe
setting of the currently used probe is called up.
NOTE:
It is only possible to configure one probe at a time. Should several probes require to be adjusted, the procedure
must be respectively repeated for these other probes.
Attention:
Ensure that the correct probe is set before commencing with adjusting the parameters.
The SONO-VIEW offers the option to access the measuring parameters of the probe. Before adjusting any
parameters, please inform yourself precisely in regard to the function of the same in the respective probe
manual. Any performed changes may affect the measurement value, the accuracy, and the measuring rate.

13
4.4.1 Sensor Info
If this menu item is selected, various information of the probe is called up and displayed.
You can exit the menu item „Sensor Info” with the
button .
4.4.2 Material Calibration
The menu item „Material Calibration“enables to adjust a material-specific calibration stored in the probe. This
enables to significantly increase the accuracy of the measurement.
You also have the option of carrying out your own calibrations here in order to also be able to measure special
materials.
After selecting the menu item "Material cal.", use the
/ buttons to "CHOOSE" one of the 15 stored
material-specific calibrations or "CHANGE" to perform a
new calibration on one of the 15 calibration memories.
The corresponding sub-point is selected with the key
and the key leaves this menu point.
4.4.2.1 Choose
The sub-item "choose" allows you to select between up to 15 material-specific calibrations.
Use the / buttons to select between the
material-specific calibrations. The "!" shows the current
standard calibration.
Save the selected calibration with the button as a
standard in the probe.
By pressing the key you can leave this sub-item
"choose" again.

14
4.4.2.2 Change
The "CHANGE" sub-point allows you to perform a 1-point calibration or 2-point calibration.
Use the / buttons to switch between 1-point
calibration and 2-point calibration.
The corresponding procedure is executed with the key
and the key is for finishing this procedure.
4.4.2.2.1 1-Point
With this material calibration option, a linear equation (f(x)=mx+b) is calculated with the dry density, a reference
moisture content and the tp value (transit time of the radar signal) which can be measured or set at the point of
the reference moisture content. Very good results are achieved with this linear calibration in most applications.
NOTE:
To perform a 1-point calibration, you need a material sample as well as the dry density of the material to be
measured. The moisture value has to be determined with another method like kiln drying or similar, before
activating this calibration procedure.
Procedure:
At the beginning of the calibration, the calibration
memory (01 – 15) to be overwritten must be set using
the / buttons.
Press the button to accept the setting and press the
button to move to the previous item.
Then the percentage reference moisture of the
measured material, must then be set with the /
buttons.
Press the button to accept the setting and press the
button to move to the previous item.

15
In the following step, the dry density of the material to
be measured must be set with the / buttons.
Press the button to accept the setting and press the
button to move to the previous item.
In the next step, the tp value (radar signal time) has to be determined by a measurement with the connected
probe or by manual setting with pre-determined tp values.
Use the / buttons to select between "Measure"
and "Set".
The corresponding sub-point is selected with the
key and the key can be used to switch to the
previous point.
Measure tp:
Press the key to start the tp measurement and press
the key to move to the previous point.
After starting the measurement with the key the
mean value of 10 measured tp values is formed.
During this phase, the SONO-View does not respond to
any input.
After completion of the measurement, the tp mean
value is displayed.
Press the key to accept the measured value and
press the key to move to the previous point.

16
Set tp
The tp value can be adjusted manually using the /
buttons.
Press the button to accept the setting and press the
button to move to the previous item.
In the last step, the calibration settings can be saved with "Save" to the previously selected calibration memory
location, or can be canceled with "Discard".
NOTE:
After performing "Save", the original material calibration is preceded by an "OWN:", this indicating that this
is a specially prepared material calibration.
Use the / buttons to switch between "Save" and
"Discard".
The corresponding sub-point is selected with the
key and the key can be used to switch to the
previous point.
4.4.2.2.2 -2-Point
For the 2-point, a linear equation (f (x) = mx + b) can be calculated with two moisture values of a material and the
corresponding tp values (running times of the radar signal) which are measured or set at the respective material
moisture.
Very good results are achieved with this linear calibration in most applications.
NOTE:
In order to perform a 2-point material calibration, you need two material samples with different moisture
values. Moisture values should be determined by another method like kiln drying or similar, before activating
this calibration procedure. The sequence - "lower moisture value" (more dry material) and then - "upper
moisture value" (moist material) must be observed.

17
Procedure:
At the beginning of the calibration, the calibration
memory (01 – 15) to be overwritten must be set using
the / buttons.
Press the button to accept the setting and press the
Button to move to the previous item.
Subsequently, the percentage moisture value at the
lower point of the material to be measured, must be set
with the / buttons.
Press the button to accept the setting and press the
button to move to the previous item.
In the next step, the tp value (radar signal time) has to
be determined by a measurement with the connected
probe at the lower moisture point or by manual setting
with pre-determined tp values.
Use the / buttons to select between "Measure"
and "Set".
The corresponding sub-point is selected with the
key and the key can be used to switch to the
previous point.
Measure tp:
See point „4.4.2.2.1“ Measure tp
Set:
The tp value of the lower moisture point can be setted
manually using the / buttons.
Press the button to accept the setting and press the
button to move to the previous item.

18
The percentage reference moisture of the upper point
of the measured material, must then be set with the
/ buttons.
Press the button to accept the setting and press the
button to move to the previous item.
The next step is to determine the tp value (radar signal time), of the upper moisture value, by a measurement
(with the connected probe) or by manual setting.
Use the / buttons to select between "Measure"
and "Set".
The corresponding sub-point is selected with the
key and the key can be used to switch to the
previous point.
Measure tp:
See point „4.4.2.2.1“ Measure tp
Set:
The tp value for the upper moisture value can be
adjusted manually using the / buttons.
Press the button to accept the setting and press the
button to move to the previous item.
In the last step, the calibration settings can be saved with "Save" to the previously selected calibration memory
location, or can be canceled with "Discard".
NOTE:
After performing "Save", the original material calibration is preceded by an "OWN:", indicating that this is a
specially prepared material calibration.

19
Use the / buttons to switch between "Save" and
"Discard".
The corresponding sub-point is selected with the
key and the key can be used to switch to the
previous point.
4.4.3 Offset Balancing
In order to compensate measurement errors e.g. due to density deviations in the material or due to the installation
conditions, there is an option to perform a linear displacement of the measurement value. This is the purpose
of this menu item. It is possible to displace the measurement value between-10 and +10 percent points. The set
displacement is stored in the probe and will subsequently also affect the analogue output.
Adjust the offset to the desired value using the buttons
/ .
Subsequently store the set value in the probe with the
button .
You can exit this menu item with the button .
4.4.4 Averaging Mode
This menu item allows you to switch on or switch over a measurement averaging in the moisture probe. The IMKO
moisture probes offer the following options:
Mode CC: (Cyclic Cumulated)
With automatic summation of a moisture quantity during one batch process.
Mode CH: (Cyclic Hold)
Similar to Mode CC but without summation.
Mode CH is recommended for applications in the construction industry. If the SONO-probe is installed under a silo
flap, Mode CH can measure moisture when batch cycles are very short, down to 2 seconds. Mode CH executes an
automatic filtering, e.g. if dripping water occurs.
Mode CA: (Cyclic Average Filter)
For relative short measuring processes with continual average value, filtering and an accuracy of up to 0.1%.
Mode CK: (Cyclic -Kalman-Filter)
For complex applications in mixers and dryers
Mode CS: (Cyclic-Successive)
For very short measuring processes (e.g. 5…20 seconds) without floating average and without filter functions,
with internal up to 100 measurements per second and a cycle time of 250 milliseconds at the analogue output.
Measurement mode CS can also be used for getting raw data from the SONO-probe without averaging and filtering.

20
Mode CF: (Cyclic Floating Average)
For continual average value with filtering and an accuracy of up to 0.1% for very slowly measuring processes, e.g.
in fluidized bed dryers, conveyor belts, etc.
NOTE:
Please also refer to the information in your Probe User's Manual.
Use the / buttons to set the desired "Average
Mode" and then set the mode as the default with the
button
The setting is then stored in the probe.
Press the button to exit the "Average Mode" menu
item.
4.4.5 Averaging Parameters
Depending on the set „Averaging Mode“, there are various „Average Parameters“ available for control purposes.
Averaging Mode Available Parameters
CC – Cyclic Cumulate
Average Time
Filter Upper Limit Offset
Filter Lower Limit Offset
Upper Limit Keep Time
Lower Limit Keep Time
Moisture Threshold
No Material Delay
Boost
Offset
Invalid Measure Count
CH – Cyclic Hold
Average Time
Filter Upper Limit Offset
Filter Lower Limit Offset
Upper Limit Keep Time
Lower Limit Keep Time
Moisture Threshold
No Material Delay
Boost
Offset
Weight
Invalid Measure Count
Other manuals for SONO-VIEW
2
Table of contents
Other IMKO Measuring Instrument manuals
Popular Measuring Instrument manuals by other brands
palintest
palintest Lumiso Chlorine user manual
STEP SYSTEMS
STEP SYSTEMS LUX Operating instruction
Ram Energy
Ram Energy Smart meter user guide

Bühler technologies
Bühler technologies GAS 222.15 installation instructions
Seametrics
Seametrics FT420 manual
Endress+Hauser
Endress+Hauser Micropilot NMR81 operating instructions
