inada SOGNO HCP-10100A User manual

●Please read this Operating Manual before use.
●Keep this manual nearby so that you can refer to it anytime.
Thank you for purchasing the inada chair SOGNO.
We hope the inada chair SOGNO will be a valued partner
in your daily health preservation for many years to come.
HCP-10100A
CONTENTS
SAFETY PRECAUTIONS··················1
MAIN FEATURES ······························4
COMPONENTS & DESCRIPTION··5
BEFORE USE ······································9
POSITION ADJUSTMENT FOR THE
CHAIR ················································11
AFTER USE ······································ 14
MASSAGE PROGRAMS &
SELECTION ····································· 15
PRESET PROGRAMS····················· 17
MANUAL SELECTION MODE····· 19
TROUBLESHOOTING ··················· 23
FAQ ··················································· 25
CARE AND STORAGE··················· 26
CUSTOMER SERVICE AND
WARRANTY ···································· 27
REGULAR MAINTENANCE FOR
SAFETY············································· 27
SPECIFICATIONS ··························· 28
Operating Manual
Warranty card provided separately

SAFETY
PRECAUTIONS
SAFETY
PRECAUTIONS
1 2
SAFETY PRECAUTIONS
Safety Precautions: Before Use
Caution
Required Action
●Before plugging the power cord into the wall outlet, make sure that the main POWER switch is set to OFF.
→May result in damage to the product or electric shock.
●Make sure that the plugs on the power cord are inserted fully into the cord connector and the wall outlet.
→May result in electric shock, short circuit, or combustion.
●Before using the chair for the first time, turn on all the switches in order as indicated in this manual to check that the chair is
operating properly.
●Before using, raise the reclining seat back to its fully upright position. Then recline the seat back slowly to the most comfortable
position, remembering to start off with a lighter massage.
→Starting with a deep massage can result in injury. Elderly people and persons with weak bones should be especially careful when selecting massage intensity.
●
When sitting down in the chair, do so slowly, ensuring that the spinal rollers are in the correct position at either side of the spine. The
backbone should lie comfortably between the rollers without having to turn or twist the body.
●Do not sit, stand, or lean on the leg rest unless you are sitting in the chair or getting up from the chair.
→Personal injury or damage to the chair may result if the chair tips over.
●If you will be using the chair after it has not been used for a long time, first read this Operating Manual again thoroughly and
check if the chair operates properly.
Prohibited
●
Do not use the product in any way not prescribed by the Operating Manual. Do not use the product together with any other therapeutic
device or with an electric blanket.
→May result in injury or have a negative effect on health.
●Do not move the product while someone is in it.
→Accident or injury may result if the product tips over.
●Do not sit down on the chair with the leg rest raised.
→Any sudden heavyweight on the leg rest could cause damage to the mechanism. Or, accident or injury may result if the chair tips over.
●Do not use with anything other than the accessories supplied with this product.
Safety Precautions: During Use
Warning
Prohibited
●Do not wrap the power cords or the remote control cord around your body, or place the product on top of either cord. Do not
scratch, tear, treat, unduly twist, stretch, or bend the power cord or the remote control cord.
→The cords may fray or tear, resulting in fire or electric shock.
●Do not spill water and/or other liquids on the chair or remote control.
→May result in electric shock, short circuit, or combustion.
●Do not use the chair while the body is wet, or with wet hands.
→Could result in electric shock or damage to the chair.
●Children should not use the chair. It is advisable to keep children and pets away from the chair (especially from behind the
reclining seat back or under the leg rest). Children aged 14 years or over should use only the Youth Program. In such a case, an
adult must attend the child.
→Could result in accident or injury.
●Do not use if the covering is torn. If it is, unplug the power cord from the wall outlet.
→Could result in accident, injury, or electric shock. Contact the vendor for repairs.
●Be careful not to get hands, feet, or objects caught between the units of the leg rest or between the leg rest and the chair. Be
careful not to get hands or objects caught between the units of the armrest or between the armrest and the chair.
→Accident, personal injury, or damage to the chair may result if hands, feet, or objects are caught.
●Do not release hands suddenly while lifting the leg rest by hand.
Required Action
●Make sure no one, especially children or pets, is in the way when lowering the reclining seat back or lowering the leg rest down.
Be careful that people and/or objects are not caught behind the seat back or under the leg rest.
Caution
Prohibited
●Do not use the chair unclothed.
●Do not use the chair for purposes other than massage, or other than the ordinary uses of a chair.
→Could result in accident or injury.
●
Do not use the chair to massage the head, chest, stomach, and/or joints (knees, elbows). Do not place hands, feet, or arms in between the
rollers.
→May result in nausea or injury. Place a soft towel behind your neck if you want to avoid intense stimulation of the area.
●Do not place hands or feet into the roller tracks, into the space between the seat back and the seat or into the moving parts.
Do not sit wearing hard objects, such as hair accessories, necklace, watch, bracelet, or ring.
→May result in personal injury.
●Do not place anything other than legs and feet on the leg rest.
→May result in personal injury.
●Do not place anything other than upper arms and forearms in the Upper-Arm and Forearm Units. Do not place anything other than
shoulders against the Shoulder Massage Unit.
→May result in personal injury.
●Do not operate the massage chair or leave it operating when there is no one in it.
→Could result in accident or injury.
Be sure that you have read these SAFETY PRECAUTIONS thoroughly before using your inada chair SOGNO for the
first time. The Operating Manual contains important information about how to use the chair safely and correctly,
avoiding possible damage to property or injury to persons using the chair and others. The Symbols shown below are
used throughout the Operating Manual to highlight important safety instructions. Please adhere to all precautions.
Descriptions of each component can be found on pages 5-8.
Display Warnings
Warning This action could result in serious injury or death.
Caution This action could result in personal injury or damage to property.
Types of Symbols and Description
Prohibited (The symbol on the left means “Do not disassemble.”)
Required Action (The symbol on the left means “Unplug the chair.”)
Remember to keep this Operating Manual in an easily accessible place.
Safety Precautions: Installation
Caution
Prohibited
●Do not install the chair in an area of high humidity,
such as a bathroom or sauna.
→Could result in electric shock or damage to the chair.
Required Action
●Only install on a flat, level surface.
→Chair could tip over accidentally if placed on an uneven surface.
Safety Precautions: Before Use
Warning
●Space Requirements
This product must be grounded. If it should malfunction or breakdown, grounding provides a path of least resistance for electric current in order to
reduce the risk of electric shock. This product is equipped with a cord having an equipment-grounding conductor and a grounding plug. The plug
must be plugged into an appropriate outlet that is properly installed and grounded in accordance with all local
codes and ordinances.
• Improper connection of the equipment-grounding conductor can result in the risk of electric shock. Check with a
qualified electrician or serviceman if you are in doubt as to whether the product is properly grounded. Do not modify
the plug provided with the product if it will not fit the outlet; have a proper outlet installed by a qualified electrician.
This product is for use on a nominal AC 120 V circuit and has a grounding plug that looks like the plug illustrated in the
figure to the right. Make sure that the product is connected to an outlet having the same configuration as the plug. No
adapter should be used with this product.
Prohibited
●The following persons must not use this massage chair:
◎Persons who have been instructed by a doctor to avoid massage therapy. Ex. Thrombosis, severe aneurism, acute varicosity, or dermatitis and/or skin infection
including inflammation of the typodermis. ◎Persons with suspected acute neck sprain (whiplash injury)
Required Action
●Persons with any of the following conditions should seek medical advice before using the chair.
◎Serious heart conditions ◎Sensory impairment caused by serious peripheral circulatory disorders due to diabetes and other diseases ◎Osteoporosis, spinal
fractures, acute pain and/or symptoms thereof ◎Persons being treated for personal injuries ◎High fever (100°F or higher) Ex. Strong acute inflammation illness
caused by fatigue, chills, blood pressure fluctuation, or asthenia ◎Persons in the early stage of pregnancy, or immediately after giving birth ◎Persons who
have electronic medical device(s) easily susceptible to electromagnetic interference Ex. pacemaker ◎Abnormal or curved spine ◎Persons planning to use the
chair for treatment or for rehabilitation purposes ◎Persons with malignant tumor(s) ◎Persons under bed rest orders ◎Persons with acute gastro-intestinal
complaints or ailments such as gastritis, enteritis, or hepatitis ◎
Persons under a doctor's care, or those experiencing unusual physical discomfort
◎
Joint dysfunction due to rheumatism, gout, or other diseases
◎Persons with symptoms such as qualm, dizziness, or tinnitus ◎Inflammation due to sprain or
torn muscles ◎Persons with thecitis or suspected thecitis
●
Elderly people and persons with weak bones, even if they have no particular disease, should seek medical advice before using the chair
.
●If your condition does not improve after use, consult a doctor or specialist.
●Do not drop or insert any object into any opening.
●To disconnect, switch all controls to the off position, then remove plug from outlet.
Prohibited
●Do not use the chair with anything other than an AC 120 V power source.
→May result in fire or electric shock.
●Do not use with any type of transformer device.
→May result in damage to the product or electric shock.
●Do not use if the power cord or plug(s) is damaged, or if the wall outlet is loose.
→May result in electric shock, short circuit, or combustion.
●Before each use, check for holes or tears in the cover of the back pad. Also, check the other parts for tearing. Stop using the chair
immediately if you find even the smallest tear. Unplug the chair and contact the vendor for assistance.
→Using the chair with holes or tears in the covering could result in injury or electric shock.
●Do not operate under blanket or pillow.
→May result in burns, fire, electric shock, or injury to persons.
●Do not use outdoors.
→May result in burns, fire, electric shock, or injury to persons.
●Do not operate where aerosol (spray) products are being used or where oxygen is being administered.
→May result in burns, fire, electric sock, or injury to persons.

3 4
SAFETY
PRECAUTIONS
MAIN
FEATURES
SAFETY PRECAUTIONS MAIN FEATURES
Safety Precautions: During Use
Caution
Required Action
●In an emergency, or if there is any sudden malfunction, push the STOP button on the remote control to make the chair stop
immediately.
●If you begin to experience marked pain or other unusual physical discomfort while using the product, seek medical advice
immediately and discontinue use of the product.
●If you feel the massage is too strong, reduce the stimulation according to this Operating Manual. If this solution does not work,
stop using and contact the vendor.
→May result in injury if you continue use with high stimulation under such circumstances.
●Make sure to keep the back pad in place during massage. Do not use the chair without the back pad.
→May result in personal injury.
●Do not fall asleep in the chair during a massage.
→May result in personal injury.
●Keep massage sessions to no more than 15 minutes in length. Area Specific Massage of any particular area on the body to no more
than 5 minutes.
→Continual use for extended periods of time can result in over-stimulation, which could cause the opposite of the desired effect, or even injury. Set 30 minutes in
total for reference per day and observe appropriate intervals between massage sessions.
* For children aged 14 years or over, use only the Youth Program and only one session per day.
●If your leg or foot comes out of the leg rest during the massage, do not try to force it back in.
→Undue force may result in damage to the mechanism.
●If your arm comes out of the Upper-Arm Unit or Forearm Unit during the massage, do not try to force it back in.
→Undue force may result in damage to the mechanism..
Unplug
the chair
●If there is a power outage or the possibility of a power outage, stop the chair immediately and set the main POWER switch to OFF.
Unplug the chair from the wall outlet.
→Accident or injury may result if the chair is still in operating mode when the power resumes.
●If there is a threat of lightning, stop the chair immediately and set the main POWER switch to OFF. Unplug the chair from the wall
outlet.
●If the chair does not start, or if there is any type of malfunction, to prevent accidents it is best to stop the chair immediately and
set the main POWER switch to OFF. Unplug the chair from the wall outlet. Contact the vendor for assistance regarding repairs or
maintenance.
→Electric shock or fire caused by a short circuit may result if the chair is left plugged in under such circumstances.
Safety Precautions: After Use or When Not in Use
Caution
Required Action
●Be sure to set the main POWER switch to OFF after every use and to unplug the chair from the wall outlet.
→Accident or injury may result if children or pets play with the product.
●After using the chair, be sure to return the reclining seat back to its upright position and lower the leg rest to its lowest position.
●Wipe the product off after every use, and store it in a place free of excess humidity.
●Do not place any object on the seat, reclining seat back, or leg rest.
Unplug
the chair
●Do not pull on the power cord to unplug the product from the wall outlet; make sure to grasp the plug firmly when unplugging.
→May result in electric shock or fire caused by short-circuiting.
●
When cleaning or caring for the product, make sure to unplug the product from the wall outlet first. Do not plug or unplug the power
cord with wet hands.
●If you will not be using the product for some time, be sure to unplug it from the wall outlet.
→Insulation degradation by dirt or moisture may occur and cause electric shock, or fire caused by short-circuiting may result.
Others Precautions
Warning
Prohibited
●Do not stand on the chair. Do not sit on any part of the chair other than the seat.
→Personal injury or damage to the chair may result if the chair tips over.
●Do not stand on the control box and/or place any object on it.
Do not
disassemble
●Do not remodel the chair. Anyone other than an authorized service person must not repair or disassemble. Contact the vendor.
●For safety reasons, if the power cord is damaged, contact the vendor for replacement.
●Do not remodel the chair.
→May result in fire, electric shock, or injury.
Caution
Required Action
●If you lend, sell, or otherwise transfer the chair to another party, make sure to include this Operating Manual.
Note
Before discarding the product or any of its accessories, consult your municipal government about the proper disposal method.
Main Features
From your palms to soles
Full-Body Massage Function
Ideal relaxation. Made possible with various modern
technologies working together for the Full-Body
Massage Function.
The Shoulder Massage Unit and the Upper-Arm and
Forearm Units function to wrap and give a gentle
massage from your shoulders to palms.
For massaging of your back, buttocks, and
calves, variable massage techniques and unique
programming make for a sensation close to human
touch. The length of the leg rest is adjusted with
springs to fit the length of your legs, which enables
the leg rest to give a gentle massage to your feet
and legs from any angle.
Optical sensors enable the
Automatic Shiatsu Point Locator
Function
This automatically locates Shiatsu points, which vary
from person to person, before starting a massage,
allowing for an effective massage that tailors itself
to your size and shape.
Easy-to-read massage guide
Remote Control Display Panel
The remote control features a clear, easy-to-read
display panel that enables you to monitor your
massage. The display guides you through each step
of your massage, displaying information about each
massage action.
Easy to adjust to the most comfortable position
Automatic Reclining Function
The seat back can be reclined to any angle between
approx. 120° and 165° from the floor. The angle of the
leg rest can be adjusted by approx. 90° according to
your preference.
With state-of-the-art technology
Various Course Functions
Healthcare programs and Well-Being programs that
allow you to select the optimal program according
to your purpose and Manual Selection mode that
accommodates your particular needs are provided.
Vibration Massage Function
The vibration mechanism is located in the chair
back. The soothing vibrations provide a relaxing
massage.
DreamWave Function
The air cushion on the seat offers DreamWave
operation.
Full-Body Stretch Function
The Full-Body Stretch Function is a combination of
curving your upper body backward with reclining
of the seat back and twisting with the air cushions
provided with the seat.
Youth Program Setting
To enable a low-stimulation massage for children
aged 14 years or over, the adjustable range of the
roller shoulder positions during an Automatic
Shiatsu Point Locator operation has been extended
to lower positions.
Benefits
As a therapeutic massage device in the general households, the inada chair SOGNO
provides the following benefits:
●Relaxes muscles ●Relives minor muscle aches and pains

5 6
COMPONENTS
& DESCRIPTION
COMPONENTS
& DESCRIPTION
COMPONENTS & DESCRIPTION
Chair
Reclining
Seat Back
Shoulder Massage Unit
Rollers
(Storage roller positions are inside
the upper part of the seat back.)
Upper-Arm Units
Seat
Calf Unit
Reclining Safety
Mechanism
Control Box
Cord Connector
Plug
Power Cord
Wheel
Power Connector
Main POWER
Switch
Foot Unit
Forearm Units
Leg Rest
Belt for the Shoulder
Massage Unit
A weight for adjusting the
position of the Shoulder
Massage Unit is housed
inside.
Back Pad
Remote
Control
Pocket for
the Remote
Control
Leg
Armrests
Child Safety Lock
7 8
COMPONENTS
& DESCRIPTION
COMPONENTS
& DESCRIPTION
COMPONENTS & DESCRIPTION
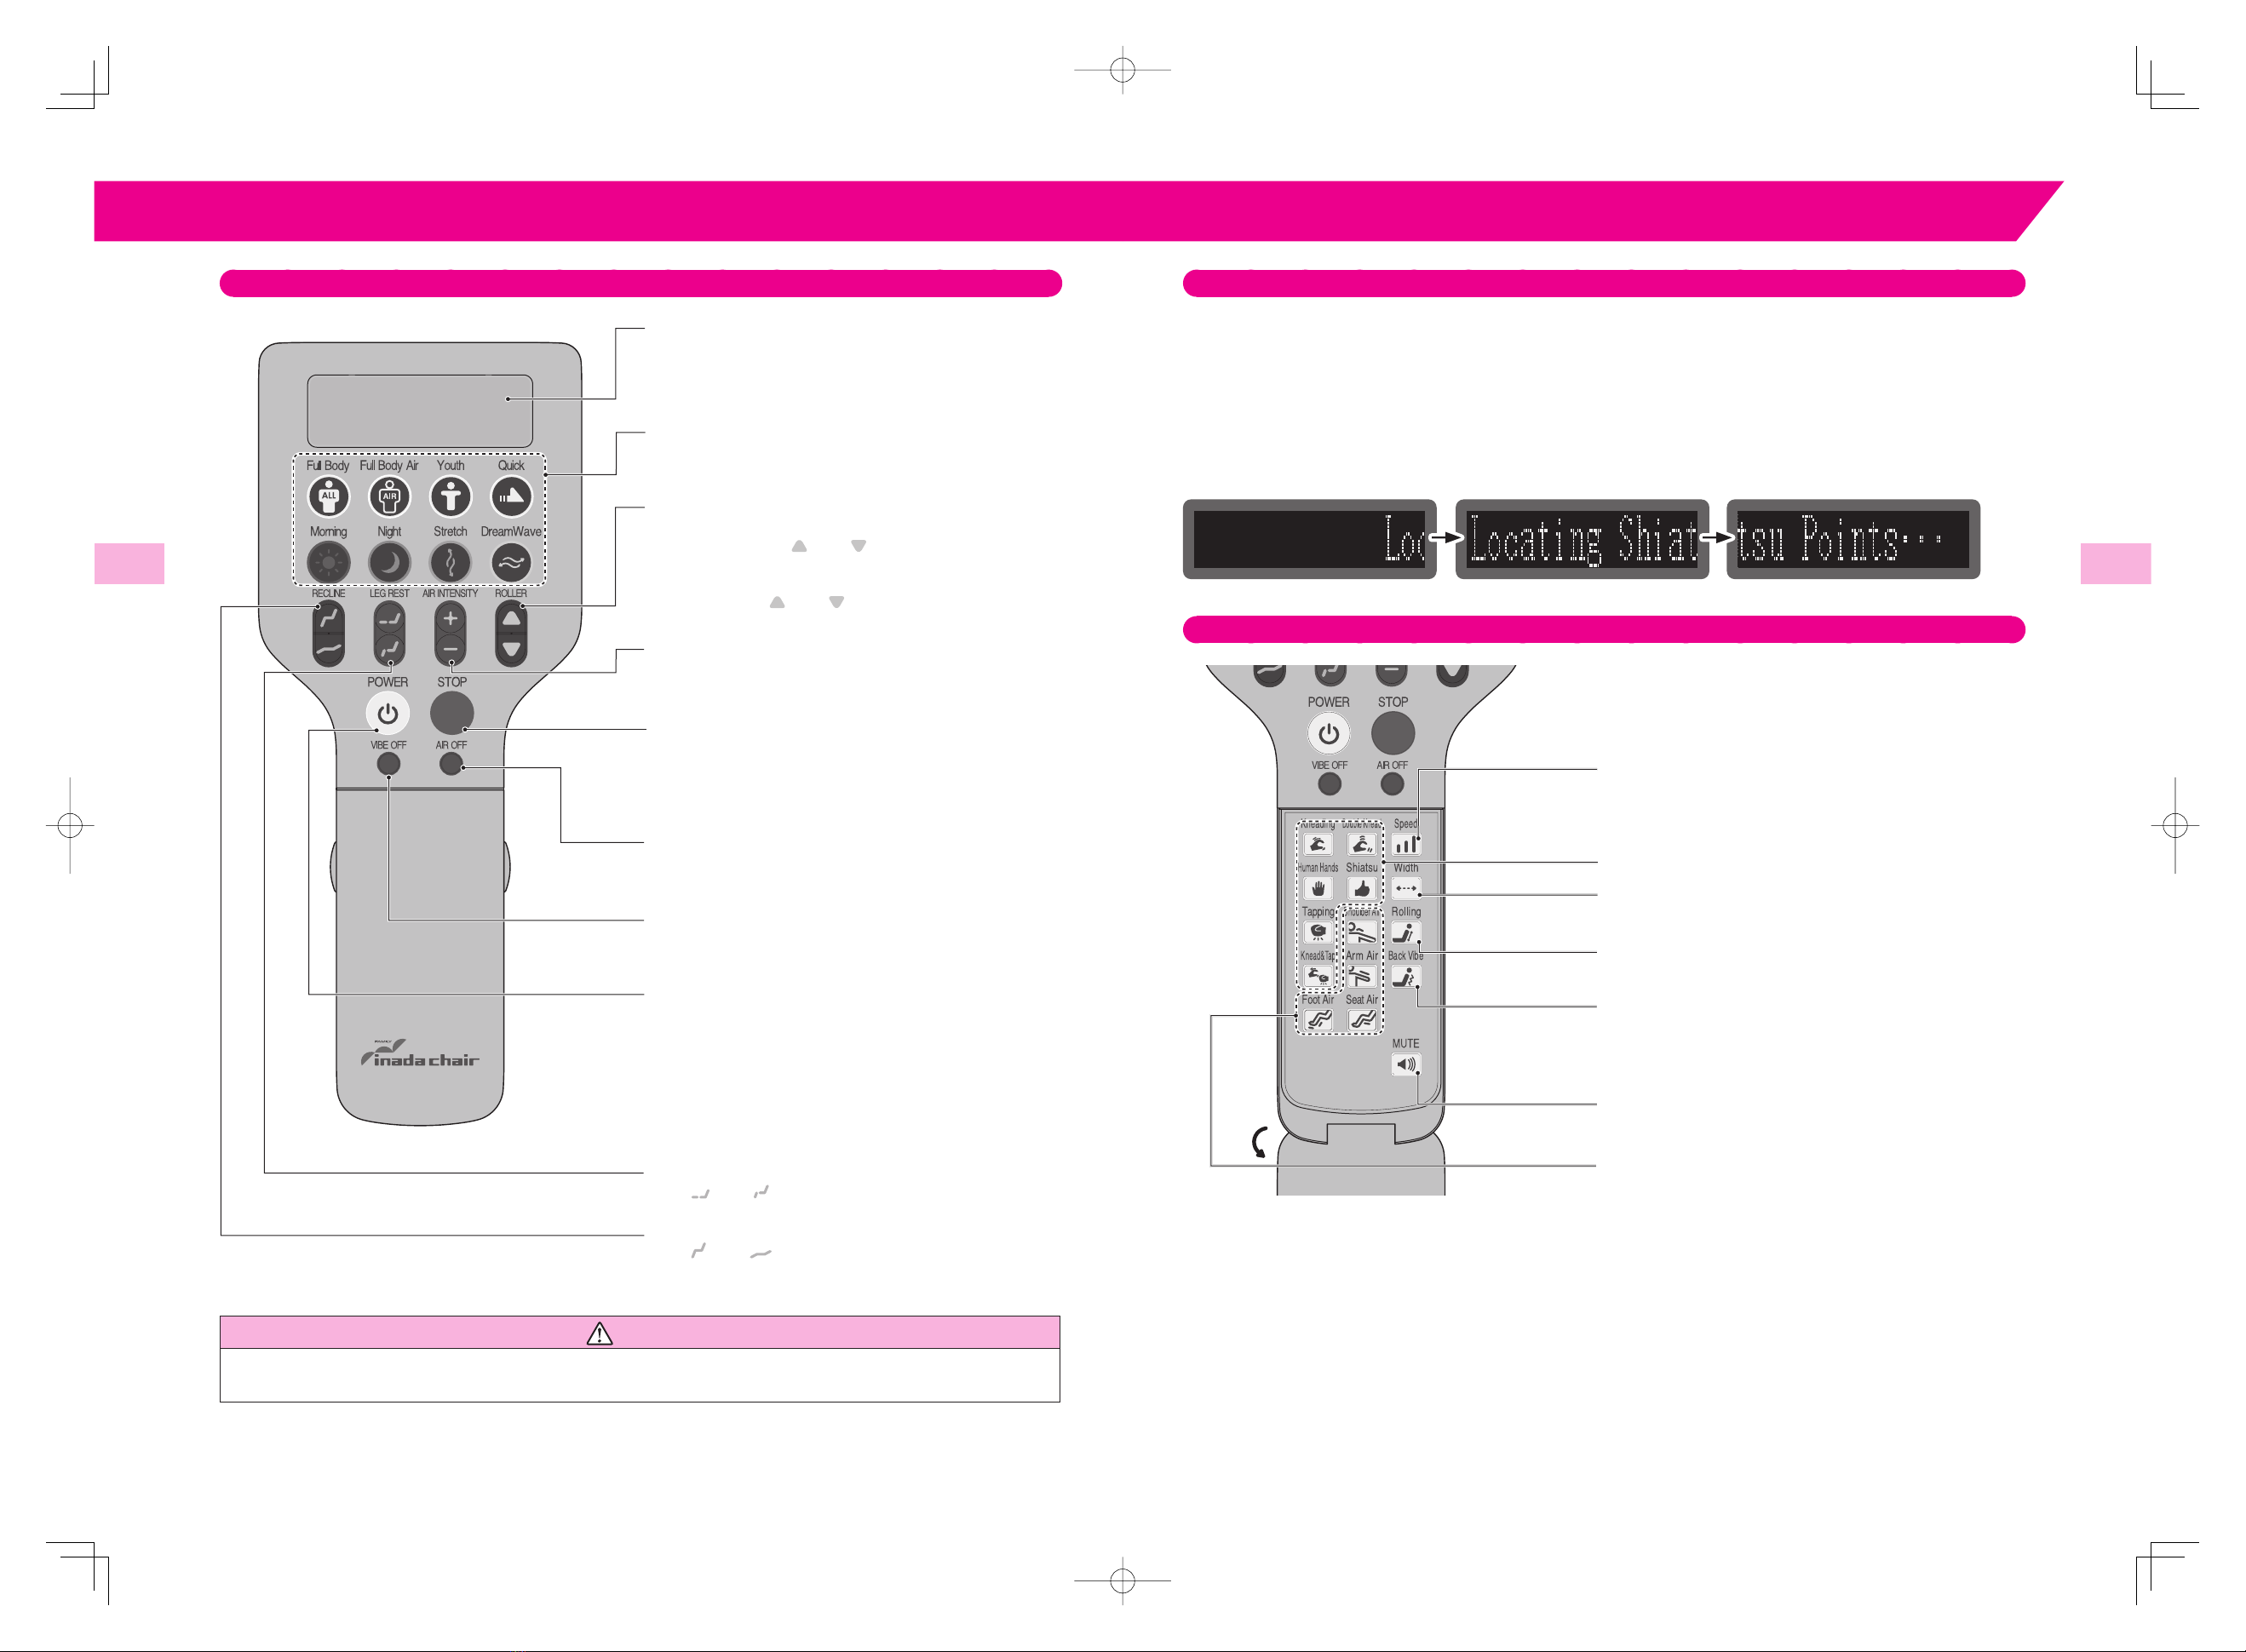
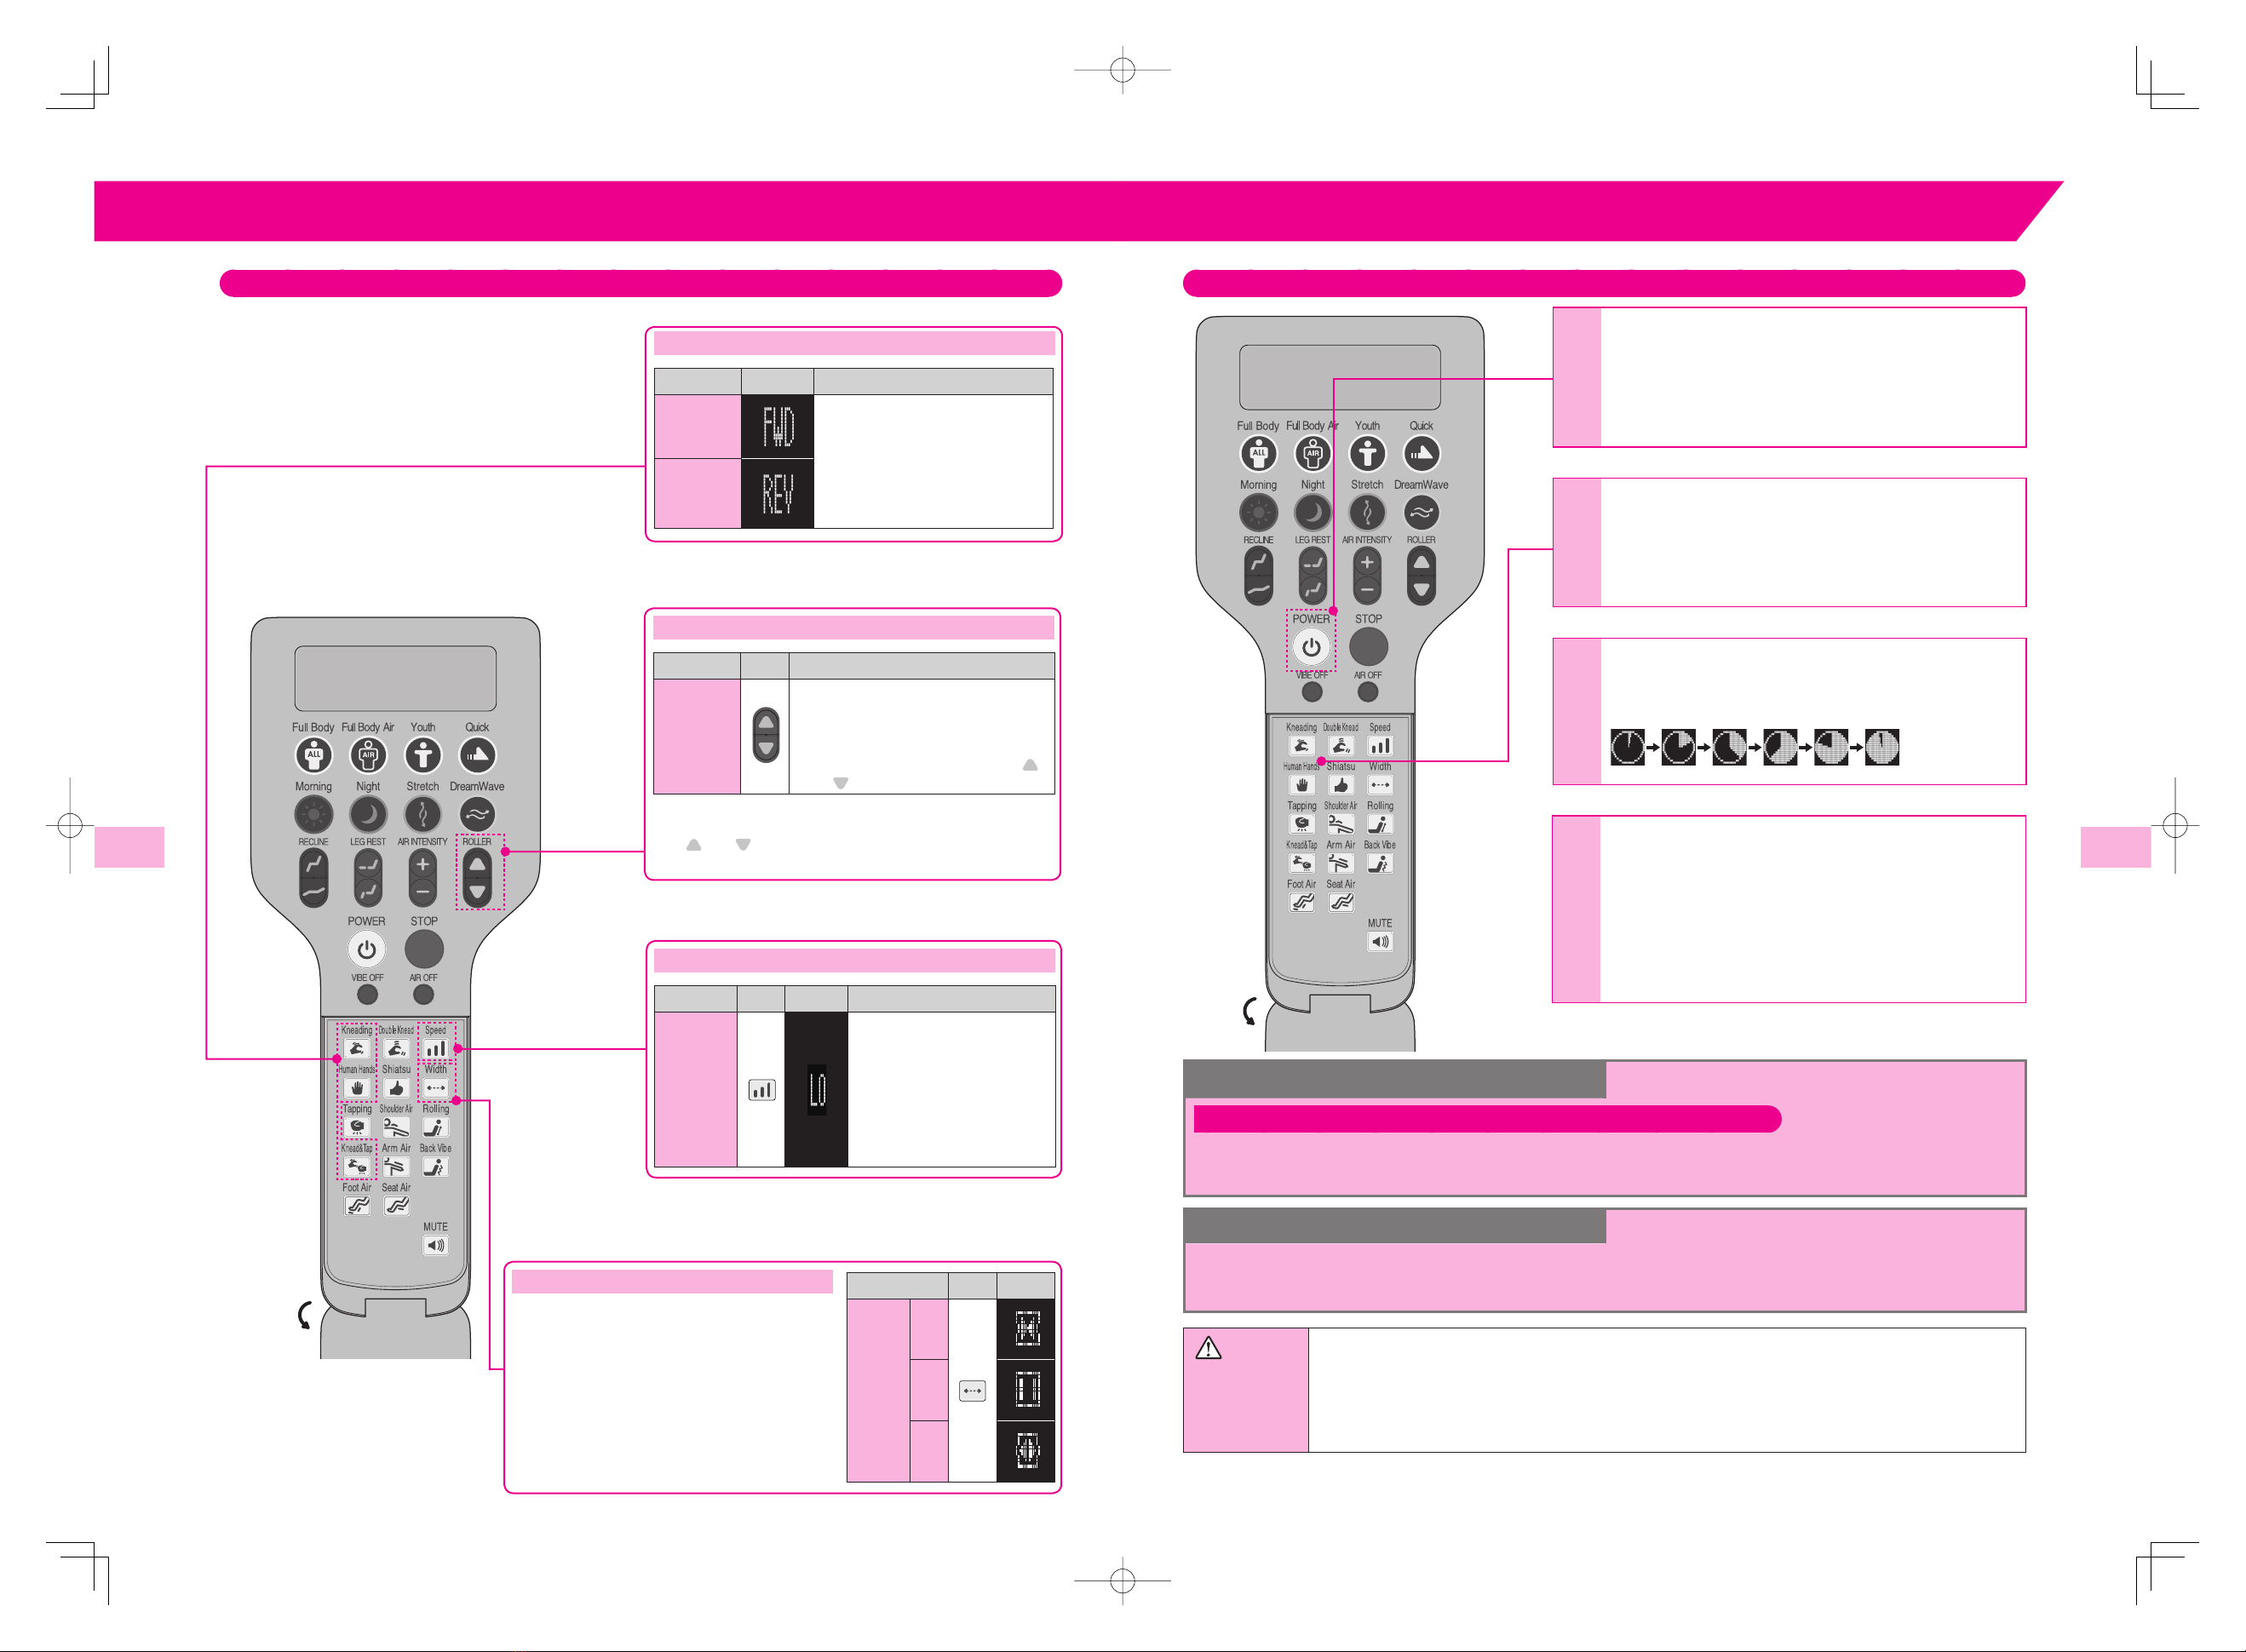
Remote Control Remote Control Display
Information, such as massage action descriptions, status of progress, and the intensity and speed of the
massage in progress, is displayed with both characters and symbols.
Characters and symbols on the display move from right to left.
Example: While the Shiatsu Point Locator sensors are being activated, the display shows the following text:
"Locating Shiatsu Points..."
Remote Control Display
Remote Control/Inside the Panel
Warning
●Do not spill water and/or other liquids on the remote control.
●Do not handle the remote control with wet hands.
●Do not sit on the remote control. Do not drop or step on the remote control. Do not pull the remote control cord forcibly.
●Do not use pointed or hard objects to push the buttons or display on the remote control.
→May result in damage to the remote control.
Remote Control Display
Information, such as massage action descriptions, status
of progress, and the intensity and speed of the massage
in progress, is displayed with both characters and
symbols. (See next page.)
Preset Programs
For selecting a program with the corresponding course
name
ROLLER Buttons
During Preset Programs, roller shoulder positions can
be adjusted using [ ] and [ ] immediately after the
Shiatsu points are located.
In Manual Selection Mode, roller positions can be
adjusted using [ ] and [ ].
AIR INTENSITY Button
For adjusting the intensity of air pressure in 3 settings
(high, medium, and low) during Preset Programs.
STOP Button
Use this button to shut the chair off immediately in an
emergency or if there is a malfunction during operation
of the chair.
The rollers will stop immediately.
AIR OFF Button
For canceling air massage during Preset Programs, use
this button.
VIBE OFF Button
For canceling vibration operation during Preset
Programs, use this button.
POWER Button
For turning the remote control power ON or OFF.
Pushing the POWER button while the chair is activated
causes the rollers to return to their storage positions
before the chair is shut off.
The button is lit in green while the power to the remote
control is on, in orange while the power is off, and in red
while the chair is stopped in an emergency.
LEG REST Buttons
Use [ ] and [ ] to adjust the angle of the leg rest.
RECLINE Buttons
Use [ ] and [ ] to adjust the angle of the reclining seat
back.
Speed Button
For adjusting the roller speed in three steps during
Kneading, Tapping 1, and Kneading & Tapping.
Basic Operation Buttons
Width Button
For adjusting the width of the rollers in three steps.
MUTE Button
For turning the speaker of the remote control ON or OFF.
Air Massage Buttons
You can select from among [Shoulder], [Arm], [Seat], and
[Foot].
* The intensity of air massage can be adjusted in three steps
(high, medium, and low).
Back Vibe Button
For back vibration operation.
* The intensity of vibration can be adjusted in two steps (high
and low).
Rolling Button
You can select from between Full and Partial Rolling.
910
BEFORE USE
BEFORE USE
At least
26 inch.
At least
16 inch.
BEFORE USE
●This product is shipped with the reclining seat back in its fully reclined position and with the armrests and leg rest removed.
Before use, be sure to attach the armrests and leg rest (refer to the insertion sheet attached) then raise the seat back to its
upright position.
●Do not expose the chair to sudden bursts of heat. If the room where the chair is to be used is cold, turn the heat up slowly. If
the chair is moved from a cold place into a heated room, wait one hour before using the chair.
→Condensation could occur in the moving parts of the product, which may compromise performance.
Installation
Allow for at least 26 inch. clearance behind the chair and 16 inch. in front of the chair when installing, so as to
be able to recline the seat back fully without obstruction.
Caution ●Do not install the chair in an area of high humidity, such as a bathroom or sauna.
●Only install on a flat, level surface.
●Do not use in areas of high debris or dust content. Do not use where ambient temperature is 104°F or over.
●Do not install the chair where it can come into contact with direct heat, such as direct sunlight or a radiator.
●To avoid damaging floor surfaces and to cut down on the noise of
the chair, it may be better to install the chair on a carpeted surface or
to lay a piece of carpet under the chair. (Do not use electric blanket.)
●The product is very heavy, so please be careful when unloading it so
as not to damage floor surfaces.
●Install the chair at least 40 inch. away from TVs, radios, and/or other
audio or video equipment. Noise from these devices can cause
problems.
●The load to the floor per 0.16 in2is approximately 5.5 lbs. with a
person weighing 220 lbs. sitting on the chair.
Main Power Connection
①Plug the power
cord into the cord
connector located at
the back of the chair
first. Then plug the
other end into the
wall outlet.
②Set the main POWER
switch located at the
back of the chair to
ON.
A text message should
appear on the remote
control display screen.
*
If the main POWER switch is turned on while the rollers are stopped in the middle of the movement, they will automatically return to
their storage position (upper part of the reclining seat) then stop.
The seat will also move for adjustment of the initial position then stop.
Warning ●Do not use with any type of transformer device.
→May result in damage to the product or electric shock.
Caution ●Before plugging the power cord into the wall outlet, make sure that the main POWER switch is set to OFF.
●Make sure that the plugs on the power cord are inserted fully into the cord connector and the wall outlet.
●Before using the chair for the first time, turn on all the switches in order as indicated in this manual to check
that the chair is operating properly.
Checking the Seat Cover
Check for holes or tears in the back pad and other parts.
Check also that the zippers located at both sides of the
back pad are securely zipped.
Back Pad
Lift the Shoulder Massage Unit
up to check for holes or tears in
the cover of the back pad.
Zipper
Shoulder
Massage Unit
Check that the zipper
is securely zipped.
Warning ●Before each use, check for holes or tears in the cover of the back pad. Also, check the other parts for tearing.
Stop using the chair immediately if you find even the smallest tear. Unplug the chair and contact the vendor
for assistance.
How To Move
First, raise the reclining seat back and set the main POWER switch to OFF. Then
unplug the power cord from the outlet. Grip the lower parts of the both armrests,
as illustrated, lift the chair, and move.
Caution ●Do not move the product while someone is in it.
●During moving, be fully careful not to pinch your feet.
How to Use the Child Safety Lock
Insert the Child Safety Lock key into the keyhole located at the
back of the chair then turn the key counterclockwise 90° to lock
the chair.
During Child Safety Lock, "Child Safety Lock ON" is displayed
on the remote control display.
Even during Child Safety Lock, you can perform the following
operations: Raising the reclining seat back, lowering the leg
rest, and emergency stop.
To unlock, turn the key clockwise 90°.
Disabled
Enabled
Turn counterclockwise 90°.
Turn clockwise 90°.

11 12
POSITION
ADJUSTMENT
POSITION
ADJUSTMENT
RECLINE
LEG REST
How to Use the Shoulder Massage Unit
Place the Shoulder Massage Unit in a proper position.
If it is not placed properly, the Automatic Shiatsu Point Locator may not function properly.
Position both ends of the Shoulder
Massage Unit on your shoulders.
Proper Position of
the Shoulder Massage Unit
To raise the unit:
Push up the headrest of the
Shoulder Massage Unit.
To pull down the unit:
Pull down the lower parts of the
Shoulder Massage Unit.
■How to Use the Chair Without the Shoulder Massage Unit
You can have your shoulders massaged by the rollers and not by the Shoulder Massage Unit, by securing the Shoulder Massage
Unit at the upper part of the seat back.
①Flip the side of the Shoulder
Massage Unit over, as
illustrated. The lock belts for
the Shoulder Massage Unit are
initially positioned at the rear
of the Shoulder Massage Unit.
* The lock belts are located at
the both sides of the unit.
②Pull out the belts on both
sides. Move the Shoulder
Massage Unit upward to
the upper part of the seat
back.
③Fasten the buttons located at the rear of
the both sides of the back pad to the holes
of the belts.
④Sit on the chair,
as illustrated, and
start a massage.
How to Use the Shiatsu Pads for Shoulders
The Shiatsu Pads for Shoulders (light) are placed inside the Shoulder Massage Unit.
If you feel that the massage given by the Shoulder Massage Unit is too light, replace it with the Shiatsu pads
(strong).
If you feel that the massage is too strong, remove the Shiatsu pads.
※The Shiatsu Pads for Shoulders (strong)
L and R are symmetrical opposites. Use
Pad L for the left shoulder and Pad R
for the right shoulder.
Shiatsu Pad for
Shoulders (strong) R
Shiatsu Pad for
Shoulders (strong) L
Shiatsu Pad for
Shoulders (light)
Disengage the Velcro at the rear of the cover of the shoulder
massage section, turn the cover over, then attach the Shiatsu
pads at any place where the Velcro is provided, according to
your preference.
* For easy replacement of the Shiatsu pads, raise and place the Shoulder
Massage Unit at the upper part of the seat back.
Velcro
Velcro
POSITION ADJUSTMENT
How to Sit
When the chair is off, the rollers are normally drawn back into the left and right sides of the upper part of the
seat back (Storage Position). For safety reasons, first check the positions of the rollers. If they are in any position
other than storage positions, set the main POWER switch to ON before sitting down to allow the rollers to
return to their storage position. When you finish checking, sit down slowly in the center of the seat.
Caution ●Do not sit down on the chair with the leg rest raised.
→Any sudden heavyweight on the leg rest could cause damage to the mechanism. Or, accident or injury
may result if the chair tips over.
●Before using, raise the reclining seat back to its fully upright position. Then recline the seat back slowly to
the most comfortable position, remembering to start off with a lighter massage.
How to Use the Reclining Seat Back
■To raise the reclining seat back:
Press and hold the RECLINE [ ] button on the remote control. Release the button when the seat back
reaches your desired position.
If the button is kept pressed, the seat back will be raised to its fully upright position and stop.
■To lower the reclining seat back:
Press and hold the RECLINE [ ] button on the remote control. Release the button when the seat back
reaches your desired position.
If the button is kept pressed, the seat back will be reclined to its lowest position and stop.
●The leg rest is raised in conjunction with the movement of the reclining seat back. As soon as reclining of the seat back stops,
the leg rest also stops.
●If the main POWER switch at the back of the chair is set to ON, the reclining angle of the seat back can be adjusted.
Warning ●Make sure no one, especially children or pets, is in the way when lowering the reclining seat back.
Be careful not to stand or place any object behind the seat.
How to Use the Leg Rest
■To raise the leg rest:
Press and hold the LEG REST [ ] button on the remote control.
Release when you reach the desired leg rest position. The leg rest is stopped.
■To lower the leg rest:
Press and hold the LEG REST [ ] button on the remote control.
Release when you reach the desired leg rest position. The leg rest is stopped.
●If the main POWER switch at the back of the chair is set to ON, the angle of the leg rest can be adjusted.
Warning ●Make sure no one, especially children or pets, is in the way when lowering the leg rest.
Be careful that people and/or objects are not caught under the leg rest.
●Do not release hands suddenly while lifting the leg rest by hand.
Caution ●Do not place anything other than legs and feet on the leg rest.
POSITION
ADJUSTMENT
13 14
AFTER USE
POSITION ADJUSTMENT
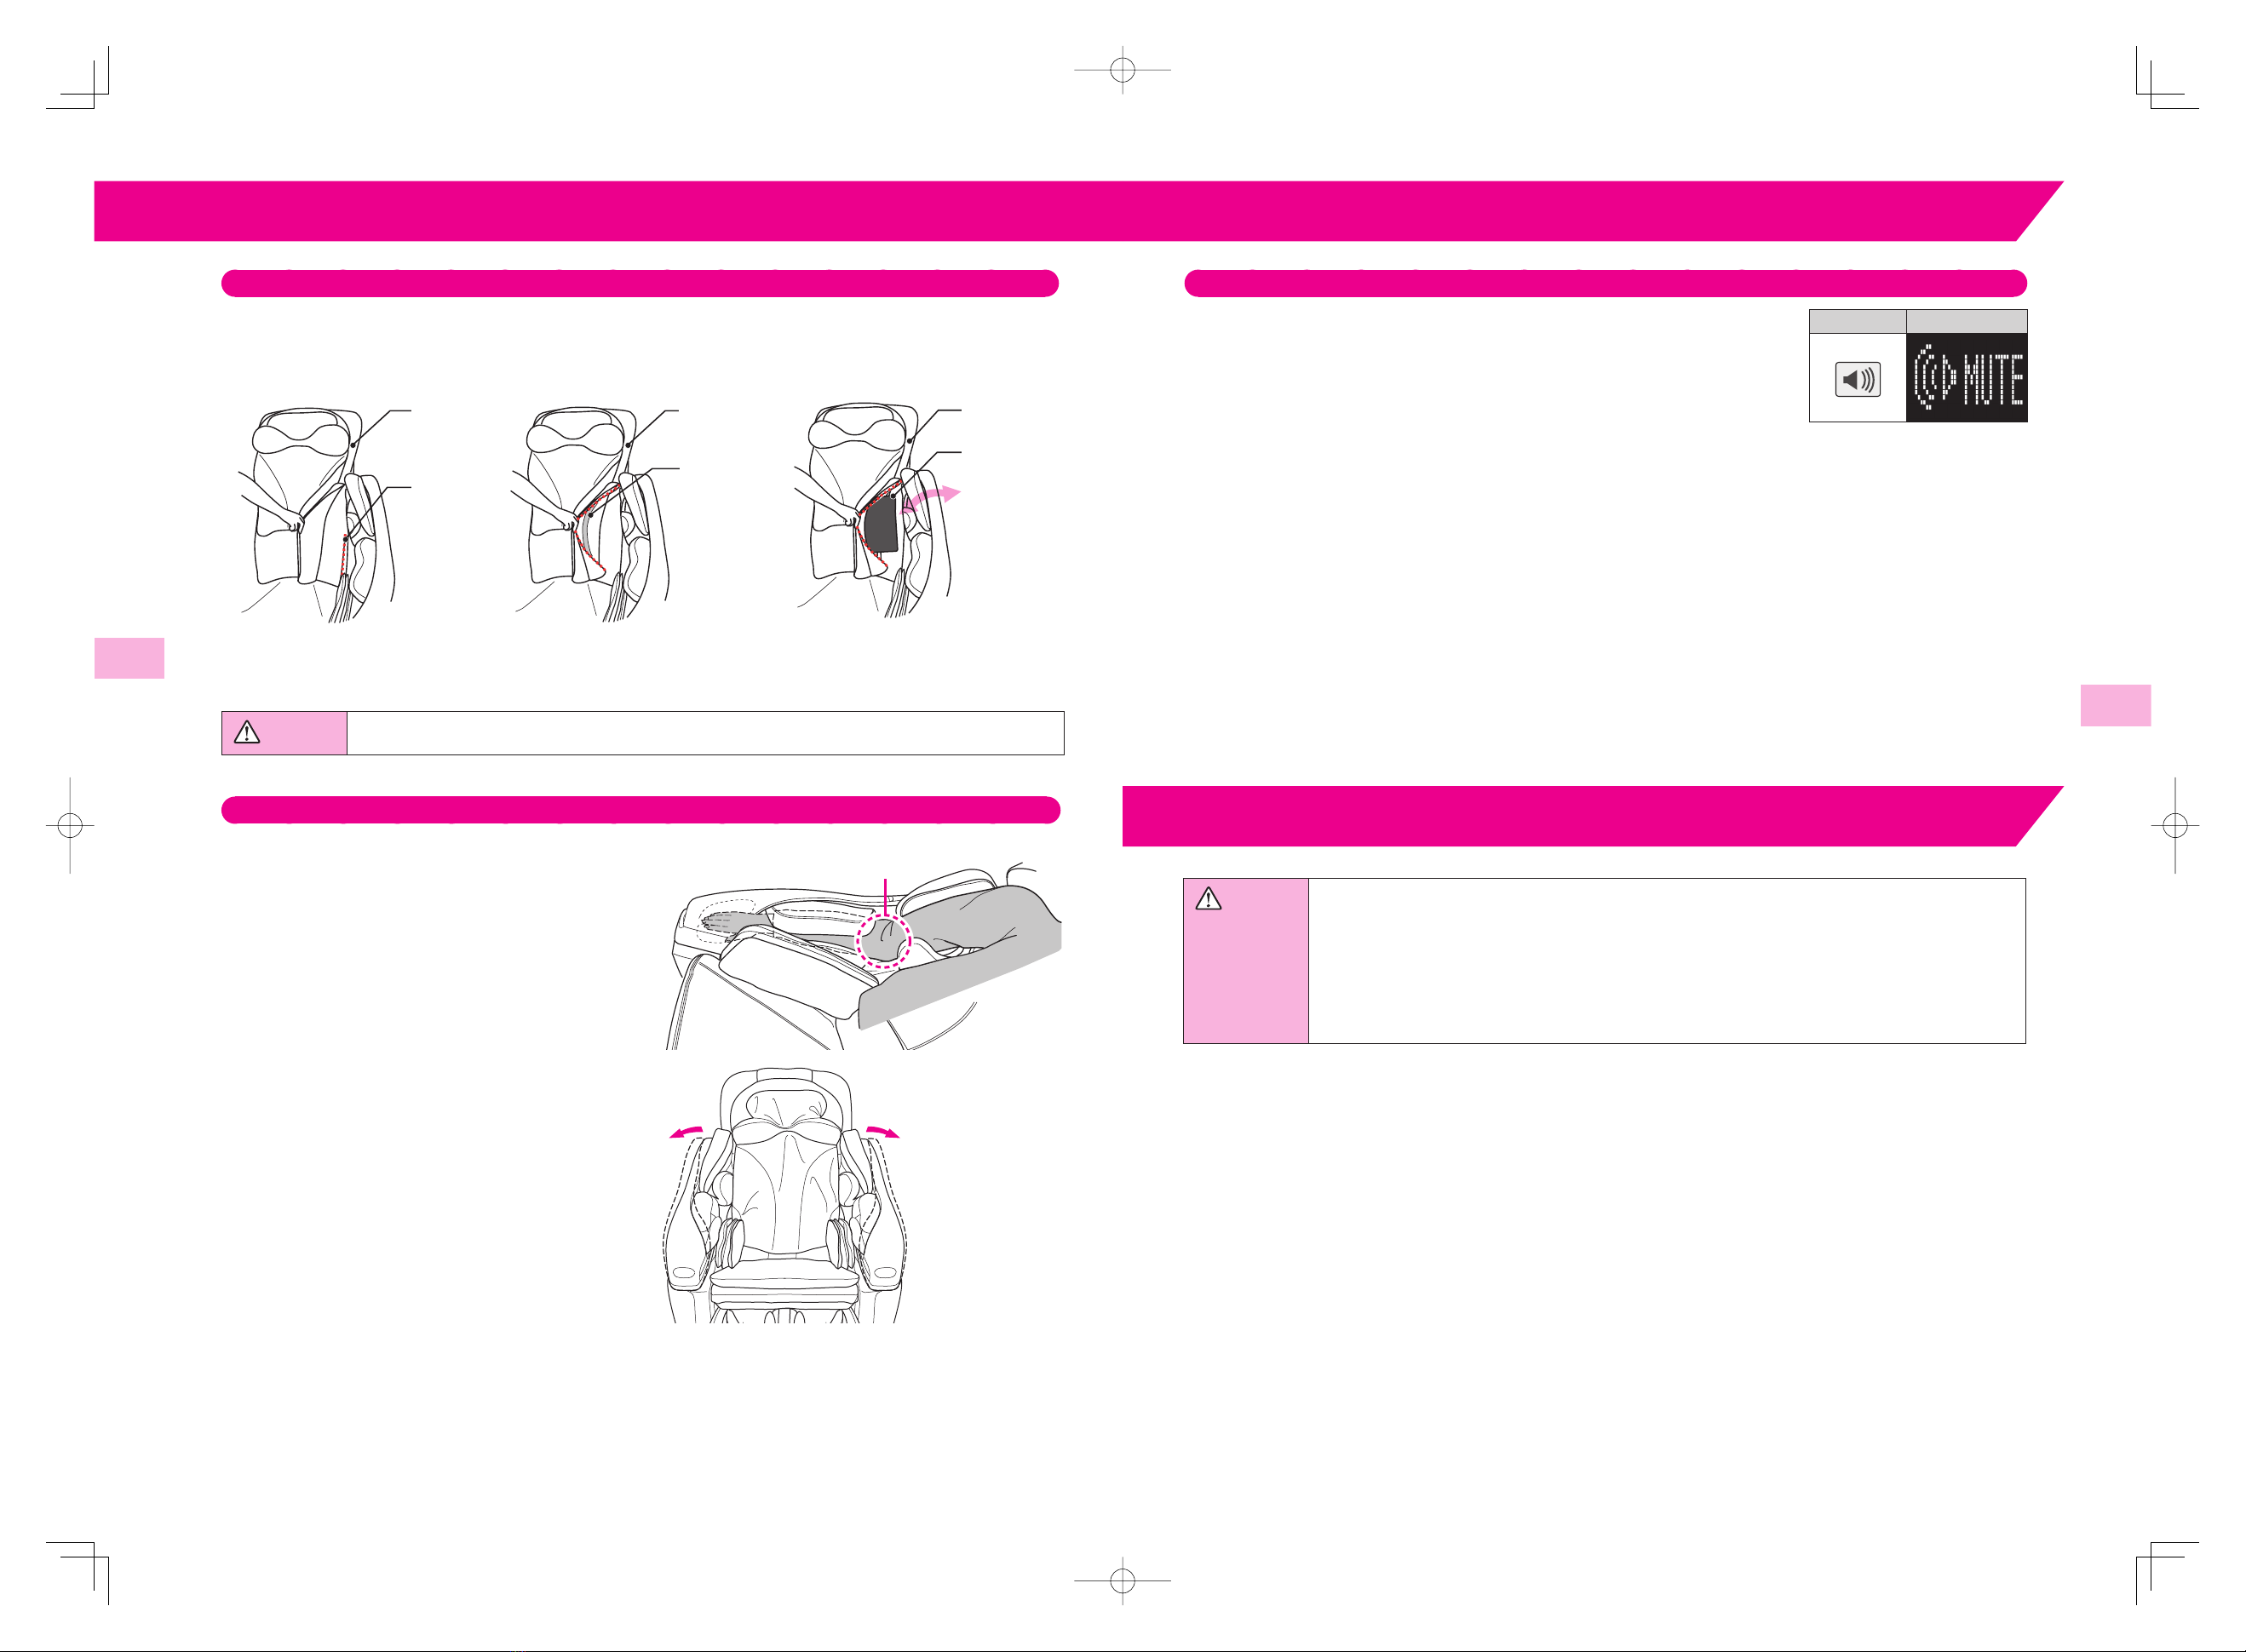
Speaker on the Remote Control
The sound from the speaker can be muted or reactivated with the MUTE
button behind the panel of the remote control.
While the sound is muted, the symbol shown on the right is displayed on
the display of the remote control.
Button Indication
How to Use the Buffer Pads
There is a buffer pad (thin) located at the rear of the back pad that helps absorb some of the roller
stimulation.
Remove the buffer pad if you feel that the massage is too light. Replace with a thicker accessory buffer pad if
too strong.
Zipper
Velcro
Back Pad Back Pad
Buffer Pad
Back Pad
①Unzip the zipper located at one side
of the back pad.
* The zippers are provided on the
both sides.
②Disengage the Velcro located at the
rear of the back pad.
③Replace the buffer pad.
* You can access the buffer pad
at the rear of the back pad from
either side.
Caution ●Before use, check that the zippers located at both sides of the back pad are securely zipped.
How to Use the Upper-Arm/Forearm Units
Place your arms in the Upper-Arm and Forearm Units,
as illustrated.
Be careful not to place your elbows where the air
cushions are.
* Be careful not to place your
elbows where the air cushions are.
The spring mechanism of the Upper-Arm and Forearm
Units enable them to stretch out by 4° at maximum so
that they can fit the body type of the user.
AFTER USE
Caution ●Be sure to set the main POWER switch to OFF after every use and to unplug the chair from the wall outlet.
→Accident or injury may result if children or pets play with the product.
●After using the chair, be sure to return the reclining seat back to the upright position and lower the leg rest
to its lowest position.
●Wipe the product off after every use, and store it in a place free of excess humidity.
●Do not pull on the power cord to unplug the product from the wall outlet; make sure to grasp the plug
firmly when unplugging.
●If you will not be using the product for some time, be sure to unplug it from the wall outlet.

15 16
MASSAGE PROGRAMS
& SELECTION
MASSAGE PROGRAMS
& SELECTION
MASSAGE PROGRAMS & SELECTION
1Full Body
For a comprehensive full-body Healthcare massage.
This program is recommended for persons who feel fatigue
or lack of energy.
2Full Body Air
For a comprehensive full-body massage focused on air
massage.
This program is recommended for persons who prefer
softer massage.
3Youth
A program for young people.
This program is recommended for persons who prefer
softer massage or for children aged 14 years or over.
4Quick
This program provides a quick massage to refresh the
entire body.
5Morning
For morning massage.
This program is recommended for persons who have a bad
morning or who have not recovered from their fatigue.
6Night
For night massage.
It is recommended to use this before going to bed.
7Stretch
For stretching operations.
This course is focused on curving and twisting motions.
8DreamWave
For a DreamWave massage.
This program is recommended for persons who need
relaxation.
●The duration of each course varies depending on height, body
type, reclining angle, and other factors related to the user.
Massage
Courses
PRESET
PROGRAMS
The Preset Programs provide
massages to meet your desired
purpose and application according
to the preset menus.
MANUAL
SELECTION
MODE
You can combine your favorite
massage types. You can also adjust
the speed, intensity, and roller
positions.
HEALTHCARE
PROGRAMS
WELL-BEING
PROGRAMS
For relaxation of muscles
For refreshing or relaxing

17 18
PRESET
PROGRAMS
PRESET
PROGRAMS
PRESET PROGRAMS
Preset Programs
●Eight automatic programs provide massages to relieve or soothe fatigue.
●
With the Preset Program buttons, you can choose your favorite program, which gives you a massage according
to preset menus.
Various Adjustments
Changing Courses
Before the course in progress finishes, you can change it to another course. After a total duration of 30 minutes, the course in
progress stops even if not completed.
Switching from One Preset Program in Progress to Another
When one Preset Program button is pressed while another Preset Program is in progress, the rollers return to their storage
positions, then the selected program starts from Automatic Shiatsu Point Locator operation.
Switching from a Preset Program to Manual Selection Mode
When one of the buttons for Manual Selection Mode located behind the panel of the remote control is pressed while a Preset
Program is in progress, the Preset Program immediately stops, and the selected operation starts with the Automatic Shiatsu
Point Locator operation. To select an air massage or back vibration operation, press the POWER button to stop the preset
program in progress before the selection.
Stopping in the Middle of a Massage
To stop mid-massage, press the POWER button. The rollers will return to their storage positions and stop.
In an emergency or if there is some malfunction during operation of the chair, press the STOP button. The rollers will stop
immediately. After confirming safety, press the POWER button. The rollers will return to their storage positions and stop.
Caution ●If you feel the massage is too strong, reduce the stimulation according to this Operating Manual. If this
solution does not work, stop using and contact the vendor.
→May result in injury if you continue use with high stimulation under such circumstances.
●Do not place hands or feet into the roller tracks, into the space between the seat back and the seat or into
the moving parts. Do not sit wearing hard objects, such as hair accessories, necklace, watch, bracelet, or ring.
●If your leg or foot comes out of the leg rest during the massage, do not try to force it back in.
■AIR INTENSITY Button
For adjusting the intensity of air pressure in 3 settings (high, medium, and
low) during Preset Programs, use [+] or [-].
The intensity of air massage is initially set to Medium.
(The intensity of air massage for the Youth Program is initially set to Low.)
* If the program is changed, the intensity of air massage is reset to its initial
setting (MED).
■VIBE OFF Button
The vibration function included in a program can be canceled with the
VIBE OFF button, according to your preference.
To reactivate the vibration function, press the VIBE OFF button again.
Caution ●Keep massage sessions to no more than 15 minutes in length. Area Specific Massage of any particular area
on the body to no more than 5 minutes.
→Continual use for extended periods of time can result in over-stimulation, which could cause the opposite
of the desired effect, or even injury.
Set 30 minutes in total for reference per day and keep appropriate intervals between each massage
session.
* For children aged 14 years or over, use only the Youth Program and only one session per day.
❶Press the POWER button.
If no selection is made within 5 minutes,
the power is automatically shut off.
❷
Press the desired button.
The selected program will be indicated
in the display.
* The Automatic Shiatsu Point Locator starts
locating Shiatsu points.
The Automatic Shiatsu Point Locator is not
available during Full-Body Air Program and
DreamWave Program.
Note For accurate Shiatsu Point location,
always sit as far back as possible and
place your head on the Shoulder
Massage Unit.
❸
The ROLLER positions can
be adjusted.
With the ROLLER buttons, the vertical
position of the rollers can be adjusted.
If no adjustment is required, do not use
these buttons.
❹
The program starts.
The progress of the program is indicated
on the display of the remote control with
the program name.
❺
Program completed.
When the massage program finishes, the
rollers return to their storage positions
(upper part of the seat back).
Then the power to the remote control is
shut off. However, reclining of the seat
back and angle adjustment of the leg
rest are still enabled.
■Air Massage Buttons
The intensity of air massage can be adjusted by area.
Each time the button located behind the panel of the remote control
is pressed, the intensity changes in the order of High, air massage
canceled, Low, then Medium
.
* Air massage cannot be canceled for the programs that include stretch or
DreamWave motions or during Full-Body Air Focus Program.
* If the program is changed, the intensity of air massage is reset to its initial
setting (MED).
■Back Vibe Button
The intensity of a back vibration operation can be adjusted with the Back
Vibe button located behind the panel of the remote control. The intensity
of back vibration is initially set to High.
(The intensity of the back vibration operation for the Young Program is
initially set to Low.)
Each time the button is pressed, the intensity changes in the order of
vibration canceled, Low, and High.
■AIR OFF Button
For canceling air massage during Preset Programs, use this button.
* Air massage cannot be canceled for the programs that include stretch or
DreamWave motions or during Full-Body Air Focus Program.
19 20
MANUAL SELECTION
MODE
MANUAL SELECTION
MODE
MANUAL SELECTION MODE
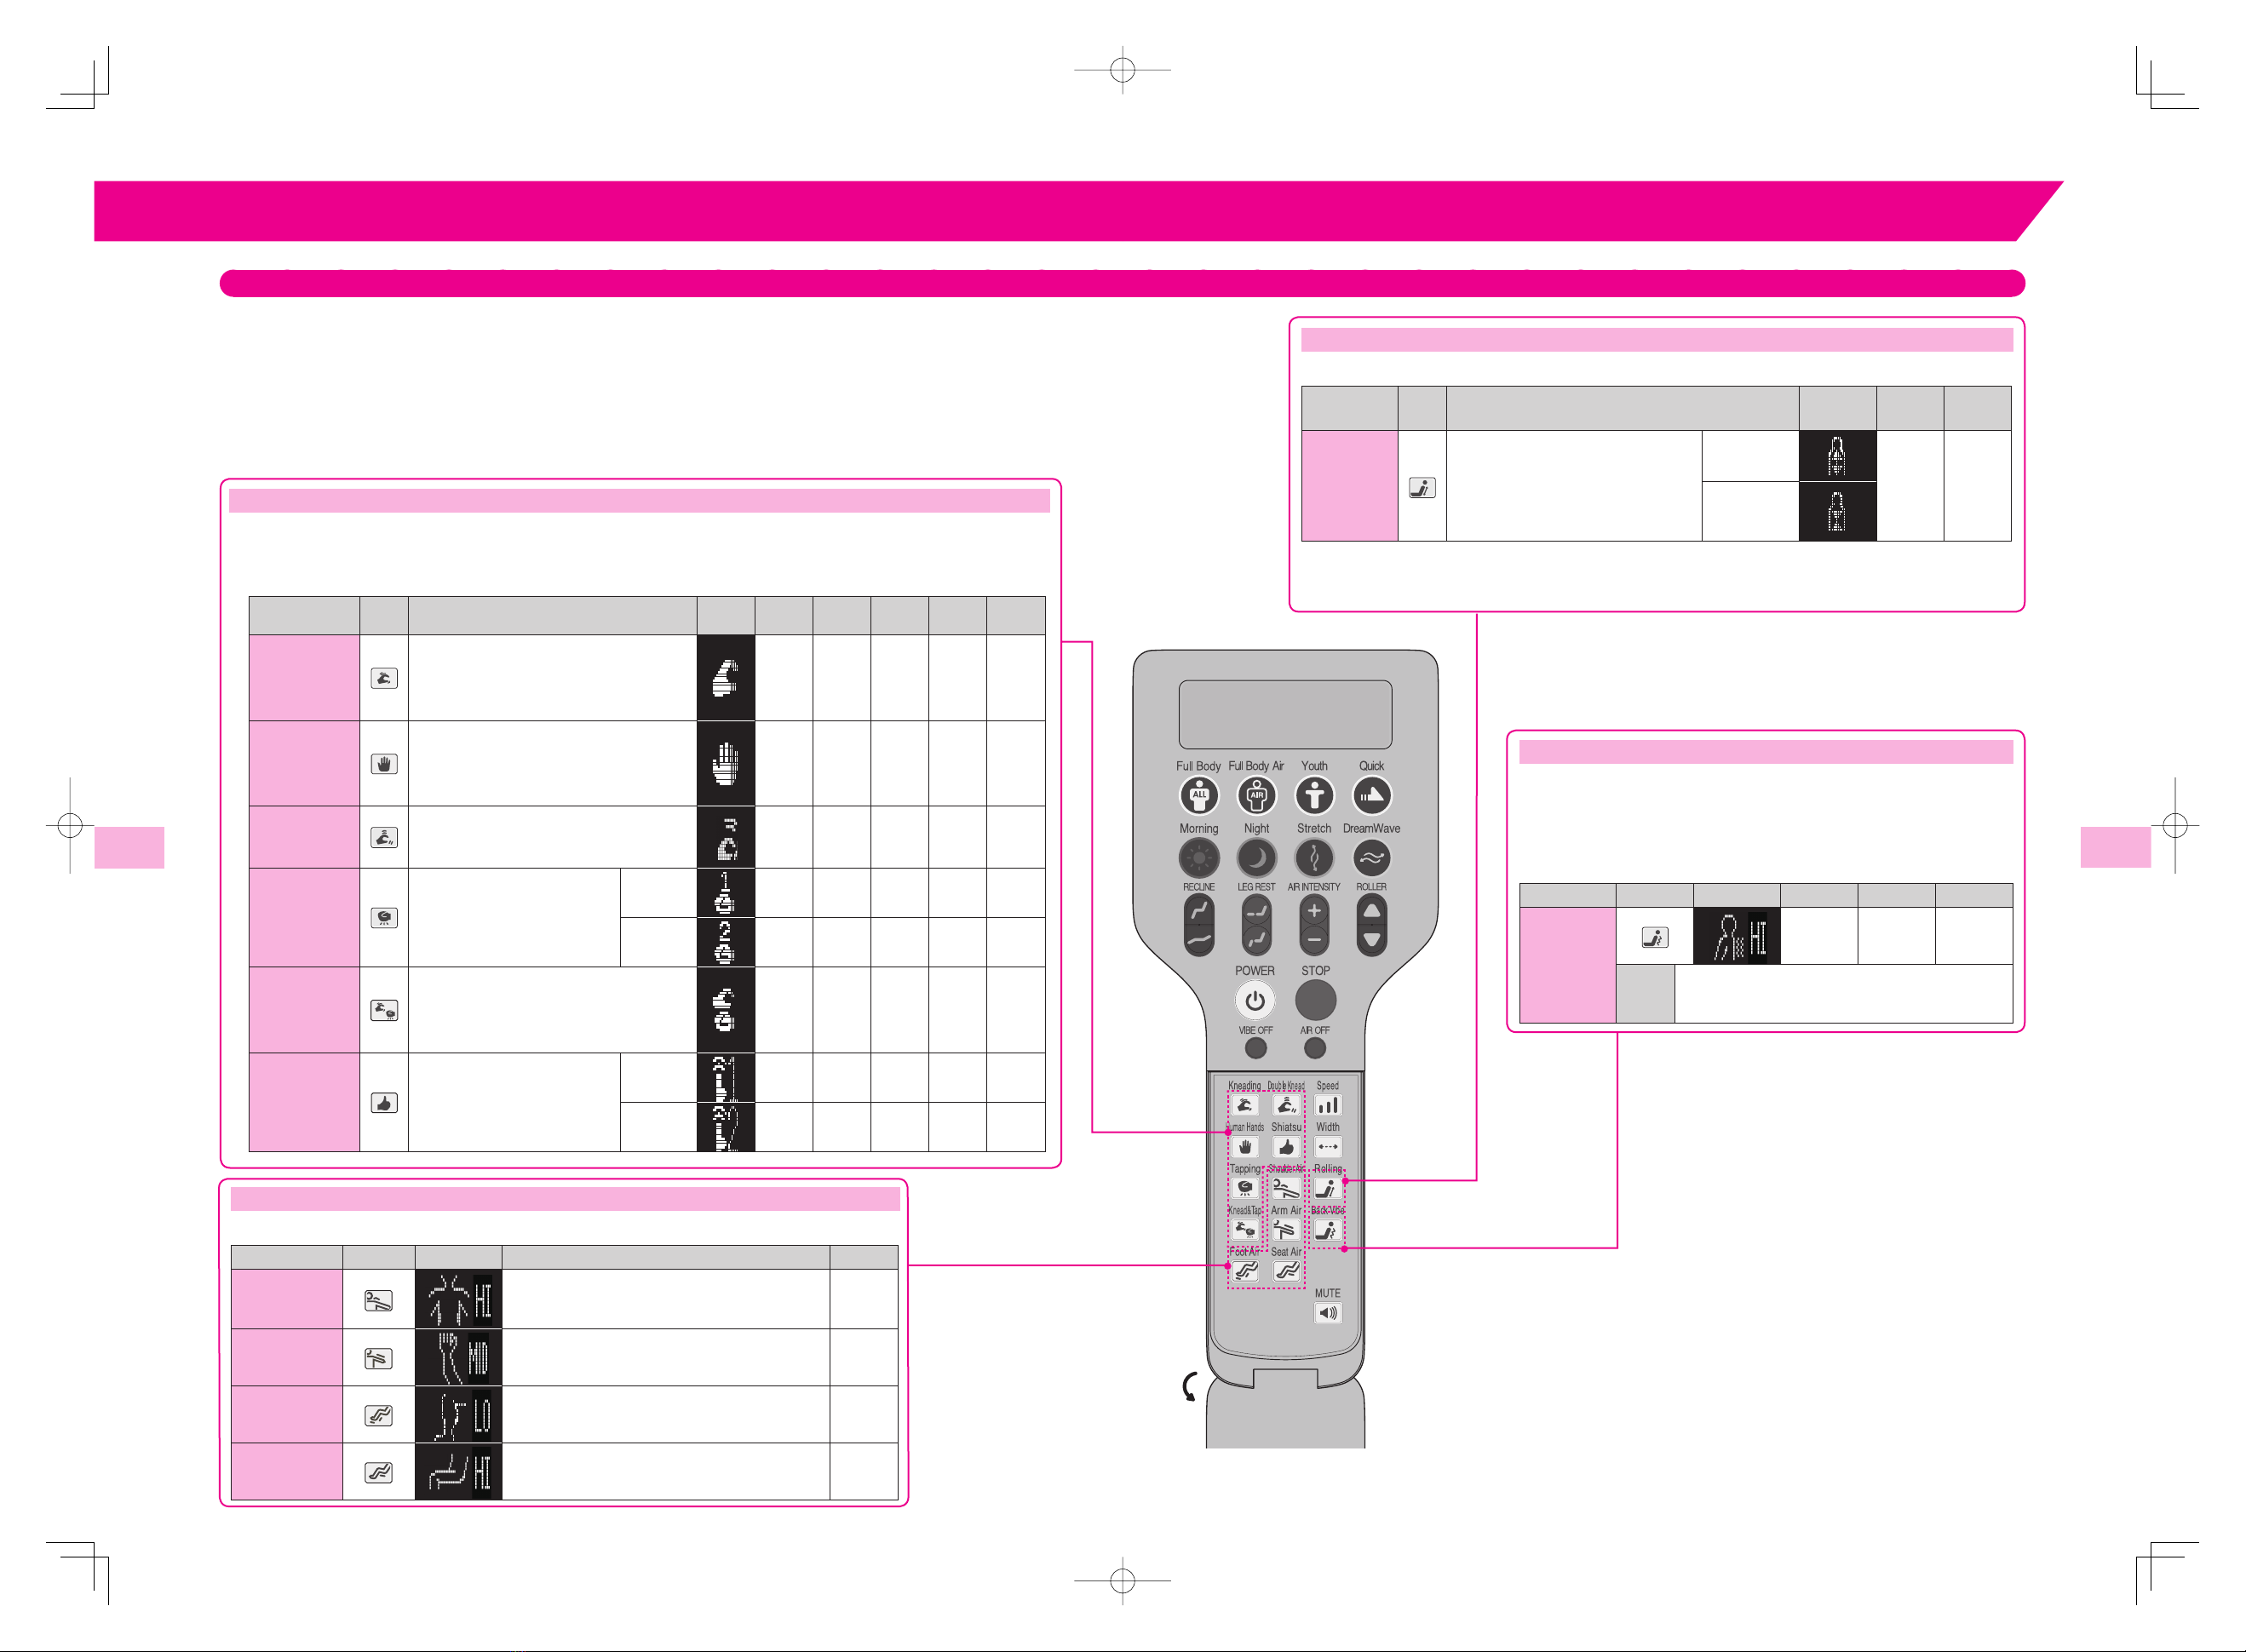
How to Operate Manual Selection Mode
You can combine massaging actions of your choice from among menus ❶to ❹.
●A circle in the adjustment column means that the particular adjustment can be made in the course of that
massage action.
●Width adjustment is not available if an action for which width adjustment is not available is combined
with rolling or back vibration.
●In the basic and rolling operations, Automatic Shiatsu Point Locator is performed in the same manner as in
the Preset Program.
①Basic Operations
• Automatic Shiatsu Point Locator is performed in the same manner as in the Preset Program.
• Once Automatic Shiatsu Point Locator is performed for a basic operation, it will not be performed again
if another basic operation is selected.
Operation
Button
Action
Indication
Forward/
Reverse
Speed Width Up/
Down
Intensity
Kneading
This performs kneading type of
massage.
Each time the button is pressed, forward
direction, reverse direction, or stop can be
selected. (See page 21.)
○○
3 steps —○○
Human
Hands
This performs complex massage similar
to human touch.
Each time the button is pressed, forward
direction, reverse direction, or stop can be
selected. (See page 21.)
○——○○
Double
Kneading
Kneading in the forward and reverse
directions at various speeds will be
automatically repeated.
———○○
Tapping
This performs tapping type
of massage.
Each time the button is pressed,
Type 1, Type 2, or stop can be
selected.
Tapping 1 —○
3 steps ○○○
Tapping 2 ——○○○
Kneading
& Tapping
Kneading and Tapping are
simultaneously performed.
Each time the button is pressed, forward
direction, reverse direction, or stop can be
selected. (See page 21.)
○○
3 steps —○○
Shiatsu
This performs rhythmical
Shiatsu massage.
Each time the button is pressed,
Shiatsu 1, Shiatsu 2, or stop
can be selected.
Shiatsu 1 ——○○○
Shiatsu 2 ———○○
②Air Massage
Each time the button is pressed, Low, Medium, High, or OFF can be selected.
Operation Button Indication Action
Intensity
Shoulders Air massage to shoulders
(The symbol on the left means that the air level to the
shoulders is High.)
○
Arms Air massage to arms
(The symbol on the left means that the air level to the
arms is Medium.)
○
Leg Air massage to legs
(The symbol on the left means that the air level to the
legs is Low.)
○
Seat Air massage to buttocks
(The symbol on the left means that the air level to the
buttocks is High.)
○
④Vibration
This performs back vibration massage.
(On or Off of vibration operation is repeated at certain
intervals.)
Each time the button is pressed, Low, High, or OFF can be
selected.
Operation Button Indication Width Up/Down Intensity
Back
Vibration
○○○
Action
For a back vibration operation
(The above symbol means that the intensity of vibration
is High.)
③Rolling
Automatic Shiatsu Point Locator is performed in the same manner as in the Preset Program.
Operation
Button
Action
Indication
Width Up/
Down
Rolling
This performs stretching of the full
or partial spine with only up and
down movements of the rollers.
Each time the button is pressed, Full
Rolling, Partial Rolling, or stop can be
selected.
Full Rolling
○○
*
Partial
Rolling
* During Partial Rolling, the center position of the range of Partial Rolling can be adjusted. During Full Rolling,
upward or downward movement is reversed.
21 22
MANUAL SELECTION
MODE
MANUAL SELECTION
MODE
MANUAL SELECTION MODE
Various Adjustments How to Operate Manual Selection Mode
■Change in Forward/Reverse Directions
Operation
Indication
Action
Forward
During Kneading, Human
Hands, and Kneading &
Tapping, each time the button
is pressed,
forward direction, reverse
direction, or stop can be
selected.
Reverse
■ROLLER Buttons
Operation
Button
Action
Up/Down
During Kneading, Human Hands,
Double Kneading, Kneading &
Tapping, Shiatsu 1/2, Tapping
1/2, and Back Vibration, the roller
positions can be adjusted with [ ]
and [ ].
* During Partial Rolling, the center position of the range of
Partial Rolling can be adjusted.
If
[ ]
or [
] is pressed during Full Rolling, upward or
downward movement is reversed.
■Speed Buttons
Operation
Button
Indication
Action
Speed
During Kneading, Kneading
& Tapping, or Tapping 1,
the speed of action can be
adjusted in 3 steps.
Speed can be adjusted
during operation. The
symbol on the left means
that the speed is set to Low.
■Width Button
During Shiatsu 1, Tapping 1/2, Full Rolling,
Partial Rolling, and Back Vibration, the width
of the rollers can be adjusted in 3 steps
(Narrow, Medium, and Wide).
The width can be adjusted during operation.
* Width adjustment is not available if an action
for which width adjustment is not available
(Kneading, Human Hands, Kneading & Tapping,
or Shiatsu 2) is combined with rolling or back
vibration.
Operation
Button
Indication
Width
N
M
W
Changing Courses
●Switching from Manual Selection Mode to a Preset Program
When one of the Preset Program buttons is pressed during Manual Selection Mode, the rollers return to their storage positions,
then the selected Preset Program starts from Automatic Shiatsu Point Locator operation. After a total duration of 30 minutes,
the course in progress stops even if not completed.
Stopping in the Middle of a Massage
To stop mid-massage, press the POWER button. The rollers will return to their storage positions then stop.
In an emergency, or if there is any sudden malfunction, push the STOP button to make the chair stop immediately.
After confirming safety, press the POWER button. The rollers will return to their storage positions and stop.
Caution ●If you feel the massage is too strong, reduce the stimulation according to this Operating Manual. If this
solution does not work, stop using and contact the vendor.
→May result in injury if you continue use with high stimulation under such circumstances.
●
Do not place hands or feet into the roller tracks, into the space between the seat back and the seat or into
the moving parts. Do not sit wearing hard objects, such as hair accessories, necklace, watch, bracelet, or ring.
●If your leg or foot comes out of the leg rest during the massage, do not try to force it back in.
❶
Press the POWER button.
When the panel of the remote control is opened, the
menus of Manual Selection Mode become available.
If no selection is made within 5 minutes, the power is
automatically shut off.
❷
Press the desired button.
* If Kneading, Human Hands, Double Kneading, Kneading
& Tapping, Tapping 1/2, Shiatsu 1/2, Full Rolling, or Partial
Rolling is selected, the Automatic Shiatsu Point Locator
starts locating Shiatsu points.
❸
Massage action starts.
The progress of the course is indicated on the display
of the remote control with the course name.
❹
After 15 minutes, the massage
operation finishes.
The rollers return to their storage positions (upper
part of seat back).
Then the power to the remote control is shut off.
However, reclining of the seat back and angle
adjustment of the leg rest are still enabled.

23 24
TROUBLESHOOTING
TROUBLESHOOTING
TROUBLESHOOTING
If there is still a problem after trying the solutions given in this troubleshooting guide, stop using the product
immediately so as to prevent accident or injury and unplug the product from the wall outlet. Contact the
vendor for assistance.
Problem
Noise during operation:
●During Tapping and Kneading & Tapping
●Sound of the air pump
●Sound of rollers rubbing against the seat cover, or squeaky rubbing sound of the seat cover
during DreamWave mode
●Vibrating mechanism noise
●Sound of the reclining seat back mechanism
●Sound of the air massage cushions
Cause &
Solution
These noises are a normal part of the product’s operation and do not affect its performance in
any way.
Problem
Remote control buttons do not seem to be activating normally.
Cause &
Solution
Check for the following possible problems:
①Check if the power cord is fully plugged into the wall outlet.
②Check if the power cord is fully plugged into the power connector located at the rear of the
chair.
③Check if the main POWER switch at the rear of the chair is set to ON.
④Check to be sure that the Child Safety Lock for disabling use of the chair is not locked.
Problem
The message "Restart the main POWER switch." appears on the remote
control display.
Cause &
Solution
Set the main POWER switch located at the rear of the chair to OFF then back ON after about 5
seconds.
①If the chair returns to normal, no further action is needed.
②If the same message is displayed again, stop using the chair and unplug it from the wall
outlet. Contact the vendor for assistance.
Problem
The Automatic Shiatsu Point Locator Function is not working properly (The
height of rollers does not fit the shoulders.)
Cause &
Solution
Sit further back in the chair so that your head rests firmly on the Shoulder Massage Unit. The
roller shoulder positions can be adjusted using the ROLLER buttons immediately after the Shiatsu
points are located.
(During air massage and vibration operations in Manual Selection mode, the Automatic Shiatsu
Point Locator Function is not available.)
Problem
Massage action stops in the middle of the program.
Cause &
Solution
Set the main POWER switch located at the rear of the chair to OFF then back ON after about 5
seconds.
①If the chair returns to normal, no further action is needed.
②If the chair does not return to normal, stop using the chair and unplug it from the wall outlet.
Contact the vendor for assistance.
Problem
The rollers stop during the massage.
Cause &
Solution
Sometimes when the speed is slow and there is too much pressure to the rollers, they may stop
moving temporarily.
This is not breakage. Just slightly lift your body.
Problem
The rollers moved up to the top and then stopped.
Cause &
Solution
The auto timer will cause the rollers to move up to the top of the chair when the massage time is
finished, so as not to interfere with your movements when getting out of the chair. To continue
massaging, press the POWER button on the remote control again.
Problem
The right and left rollers are out of alignment.
Cause &
Solution
The rollers are designed to provide for the alternating tapping
function, so in the stopped position they are sometimes out
of line—This is part of their design, and there is nothing
wrong with the product.
Approx.
0.6 inch.
Approx.
0.6 inch.
Problem
Reclining of the seat back cannot be performed.
Cause &
Solution
Check to be sure there are no objects between the seat back and control box.
The reclining safety mechanism may be activated.
Problem
If I try to recline the seat back or adjust the angle of the leg rest during air
massage, the chair stops.
Cause &
Solution
For safety purposes, the air pressure massage is designed to stop if the reclining seat back or the
leg rest is activated. This is not breakage.
Anyone other than an authorized serviceperson must not repair or disassemble.

25 26
FAQ
CARE AND STORAGE
FAQ CARE AND STORAGE
How do I make the massage deeper?
In Preset Program mode, adjust the intensity of massage with the AIR INTENSITY button, Back
Vibe button (behind the panel), or each operation button for air massage (behind the panel) on
the remote control. In Manual Selection mode, adjust the intensity of massage with the Back Vibe
button or each operation button for air massage behind the panel on the remote control.
If this solution does not work, lower the reclining seat back and sink deeply into the chair to put
more weight on the reclining seat back.
You can also increase the intensity by removing the buffer pad located at the rear of the back
pad.
How do I make the massage lighter?
In Preset Program mode, adjust the intensity of massage with the AIR INTENSITY button, Back
Vibe button (behind the panel), or each operation button for air massage (behind the panel) on
the remote control. In Manual Selection mode, adjust the intensity of massage with the Back Vibe
button or each operation button for air massage behind the panel on the remote control.
If this solution does not work, replace the buffer pad at the rear of the back pad with the supplied
buffer pad (thicker).
You can decrease the intensity of massage by raising the seat back.
I spilled water on the product. What should I do?
Immediately set the main POWER switch located at the rear of the chair to OFF, then unplug the
chair from the wall outlet. Contact the vendor for assistance.
Can I use the chair even if I am overweight?
We recommend the chair be used by people weighing up to 220 lbs. If you weigh more than that,
try sitting lightly in the chair, and not reclining too far.
Storage
●After wiping off any dust or dirt, store the product in a place that is relatively dry.
●If you are not going to use the product for some time, put a cover on it that will protect it from dust and
dirt.
●Pets can sometimes chew on power cords, so try to keep pets away from the product even when it is
being stored.
Caution ●Do not install the product where it can come into contact with direct heat, such as direct sunlight or a
radiator.
Care and Maintenance
Caution ●When cleaning or caring for the product, make sure to unplug the product from the wall outlet first. Do not
plug or unplug the power cord with wet hands.
Caring for the Back Pad and Covers
Soak a piece of soft cloth in lukewarm water in which a small amount of mild detergent has been added. Then
thoroughly wring it out before cleaning off any spots or grime.
Caution ●The fabric color can change if the product is in contact with vinyl covers or some wall coverings for a
prolonged period of time.
Caring for the Remote Control
Wipe dirt off the remote control with a dry cloth.
●Never use a moistened or wet cloth. →May result in mechanical failure.
Caring for Other Plastic Parts
Soak a piece of soft cloth in lukewarm water in which a small amount of mild detergent has been added,
thoroughly wring it out, and clean off any spots or grime. Then wipe with a dry cloth so that no detergent
residue remains.
●Do not use alcohol based or other household cleaning products or abrasives because they can scratch or
crack the finish and/or cause color to fade
.
27 28
SPECIFICATIONS
REGULAR MAINTENANCE
FOR SAFETY
REGULAR MAINTENANCE FOR SAFETY
CUSTOMER SERVICE AND WARRANTY
1. Warranty
Please read the contents carefully and keep it in a safe place. (You will need the card to facilitate warranty
repairs)
If the chair is to be used outside the home (in a commercial setting, for example), fees will be charged for
repairs even while the chair is under warranty.
2. Repairs & Service
Before calling for repairs or service, use the Troubleshooting guide on pages 23-24 to see if the problem can
be solved easily.
If the problem persists, contact the vendor for assistance. Have the following information ready.
1) Your name, address, and phone number
2) Product name and model number (see page 34)
3) Serial No. (see the Serial No. label on the back cover of the chair)
4) Date of purchase
5) Trouble status
6) Proof of purchase
If the warranty is valid:
Show the vendor the warranty card.
A service charge may apply, subject to the nature of the trouble and/or repair according to the terms of the warranty. See the
warranty for full details.
If the warranty has expired:
Consult the vendor.
If the product can be repaired, the vendor will give you an estimate of the cost to repair the product.
Replacement parts stock:
We will stock service parts (except fabric) of this product for at least six years after terminating the production of this model.
Service parts refer to those necessary for maintaining the intended performance of the product.
For more information on service:
Contact the vendor.
SPECIFICATIONS
Name & Model Number inada chair SOGNO HCP-10100A
Power Supply AC 120 V
Power Consumption 165 W
Power Frequency 60 Hz
Rated Time 30 minutes
Upper Body
Kneading Speed 3 levels, from minimum approx. 10 times/minute to maximum approx. 32
times/minute
Tapping Speed 3 levels, from minimum approx. 180 times/minute to maximum approx.
480 times/minute
Roller Width 3 levels
Narrow, Medium, and Wide
Up/Down Speed One full cycle (top to bottom to top again) in approx. 30 seconds (approx.
1.64 inch./sec)
Back Stroke Range Approx. 28 inch. (in partial rolling massage: approx. 6 inch.)
Preset Programs Healthcare Programs: 4 types, Well-Being Programs: 4 types
Manual Selection Mode 15 types (Automatic Shiatsu Point Locator Function included in some
programs)
Vibration Massage
Function
Back: 2 levels (Min: Approx. 1650 times/minute, Max: Approx. 2350
times/minute)
Air Pressure 60 Hz: Approx. 38 kPa
Auto Timer Approx. 15 minutes (Preset Programs vary in duration.)
Leg Rest Adjustment
Range Approx. 10 inch.
Reclining Angle Approx. 120°-165° from floor level continuous motion (Automatic reclining)
Dimensions
Approx. 37 (38) × 55 (83) × 48 (30) inch. (W/D/H)
The figure in ( ) for the width represents the dimension when the armrests are fully extended.
The figures in ( ) for the depth and height represent dimensions when the seat back is fully
reclined and with the leg rest flat.
Weight Approx. 253 lbs. (Chair: Approx. 165 lbs., Arm rests: Approx. 48 lbs. [one
unit 24 lbs. × 2], Leg rest: Approx. 40 lbs.)
Outer Covering Synthetic leather (with antibacterial/soil resistant finish)
Accessories
Power Cord, T-shaped Wrench, Buffer Pad (thick), Buffer Pad (thin), Child
Safety Lock Keys (2), Shiatsu Pads for Shoulders (light) (1 each left and
right), Shiatsu Pads for Shoulders (strong) (1 each left and right)
Regular Maintenance Will Preserve the Life of Your Chair
Have you experienced any of these problems?
●The chair does not start with the main POWER switch set to ON.
●The power cord has been cracked or scratched.
●The power cord or plug becomes abnormally hot.
●The chair produces a burnt smell, abnormal sound or vibration.
●The auto timer function does not work in some cases.
●Other failures.
To Use Safely
Fabric of the chair (roller fabric) is consumable, and its service life is 3 years (conditions of use: two 15-minute
sessions a day, every day).
For safe use, periodic inspection by the vendor is recommended before the end of service life.
* Durable years vary depending on conditions of use.
* After about five years of use, a professional inspection is recommended even if there are no symptoms or
problems.
For inspection fees, contact the vendor.
If you find anything listed above, stop using and unplug the power cord
from the outlet to prevent failure or accident. Be sure to contact with the
vendor where you purchased for maintenance.

??776932500??
Manufactured by FAMILY CO., LTD. Made in JAPAN
Table of contents
Other inada Massager manuals

inada
inada CUBE FML-3000A User manual

inada
inada cube FML-3000D User manual

inada
inada HCP-G900 User manual

inada
inada Flex 3s HCP-S373A User manual

inada
inada HCP-WG1000A User manual

inada
inada THERAPINA ROBO User manual

inada
inada INADA SOGNO DREAMWAVEHCP-10001A User manual

inada
inada DREAMWAVE HCP-11001A User manual
Popular Massager manuals by other brands


Optimum Medical
Optimum Medical HZ-7020 operating instructions

Cozzia
Cozzia 7100 Maintenance service manual

Brookstone
Brookstone MINI CRAZY FIT MASSAGER SH-0818 Directions for use

OAKWORKS Spa
OAKWORKS Spa PORTAL PRO user manual

Panasonic
Panasonic EV-328 operating instructions

Expain
Expain RELAX BACK user manual