Indu-Sol EmCheck ISMZ I User manual

Intelligent current clamp meter ISMZ I –User Manual 1
ä


Intelligent current clamp meter ISMZ I –User Manual 3
Revision overview
Date
Revision
Change(s)
05.08.2016
0
First version
05.09.2016
1
05.03.2019
2
General improvements
© Copyright 2019 Indu-Sol GmbH
We reserve the right to amend this document without notice. We continuously work on further developing
our products. We reserve the right to make changes to the scope of supply in terms of form, features and
technology. No claims can be derived from the specifications, illustrations or descriptions in this
documentation. Any kind of reproduction, subsequent editing or translation of this document, as well as
excerpts from it, requires the written consent of Indu-Sol GmbH. All rights under copyright law are expressly
reserved for Indu-Sol GmbH.

Contents
Intelligent current clamp meter ISMZ I –User Manual 4
Contents
Revision overview......................................................................................................................................... 3
Contents ....................................................................................................................................................... 4
General information.............................................................................................................................. 5
Purpose of use.............................................................................................................................. 5
Technical data .............................................................................................................................. 5
Scope of supply............................................................................................................................ 6
Safety information......................................................................................................................... 6
Controls and display elements ............................................................................................................. 7
Operation.............................................................................................................................................. 8
Switching on/off ............................................................................................................................ 8
Standby mode............................................................................................................................... 8
Menu control................................................................................................................................. 8
Settings................................................................................................................................................. 9
Time and date............................................................................................................................... 9
Display light .................................................................................................................................. 9
Display function .......................................................................................................................... 10
Sampling frequency.................................................................................................................... 10
Viewing current values ....................................................................................................................... 11
Measuring the current effective value......................................................................................... 11
Viewing the current course......................................................................................................... 11
Viewing the spectrum ................................................................................................................. 11
Status memory, battery and recording ....................................................................................... 11
Carrying out recordings ...................................................................................................................... 12
Configure recordings .................................................................................................................. 12
6.1.1 Permanent recording.......................................................................................................... 12
6.1.2 Triggered recording ............................................................................................................ 13
Control software EMCheck®View....................................................................................................... 15
Installation of the EMCheck®View software............................................................................... 15
Copying recordings to the PC..................................................................................................... 16
Data evaluation with EMCheck®View......................................................................................... 17

General information
Intelligent current clamp meter ISMZ I –User Manual 5
General information
Please read this document thoroughly from start to finish before you begin using the device for the first
time.
Purpose of use
The Intelligent current clamp meter EMCheck® ISMZ I is a mobile measuring device for conductor-bound
interference currents. In standalone mode, the measuring clamp independently measures current values
and continuously records the current course. Its integrated intelligence allows the user to make preliminary
inspections and thus first estimations on the electromagnetic compatibility (EMC) of industrial systems.
The following measurements can be carried out:
Current effective value (RMS)
Current course
Spectrum
To record the current values, an SD card is necessary, which is included in the scope of supply. All recorded
data can be evaluated using a corresponding PC software.
Technical data
The Intelligent current clamp meter EMCheck® ISMZ I is suitable for recording conductor-bound
electrical currents in the following ranges.
Measuring range: 10 mA to 30 A
Frequency range: Sampling frequency 10 kHz: 40 Hz to 5 KHz
Sampling frequency 20 kHz: 40 Hz to 10 KHz
Sampling frequency 40 kHz: 40 Hz to 20 KHz
Battery life: 336 h (14 days)
Changing the sampling frequency also changes the measurable frequency range. The sampling frequency
should always feature at least the double value of the frequency to be measured.
The maximum monitoring time of 14 days is available when a sampling frequency of 10 kHz has been set.
If the sampling frequency is increased, the monitoring time / battery life is reduced due to the increased
current consumption.
Six LR6 (AA) batteries are needed to operate the ISMZ I. Please do not use any rechargeable
batteries.

General information
Intelligent current clamp meter ISMZ I –User Manual 6
Scope of supply
The scope of supply comprises the following individual parts:
Intelligent current clamp meter EMCheck®ISMZ I
USB connection cable
32GB micro SD card with ISMZ I adapter
6 x 1.5V LR6 batteries
CD with software for the report analysis and device manual
Transport case
Please check that the contents are complete before using it the first time.
Safety information
Never open the housing of the ISMZ I
Opening the housing immediately voids any warranty.
If you think the device is defective, send it back to the supplier.

Controls and display elements
Intelligent current clamp meter ISMZ I –User Manual 7
Controls and display elements
(A) Standby mode
Flashing green
Standby mode active
(B) Battery warning
Flashing yellow
Battery charge low (less than 20 %)
(C) Alarm
Flashing red
Trigger activated
Table 1: Overview LEDs
The Intelligent current clamp meter EMCheck®ISMZ I features an integrated illuminated LCD. All settings
and measurements can be carried out by the controls and the display elements. To evaluate recordings,
copy the measurement data from the SD card onto your PC and run the software EMCheck®View. Settings
on the ISMZ I can also be carried out with an established USB connection via the PC Software EMCheck®
View.
1 On / Off / Standby function
2 Mode
3 Display light
4 Start recording / Start observation
5 Hold value
6 up
7 right
8 Enter
9 left
10 down
A LED "Standby mode"
B LED "Battery warning"
C LED "Alarm"

Operation
Intelligent current clamp meter ISMZ I –User Manual 8
Operation
Switching on/off
Pressing the red Power button (1) switches the ISMZ I on. When the clamp is switched on, it can be set
into standby mode by briefly pressing the red Power button (1). To switch off the ISMZ, the Power button
(1) has to be pressed for a longer time.
Standby mode
The standby mode is a power-saving function. All measurements remain active and are not lost. You can
also specify in the settings how long the period of inactivity should be before the clamp automatically
switches into standby mode. The display is deactivated in standby mode. Standby mode is indicated by
brief flashing of the standby LED.
Menu control
Press the Mode button (2) to leaf through the menu of the clamp to access the settings and functions.
The following menu pages are available:
CURRENT - Effective value measurement (main menu)
CURRENT COURSE - Course of the current over time
SPECTRUM - Display of frequency specter (0…20 kHz)
TEACH… - Automatic teaching of trigger thresholds
REC. CONFIG - Configure recordings and trigger
SETTINGS - Basic settings of the measuring clamp
STATUS - Memory and battery, status of the recordings
You can confirm entries by pressing the Enter button (8).
Use the arrow buttons (6), (7), (9) and (10) to scroll through the menu and also to change input values and
zoom stages.
With pressing the Rec button (4) the time of recording or time of observation (trigger mode) can be started
or stopped.
Switch the display light on and off by pressing the button Display light (3).

Settings
Intelligent current clamp meter ISMZ I –User Manual 9
Settings
Switch into the SETTINGS menu with the Mode button (2).
Time and date
Use the arrow buttons (6) and (10) to select TIME/DATE.
Press the Enter button (8) on TIME/DATE to make settings for the
time and date.
Use the arrow buttons (7) and (9) to move the cursor.
Use the arrow buttons (6) and (10) to change the numerical value
at the cursor position.
Enter the date first and then the time. Confirm the date and time
by pressing the Enter button (8).
Display light
The display light is switched on or off by pressing button Display light
(3).
Use the arrow buttons (6) and (10) to select LIGHT OFF.
Use the arrow buttons (7) and (9) to select the time for switching
the light off automatically. The following values are possible:
Always on
10 seconds
30 seconds
1 minute
3 minutes
5 minutes
7 minutes
10 minutes

Intelligent current clamp meter ISMZ I –User Manual 10
Display function
Use the arrow buttons (6) and (10) to select DISPLAY OFF.
Use the arrow buttons (7) and (9) to select the time for switching
the display off automatically. The following values are possible:
Always on
1 minute
3 minutes
5 minutes
7 minutes
10 minutes
20 minutes
25 minutes
30 minutes
While recording or observing a current, the clamp will switch into
standby mode after the set time.
Sampling frequency
Use the arrow buttons (6) and (10) to select SAMPLING
Use the arrow buttons (7) and (9) to change the sampling
frequency. The following values are possible:
10 kHz
20 kHz
40 kHz
Changing the sampling frequency also changes the measurable
frequency range. The sampling frequency should always feature at
least the double value of the frequency to be measured. The higher
the sampling frequency, the shorter the battery life.

Viewing current values
Intelligent current clamp meter ISMZ I –User Manual 11
Viewing current values
Once you have switched on the ISMZ I with the red Power button (1), you are in the CURRENT menu. The
current effective value (RMS) is displayed.
Measuring the current effective value
Switch into the CURRENT menu with the Mode button (2).
Pressing Hold (5) displays or hides the maximum value.
Viewing the current course
Switch into the TIME DOMAIN menu with the Mode button (2).
Use the arrow buttons (6) and (10) to change the zoom stage of
the current (Y-axis).
Use the arrow buttons (7) and (9) to change the zoom stage of the
time (X-axis).
Press Enter (8) to stop the display and to start it again.
Pressing Hold (5) displays or hides the maximum value.
Viewing the spectrum
Switch into the SPECTRUM menu with the Mode button (2).
Use the arrow buttons (6) and (10) to change the zoom stage of
the current (Y-axis).
Press Enter (8) to stop the display.
Pressing Hold (5) displays/hides the frequency range with the
highest components.
Status memory, battery and recording
Switch into the STATUS menu with the Mode button (2).
You will receive information on available memory and the battery
status in %. Once a recording is active, you receive information on the
recording duration as well as maximum values or trigger exceedances.

Carrying out recordings
Intelligent current clamp meter ISMZ I –User Manual 12
Carrying out recordings
The ISMZ I is capable of recording current values continuously and to save these on the SD card. The
recordings are either saved without interruption during a permanent recording or only during specified
trigger events. Before starting a recording, choose between permanentor triggered recording byconfiguring
the recording options.
Configure recordings
Switch into the RECORD MENU with the Mode button (2).
Use the arrow buttons (6) and (10) to select RECORDING.
Use the arrow buttons (7) and (9) to choose between
PERMANENT and TRIGGERED.
PERMANENT –permanent recording
TRIGGERED –triggered recording
6.1.1 Permanent recording
All current values are recorded without interruption during a permanent recording and saved on the SD
card. No trigger thresholds are therefore necessary.
The recording is started by button REC (4) and selection of a
time with arrow buttons (7), (9), and the button Enter (8). The
following values are possible:
1 minute
3 minutes
5 minutes
10 minutes
15 minutes
30 minutes
1 hour
4 hours
8 hours
15 hours
1 day
2 days
3 days
∞ (permanent recording)
The recording is stopped by button REC (4).
Once the recording is being actively conducted, the abbreviation REC appears in the display. The ISMZ I
saves all recordings on a micro SD card in "*.EMC" format. The directories are saved temporally in the
format YYYY-MM-DD and the files in the format hh:mm:ss. Recordings can be evaluated with the included
software EMCheck®View.

Carrying out recordings
Intelligent current clamp meter ISMZ I –User Manual 13
6.1.2 Triggered recording
During a triggered recording, current values are only registered if the set trigger thresholds are exceeded.
You can specify the trigger threshold automatically by a teach-in process or configure them manually. Once
you have chosen the triggered recording in the RECORD MENU, the set trigger thresholds for the current
level and the current inclination appear in the display.
6.1.2.1 Specifying the trigger thresholds manually
Use the arrow buttons (7) or (9) to switch to RECORD MODE
TRIG.
Select the LEVEL with the arrow buttons (6) and (10).
After pressing Enter (8) on LEVEL, the current value can be set by
the arrow buttons (6), (7), (9) and (10) that should actuate the
trigger if exceeded. Confirm by pressing Enter (8).
Select the SLOPE with the arrow buttons (6) and (10).
After pressing Enter (8) on SLOPE, the current change in A/ms
can be set by the arrow buttons (6), (7), (9) and (10) that should
actuate the trigger if exceeded. Confirm by pressing Enter (8).
The monitoring is started and stopped as described in 6.1.1
Permanent recording.
6.1.2.2 Teaching of trigger thresholds
When trigger threshold are taught, the ISMZ I registers all current levels and current changes during the
process. Before the teaching process, specify by which amount the trigger thresholds should be higher than
the registered values (e.g. by 20 % higher). Furthermore you set a specific teaching time or start and stop
the teaching manually.
Switch into the TRAINING… menu with the Mode button (2).
Select ADD THRESHOLD with the arrow buttons (6) and (10).
Use the arrow buttons (7) and (9) to set by how much the
operationally prevailing current needs to be exceeded so that a
start trigger is actuated (e.g. 20 %). Values between 0 % and 95%
are possible.
Select PERIOD with the arrow buttons (6) and (10).
If the function MANUAL is used, the training time can be started
with selecting start with arrow buttons (6) und (10) and confirming
this with button (8).
From now the ISMZ will measure the LEVEL and SLOPE of the
current. The measured values will be shown in the display.
If the TRAINING time should be stopped, the button (8) has to be
pressed.
After stopping the TRAINING time the window RECORD MENU
will be shown and the monitoring can be started as described in
6.1.1 Permanent recording.

Carrying out recordings
Intelligent current clamp meter ISMZ I –User Manual 14
Select PERIOD with the arrow buttons (6) and (10).
Switch from MANUAL to a time (5 min, 10 min, 15 min, 20 min, 25
min or 30 min) to observe the current and set the trigger threshold
by using the arrow buttons (7) and (9).
After choosing a PERIOD to add the trigger threshold the
MON.PERIOD (time of monitoring) should be chosen with the
arrow buttons (7) and (10), as described in 6.1.1 Permanent
recording.
Select START with the arrow buttons (6) and (10) and confirm to
start the measurement with button (8).
The clamp will now learn the trigger thresholds and start
monitoring afterwards.

Control software EmCheck® View
Intelligent current clamp meter ISMZ I –User Manual 15
Control software EMCheck®View
The ISMZ I saves all recordings on a micro SD card in "*.EMC" format. The directories are saved temporally
in the format YYYY-MM-DD and the files in the format hh:mm:ss. Recordings can be evaluated with the
included EMCheck®View software.
Installation of the EMCheck®View software
Insert the supplied CD in your drive and run Setup.exe by double-clicking it. Select “Language”, “Install to”
, “create desktop Icon” and “register filextension emc and raw”. Click on “Install” to execute the installation.
Confirm the completion of the installation at the end.
Figure 1: Selecting the installation folder
Figure 2: Completing the installation
In addition, run the installation of the USB driver and click on Extract.
Figure 3: USB driver installation
Figure 4: EMCheck®View
After a successful installation, you can start the EMCheck®View software.

Control software EmCheck® View
Intelligent current clamp meter ISMZ I –User Manual 16
Copying recordings to the PC
There are two methods for copying the recordings from the ISMZ I onto your PC.
1) Remove the micro SD card from the clamp and take it from the adapter board. You can now read
the micro SD card using a removable medium reader with an adapter to USB or standard SD.
2) Connect the ISMZ I with the integrated memory card via USB to your PC. A USB cable is included
in the scope of supply.
Open the EMCheck®View software.
Select "Adjust clamp" (on top, on the right side)
Follow the instructions of the software –it´s recommended to use “Wizard”
Once the connection has been established, you can make settings on the clamp and use it as
a removable medium reader to access the micro SD card.
Once you end the "Set clamp" field, the function as removable medium is interrupted.
Figure 5: Select "Adjust clamp"
Figure 6: USB connection active
Control software EmCheck® View
Intelligent current clamp meter ISMZ I –User Manual 17
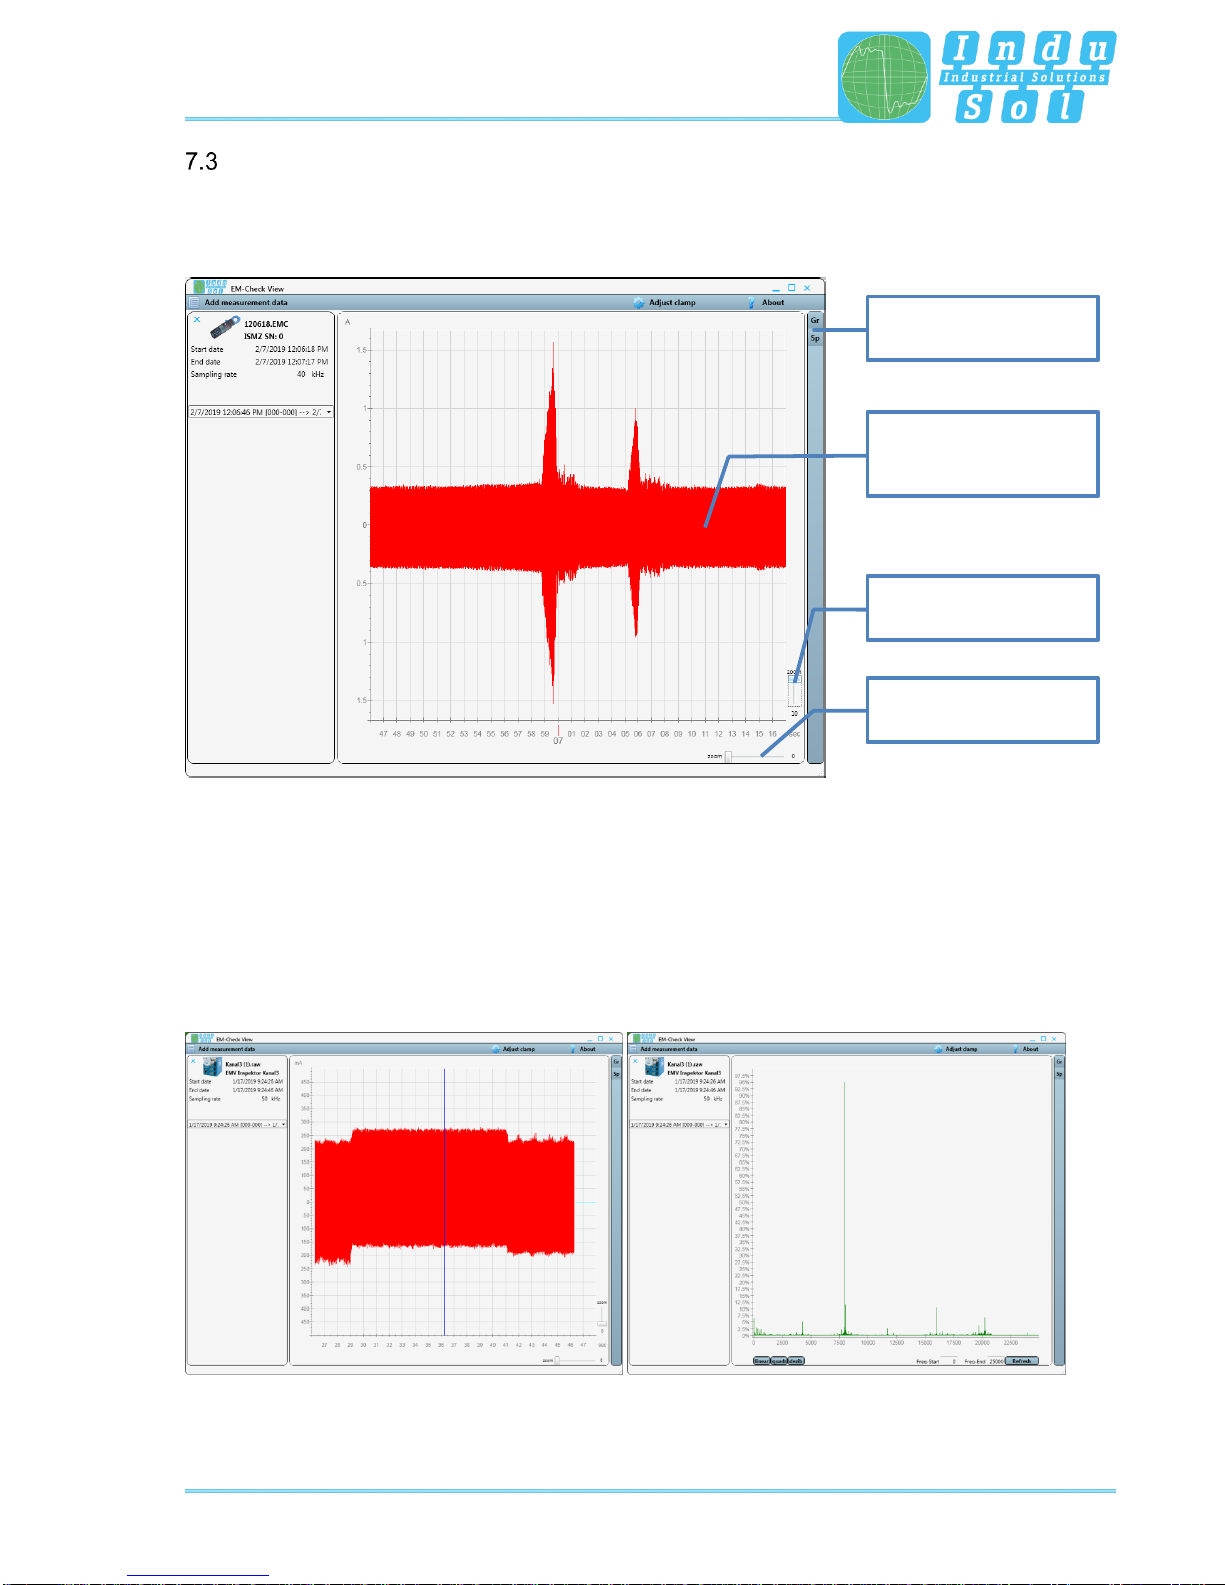
Data evaluation with EMCheck®View
Import of up to four EMC-files is possible by clicking the button “Add measurement data” in the top left
corner.
Figure 7: EMCheck®View data evaluation
You can change the displayed time frame for the display by drawing a frame with the mouse over the
current course.
Using the arrow buttons next to the displayed time range, you can switch into previously set time ranges.
All time ranges created till now are expanded by clicking on the time range.
By clicking on the button “Sp”, you can switch from “Current course” to the “frequency specter” of the shown
graph.
Figure 8: EMCheck®View data evaluation, Current course and frequency specter
Current course,
Zoom with mouse
selection
Zoom Y-axis
(current)
Zoom X-axis
(time)
Current course /
frequency specter


Table of contents
Other Indu-Sol Measuring Instrument manuals


Popular Measuring Instrument manuals by other brands

Madur
Madur MAMOS user guide

KLEIBER
KLEIBER 217 R-LWL Operation manual

EUTECH INSTRUMENTS
EUTECH INSTRUMENTS WATERPROOF CYBERSCAN PD 300 PHDISSOLVED OXYGEN... instruction manual

eXact
eXact 486201 quick start guide

Badger Meter
Badger Meter Impeller Data Industrial 228PV Series Installation & operation manual

Elcometer
Elcometer 124 user guide


