manuals.online logo
Brands
  1. Home
  2. •
  3. Brands
  4. •
  5. Ingeteam
  6. •
  7. Inverter
  8. •
  9. Ingeteam INGECON SUN 1Play 3.68TL User manual

Ingeteam INGECON SUN 1Play 3.68TL User manual

ES Kit de autoconsumo instantáneo para
INGECON SUN 1Play
EN Instant self-consumption kit for
INGECON SUN 1Play
W
A B C D
E
RS-485
E F
G
ES EN
A. Red
B. Interruptor de Control de Potencia (ICP)
C. Diferencial.
D. Vatímetro A65
E. Cargas
F. INGECON SUN 1Play
G. Paneles solares
A. Grid
B. Circuit breaker switch
C. Residual current device
D. Wattmeter A65
E. Loads
F. INGECON SUN 1Play
G. Solar panels
AAX2017IQM03_A
11/2014
Ingeteam Power Technology, S.A.
Energy
Avda. Ciudad de la Innovación, 13
31621 SARRIGUREN (Navarra) - Spain
Tel.: +34 948 28 80 00
Fax: +34 948 28 80 01
e-mail: solar[email protected]
Service Call Center: +34 948 69 87 15
W
ES
Conexión del vatímetro
Todas las conexiones se deberán realizar sin tensión.
El vatímetro se debe instalar sobre carril DIN. Es importante instalar el vatímetro en el punto de conexión de la vivienda
después del Interruptor de Control de Potencia (ICP) y del diferencial, y antes de que el cableado de la vivienda se bifurque a
todas las cargas y al inversor, tal y como muestra el esquema de la instalación anterior.
Para realizar las conexiones quitar las dos tapas protectoras de las conexiones para tener acceso a las mismas.
Conectarlo como muestra la figura F1, teniendo en cuenta el esquema eléctrico del sistema visto anteriormente.
Se debe conectar un puente entre los puntos 1 y 4 del vatímetro (ver figura F2).
Con el vatímetro se adjunta la tarjeta de comunicaciones necesaria, las guías para instalar la tarjeta y un prensaestopa.
Insertar las guías en la tarjeta de potencia en el lugar indicado con la inscripción INGECON Connect, conectar la tarjeta de
comunicaciones y realizar el cableado según la siguiente tabla (ver figura F3). Las conexiones con el vatímetro (ver figura
F2) se realizarán tal y como se describe a continuación.
Tarjeta de comunicaciones
Pin Señal
1 RS-485 (B+)*
2 RS-485 (A-)**
3 Pantalla de protección
4 (GND)***
* El pin 1 de la tarjeta de comunicaciones debe conectarse al
punto de conexión 42 del vatímetro.
** El pin 2 de la tarjeta de comunicaciones debe conectarse
al punto de conexión 41 del vatímetro.
*** El pin 4 de la tarjeta de comunicaciones debe conectarse
al punto de conexión 43 del vatímetro.
Vatímetro
Conexión Señal
11 Neutro del inversor
Neutro de red
1Línea de red
Puente con 4
4 Puente con 1
7 -
3 Línea del inversor
6 -
9 -
41 RS-485 (A-)**
42 RS-485 (B+)*
43 (GND)***
El cableado de la tarjeta de comunicaciones deberá salir del inversor a través del prensaestopas.
Una vez se ha conectado el vatímetro a la red siguiendo el esquema anterior, conectar éste al INGECON SUN 1Play
mediante el cable RS-485 proporcionado (ver figura F4). Las cargas siempre se conectarán entre el vatímetro y el
INGECON SUN 1Play (ver esquema de la instalación).
EN
Connecting the Wattmeter
All the connections must be made without voltage.
The Wattmeter must be installed on the DIN rail. The Wattmeter should be installed at the connecting point of the home after
the circuit breaker switch and residual current device, and before the wiring of the home is branched off to all the loads and
to the inverter, as shown in the diagram of the previous installation.
To make the connections, get access to the connections by removing the two protective caps.
Connect it as shown in Figure F1, taking into account the electrical diagram of the system as seen above.
A jumper must be connected between points 1 and 4 of the Wattmeter (see Figure F2).
Attach the required communications card, the guides to install the card and a packing gland to the Wattmeter. Insert the
guides into the power card in the place indicated with the inscription INGECON Connect. Connect the communcations card
and connect the wiring in accordance with the following table (see Figure F3). Connections with the Wattmeter (see Figure
F2) should be carried out as described below.
Communications card
Pin Signal
1 RS-485 (B+)*
2 RS-485 (A-)**
3 Protection shield
4 (GND)***
* Pin 1 of the communications card must be connected to
connection point 42 of the Wattmeter.
** Pin 2 of the communications card must be connected to
connection point 41 of the Wattmeter.
*** Pin 4 of the communications card must be connected to
connection point 43 of the Wattmeter.
Wattmeter
Connection Signal
11 Inverter neutral
Grid neutral
1Grid line
Jumper with 4
4 Jumper with 1
7 -
3 Inverter line
6 -
9 -
41 RS-485 (A-)**
42 RS-485 (B+)*
43 (GND)***
The communications card wiring should leave the inverter through the packing gland.
Once you have connected the Wattmeter to the grid using the diagram above, connect this to the INGECON SUN
1Play using the RS-485 cable provided (see Figure F4). Loads should always connect between the Wattmeter and the
INGECON SUN 1Play (see installation diagram).
11 1
L1
N
3 4
41
43GND
A(-)
B(+) 42
F1
41 42 43
31 32 33 3 6 9
11 147 A
B
D
E
C
A
F2
ES
A. Conexiones. B. Joystick. C. LED. D. Selector. E. Display.
EN
A. Connections. B. Joystick. C. LED. D. Selector. E. Display.
F3
F4
ES
Configuración del vatímetro
El vatímetro está configurado de serie para funcionar junto al INGECON SUN 1Play y no es necesario modificar
ningún parámetro.
En este apartado se recogen las pautas para restablecer la configuración de serie sólo en caso de que éste se
desconfigure.
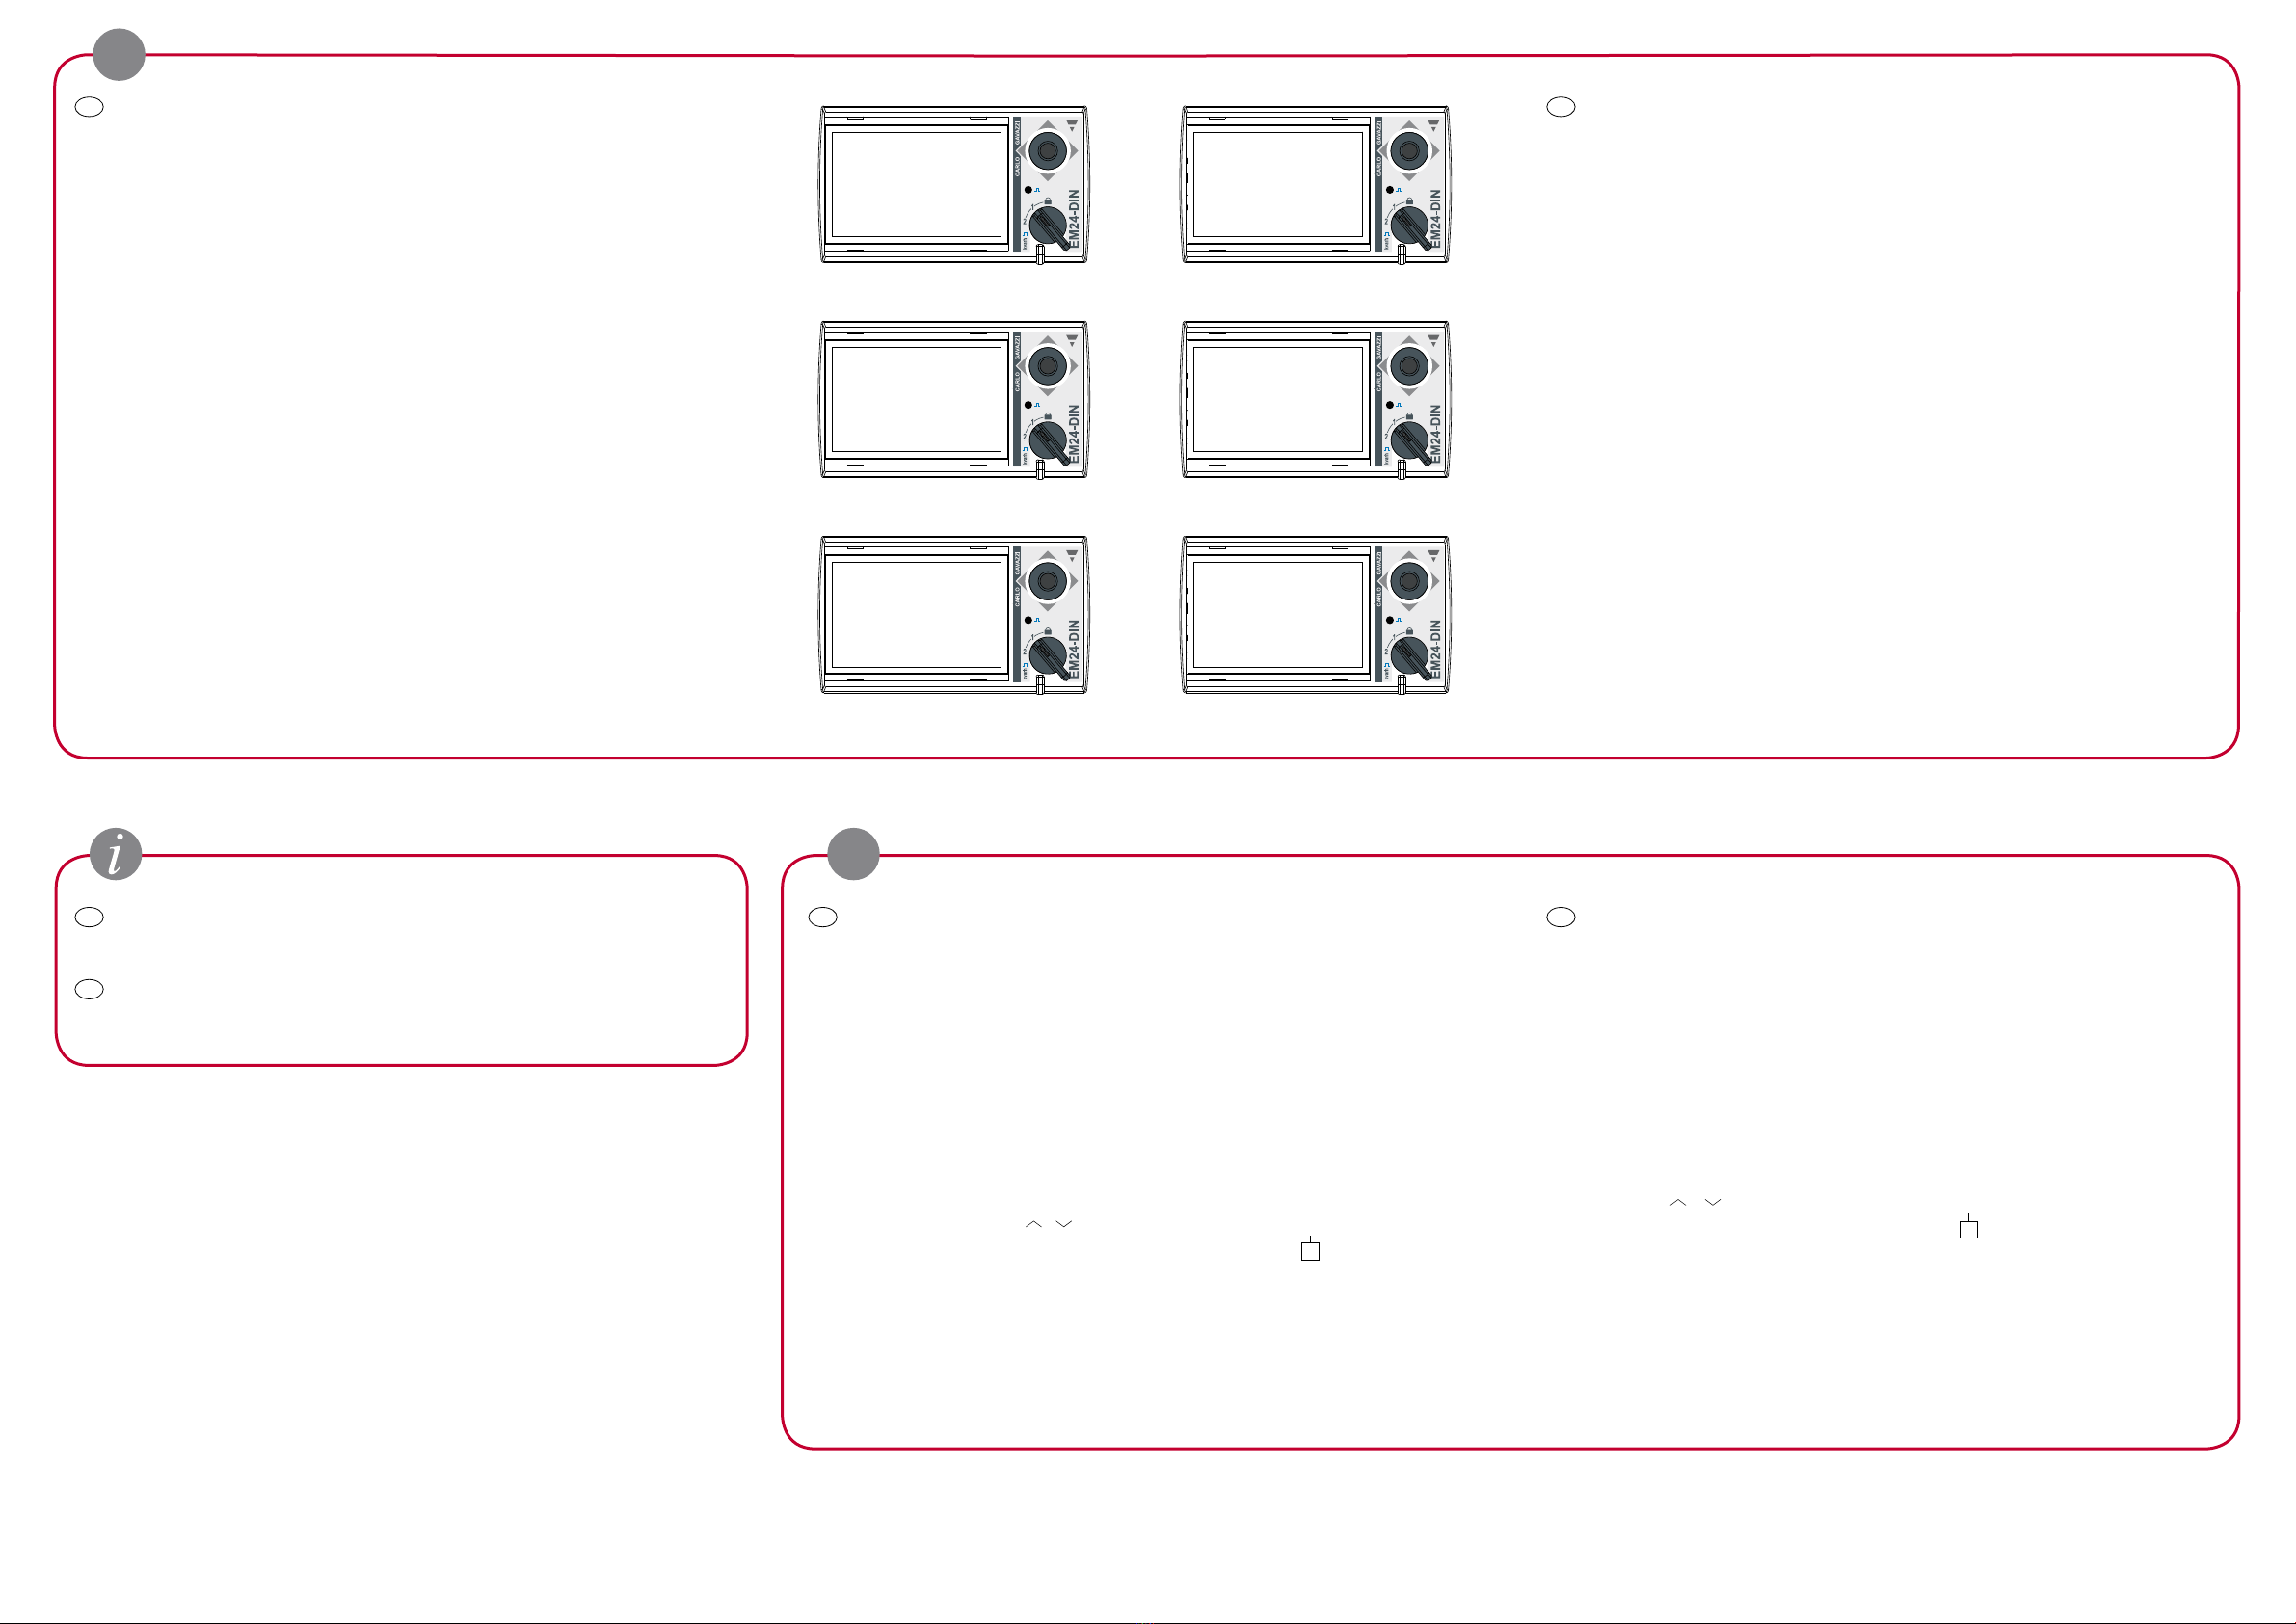
Para configurar el vatímetro seguir los siguientes pasos:
1. Alimentar el vatímetro desde la red eléctrica.
2. Mediante el selector elegir la posición 1.
3. Acceder al menú de configuración presionando el joystick durante 3 segundos. Se solicitará una clave de
acceso. Por defecto, esta clave es 0. Una vez introducida la clave pulsar una vez el joystick para aceptar. Ver D1.
4. Al aceptar se accede a la pantalla de configuración de la contraseña CNG PASS. Se recomienda no
modificar el valor y desplazar el joystick hacia la derecha para pasar a la siguiente pantalla.
5. Pantalla de tipo de aplicación APPLICAT. En esta pantalla se debe seleccionar la aplicación tipo H. Para ello
pulsar el joystick una vez. En la parte inferior del display aparece PRG, indicativo de que es posible modificar
el valor. Desplazar el joystick en cualquiera de los 4 sentidos hasta que aparezca TYP.H. Presionar una vez el
joystick para aceptar. Ver D2.
6. Avanzar hasta la pantalla de selección del tipo de sistema SYS mediante el joystick. Presionar el joystick
una vez (aparecerá en la parte inferior del display la indicación PRG). Desplazar el joystick en cualquiera de los
cuatro sentidos hasta llegar a 1P. Pulsar el joystick una vez para aceptar. Ver D3.
7. Avanzar hasta la pantalla de número de nodo ADDRESS mediante el joystick. Presionar el joystick una
vez (aparecerá en la parte inferior del display la indicación PRG). Desplazar el joystick en cualquiera de los
4 sentidos para que el número seleccionado sea el mismo que el número de nodo del inversor asociado
(este número se puede consultar en el display del inversor; más información en el manual de instalación de
INGECON SUN 1Play). Pulsar el joystick una vez para aceptar. Ver D4.
Al aceptar se accede a la pantalla de configuración del BAUD RATE. Pulsar nuevamente el joystick (aparecerá
en la parte inferior del display la indicación PRG). Desplazar el joystick en cualquiera de los cuatro sentidos para
seleccionar 9600 bps. Pulsar el joystick una vez para aceptar. Ver D5.
8. Avanzar hasta la pantalla END. Presionar el joystick una vez para salir a la pantalla principal.
9. Volver a elegir la posición de bloqueo mediante el selector.
Config
Config
PASS?
0
PRG
D1
Applicat
typ.H
PRG
D2
SYS
1P
PRG
D3
ADDRESS
1
PRG
D4
BAUD RATE
9600
PRG
D5
end
D8
EN
Wattmeter configuration
The Wattmeter is factory configured to work alongside the INGECON SUN 1Play and it is not necessary to modify any
parameters.
This section lists the guidelines to reset the serial configuration only in the event that it loses its configuration.
Follow these steps to configure the Wattmeter:
1. Supply power to the Wattmeter from the electrical grid.
2. Choose position 1 using the selector.
3. Access the Configuration menu by pressing the joystick for 3 seconds. A passkey will be requested. By
default, this key is 0. Once you have entered the key press the joystick once to accept. See D1.
4. Accepting this gains access to the password configuration screen CNG PASS. It is recommended that you do
not modify the value and move the joystick right to move to the next screen.
5. APPLICAT application type Screen. Select the application type H in this screen. To do this press the joystick
once. At the bottom of the display PRG appears, indicating that it is possible to modify the value. Move the joystick
in any of the 4 directions until TYP.H appears. Press the joystick once to accept. See D2.
6. Move to the SYS system type selection screen using the joystick. Press the joystick once (the PRG indication
will appear on the bottom of the display). Move the joystick in any of the 4 directions until 1P appears. Press the
joystick once to accept. See D3.
7. Move to the ADDRESS node number screen using the joystick. Press the joystick once (the PRG indication
will appear on the bottom of the display). Move the joystick in any of the 4 directions so that the selected number
is the same as the node number of the associated inverter (you can see this number on the inverter display. More
information is available in the INGECON SUN 1Play installation manual). Press the joystick once to accept. See
D4.
Accepting this gains access to the BAUD RATE configuration screen. Press the joystick again (the PRG indication
will appear on the bottom of the display). Move the joystick in any of the 4 directions to select 9600 bps. Press the
joystick once to accept. See D5.
8. Move to the ENG screen. Press the joystick once to exit to the main screen.
9. Set the lock position using the selector.
ES
Para ampliar información sobre las conexiones RS-485 consultar el manual de accesorios de comunicación vía
RS-485.
EN
For more information on RS-485 connections, see the RS-485 communication accessories manual.
EN
Configuring the INGECON SUN 1Play (1)
After installing and connecting the Wattmeter it is necessary to set up the INGECON SUN 1Play inverter for it to
operate correctly. The inverter must be powered to carry out this configuration.
In order to configure the unit, an installer password (3725) must be introduced in Main menu > Advanced settings.
Access the Main menu > Settings > Self-consumption > Mode to select the self-consumption mode. Select Self-
limiting CG EM24 (2).
It is also necessary to configure the power balance that you require in the installation. There are three options:
• Positive Balance: the inverter will establish, provided that the loads are sufficient, that the consumption is at
the set value.
• Balance 0.
• Negative Balance: the inverter will establish, provided that the power generated by the photovoltaic array is
sufficient, that there is an injection of power to match the set value.
To configure the balance access the Main menu > Settings > Self-consumption > Power setpoint. Select the desired
power using the keys or . Press OK to confirm.
If the instantaneous self-consumption has been correctly configured the Wsymbol appears continuously together
with the inverter on the main screen. In the event that this symbol does not appear it is necessary to re-configure the
balance.
If the symbol appears flashing, this means that there is a communication failure in cable RS-485. Check the
connections and connect the cable correctly until the fault disappears.
(1) If the country selected in the inverter under the Main menu > Advanced settings > Country regulations is Spain,
the Self-consumption option will come factory configured and it will not be possible to modify it, thus complying with
the country’s legislation. For the remaining countries it will be possible to modify this configuration.
(2) Once you have selected Self-limiting CG EM24 mode in Self-consumption it will not be possible to enable MPPT
mode. If you want to enable MPPT mode, contact the Ingeteam Technical Service.
ES
Configuración del INGECON SUN 1Play (1)
Tras la instalación y conexión del vatímetro habrá que configurar el inversor INGECON SUN 1Play para su correcto
funcionamiento. Para realizar esta configuración el inversor debe estar alimentado.
Para la configuración del autoconsumo se debe introducir previamente la contraseña de instalador (3725) dentro de Menú
principal > Ajustes avanzados.
Acceder al menú Menú principal > Ajustes > Autoconsumo > Modo para seleccionar el modo de autoconsumo. Elegir Auto-
limitado CG EM24 (2).
También habrá que configurar el balance de potencia que se desea en la instalación. Existen tres opciones:
• Balance positivo: el inversor determinará que, siempre que las cargas sean suficientes, exista un consumo de la
magnitud fijada.
• Balance 0.
• Balance negativo: el inversor determinará que, siempre que la potencia generada por el campo fotovoltaico sea
suficiente, exista una inyección de potencia de la magnitud fijada.
Para configurar el balance acceder a Menú principal > Ajustes > Autoconsumo > Consigna de potencia. Seleccionar la
potencia deseada mediante las teclas o . Pulsar OK para confirmar.
Si el autoconsumo instantáneo se ha configurado correctamente aparecerá el símbolo Wluciendo de forma continua
junto al inversor en la pantalla principal. En el caso de que este símbolo no aparezca se deberá volver a configurar
correctamente.
Si dicho símbolo apareciese parpadeando significa que existe un fallo de comunicación del cable RS-485. Revisar las
conexiones y conectar correctamente hasta que desaparezca el fallo.
(1) Si el país seleccionado en el inversor dentro del menú Menú principal > Ajustes avanzados > País normativa es España,
la opción de Autoconsumo vendrá configurada de serie y no será posible modificarla, cumpliendo de este modo la
normativa propia del país. Para el resto de países sí será posible modificar esta configuración.
(2) Una vez seleccionado el modo Auto-limitado CG EM24 de Autoconsumo no será posible activar el modo MPPT. En caso
de querer activar el modo MPPT contactar con el SAT de Ingeteam.

Other Ingeteam Inverter manuals

Ingeteam Ingecon Sun Lite User manual

Ingeteam

Ingeteam Ingecon Sun Lite User manual

Ingeteam Ingecon Sun Smart U User manual

Ingeteam

Ingeteam Ingecon Sun Smart U User manual

Ingeteam INGECON SUN STORAGE 1Play Quick start guide

Ingeteam

Ingeteam INGECON SUN STORAGE 1Play Quick start guide

Ingeteam 160TL User manual

Ingeteam

Ingeteam 160TL User manual

Ingeteam INGECON SUN EMS Board Instruction sheet

Ingeteam

Ingeteam INGECON SUN EMS Board Instruction sheet

Ingeteam INGECON SUN PowerMax TL U B 1000 Vdc Series User manual

Ingeteam

Ingeteam INGECON SUN PowerMax TL U B 1000 Vdc Series User manual

Ingeteam INGECON SUN STORAGE 1Play Operating and maintenance instructions

Ingeteam

Ingeteam INGECON SUN STORAGE 1Play Operating and maintenance instructions

Ingeteam INGECON SUN STORAGE 1Play Quick start guide

Ingeteam

Ingeteam INGECON SUN STORAGE 1Play Quick start guide

Ingeteam Ingecon Sun Lite 2.5TL Operating manual

Ingeteam

Ingeteam Ingecon Sun Lite 2.5TL Operating manual

Ingeteam INGECON SUN 1Play TL M User manual

Ingeteam

Ingeteam INGECON SUN 1Play TL M User manual

Ingeteam INGECON SUN 1Play TL M User manual

Ingeteam

Ingeteam INGECON SUN 1Play TL M User manual

Ingeteam Ingecon Sun 1Play HF Setup guide

Ingeteam

Ingeteam Ingecon Sun 1Play HF Setup guide

Ingeteam Ingecon Sun 250 TL User manual

Ingeteam

Ingeteam Ingecon Sun 250 TL User manual

Ingeteam Ingecon Sun 1Play HF User manual

Ingeteam

Ingeteam Ingecon Sun 1Play HF User manual

Ingeteam INGECON SUN 3Play 160TL User manual

Ingeteam

Ingeteam INGECON SUN 3Play 160TL User manual

Ingeteam Ingecon Sun Power Series User manual

Ingeteam

Ingeteam Ingecon Sun Power Series User manual

Ingeteam INGECON SUN PowerMax TL B Series User manual

Ingeteam

Ingeteam INGECON SUN PowerMax TL B Series User manual

Ingeteam INGECON SUN SMART User manual

Ingeteam

Ingeteam INGECON SUN SMART User manual

Ingeteam Ingecon mWind Interface User manual

Ingeteam

Ingeteam Ingecon mWind Interface User manual

Ingeteam Ingecon Sun Smart TL User manual

Ingeteam

Ingeteam Ingecon Sun Smart TL User manual

Ingeteam Ingecon Sun Lite User manual

Ingeteam

Ingeteam Ingecon Sun Lite User manual

Ingeteam INGECON SUN STORAGE 1Play TL User instructions

Ingeteam

Ingeteam INGECON SUN STORAGE 1Play TL User instructions

Ingeteam INGECON SUN STORAGE 1Play Operating and maintenance instructions

Ingeteam

Ingeteam INGECON SUN STORAGE 1Play Operating and maintenance instructions

Ingeteam INGECON SUN 3Play TL U M User manual

Ingeteam

Ingeteam INGECON SUN 3Play TL U M User manual

Popular Inverter manuals by other brands

Galletti MPI DC 10 Installation, use and maintenance manual

Galletti

Galletti MPI DC 10 Installation, use and maintenance manual

YASKAWA Varispeed 606PC3 instruction manual

YASKAWA

YASKAWA Varispeed 606PC3 instruction manual

Hoymiles HMS-1600-4T-NA user manual

Hoymiles

Hoymiles HMS-1600-4T-NA user manual

Victron energy Quattro 12/3000/120-50/50 230V manual

Victron energy

Victron energy Quattro 12/3000/120-50/50 230V manual

BELTTT BEL150XTU manual

BELTTT

BELTTT BEL150XTU manual

Westerbeke 29.0 EGED 60Hz Operator's manual

Westerbeke

Westerbeke 29.0 EGED 60Hz Operator's manual

Van Der Valk ValkSolarFix installation manual

Van Der Valk

Van Der Valk ValkSolarFix installation manual

Xantrex GT 2.5-DE, GT 3.8-DE, GT 2.8-S owner's manual

Xantrex

Xantrex GT 2.5-DE, GT 3.8-DE, GT 2.8-S owner's manual

Honeywell HW750PI owner's manual

Honeywell

Honeywell HW750PI owner's manual

Huawei FusionSolar SUN2000 Commissioning Guide

Huawei

Huawei FusionSolar SUN2000 Commissioning Guide

Sako SKI650 Series user manual

Sako

Sako SKI650 Series user manual

Cyber Power CPS5000ECH48 user manual

Cyber Power

Cyber Power CPS5000ECH48 user manual

Kaco blueplanet 5.0 TL3 operating instructions

Kaco

Kaco blueplanet 5.0 TL3 operating instructions

Velleman SOL30UC12V user manual

Velleman

Velleman SOL30UC12V user manual

Jntech JNP22KH-V5 user manual

Jntech

Jntech JNP22KH-V5 user manual

SMA SUNNY CENTRAL 500CP XT installation manual

SMA

SMA SUNNY CENTRAL 500CP XT installation manual

TECO JN5-CM-USB instruction manual

TECO

TECO JN5-CM-USB instruction manual

Hitachi SJ300 Series Quick reference guide

Hitachi

Hitachi SJ300 Series Quick reference guide

manuals.online logo
manuals.online logoBrands
  • About & Mission
  • Contact us
  • Privacy Policy
  • Terms and Conditions

Copyright 2025 Manuals.Online. All Rights Reserved.