Inkee Warthog User manual

User Manual
Warthog
V1.02
2021.05

Searching for Keywords
Navigating to a Topic
Search for keywords such as “battery” and “install” to find a topic. If you are using Adobe
Acrobat Reader to read this document, press CTRL+F on Windows or Command + F on
Mac to begin a search.
View a complete list of topics in the table of contents. Click on a topic to navigate to that
section.
This document supports high resolution printing.
Printing this Document
Contents
02
02
02
03
05
05
05
06
06
08
09
10
10
11
11
11
12
12
15
18
20
20
22
23
25
Warthog Diagram
Getting Started
Grip and Built-In Battery
Before You Begin
Mounting the Grip
Attaching the Tripod
Mounting the Camera
Balancing
Balancing the Vertical Tilt
Balancing Depth for the Tilt Axis
Balancing the Roll Axis
Balancing the Pan Axis
Using the Grip
Operation and settings
Button Features
Product List
Disclaimer and Warning
Maintenance
01
09
Introduction
Locking/Unlocking the Gimbal
Charging
Operation Modes
Calibration and Updating Firmware
Six-side Calibration
Firmare upgrading
Specifications
21
Menu settings 19
2020 INKEE Warthog ALL Rinhts Reserved.
C
17
Screen display status
15
Zoom/Focus Installation
APP download
Before you begin
The following documents have been produced to help you safely operate and make full use
of your Warthog .
Warthog Quick Start Guide
Warthog User Manual
Read this entire user manual to understand your legal rights and responsibilities. If you have
any questions or problems during the installation, maintenance, or use of this product,
contact INKEE or an INKEE authorized dealer.
Please download and install the APP on the official website of INKEE
02
Introduction
INKEE Warthog is a professional 3-axis single-handed gimbal that’s been specifically
designed for mirrorless cameras. The wide range of operation modes include Pan Following
Mode, General Locking Mode, Horizontal Locking Mode, General Following Mode and
Flashlight Mode. With the rotation function of the Flashlight Mode users can shoot smooth
rotational footage effortlessly. While the hyper button allows more faster following speed of
gimbal, which meets the needs of the lens in fast-moving scenes.
Warthog boasts axis lock allowing for individual axis balancing and for faster, more
convenient storage. With Warthog , users can control the movement of the gimbal and
switch control profiles easily with a click of a button. Used with the provided camera control
cables, Warthog is able to control shutter, recording, and focus. With the accessory ports,
users can attach accessories such as follow focus.
The gimbal and grip are detachable, with a built-in 2500 mAh battery, providing a maximum
standby time up to 10 hours*. After connecting to the app, it is easy to control gimbal
movement and parameter settings.
* The standby time was tested when Warthog was well-balanced and without any accessories attached,
including any camera cables. The maximum standby time is for reference only.
Warthog User Manual
2020 INKEE Warthog ALL Rinhts Reserved.
C

03
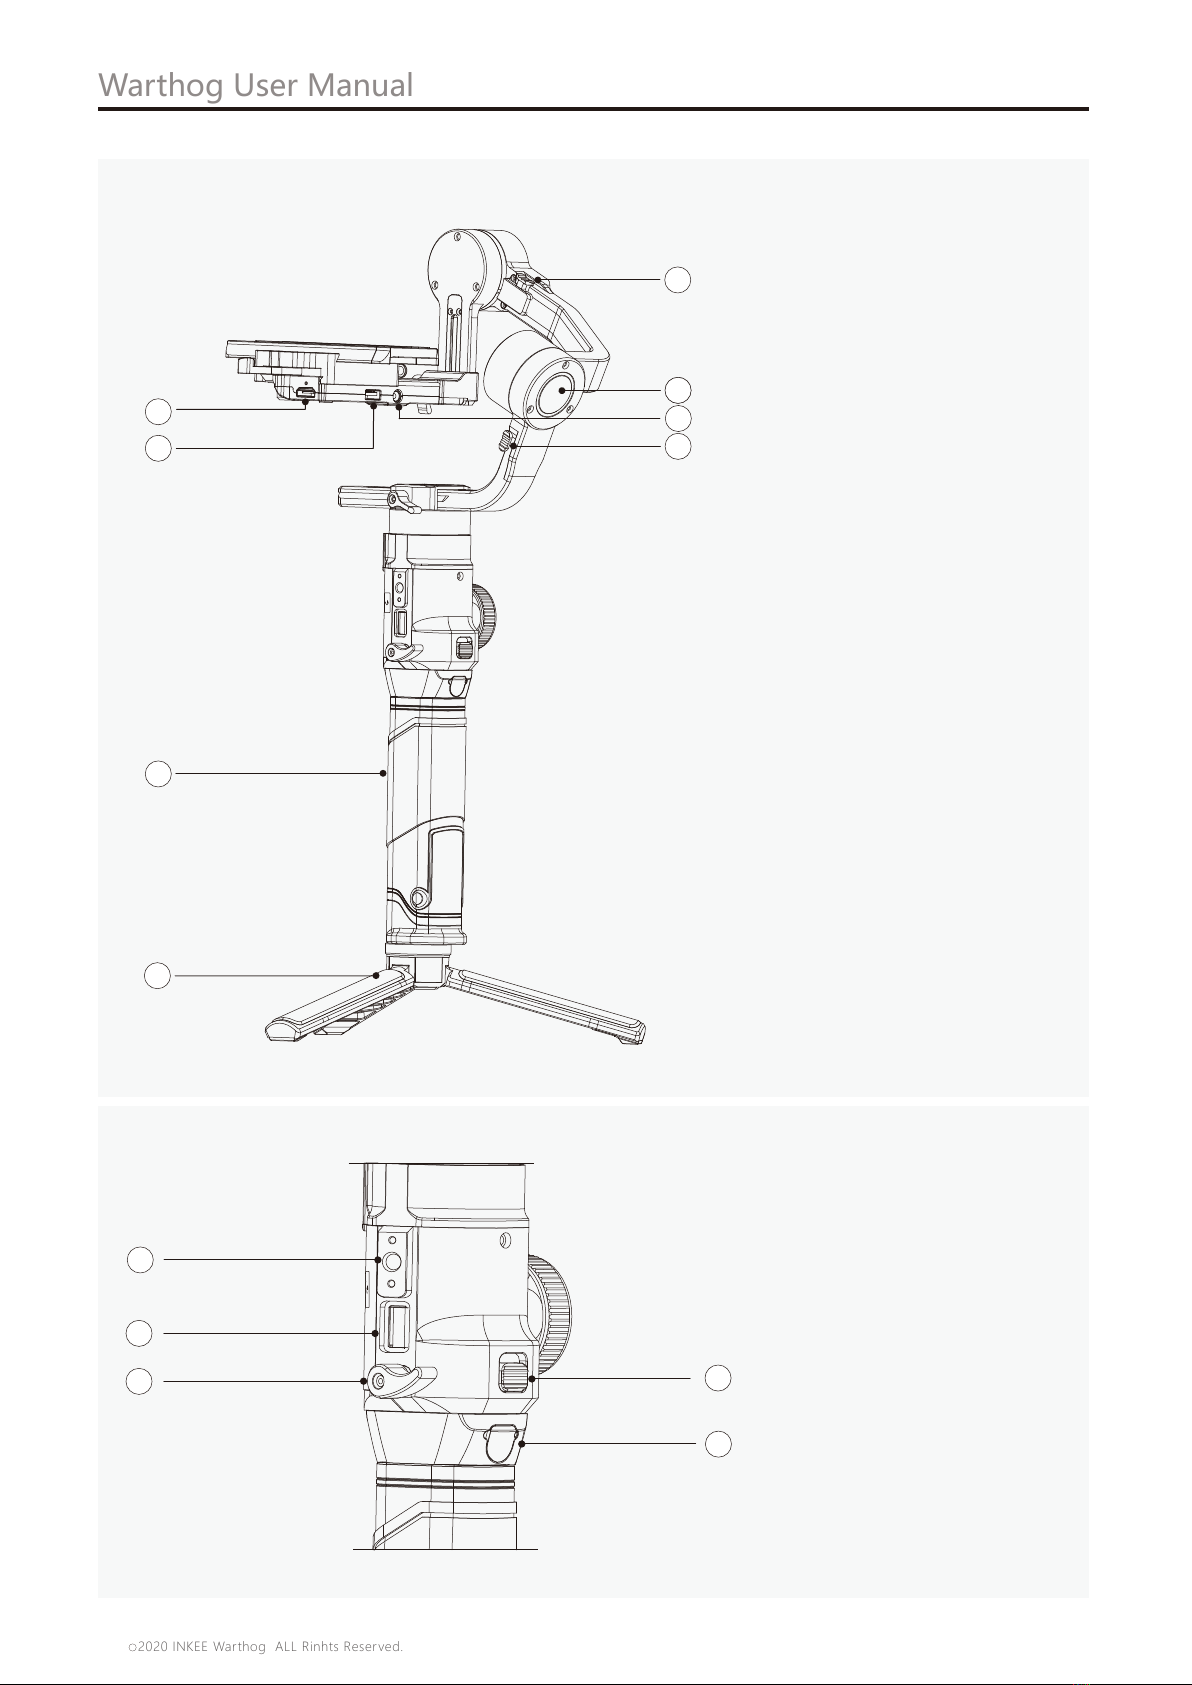
Warthog Diagram
Warthog User Manual
1. Tilt Motor
2. Camera Mounting Plate
3. Tilt Lock
4. Zoom/Follow Focus Port
5. Lens Support Screw
6. Camera Mounting Plate
Base Lock
7. Pan Motor
8. Wheel
9. Battery Level Indicators
10. Quick Release Plate Lock
11. Pan Lock
1
2
3
4
5
67
18
17
13
12
16
A
B
M
o
A
B
O
19
14
15
11
10
8
9
12. Display Screen
13. A、B Button
14. Mode Switch Button
15. Joystick
16. Power Button
17. Record Button
18. Hyper Button
19. Battery Button
2020 INKEE Warthog ALL Rinhts Reserved.
C
04
Warthog User Manual
20. Video Output Port
21. Camera Control Port
22. Battery Grip
23. ripod
24. Tilt Motor Lock
25. Roll Motor
26. DC8.4V Outlet
27. Roll Motor Lock
28
29
30 31
32
23
22
21
20
24
22
26
25
27
28. Quarter Screw
29. USB-A Port
30. Battery Grip Lock
31. Battery Grip Safety Button
32.Battery Grip Charging Port
2020 INKEE Warthog ALL Rinhts Reserved.
C
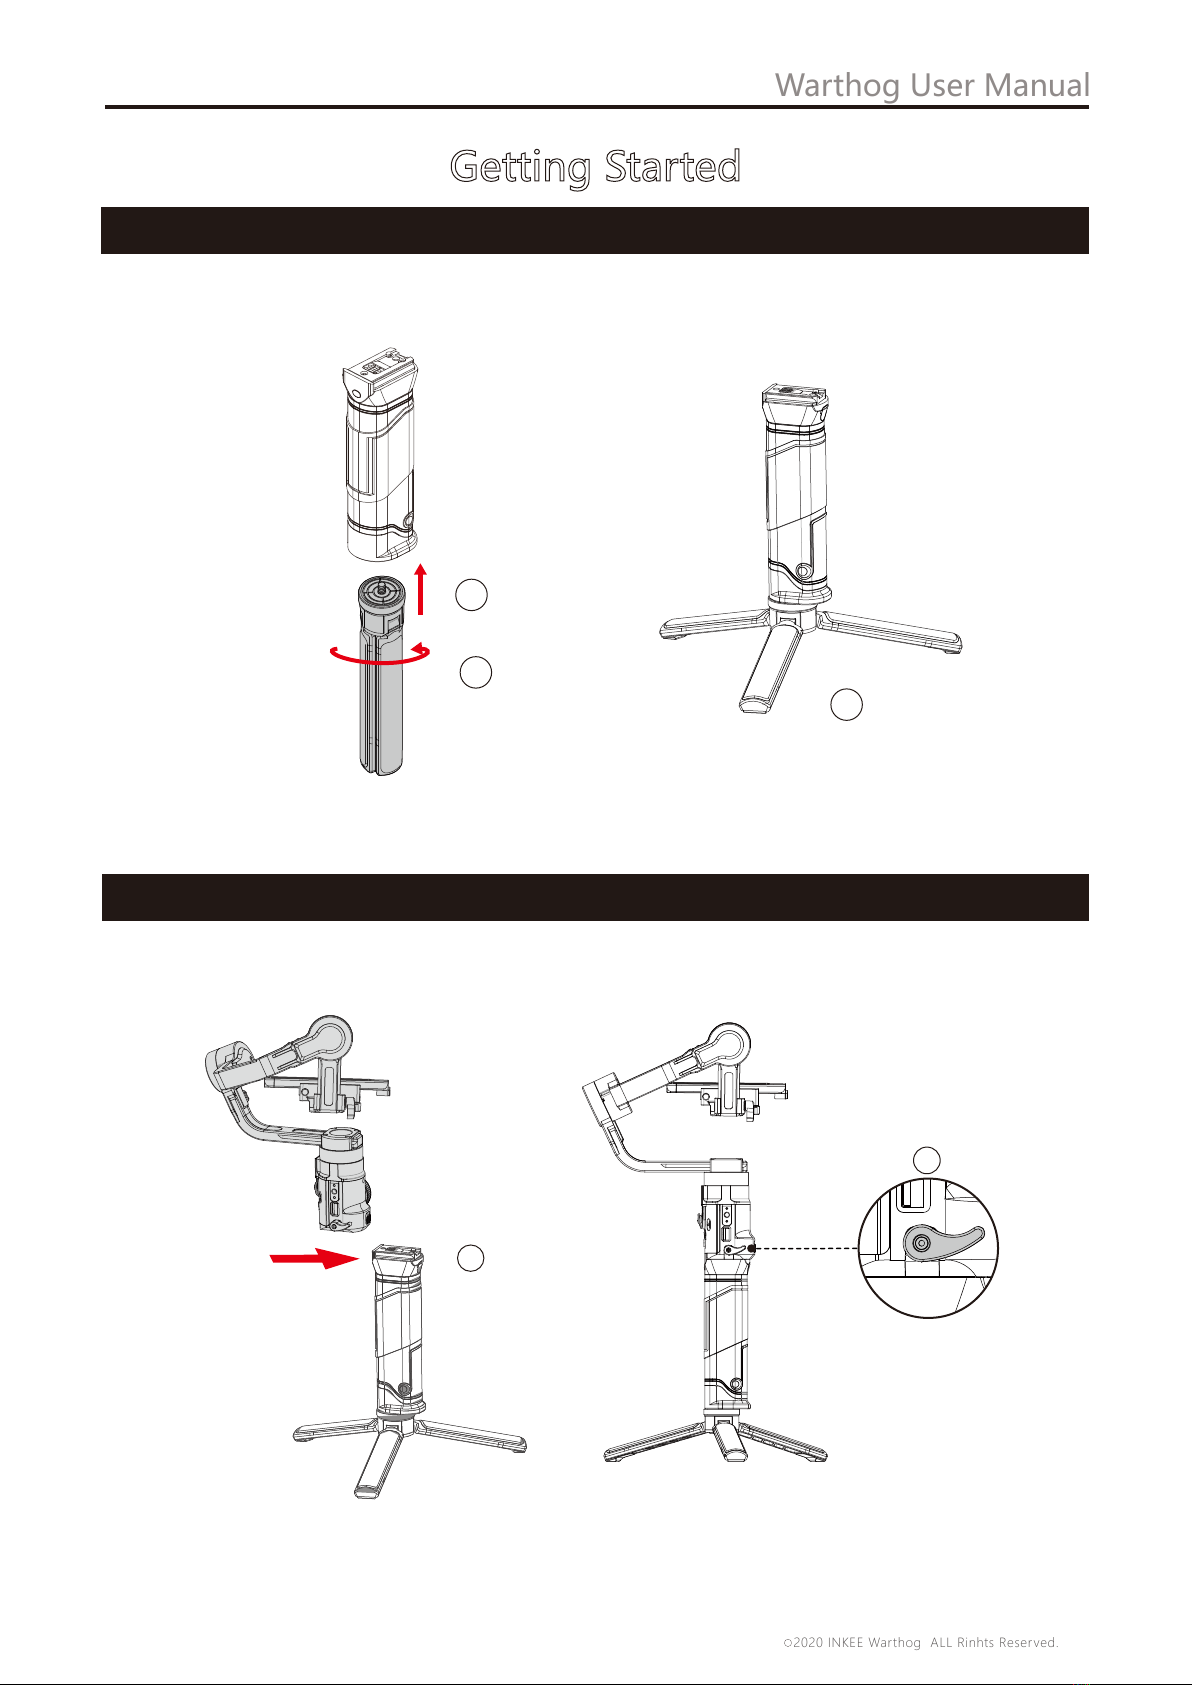
Attaching the Tripod
05
1
2
3
Mounting the Grip
1
Warthog User Manual
2
Getting Started
2020 INKEE Warthog ALL Rinhts Reserved.
C

Toggle the tilt and roll axis lock to the locked position to lock the corresponding axis. Toggle
the axis lock to the unlocked position to unlock the corresponding axis. It is recommended
to hold on to the axis arm before toggling the corresponding axis lock.
Locking/Unlocking the Gimbal
Tilt Axis Lock
Roll Axis Lock
Warthog has been rigorously tested to support a payload of 2.0-5.0kg. Make sure the
combined weight of the camera, lens and other accessories are within 5.0kg.
Refer to the Warthog product page (www.inkee.com/Warthog ) for the most updated
Warthog Camera Compatibility List.
Supported Cameras and Lenses
Mounting a Camera
Make sure to prepare the camera before mounting it to Warthog . Remove the lens cap and
make sure the battery of the camera and memory card are already inserted.
1. Tilt axis and Roll axis of the gimbal are locked by default. Unlock these two axes, adjust the
gimbal to the position as shown, and lock the two axes again.
06
Mounting the Camera
Warthog User Manual
2020 INKEE Warthog ALL Rinhts Reserved.
C
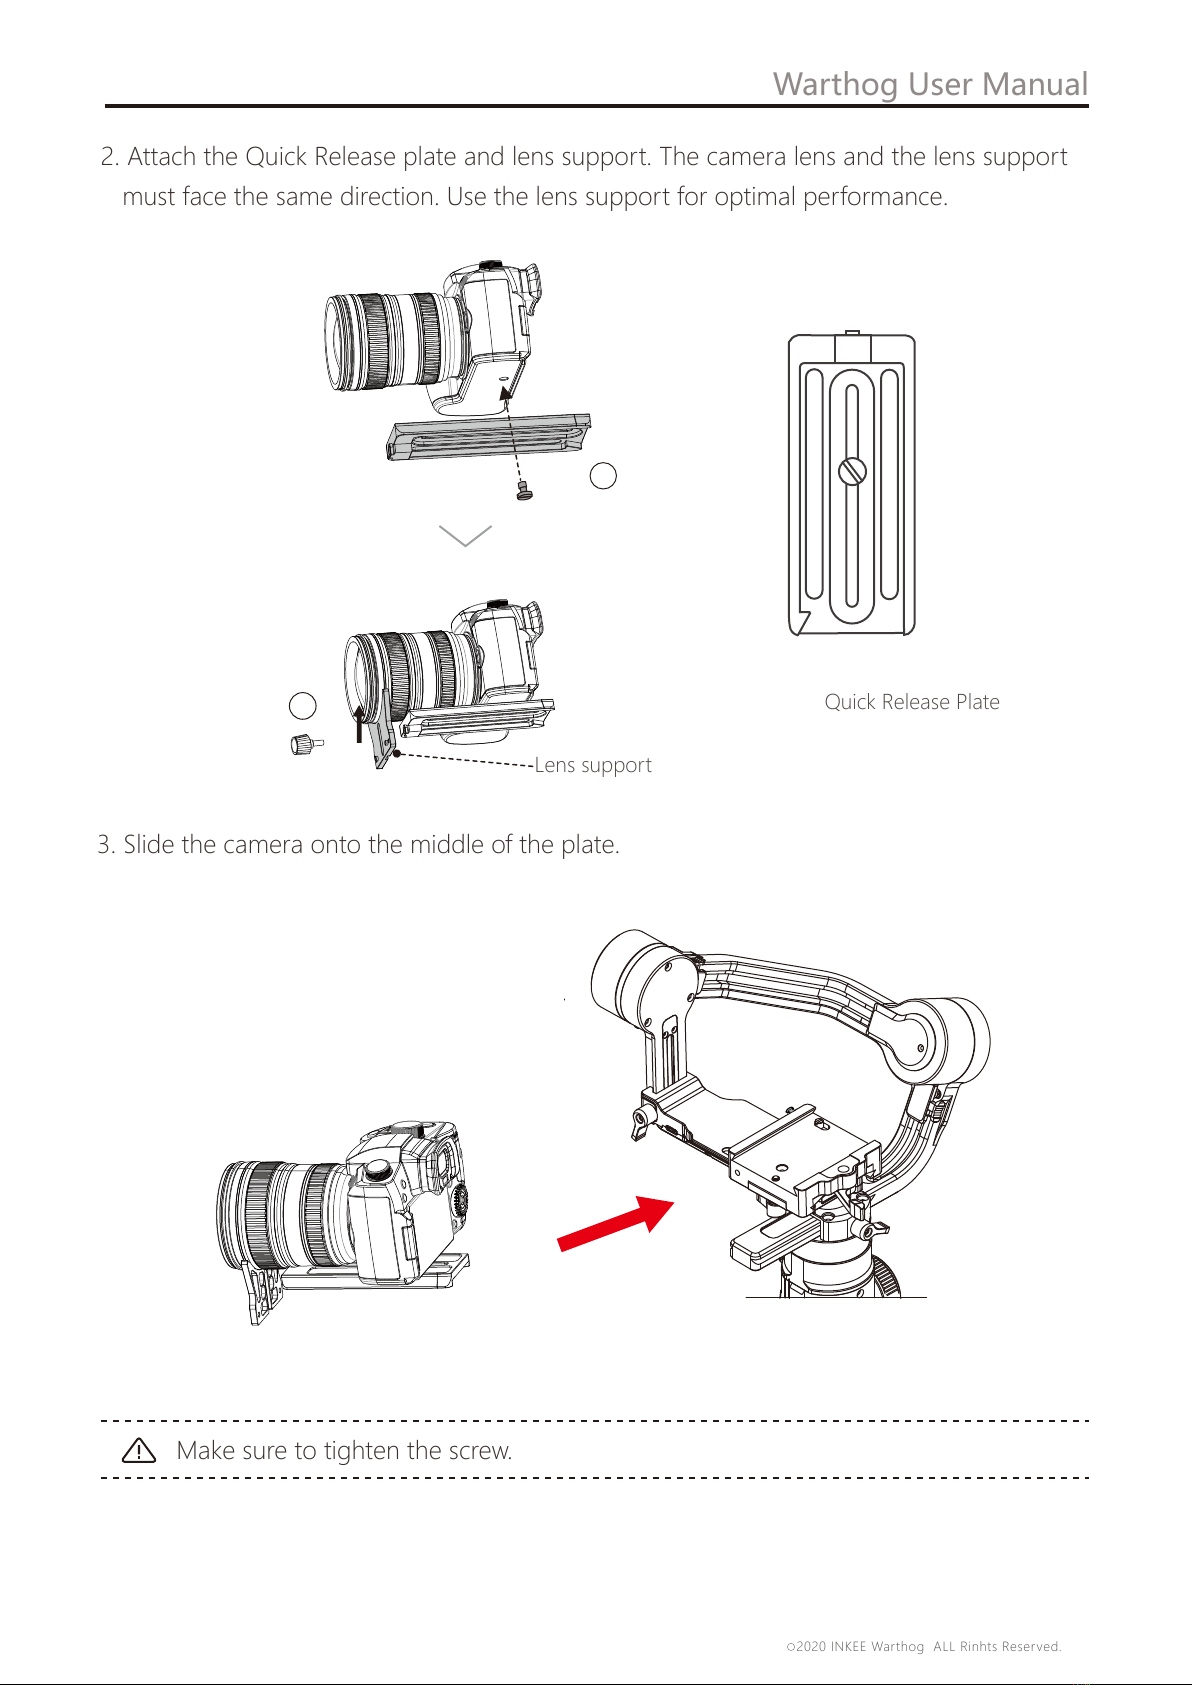
2. Attach the Quick Release plate and lens support. The camera lens and the lens support
must face the same direction. Use the lens support for optimal performance.
Make sure to tighten the screw.
1
2
Lens support
Quick Release Plate
07
Warthog User Manual
3. Slide the camera onto the middle of the plate.
2020 INKEE Warthog ALL Rinhts Reserved.
C

08
Camera Connections
Connect the provided camera control cable to the camera and the camera control port on
the gimbal. Press the record button halfway to auto focus. Full press the record button to
start or stop recording. Push down the joystick to control the camera Aperture, Shutter and I
SO. (Refer to the Warthog Camera Compatibility List for more information.)
Make sure Warthog is not powered on when plugging or unplugging the RSS cable,
otherwise,the cable may burn out.
When connecting to cameras with the USB cable, make sure to power on Warthog
prior to powering on the camera. Otherwise, camera control may not work.
When the camera and Warthog are connected using the camera control cable (USB-C),
playback may not be accessed. In that scenario, press the power button to enter sleep
mode to gain access to playback.
The camera needs to be fully configured, with all accessories and cables connected, before
installing and balancing the camera on the gimbal. If the camera has a lens cap, make sure
to remove it before balancing.
Before balancing, make sure to power on the camera if using an optical zoom lens and
select the focal length if using a varifocal lens. Make sure Warthog is powered off or in
sleep mode before balancing.
Balancing
Warthog User Manual
2020 INKEE Warthog ALL Rinhts Reserved.
C

1. Balancing Depth for the Tilt Axis
Toggle the tilt axis lock to the unlocked position, then lower the camera by loosening
the tilt axis knob①.
Rotate the tilt axis so that the camera lens is pointing forward. Check to make sure the
camera is not front or back-heavy. If front-heavy, move the camera backward. If back-
heavy, move the camera forward.
Loosen the knob under the Quick Release Plate②, and adjust the camera balance③
until the camera is steady.
Tighten the tilt axis knob.
a
b
c
d
2
3
1
2.Balancing the Vertical Tilt
Rotate the tilt axis so that the camera lens is pointing upward. Make sure the camera is
not top or bottom-heavy. If the camera is tilted to one side, pull the tilt arm towards the
other side.
Loosen the knob on the tilt motor① and adjust the balance of the camera② until the
camera is steady without tilting up or down.
Lock the tilt axis knob.
Repeat Step 1 to balance the depth of the tilt axis for optimal performance.
09
a
b
c
d
2
1
Warthog User Manual
2020 INKEE Warthog ALL Rinhts Reserved.
C

10
3.Balancing the Roll Axis
Lock the tilt axis and unlock the roll axis. Check the direction in which the roll motor
swings. If the camera rotates to the left, move the camera to the right. If the camera
rotates to the right, move the camera to the left.
Loosen the knob on the base of camera mounting plate①,and adjust position of the
plate② until the camera is steady.
Tighten the roll axis knob.
a
b
c
1
2
4.Balancing the Pan Axis
Hold and tilt the grip sideways, and check the movement of the Pan axis. If the camera
ens rotates downward, push the pan axis back. If the camera lens rotates upward, push
the pan axis forward.
Loosen the Knob on the pan motor①. Adjust the camera balance② until the camera is
steady when rotating the pan while lifting the grip.
Tighten the pan axis knob.
The knobs on the gimbal can be pulled out and repositioned if the rotation of the knob
is obstructed.
If mounting a longer camera system, it is necessary to use counterweights.
Counterweights will be released soon and sold separately.
a
b
c
Warthog User Manual
1
2
2020 INKEE Warthog ALL Rinhts Reserved.
C

The grip is for handheld use. The built-in battery within the grip has a capacity of 2500 mAh
and the maximum standby time is 10 hours (when the Warthog is properly balanced).
Grip and Built-in Battery
The battery must be charged to activate before using for the first time. Battery level
indicators will light to indicate activation is successful.
After attaching to the gimbal, charge the grip through the power port using a power
cable(included) and a USB adapter (not included). It is recommended to use a 5V/2A USB
power adapter.
Charging
Using the Grip
During charging, the battery level indicators indicate the battery level. When not charging,
press the battery level button to check the battery level.
11
Power Outlet 100-240V
Adapter
Power port
High
Low
Warthog User Manual
2020 INKEE Warthog ALL Rinhts Reserved.
C
12
Warthog User Manual
Operation Modes
Operation and settings
Tilt Axis
Roll Axis
Pan Axis
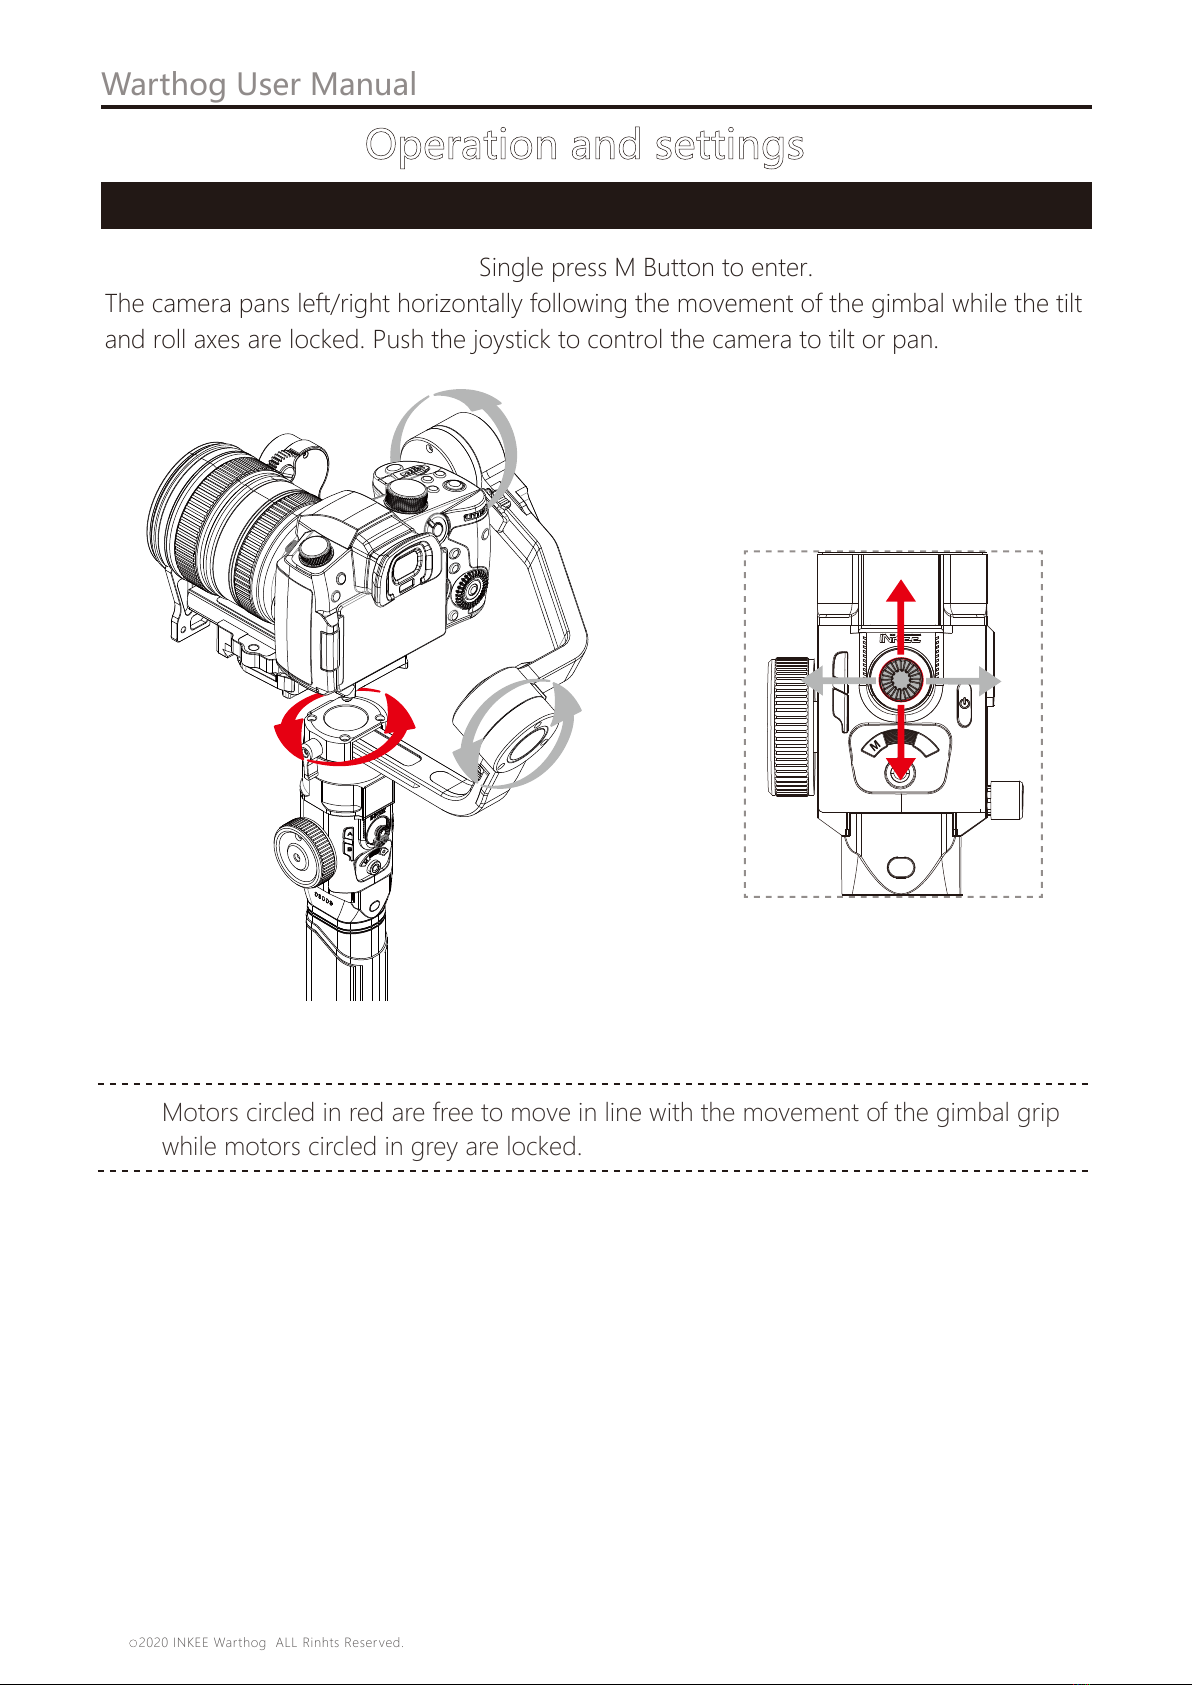
Motors circled in red are free to move in line with the movement of the gimbal grip
while motors circled in grey are locked.
Pan Following Mode (PF): Single press M Button to enter.
The camera pans left/right horizontally following the movement of the gimbal while the tilt
and roll axes are locked. Push the joystick to control the camera to tilt or pan.
A
B
O
2020 INKEE Warthog ALL Rinhts Reserved.
C

13
Warthog User Manual
Horizontal Locking Mode (HL): Press three times to enter.
The camera pans and tilts following the movement of the gimbal while the roll axis is locked.
Pushing the joystick left/right allows manual control of the roll axis.
Tilt Axis
Roll Axis
Pan Axis
General Locking Mode (GL): Single press M Button to enter.
This mode locks the movement of all three axes to keep the camera fixed on a shooting
direction. Pushing the joystick up/down and left/right allows manual control of the tilt axis
and pan axis.
Tilt Axis
Roll Axis
Pan Axis
A
B
O
A
B
O
2020 INKEE Warthog ALL Rinhts Reserved.
C

14
Warthog User Manual
FPV: Double press M Button to enter.
All three motors move following the movement of the gimbal.
Flashlight mode(FL):Double press M Button to enter.
Tilt axis motor rotates 90° angle upwards while tilt axis, roll axis and pan axis motor move
following the movement of the grip. Push joystick to the left/right to rotate pan axis arm.
Tilt Axis
Roll Axis
Pan Axis
Tilt Axis
Roll Axis
Pan Axis
A
B
O
A
B
O
2020 INKEE Warthog ALL Rinhts Reserved.
C
15
Warthog User Manual
2020 INKEE Warthog ALL Rinhts Reserved.
C
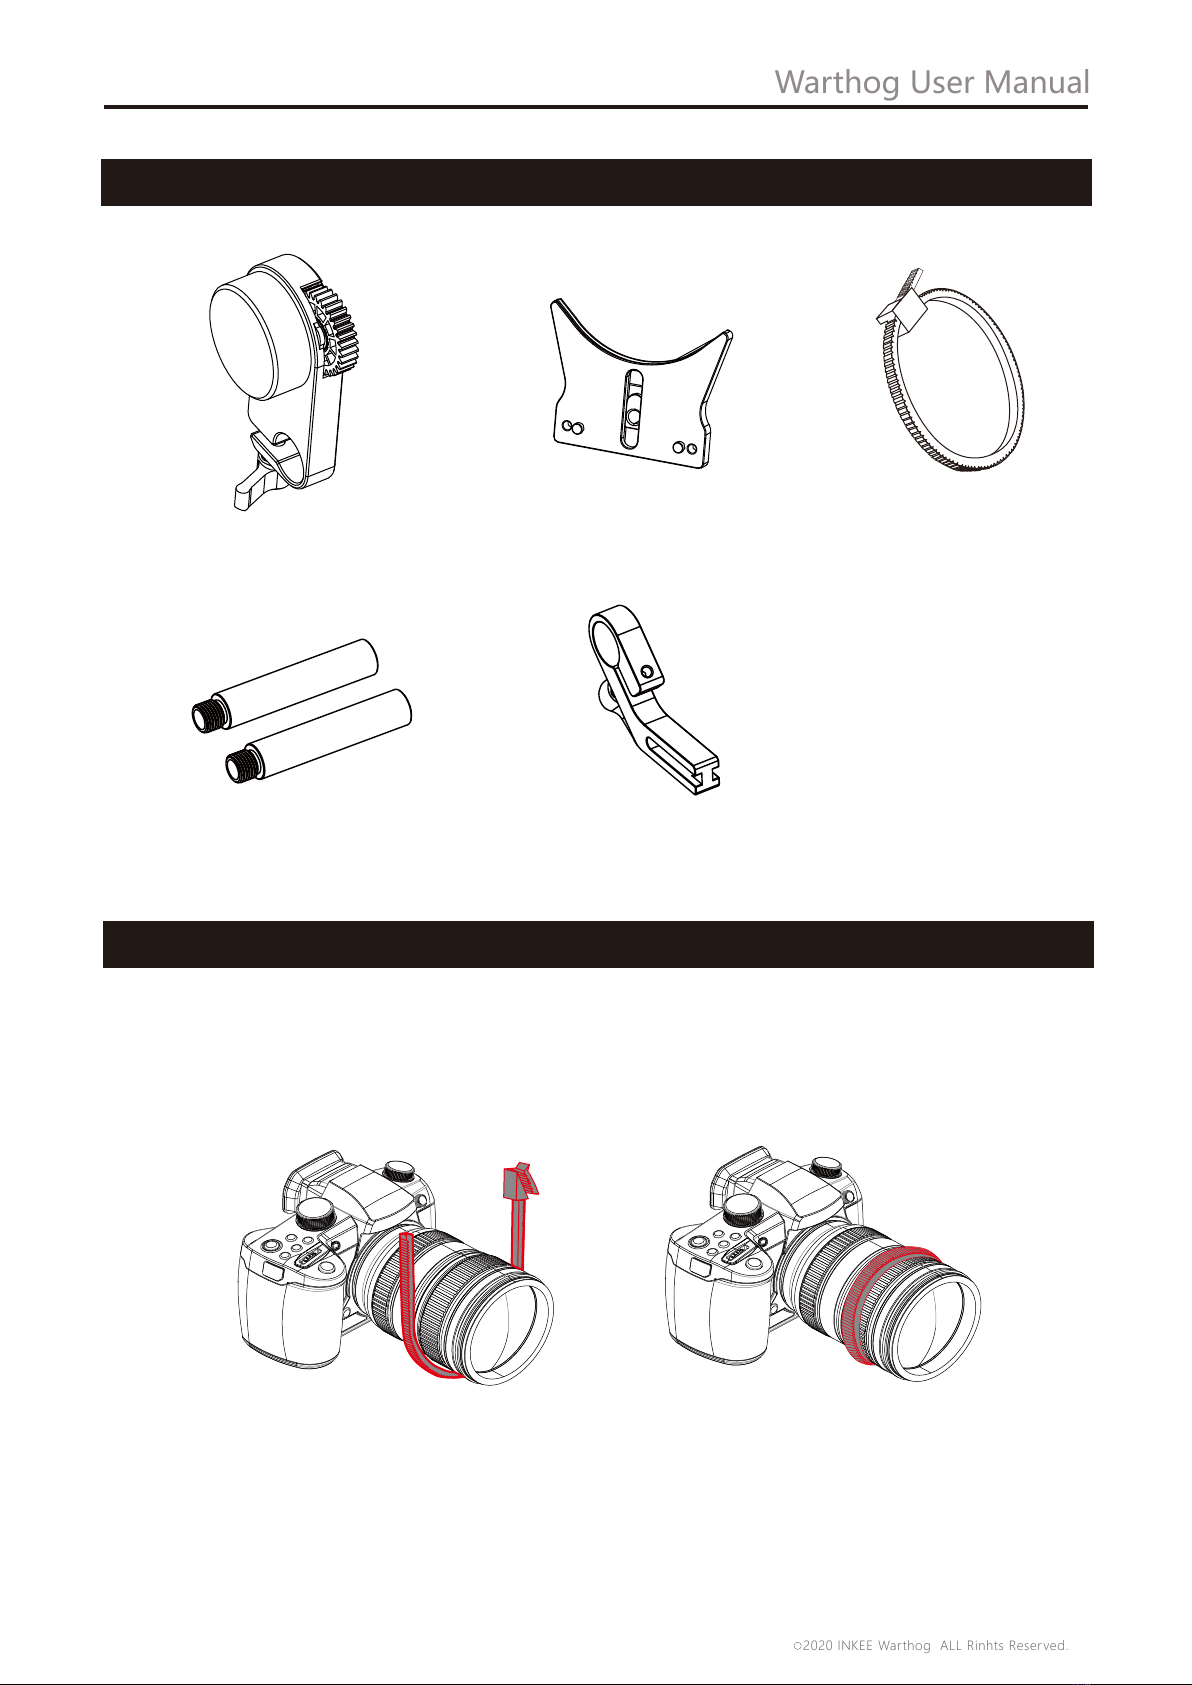
1. Untie the gear ring, fit it to the appropriate position on the focus ring and zoom ring of
the camera lens, then tighten the gear ring.
Focus Support Bracket x1Round Rod x2
Focus Motor x1 Lens Support Bracket x1 Gear Ring x1
Product List
Zoom/Focus Installation
16
Warthog User Manual
2020 INKEE Warthog ALL Rinhts Reserved.
C
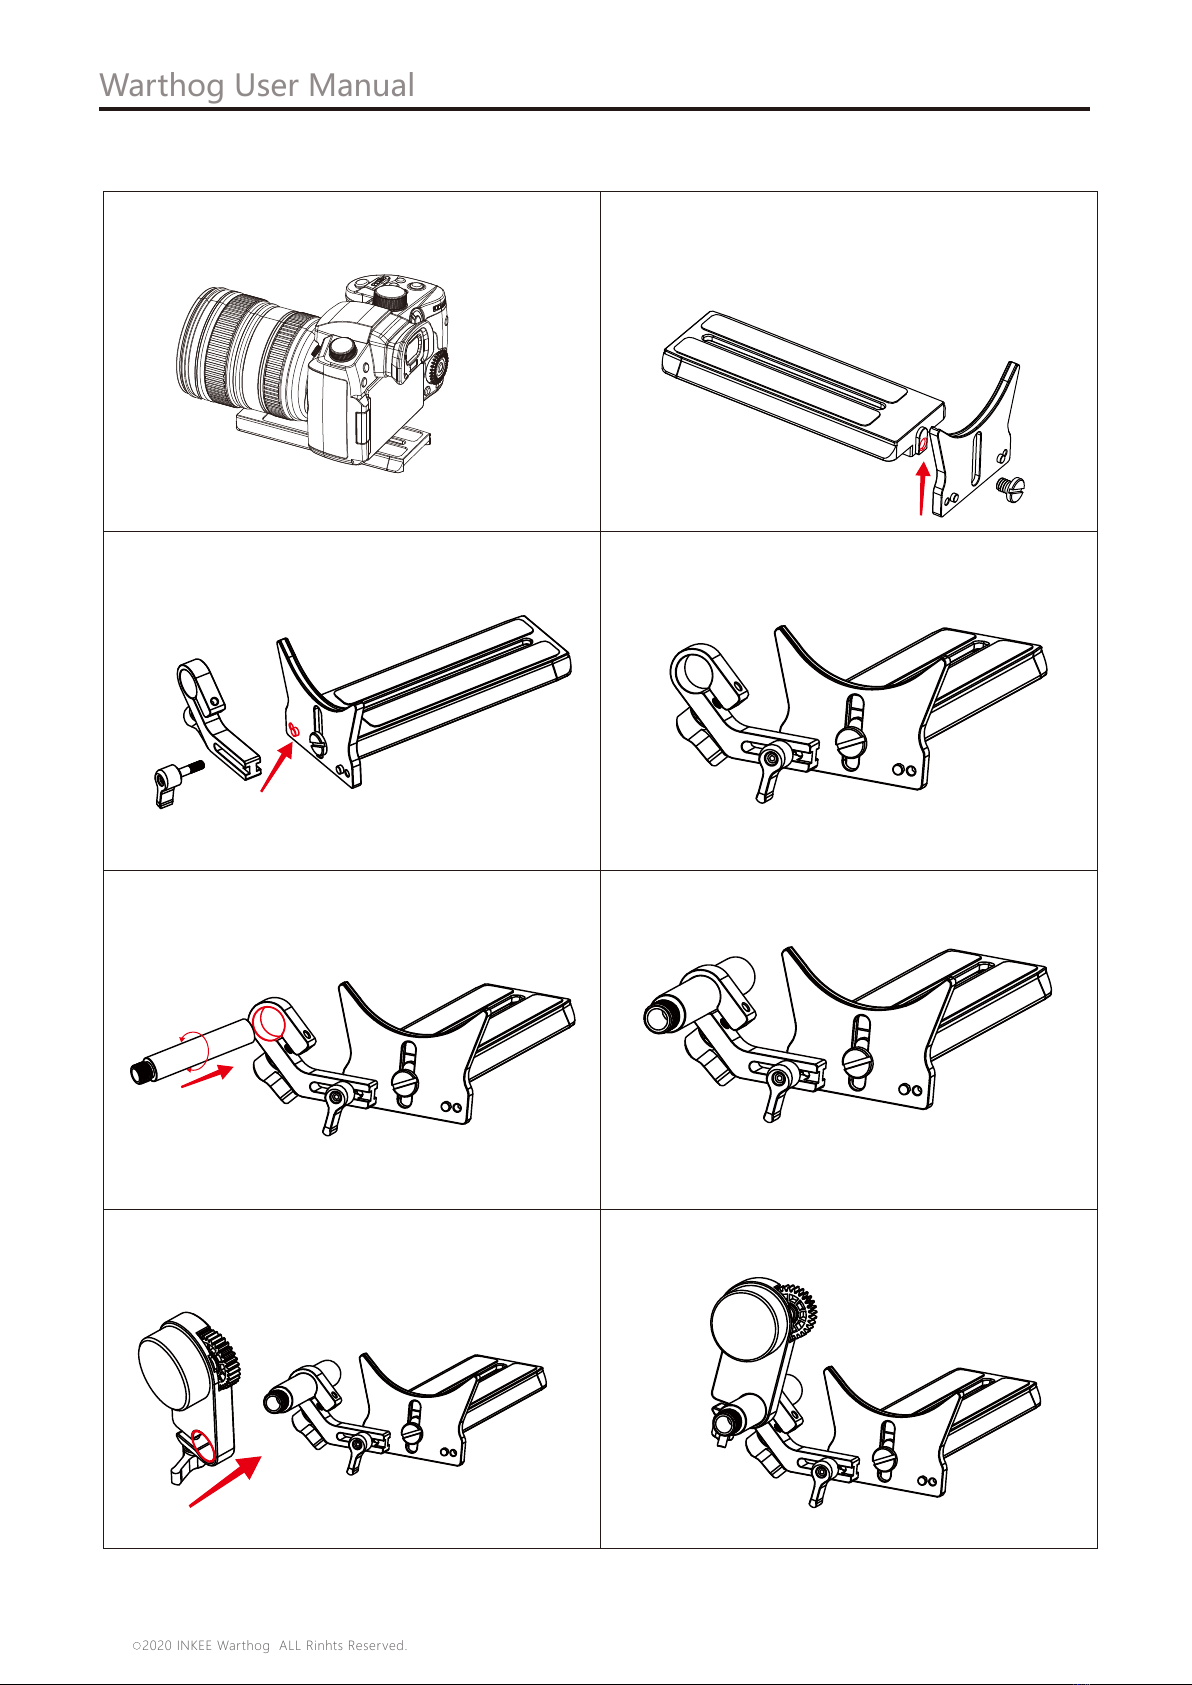
③Mount Focus Support Bracket onto
the Lens Support Bracket.
④ Tighten it with the screw.
⑤ Mount Round Rods onto the Focus
Support Bracket.
⑥
⑦ Mount Focus Motor onto the Focus
Support Bracket.
⑧
① Mount the camera onto the Quick
Release Plate.
② Align Lens Support Bracket with the screw
hole in the middle of the Quick Release Plate
and tighten the screw.
2. Zoom/Focus installation steps:

17
Warthog User Manual
2020 INKEE Warthog ALL Rinhts Reserved.
C
①
②
3. After installing Zoom/Focus, rotate the wheel on the grip and the Focus Motor to work.
As shown in Fig.2, after Focus Motor is attached with the stabilizer, if the version of Focus
Motor is too old then the tracker will automatically update the firmware. In the menu of
the stabilizer one can also set the boundary of Focus Motor and Position of AB Point, after
setting of AB point, Press Point A or Point B to quickly reach the set position of AB Point.
After the focus tracker is connected with the stabilizer, as shown in Fig. 2, if the version of
the tracker is too old, the tracker will automatically update the firmware. In the menu of
stabilizer, you can also set the boundary of the focus tracker and the position of point ab.
after setting point AB, click point a or point B to quickly reach the set position of point ab.
Screen display status
① Bluetooth icon is on, indicating that there is an external device connected to the gimbal
through Bluetooth. Otherwise it is disconnected.
Image transmission
streaming
Image transmission
stopped Ready
Bluetooth
②Status display of transmitter is shown as the figures below.

18
Warthog User Manual
Button Features
Power Button
A\B Button
Press and hold the Power button to turn on/off Warthog . Single press to enter the menu,
the camera will exit the camera control mote in control mote.
Tap A button to carry on the point A of the follow focus motor. Long press A button to enter
or exit the setting of the point A of the follow focus motor. Tap B button to carry on the
point B of the follow focus motor. Long press B button to enter or exit the setting of the
point B of the follow focus motor.
Joystick
1. Push the joystick up or down to control the movement of the tilt axis, and push it left or
right to control the movement of the pan axis.
2. ap the joystick to enter the camera control interface.
Operation Mode
Pan Following Mode (PF): The camera pans left/right horizontally following the movement
of the gimbal while the tilt and roll axes are locked. Push the joystick to control the camera
to tilt or pan. Press and hold the hyper button to speed up. Press twice to recenter the
gimbal. Press three times to turn the gimbal 180° so that the camera faces you.
Hyper Button
Single press the Hyper button to enter Hyper mote. Press twice to recenter the gimbal. Press
three times to turn the gimbal 180° so that the camera faces you. Long press to maintain the
Hype mote.
General Locking Mode (GL): This mode locks the movement of all three axes to keep the
camera fixed on a shooting direction. Pushing the joystick up/down and left/right allows
manual control of the tilt axis and pan axis. Press and hold the hyper button to speed up.
Press twice to recenter the gimbal. Press three times to turn the gimbal 180° so that the
camera faces you.
Horizontal Locking Mode (HL): The camera pans and tilts following the movement of the
gimbal while the roll axis is locked. Pushing the joystick left/right allows manual control of
the roll axis. Press and hold the hyper button to speed up. Press twice to recenter the
gimbal. Press three times to turn the gimbal 180° so that the camera faces you.
FPV: All three motors move following the movement of the gimbal. Press and hold the
hyper button to speed up. Press twice to recenter the gimbal. Press three times to turn the
gimbal 180° so that the camera faces you.
Flashlight mode(FL):With the camera lens pointing upward, press and hold the hyper
button to speed up. The tilt axis, roll axis and pan axis move following the movement of the
gimbal, Pushing the joystick left/right allows manual control of the pan axis rotation.
2020 INKEE Warthog ALL Rinhts Reserved.
C
Table of contents
Other Inkee Camera Accessories manuals


