manuals.online logo
Brands
  1. Home
  2. •
  3. Brands
  4. •
  5. dji
  6. •
  7. Camera Accessories
  8. •
  9. dji Ronin User manual

dji Ronin User manual

v1.0 2020.10
DJI RONIN
3D Focus System
User Guide
使用说明
使用說明
ユーザーガイド
사용자 가이드
Bedienungsanleitung
Guía del usuario
Guide de l'utilisateur
Guida all’uso
Gebruiksaanwijzing
Manual do utilizador
Guia do usuário
Руководство пользователя
1
Contents
EN
KR
IT
CHT
ES
NL
CHS
DE
PT
PT-BR
JP
FR
RU
User Guide 3
使用说明 7
使用說明 11
ユーザーガイド 15
사용자 가이드 19
Bedienungsanleitung 23
Guía del usuario 28
Guide de l'utilisateur 33
Guida dell'utente 38
Gebruiksaanwijzing 43
Manual do utilizador 47
Guia do usuário 52
Руководство пользователя 57
Compliance 62
2
A.
B.
1
2
2
1
3
EN
Disclaimer and Warning
Congratulations on purchasing your new DJI OSMOTM product. Please read this
entire document and all safe and lawful practices DJI OSMO provided carefully
before use. Failure to read and follow instructions and warnings may result in serious
injury to yourself or others, damage to your DJI OSMO product, or damage to other
objects in the vicinity. By using this product, you hereby signify that you have read
this document carefully and that you understand and agree to abide by all terms and
conditions of this document and all relevant documents of this product. You agree
to use this product only for purposes that are proper. You agree that you are solely
responsible for your own conduct while using this product, and for any consequences
thereof. DJI OSMO accepts no liability for damage, injury or any legal responsibility
incurred directly or indirectly from the use of this product.
RONIN is a trademark of SZ DJI OSMO TECHNOLOGY CO., LTD. (abbreviated as
“DJI OSMO”) and its affiliated companies. Names of products, brands, etc., appearing
in this document are trademarks or registered trademarks of their respective owner
companies. This product and document are copyrighted by DJI OSMO with all rights
reserved. No part of this product or document shall be reproduced in any form without
the prior written consent or authorization of DJI OSMO.
This document and all other collateral documents are subject to change at the sole
discretion of DJI OSMO. For up to date product information, visit http://www.dji.com
and click on the product page for this product.
This document is available in various languages. In the event of divergence among
different versions, the English version shall prevail.
Introduction
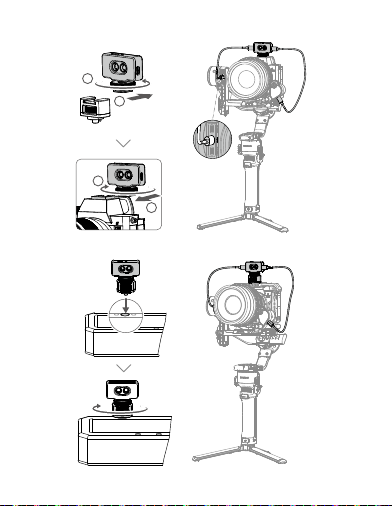
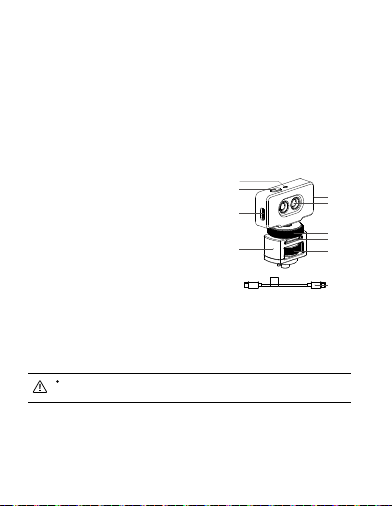
The DJI RONINTM 3D Focus System can be installed onto the camera or camera
cage to assist manual lens focus. The 3D Focus System can only be used to focus
on subjects in the center of the camera view. It is not recommended to set the focal
length of the lens to longer than 85 mm when using the 3D Focus System.

4
Overview
1. Status Indicator
2. AF/MF Switch Button
3. USB-C Port
4. 1/4”-20 Thread to Cold Shoe Adapter
5. Thumb Screw
6. Mounting Base
7. Lock Wheel
8. Infrared Distance Sensor (TOF)
9. USB-C Cable
×1
×1
1
2
3
45
6
7
8
9
3
Installation and Connection
Installing on Camera Cold Shoe (Figure A)
1. Remove the 1/4”-20 thread to cold shoe adapter.
2. Install the 3D Focus System on the cold shoe of the camera and rotate the lock
wheel to fix firmly.
3. Use two USB-C cables to connect the 3D Focus System to the USB-C port and
focus motor of the gimbal.
DO NOT directly insert third-party cables or devices into either USB-C ports
of the 3D Focus System. Otherwise, the 3D Focus System or third-party
devices may be damaged by the power supply.
Installing on Camera Cage (Figure B)
1. Use a 1/4”-20 thread to cold shoe adapter to install the 3D Focus System onto the
camera cage and rotate the thumb screw to fix firmly.
2. Use two USB-C cables to connect the 3D Focus System to the USB-C port and
focus motor of the gimbal.
Using the 3D Focus System
A focus motor is required in order to use the 3D Focus System.
5
Calibration
The 3D Focus System must be calibrated before using for the first time. Follow the
steps below to calibrate. A person or large object must be placed in the center of the
camera view in order to calibrate.
1. Power on the DJI RS 2 gimbal, swipe up on the touchscreen, tap Dial Functions,
and Focus Motor.
2. Return to the home screen, swipe left, tap Create, swipe up, and tap 3D Focus .
3. Tap Lens Calibration. Perform Focus Motor Calibration by following the prompts and
select the focal length.
AF
MF
Lens Config
Lens1
Focal Len
50mm
3D Focus
Lens Calibration
4. Focus the 3D Focus Sytem on a person or large object in the center of the camera view
that is approx. 1 m away. Keep the camera stable and DO NOT move the gimbal
until the progress bar is completely green. Adjust the front dial until the subject is in
focus and tap Confirm.
Keep camera stable
NOW: 1.1m
Lens 1 Calibration
Focus on subject
around 1m away
Lens 1 Calibration
Confirm
Keep camera stable
Focus on subject
around 1m away
NOW: 1.1m
Confirm
5. Repeat the previous step with a person or large object that is approx. 4 m away.
The 3D Focus System must be recalibrated if the lens is replaced.
It is recommended to focus on a person during calibration.
6
Lens Conáguration
Lens configuration can be used to store up to three sets of calibrated lens parameters.
Once stored, users can select parameters directly by tapping Lens Configuration.
Usage
If the camera lens is replaced, the focus motor must be recalibrated the next time the
3D Focus System is powered on. To calibrate the focus motor, either double tap the
AF/MF Switch button or follow the prompts to calibrate the focus motor after selecting
the lens in Lens Configuration.
To switch between AF and MF, press the AF/MF Switch button once or switch between
AF and MF on the touchscreen. Once in AF, the 3D Focus System will be active and
the status indicator turns solid green.
DO NOT hot plug and unplug the 3D Focus System. Otherwise, the
parameters will be lost and the focus motor will need to be calibrated again.
Only manual focus lenses with a mechanical limit are supported.
DO NOT use corrosive organic solvents such as alcohol to wipe the lens of
the 3D Focus System.
Make sure the infrared distance sensor (TOF) is not blocked by the hood
or filter of the camera. Otherwise, the auto focus of the 3D Focus will be
inaccurate.
Status Indicator Description
Solid green The 3D Focus System is working in AF
Solid yellow The 3D Focus System is calibrated and working in MF
Solid red The 3D Focus System needs calibrating
Specications
Model DF01
Weight 54.8 g
7
Dimensions 63.8×50.1×27.0 mm
Sensing
Range*
Strong reflection (e.g. white wall, metal):
30 cm - 10 m @ reflectivity>80%,
Weak reflection (e.g. black paper, glass, water surface):
30 cm - 4 m @ 10%>reflectivity>5%,
Between strong reflection and weak reflection:
the farthest distance is between 4 - 10 m, and the nearest distance is
around 30 cm.
FOV ±15°
Operating
Environment
Use in environments with large and diffuse obstacles with a reflectivity
of more than 10%. DO NOT use in environments with dense fog or aim
at or through glass surfaces.
Operating
Temperature 20° to 45° C (-4° to 113° F)
* The sensing range is affected by the dimensions of the object and the distance between
the 3D Focus System and the object.
RONIN is a trademark of DJI OSMO.
Copyright © 2020 DJI OSMO All Rights Reserved.
CHS
免责声明和警告
感谢您购买大疆灵眸 TM (DJI OSMOTM) 产品。使用本产品之前,请仔细阅读并遵循本文及大
疆灵眸(DJI OSMO)提供的所有安全与合规操作指引,否则可能会给您和周围的人带来伤
害,损坏本产品或其它周围物品。一旦使用本产品,即视为您已经仔细阅读本文档,理解、
认可和接受本文档及本产品所有相关文档的全部条款和内容。
您承诺仅出于正当目的使用本产品。您承诺对使用本产品以及可能带来的后果负全部责任。
大疆灵眸(DJI OSMO)对于直接或间接使用本产品而造成的损坏、伤害以及任何法律责任
不予负责。
RONIN 是深圳市大疆灵眸科技有限公司及其关联公司的商标。本文出现的产品名称、品牌
等,均为其所属公司的商标或注册商标。本产品及手册为大疆灵眸版权所有。未经许可,
8
不得以任何形式复制翻印。
本文档及本产品所有相关的文档最终解释权归大疆灵眸(DJI OSMO)所有。如有更新,恕
不另行通知。请访问 www.dji.com 官方网站以获取最新的产品信息。
简  介
DJI RONINTM 3D 跟焦系统可安装到相机或兔笼上,用于辅助手动镜头跟焦。注意 3D 跟焦
系统仅对相机画面中心物体进行跟焦。使用 3D 跟焦系统时,镜头不推荐在 85mm 以上焦
段使用。
部件说明
1. 状态指示灯
2. AF/MF 切换按键
3. USB-C 接口
4. 1/4''-20 螺纹转冷靴转接件
5. 手拧螺丝
6. 安装座
7. 锁紧转盘
8. 红外深度传感器(TOF)
9. USB-C 线
×1
×1
1
2
3
45
6
7
8
9
3
安装连线
相机冷靴安装(图 A)
1. 移开 1/4''-20 螺纹转冷靴转接件。
2. 将3D 跟焦系统安装到相机上,并旋转锁紧转盘固定。
3. 使用两根 USB-C 线,分别连接 3D 跟焦系统至云台接口和跟焦电机接口。
禁止直接插入第三方线材或设备到两个 USB-C 口,防止电源直通导致 3D 跟焦
系统或第三方设备损坏。
兔笼定位孔安装(图 B)
1. 使用 1/4''-20 螺纹转冷靴转接件,将 3D 跟焦系统安装到兔笼定位孔上,并旋转手拧螺丝
固定。
2. 使用两根 USB-C 线,分别连接 3D 跟焦系统至云台接口和跟焦电机接口。
9
使用 3D 跟焦系统
3D 跟焦系统需要与 Ronin 跟焦电机一起使用。
标定
首次使用,3D 跟焦系统需要标定镜头后才能使用。在标定过程中,需要将标定参照物(人
或面积较大物体)放置于画面中心,标定步骤如下:
1. 开启 DJI RS 2 云台电源,在触摸屏主界面从下往上滑动,点击拨轮功能选项,选择跟焦
电机。
2. 返回主界面后将主界面从左向右滑动,进入创作界面,从下往上滑选择 3D 跟焦菜单
。
3. 在3D 跟焦菜单页面中,选择镜头标定。先根据提示进行跟焦电机校准,校准完成后根
据提示选择当前镜头焦距。
3D
跟焦
AF
MF
镜头标定
镜头配置
镜头1
镜头焦距
50mm
4.焦距输入完成后,按照屏幕提示将相机中心对准约 1m 远处标定参照物(人或面积较大
物体),等待屏幕进度条完全变绿色(注意在进度条出现绿色但未完全变绿时请勿移动
云台);通过前置拨轮调整镜头焦点至中心物体合焦完成,点击确认已合焦。
请保持相机稳定
1
当前:1.1m
镜头1标定
1
当前:1.1m
镜头1标定
确认已合焦
请保持相机稳定
确认已合焦
5.按照屏幕提示将相机中心对准约 4m 远处的标定参照物(人或面积较大物体),重复上
一步操作,点击确认后标定即可完成。
10
更换不同镜头时,需要重新标定 3D 跟焦系统。
建议对准人物进行标定。
镜头配置
镜头配置可用于存储最多三组用户标定的镜头参数。使用时可在 3D 跟焦菜单 -> 镜头配置
中直接调用,无需重新标定。
使用
更换相机镜头后开机使用时,需要校准跟焦电机才可使用。
跟焦电机校准方法:双击 3D 跟焦系统的 AF/MF 切换按键,或在镜头配置中选择镜头后,
根据提示进行电机校准。
自动对焦 /手动对焦切换方法:单击 3D 跟焦系统的 AF/MF 切换按键或在 3D 跟焦菜单界
面下选择 AF/MF。
使用时需切换到 AF 状态,此时状态指示灯绿灯常亮, 3D 跟焦系统正常工作。
请勿带电插拔 3D 跟焦系统,否则将丢失限位参数,需重新校准跟焦电机限位。
仅支持带机械限位的手动对焦镜头。
切勿使用酒精等有腐蚀性的有机溶剂擦拭 3D 跟焦系统镜头。
切勿让相机遮光斗或者滤光片遮挡住 3D 跟焦系统的红外深度传感器,否则将导
致3D 跟焦系统自动对焦不准确。
状态指示灯说明
指示灯 描述
绿灯常亮 3D 跟焦系统工作在 AF 状态。
黄灯常亮 3D 跟焦系统已标定,工作在 MF 状态。
红灯常亮 3D 跟焦系统未标定,需要进行标定后才能工作。
规格参数
型号 DF01
重量 54.8 g
11
尺寸 63.8×50.1×27.0 mm
感知范围 *
强反射(如:白墙、金属):30 cm - 10 m @ 反射率 >80%,
弱反射(如:黑纸、玻璃、水面):30 cm - 4 m @ 10%> 反射率 >5%,
当反射率介于强反射与弱反射之间时:最远量程介于 4 - 10 m,最近量程
在30 cm 附近
FOV ±15°
使用环境 漫反射,大尺寸,高反射率(反射率 >10%)物体;不透过或对着玻璃;
非浓雾天气
工作环境温度 -20℃至 45℃
*感知范围受物体宽度和距离影响。
RONIN 是大疆灵眸的商标。
Copyright ©2020 大疆灵眸 版权所有
CHT
免責聲明和警告
感謝您購買大疆靈眸 TM(DJI OSMOTM)產品。使用本産品之前,請仔細閱讀並遵循本文及
大疆靈眸(DJI OSMO)提供的所有安全與合規操作指引,否則可能會為您和周圍的人帶來
傷害,損壞本産品或其它周圍物品。一旦使用本産品,即視為您已經仔細閱讀本文件,理解、
認可和接受本文件及本産品所有相關文件的全部條款和內容。
您承諾僅出於正當目的使用本產品。您承諾對使用本產品及其可能帶來的後果負全部責任。
大疆靈眸(DJI OSMO)對於直接或間接使用本產品而造成的損壞、傷害及任何法律責任概
不負責。
RONIN 是深圳市大疆靈眸科技有限公司及其附屬公司的商標。本文出現的産品名稱、品牌等,
均為其所屬公司的商標或註冊商標。本産品及手冊為大疆靈眸版權所有。未經許可,不得
以任何形式複製翻印。
本文件及本產品所有相關文件的最終解釋權歸大疆靈眸(DJI OSMO)所有。如有更新,恕
不另行通知。請前往 www.dji.com 官方網站以取得最新的產品資訊。
12
簡介
DJI RONINTM 3D 對焦系統可安裝到相機或兔籠上,用於輔助手動鏡頭對焦。注意 3D 對焦
系統僅對相機畫面中心物體進行對焦。使用 3D 跟焦系統時,不建議使用鏡頭之 85 mm 以
上焦段。
零組件說明
1. 狀態指示燈
2. AF/MF 切換按键
3. USB-C 連接埠
4. 1/4''-20 螺紋轉冷靴轉接配件
5. 手轉螺絲
6. 安裝座
7. 鎖緊轉盤
8. 紅外線深度感應器(TOF)
9. USB-C 線
×1
×1
1
2
3
45
6
7
8
9
3
安裝連線
相機冷靴安裝(圖 A)
1. 移開 1/4''-20 螺紋轉冷靴轉接配件。
2. 將3D 對焦系統安裝到相機上,並旋轉鎖緊轉盤固定。
3. 使用兩根 USB-C 線,分別將 3D 對焦系統連接至雲台連接埠和對焦馬達連接埠。
禁止將第三方線材或裝置直接插入兩個 USB-C 口,以防止電源直通而導致 3D
對焦系統或第三方裝置損壞。
兔籠定位孔安裝(圖 B)
1. 使用 1/4''-20 螺紋轉冷靴轉接配件,將 3D 對焦系統安裝到兔籠定位孔上,並旋轉手轉
螺絲固定。
2. 使用兩根 USB-C 線,分別將 3D 對焦系統連接至雲台連接埠和對焦馬達連接埠。
使用 3D 對焦系統
3D 對焦系統需要與 Ronin 對焦馬達一起使用。
13
標 定
首次使用,3D 對焦系統需要標定鏡頭後才能使用。在標定過程中,需要將標定參考物(人
或面積較大物體)放置於畫面中心,標定步驟如下:
1. 開啟 DJI RS 2 雲台電源,在觸控螢幕主介面從下往上滑動,點擊撥輪功能選項,選擇對
焦馬達。
2. 返回主介面後將主介面從左向右滑動,進入創作介面,從下往上選擇 3D 對焦選單 。
3. 在3D 對焦選單頁面中,選擇鏡頭標定。先根據提示進行對焦馬達校正,校正完成後根
據提示選擇目前鏡頭焦距。
3D
跟焦
AF
MF
镜头标定
镜头配置
镜头1
镜头焦距
50mm
4. 焦距輸入完成後,按照螢幕提示將相機中心對準約 1m 遠處標定參考物(人或面積較大
物體),等待螢幕進度條完全變綠色(注意在進度條出現綠色但未完全變綠時請勿移動
雲台);透過前置撥輪調整鏡頭焦點至中心物體合焦完成,點擊確認已合焦。
请保持相机稳定
1
当前:1.1m
镜头1标定
1
当前:1.1m
镜头1标定
确认已合焦
请保持相机稳定
确认已合焦
5. 按照螢幕提示將相機中心對準約 4m 遠處外的標定參考物(人或面積較大物體),重複
上一步操作,點擊確認後標定即可完成。
更換不同鏡頭時,需要重新標定 3D 對焦系統。
建議對準人物進行標定。
14
鏡頭配置
鏡頭配置可用於儲存最多三組使用者標定的鏡頭參數。使用時可在 3D 對焦選單 -> 鏡頭配置
中直接調用,無需重新標定。
使 用
更換相機鏡頭後開機使用時,需要校正對焦馬達才可使用。
對焦馬達校正方法:按兩下 3D 對焦系統的 AF/MF 切換按鍵,或在鏡頭配置中選擇鏡頭後,
根據提示進行馬達校正。
自動對焦 /手動對焦切換方法:按一下 3D 對焦系統的 AF/MF 切換按鍵或在 3D 對焦選單介
面下選擇 AF/MF。
使用時需切換到 AF 狀態,此時狀態指示燈綠燈恆亮,3D 對焦系統正常運作。
請勿帶電插拔 3D 對焦系統,否則將失去限位參數,需重新校正對焦馬達限位。
僅支援帶有機械限位的手動對焦鏡頭。
切勿使用酒精等有腐蝕性的有機溶劑擦拭 3D 對焦系統鏡頭。
切勿讓相機遮光斗或者濾光片遮擋住 3D 對焦系統的紅外線深度感應器,否則將
導致 3D 對焦系統自動對焦不準確。
狀態指示燈說明
指示燈 描述
綠燈恆亮 3D 對焦系統運作在 AF 狀態。
黃燈恆亮 3D 對焦系統已標定,運作在 MF 狀態。
紅燈恆亮 3D 對焦系統未標定,需要進行標定後才能運作。
規格參數
型號 DF01
重量 54.8 g
尺寸 63.8×50.1×27.0 mm
15
感知範圍 *
強反射(如:白牆、金屬):
30 cm - 10 m @ 反射率 > 80%,
弱反射(如:黑紙、玻璃、水面):
30 cm - 4 m @ 10% > 反射率 > 5%,
當反射率介於強反射與弱反射之間時:
最遠量程介於 4 - 10 m,最近量程在 30 cm 附近
FOV ±15°
使用環境 漫反射,大尺寸,高反射率(反射率 > 10%)的物體;不透過或對著玻璃;
非濃霧天氣
運作環境溫度 -20℃ 至 45℃
*感知範圍受物體寬度和距離影響。
RONIN 是大疆靈眸的商標。
Copyright © 2020 大疆靈眸 版權所有
JP
免責事項および警告
DJIOSMOTM 製品をご購入いただき、誠にありがとうございます。ご使用前に、この文書全体に
目を通し、DJIOSMO が提供する安全で合法的慣行についての説明を注意深くお読みください。
指示と警告に従わなかった場 合、ご自身や他の人に重傷を負わせたり、またはお 客 様の DJI
OSMO 製品および周辺の物的破損につながる恐れがあります。本製品を使用することにより、
本書をよく読み 、本文書および本製品のすべての関連文 書に記載されている利用規約を理解
し、順守することに同意したとみなされます。本製品を適切な目的のためにのみ使 用すること
に同意するものとします。本製品の使 用中の行動とこれに伴う結果には、ユーザーが全面的に
責任を負うことに同意するものとします。本製品の使用により直接または間接的に発生する
損害、傷害、およびその他法的責任に対して、DJIOSMO は一切責任を負いません。
RONIN は、SZDJIOSMOTECHNOLOGYCO.,LTD.(以下「DJIOSMO」と省略)およびその関
連会社の商標です。本書に記載されている製品、ブランドなどの名称は、その所有者で
ある各社の商標または登録商標です。本製品および本書は、不許複製禁無断転載を原則とす
る DJIOSMO の著作物のため、DJIOSMO から書面による事前承認または許諾を得ることなく、
本製品または文書 のいかなる部分も、いかなる方法によっても複製することは固く禁じられて
います。
本書およびその他すべての付属 書は 、DJI O SMO 独 自の裁 量で 変更されることが あります。最
16
新の製品情報については、http://www.dji.com にアクセスして、本製品に対応する製品ペー
ジをクリックしてご覧くだ さ い。
この文書は複数の言語で提供されています。言語版によって相違がある場合には、英語版が優
先されます。
はじめに
DJIRONINTM 3D フォーカスシステムは、カメラまたは カメラケージに取り付けて、手動でレン
ズの焦点を合わせることができます。3D フォーカスシステムは、カメラビューの中央にある被
写体にのみ焦点を合わせることができます。3D フォーカスシステムを使用中に、レンズの焦点
距離を 85mm 以上に設定することは推奨しません。
概要
1. ステータスインジケータ
2. AF/ M F 切り替えボタン
3 .  U S B - C ポ ート
4. アダプター(1/4-20 ねじ-コールドシュー)
5. つまみねじ
6 .  取 り付 けベース
7.  ロック ホイール
8. 赤外線距離センサー(TOF)
9 .  U S B - C ケ ーブ ル
×1
×1
1
2
3
45
6
7
8
9
3
取り付けと 接 続
カ メ ラ の コ ー ル ド シ ュ ー へ の 取 り 付 け( 図 A )
1. アダプター(1/4-20 ねじ-コールドシュー)を取り外します。
2. カメラのコールドシューに 3D フォーカスシステムを取り付け、ロックホイールを回 転させ て
しっ かりと 固 定し ま す。
3. 2 本の USB-C ケーブルを使用して、3D フォーカスシステムをジンバルの USB-C ポートとフ
ォーカスモーターに接続します。
 サードパーティ製のケーブルまたはデバイスを 3D フォーカスシステムの USB-C ポ
ートに直 接 挿入し ないで くだ さい。3 D フォーカ スシステムまた は サ ードパー ティ製
のデバイスが電源供給により損傷する可能性があります。
17
カ メ ラ ケ ー ジ へ の 取 り 付 け( 図 B )
1.  アダプター(1/ 4-20 ねじ -  コールドシュー)を 使 用して、3D フォーカスシステムを カメラケー
ジ に 取 り 付 け 、つ ま み ね じ を 回 し て し っ か り と 固 定 し ま す 。
2. 2 本の USB-C ケーブルを使用して、3D フォーカスシステムをジンバルの USB-C ポートとフ
ォーカスモーターに接続します。
3 D フォ ーカスシステムの 使 用
3 D フォ ーカスシステムを使 用す るには、フォ ーカスモ ーター が 必要です。
キャリブレー ション
3 D フォ ーカスシステム を初 めて使 用 する 前 にキャリブレーションする 必 要 がありま す。キャリ
ブレ ーションするには、以下の手順に 従ってください。キャリブレーションするには、人物また
は大きな被写体をカメラビューの中央に配置してください。
1. DJIRS2 ジンバルの電源を入れ、タッチ画面で上へスワイプし、[ダイヤル機能]、[フ
ォ ー カ ス モ ー タ ー ]を タ ッ プ し ま す 。
2. ホーム画面に戻り、左にスワイプして[作成]をタップし、上へスワイプして[3D フォーカ
ス ]を タ ッ プ し ま す 。
3.[レンズキャリブレ ーション]をタップします。プロンプトに従ってフォー
  カスモーターの キャリブレ ーションを実 行し、焦 点 距離を 選択しま す。
AF
MF
Lens Config
Lens1
Focal Len
50mm
3D Focus
Lens Calibration
4. 3D フォーカスシステムは、カメラビューの中央に配置した、約 1m 先の人物または大きな
被写体に焦点を合わせます。カメラを安定させ、進捗バーが完全に緑色になるまでジンバ
ルを動かさないでください。被写体に焦点が合うまでフロントダイヤルを調整し、[確認]
を タ ップ し ま す。
18
Keep camera stable
NOW: 1.1m
Lens 1 Calibration
Focus on subject
around 1m away
Lens 1 Calibration
Confirm
Keep camera stable
Focus on subject
around 1m away
NOW: 1.1m
Confirm
5.約 4m 先に人物または大きな被写体を配置して、1 ~ 4 の手順を繰り返します。
 レン ズ を交 換 した 場 合 は、3 D フォ ーカスシステム を再 度 キャリブ レ ーション する 必
要 が あり ます。
 キャリブレーション中は人物に焦 点を合わせることをお勧めします。
レンズ 構 成
レンズ 構 成 を 使 用して、最 大 3 セットのキャリブ レ ーション済みレンズ パラメータ ーを 保 存 で
き ます。一 旦 保 存 す ると 、レンズ 構 成 を タップしてパ ラメ ーター を 直 接 選 択 で き ま す。
使用方法
カメラレンズを交換した場 合は、次回 3D フォーカスシステムの電源を入れたときにフォーカス
モーターを再 度キャリブレーションする必 要 があります。フォーカスモーターをキャリブレーシ
ョン する には 、A F / M F 切 り替 えボタ ンを ダブル タップ する か、レンズ 構 成 でレンズ を選 択した後 、
プロンプトに従ってフォーカスモーターをキャリブレ ーションします。
AFと MF を切り替えるには、AF/MF 切り替えボタンを1 回押すか、タッチ画面で AFと MF を
切り替えます。A F に入ると、3D フォーカスシステムが有効になり、ステータスインジケーター
が 緑 色 に 点 灯し ま す。
3D フォーカスシステムの電源を入れたまま、プラグを抜き差ししないでください。抜
き差しすると、パラメーターが失われ、フォーカスモーターを再度キャリブレーショ
ンする必要が生じる場合があります。
機械的な制限のあるマニュアルフォーカスレンズのみがサポートされています。
 3D フォーカスシステムのレンズを拭くために 、アルコールなどの腐 食性 有機 溶剤 を
使 用し ないでくだ さい 。
赤外線距離センサー(TOF)がカメラのフードまたはフィルターによって遮られてい
ないか確認してください。遮られてる場合、3D フォーカスのオートフォーカスが不
正 確 に なり ま す。
19
ステータスインジケーターの説明
ステータスインジケーター 説明
緑色点灯 3D フォーカスシステム は AF で 動 作 中
黄色点灯 3 D フォーカスシステムはキャリブレーション済み、M F 動 作中
赤色点灯 3D フォーカスシステムのキャリブレーションが必要
仕様
モデル DF01
重量 54.8 g
サイズ 63.8 × 50.1 × 27.0mm
検知範囲 *
強い反射(例:白い壁、金属):
30cm~10m@ 反射率 >80%
弱 い 反 射 ( 例 : 黒 い 紙 、 ガ ラ ス 、 水 面 ):
30cm~4m@ 反射率 5% ~ 10%
中 程 度 の 反 射:
最も遠い距離:4~10m、最も近い距離:約 30cm
FOV ± 15°
動作環境
反射率が 10%以上、大型で拡散反射する被写体がある環境で使用します。
濃霧の環 境やガラスで反射させたり透過させるような環境下では使 用しな
いでください。
動作環境温度 20℃~45℃
*
検知範囲は、被写体のサイズと 3D フォーカスシステムと被写体間の距離によって影響され
ます。
RONIN は、DJIOSMO の商標です。
Copyright©2020DJIOSMOAllRightsReserved.
KR
고지 사항 및 경고
DJI OSMOTM 신제품을 구매해주셔서 감사합니다 . 제품을 사용하기 전에 본 문서 전체와 DJI OSMO 에
서 제공한 모든 안전 및 준법 관행을 읽으십시오 . 지침과 경고를 읽고 준수하지 않는 경우에는 본인과 타

Other manuals for Ronin

4

Other dji Camera Accessories manuals

dji DF01 User manual

dji

dji DF01 User manual

dji OSMO User manual

dji

dji OSMO User manual

dji Zenmuse X5 User manual

dji

dji Zenmuse X5 User manual

dji RS 2 User manual

dji

dji RS 2 User manual

dji RONIN-SC User manual

dji

dji RONIN-SC User manual

dji RONIN-M User manual

dji

dji RONIN-M User manual

dji Ronin-S User manual

dji

dji Ronin-S User manual

dji AGRAS T30 User manual

dji

dji AGRAS T30 User manual

dji OM 4 User manual

dji

dji OM 4 User manual

dji Thumb Controller User manual

dji

dji Thumb Controller User manual

dji Ronin-S User manual

dji

dji Ronin-S User manual

dji Ronin-S User manual

dji

dji Ronin-S User manual

dji OSMO MOBILE 2 User manual

dji

dji OSMO MOBILE 2 User manual

dji OSMO MOBILE 3 User manual

dji

dji OSMO MOBILE 3 User manual

dji Zenmuse Z15 User manual

dji

dji Zenmuse Z15 User manual

dji MG-12000P User manual

dji

dji MG-12000P User manual

dji Ronin S2 User manual

dji

dji Ronin S2 User manual

dji Focus User manual

dji

dji Focus User manual

dji Ronin-S User manual

dji

dji Ronin-S User manual

dji RONIN-SC User manual

dji

dji RONIN-SC User manual

dji OM 4 User manual

dji

dji OM 4 User manual

dji BS30 User manual

dji

dji BS30 User manual

dji Ronin-MX User manual

dji

dji Ronin-MX User manual

dji Zenmuse Z15-5D III User manual

dji

dji Zenmuse Z15-5D III User manual

Popular Camera Accessories manuals by other brands

Total Micro PowerStation 100 supplementary guide

Total Micro

Total Micro PowerStation 100 supplementary guide

Moog Videolarm FDP75C2N Installation and operation instruction

Moog Videolarm

Moog Videolarm FDP75C2N Installation and operation instruction

ETERNITY OPzV Series Installation, operation and maintenance

ETERNITY

ETERNITY OPzV Series Installation, operation and maintenance

Panasonic PDM9 Features & specifications

Panasonic

Panasonic PDM9 Features & specifications

Hama SpotLight Smart 80 operating instructions

Hama

Hama SpotLight Smart 80 operating instructions

BMZ Cargo Rack Battery V2 Original operating instructions

BMZ

BMZ Cargo Rack Battery V2 Original operating instructions

Renogy RBT100LFP12-BT-US manual

Renogy

Renogy RBT100LFP12-BT-US manual

Bosch GLM-BAT Operating/safety instructions

Bosch

Bosch GLM-BAT Operating/safety instructions

Nikon MC-36 Instruction manua

Nikon

Nikon MC-36 Instruction manua

Ikelite DSC-P150 instruction manual

Ikelite

Ikelite DSC-P150 instruction manual

Axis T96A05-V installation guide

Axis

Axis T96A05-V installation guide

Beghelli 26719 Instructions for installation, use and maintenance manual

Beghelli

Beghelli 26719 Instructions for installation, use and maintenance manual

Nikon WP-CP1 - Underwater Housing user manual

Nikon

Nikon WP-CP1 - Underwater Housing user manual

Idis DA-TM4100 installation manual

Idis

Idis DA-TM4100 installation manual

LevelOne DOH-1000 Quick installation guide

LevelOne

LevelOne DOH-1000 Quick installation guide

Wolf Garten 72V Li-ION Power 24B Original operating instructions

Wolf Garten

Wolf Garten 72V Li-ION Power 24B Original operating instructions

Ikelite 6085 Supplemental instructions

Ikelite

Ikelite 6085 Supplemental instructions

Ozito PXBP-200 instruction manual

Ozito

Ozito PXBP-200 instruction manual

manuals.online logo
manuals.online logoBrands
  • About & Mission
  • Contact us
  • Privacy Policy
  • Terms and Conditions

Copyright 2025 Manuals.Online. All Rights Reserved.