Inkel IPT-8254 User manual


PROGRAM TIMER
2IPT-8254
Welcome 3
Unpacking 3
Before Use 3
Safety Instruction 4
Operation 5
Features 5
Front Panel 6
Rear Panel 7
Detail Operating Method 8
Precaution to Install RACK 12
Rack Connection 12
Block Diagram 13
Specification 14
Service and Warranty 15
Contents

PROGRAM TIMER
IPT-8254 3
Welcome you from management and staffs of INKEL PA.
All of the staffs here at INKEL PA have dedicated to provide excellent products of value, and we are glad
that you have purchased one of our products.
We sincerely trust that this product will provide satisfactory service, but if anything goes up you do not
satisfy completely, we will endeavor to make things right.
Welcome to INKEL PA and thank you for joining our worldwide family.
Please inspect all equipment carefully right after unpacking. If you find any damages, contact your supplier
or dealer immediately. Only a shipper may file a damage claim as a carrier for damages which have been
incurred during shipping. Be sure to keep carton boxes and other all packing materials for the carrier’s
inspection. If your packing materials are in good condition, please keep them. If you ever need to return
the unit to INKEL PA or an authorized service center, you should use only the original factory packing.
Welcome
WARNING : TO PREVENT FIRE OF ELECTRIC SHOCK HAZARD,
DO NOT EXPOSE THIS PRODUCT TO RAIN OR MOISTURE
Unpacking
To insure proper use of this product, please read owner’s manual carefully and keep this manual in an
easily accessible place for future reference.
Before Use
CAUTION : TO REDUCE THE RISK
OF ELECTRIC SHOCK
DO NOT REMOVE THE COVER (OR BACK)
NO USER SERVICABLE PARTS INSIDE
REFER SERVICING TO QUALIFIED SERVICE PERSONNEL
This lightening flash with arrowhead symbol within an equilateral triangle is intended to alert the
user to the presence of non insulated “dangerous” voltage within the product’s enclosure that may
be of sufficient magnitude to constitute a risk of electric shock to persons.
This exclamation point within an equilateral triangle is intended to alert the user to the presence
of important operating and maintenance (servicing) instruction in the literature accompanying the
products.

PROGRAM TIMER
4IPT-8254
Safety Instruction
1. Read these instructions.
2. Keep these instructions.
3. Heed all warnings.
4. Follow all instructions.
5. Do not use this apparatus near water.
6. Clean only with dry cloth.
7. Do not block any ventilation openings. Install in accordance with the manufacturer’s instructions.
8. Do not install near any heat sources such as radiators, heat registers, stoves, or other apparatus (including
amplifiers) that produce heat.
9. Do not defeat the safety purpose of the polarized or grounding-type plug. A polarized plug has two blades with one
wider than the other. A grounding type plug has two blades and a third grounding prong. The wide blade or the third
prong are provided for your safety. If the provided plug does not fit into your outlet, consult an electrician for
replacement of the obsolete outlet.
10. Protect the power cord from being walked on or pinched particularly at plugs, convenience receptacles, and the
point where they exit from the apparatus.
11. Only use attachments/accessories specified by the manufacturer.
12. Use only with the cart, stand, tripod, bracket, or table specified by the manufacturer, or sold with the apparatus.
When a cart is used, use caution when moving the cart/apparatus combination to avoid injury from tip-over.
13. Unplug this apparatus during lightning storms or when unused for long periods of time.
14. Refer all servicing to qualified service personnel. Servicing is required when the apparatus has been damaged in
any way, such as power-supply cord or plug is damaged, liquid has been spilled or objects have fallen into the
apparatus, the apparatus has been exposed to rain or moisture, does not operate normally, or has been dropped.
Information for Users on Collection and Disposal of Old Equipment and used Batteries
These symbols on the products, packaging, and/or accompanying documents mean that used electrical
and electronic products and batteries should not be mixed with general household waste.
For propertreatment, recovery and recycling of old products and used batteries, please take them to
applicable collection points, in accordance with your national legislation.
By disposing of these products and batteries correctly, you will help to save valuable resources and
prevent any potential negative effects on human health and the environment which could otherwise arise
from inappropriate waste handling.
For more information about collection and recycling of old products and batteries, please contact your
local municipality, your waste diposal service or the point of sale where you purchased the items.
Information on Disposal in other Countries outside the European Union
These symbols are only valid in the European Union. If you wish to discard these items, please contact
your local authorities or dealer and ask for the correct method of diposal.
Note for the battery symbol (bottom two symbol examples):
The sign Pb below the symbol for batteries indicates that this batteries contains lead.

PROGRAM TIMER
IPT-8254 5
Features
* CONVENIENT PROGRAMMING
Able to operate melody and voice file optionally by using a button on the front and upload or download of data through
PC by using RS-232C PORT on the rear.
* VARIOUS MELODIES AND SOUND OUTPUT
You can generate 15 sorts of melody and Nine-hundred ninety-nine sorts of voice file (connection with IVF-8201).
* AC POWER OUTLET CONTROL
When connecting to other device through IPT-8254 AC OUTLET, able to control manually by turning outlet button
on/off and control on/off condition of power during reservation time by setting day/time.
* BACK UP POWER
You can continue to maintain the time counter for about a week through the inner back-up even though AC power
turns off with current time set. There is no need of re-adjusting time, ever though AC power is applied.
* SOLUTION IN POWER FAILURE
Used Flash Memory to prevent the loss of date cause of power failure or unstable power source.
* TIME CONTROL OF AC POWER OUTLET
Able to control IPT-8254 AC Power Output time from 1 second to maximum 20 seconds to prevent time delay when
connecting with external power amplifier.
Operation
1. Check the proper power source (AC INPUT or DC +24V) first, and then connect the unit.
2. Check the time by inserting proper time with time button when showing time setting mode on display.
3. Connect the cable to RS-232C terminal on the rear panel if you want interface with IVF-8201.
4. Connect appropriate source devices to the switched AC outlet if applicable to the system design.
5. Slowly increase the volume level control to the desired level.

PROGRAM TIMER
6IPT-8254
1. AC OUTLET BUTTON
This is button to turn on/off the AC power and remote
output contact terminal of the rear AC outlet
NO.1, NO. 2.
2. MELODY OUTPUT BUTTON
On/Off button for melody channel output.
When output button is OFF even though melody is
played, it never be out.
3. MODIFY BUTTON
To change the reserved data.
When output button is OFF even though melody is
played, it never be out.
4. AC BUTTON
To set the reservation or setting of AC power outlet.
5. MELODY BUTTON
To set the reservation or setting of melody output.
6. VOICE BUTTON
To set the reservation or setting of voice file.
7. TIME BUTTON
To set the current time.
8. CANCEL BUTTON
To cancel the setting.
It is changed to ready mode by pressing this button.
9. DELETE BUTTON
To delete the reserved data.
10. COPY BUTTON
To copy the reserved date to other dates.
11. CHANNEL BUTTON
To select the melody, voice reservation setting and
output channel.
12. TRACK BUTTON
To select the track when setting melody and voice.
13. OUTPUT CHANNEL INDICATOR
Indicating the out-coming channel now.
14. DATE INDICATOR
Indicating the weekday of current time or reserved time.
15. VFD DISPLAY
Indicating the operation status of each function button.
16. OUTPUT LEVEL CONTROL
To control the output volume of built-in melody.
17. DOWN/UP BUTTON
To check the reserved data.
18. AM/PM, HOUR/MIN, DAY BUTTON
To set the present time or reservation time, AM/PM
button is for morning/afternoon, HOUR/MIN button is for
time/minute/second, DAY button is for date.
19. ENTER BUTTON
To save the set data.
20.NUMBER BUTTON
To select the time setting, track entry, channel
selecting.
Front Panel

PROGRAM TIMER
IPT-8254 7
1. AC INLET AND FUSE
Connect the supplied standard AC input cable to this
input. The fuse holder below the input contains the AC
overload protection fuse. If the fuse has blown out,
replace it with a fuse of the same type and rating.
If the fuse continues to blow, refer servicing to a
qualified service technician
2. AC POWER OUTLET 1
AC power outlet terminal, able to use maximum 500W.
* Note : The shape of outlets can be different according
to country requirement.
3. AC POWER OUTLET 2
AC power outlet terminal, able to use maximum 30W.
* Note : The shape of outlets can be different according
to country requirement.
4. VOICE INPUT JACK
This jack is intended to receive a signal from the output
of the IVF-8201 (VOICE FILE).
5. CHANNEL INPUT JACK
These are the input jacks for channel 1 through 4.
6. DC INPUT & OUTPUT
DC power input and output terminal, its power source is
DC +24V.
Before connecting, ensure to check voltage and (+), (-)
polarity.
7. REMOTE OUTPUT
Be used for a point to contact external devices and be
operated AC outlet together Connect to IPD-8329
(Power Distributor) or IPX-8116 (Matrix).
8. COMMUNICATION TERMINAL
This is a terminal that communication is done between
our corporation product, IVF-8201 and IPT-8254, and
you can easily perform reservation setting through
management program by connecting a PC.
This terminal uses RS-232C communication method
and the distance to stably transmit and receive data is
maximum 15M.
9. CHANNEL OUTPUT JACK
These are the output connectors for channels 1
through 4.
Rear Panel

PROGRAM TIMER
8IPT-8254
Detail Operating Method
1. TIME SETTING - To set the current time.
1) Press TIME button on STAND-BY mode, then setting
will be start while AM/PM flickers on the screen.
2) Select AM/PM with AM/PM button. AM/PM will be
changed whenever you pressing it once.
3) Press HOUR/MIN button, then time flickers. Set the
time with numeric button.
4) Press HOUR/MIN button again, then minute flickers.
Set the minute with numeric button.
Time and minute setting will be changed whenever
pressing it once and if you keep pressing for a while,
then you can set the second.
5) Press DAY button, then date flicker. Select the
proper date by pressing DAY button.
6) Press ENTER button to save the setting. If you want
to cancel your setting, press CANCEL button, then
screen will be changed to STAND-BY mode.
7) After setting completion, LED will be illuminated
relevant weekly on date indicator.
2. VOICE SETTING - To play saved sound source in
IVF-8201 (VOICE FILE) at the desired time.
1) Keep pressing the voice button for a while, then LED
flickers. Ready to set from now.
2) Set by the same way of time setting for reservation
time setting.
3)Press the reservation track button, then track
number flickers on the screen.
-Enter the track number with numeric button
(available to 999 tracks).
4) Channel setting: Press CH button, then it will be
changed to output channel setting mode on the
screen.
- Select the desired channel (1~4) with numeric
button.
This time, if you press the same number with
selected channel number or CH button, ON/OFF
will be changed.
When ON mode, proper channel LED is illuminated
on the channel indicator.
INITIAL TIME SETTING
- Under unset initial time condition, its initial screen is as follow:
- AM 00:00 MON flickers, and then do as below.

- If you keep pressing CH button for a while under
channel setting mode, the words,“CH ALL ON”is
showed shortly on the indicator. After then, CH 1~4
are all changed to ON mode and it moves to
channel output setting screen again.
- If you keep pressing CH button for a while when all
channel is set as ON mode, the words,“CH ALL
OFF”is showed shortly on the indicator. After then
CH1~4 are all changed to OFF mode and it moves
to channel output setting screen again.
5) Press ENTER button after channel setting, then the
setting is saved and over.
6) Reserved data is played on the set time.
- If you reserve the same time with already saved
time, former data is removed and latter data is
saved.
3. MELODY SETTING - To play the saved sound source
in this unit on desired time.
- MELODY
1)Keep pressing the MELODY button, then LED
flickers. Ready to set from now.
2) Same way with voice setting for other settings.
- Track setting should be entered from 1 to 15.
Melody offered by this unit is limited to 15 tracks.
Over than 15 tracks is not allowed.
3) Start to play with reserved data on the set time.
4. MELODY PLAY - play the sound which was saved in
this unit by selecting the desired track and channel.
1) Keep pressing the track button for a while, then
setting starts.
2) Enter the track which will be played with numeric
button and press ENTER button. After that press CH
button, then it is changed to CHANNEL mode.
3) After selecting the channel, if pressing the ENTER
button, selected track is played. When playing is
over, it stops automatically.
-This function is not available during
MELODY/VOICE playing.
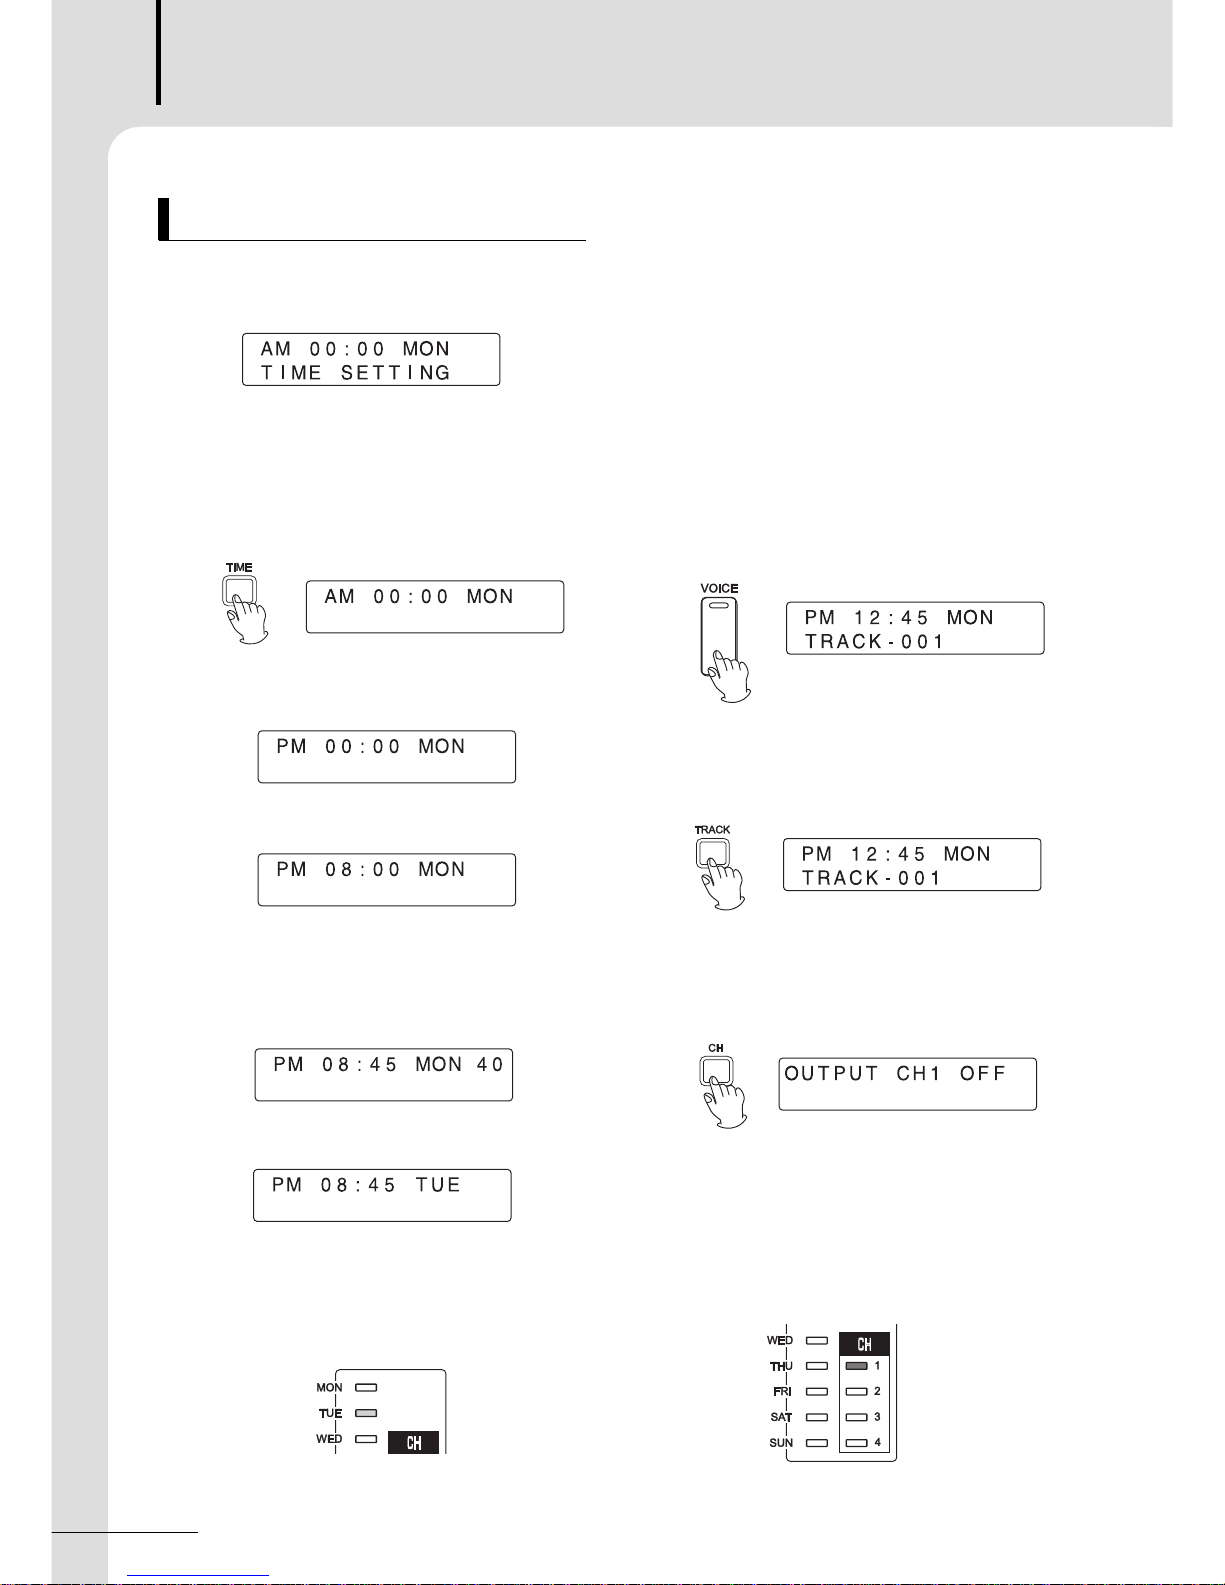
5. AC SETTING
Function to ON/OFF the AC OUTLET and REMOTE
OUTPUT in desired time.
AC OUTLET and REMOTE OUTPUT are operated at
the same time.
1) Keep pressing AC button, then LED flickers. Ready
to set from now.
2)Way to set the reservation time is same with
VOICE/MELODY setting function.
3)ON/OFF setting of AC OUTLET is started by
pressing CH button. After that, each time pressing
CH button, ON/OFF is changed.
4) Press ENTER button, then setting is saved.
-It is designed to operate AC OUTLET and
REMOTE OUTPUT during MELODY/VOICE
playing, and when playing is over, operating AC
OUTLET and REMOTE OUTPUT is also over.
- If reserving AC OUTLET with the same time of
MELODY/VOICE reservation time, even when
melody is over, AC OUTLET and REMOTE
OUTPUT keep out.
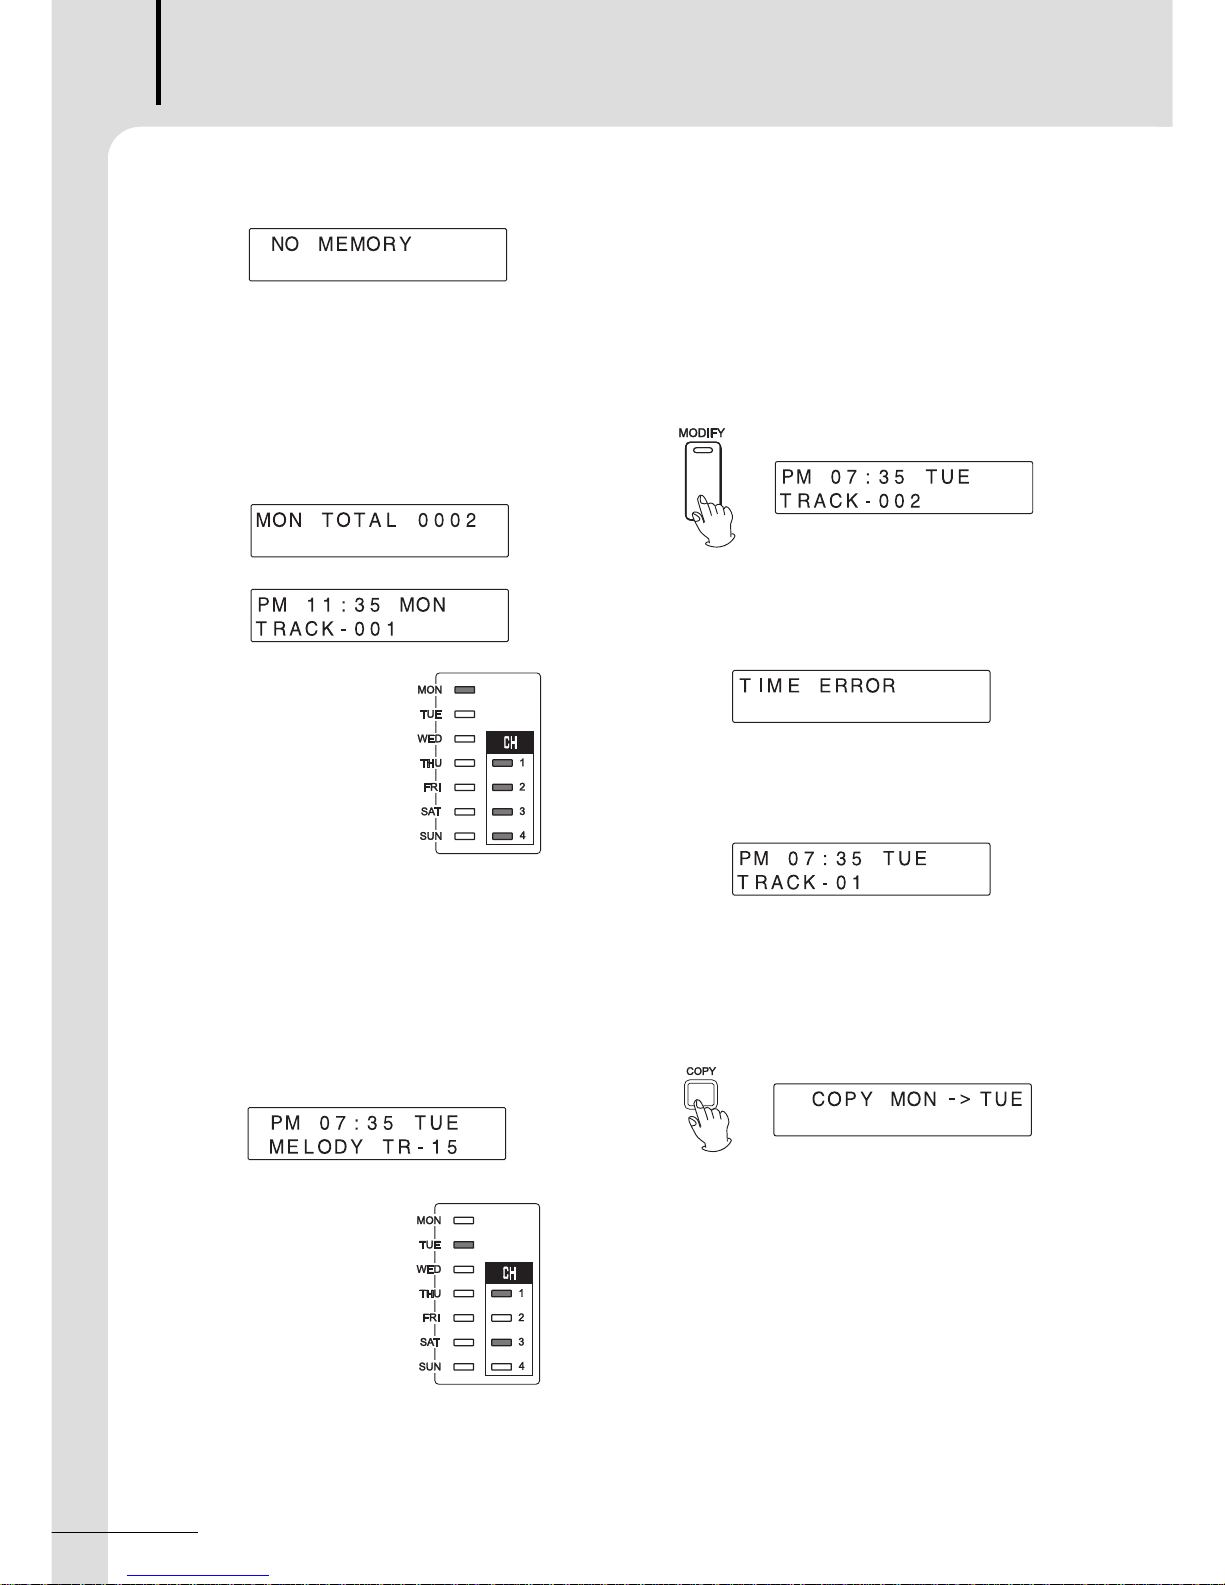
6. CHECKING THE RESERVATION DATA
When voice, melody, and AC data were reserved, able
to check as below, and if there was no memory,“NO
PROGRAM TIMER
IPT-8254 9

PROGRAM TIMER
10 IPT-8254
MEMORY”is showed on the screen.
1) Check the Voice reservation.
- Press VOICE button, then LED is illuminated while
saved data is showed on the screen from Monday.
At this time, if you want to check other reserved
data, you can check it in order of reserved time by
using DOWN/UP button, and also if you press
DOWN/UP button for a while, you can check the
data which was saved other date.
- LED indicator shows even
during researching.
2) Check the MELODY reservation.
- Press MELODY button, then LED is illuminated
while saved data is showed on the screen from
Monday.
At this time, if you want to check other reserved
data, you can check it in order of reserved time by
using DOWN/UP button, and also if you press
DOWN/UP button for a while, you can check the
data which was saved other date.
- LED indicator shows even
during researching.
- When checking AC
reservation data, start
it by pressing AC button.
Checking method is same
with above.
3) Press CANCEL button, then it returns to STAND-BY
mode.
7. MODIFY
Function to change the VOICE/MEDOLY/AC
reservation data.
1) Select the data which should be changed with
DOWN/UP button in reservation checking mode.
2) Press MODIFY button, and then it is changed to
MODIFY mode. At this time, desired LED of the
mode flickers and LED of MODIFY button turns on.
3) Press ENTER button after changing reservation time,
track, and channel, then it is saved and over.
4) If setting wrong reservation time, error message is
displayed on the screen.
5)Press the MODIFY button to move VOICE
reservation data to MELODY during modifying. To
move MELODY reservation data to VOICE, press
VOICE button.
8. MEMORY COPY
Function to copy the reserved data to other dates.
1) Press COPY button, then setting is ready.
2) Former date on the screen is original date and latter
date will be copied.
3) When former date flickers, select the desired date
with DOWN/ON button or DAY button.
4) Press COPY button again, then latter date flickers,
select the desired date with DOWN/ON button or
DAY button.
5) Press ENTER button after setting, then copy is done.

PROGRAM TIMER
IPT-8254 11
9. DELETE
Function to delete the reserved data.
1) Select the data which will be deleted among of
reserved data, and press DELETE button.
- If pressing DELETE button for a while, data deletion
screen is showed as below.
- If pressing DELETE button, all data of selected date
is eliminated.
2) Deletion of reservation data per day is shifted to
relevant mode by pressing DELETE button in
STAND-BY mode.
-Select the day with DAY button or UP/DOWN
button.
- Order of DAY button is MON →TUE →WED →
THU →FRI →SAT →SUN →ALL.
- DELEATE ALL erase all reserved data.
3) Press ENTER button, then all data of selected day is
eliminated.
10. AC OUTPUT TIME CONTROL
Function to release AC OUTLET and REMOTE
OUTPUT per setting time in advance before reserved
broadcasting.
With this function, when reserved broadcasting is out
without delay by operating connected unit in advance.
1) Keep pressing AC OUTLET button in STAND-BY
mode, then able to control AC OUTPUT time.
2) Enter AC power output time with numeric button.
3) Press ENTER button, then it is saved and over.
4) Available to set range of 1 to 20 seconds, and the
basic setting is 10 seconds.
11. ADJUST TIME CALIBRATION
Use this button when time is fast or slow.
1) Keep pressing TIME button for a while in STAND-BY
mode, then setting is available from now.
2) Enter setting data with numeric button.
- Available to set range from - 30 to + 30 and the
basic setting is - 8.
- Time is adjusted for 0.2 seconds per a day for each
stage.
3) +/- in front of number can be changed with TIME
button.(+ is to be faster and - is to be slower)
4) Press ENTER button, then it is saved and over.
12. KEY LOCK
1) Function to protect reserved data. Keep pressing
ENTER button for a while, the word,“KEY LOCK”is
showed on the screen shortly, and entry of all
function buttons is locked.
2)Press ENTER button again, the word,“KEY
UNLOCK”is showed on the screen shortly, and
entry of all function buttons is available.
13. OTHERS
1) Able to ON/OFF the AC power output with AC
OUTLET button.
-When you want AC power output, press AC
OUTLET button to turn on the LED.
2) When LED on OUTPUT button is off, if MELODY is
played, it does not come out. If you want sounding,
press OUTPUT button to turn on the LED.
- VOICE reserved broadcasting output always comes
out no matter what button is placed.

RACK Connection
PROGRAM TIMER
12 IPT-8254
●When you install this unit, use specified model only for our RACK.
●When you install this unit with other model not ours, use after checking the power capacity by our agency.
●Be sure to check the power capacity before use.
●Turn off the RACK POWER totally.
●Use AC and DC power properly according to the power source of other device you want to connect.
●When connecting AC power on the rear panel, connect and use it less than rated power.
(AC OUTLET 1< 500 W, AC OUTLET2 < 30 W)
Precaution to Install RACK

PROGRAM TIMER
IPT-8254 13
Block Diagram

Specifications
ELECTRICAL
Input (Balanced) 5 Channel
Output (Balanced) 4 Channel
Output Level 1.2V, Max
AC Power Outlet 1 500W, Max
AC Power Outlet 2 30W, Max
Melody Time 15 settings, Total 240 second
Operation Temperature -10℃~ +40℃
Storage Temperature -20℃~ +60℃
GENERAL
Power Source AC 100V - 120V, 220V- 240V, 50/ 60Hz, DC 24V
( Supplied AC main transformer depends on country requirements)
Power Consumption 10W
Weight 4.6kg
Dimension 482(W) x 88(H) x285(D)mm
※Specifications and design are subject to change without notice.
PROGRAM TIMER
14 IPT-8254

PROGRAM TIMER
IPT-8254 15
Service and Warranty
TO PURCHASE ADDITIONAL INKEL PA. GEAR AND ACCESSORIES
To purchase INKEL PA gear and optional accessories, contact any authorized INKEL PA distributor.
For a list of INKEL PA distributors please visit our website at www.inkelpa.com.
SERVICE AND REPAIR
For replacement parts, service and repairs please contact the INKEL PA distributor in your country.
INKEL PA does not release service manuals to consumers, and advice users to not attempt any self repairs, as doing
so voids all warranties.
You can locate a dealer near you at www.inkelpa.com.
WARRANTY INFORMATION
Warranty terms and conditions vary by country and may not be the same for all products.
Terms and conditions of warranty for a given product may be determined first by locating the appropriate country which
the product was purchased in, then by locating the product type.
To obtain specific warranty information and available service locations contact INKEL PA directly or the authorized
INKEL PA distributor for your specific country or region.
CUSTOMER SERVICE AND TECHNICAL SUPPORT
We encourage you to visit our online help and support at http://www.inkelpa.com.
There you can find answers to frequently asked questions, tech tips, downloads, returns instruction and other helpful
information.
We make every effort to answer your questions within one business day.

Table of contents