Inmarsat IsatPhone User manual

The mobile satellite company™
IsatPhone
User guide

2 Welcome
Welcome
IsatPhone is Inmarsat’s new mobile satellite phone service,
providing a simple, highly affordable way of staying in
touch.
IsatPhone offers:
• Lightweight,pocket-sizedhandset.
• Ruggeddesign.
• Dualmodesatellite/GSM900mobilephone.
• Easytouse,icon-drivenmenu.
• Fullrangeofaccessories.
This user guide explains in detail how to set up, connect,
personalise, and use your phone.

Contents 3
Contents
Before you start 05
Package contents 05
Subscriptions and SIM cards 05
Connecting to the Inmarsat satellite/GSM 06
About this guide 06
Further details and support 06
Setting up your IsatPhone 07
Installing the SIM card 07
Installing the battery 09
Installing the antenna 12
Turning the phone on and off 14
Connecting to the network 15
Connecting to the satellite 15
Viewing satellite indicators 19
Positioning the antenna 20
Selecting or checking the channel number 23
Search options 24
Making and receiving calls 25
Making a call 25
Receiving a call 27
Navigating the menu system 27
Menu mode 28
Menu keys 28
Initial phone settings 29
Master reset 29
Locking and unlocking your phone 29
Setting phone numbers 30
Displaying phone numbers 30
Setting satellite antenna pointing 31
Personalising your phone 32
Setting time and date 32
Setting the alarm 33
Selecting ring type 34
Composing your own melody 34
Changing the earpiece volume 36
Setting handsfree volume 36
Changing the greeting text 36
Setting the minute minder 37
Changing the display backlight 37
Setting the ring signal level 38
Setting the key sound preference 49
Supplementary services 40
Returning a call 40
Re-dialling a number 40
Clearing call memory 41
Displaying missed calls 42

4Contents
Hiding or showing your number 42
Changing the function during a call 43
Using the display as a scratch pad 44
Sending tone signals 44
Call forwarding (call divert) 45
Setting up call waiting 46
Setting up conference calls 49
Setting up call barring 51
Setting up call ID 51
About voicemail 52
Displaying call time information 52
Using the calculator 53
Selecting answer mode 53
The phone book 54
Before you start 54
Using phone book memories 54
Entering characters 54
Creating your personal phone book 55
Recalling a phone number 57
Communicating via modem 62
Making data calls 62
Communicating via modem-satellite mode 63
Using the GSM service 64
Setting GSM search preferences 64
Selecting answer mode 65
Setting next call type 66
Checking GSM call cost 67
Sending and receiving text messages 67
Using the phone memories 67
Sending, receiving and managing messages 69
Security 73
Using the SIM card lock 73
Using the phone lock 77
Using the key lock 78
Using the calling card security 78
Guidelines for safe and efcient use 79
Indicators in the display 84
List of terms 85
Channel number map 86

Before you start 5
Before you start
Package contents
When you unpack the Inmarsat IsatPhone, make sure you have the
following:
• IsatPhonehandset
• Antenna
• ACpoweradapterandcables
• Powercords(European,US,British)
• Wiredhands-freeunit
• Slimbatterypack
• Quickstartguide
• Channelnumberlabel
The following are optional accessories that you may choose to include
in the package:
• Sparechargerandcable
• SoftGSMmodemwithUSBconnector
• IsatPhonehandsetholder
• IsatPhoneindoorkit
• IsatPhonecarkit
Subscriptions and SIM cards
Before you can use your phone you must obtain a subscription
and SIM card from a service provider. The services included in your
subscription depend on your choice of subscription – contact your
service provider for details.

6Before you start
Connecting to an Inmarsat satellite/GSM
Your phone operates in either ‘SAT’ (Inmarsat satellite) mode or ‘GSM’
mode, depending on which satellite network you are using.
• YoumustuseanInmarsat-provisionedSIMcardtoaccessthe
Inmarsat satellite network. An Inmarsat-provisioned SIM card
cannot be used on a GSM network.
• YoucanuseanyvalidGSMSIMcardtoaccesstheGSMnetwork.
A GSM SIM card cannot be used on the Inmarsat satellite network.
About this guide
This guide focuses on the use of the IsatPhone on the Inmarsat satellite
network. Refer to ‘Using the GSM service’ on page 65 for details on
using a GSM SIM card in the IsatPhone.
The following conventions are used in this guide:
• LettersinBold indicate a menu, function or key.
• Theslashcharacter(/)isusedtoseparatemenusfromsub-menus.
For example, Networks/New search indicates that you should
select the Networks menu option and then New search in the sub-
menu.
• Textwithinbrackets()indicatesthecurrentsettingforthefunction
displayed; < and > indicates that you can scroll through more options.
• Theterm‘select’meansmovetothespeciediteminthemenuor
sub-menu, and press the YES key.
Further details and support
If you experience problems whilst using your IsatPhone, contact your
service provider for customer support.
In an emergency, the Inmarsat Customer Services Technical Helpdesk
is available to assist.
To contact Inmarsat customer services:
Tel: +44 (0)20 7728 1300
Email: [email protected]
Fax: +44 (0)20 7728 1142

Setting up your IsatPhone 7
Setting up
your IsatPhone
Beforeyoucanuseyourphoneforthersttime,youshould
do the following:
1. Install the SIM card if it is not already installed.
2. Install the battery and charge the battery.
3. Attach the antenna.
These three steps are described in further detail below.
Installing the SIM card
If you purchased your phone from your network service provider, the
SIM card may already be installed. If not, you must install it before you
can use your phone.
The SIM card that comes with your subscription is about the size
of a postage stamp (sometimes, service providers provide you with a
larger card, containing a smaller, postage stamp-sized SIM card that
you can punch out).
Opening the SIM card holder
To open the SIM card holder, remove the battery, if attached, then:
1. Release the SIM card holder
by sliding it towards the top
of the phone.
2. Fold out the holder as shown.

8Setting up your IsatPhone
Inserting the SIM card
To insert the SIM card:
1. Hold the SIM card with the
angled corner at top
right. The metal contact strip
should be facing downwards
towards the metal contacts in
the phone.
2. Slide the card into the holder.
3. Fold down the holder.
4. Lock the holder by pressing it
down and sliding it towards
the bottom of the phone.
Setting up your IsatPhone 9
Installing the battery
Your IsatPhone comes with a nickel metal hydride (NiMH) battery.
The battery is not charged when you purchase the phone, but there may
be enough power to turn the phone on. You will need to charge the
battery after you attach it to the phone. See ‘Charging the battery’ on
page 11.
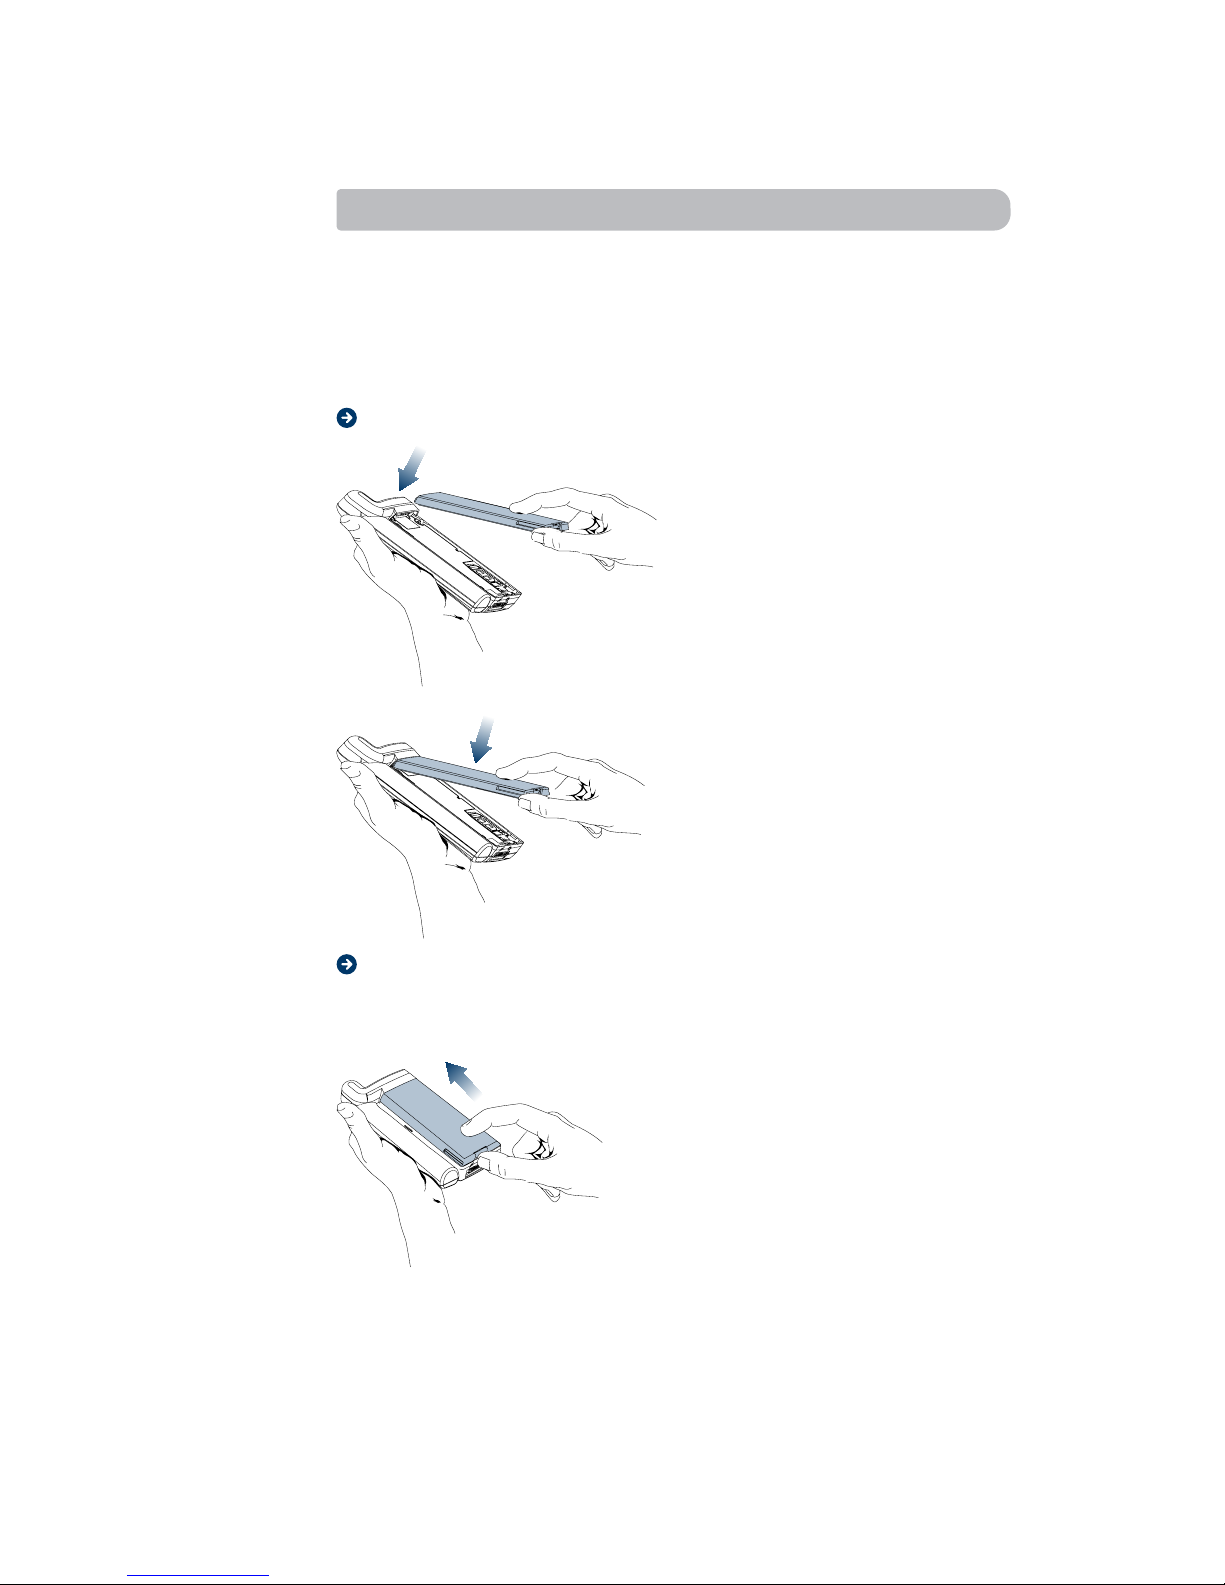
Attaching the battery
1. Place the battery on the back
of the phone.
2. Press the battery forward and
down until you hear a click.
Removing the battery
Make sure that the phone is turned off before removing the battery,
and then:
1. Press the battery forward.

10 Setting up your IsatPhone
2. Lift the battery up and away
from the phone.
Charging the battery
The phone comes with an AC battery charger. Inmarsat recommends
that you charge the battery overnight before using your phone for
thersttime.
Attaching the AC charger
Follow these steps to connect the charger:
1. If applicable, connect the
plastic plug on the power
cable to the charger.
2. Connect the charger to
the socket.
3. Connect the other end of
the charger to the phone.
Note: The flash symbol on the plug must face upwards. You may have
to press hard.
The battery starts charging as soon as you attach the charger (a green
indicator on the phone lights up). If it does not, disconnect the charger
from the phone and try attaching it again, pressing hard. You should
hear a click.

Setting up your IsatPhone 11
You can charge the phone when it is on or off.
• Ifachargerisattached,butthephone
turned off, the message Charging
Battery Only is displayed.
• Ifthephoneison,thedisplaywill
continue to operate normally.
Charging is indicated by the following:
• Thebatterymeterinthedisplayshowslllevel.
• Theindicatorontopofthephoneshowsasteadyredlightifthe
phone is off, and green if the phone is on.
When the battery is fully charged, the
battery meter in the display shows full
and the indicator on top of the phone
shows a steady green light.
It is possible to use the phone while the battery is being charged.
However, the charging time is increased.
Disconnecting the charger
1. Disconnect the charger from
the electrical socket.
2. Lift the plug connected to the
phone upwards and pull it out.
12 Setting up your IsatPhone
When to charge the battery
The nickel metal hydride (NiMH) battery that comes with your
phone can be charged as often or as long as you wish without
losing performance.
Note: For optimal talk and standby time, Inmarsat recommends that
you use only nickel metal hydride (NiMH) batteries with your phone.
When the battery needs charging, the phone gives the following
indications:
• Analarmsignal(alongbeep)soundsandthemessageBattery low
appears for ten seconds in the display.
• Theindicatorlightontopofthephonestartstoblinkred.
• Thealarmmaysoundagainafter10minutes,depending
on the battery type and how fast it is being discharged.
Low battery alarm
When the battery has discharged, the low battery alarm sounds, then
the phone automatically shuts off. You might be able to turn the phone
on again, but you cannot make or receive any calls until the battery has
been charged, or replaced with a charged one.
Installing the antenna
The supplied antenna can be used to connect to either the Inmarsat
I-4 satellite (with an Inmarsat SIM card), or a GSM network (with a GSM
SIM card).
Attaching the antenna
To attach the antenna:
1. Place the phone in front
of the antenna.

Setting up your IsatPhone 13
2. Press together as shown.
You hear a click when the
two are attached properly.
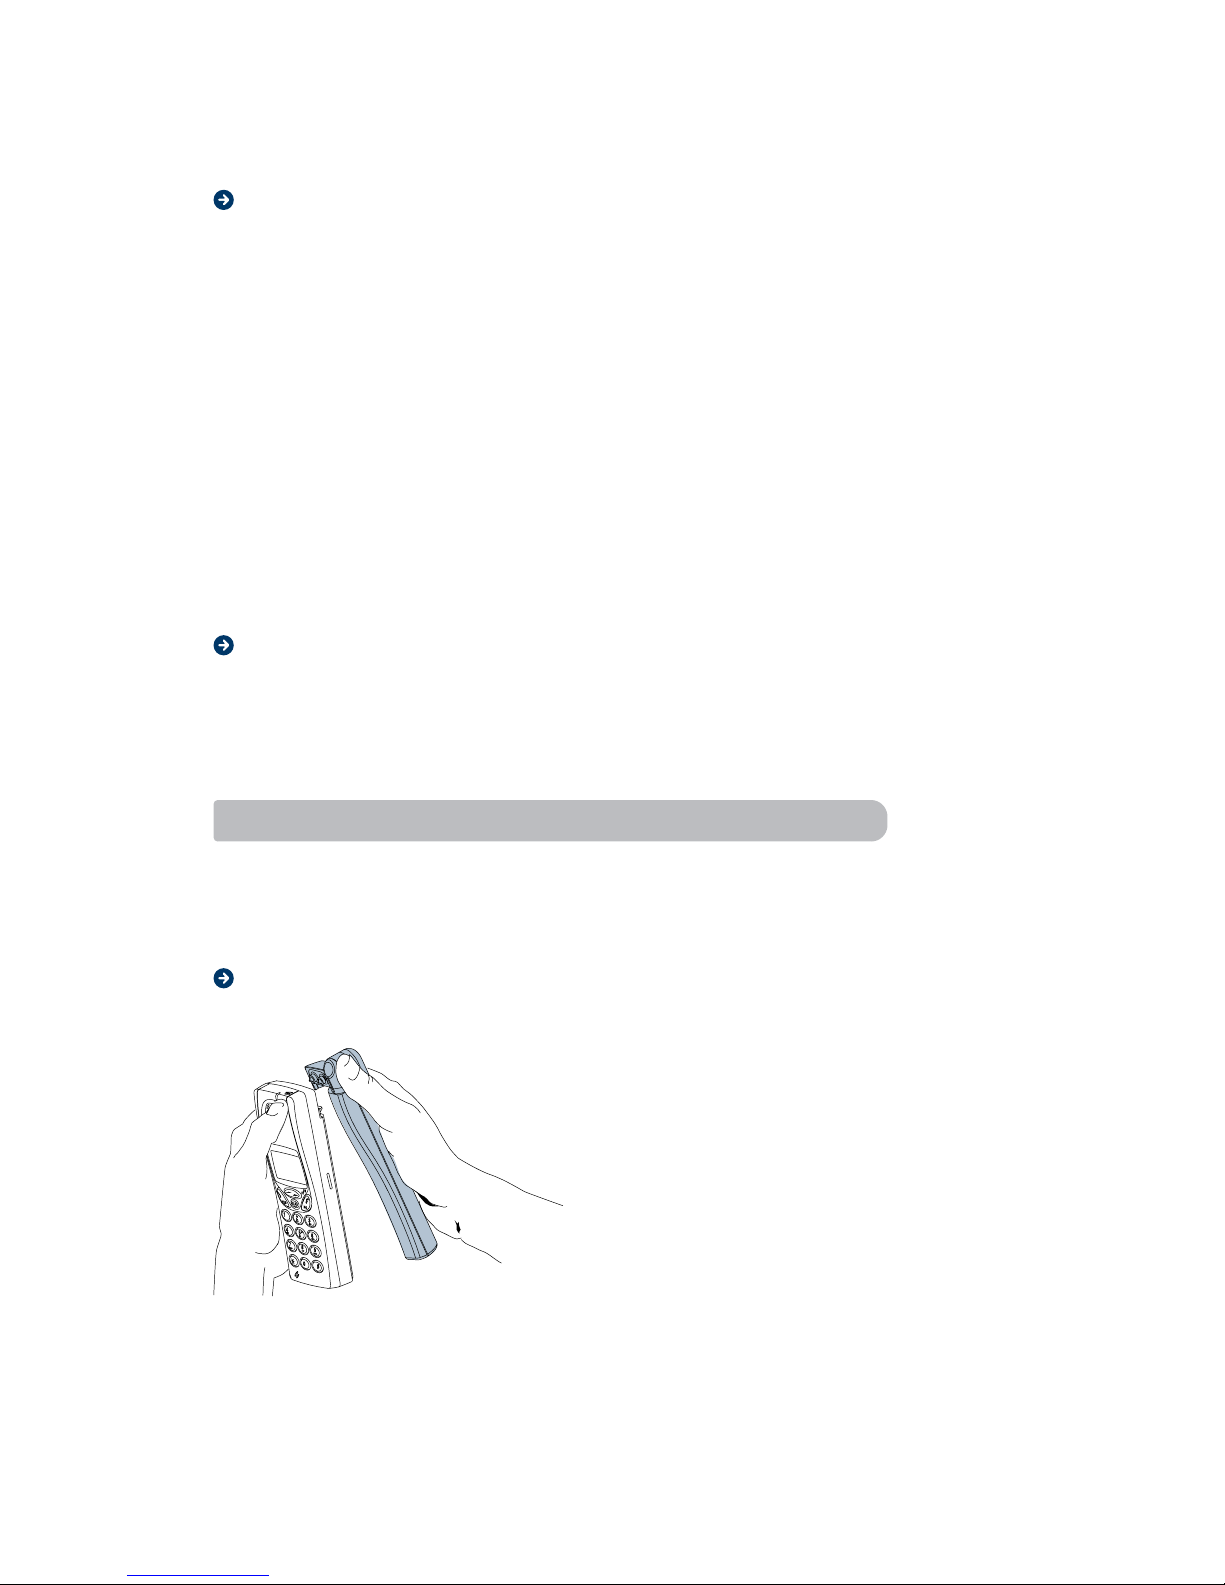
Removing the antenna
To remove the antenna from your phone (for storage or shipping),
do the following:
1. Grasp the phone with
both hands.
2. Place your right thumb on the
lower part of the antenna.
3. Press back on the antenna.
4. Lift off the antenna with a slight
rotation from bottom to top.
Note: Damage will occur if the
antenna is removed incorrectly.
14 Setting up your IsatPhone
Turning the phone on and off
Note:Thersttimeyouturnyourphoneon,orthersttimeyouturnon
your phone after inserting a new SIM card, you have to enter the PIN
(SIM lock code) given to you by your network service provider.
You may change your PIN or turn the SIM lock off. See ‘Locking the
SIM card’ on page 75 for instructions.
Note: If you see the message SETUP NEW SIM - ACeS Subscription?,
after entering a new SIM card, press the NO key.
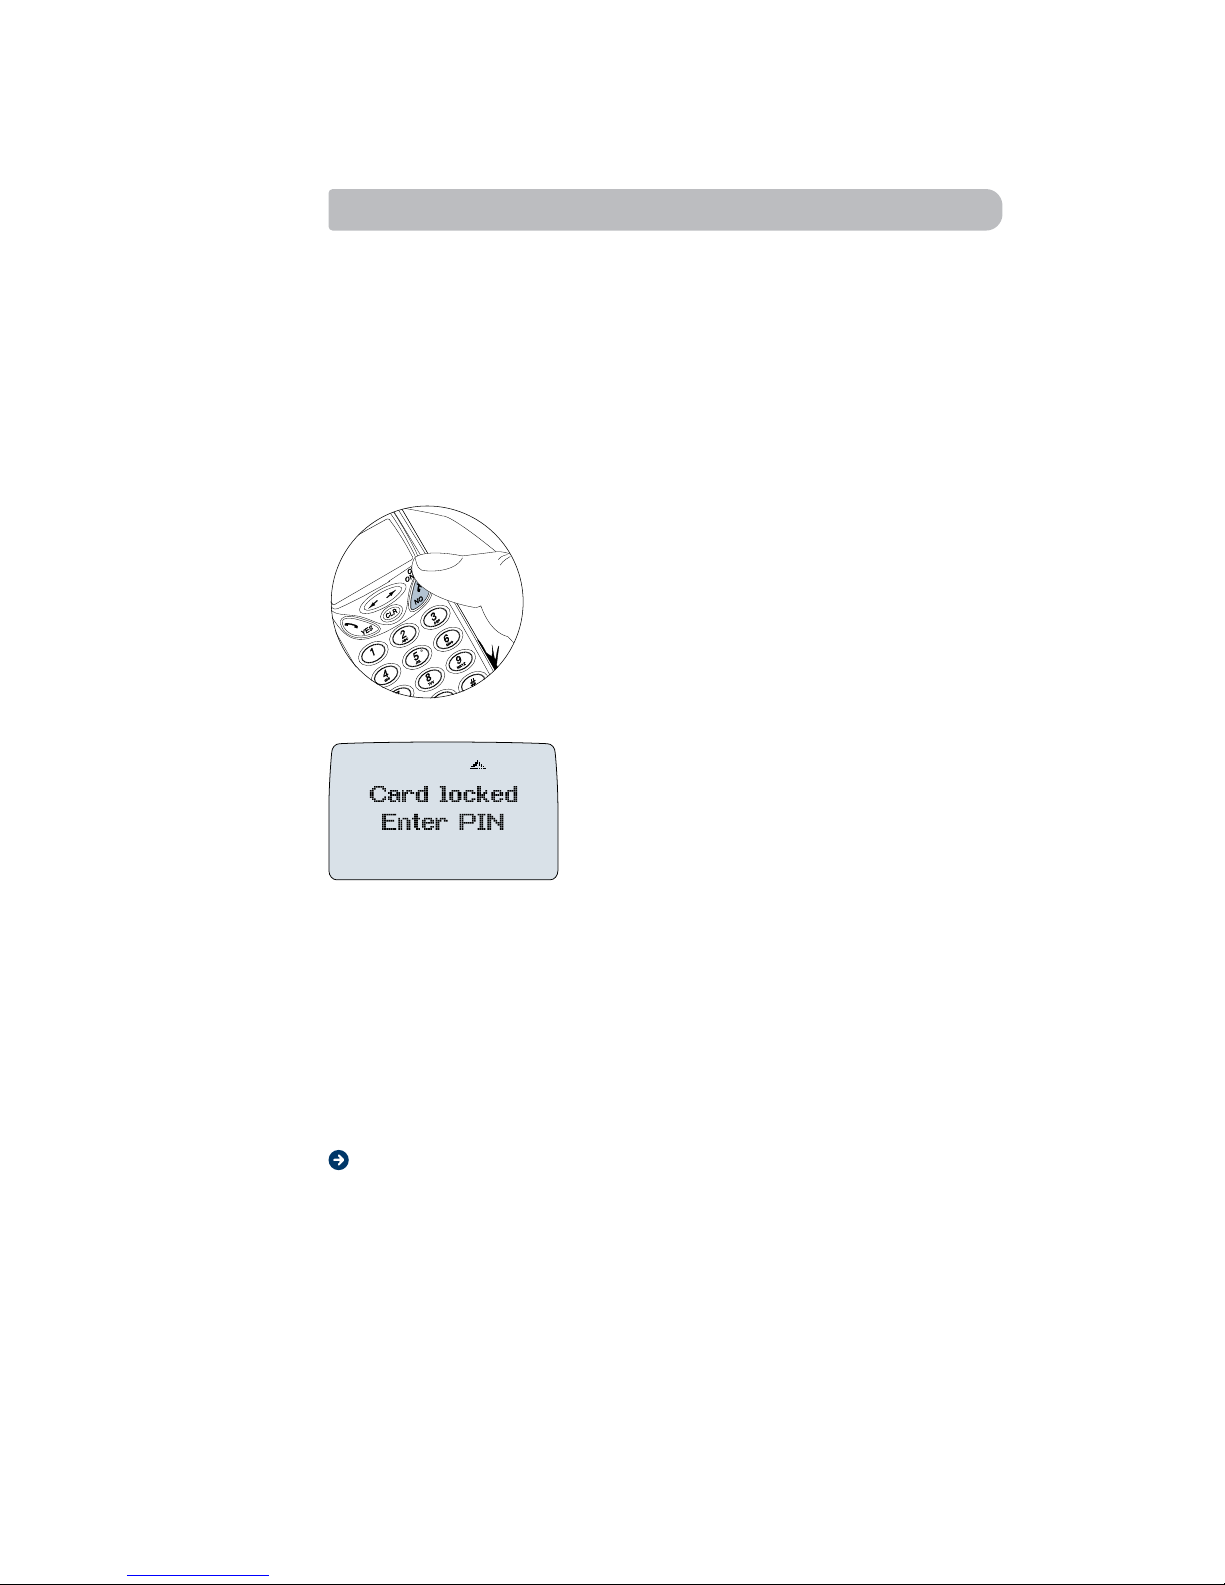
To turn the phone on:
1. Press and hold down the NO
(on/off) key for 3-5 seconds
until you hear a click and the screen
is activated.
Note: If you see the message Insert
card, you must insert a SIM card. Refer
to “Installing the SIM card” on page 8.
The message shown on the
left displays.
2. Enter your PIN (if set up). The digits appear as stars (*) in the
display. If you make a mistake while entering your PIN, delete
the wrong digit by pressing the CLR key.
3. Press YES.
If you enter your PIN correctly, you see a greeting text.
To turn your phone off, press and hold the NO (on/off) key
until the display is turned off.
SIM card rejected
Your SIM card may be rejected by the phone if you are operating
in satellite mode and a faulty SIM card is installed. Contact your service
provider.

Connecting to the network 15
Connecting
to the network
Connecting to a satellite
To connect your IsatPhone to a satellite:
1. Make sure you are in the I-4 satellite coverage area
(shown on the coverage map at the back of this guide).
Note your position relative to the closest satellite (as indicated on the
coverage map); this will help you to point the antenna.
2. Stand in an open area, free from obstructions such as buildings,
trees or mountains.

16 Connecting to the network
3. Turn on the IsatPhone by pressing and holding the NO (On/Off) key
for 3-5 seconds, until you hear a click and the screen is activated.
If prompted to enter a PIN, enter the PIN provided by your
service provider.
Note: The Inmarsat default PIN is 8888.
4. Raise the antenna and point it in the direction of your chosen
satellite, using the coverage map for guidance.
To do this, angle the phone
antenna in the direction of the
satellite.
If you are closer to the centre
of the satellite’s coverage area
than the edge, point the antenna
directly upwards, as shown left:
If you are closer to the edge of
the satellite’s coverage area than
the centre, angle the phone
and antenna at 45º towards the
satellite, as shown left:

Connecting to the network 17
The IsatPhone now searches for the satellite automatically.
As the search progresses, monitor the screen until the signal bars
indicate good signal strength (at least two bars), and the full circle
symbol displays .
Wait until SAT is displayed, as shown below
(this may take up to 2 minutes):
The IsatPhone is now ready to make and receive calls.
Note: If you see any other screen during pointing,
refer to ‘Viewing satellite indicators’ on page 20.
Tip: Inmarsat recommends you use the supplied handsfree unit
to make and receive calls. This makes it easier for you to keep
the antenna pointed in the direction of the satellite.
18 Connecting to the network
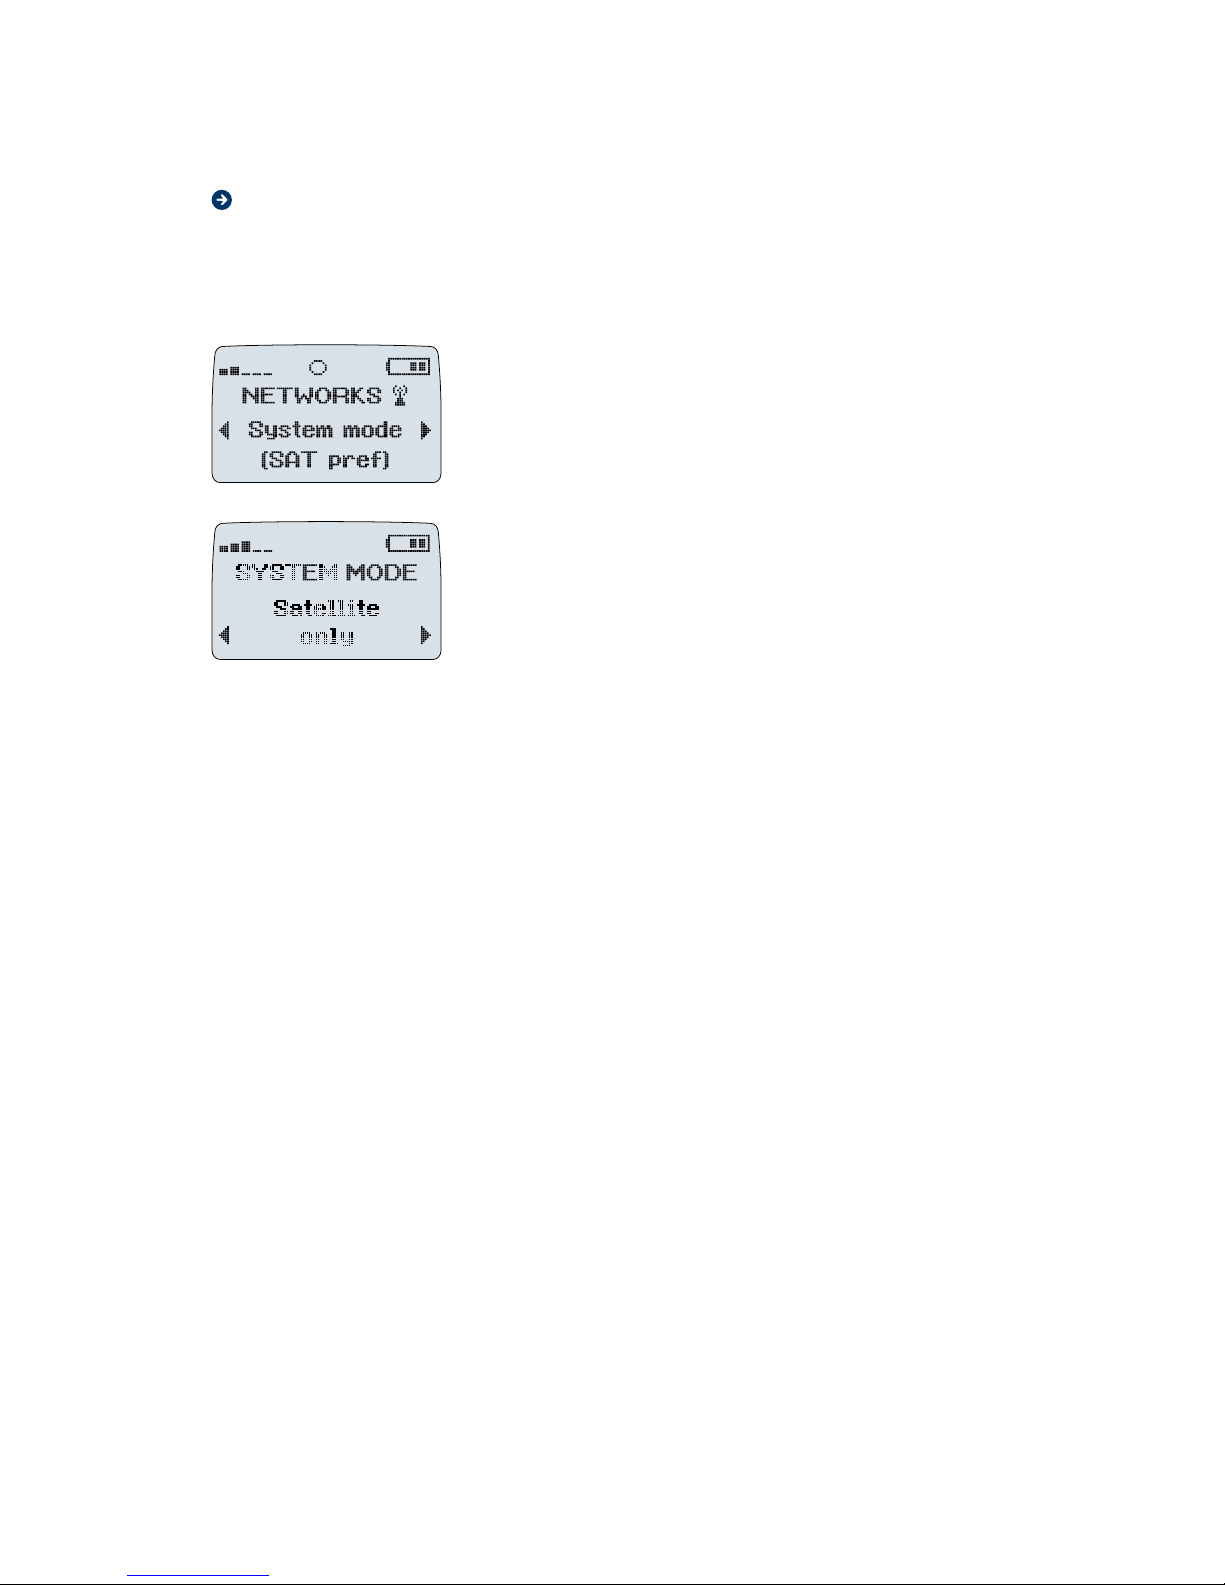
Changing the satellite search mode
If the message SearchingGSM displays after SearchingSAT short, the
IsatPhone was unable to locate the Inmarsat satellite and is trying to
locateaGSMnetwork.Ifyouseethismessage,congureyourphone
to search for the I-4 satellite only. To do this:
1. Use the up and down arrow keys
to scroll through the menus to
NETWORKS/System mode/
<current setting>, and press YES.
2. Select SYSTEM MODE/Satellite only,
and press YES to store the setting.
3. Re-point the antenna as described in ‘Connecting to the satellite’.
Note: Similarly, if you are using a GSM SIM card and the message
SearchingSAT short displays, the IsatPhone was unable to locate a
GSM network and is searching for the I-4 satellite. Follow steps 1-3
above, and select GSM only at step 2.
Note that you can set your phone to search in one of four modes:
• Satellite pref: This is the default. In this mode, the IsatPhone searches
rstfortheInmarsatsatellite.Ifitdoesn’tndthesatellite,ittriesto
search for a GSM network. Note, however, that your IsatPhone will
not connect to a GSM network unless it has a GSM SIM card installed.
• Satellite only: Searches only for the Inmarsat satellite network.
Select this mode to speed up the satellite search.
• GSM pref: Select this mode if you have a GSM card installed. In this
mode, the IsatPhone searches for a GSM network. If none is found,
it tries to search for the Inmarsat satellite. Note, however, that your
IsatPhone will not connect to the Inmarsat satellite unless it has an
Inmarsat-provisioned SIM card installed.
• GSM only: Searches only for a GSM network. Select this mode
to speed up the search for a GSM network.
To set your phone to one of these modes:
1. Select Networks from the menu.
2. Select System mode from the options.
3. Scroll to the mode you want to set your phone to and press YES.
Connecting to the network 19
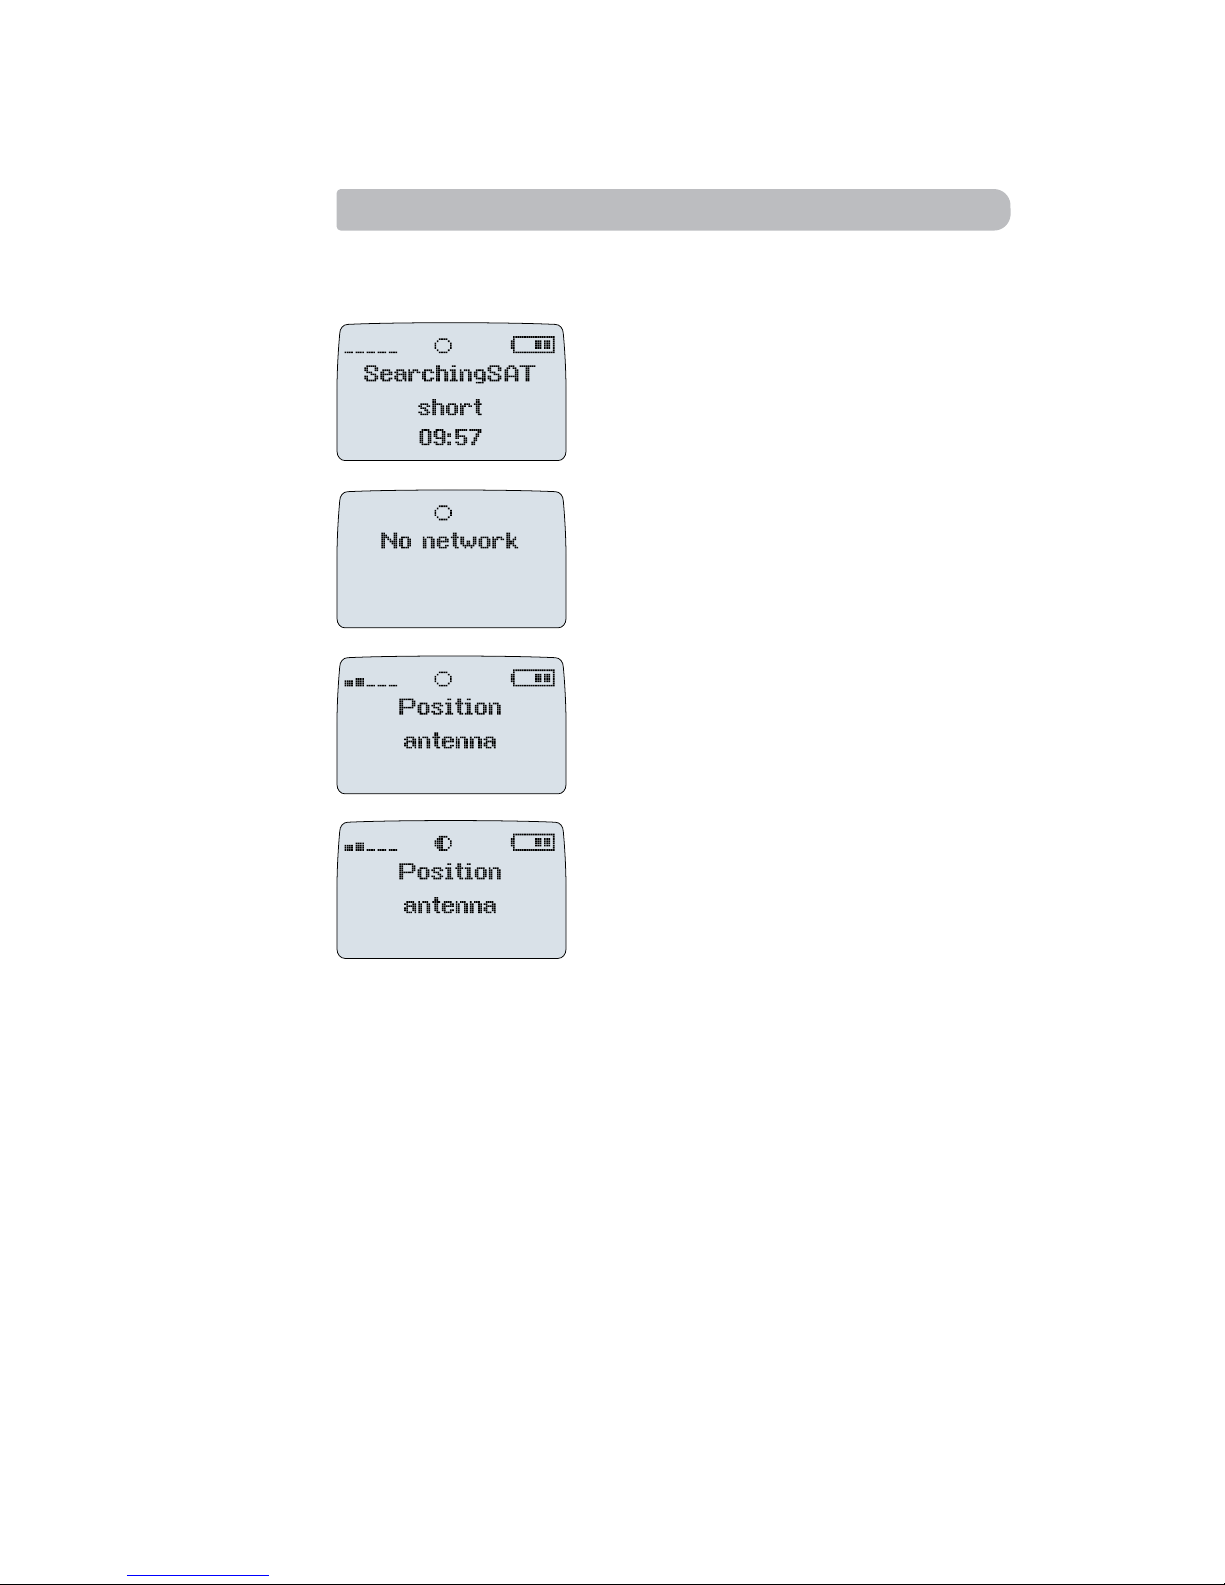
Viewing satellite indicators
The following are the satellite service indicators that can display if the
IsatPhone does not connect to the required satellite:
• IfthemessageSearchingSAT short
displays for more than two minutes,
and the signal strength indicator
shows no signal, you must re-point
the antenna.
• Anemptycirclewiththemessage
No network indicates limited or no
satellite service.
• Anemptycirclewiththemessage
Position antenna indicates that
you should position the antenna to
obtain a better signal and full satellite
service for both making and receiving
calls.
• Ahalfcirclewiththemessage
Position antenna indicates that
you should position the antenna
to obtain a better signal and full
satellite service for both making
a receiving calls.
Note:Youmightreceivenotication
of an incoming satellite call
when a half circle displays, but will
not be able to receive the call.
Refer to ‘Point antenna to receive a
call’ on page 22 for details.
If you see any of the screens shown above, do the following:
• Re-pointtheantenna,asdescribedin‘Pointingtheantenna’on
page 21. If you still do not receive a full strength satellite signal:
• Enterachannelnumber,asdescribedin‘Selectingorcheckingthe
channel number’ on page 24.

20 Connecting to the network
Pointing the antenna
If you do not have a strong enough satellite signal:
• Checkthatyourcurrentlocationiswithinthecoverageareaofthe
I-4 satellites, shown on the coverage map at the back of this guide.
• Checkthatyouareinanopenareafreefromobstructions.
• Re-point,usingthecoveragemapforguidance.
If you still do not get a satellite signal, refer to ‘Selecting or checking
the channel number’ on page 24.
Pointing from the edge of the coverage area
If you are closer to the edge of the satellite’s coverage area than the
centre, angle the phone and antenna at 45oand point as described in
‘Connecting to the satellite’ on page 16.
If you do not know the exact location of the satellite, point the phone
in the approximate direction and hold for at least two minutes,
monitoring the signal strength indicator. If the phone continues to
display SearchingSAT short and shows no signal strength after two
minutes, rotate the phone antenna 90oand repeat the process.
Continue until the signal strength indicator shows a signal.
If no signal is shown after you have turned through 360o, refer to
‘Selecting or checking the channel number’ on page 24.
Other manuals for IsatPhone
3
Table of contents
Other Inmarsat Marine GPS System manuals

Inmarsat
Inmarsat IsatPhone 2 Assembly instructions

Inmarsat
Inmarsat B-M-C User manual

Inmarsat
Inmarsat LandPhone User manual

Inmarsat
Inmarsat IsatPhone Pro Installation guide

Inmarsat
Inmarsat IsatPhone Pro Installation guide

Inmarsat
Inmarsat LandPhone User manual

Inmarsat
Inmarsat IsatPhone 2 User manual

Inmarsat
Inmarsat GX-9 User manual

Inmarsat
Inmarsat IsatPhone 2 User manual

Inmarsat
Inmarsat IsatPhone 2 User manual


