Innova M Series User manual

ABM International, Inc. V1.0
Model: (M) Series User’s Manual
Proprietary information of ABM INTERNATIONAL, Inc. furnished for customer use only.
No other uses are authorized without prior written permission of
ABM INTERNATIONAL, INC.
1

ABM International, Inc. V1.0
Model: (M) Series User’s Manual
Proprietary information of ABM INTERNATIONAL, Inc. furnished for customer use only.
No other uses are authorized without prior written permission of
ABM INTERNATIONAL, INC.
2
Table Of Contents:
Figure 0.1- (M) 28 INNOVA on Pro-Frame with AutoPilot Mach 3
SECTION
HEADING
PAGE
1.0
Introduction
3
2.0
Safety
4
3.0
Machine Set-Up
6
4.0
Machine Operation
9
5.0
(M) Series Lightning Stitch User Manual
15
6.0
(M) Series Service Manual
33
7.0
(M) Series Parts Diagram
63
8.0
Basic Cleaning For Your INNOVA
65

ABM International, Inc. V1.0
Model: (M) Series User’s Manual
Proprietary information of ABM INTERNATIONAL, Inc. furnished for customer use only.
No other uses are authorized without prior written permission of
ABM INTERNATIONAL, INC.
3
Section 1: Introduction
ABM International would like to thank you for the purchase of an INNOVA
Long Arm Quilting Machine. ABM is confident that this machine will meet or
exceed your expectations.
If at anytime you experience problems with your ABM machine, we ask that
you contact us - 24 hours a day by calling our service department at (936) 441-
4401. We can help you solve the problem quickly, and correctly. Your calls,
questions, and comments will in turn help us to perfect the quality of our
products and services in the future.
Once again, we thank you for your purchase.
ABM International, Inc.

ABM International, Inc. V1.0
Model: (M) Series User’s Manual
Proprietary information of ABM INTERNATIONAL, Inc. furnished for customer use only.
No other uses are authorized without prior written permission of
ABM INTERNATIONAL, INC.
4
Section 2: Safety
1.0 Safety Introduction
ABM is dedicated to assuring your safe operation of the INNOVA quilting
machine. This section will alert you to many precautions that you can take to
help avoid unnecessary accidents. Though ABM cannot anticipate all actions
that may create an unsafe environment and we urge you to be aware, and
extremely careful when operating the INNOVA quilting machine.
It is imperative that the operating person of the INNOVA quilting machine
read and understand the information in this manual before operating the
machine.
1.1 Safety Policy Statement
The conservation of the assets of any home or business, which include the
personal belongings and supplies as well as persons therewithin, must be and
is the responsibility of the operator. All operators should recognize that
conservation of all property and persons should be at the forefront of their
thoughts and reasoning while using this machine.
Safety of persons in every aspect must be of first consideration. Exercising the
utmost precaution will help facilitate a safe quilt space and will prevent
potential injuries from occurring.

ABM International, Inc. V1.0
Model: (M) Series User’s Manual
Proprietary information of ABM INTERNATIONAL, Inc. furnished for customer use only.
No other uses are authorized without prior written permission of
ABM INTERNATIONAL, INC.
5
1.2 Safety Practices
The safety factors must be observed to ensure safe operation of the INNOVA.
Read and understand the operating instructions of the INNOVA before
operating.
Use extreme caution when working around the INNOVA electrical controls.
Keep hands or other body parts away from the moving parts of the INNOVA.
Wear appropriate personal safety protection.
Stop the INNOVA immediately at any sign of malfunction or danger.
Never lean on the INNOVA Quilting machine.
Do not use the INNOVA quilting machine as leverage to lift yourself off a chair.
Do not crawl under or into the INNOVA for any reason during the operation of
the machine.
Do not reach into the INNOVA at any time during the operation of the
machine.
Do not climb, walk, or stand on the INNOVA at any time.
Do not tamper with factory installed guards and or safety devices.
Never operate machinery without all ABM installed guards and safety devices
intact, and in working order.
Before starting the INNOVA, ensure that no loose tools, bars, or parts are lying
in or on any part of the machine.
Proper fire fighting equipment should be kept in good operating condition and
kept near in the event of fire.
Do not wear loose clothing or jewelry when operating the INNOVA.
Always keep hair from coming in contact with moving parts.

ABM International, Inc. V1.0
Model: (M) Series User’s Manual
Proprietary information of ABM INTERNATIONAL, Inc. furnished for customer use only.
No other uses are authorized without prior written permission of
ABM INTERNATIONAL, INC.
6
Section 3.0 – Machine Set-Up
The INNOVA ships fully tested and ready to operate. As a result, this manual
provides a section on machine setup so that you can install the machine.
Please read this manual in its entirety and follow all ABM instructions,
especially the inspections. Total setup time, excluding frame assembly, will
take approximately 3 hours.
SETUP INSTRUCTIONS:
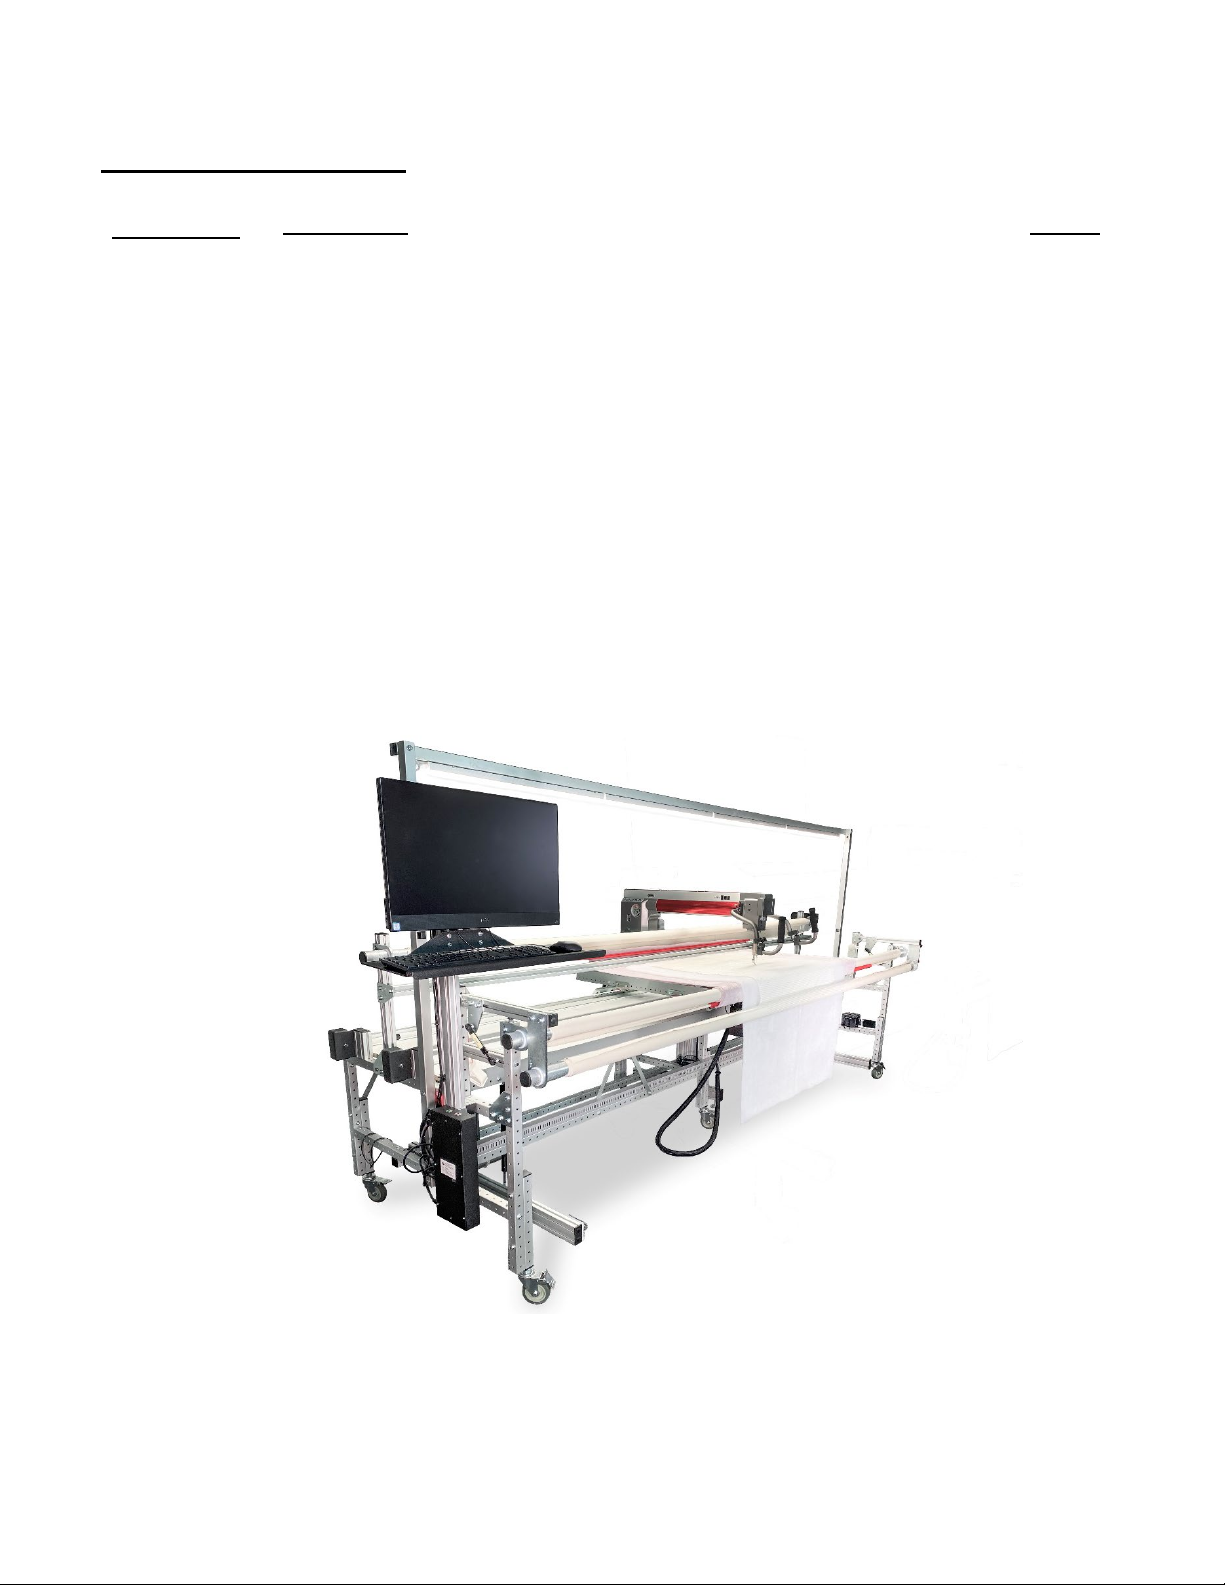
INSPECTION #1: Upon receipt of the machine, check to ensure that there is no
visible damage. Figure 0.1 and the front cover of this manual are enough for
this inspection. Note: Some components may be in different locations
depending on the version of the machine.
Determine the location in your home or business for the quilting machine.
Once a final position has been determined for the machine, plug it into your 3
prong AC outlet (NOTE: Machine is voltage specific 110-125 VAC 60Hz for
domestic or 220-240 VAC 50/60Hz for international.). The machine comes
wired with a voltage specific plug according to the original machine shipment
destination and should be plugged directly into the wall receptacle. Note: (M)
Series machines should NOT be plugged into a surge protector if an
Autopilot is installed.ABM does not recommend the use of any type of
extension cord to power the machine. However, if an extension cord is
required, please use a least a 12-gauge cord that is no longer than 8’. Coil any
excess cable and wire tie it to the table of the machine, which will reduce the
risk of a tripping hazard.
WARNING: RISK OF ELECTRICAL SHOCK. MAKE SURE THE OUTLET
BEING USED FOR THE INNOVA HAS A WORKING EARTH GROUND
CONNECTION. IF YOU ARE UNSURE, HAVE A QUALIFIED
ELECTRICIAN CHECK THE CIRCUIT. FAILURE TO DO SO MAY RESULT
IN SERIOUS INJURY OR DEATH.

ABM International, Inc. V1.0
Model: (M) Series User’s Manual
Proprietary information of ABM INTERNATIONAL, Inc. furnished for customer use only.
No other uses are authorized without prior written permission of
ABM INTERNATIONAL, INC.
7
INSPECTION #2: Will confirm that the electronics of the INNOVA long arm
quilting machine are functioning properly.
WARNING: ELECTRICAL SHOCK HAZARD. NEVER ATTEMPT TO
WORK ON OR OPERATE THE MACHINE WHILE THE ELECTRICAL
COVERS ARE REMOVED. WHENEVER REMOVING THE ELECTRICAL
COVERS PLEASE BE CERTAIN TO TURN-OFF THE MACHINE AND
UNPLUG THE POWER RECEPTICAL.
Upon power up, the lightning touchscreen should power up. If this does not
occur, check for incoming voltage at the outlet.
WARNING – WHEN OPERATING THE MACHINE, YOU MUST ENSURE THAT
THERE ARE NO LOOSE ITEMS SUCH AS TOOLS, FOOD, DRINKS, ETC. ON THE
MACHINE AND THAT ALL PERSONS ARE CLEAR OF THE MACHINE.

ABM International, Inc. V1.0
Model: (M) Series User’s Manual
Proprietary information of ABM INTERNATIONAL, Inc. furnished for customer use only.
No other uses are authorized without prior written permission of
ABM INTERNATIONAL, INC.
8
Final Test:
Inspect the front of the machine and ensure that the sewhead is free of
obstructions.
Step 1: Press and release the (Red) left hand button and the needle will move
to the up position.
Step 2: Press and release the (Red) left hand button again and the needle will
move to the down position.
Step 3: Press and release the (Green) right hand button and the sewhead will
start to run
Step 4: Press and hold the (Green) right hand button and the sewhead will
increase sewing speed.
Step 5: Press and hold the (Red) left hand button and the sewhead will
decrease sewing speed.
Step 6: Press and release the (Green) right hand button again and the
sewhead will stop.
Setup and inspection are now complete.

ABM International, Inc. V1.0
Model: (M) Series User’s Manual
Proprietary information of ABM INTERNATIONAL, Inc. furnished for customer use only.
No other uses are authorized without prior written permission of
ABM INTERNATIONAL, INC.
9
Section 4.0 – Machine Operation
This section will discuss how to properly use your INNOVA M Series machine
to fulfill all your quilting needs.
4.1 Rotating the Sewing Head
ABM has equipped the INNOVA with an industry “exclusive” rotating sewhead
for ease of material, head, and roller removal, as well as ease of sewing
machine maintenance. To properly rotate the head, follow these easy steps:

ABM International, Inc. V1.0
Model: (M) Series User’s Manual
Proprietary information of ABM INTERNATIONAL, Inc. furnished for customer use only.
No other uses are authorized without prior written permission of
ABM INTERNATIONAL, INC.
10
4.2 Rotating the Sewing
Head Back

ABM International, Inc. V1.0
Model: (M) Series User’s Manual
Proprietary information of ABM INTERNATIONAL, Inc. furnished for customer use only.
No other uses are authorized without prior written permission of
ABM INTERNATIONAL, INC.
11
4.2 Rotating the Sewing Head Back(Cont.)

ABM International, Inc. V1.0
Model: (M) Series User’s Manual
Proprietary information of ABM INTERNATIONAL, Inc. furnished for customer use only.
No other uses are authorized without prior written permission of
ABM INTERNATIONAL, INC.
12
4.3 Installing the Extension Plate

ABM International, Inc. V1.0
Model: (M) Series User’s Manual
Proprietary information of ABM INTERNATIONAL, Inc. furnished for customer use only.
No other uses are authorized without prior written permission of
ABM INTERNATIONAL, INC.
13
4.4 Threading the Sewing Head
1. Pull thread from cone
2. Pass thread through upper thread guide
on motor cover. MAKE SURE THE THREAD
GUIDE IS POSITIONED DIRECTLY
OVER THE CENTER OF THE CONE OF THREAD.
3. Pass thread through upper hole of thread
post. Thread should go through the hole
from the right to the left.
4. Bring thread around the post and back
into the bottom hole of thread post. Thread
should go through the hole from right
to left.
5. Pass thread through the upper thread
guide of the pre-tension.
6. Bring the thread clockwise around the
pre-tension discs and pass through the lower
thread guide hole of the pre-tension.
NOTE: DO NOT WRAP THE THREAD COMPLETELY
AROUND THE DISC. THE THREAD SHOULD TRAVEL
FROM THE TOP HOLE TO THE BOTTOM HOLE AND
PASS THROUGH THE DISCS ON THE RIGHT SIDE
ONLY.
7. Pass the thread through thread guide
8. Wrap the thread completely around the rotary tension
assembly TWICE - clockwise. Pass thread over check spring.
NOTE: OIL FELTS ON ROTARY TENSION TO ENSURE
SMOOTH MOVEMENT.
9. Pass the thread through thread guide
10. Pass the thread through the take-up finger. Make sure thread
runs from right to left.
11. Pass thread through thread guide.
12. Pass thread through thread guide located on the Spectre LED.
13. Pass thread through thread guide at the bottom of the needle
Bar bushing.
14. Pass the thread through the needle bar thread guide located
on the end of the needle bar.
15. Insert thread through the eye of the needle from left to right. Pull
thread to check for proper threading. As the thread is pulled through
the needle, the check spring #8 should move and thread should pull from the cone #1.

ABM International, Inc. V1.0
Model: (M) Series User’s Manual
Proprietary information of ABM INTERNATIONAL, Inc. furnished for customer use only.
No other uses are authorized without the prior written permission of
ABM INTERNATIONAL, INC.
14
4.5 Changing the Bobbin
Remove the old bobbin and press in the new bobbin. Inset the bobbin making sure it turns clockwise
when the thread is pulled (viewed from the bobbin side). Pull the loose thread up and under the
guide into the case. Route the thread under the tension spring, and through the guide hole. Place the
loose thread through the case slot.
Now press the case back into the hook and listen for the latch clicking into place.
You are now ready to begin sewing.

ABM International, Inc. V1.0
Model: (M) Series User’s Manual
Proprietary information of ABM INTERNATIONAL, Inc. furnished for customer use only.
No other uses are authorized without the prior written permission of
ABM INTERNATIONAL, INC.
15
4.6 INSTALLING LEADERS
Do not wash or steam iron these leaders. The canvas is not pre-shrunk.
Find the edge of the leaders that isn’t hemmed. The hemmed edge is for
pinning fabric or inserting Red Snappers™. Using the weld seam as a straight
edge guide, tape the non-hemmed edge of the leaders to the bars along the
entire length. The Take-Up and Back leaders will fall off the bars to the back
side, while the Top leader will fall off the bar to the front side. See
illustrations below.

ABM International, Inc. V1.0
Model: (M) Series User’s Manual
Proprietary information of ABM INTERNATIONAL, Inc. furnished for customer use only.
No other uses are authorized without the prior written permission of
ABM INTERNATIONAL, INC.
16
4.7 LOADING THE FABRIC AND BATTING
1. Measure the quilt back and quilt top and prepare the batting. Batting and
backing should be larger than the quilt top by 3 inches in every direction.
2. Assess which direction to load the quilt for efficient quilting(top/bottom).
3. Place a pin at the center top and bottom edge of the quilt top.
4. Place a pin at the center top and bottom edge of the quilt back.
5. Attach the top edge of the quilt backing (face down) to the take up roller
and roll it on.
6. Attach the bottom edge of the quilt backing to the leader (making sure
the fabric passes beneath the rear bypass bar) and roll it on until the top
edge reaches the sewing area.
7. Attach the bottom edge of the quilt top (face up) to the leader and roll it
on.
8. Lay the batting on the quilt backing and baste the top edge with channel
locked to ensure a straight line.
9. Lay the top edge of the quilt top up near the top of the backing/batting
top edge, close to the basting line, and baste it down.
10. Smooth all the layers to ensure there are no tucks.
11. Make sure the tension on backing and top is appropriate.
12. Baste the sides.
13. Clamp the sides.
14. QUILT!
4.8 ADVANCING A QUILT
1. Remove the side clamps.
2. Release the EZ Locks for the quilt top and backing roller bars.
3. Advance the quilt by turning the take-up roller.
4. Engage the EZ Lock for quilt backing roller.

ABM International, Inc. V1.0
Model: (M) Series User’s Manual
Proprietary information of ABM INTERNATIONAL, Inc. furnished for customer use only.
No other uses are authorized without the prior written permission of
ABM INTERNATIONAL, INC.
17
5. Adjust backing tension.
6. Lift the top roller bar and straighten out the batting.
7. Run your hand along the underside of the backing roller from the center
to the outer edges to smooth out the material.
8. Lower the top roller bar.
9. Engage the EZ Lock for the quilt top.
10. Adjust the tension to the proper amount for the top.
11. Baste the sides from the bottom up.
12. Clamp the sides.
13. QUILT!
4.9 THREAD TENSION
1. Start by setting your bobbin tension.
-On a Towa tension gauge, 180 is a good place to start.
-To set your bobbin tension without a Towa gauge, lay the bobbin case
in the palm of your hand. Pull the thread horizontally. The bobbin case
should remain in your hand while the thread pulls freely from the bobbin
case. Pull the thread vertically above the bobbin case. The bobbin case
should pull up and “stand” on its side but should not lift off your hand.
2. Adjust the INNOVA tension assembly by turning left to loosen or right to
tighten until the correct balance is achieved.
TENSION REMINDERS
BALANCE is the goal. If you set the bobbin appropriately, you can
then adjust the top thread until you achieve that balance.
The best stitch will be achieved when the thread (top and bottom)
is as tight as possible without breakage.

ABM International, Inc. V1.0
Model: (M) Series User’s Manual
Proprietary information of ABM INTERNATIONAL, Inc. furnished for customer use only.
No other uses are authorized without the prior written permission of
ABM INTERNATIONAL, INC.
18
4.11 TROUBLESHOOTING STEPS FOR THREAD ISSUES
1. Clean out lint.
2. Re-thread machine.
3. Re-thread bobbin.
4. Change needles.
5. Loose the quilt fabric tension.
4.12 THREAD BREAKAGE
1. If there is thread breakage, loosen the bobbin a bit and then adjust the
top to match. Continue until you have beautiful stitches and minimal
breakage.
2. Remember that delicate threads are not appropriate for fast quilting.
Slow down a little.
3. Check the needle for burrs. If a burr is found, change the needle.
4. Check the thread path for nicks or wear crevices in thread guides. Replace
any worn thread guides.
5. Check the throat plate top, bottom, and needle hole for nicks. Polish any
nicks or replace the throat plate as needed.
6. Make sure the needle size is appropriate for the thread size.
7. Re-thread the machine and bobbin and check for lint.

ABM International, Inc. V1.0
Model: (M) Series User’s Manual
Proprietary information of ABM INTERNATIONAL, Inc. furnished for customer use only.
No other uses are authorized without the prior written permission of
ABM INTERNATIONAL, INC.
19
SECTION 5.0 (M) SERIES LIGHTNING STITCH USER MANUAL
INNOVA M SERIES Lightning Stitch Controller and User Interface
The INNOVA M Series machines are equipped with a machine controller
that handles all the electronic functions of the machine. The controller
performs the following tasks:
•Stop and start the sewing motor
•Maintain and adjust sewing speed
•Perform needle positioning - up and down
•Display sewing speed
•Display thread break
•Display electronic error messages in case of failure
•Maintain stitches per inch
•Deactivation of stitch regulation if idle for more than 20 seconds
The user interface provides the INNOVA user the ability to modify settings
of the lightning stitch regulator as well as maintain and troubleshoot
problems if needed. When the INNOVA is turned on, the Lightning Stitch
controller and interface will take a few moments to boot – usually 30
seconds to 1 minute. The boot up procedure allows the controller to check
that all components of the system are functioning properly. If problems are
detected, the controller will notify the user through the user interface.
Though not required, it is recommended that the machine be allowed to
boot up completely before attempting to operate the machine. This will
ensure that all components function properly. Upon completion of a
successful boot sequence, the main user screen will be displayed.
The system has been engineered in such a way that the interface is not
imperative to the operation of the system. This means that if the interface

ABM International, Inc. V1.0
Model: (M) Series User’s Manual
Proprietary information of ABM INTERNATIONAL, Inc. furnished for customer use only.
No other uses are authorized without the prior written permission of
ABM INTERNATIONAL, INC.
20
were to fail, the lightning stitch assembly would still function and operate
based on its last parameter settings for stitches per inch and quilting mode.
However, without a working interface, the settings would be unchangeable.
The user interface allows the user to make choices to adjust the tasks and
features to their specifications. A blue button indicates the status of that
button’s function setting as ON, while a gray button indicates the
button function setting as OFF. The green buttons are needle action
buttons. Pressing a green button will cause the needle to move so
precautions must be taken to avoid accidental stitches
This manual suits for next models
3
Table of contents
Other Innova Industrial Equipment manuals
Popular Industrial Equipment manuals by other brands

Vaillant
Vaillant VRM 3 quick start guide

National Instruments
National Instruments NI 9402 Getting started

Agriculex
Agriculex ESC-2 Operator's manual

Krone
Krone Titan R/50 GL operating instructions

Renishaw
Renishaw OMP40-2 installation guide

KTR-Group
KTR-Group REVOLEX KX Series Operating & assembly instructions