Innovaciones M.S. TWIN User manual

MANUAL DE INSTRUCCIONES
IMPORTANTE!! LEER DETENIDAMENTE Y MANTENERLAS PARA FUTURAS CONSULTAS
REFS.: 21502
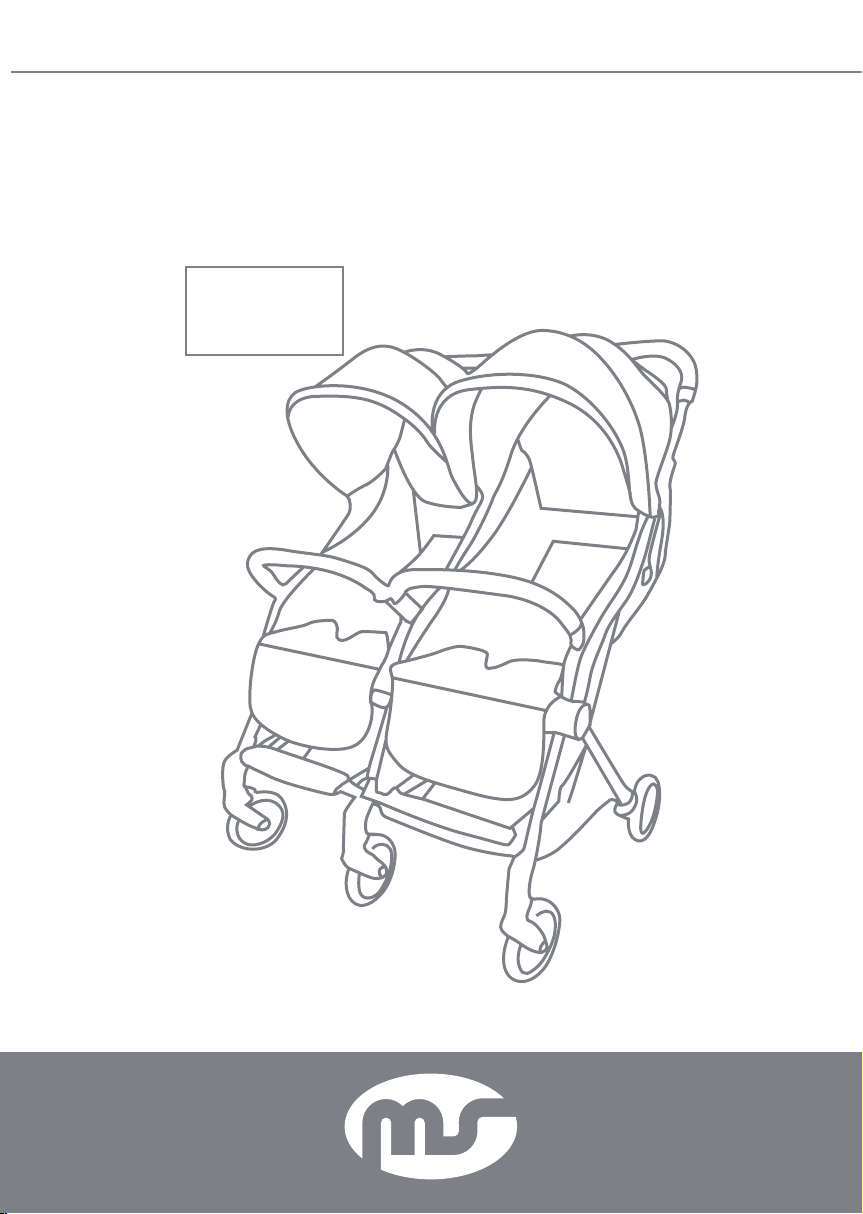
CARRO GEMELAR
TWIN
ESTE CARRO GEMELAR
CUMPLE CON LA NORMA
UNE EN
1888:2018

2
IMPORTANTE, MANTENER PARA
FUTURAS CONSULTAS.
LEER ATENTAMENTE
ADVERTENCIAS
1. El niño debe tener el arnés de seguridad siempre puesto cuando esté
en el carro.
2. Cuando el niño viaja, el cuidador debe vigilarlo.
3. No permita que el niño salga de la barandilla o se pare en el asiento
por su propia seguridad.
4. Cuando un niño sube y baja del carro, el personal de cuidado será res-
ponsable de la aplicación del dispositivo de freno cuando el niño se coloca
dentro o fuera del carro.
5. No se acerque al fuego.
6. No use el carro en lugares con mucho desnivel o donde se puedan
producir volcamientos.
7. No se pueden llevar 3 o más niños en el carro.
8. Se prohíben los accesorios y piezas sueltas no suministradas por el
fabricante.
9. Cuando el carro no esté en movimiento, la rueda debe detenerse para
evitar el peligro causado por el deslizamiento.
10. El peso máximo soportado por cada asiento de la silla es de 15kg por
niño, es decir una edad comprendida aproximadamente entre los 0-36
meses.
11. El peso máximo soportado por cada una de las partes de la cesta de
debajo del asiento es de 2kg cada una.
12. Asegúrese antes de usar la silla, de que todos los puntos de bloqueo
están desbloqueados.
13. Este carro no puede llevarse a una velocidad excesiva.
14. No añada almohadillas de algodón grueso en los bolsillos de más de
10mm.
15. Quite la bolsa del envoltorio del alcance de los niños para evitar el
peligro de asfixia.
16. No es adecuado de usar para niños de menos de 6 meses la silla cuan-
do esta tenga un ángulo entre el respaldo y el asiento entre 0 y 150 grados.
17. Añadir alguna pieza extra al carro puede disminuir su estabilidad.

33
REPARACIONES Y MANTENIMIENTO
ABRIR Y CERRAR EL CARRO
1. Chequee regularmente el estado de los componentes de la silla y re-
emplácelos o mándelos a reparar en caso de que sea necesario.
2. Mantenga limpio el carro y no lo coloque cosas puntiagudas en el mis-
mo para evitar heridas en el niño.
3. Exponer el carro a temperaturas extremas de calor puede deteriorar
las partes de plástico del carro.
4. Para lavar los textiles de la silla sin dañarlos, debe hacerse con jabones
neutrales a una temperatura del agua de 10 a 40 grados.
5. A cada mecanismo de rotación se le debe de poner aceite para man-
tener la rotación flexible.
Bloqueo de
plegado
Imagen 1
Imagen 1-4 Imagen 2 Imagen 2-1 Imagen 2-2
Imagen 1-1 Imagen 1-2 Imagen 1-3
Segundo plegado
1. Apertura y cierre del carro:
Apertura del carro:
Saque el carro de la caja y sitúelo sobre una superficie con las ruedas hacia
abajo como la imagen 1-2.
Apriete los botones como en la imagen 1-3.
Mientras mantiene pulsados los botones despliegue el carro como en la

4
imagen 1-4.
Cierre del carro:
Apriete los botones como en la imagen 1-3.
Pliegue el carro hasta que quede como en la imagen 1-2.
Ponga las barras frontales hasta que se queden como en la imagen 2.
Inserte la barra en la ranura hasta que note un click, tal y como se observa
en la imagen 2-1.
Para quitar la barra como en la imagen 2-2 Pulse el botón de la barra y
retírela.
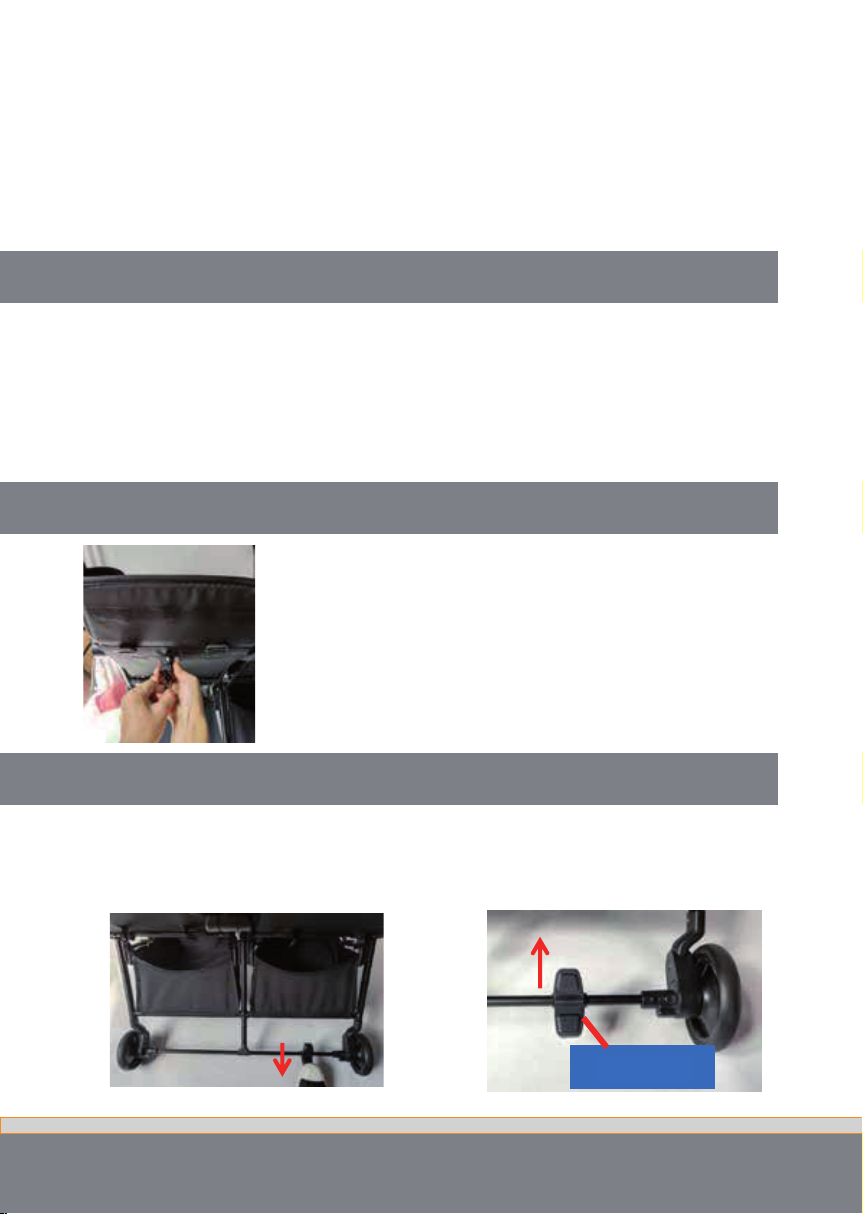
Tal y como se muestra en la imagen 4, para frenar pulse el freno, para qui-
tar el freno levante el freno hacia arriba como en la imagen 4-1.
Ajuste el respaldo con la correa con una mano, pulse
el mecanismo y deslice la correa hasta que se quede
como usted desee, pudiendo ajustar diferentes inclina-
ciones, tal y como se muestra en la imagen 3.
2. USO DE LA BARRA FRONTAL
3. AJUSTE DEL RESPALDO
4. FRENAR Y QUITAR EL FRENO
Imagen 3
Imagen 4 Imagen 4.1
pedal del freno
55
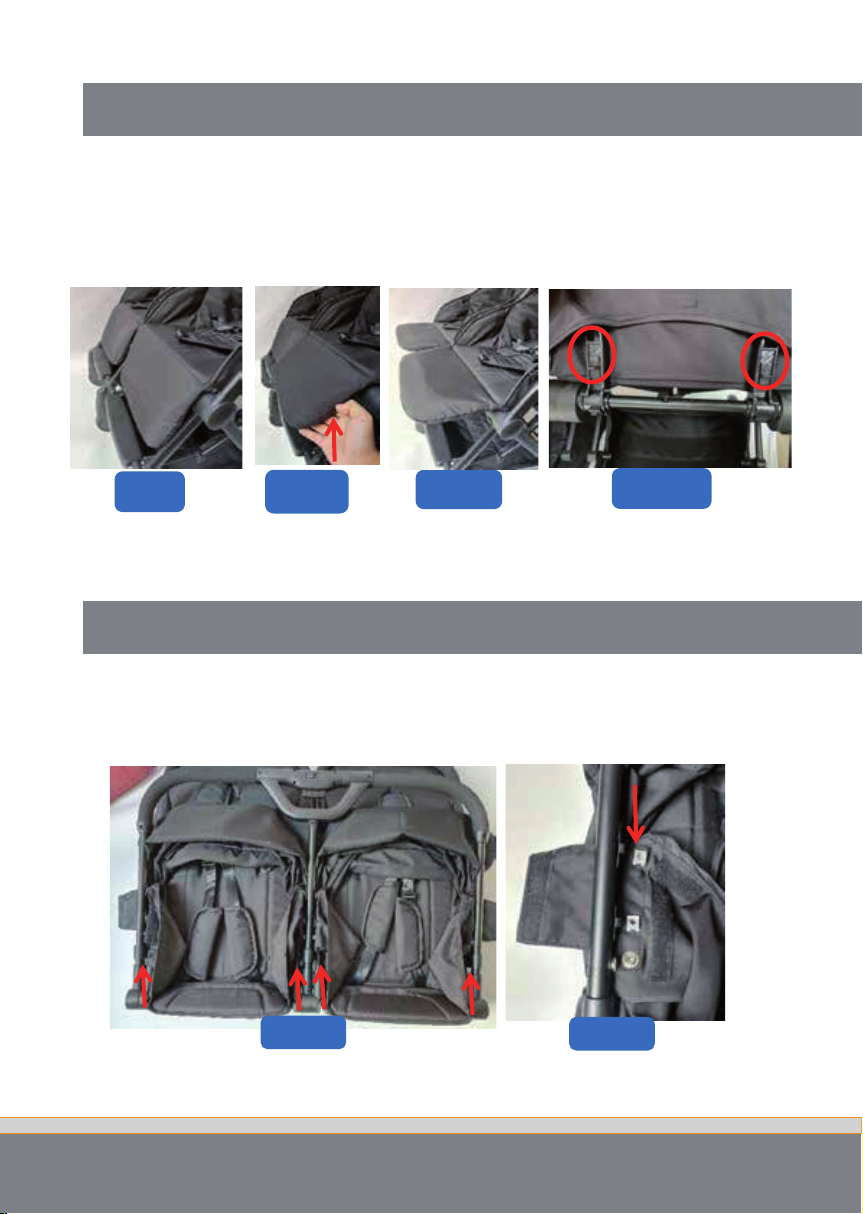
Tal y como se muestra en la imagen 5-1, levante el reposapiés y seguida-
mente tras escuchar el click sitúelo como en la imagen 5-2.
Como se muestra en la imagen 5-3, estire con ambas manos en dirección
de las flechas mientras pulsa los botones hasta que se quede instalado como
en la imagen 5.
Pasos para desmontar: como se muestra en la imagen 6, los cinturones de
ambas sillas están desabrochados hasta arriba, y tal y como se muestra en la
imagen 6-1 los cinturones de ambas sillas están abrochados hasta arriba para
asegurar su firmeza.
PS: todo el procedimiento necesita ser confirmado para ver si se ha
puesto todo en el sitio correcto.
Lea estas instrucciones detenidamente antes de usar este producto, la
seguridad de su hijo está en peligro si no sigue estas instrucciones.
5. USO DEL REPOSAPIÉS
6. COMO DESMONTAR LAS DOS ALAS DEL CARRO
Imagen 5 Imagen 5-1 Imagen 5-2 Imagen 5-3
Imagen 6 Imagen 6-1

7. USO DEL CINTURÓN
6
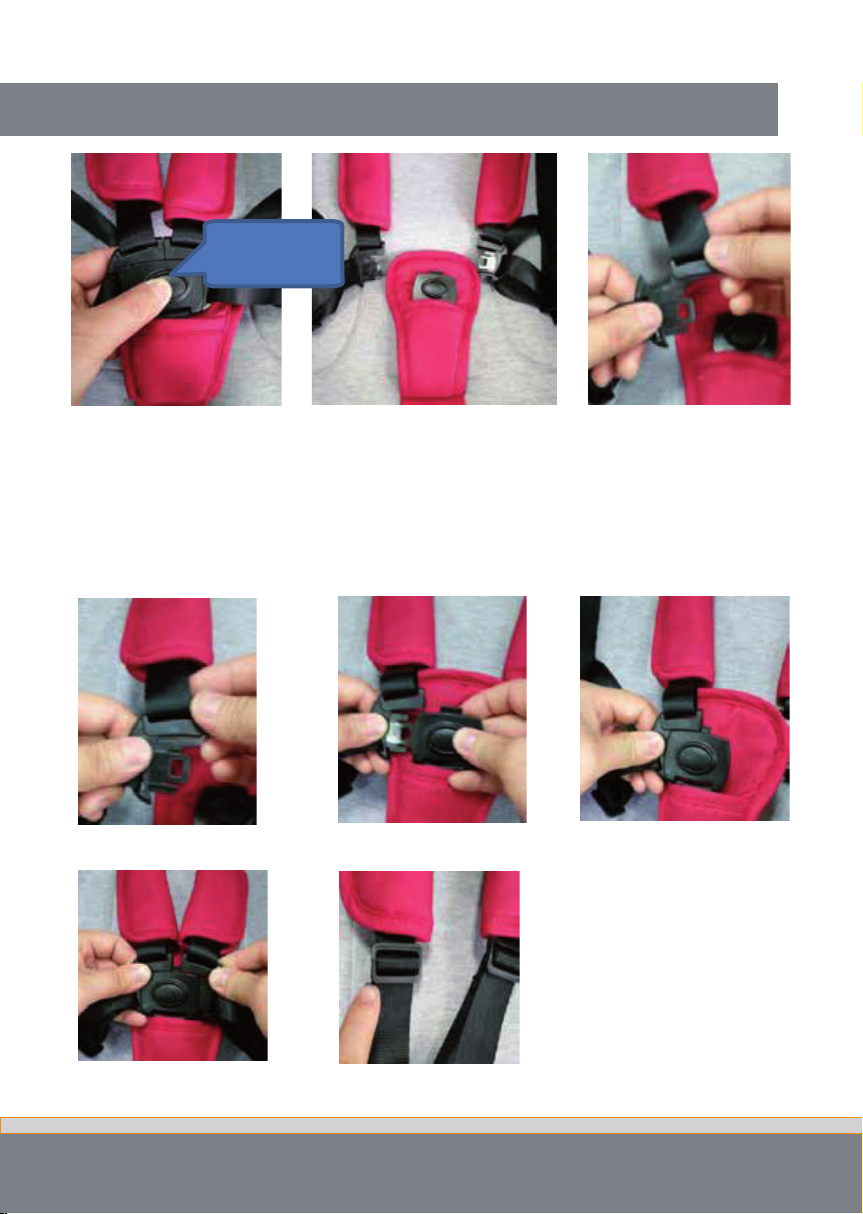
Siga los siguientes pasos para colocar a su hijo en el carro.
Primero pulse el botón para separar las correas como en la imagen 7, y 7-1,
estire las correas y conecte las hombreras hasta la correa del puente como la
imagen 7-2.
hebilla segura
para liberar el
botón
Imagen 7
Imagen 7.3
Imagen 7.6
Imagen 7.1
Imagen 7.4
Imagen 7.7
Imagen 7.2
Imagen 7.5

77
7. USO DEL CINTURÓN
77
Ponga a su hijo en el medio de la silla y póngale los cinturones de uno y
otro brazo a la altura de sus hombros junto con el cinturón central como en
la imagen 7-3, una vez hecho esto únalo a la parte de las piernas, hasta que
escuche el click como en las imágenes 7-4, 7-5, y 7-6.
Ajuste las correas como crea necesario como en la imagen 7-7-

8
GARANTIA FORMAL
Los contenidos de este documento como se muestra a continua-
ción tendrán efecto desde el momento que se compra el producto.
Innovaciones M.S. S.L. el distribuidor oficial situado en Pol. Ind.
La Cava. Avda. Generalitat Valenciana s/n. Sector Industrial 5. 46892
MONTAVERNER. Valencia.(Spain) garantiza al consumidor que este es
un producto nuevo y no tiene ningún fallo en cuanto a los materiales,
diseño y fabricación y que tiene las características que ha declarado el
fabricante.
Esta garantía formal, es válida para todos los países miembros de
la Comunidad Europea sin quedar en ninguno excluido el derecho del
consumidor según medidas legales que obligan a la tienda que vende el
producto a ofrecer esta garantía.
Para beneficiarse de esta garantía formal, el Consumidor debe devol-
ver el producto defectuoso a la tienda donde lo adquirió presentando al
comerciante la prueba de compra del producto que debe mostrar deta-
lladamente la dirección de la tienda, la fecha de compra del producto
con el sello de la tienda y una firma indicando de que producto se trata,
o , en su defecto, el recibo que no debe ser alterado y que claramente
debe mostrar la misma información que hemos dicho antes.
La garantía formal es válida durante veinticuatro (24) meses des de
que se compra el producto.
Durante este periodo INNOVACIONES M.S. S.L. arreglará o cambiará
cualquier producto defectuoso bajo su criterio.
La garantía formal es para el comprador final del producto (Consumi-
dor) y no excluye ni limita los derechos del Consumidor según marca la
ley y/o los derechos que el Consumidor tiene respecto a la tienda que
vende el producto.
LA GARANTÍA NO SERÁ VÁLIDA EN LOS SIGUIENTES CASOS.
La garantía formal queda excluida en el caso de daño causado al pro-
ducto por las siguientes razones: si el producto se utiliza de una forma
que no cumple con la información de las instrucciones para su uso y
montaje, si le han dado un golpe al producto o se ha caído, si el pro-

9
GARANTIA FORMAL
ducto está expuesto a la humedad, o al calor extremo o a condiciones
ambientales adversas, o a cambios repentinos de tiempo, cuando el
producto se corroe , se oxida o se repara o se altera el producto sin
autorización previa, si lo repara utilizando piezas de repuesto no auto-
rizadas , si el uso o mantenimiento del producto no es el correcto, o no
hace ningún tipo de mantenimiento sin hacer lo que se dice en el ma-
nual de instrucciones, se monta mal, tiene algún accidente , se estropea
a causa de la comida o la bebida, por cualquier producto químico o
causas de fuerza mayor.
En cualquier caso, INNOVACIONES M.S. S.L. ,rechaza toda respon-
sabilidad por daños causada a las personas o a la propiedad , otra que
no sea el producto, si el daño lo causa por no seguir las instrucciones,
consejos o precauciones que hay en el manual de instrucciones por
parte del propietario o persona que esté utilizando el producto. (Sólo
como ejemplo, no deje nunca al niño solo o el niño debe de tener siem-
pre el arnés puesto…)
Es más, INNOVACIONES M.S. S.L. , rechaza toda responsabilidad de
daño a personas y a la propiedad cuando la rotura del producto se debe
a un deterioro de los componentes del producto normal por el uso que
se hace de éste. Todos los componentes de este producto hechos de
plástico, se desgastan con el uso.
Importado por INNOVACIONES M.S. S.L.
Pol. Ind. La Cava
C/. Beniganim, 9
46892 MONTAVERNER (Valencia) Spain
Tel. 96 229 76 70 - Fax 96 229 76 76
Sello del establecimiento vendedor para garantía
9

INSTRUCTION MANUAL
IMPORTADO POR:
INNOVACIONES M.S. S.L.
Pol. Ind. La Cava.
C/ Benigànim, 9
46892 MONTAVERNER
(Valencia) Spain
Tel. 96 229 76 70
Fax 96 229 76 76
INNOVACIONESMS.COM
IMPORTANT!! READ CAREFULLY AND KEEP THEM FOR FUTURE CONSULTATIONS
INSTRUCTION MANUAL
REFS.: 21502
TWIN BABY
TWIN
THIS TWIN BABY STROLLER
COMPLIES WITH THE STANDARD
UNE EN
1888:2018

12
IMPORTANT- READ CAREFULLY
AND KEEP FOR FUTURE REFE-
RENCE.
WARNING
1. For your child’s safety, the child must use a seat belt when riding.
2.When the child is riding, the caregiver shall not leave.
3. Do not allow the child to climb out of the guardrail or stand on the
seat for your child’s safety.
4. When a child gets on and off the cart, the care personnel shall be res-
ponsible for the application of the brake device when the child is placed
in or out of the stroller.
5. Do not approach fire.
6. Do not use the stroller in uneven or easy to roll over.
7. Three or more children are prohibited from carrying this cart.
8. Accessories and spare parts not supplied by the manufacturer are
prohibited.
9. When the car does not move, the wheel muse be stopped to avoid
the danger caused by sliding.
10.The maximum load of a single seat of this stroller is 15kg,which is sui-
table for children from 0 to 36 months.
11.The maximum bearing capacity of a single dish basket on this plat-
form is 2kg.
12.Ensure that all locking devices are locked before using the stroller.
13. This car cannot be carried out quickly.
14.Do not add more than 10 mm thick cotton pads in the pocket.
15. Please put the bag in time to avoid children’s suffocation.
16. When the angle between the backrest and the seating surface is less
than 150 degrees, it is not applicable to infants below 6 months.
17. Placing any load on the handle will affect the stability of the stroller.

1313
REPAIR AND MAINTENANCE
OPEN AND FOLD THE STROLLER
1. Regularly check whether there are looseness of screws, aging of parts,
broken materials and seams. Please replace and repair them if necessary.
2. Keep the baby car clean, and do not place the tip or blade on the vehi-
cle to avoid the child from injury.
3. Excessive exposure or strong heat can cause plastic parts to deteriora-
te and the cloth fade.
4. The textiles on the washing stroller should be washed with neutral
detergent and warm water of 10~40 degrees to avoid damage to the cloth.
5. Each rotating mechanism shall be oiled to keep the rotation flexible.
Folding Lock
Pic 1
Pic 1-4 Pic 2 Pic 2-1 Pic 2-2
Pic 1-1 Pic 1-2 Pic 1-3
Second Lock
1. Open and fold the stroller:
Open and fold the stroller:
Cierre del carro:
Apriete los botones como en la imagen 1-3.
Pliegue el carro hasta que quede como en la imagen 1-2.
14
Fold the stroller:
Grip the folding box by right hand after fold the canopy, move the second
lock button to right by thumb as picture1-3.
Press the folding lock button up by another fingers at same time, push
down the handle to fold the frame, the frame could keep standing after fold it
as picture1-2.
Assemble the front bumper bar by yourself after open the stroller as pictu-
re2.
Insert one side of bumper bar into the frame until it locked with click”, then
operate the other side as picture2-1.
Remove the front bumper bar as picture2-2, press the front bumper bar
socket button and take out the front bumper bar.
As picture 4. Push the brake pedal down with your toes and complete the
brake when you hear the “click” sound.
Push the brake pedal forward in the direction indicated by the arrow as pic-
ture 4-1 to the state
before the brake.
Fix the backrest adjustable strap by one hand, push
the butterfly clasp switch from the sides to the midd-
le to the fixed position by the other hand to slide up
or down to adjust the different stances of backrest as
picture3.
2. USING THE FRONT BUMPER BAR
3. BACK REST ADJUSTMENT
4. BRAKE AND RELEASE BRAKE
Pic 3
Pic 4 Pic 4.1
Brake pedal

1515
a. As picture 5-1, raise the foot position upward, and when you hear the click, the
foot unfolds as shown in picture 5-2.
b. As picture 5-3. Pull the footrest with both hands in the direction indicated by the
arrow and press the foot down ,then footrest can be retracted as picture 5.
a: Disassembly steps. (as picture 6) 1. The fasteners on both sides of the body are
unfastened sequentially from bottom to top.
b: Installation steps: (as picture 6-1) 1. The fasteners on both wings of the seat body
are fastened in order from top to bottom, to ensure fasteners on both wings of the seat
body are firmly fastened with the fasteners on the handlebars.
PS: The whole procedure needs to confirm whether the fastener is in
place for safe use.
Please read these instructions carefully before use and keep them for later reference.
The safety of your child could be put at risk if you do not follow these instructions.
5. USING FOOT BENDING
6. DISASSEMBLY AND INSTALLATION OF THE TWO WINGS OF THE
SEAT
Pic 5 Pic 5-1 Pic 5-2 Pic 5-3
Pic 6 Pic 6-1
7. USING THE SEAT BELT
16
a, follow these steps when you need to place your baby on the stroller:First
press the safety buckle release button to separate the shoulder strap, belt and
span belt as picture 7, picture7-1. Pull the shoulder strap and belt connection
position again to separate the shoulder strap from the jumper strap as pictu-
re 7-2.
safety buckle
release button
Pic 7
Pic 7.3
Pic 7.6
Pic 7.1
Pic 7.4
Pic 7.7
Pic 7.2
Pic 7.5

1717
7. USING THE SEAT BELT
1717
b, Put your baby in the middle of the cart seat and pass the left and right
shoulder straps through the shoulders, with the chest and belt as picture 7-3.
Then cross the belt through the baby’s legs and the left and right shoulder
straps and belts, and hear the sound of the safety buckle as picture 7-4, pictu-
re7-5, picture 7-6.c. Shoulder straps, belt length can be adjusted by pulling up
and down the day buckle position as picture 7-7.

18
FORMAL WARRANTY
The contents of this document as it is shown in the following part will
be effective since the product is bought.
Innovaciones M.S., S.L. the official distributor located in Pol. Ind La
Cava, C/. Beniganim, 9, 46892 MONTAVERNER (Valencia - Spain) gua-
rantees the consumer that this product is new and it has not got any fault
in the materials, design and manufacturing process and that it has got the
features declared by the manufacturer.
This formal guarantee is valid for every country in the European Union
and in all of them the consumer has the same right according to legal
measures which say that the shop which sells the product has to offer
this guarantee.
To benefit from this formal guarantee, the Consumer has to take back
the faulty product to the shop when this product was bought showing the
shop assistant the buying ticket of the product with the stamp of the shop
and a signature indicating which product it is being sold, or, failing that,
the bill which must not be modified and it clearly has to show the same
information we have mentioned before.
The formal guarantee is valid for twenty-four (24) months since the pur-
chase of the product. During this period INNOVACIONES M.S., S.L. will
repair and change any faulty product according to its judgement.
The formal guarantee is for the final buyer of the product (Consumer)
and it does not exclude, neither limits the rights of the Consumer accor-
ding to the law and/or the rights which the Consumer has in relation to the
shop which is selling this product.
THE GUARANTEE IS NOT VALID IN THE FOLLOWING CASES.
The formal guarantee is excluded in case of any damaged produced to
the product for the following reasons: if the product is used in a different
way from the information given in the manual book of instructions for its
assembly and use, if the product has been hit or has fallen down, if the
product has been exposed to extreme humidity or heat or any negative
environmental conditions, or sudden weather changes, when the pro-
ducts corrodes itself, it rusts or the product is repaired or modified without
previous authorization, or if it is repaired using spare pieces which are not

19
FORMAL WARRANTY
authorized, if the use and maintenance of the product are not correct, or
it is not made any maintenance at all not following the instructions on the
manual, it is not assembled properly, it has some accident, it is damaged
because the food or drink, or any chemical product or major force.
In any case, INNOVACIONES M.S., S.L., rejects any responsability for
damages caused to the people or the goods, which are not the product
itself, if the damaged is caused because the user has not followed the
instructions, advices or warnings which are in the manual book of ins-
tructions by the owner or any person who is using the product. (Just an
example, never leave the child alone or the child has to wear the harness
all the time...).
It is more, INNOVACIONES M.S., S.L., rejects any responsibility of da-
maged caused to people or goods when the breakage of the product has
been caused due to the fact that the components have been damaged
because of the use of the product. Every component in this product made
of plastic are worn out because the daily use.
Imported by INNOVACIONES M.S. S.L.
Pol. Ind. La Cava
C/. Beniganim, 9
46892 MONTAVERNER (Valencia) Spain
Tel. 96 229 76 70 - Fax 96 229 76 76
Dealer’s stamp for warranty.
19

INSTRUÇÕES DE MONTAGEM
IMPORTED BY:
INNOVACIONES M.S. S.L.
Pol. Ind. La Cava.
C/ Benigànim, 9
46892 MONTAVERNER
(Valencia) Spain
Tel. 96 229 76 70
Fax 96 229 76 76
INNOVACIONESMS.COM
This manual suits for next models
1
Table of contents
Languages:
Other Innovaciones M.S. Stroller manuals


