Inspired by drive trotter TR-1400 User manual

trotter®mobility chair
TR-1200, TR-1400, TR-1600 & TR-1800
Limited lifetime warranty on frame and cross braces.
One year limited warranty on other components.
Your Inspired by Drive brand product is warranted to
be free of defects in materials and workmanship for the
lifetime of the original consumer purchaser.
This device was built to exacting standards and care-
fully inspected prior to shipment. This Lifetime Limited
Warranty is an expression of our confidence in the mate-
rials and workmanship of our products and our assur-
ance to the consumer of years of dependable service.
This warranty does not cover device failure due to owner
misuse or negligence, or normal wear and tear. The
warranty does not extend to non-durable components,
such as rubber accessories, casters, and grips, which are
subject to normal wear and need periodic replacement.
This warranty does not cover damage resulting from
transit use or from exceeding weight limit for user plus
items carried.
If you have a question about your Inspired by Drive
device or this warranty, please contact an authorized
Inspired by Drive dealer.
lifetime limited
warranty
Rev.3.9.28.17
2017 Medical Depot, Inc. All rights reserved.
Drive DeVilbiss Healthcare
99 Seaview Boulevard
Port Washington N.Y. 11050 USA
Made in China
www.inspiredbydrive.com
EU Authorized Representative
Drive Medical LTD
Ainley’s Industrial Estate
Elland, West Yorkshire,
United Kingdom HX5 9JP

features
1. Wheel locks
2. Rear Wheels
3. Front Wheels
4. Folding Mechanism
5. Push Handle
6. Bus Transit Tie Downs (optional)
7. Footrest
8. Five-points “H” Harness
9. Closure Strap
NOTE:
Before seating a child always check that the mobility
chair is properly locked in its upright position and that
the wheel locks are engaged (see Fig 2).
operating instructions:
1
2
4
6
3
7
8
5
9
A. UNFOLDING (Fig 1)
1. Unhook closure strap.
2. Place chair in the upright position, hold one push
handle (A) and press firmly on the seat rail (B) on the
opposite side.
3. Press down the seat rail until the chair is completely
open.
4. Press down the locking brace to its full extended
position (Fig. 2).
A
figure 2
figure 1
A
B

B. WHEEL LOCKS (Fig 3)
1. To engage, pull both wheel lock levers (A) back until
the locking bar pushes into the wheel and the lever
locks into position.
2. To disengage, lift both wheel lock levers until the
locking bar comes free of the tire and the lever locks
into position.
figure 3
C. FOOTREST
1. At the lowest point, footplates should be at least 2”
off the ground.
2. Avoid putting weight on the footrest.
3. Never lift the Trotter® Mobility Chair by the footrest.
D. FOLDING (Fig 3)
1. Engage wheel locks (A). Remove the child from the
chair.
2. Remove headrest extension. Trotter® Mobility Chair
cannot be folded with headrest extension (B).
3. Swing footrest to the side.
4. Lift locking brace (Fig. 2A) from the center.
5. Lift center of seat slightly.
6. Hold one push handle (C) as you pull the opposite
seat rail (D) towards you.
7. Place chair on its back and press the seat rails to a
complete fold.
8. Wrap the closure strap around chair and click to lock.
Positioning and growth adjustments should be done in
the following order:
1. Seat
2. Back
3. Positioning belt & harness
4. Footrest
5. Head support
6. Additional standard and optional adjustments as
required
7. Ensure that all adjustment screws are tight
adjustments:
D. TRANSIT OPTIONS
Bus Transit Tie Downs are available and should be
used with restraint systems that conform to SAE J2249
requirements.
The trotter has passed a dynamic crash test done with a
130 lb. front facing occupant tested at 30 mph (48 km/h)
B
C
A
D
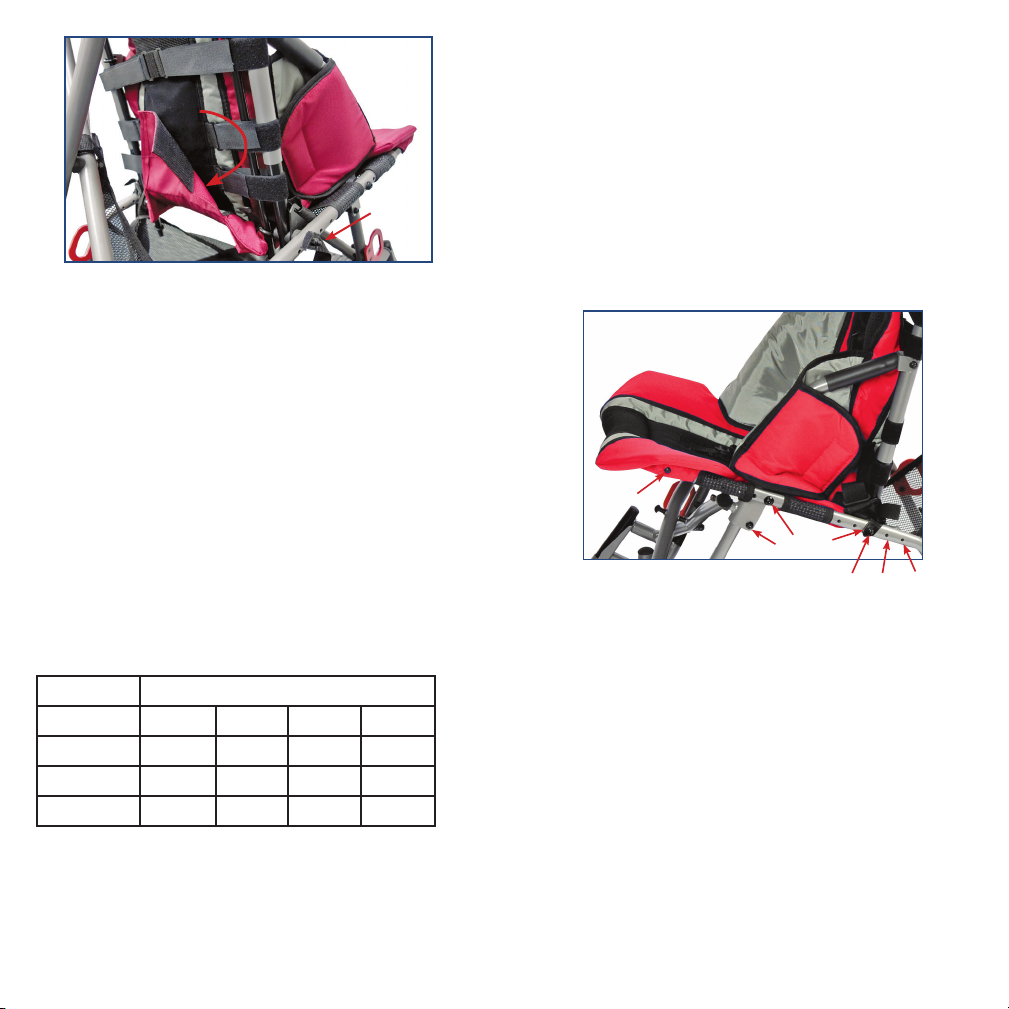
SEAT DEPTH ADJUSTMENT
1. Determine the proper seat depth.
2. To change seat depth, undo the hook and loop that
attaches the back panel to the seat panel. (Fig. 4)
3. Relieve fabric tension by partially folding the chair.
4. Unscrew the bolt on the side of the seat rail
(Fig. 5A) and move seat tube to the desired hole
(8, 9 or 10). Refasten the bolt. See seat depth
matrix.
5. Repeat operation on other side of seat.
6. Reattach the seat panel to the back panel.
To Adjust The Back Angle:
1. To adjust the back angle, relative to the seat, consult
the Set-up Matrix.
2. To relocate the back post along the seat rail, loosen
and remove bolts (Fig 4A & Fig 5D) from both sides
of the seat and align the back posts along the seat
rail in the required location.
3. Put bolts back in place and secure the nuts tightly.
D
BC
A
figure 4
figure 5
CAUTION – The modification of the back angle will
affect the seat depth.
SET-UP MATRIX
A
Seat Depth Matrix
Back Angle 12” 14” 16” 18”
85o11” 13” 13.5” 14.5”
90o10” 12” 12.5” 13.5”
95o9” 11” 11.5” 12.5”
Add 3” when used with seat rail extension
95o90o85o
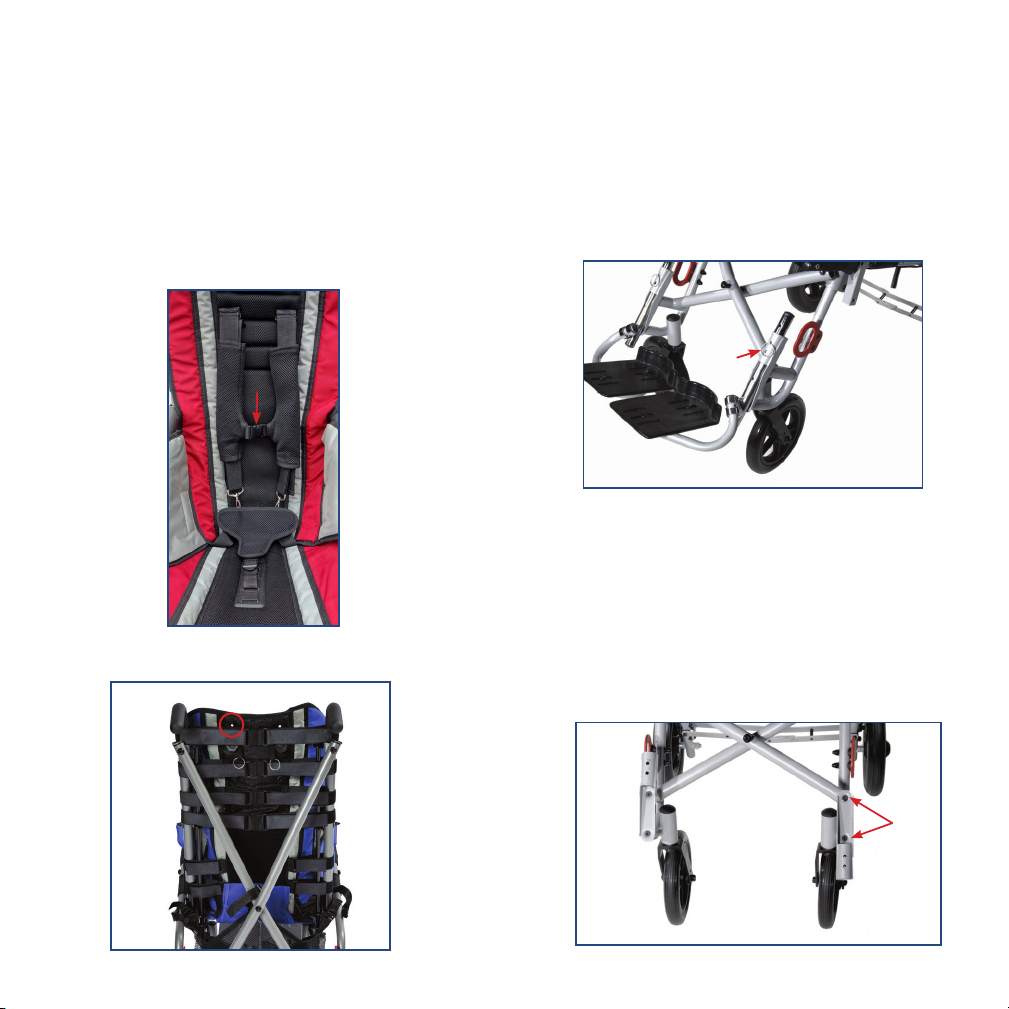
FIVE POINT “H” HARNESS & PELVIC BELT ADJUSTMENT
1. Place user in the chair and position child’s hips.
2. Buckle the pelvic positioning belt to the proper position.
3. Connect both straps of the “H” harness to the pelvic
positioning belt.
4. To adjust the height of the attachment point of the
shoulder straps, undo the knob on the back panel, and
take the insert out of the grommet (Fig 7). Place the
insert at the required position and tighten in place with
the knob.
A
figure 6
figure 7
FOOTREST ADJUSTMENTS
To Adjust Or Remove Footrest:
1. Pull out the locking pin (Fig. 8A).
2. Move the footplate extension tube up or down to the
desired position.
3. Align the holes of the footrest with the holes of the
housing bracket.
4. Put the locking pin back in place.
A
figure 8
Range Adjustment
To modify the range of adjustment of the footrest by
reversing the housing bracket:
1. Remove footrest.
2. Remove both screws from the housing bracket (Fig 9A).
3. Relocate the housing facing up or down as desired.
4. Put both screws back in place.
figure 9
A
Standard
Position
(Down)
Reversed
Position
(Up)

To Modify the Range of Adjustment by Inverting the
Footrest Extension Tube
1. Remove the footrest.
2. Remove the cap head screw (Fig 10A) from the foot
plate support and pull the footplate assembly off the
extension tube.
3. Reverse the footrest extension tube orientation (Fig 11).
4. Insert the footplate assembly into to top opening of
the housing bracket.
5. Tighten the cap head screw.
A
figure 10
figure 11
Depth Adjustment
1. Loosen both fasteners on the footplate (Fig. 12A).
2. Slide the footplate to the desired position.
3. Tighten both fasteners.
A
CRUTCH STRAP DEPTH ADJUSTMENT
1. Determine the appropriate depth for the user.
2. Remove the belt from the buckle (Fig. 13A).
3. Insert belt into appropriate slot.
4. Thread the strap back into the buckle.
figure 12
A
figure 13
This manual suits for next models
4
Other Inspired by drive Mobility Aid manuals

Popular Mobility Aid manuals by other brands

identités
identités NEO STRONG instruction manual

aidacare
aidacare Kidz Phoenix Operation manual & product specification

Symmetrikit
Symmetrikit Meywalk 4 Series User handbook

Probasics
Probasics RLS6BL manual

Guldmann
Guldmann GLS5.2 quick guide

HartMobility
HartMobility TITAN TSG600 Assembly/installation instructions


Kolcraft
Kolcraft Deluxe Walker instruction sheet

Eurovema
Eurovema Volaris Discovery manual

Drive
Drive Diamond Deluxe Assembly instructions

NRS Healthcare
NRS Healthcare P11619 User instructions

Sunrise Medical
Sunrise Medical Component Mobility System IC-5140 User instructions

Aquatec
Aquatec PICO instructions