Kolcraft Deluxe Walker User manual

©2005 Kolcraft® Enterprises, Inc. All Rights Reserved. W06-R5 9/05
Deluxe Walker Instruction Sheet
Hoja de instrucciones de la andadera de lujo
W06-R5.qxd 09/13/2005 9:37 AM Page 1

2
Read all instructions BEFORE assembly and USE of this walker.
Keep instructions for future use.
IIMMPPOORRTTAANNTTSSAAFFEETTYYIINNFFOORRMMAATTIIOONN::
HHoowwttooKKeeeeppYYoouurrCChhiillddSSaaffeeWWhhiilleeUUssiinnggtthhiissPPrroodduucctt
•NNEEVVEERRleave child unattended. Always keep child in view while
UUSSIINNGGWWAALLKKEERR.
•CCAAUUTTIIOONN::TTooyyssiinntteennddeeddttoobbeeaasssseemmbblleeddbbyyaadduulltt!!
SSTTAAIIRRHHAAZZAARRDD
• Avoid serious injury or death. Block stairs & steps securely before
using this walker.
• Use only on flat surfaces free of objects that could cause this
walker to tip over. Never use near stairs, steps, thresholds, hills,
roadways, or pools.
• To avoid burns, keep child away from hot liquids, stoves, radiators,
space heaters, fireplaces, etc.
• Discontinue using this walker should it become damaged or
broken.
• Never carry this walker with child in it. Never adjust seat while child
is in product.
•DDoonnoottlift or carry by tray, music center, or toys.
•DDoonnoottuse this walker until baby can sit up unassisted.
• To reduce the chance of child slipping out of seat, check that both
feet of child touch the floor.
• Discontinue using this walker when your child can stand unaided or
walk unassisted.
OOnnllyyuusseetthhiisswwaallkkeerriiffyyoouurrcchhiillddMMEEEETTSSAALLLLoofftthheerreeqquuiirreemmeennttss
bbeellooww::
1. Can support body weight with legs
2. Weight is between 15 and 26 pounds (6.8 and 11.8 kgs)
3. Height is less than 32 inches (80 cms)
• To maintain stopping performance, clean friction strips regularly
with damp cloth.
WARNING
W06-R5.qxd 09/13/2005 9:37 AM Page 2

3
ADVERTENCIA
Lea todas las instrucciones ANTES de armar y USAR
la andadera
. Guarde
las instrucciones para futura referencia.
IINNFFOORRMMAACCIIÓÓNNIIMMPPOORRTTAANNTTEEDDEESSEEGGUURRIIDDAADD::
CCóómmoommaanntteenneerraassuuhhiijjoosseegguurroommiieennttrraasseessttááuuttiilliizzaannddooeesstteepprroodduuccttoo
•NNOOdeje nunca al niño solo. Tenga al niño siempre a la vista
mientras utiliza la AANNDDAADDEERRAA.
••PPRREECCAAUUCCIIÓÓNN::LLoossjjuugguueetteesseessttáánnpprreetteennddiiddoossppaarraaeennssaammbbllaarrppoorr
eellaadduullttoo..
PPEELLIIGGRROOEENNEESSCCAALLEERRAASS
• Evite heridas graves o mortales. Bloquée las escaleras y escalones
antes de utilizar esta andadera.
• Utilice solo en superficies planas sin objetos que puedan hacer
que la andadera vuelque. Nunca utilice cerca de escaleras,
escalones, umbrales, colinas, carreteras o piscinas.
• Para evitar quemaduras, mantenga al niño lejos de líquidos
calientes, estufas, radiadores, calefacciones, chimeneas etc.
• Si la andadera se rompe o se daña, deje de utilizarla.
• Nunca acarrée la andadera con el niño adentro. Nunca ajuste el
asiento con el niño adentro.
•NNoola levante o la cargue por medio de la bandeja, el centro musi-
cal o los juguetes.
•NNooutilice este producto hasta que el niño se pueda sentar sin
ayuda.
• Para reducir la posibilidad de que el niño se resbale fuera del
asiento, compruebe que sus pies tocan el suelo.
• Deje de usar la andadera cuando el niño pueda ponerse de pie o
andar sin ayuda.
UUsseellaaaannddaaddeerraassoollaammeenntteessiieellnniiññooCCUUMMPPLLEECCOONNTTOODDOOSSllooss
ssiigguuiieenntteessrreeqquuiissiittooss::
1. Puede soportar su propio peso con las piernas.
2. Pesa entre 6.8 y 11.8 kgs. (15 y 26 libras)
3. Mide menos de 80 cms. (32 pulgadas).
• Para mantener la función de parar, limpie las tiras de fricción con
regularidad con un trapo húmedo.
W06-R5.qxd 09/13/2005 9:37 AM Page 3

Attach Seat Pad Para colocar el cojín del asiento
4
Parts List Lista de piezas
1
Push crotch portion of seat pad inside out to
form seat, so that the fabric is on inside of
seat pad.
Empuje la parte del cojín del asiento adentro
hacia afuera para formar el asiento, de man-
era que el tejido quede en la parte interior
del cojín del asiento.
Place seat pad into seat ring located on tray.
Align it so that the highest point of the seat
pad aligns with back of walker ring.
Sitúe el cojín del asiento en el anillo del
asiento situado en la bandeja. Alinéelo de
forma que el punto más alto del cojín del
asiento esté alineado con el trasero del anillo
de la andadera.
Continued on next page
Continuación en la página siguiente
1
2
Back
Trasera
Base
Base Tray
Bandeja
Seat Pad
Cojín del asiento
A
BD
C
A B C D
Electronic Toy
(select models)
Juguete electrónico
(modelos selectos)
Small Nuts (2)
Tuercas chica (2) Axles (2)
Tornillos (2)
Large Nuts (4)
Tuercas grande (4) Rear Wheels (2)
Ruedas traseras (2) Front Casters (2)
Ruedecillas
delanteras (2)
Upright Toys (2)
(select models)
Juguetes parados (2)
(modelos selectos)
Right Legs Square Hole
(2)
Patas derechas agujero
cuadrado (2)
Left Legs
Diamond Hole (2)
Patas izquierdas
agujero de
diamante (2)
W06-R5.qxd 09/13/2005 9:37 AM Page 4

5
3
4
Insert the 8 round tabs on the seat pad into
slots located around the seat ring. Slide tabs
through holes.
Inserte las ocho lengüetas en las ranuras
situadas alrededor del área del asiento.
Deslice las lengüetas a través de los agujeros.
Turn tray up side down. Pull tabs and align
into grooves. You may have to push tabs
from top of walker to properly fasten.
Voltee la bandeja. Estire las lengüetas y
alinée las en las ranuras. Puede que tenga
que empujar las lengüetas desde la parte de
arriba para que se ajusten adecuadamente.
TTeesstt::Push down hard on seating area of seat
pad to make sure seat is securely in place.
PPrruueebbaa::Empuje en el medio del cojín para
asegurarse de que está en su sitio.
CCAAUUTTIIOONN::Do not use walker if all tabs are
not secured properly, otherwise child may fall
through walker.
PPRREECCAAUUCCIIÓÓNN::No utilice la andadera si
todas las lengüetas no están aseguradas ade-
cuadamente. En caso contrario el niño podría
caerse de la andadera.
3
4
Tabs
Lengüetas
Tabs
Lengüetas Grooves
Ranuras
Attach Rear Wheels Unión de las ruedas traseras
Flip base over to expose underside. Locate
rear wheel opening in base of the walker.
Voltée la base para exponer la parte de
abajo. Localice la abertura de la rueda trasera
en la base de la andadera.
Align holes of wheel with corresponding axle
holes on the base of the walker. Plastic tab
may need to be pushed to the side to
expose the axle hole. The stem of the wheel
should be facing the inside of the base.
Alinee los agujeros de las ruedas con los
agujeros del eje correspondientes en la base
de la andadera. Puede que sea necesario
empujar la pestaña de plástico para que se
vea el agujero del eje. El tubo de la rueda
debe de estar opuesta adentro de el base.
Slide metal axle into holes until the head of it
passes the plastic tab and clicks into place.
Deslice el eje de metal en los agujeros hasta
que la cabeza pase por la pestaña de plástico
y encaje en su lugar.
Repeat for other wheel.
Repita el proceso en la otra rueda.
1
2
3
4
3
W06-R5.qxd 09/13/2005 9:37 AM Page 5

6
Attach Front Casters Unión de las ruedecillas delanteras
Turn the base over and insert the stem of one
of the front casters into the hole in one of the
front corners. Push firmly until the caster
snaps (locks) into place. Pull up on caster to
make sure it is locked in place.
Voltee la base y inserte el tubo de unas de las
ruedecillas delanteras en la agujero de unas
de la esquinas delanteras. Empuje firmemente
hasta que la pieza se coloca (asegure) en su
lugar. Jale para arriba la ruedecilla para
asegurar que este asegurado en su lugar.
1
Attach Legs to Tray Una las patas a la bandeja
Legs are marked “A” , “B”, “ C”, or “D”.
Locate leg marked A.
Las patas están marcadas “A”, “B”, “C”, o
“D”. Localice la pata “A”.
Rest tray on side with “A” side facing up.
Place opening in leg “A” through tray bolt “A”.
Sitúe la bandeja de aldo con la cara “A”
mirando hacia arriba. Ponga la pata “A” a
través de la tuerca “A” de la bandeja.
Push leg down at slight angle so leg hooks
snap under tray. The leg should be attached
to tray.
Empuje la pata hacia abajo en un pequeño
ángulo de manera que los ganchos de la pata
se enganchen por debajo de la bandeja. La
pata debe de estar enganchada a la bandeja.
1
A
BD
C
BA
DC
Back
Trasera
Bolt
Tornillo
View of Underneath
Tray & Leg
Vista de la bandeja y
la pata por debajo
Leg Hooks Have to Catch
on Tray
Los ganchos de las patas
tienen que engancharse en
las lengüetas de la bandeja
1
2
3
2
3
Continued on next page
Continuación en la página siguiente
W06-R5.qxd 09/13/2005 9:37 AM Page 6

7
Secure large plastic nut to bolt. Tighten until
flush against leg. The bolt should be flush
with the nut.
Asegure la tuerca grande de plástico al tornil-
lo. Ajústelo hasta que quede apretado a la
pierna. El tornillo debe de estar apretado con
la tuerca.
NNOOTTEE::There should not be a gap between
leg and tray.
NOTA: No debe quedar hueco entre la pata
y la bandeja.
Repeat Steps 1-4 for other legs. Make sure to
match corresponding letters on tray and legs.
Repita los pasos 1-4 en las otras patas.
Asegúrese de emparejar las letras correspon-
dientes en la bandeja y en las patas.
4
5
4
Attach Tray to Base Una la bandeja a la base
Make sure that both “Kolcraft” on the tray
and “Tot Rider 2” on the base are facing the
same direction.
Asegúrese de que “Kolcraft” en la bandeja y
“Tot Rider 2” en la base están mirando en la
misma dirección.
Insert assembled legs into mounting holes of
base by pushing button in and pressing
down.
Inserte las patas ensambladas en los agujeros
para montarlas en la base, empujando el
botón y presionando hacia abajo.
As leg is lowered, button will automatically
pop into the top position. Be sure all 4 but-
tons are in the same numbered position.
Cuando baje la pata, el botón se ajustará
automáticamente en cada posición.
Asegúrese de que los 4 botones están en la
misma posición numerada.
NNOOTTEE::To maintain stopping performance,
clean friction strips regularly with damp cloth.
NNOOTTAA::Para mantener la función de parar,
limpie las tiras de fricción con regularidad
con un trapo húmedo.
1
Nut
Tuerca
CORRECT
Tight against tray
CORRECTO
Apretado contra la bandeja
INCORRECT
Incorrecto
GAP
Hueco
2
3
Friction Strips
Tiras de Fricción
2
W06-R5.qxd 09/13/2005 9:37 AM Page 7

8
To Attach Upright Toys
(select models)
Para unir los juguetes
(modelos selectos)
Locate holes in top tray. Align toy post and
insert into hole. Repeat for other toy.
Localice los agujeros en la bandeja superior.
Alinée los postes de los juguetes e insértelos
en el agujero. Repita para el otro juguete.
CCAAUUTTIIOONN::Toys intended to be assembled
by adult!
PPRREECCAAUUCCIIÓÓNN::Los juguetes están
pretendidos para ensamblar por el adulto.
1
1
To modify the leg’s height, only one level can
be adjusted at a time. To adjust walker height
up or down, push button in and raise or
lower leg. Before use, be sure all 4 legs have
buttons in the same position.
Cuando cambie la altura de las patas, solo
puede modificar la altura de las patas un
nivel a la vez. Para ajustar la altura de la
andadera hacia arriba o abajo, empuje el
botón y suba o baje la pata. Antes de usarlo,
asegúrese de que los 4 botones están en la
misma posición.
Adjust Walker Height
Ajuste la alutra de la andadera
1
WARNING
Do Not lift walker by toys or tray. ADVERTENCIA
No levante la andadera por los juguetes
o la bandeja.
W06-R5.qxd 09/13/2005 9:37 AM Page 8

9
To Install Batteries in Electronic
Toy (select models)
Para instalar las pilas en los juguete
electrónico (modelos selectos)
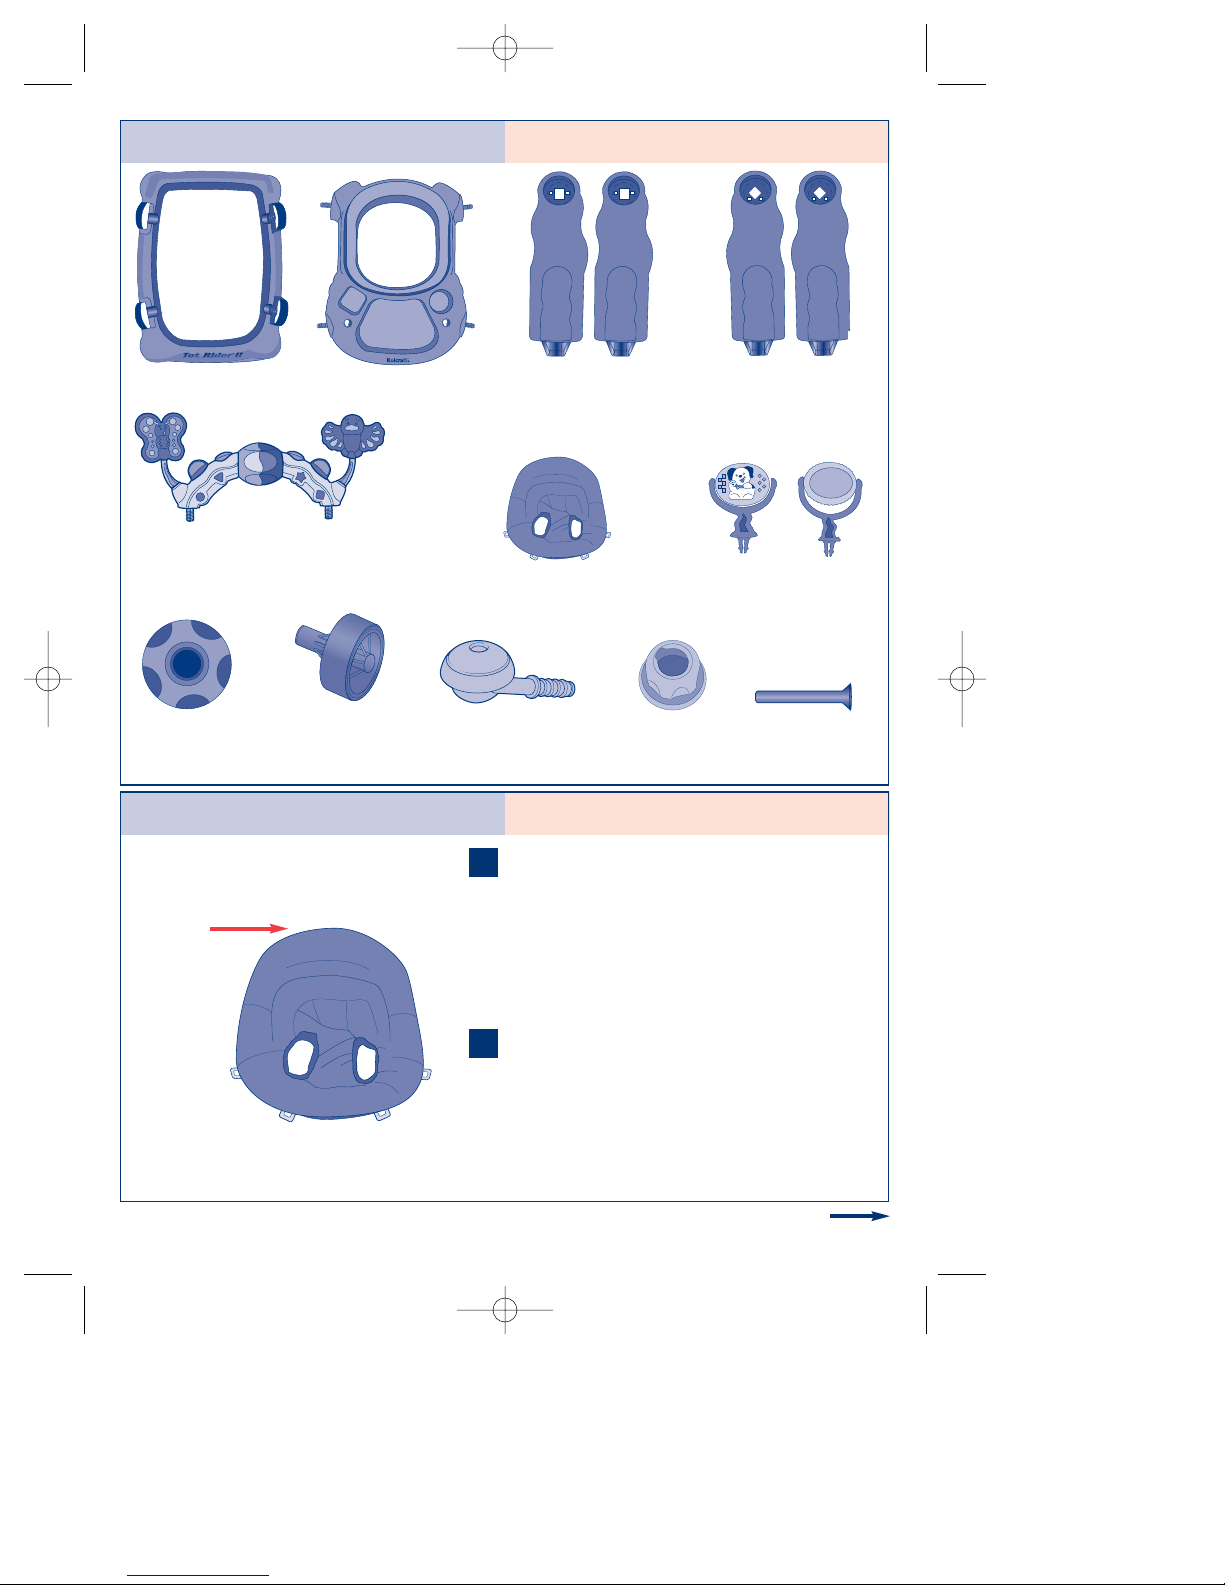
Requires 3 “AAA” batteries (Not Included).To
insert batteries, use a Phillips head screwdriver
to unfasten battery cover. Insert batteries as
shown. Secure battery cover.
Requiere 3 “AAA” pilas (No Incluídas). Para
insertar las pilas, use un destornillador con
punta de cruz para quitar la tapa del compar-
timiento de pilas. Inserte las pilas como se ve
en el dibujo. Vuelva asegurar la tapa.
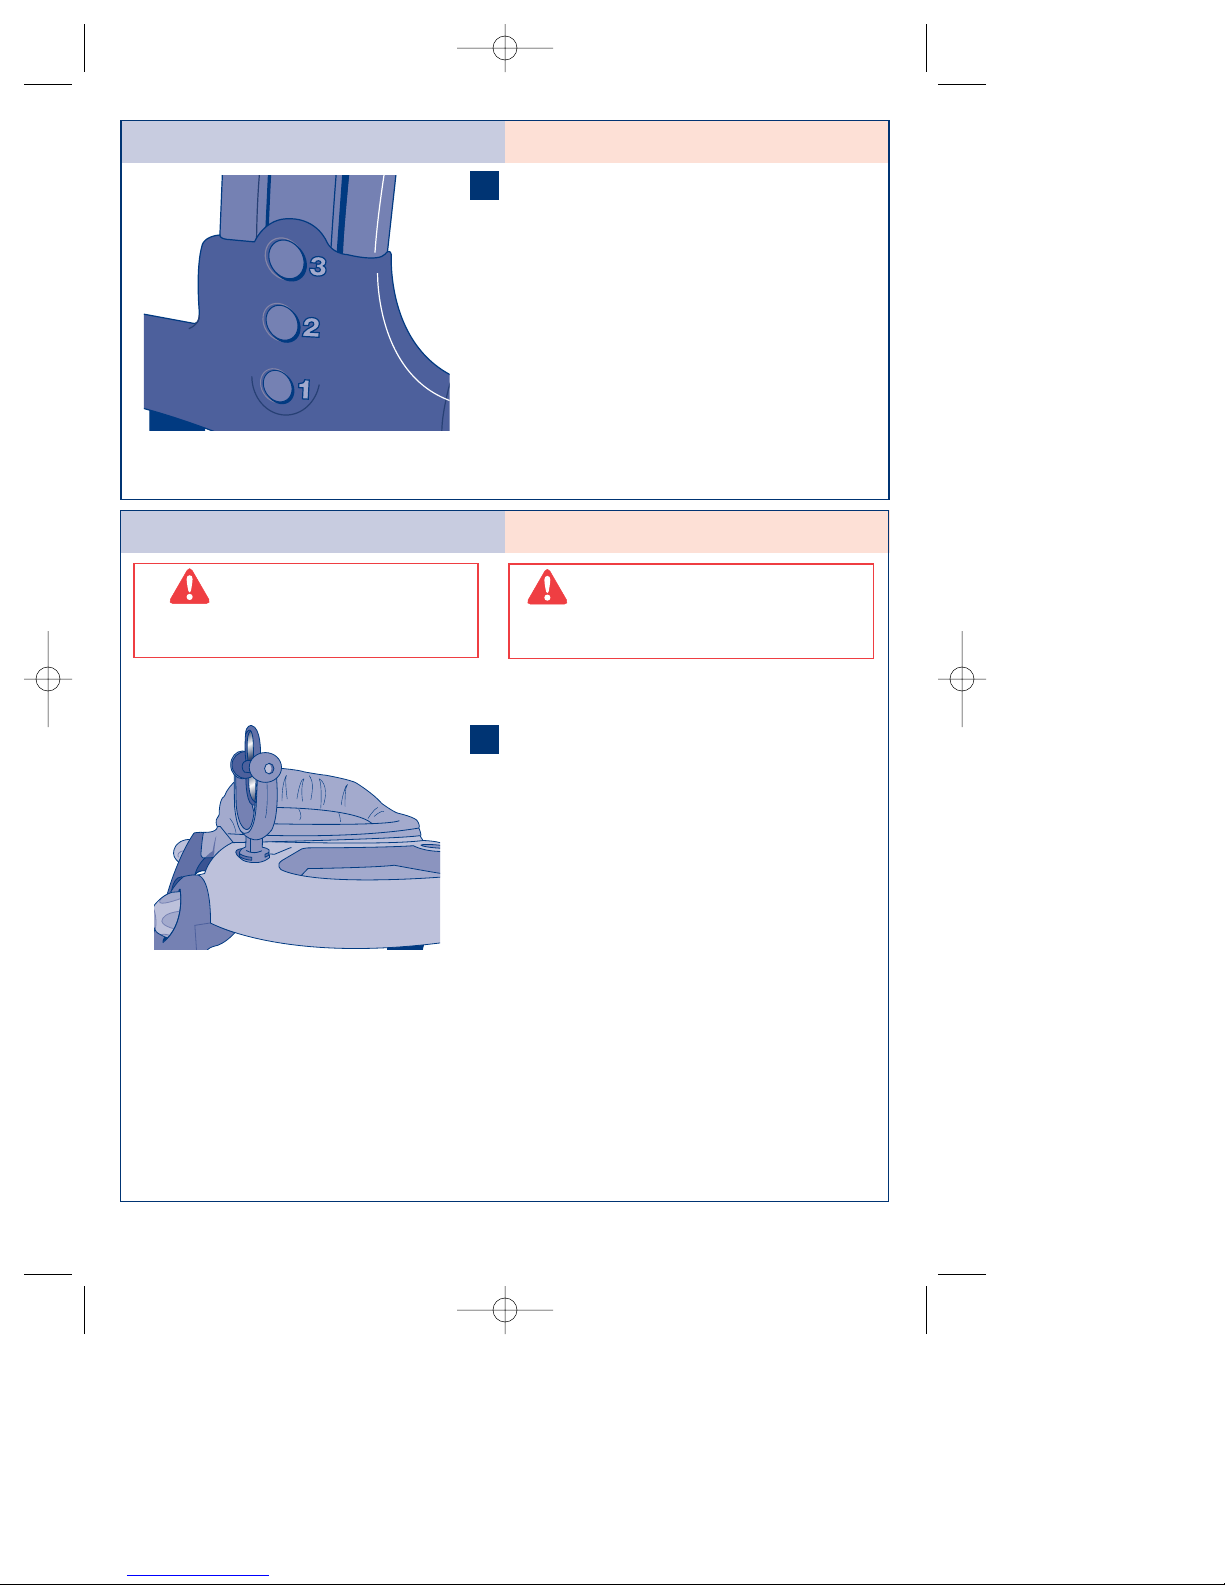
This toy has 2 levels of volume. Move switch
to the middle position for low volume and to
the far right for high volume. To turn off,
move switch to “O” position.
Este juguete tiene 2 niveles de volumen.
Mueva el interruptor a la posición media para
volumen más bajo y todo hasta la derecha
para subir el volumen. Para desconectar, sitúe
el interruptor en la posición “O”.
CCAAUUTTIIOONN::Do not mix old and new batteries.
Do not mix alkaline, standard (carbon-zinc) or
rechargeable (nickel cadmium). Remove
battery(ies) before storing this product for a
prolonged period of time.
PPRREECCAAUUCCIIÓÓNN::No mezclar pilas nuevas y
viejas. No mezclar pilas alkalinas, estándar
(carbon-zinc) o recargables (níquel-cadmio).
Las pilas deben sacarse antes de guardar este
producto por largo timepo.
1
To Attach Electronic Toys
(select models)
Para unir los juguetes electrónicos
(modelos selectos)
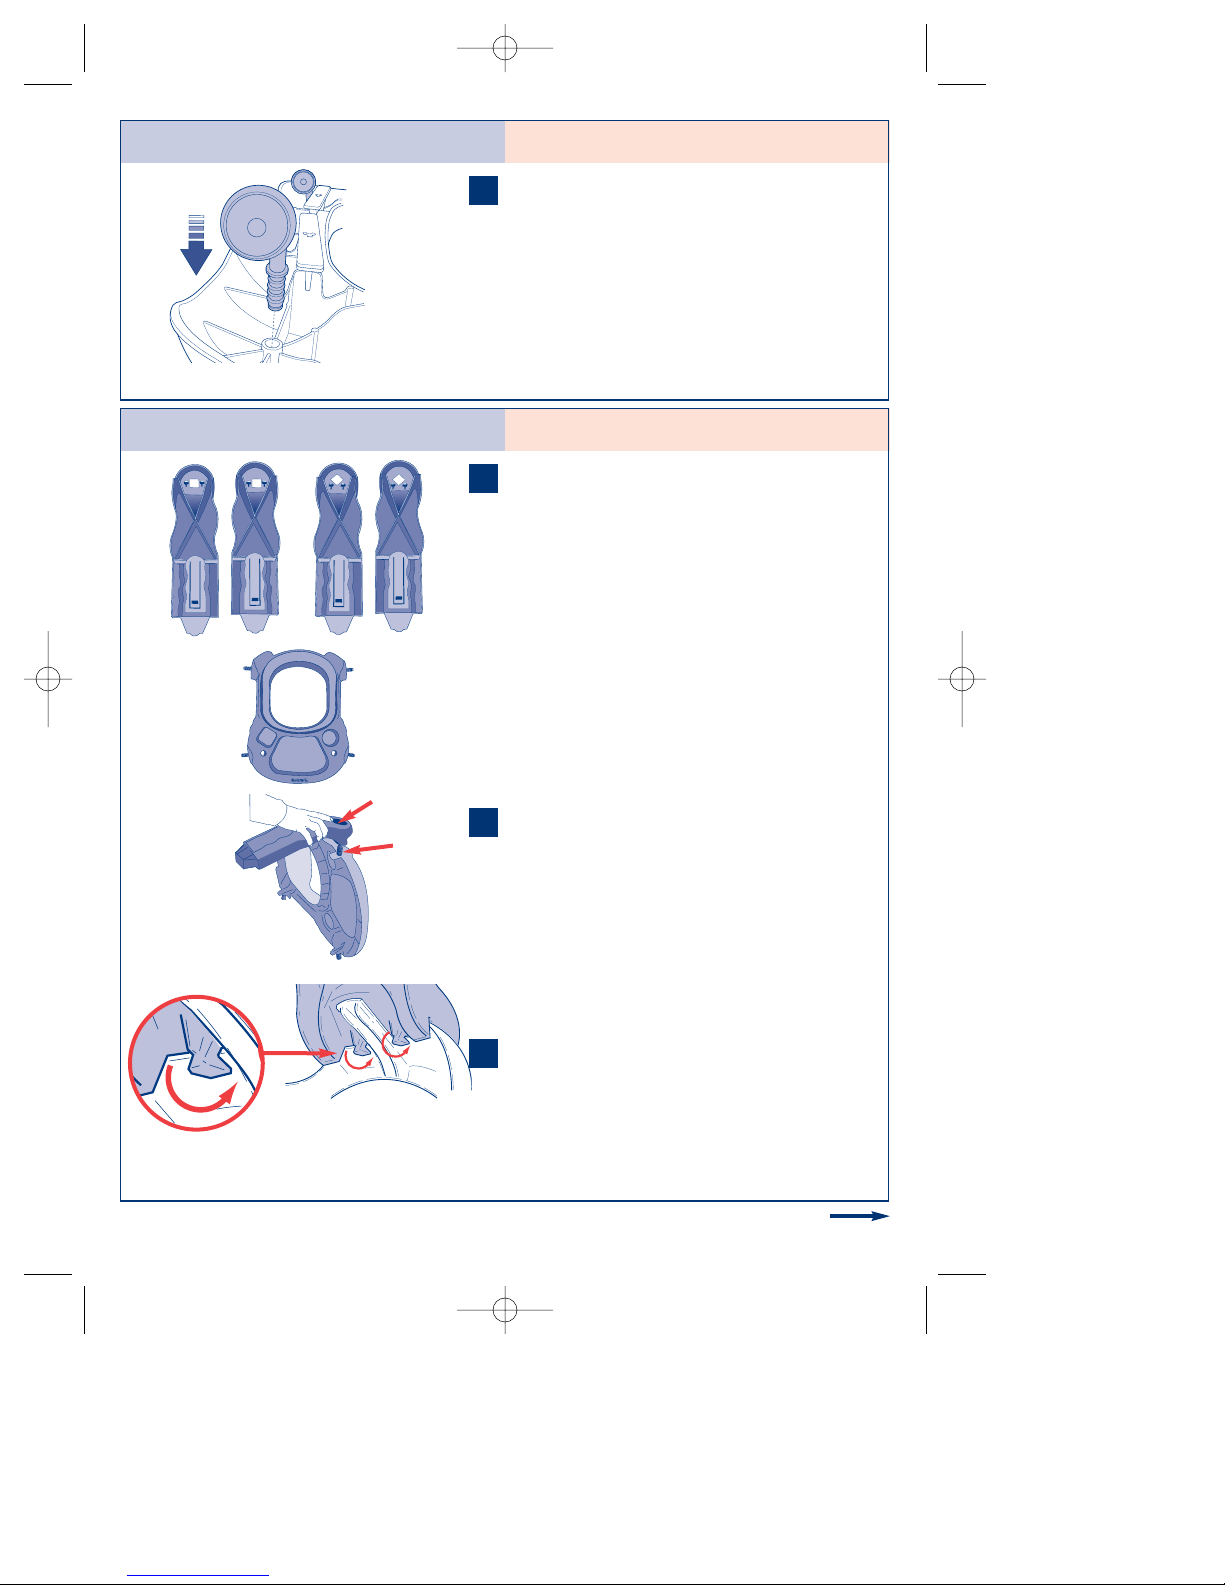
Insert the electronic toy bolts into the tray
openings as shown.
Inserte las tuercas del juguete electrónico en
las aberturas de la bandeja como se muestra.
To secure the electronic toy, flip tray over and
tighten each small nut until they are against
the tray.
Para asegurar el juguete electrónico, dele la
vuelta a la bandeja y asegure cada tuerca
chica hasta que esten contra la bandeja.
CCAAUUTTIIOONN::Toys intended to be assembled
by adult!
PPRREECCAAUUCCIIÓÓNN::¡los juguetes están diseñados
para que los ensamble un adulto!
1
1
WARNING
Do Not lift walker by toys or tray. ADVERTENCIA
No levante la andadera por los juguetes
o la bandeja.
+_
_
_
+
+
+_
_
_
+
+
_
_
_
+
+
1
2
2
2
2
W06-R5.qxd 09/13/2005 9:37 AM Page 9

10
1. Limpie con un paño húmedo, empleando un
jabón suave.
2. Lava a maquina el cojín del asiento en agua
sría y en ciclo suave. No utilice detergentes
fuertes ni blanqueador. No seque a
maquina.
3. Tiéndala a secar.
Care & Maintenance / Cuidado & Manteniniento
1. Wipe plastic parts with a damp cloth
using mild soap.
2. Machine wash seat pad in cold water in
gentle cycle. Do not use harsh deter-
gents or bleach. Do not dry clean.
3. Air or line dry.
W06-R5.qxd 09/13/2005 9:37 AM Page 10

Kolcraft®warrants this product to be free of defects in materials and workmanship, as
follows: For a period of ONE YEAR from the date of purchase, Kolcraft will repair or
replace, at its option, the defective product. If you have a problem or are not satisfied
with this product, please contact the Consumer Service Department at Kolcraft.
REPAIR OR REPLACEMENT AS PROVIDED UNDER THIS WARRANTY IS THE EXCLUSIVE
REMEDY OF THE CONSUMER. KOLCRAFT SHALL NOT BE LIABLE FOR ANY
INCIDENTAL OR CONSEQUENTIAL DAMAGES FOR BREACH OF ANY EXPRESS OR
IMPLIED WARRANTY ON THIS PRODUCT, EXCEPT TO THE EXTENT REQUIRED BY
APPLICABLE LAW. ANY IMPLIED WARRANTY OF MERCHANTABILITY OR FITNESS FOR
A PARTICULAR PURPOSE ON THIS PRODUCT IS LIMITED TO THE DURATION OF THIS
WARRANTY.
Some states do not allow the exclusion or limitation of warranties set forth above, so the
above exclusions may not apply to you. This warranty gives you specific legal rights, and
you may also have other rights which vary from state to state. We sincerely thank you for
your purchase of this Kolcraft product.
To obtain warranty service, please call Kolcraft’s Consumer Service Department at
1-800-453-7673 in U.S. and Canada, 1-910-944-9345 outside U.S. and Canada or contact
If the product is returned to Kolcraft’s Consumer Service Department for repair or
replacement, it must be shipped prepaid and adequately insured.
For further information visit www.kolcraft.com
RREECCAALLLLWWEEBBSSIITTEE::HELP KEEP YOUR CHILD SAFE. Check www.recall.gov to see if any
products you use with your child or any of your child's toys have been recalled.
Kolcraft®garantiza que este producto estará libre de defectos en materiales y fabricación
de la siguiente manera: Por un período de UN AÑO después de la fecha de compra,
Kolcraft reparará o reemplazará, a su opción, el producto defectuoso. Si usted tiene un
problema o no está satisfecho con este producto, por favor diríjase al Departamento de
Servicio al Consumidor de Kolcraft.
LA REPARACIÓN O EL REEMPLAZO SEGÚN SE DISPONE EN ESTA GARANTÍA ES EL
REMEDIO EXCLUSIVO DE CONSUMIDOR. KOLCRAFT NO SE HARÁ RESPONSABLE DE
NINGÚN DAÑO INCIDENTAL O EMERGENTE POR VIOLACIÓN DE CUALQUIER
GARANTÍA EXPRESA O IMPLÍCITA DE ESTE PRODUCTO, SALVO EN LA MEDIDA
REQUERIDA POR LA LEY APLICABLE. CUALQUIER GARANTÍA IMPLÍCITA DE
COMERCIABILIDAD O IDONEIDAD PARA UN FIN EN PARTICULAR DE ESTE PRODUCTO
ESTÁ LIMITADA EN DURACIÓN AL TÉRMINO DE ESTA GARANTÍA.
Algunos estados no permiten la exclusión o limitación de garantías según se dispone
anteriormente, de manera que es posible que las antedichas exclusiones no sean
aplicables a usted. Esta garantía le otorga derechos legales específicos y es posible que
también disponga de otros derechos, los cuales pueden variar de un estado a otro. Le
agradecemos sinceramente por haber comprado este producto Kolcraft.
Para obtener servicio de garantía, llame al Departamento de Servicio al Consumidor de
Kolcraft al 1-800-453-7673 en Estados Unidos y Canada; fuera de Estados Unidos y
Canada: 1-910-944-9345 o envianos un mensaje por correo electrónico a
Si el producto se devuelve al Departamento de Servicio al Consumidor de Kolcraft para
ser arreglado o reemplazado, debe mandarse con el flete pagado y debidamente
asegurado.
Para mayor información visítenos en www.kolcraft.com
SSIITTIIOODDEEWWEEBBDDEEHHAACCEERRVVOOLLVVEERR::MANTENGA A SU HIJO SEGURO. Compruebe
www.recall.gov para ver si cualquiera de los productos que utiliza con su hijo o cualquiera
de sus juguetes han sido retirados.
11
Limited Warranty / Garantía limitada
W06-R5.qxd 09/13/2005 9:37 AM Page 11

12
Personal Record Card / Tarjeta de registro personal
Once in a while, we are less than perfect and one of our products reaches a customer with
a problem. In most cases, we can solve your problem with replacement parts. Please
contact us before you return one of our products to the store. Once a product is returned,
it cannot be resold. The materials and the energy used to make it are wasted.
Please fill in the information in the space provided and attach a copy of your purchase
receipt. You will need this information to obtain warranty service.
You will need this information to obtain warranty service. You can find Model Number and
Date of Manufacture on a sticker located underneath the base ring.
Ocasionalmente no logramos la perfección y uno de nuestros productos presenta algún
problema al llegar al cliente. En la mayor parte de los casos podemos resolver el problema
con piezas de reemplazo. Sírvase ponerse en contacto con nosotros antes de devolver uno
de nuestros productos a la tienda. Una vez que se devuelve un producto, no se pude
volver a vender. Se desperdician los materiales y la energía que se usó en su fabricación.
Por favor escriba la información en el espacio provisto y adjunte una copia de su recibo de
compra. Usted necesitará esta información para obtener los servicios incluidos en la
garantía.
Usted encontrará el Número de Modelo y la Fecha de Fabricación en una etiqueta bajo el
anillo de la base.
PPlleeaasseeddiirreeccttaannyyccoommmmeennttss,,qquueessttiioonnssoorrrreeppllaacceemmeennttppaarrttrreeqquueessttssttoo::
FFaavvoorrddeerreemmiittiirrccuuaallqquuiieerrccoommeennttaarriioo,,pprreegguunnttaassooppeeddiiddoossddeeppiieezzaassddee
rreessppuueessttooaa::
Kolcraft® Enterprises, Inc. Consumer Service Department
10832 NC Highway 211East
Aberdeen, NC 28315
1-800-453-7673 in U.S. & Canada, 1-910-944-9345 outside U.S. & Canada
Eastern Standard Time, 8 am-5:45 pm Monday - Thursday, 8 am-3:30 pm Friday
1-800-453-7673 en los Estados Unidos y en Canada, 1-910-944-9345 fuera de los Estados
Unidos y Canada tiempo estándar del este, 8 am-5:45 pm Lunes - Jueves, 8 am-3:30 pm
Viernes
ffaaxx//fax: 910-944-3490
ee--mmaaiill//correo electrónico: [email protected]
Model / Style Number:
Número de Modelo/Estilo: _________________________
Date of Manufacture:
Fecha de fabricación: ______________________________
Date of Purchase:
Fecha de compra: _________________________________
W06-R5.qxd 09/13/2005 9:37 AM Page 12

13
Circle the Part You Need
Replacement Parts List / Lista de piezas de repuesto
Marque con un círculo el repuesto
que necesita
Las piezas de recambio se pueden ver
ligeramente diferentes de como se muestran
abajo.
Replacement parts may look slightly
different than what is shown below.
Base
Base
$13.00
Tray
Bandeja
$10.00
Seat Pad
Cojín del asiento
$12.00
Right Leg
Square Hole (A)
Pata agujero
cuadrado (A)
$7.00
A
BD
C
Left Leg Diamond
Hole (D)
Pata agujero de
diamante (D)
$7.00
Electronic Toy
Juguete electrónico
$20.00
Small Nut
Tuerca chica
$2.00
Large Nut
Tuerca grande
$3.00
Rear Wheel and
Axle
Ruedas traseras y
tornillo
$3.00
Front Caster
Ruedecilla
delantera
$2.00
Right Leg
Square Hole (B)
Pata agujero
cuadrado (B)
$7.00
Left Leg
Diamond Hole (C)
Pata agujero de
diamante (C)
$7.00
W06-R5.qxd 09/13/2005 9:37 AM Page 13

14
Replacement Parts Order Form / Formulario para ordenar piezas de repuesto
Model Number -
No de modelo
Date of Manufacture -
Fecha de fabricación
Total -
Total
:
Shipping & Handling* -
Gastos de envío
*: $5.00
Sales Tax** -
Impuestos
**:
Total Due -
Total a pagar
:
*$15.00 outside the continental U.S.
*U.S. $15,00 para fuera de continente de EE.UU
**NC Residents Only 7%
**Residentes de North Carolina nomas 7%
❑
Check or money order (in US dollar) enclosed (payable to Kolcraft
Enterprises, Inc.)
Cheque o giro adjunto (a nombre de Kolcraft Enterprises, Inc.)
❑
Charge to credit card
Cobrar a la tarjeta de crédito
❑ Visa ❑ Mastercard
Account# -
Cuenta No
:
Expiration Date -
Fecha de vencimiento
://
Signature -
Firma
:
Ship to -
Enviar a
:
Name - Nombre
Address - Dirección
City, State, Zip - Ciudad, Estado, Código postal
(())
Telephone - Teléfono
Email Address - Correo electrónico
Complete the following form. Your
model number and date of manufacture
must be included on the form to ensure
proper replacement parts.
Complete el siguiente formulario. Debe
incluir en el formulario el número de su
modelo y fecha de fabricación para
asegurarse de que obtenga las piezas de
repuesto adecuadas.
W06-R5.qxd 09/13/2005 9:37 AM Page 14
Table of contents
Other Kolcraft Mobility Aid manuals