Inter-fab Zoomerang User manual
INSTALLATION MANUAL
3050 S. Alvernon Way
Tucson, AZ 85713
(800) 737-5386 / (520) 790-7040
(520) 790-7127 Fax
www.inter-fab.com
1

TABLE OF CONTENTS
Product Safety……………………………………………………………3
Slide Placement & Positioning…………………………………………..3
Slide Components………………………………………………………..4
Step 1: Flume Assembly………………………………………….……...5
Step 2: Ladder & Handrail Assembly to Flume………………….……6
Step 3: Slide Anchoring; Wooden Deck/Concrete Deck….…………...7
Step 4: Water Supply Hook-up………………...………….…………….8
Care & Maintenance……………….…………………………………….9
Limited Warranty & Registration………………………………….....10
2
S
Sa
af
fe
et
ty
y
F
Fi
ir
rs
st
t!
!
Thank you for purchasing the Zoomerang™ slide. You have made an investment in years of family fun. Like all
Inter-Fab products the Zoomerang™ was designed to provide the ultimate in performance and safety. As with
all recreational products (particularly those associated with water) there are some common sense rules that
apply to enjoy the Zoomerang™ in a safe manner. As the owner of this product, it is your responsibility to read
and strictly enforce the guidelines listed below.
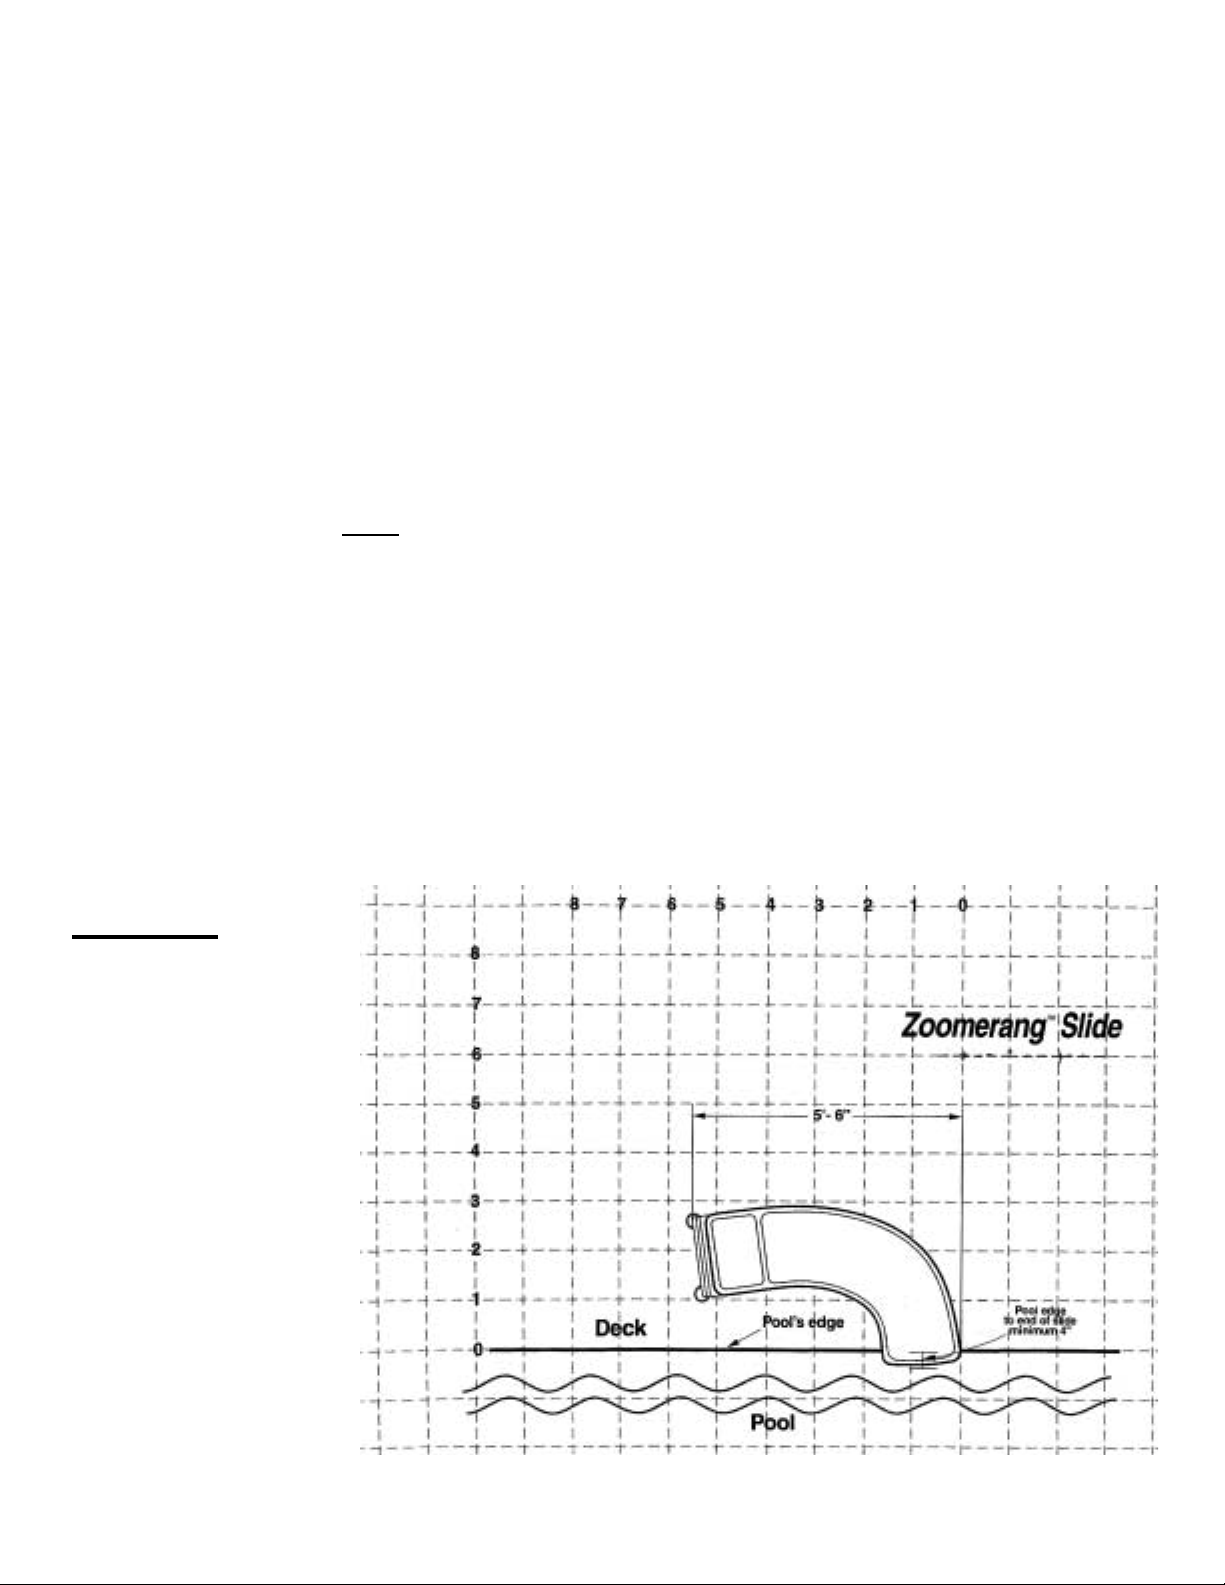
• Do not install or use this slide unless there is unobstructed clearance of 3’ on either side of the exit of the
flume, a minimum of 8’ clearance in front of the flume and a minimum water depth of 3’6” of water
within the corridor defined by these measurements.
• This product must be securely fastened to a deck surface that conforms to local or commonly accepted
construction standards. Do not use if the there is movement between the slide base where it contacts the
deck or with wooden decks that are inadequately supported, have signs of rot or other indications of
deterioration.
• This product should never be used without adult supervision.
• This product has a user weight limit of 200 lbs.
• The Zoomerang™ should only be used feet first in a seated position. Never let users slide headfirst or
backward.
• Users should hold the grab rails before beginning to climb the ladder and maintain constant contact with
grab rails until seated in the proper position to begin a feet first slide.
• Never stand upright on top of or jump off of the Zoomerang™.
• Users should always check to see that the slide corridor outlined above is free of bathers, pool toys or
other obstructions prior to sliding to avoid possible collisions.
• The Zoomerang™ is to be used only by one slider at a time.
• Check local electrical code requirements regarding acceptable methods of grounding the metal
components of the Zoomerang™.
Foreword: Before
beginning the assembly
process of the slide, first
determine where it will be
positioned.
Scale: 1 square = 1’
3

SLIDE COMPONENTS
• Flume
• Ladder Treads (3)
• Flume support base
• Ladder rails (2)
• Plumbing Kit (Hose, slide adapter fitting, pool adapter fitting)
• Grab Rails (2)
• Hardware packs (2)
When unpacking box, please note
treads are located in stapled side
pocket.
4
ASSEMBLY
Tools
Hammer, drill, hammer drill (for masonry deck), socket wrench with 7/16” and 9/16” sockets,
7/16” open-end wrench, ½” open-end wrench, pencil or marker.
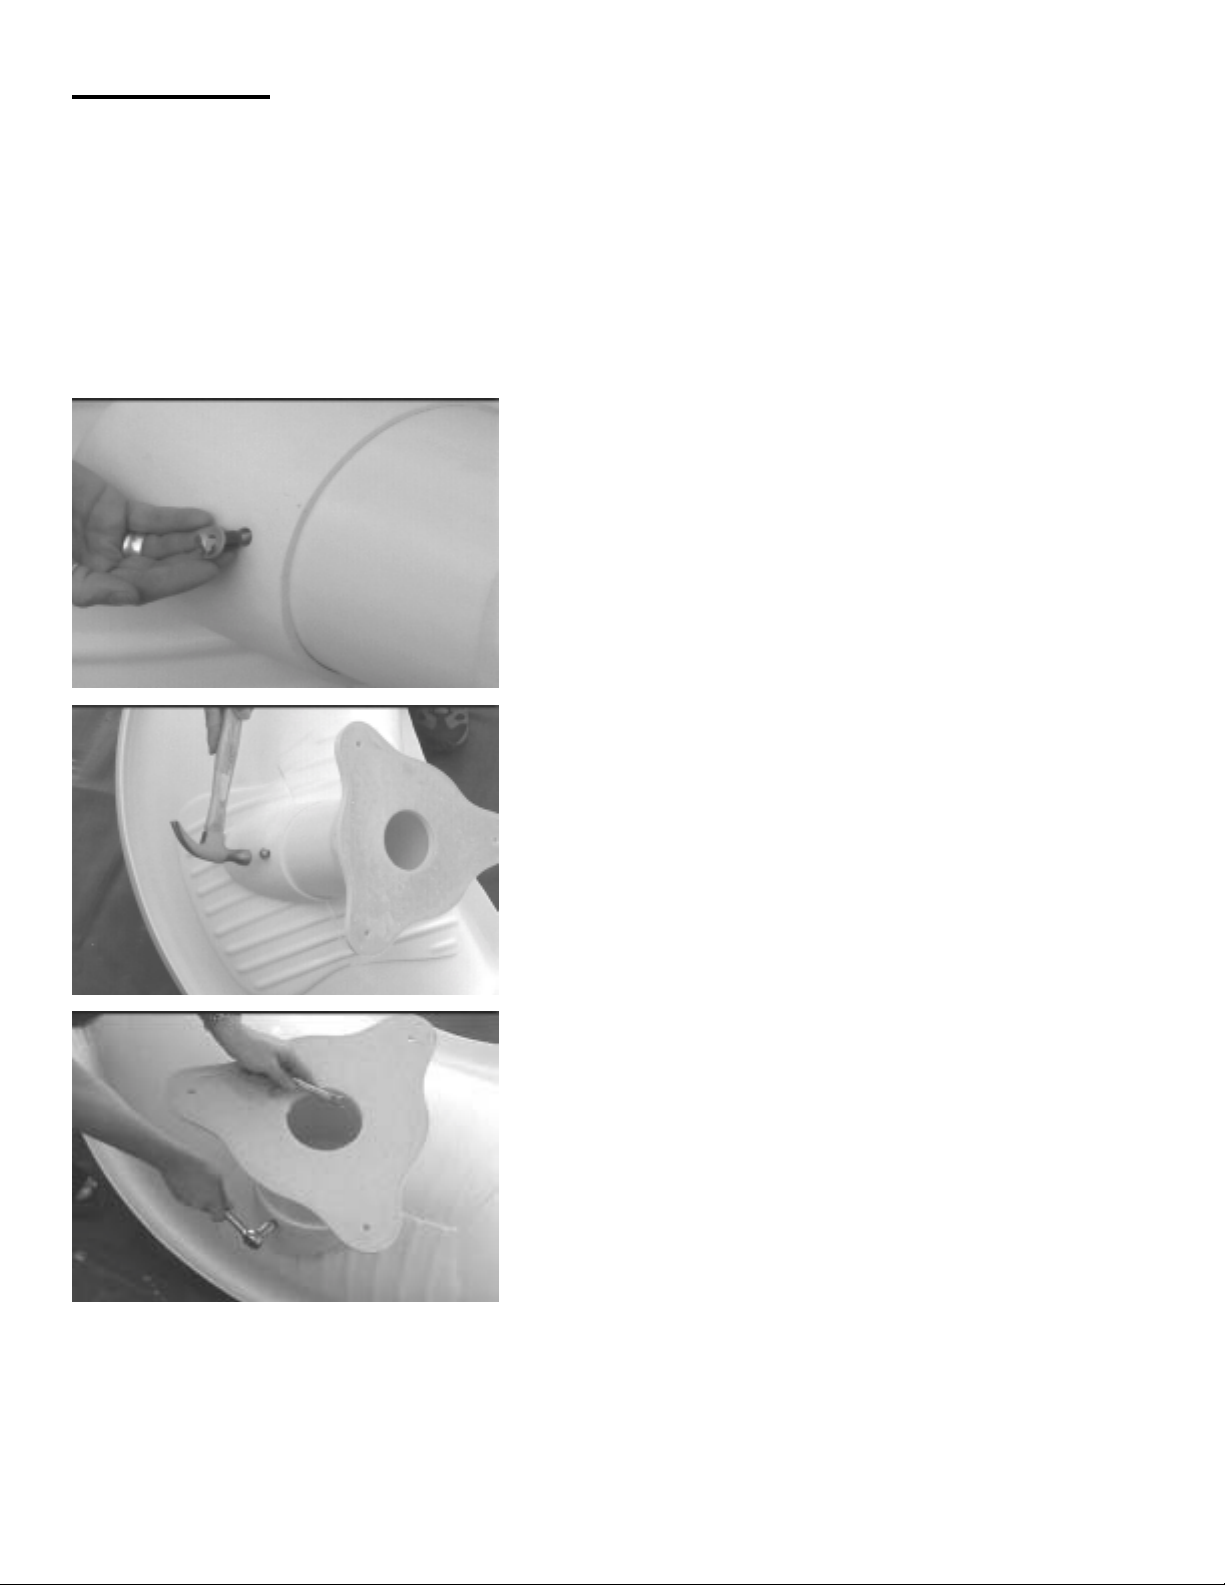
Flume Support to Flume
Flatten product box to use as a protective work platform. This prevents possible scratching of
the acrylic slide parts during assembly.
1. Align pre-drilled holes in the flume support pipe
with those of the receptor on the underside of the
flume.
2. Using the 1” long bolt and corresponding washer,
insert 3/16” roll pin onto bolt. Use a hammer to
gently tap the bolt assembly into the
pipe/receptor.
3. Secure on the inside of the pipe with ¼” nut and
corresponding washer using a 7/16” wrench.
Repeat for all three holes.
5
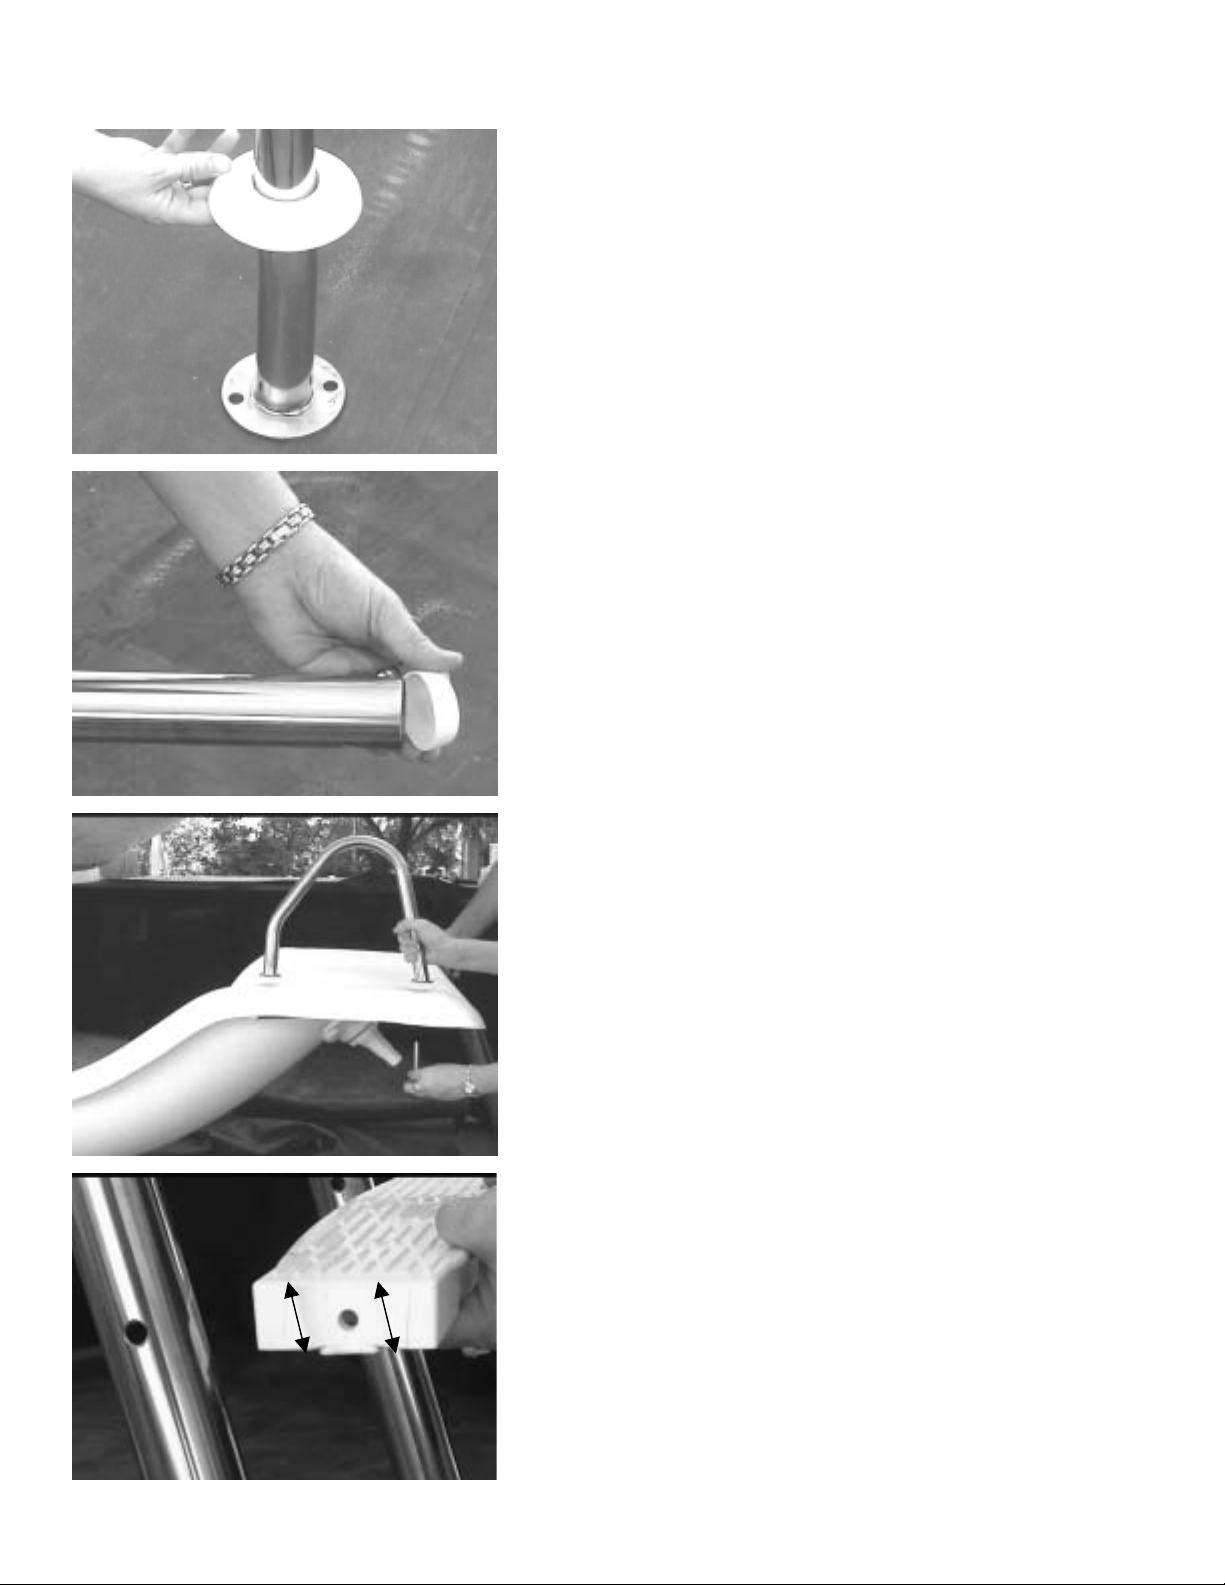
Ladder Rails & Grab Rails to Flume
1. Slide acrylic escutcheon (looks like a doughnut –
it’s used to cover the ladder flange and hardware
at the base of the ladder) over the open rail end.
Installed correctly it will cover the flanged end of
the rail.
2. Attach soft vinyl rail caps over the open end of
the ladder rail.
3. Lift the flume up to its upright finished position
and align the holes of the rail underneath the
holes in the seat area of the flume. Use 3/8” X 3”
bolts with washer inserted from the bottom up to
attach rail to flume and to the grab rail placed on
top of the flume holes. Note: Straight to bend
portion of the grab rail is closest to the ladder end.
The angle bend is closest to the flume. Secure
with a 9/16” wrench.
4. Repeat steps 1- 3 for other ladder rail to flume to
grab rail assembly.
5. Install the ladder treads using the special curved
head bolts inserted from the outer edge of the
ladder rails through the underside of the treads.
Use washer and nut combination to secure with
½’ open-end wrench. Note: because the ladder
rails are angled there is a correct way to install the
treads so they are parallel with the deck when
installed. Please be sure to check this before
tightening hardware.
6

INSTALLATION
nstallation to Deck - Concrete
ty corridor standards listed in
2. of the flange holes in the ladder and flume support with a pencil or
3. 3” deep. It is important to drill
4. threading the nut onto the threads as far down as possible.
5. vinyl nut caps over exposed threads of the flume support base and make sure
nstallation to Deck – Wood Deck
. The lip of the flume exit should protrude over the pool
2. locations with a pencil or marker.
r deck
3. ck.
rs and nut assemblies using two
5. of the flume support base and make sure
ote: We recommend using wood screws instead of nails to secure the deck slats supporting
I
1. Place slide in desired location. Be sure it conforms to safe
the product safety section. The lip of the exit of the flume should project over the edge of
the pool 2” to 4”.
Mark the position
marker. Note: We recommend the use of a hammer drill for drilling into masonry. These
can be rented at most local equipment rental companies.
Using a 3/8” masonry bit, drill holes between 2-3/4” and
the holes as vertically as possible. Clean the dust from the holes using a shop vacuum or
garden hose at full pressure.
Prepare anchor hardware by
Insert the anchor with the washer below the nut and the threads and drive pinhead facing
up. Use a hammer to set the drive pin into the anchor, securing it to the deck. Remove nut
and washer. Repeat the process for the remaining base bolt holes and ladder to deck
holes.
Attach
escutcheons cover exposed hardware on the ladder flanges.
I
1. Place slide in desired position
edge by 2” to 4”. Make sure your chosen location conforms to the safety corridor
guidelines listed in the Product Safety section.
Mark the ladder flange and flume support hole
Note: Be sure holes are not located over seams in the decking or directly ove
support joists. If either of these conditions are present re-position the Zoomerang™
as necessary to remedy and mark the new holes.
Use a 5/16” wood drill bit to drill the holes in the de
4. Secure with the 3/8” x 3” bolts, corresponding washe
9/16” wrenches and a helper under the deck.
Attach vinyl nut caps over exposed threads
escutcheons cover exposed hardware on the ladder flanges.
N
the Zoomerang™.
7

WATER SUPPLY HOOK-UP
Your kit contains a length of 1-1/4” hose, a two part plastic fitting, and two plastic clamps.
1. Wet one end of the hose and slide it onto the cone
2.
3. Remove the collar that secures the directional
4. Slide the hose over the lipped flange of the
5. Turn on your filtration system and your
shaped fitting on the underside of the flume (Fully
enclose the smaller cone). Secure with a plastic
clamp by pinching together the interlocking teeth.
Turn off your filtration system before connecting
the other end of the hose to your pool return
fitting.
“eyeball” fitting in your pool return (inside the
pool). There are many variations of return fittings,
however, the many thread combinations provided
by the two fitting adaptors provided should fit
your pool. Tighten by hand only. You will want
to be able to remove the Zoomerang™
fitting/hose from your wall return fitting when the
Zoomerang™ is not in use.
adaptor fitting until the lip locks into the hose
corrugation. Attach the plastic clamp, but do not
secure too tight. You should be able to swivel the
fitting inside the hose (in order to hand thread or
remove the Zoomerang™ hose/adaptor fitting
combination without tools).
Zoomerang™ is ready for action!
8

CARE & MAINTENANCE
1. General Cleaning
• Use nonabrasive soap and water when possible.
• Review cleaner’s label instructions before applying to acrylic surface.
• Avoid harsh chemicals and disinfectants.
You may safely use: *
• Chlorox
• Spic & Span Powder
• Mr. Clean
• Formula 409
• Liquid Comet
• Windex
• Glass Plus
• Soft Scrub
• Calgon Bath Oil Beads
Do not use:
• Lysol Disinfectant Spray
• Dow Disinfectant Bathroom Cleaner
• Pinesol
• Whitecap
• Lestoil
2. Scratches, abrasions, etc.
Abrasions and scratches may be removed and original gloss fully restored using the
following materials. *
• Novus plastic polish (Novus, Inc.)
• Mirror Glaze Professional Formula #17 (Mirror Bright Polish Co., Irvine, CA)
• Permatex Plastic Cleaner #403D (Permatex Co., Kansas City, KS)
• “J-Wax” or “Kit” Automotive Cleaner/Waxes (S.C. Johnson & Son)
• DuPont or Turtlewax “White Polish” automotive polishing compound.
Light Scratches:Very light scratches, scuff marks and haze can be hand polished with Permatex
Plastic Cleaner or Gel-Gloss. Follow the manufacturer’s guidelines. Clean cotton cloth works
best for applying the polish and buffing. *
*These suggestions and data based on information we believe to be reliable, from our acrylic manufacturer. They are offered in
good faith, but without guarantee, as conditions and methods of use and procedures are beyond our control.
9

Limited Warranty
Inter-Fab Inc. warrants the Zoomerang™ to be free of defects in manufacturing, materials or workmanship for a
period of (1) year from date of end user purchase. Products which fail or become defective during the warranty
period, except as a result of improper installation, improper use or care, negligence or natural accidents (acts of
God) will be repaired or replaced at Inter-Fab’s option at no charge.
To enact this warranty, product owner or representative must notify Inter-Fab Inc. (or its wholesale agent) in
writing, giving a full description of the nature of the product defect or failure, along with proof of purchase date
and serial number of the product.
Inter-Fab reserves the right to physically inspect damaged or defective products or components if necessary to
determine the cause of the damage or defect, prior to authorizing repair or replacement of its products.
Product Warranty Registration
While not required, Inter-Fab encourages you to register your Zoomerang™ with us. It will speed processing
should you have a problem with the product, provide us with valuable feedback and allow us to notify you
directly of accessory items or new products that might interest you. To show our appreciation, upon submission
of your completed warranty registration form, Inter-Fab will extend your warranty for an additional year. Please
detach form below and return to Inter-Fab, Inc. (See mailing address below)
--------------------------------------------------------------------Detach here ------------------------------------------------------------------------
Purchased By:
Name:
Last (Required) First Phone Email
Address:
(Required) Street City State Zip
Purchased From:
Purchase Date:
(Required) MM/DD/YYYY Dealer Name Phone
City State Zip
Customer Survey:
! A Catalog ! My pool supply dealer (builder, service,
or retail store)
1. I first learned about the Zoomerang from:
! Inter-Fab website ! Other (please specify)*_______________
! A new pool ! An existing pool2. I purchased this slide for:
! Replacement for an old slide
3. The slide was installed by: ! Myself, family member, or friend ! Professional installer
4. This was installed on: ! A concrete deck ! A wooden deck ! Other*________
! Easy ! Somewhat difficult5. How would you describe the installation?
! Very difficult (please describe)*________________________________________
6. Have you or your immediate family used other
residential slides in the past?
! Yes (Continue to #7) ! No (Skip to #8)
! Better than I expected ! The same as other residential slides used7. If yes, would you describe the “ride” of the
Zoomerang to be: ! Worse than other residential
slides used
! Better than I expected ! As I expected8. If no, would you describe the “ride” of the
Zoomerang to be: ! Worse than I expected
9. Overall, how would you describe the
Zoomerang?
! High quality ! Average quality ! Poor quality
*For more descriptive responses, please attach a separate sheet.
Mail to: 3050 S. Alvernon Way – Tucson, AZ 85713
10
Attention: Customer Service Department
Table of contents
Other Inter-fab Lighting Equipment manuals


Popular Lighting Equipment manuals by other brands

Limente
Limente SMART 400 Assembling instructions

Source
Source SEM-EXB-P04 installation instructions

Laserworld
Laserworld BLUE-300-473 user manual

Sensio
Sensio Neo Pro SE11598P0 manual

Current
Current Dual-Lite PLD7 Installation, operation and service instructions

RECA
RECA Zone 360 XL operating instructions


