manuals.online logo
Brands
  1. Home
  2. •
  3. Brands
  4. •
  5. Interlogix
  6. •
  7. Control Unit
  8. •
  9. Interlogix UltraSync UM-Z8 Assembly instructions

Interlogix UltraSync UM-Z8 Assembly instructions

© 2017 United Technologies Corporation 1 / 2 466-5270 • REV C • ISS 14FEB17
UltraSync Modular Hub
Zone Expansion Module
Installation Sheet
UM-Z8
UM-Z20
English Installation Sheet
Product Summary: These modules add 8 or 20 hardwired zone inputs to an UltraSync Modular Hub system.
Installation
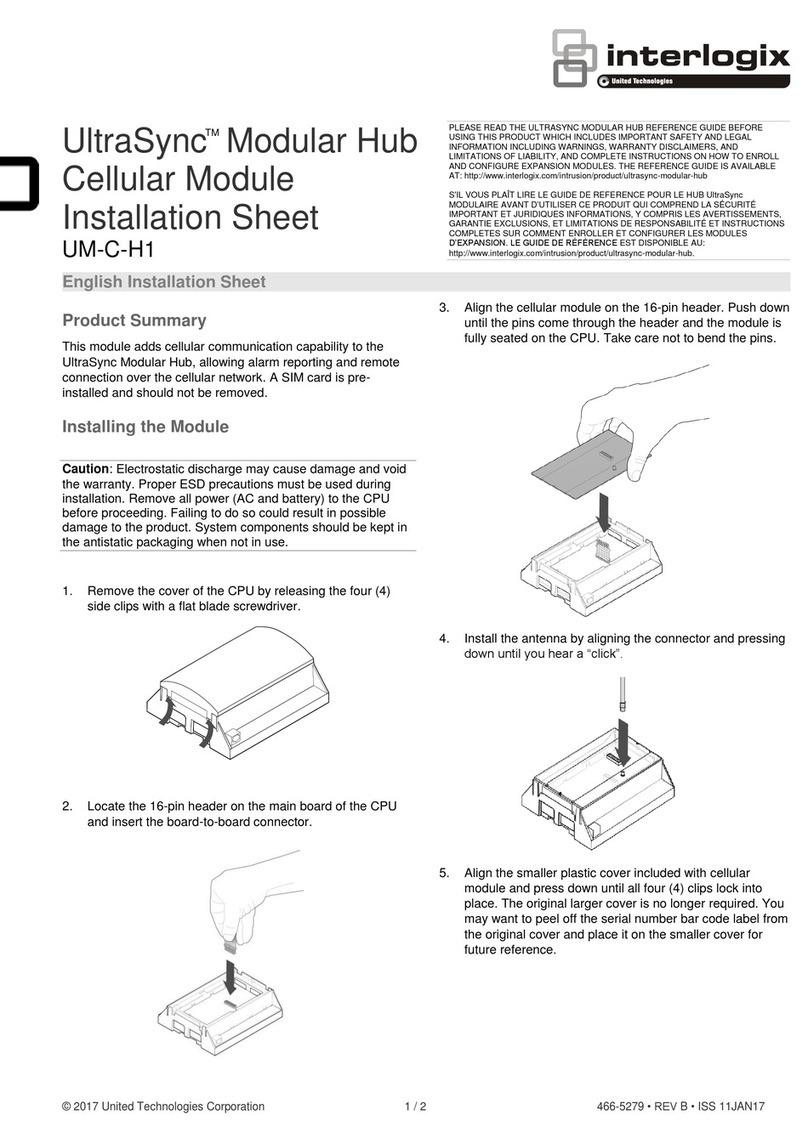
1. Pull down the din rail tab on the bottom of the module.
2.Hang the module on the top of the din rail, tilting the bottom of
the module outward. Once the module is vertical, lock the
module on the rail by pushing the tab up.
4. Install a TERM (bus termination) jumper if required.
See above for guidance.
5. Enroll the expansion module in your system. To manually
enroll the module, use the web interface. In the advanced
menu, navigate to Devices –System Devices –Control
–Enroll Function and select Manual Enroll from the
drop down menu. This puts the system into manual
enrollment mode.
6. When the CPU is in the manual enrollment mode, simply
push ENROLL button on the module to enroll the module
into the system. Hold the button down for three seconds.
You can automatically enroll the module into the system
by pressing the ENROLL button on the CPU.
1. Tamper input.
Disabled by default. Connect tamper
switch when mounted in a separate
enclosure from CPU. Enable in
\Devices\System Devices\Relay
Expanders\Expander Options.
2. Manual enroll button
3. TERM (bus termination). Correct RS-
485 termination reduces communication
issues with signal reflections. For a
single long cable run, put a jumper
across the terminal labeled TERM on
the CPU and the furthest bus device.
For installations with multiple long cable
runs, (star configurations) do not place a
terminator on the CPU; rather place one
at the end of the two longest cable
runs.
4. Power available on terminals for sensors.
UM-Z20
(pictured)
or UM-Z8
3
1
2
4
3. Connect the POS, NEG, LAN+ and LAN-
UM-Z8
TM
PLEASE READ THE ULTRASYNC MODULAR HUB REFERENCE GUIDE BEFORE
USING THIS PRODUCT WHICH INCLUDES IMPORTANT SAFETY AND LEGAL
INFORMATION INCLUDING WARNINGS, WARRANTY DISCLAIMERS, AND
LIMITATIONS OF LIABILITY, AND COMPLETE INSTRUCTIONS ON HOW TO ENROLL
AND CONFIGURE EXPANSION MODULES. THE REFERENCE GUIDE IS AVAILABLE
AT: http://www.interlogix.com/intrusion/product/ultrasync-modular-hub
S'IL VOUS PLAÎT LIRE LE GUIDE DE REFERENCE POUR LE HUB UltraSync
MODULAIRE AVANT D'UTILISER CE PRODUIT QUI COMPREND LA SÉCURITÉ
IMPORTANT ET JURIDIQUES INFORMATIONS, Y COMPRIS LES AVERTISSEMENTS,
GARANTIE EXCLUSIONS, ET LIMITATIONS DE RESPONSABILITÉ ET INSTRUCTIONS
COMPLETES SUR COMMENT ENROLLER ET CONFIGURER LES MODULES
D’EXPANSION. LE GUIDE DE RÉFÉRENCE
EST DISPONIBLE AU: http://www.interlogix.com/intrusion/product/ultrasync-modular-hub.
© 2017 United Technologies Corporation 2 / 2 466-5270 • REV C • ISS 14FEB17
Consult the UltraSync Modular Hub Reference guide for
more information.
7. When connecting zones you can use the expansion
module’s terminals for Zone input, and Positive/Common
for power. Power is taken from BUS power. Zone current
draw must be accounted for in your power budget
calculations. Refer to the documentation of the connected
devices.
8. After enrolling a zone expansion module, its zone range
(Start Zone and End Zone) must be programmed. Each
module has its own range. The start zone needs to
account for CPU zones and other existing modules. (The
CPU can be 8 to 16 zones depending on the
implementation of zone doubling).
Default Expansion Module Settings
8ZoneExp.
20 Zone Exp.
Start Zone
9
9
End Zone
16
28
Not all of the zones of a module need to be used but the
zones must be used in order starting at 1.
For example: Use a 20 zone module to add 12 zones to
an eight zone (CPU only) system.
Your Start Zone is # 9.
Your End Zone is # 20.
You must use zones 1 –12 on the module.
There are now 8unused zones available in the system’s
total count of available zones.
Firmware
Remotely upgradeable using DLX 900.
Specifications
Compatibility
UltraSync Modular Hub systems
Zone Capacity UM-Z8
UM-Z20
8 Zones
20 Zones
UL/ULC Listed Voltage
7.82 - 15 VDC
Operational Voltage
6.55 - 15 VDC
Current UM-Z8
UM-Z20
Average
35 mA
45 mA
Alarm/Maximum
35 mA
45 mA
Powered sensor current draw must be included in power budget
calculations
Product Dimensions
(W × H × D) UM-Z8
UM-Z20
4.64” x 2.79” x 2.0”
(118mm x 71mm x 51mm)
4.64” x 2.79” x 2.52”
(118mm x 71mm x 64mm)
Operating
temperature
Non UL/ULC installations
14° to 131°F
(-10° to 55°C)
UL/ULC installations
32° to 120° F
(0° to 49° C)
Storage temperature
−30° to 140°F
(−34° to 60°C)
Relative
humidity
Non UL/ULC installations
up to 95% noncondensing
UL/ULC installations
up to 85% noncondensing
Regulatory Information
Manufacturer
Placed on the market by:
UTC Fire & Security Americas Corporation, Inc.
3211 Progress Drive, Lincolnton, NC, 28092, USA
This equipment has been tested and found to comply with the limits for a
Class B digital device, pursuant to part 15 of the FCC Rules. These limits
are designed to provide reasonable protection against harmful
interference when the equipment is operated in a commercial
environment. This equipment generates, uses, and can radiate radio
frequency energy and, if not installed and used in accordance with the
instruction manual, may cause harmful interference to radio
communications.
If this equipment does cause harmful interference to radio or television
reception, which can be determined by turning the equipment off and on,
the user is encouraged to try to correct the interference by one or more
of the following measures:
• Reorient or relocate the receiving antenna.
• Increase the separation between the equipment and receiver.
• Connect the equipment into an outlet on a circuit different from that to
which the receiver is connected.
• Consult the dealer or an experienced radio/TV technician for help.
This Class B digital apparatus complies with Canadian ICES-3B.
Cet appareil numérique de la classe B est conforme à la norme NMB-
003 du Canada.
Contact Information
For contact information, visit us online at www.interlogix.com.
For technical support, see www.interlogix.com/support
Copyright
Copyright © 2017 United Technologies Corporation. All rights
reserved.
Trademarks
Interlogix is a registered trademark of United Technologies
Corporation. Interlogix is part of UTC Climate, Controls &
Security, a unit of United Technologies Corporation.

This manual suits for next models

1

Other Interlogix Control Unit manuals

Interlogix AdvisorOne AVO-ZW Assembly instructions

Interlogix

Interlogix AdvisorOne AVO-ZW Assembly instructions

Interlogix SuperBus 2000 User manual

Interlogix

Interlogix SuperBus 2000 User manual

Interlogix NX-586E User manual

Interlogix

Interlogix NX-586E User manual

Interlogix UM-ZW User manual

Interlogix

Interlogix UM-ZW User manual

Interlogix NXG-7002 Assembly instructions

Interlogix

Interlogix NXG-7002 Assembly instructions

Interlogix ATS7200N Assembly instructions

Interlogix

Interlogix ATS7200N Assembly instructions

Interlogix DTIM Assembly instructions

Interlogix

Interlogix DTIM Assembly instructions

Interlogix UltraSync UM-W7 Assembly instructions

Interlogix

Interlogix UltraSync UM-W7 Assembly instructions

Interlogix NX-595E User manual

Interlogix

Interlogix NX-595E User manual

Interlogix TruPortal TP-ADD-2D Series User manual

Interlogix

Interlogix TruPortal TP-ADD-2D Series User manual

Interlogix UltraSync UM-C-H1 Assembly instructions

Interlogix

Interlogix UltraSync UM-C-H1 Assembly instructions

Interlogix ATS7200E Assembly instructions

Interlogix

Interlogix ATS7200E Assembly instructions

Interlogix SuperBus 2000 PIV User manual
Interlogix

Interlogix SuperBus 2000 PIV User manual

Interlogix 600-1046-95 User manual

Interlogix

Interlogix 600-1046-95 User manual

Interlogix ATS 500A Series User manual

Interlogix

Interlogix ATS 500A Series User manual

Interlogix TruPortal TP-ADD-2D-BRD User manual

Interlogix

Interlogix TruPortal TP-ADD-2D-BRD User manual

Interlogix VT1101M-AC Installation instructions

Interlogix

Interlogix VT1101M-AC Installation instructions

Interlogix NX-586E User manual

Interlogix

Interlogix NX-586E User manual

Interlogix RF-KF101-K4 Assembly instructions

Interlogix

Interlogix RF-KF101-K4 Assembly instructions

Interlogix ATS1520 Assembly instructions

Interlogix

Interlogix ATS1520 Assembly instructions

Interlogix VR1101M Installation instructions

Interlogix

Interlogix VR1101M Installation instructions

Interlogix ATS1831 Assembly instructions

Interlogix

Interlogix ATS1831 Assembly instructions

Interlogix DIGITAL INVERTER GENERATOR Assembly instructions
Interlogix

Interlogix DIGITAL INVERTER GENERATOR Assembly instructions

Interlogix 60-677 User manual

Interlogix

Interlogix 60-677 User manual

Popular Control Unit manuals by other brands

Haldex ILAS E 62101005 installation instructions

Haldex

Haldex ILAS E 62101005 installation instructions

Honeywell Notifier FCM-1-REL Installation and maintenance instructions

Honeywell

Honeywell Notifier FCM-1-REL Installation and maintenance instructions

SKUTCH AS-703-SBC manual

SKUTCH

SKUTCH AS-703-SBC manual

Kingfisher KI 7010B Series Operation & maintenance guide

Kingfisher

Kingfisher KI 7010B Series Operation & maintenance guide

Mec Excelerator ME990S-2DFM Installation and operating manual

Mec

Mec Excelerator ME990S-2DFM Installation and operating manual

Texas Instruments TPS55165Q1-EVM user guide

Texas Instruments

Texas Instruments TPS55165Q1-EVM user guide

GW Instek GDB-03 user manual

GW Instek

GW Instek GDB-03 user manual

ARRI RF-2400 user manual

ARRI

ARRI RF-2400 user manual

SMC Networks S0700 manual

SMC Networks

SMC Networks S0700 manual

Danze D5609 Series installation instructions

Danze

Danze D5609 Series installation instructions

Omron G9SX Series manual

Omron

Omron G9SX Series manual

Armstrong 880100-002 Installation and operating instructions

Armstrong

Armstrong 880100-002 Installation and operating instructions

GECMA CHALLENGER Mi-PS2 manual

GECMA

GECMA CHALLENGER Mi-PS2 manual

Mitsubishi Electric MELSEC Q Series user manual

Mitsubishi Electric

Mitsubishi Electric MELSEC Q Series user manual

Marshall Excelsior ME980-905 installation instructions

Marshall Excelsior

Marshall Excelsior ME980-905 installation instructions

Visual Productions IoCore2 user manual

Visual Productions

Visual Productions IoCore2 user manual

Evoqua WALLACE & TIERNAN SFC fieldbus manual

Evoqua

Evoqua WALLACE & TIERNAN SFC fieldbus manual

Allen-Bradley POINT I/O 1734-PDN installation instructions

Allen-Bradley

Allen-Bradley POINT I/O 1734-PDN installation instructions

manuals.online logo
manuals.online logoBrands
  • About & Mission
  • Contact us
  • Privacy Policy
  • Terms and Conditions

Copyright 2025 Manuals.Online. All Rights Reserved.