INVENTOR QLT-700 User manual

MODEL:
QLT-700
• USER’S MANUAL
• ΕΓΧΕΙΡΙΔΙΟ ΧΡΗΣΗΣ
• MANUAL UTILIZATORULUI
• BEDIENUNGSANLEITUNG
• MANUEL D'UTILISATEUR
• MANUALE DELL’ UTENTE
• MANUAL DEL PROPIETARIO
• INSTRUKCJA OBSŁUGI
ENGLISH | ΕΛΛΗΝΙΚΑ | ROMANA | DEUTSCH |
FRANÇAIS | ITALIANO | ESPAÑOL | POLSKI
AIR PURIFIER


|LANGUAGES
ENGLISH ......................................................................................................... 4
ΕΛΛΗΝΙΚΑ..................................................................................................... 20
ROMANA ...................................................................................................... 36
DEUTSCH ...................................................................................................... 52
FRANÇAIS ..................................................................................................... 68
ITALIANO...................................................................................................... 84
ESPAÑOL .................................................................................................... 100
POLSKI ........................................................................................................ 116

4EN
|Safety Warning
Safety Matters for Attention
Note
This section describes the contents and importance of the safety matters to prevent
personal injuries or property damages to the users or others. Please read the text on
the basis of full understanding of the following contents (marks and icons), and be sure
to abide by the safety matters as described.
Indicate [Prohibited] contents
No inammable articles No wet area No open ames
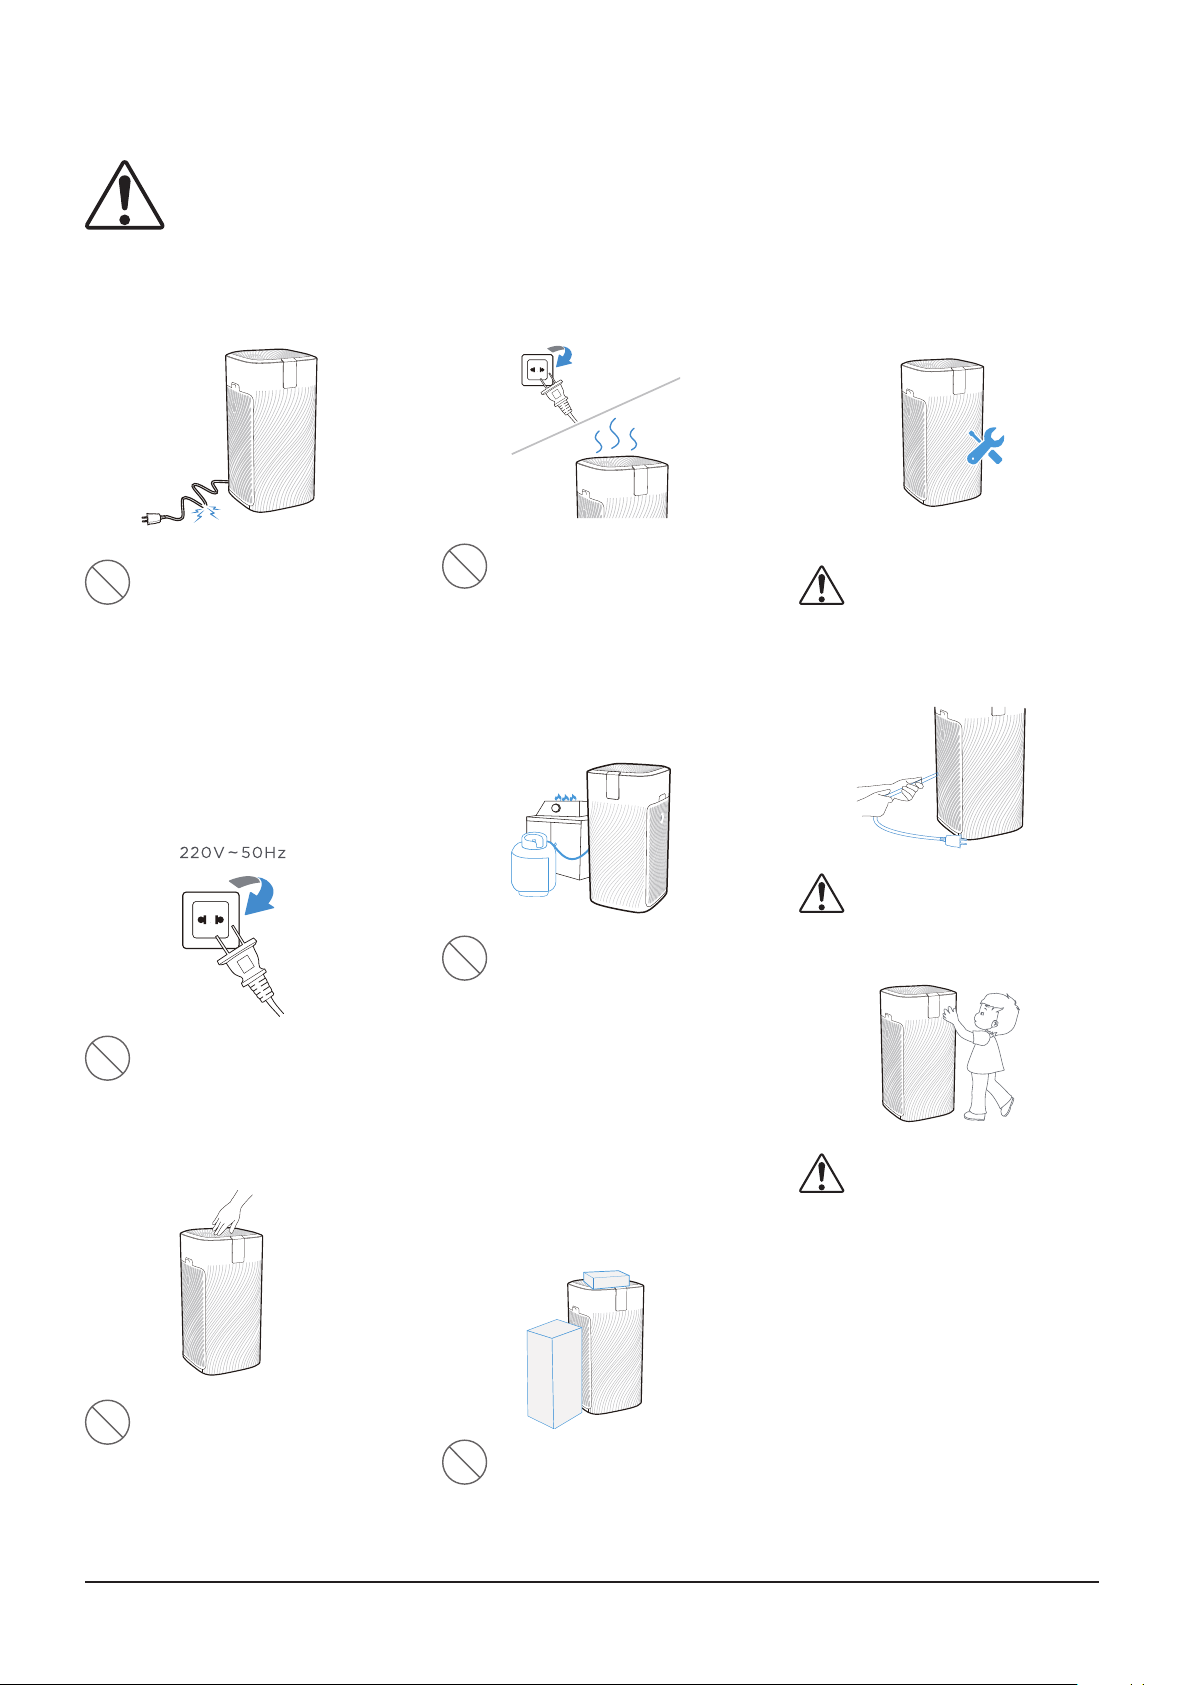
• Do not use this appliance in wet or high temperature environment (like bathroom, toilet
and kitchen).
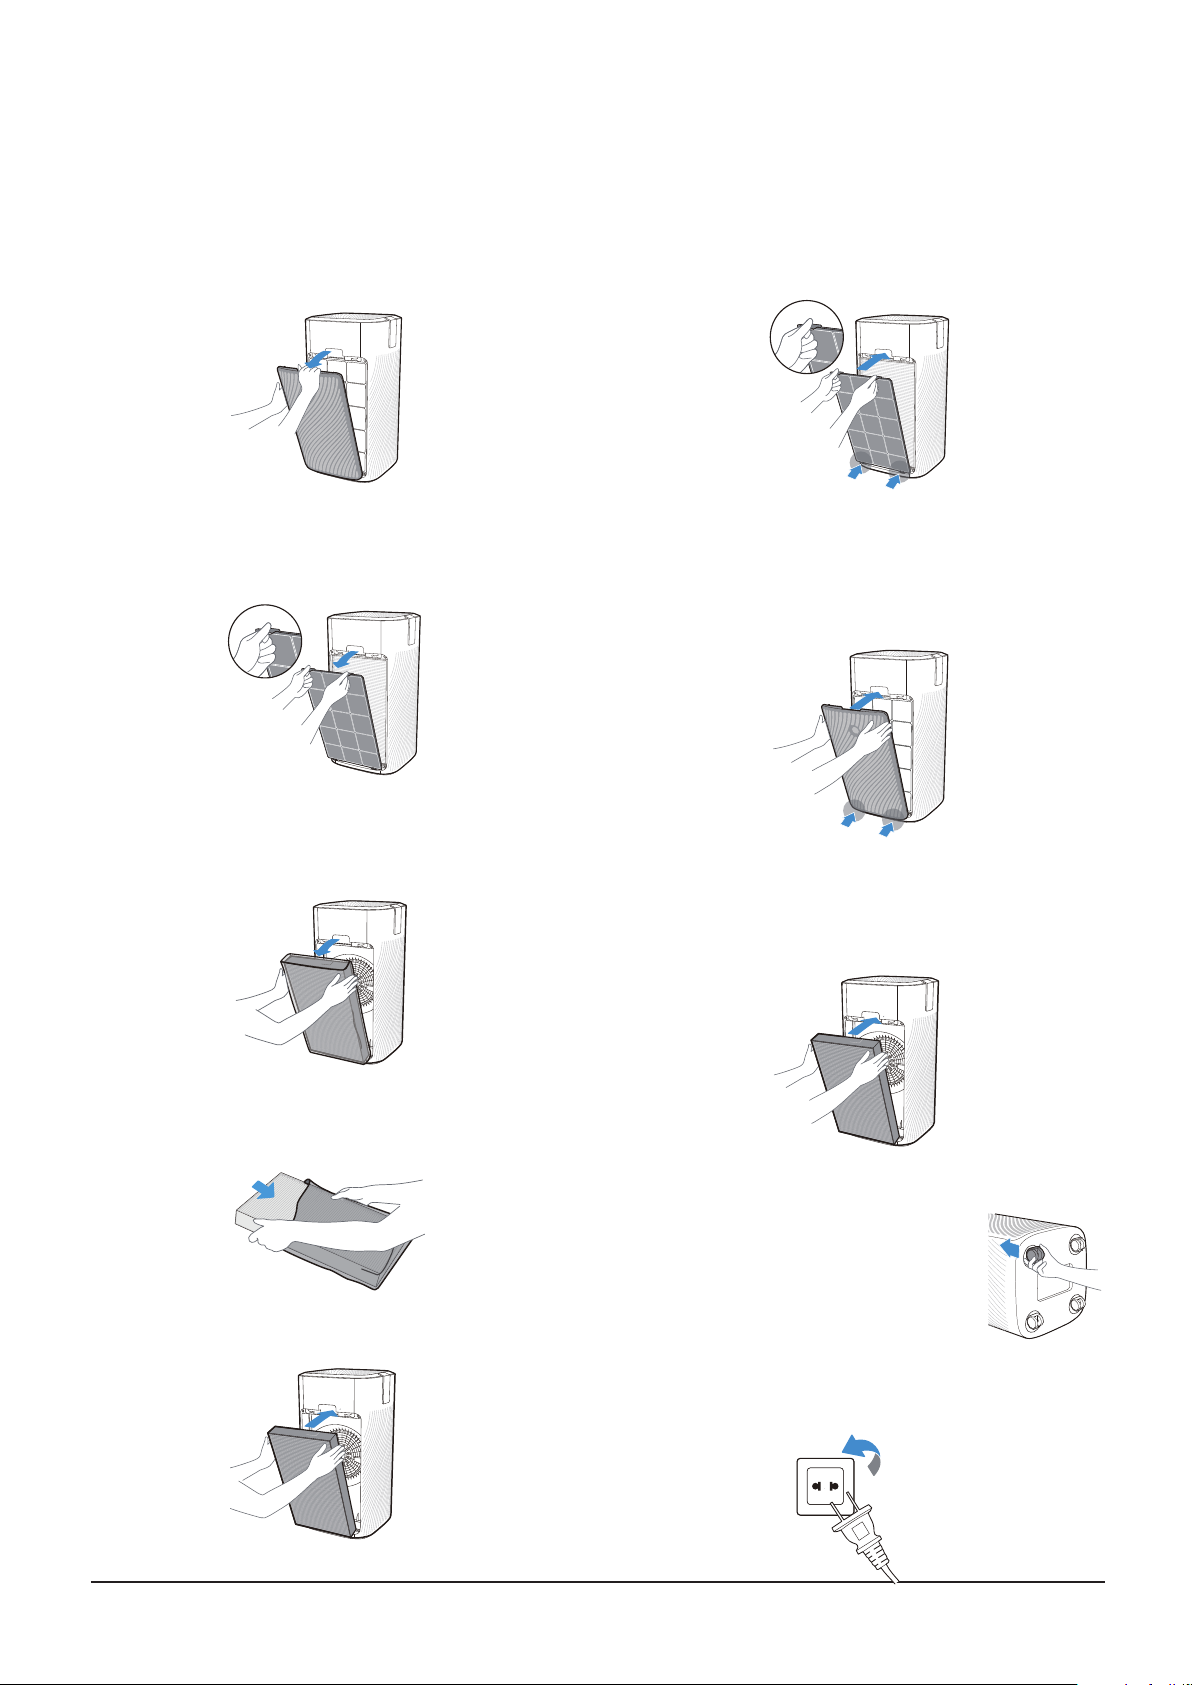
• Before replacing the lter, please stop this appliance and cut o power.
• Do not place other items on top of the appliance, and sitting or standing on this
appliance is forbidden.
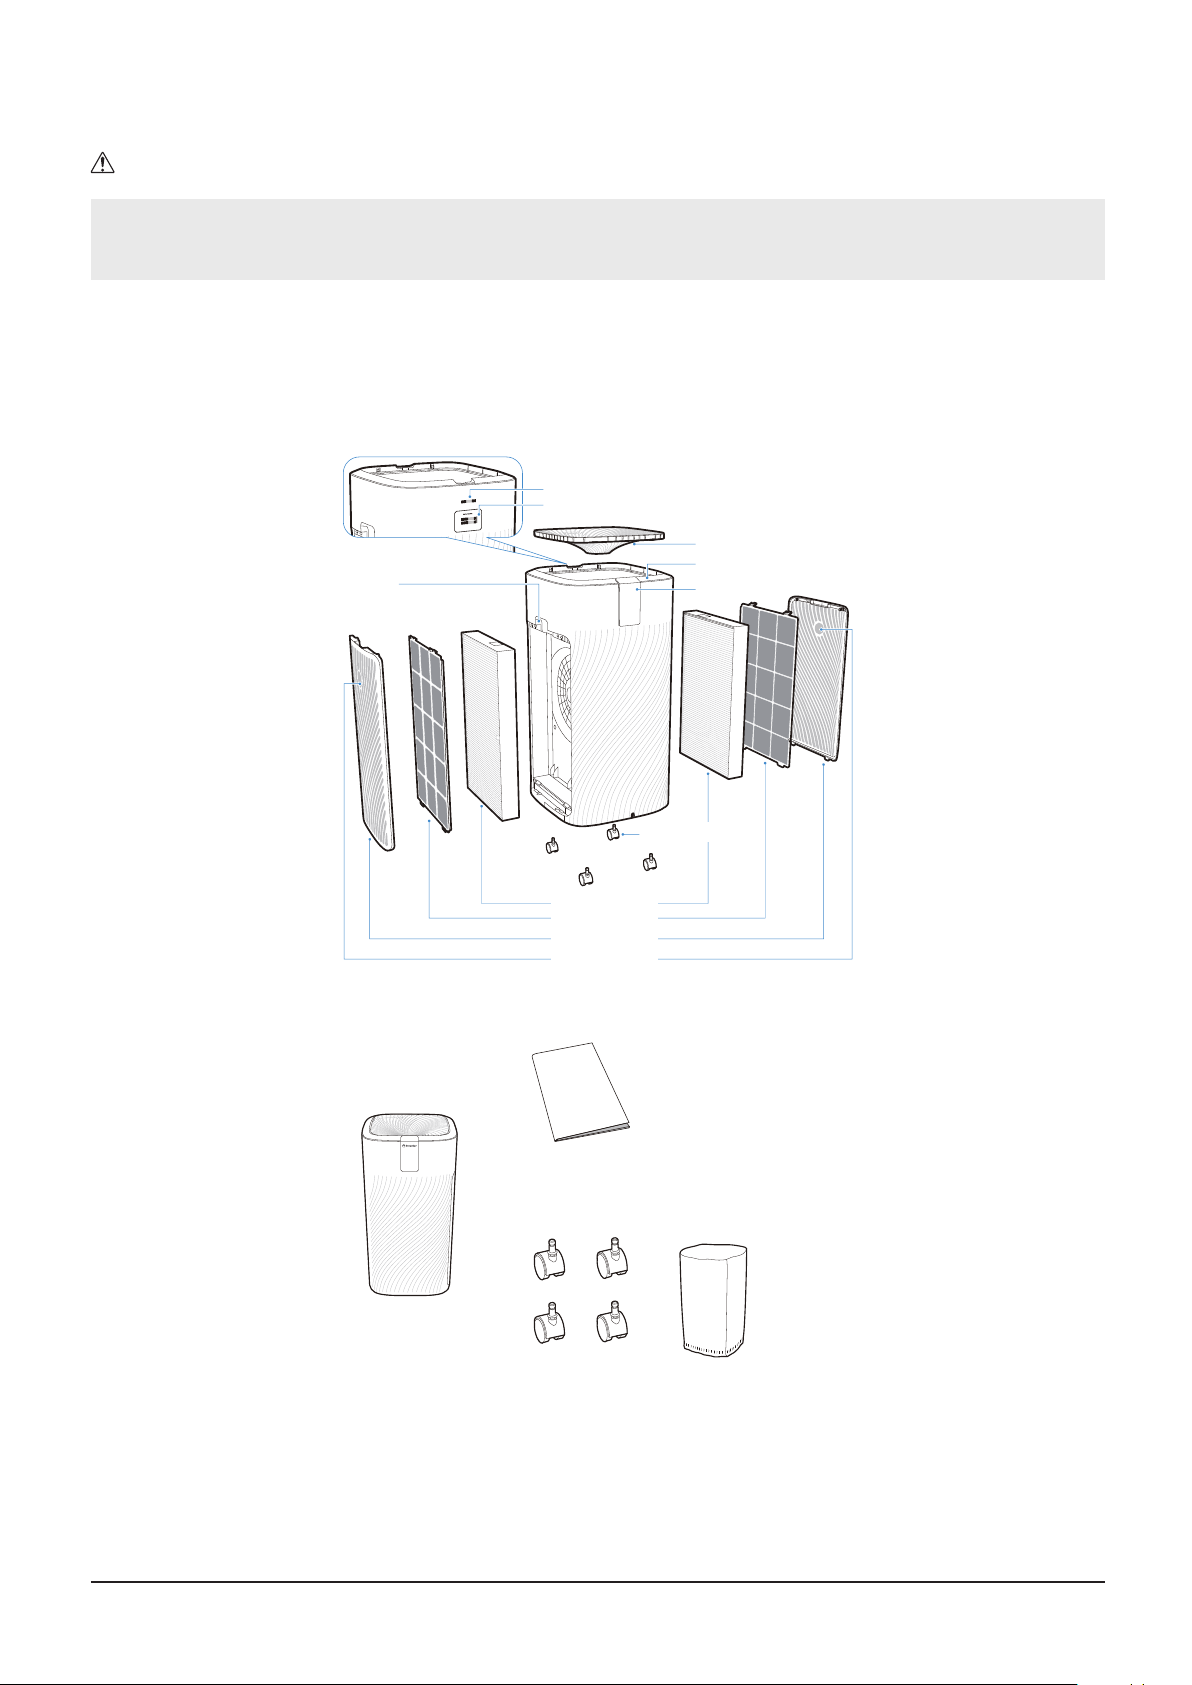
• Please use the original lter provided by the factory. In case other lters are used, the
best results cannot be achieved.
• Do not use damaged or aged power cords; Do not replace the power cord without
authorization. If the power cord is damaged, it must be replaced by the manufacturer,
its service department or professionals from similar departments to avoid danger.
• This appliance is only limited to 220-240V power supply, and please unplug the
appliance when it is not used for a long time.
• Do not insert your ngers or objects into the air inlets or air outlets to prevent the
product from physical damages or malfunction.
• Please unplug the appliance immediately and contact the service center in time when
the appliance gives o abnormal sound or burnt smell or smoke.
• Do not spray ammable substances near the appliance; Do not spray water directly on
the appliance or use chemical cleaners like alcohol or hydrochloric acid, etc.; Do not
place water containers, medicines, or ammable materials on the appliance.
• Do not block the air inlets/outlets of the appliance with any item.
•This appliance can be used by children aged from 8 years and above and persons
with reduced physical, sensory or mental capabilities or lack of experience and
knowledge if they have been given supervision or instruction concerning use of the
appliance in a safe way and understand the hazards involved. Children shall not play
with the appliance. Cleaning and user maintenance shall not be made by children
without supervision.Prior to cleaning or other maintenance, the appliance must be
disconnected from the supply mains.

5
EN
Matters that may Cause Minor Injury or Property Damages
• This appliance cannot replace natural ventilation and other appliances like the vacuum
cleaner, kitchen ventilator, etc.
• When the appliance is working, it must be placed on a dry, at and stable oor, with at
least 30cm space reserved around it.
• Do not put it in a place with direct sunlight.
• To prevent electromagnetic disturbance, the appliance must keep a certain distance
from the TV, radio, microwave oven and other appliances.
• The mist produced by the ultrasonic humidier may aect the PM2.5 detection of this
appliance, and both should maintain a certain distance.
• Do not disassemble or modify this appliance without authorization to avoid accidents.
• Do not move the appliance by pulling the power cord.
• Please take care of the children and make sure that the children do not touch the
appliance to avoid accidents.
Statement
Executive standards of the product: GB 4706.1-2005, GB 4706.45-2008, GB 21551.3-2010,
and GB/T 18801 2015. With the technical innovation and improvement of the product, the
manual content of the same type as this product may be changed. The updated parts will
not be separately notied. The legends shown in this manual are based on the appearance
of standard puriers and only used for illustrative purposes. The actual appearance shall
be based on the purchased product. Due to product improvement, some parameters may
be changed. The changed parameters have no retroactivity to this product. Please take
the parameters on the nameplate of products as the criterion. If there is any change in the
manual contents, our company will give the notice through the company's ocial website
without separate notice; Unless explicitly stated in the notice, the changed contents have
no retroactivity to this product in principle. The right to interpret the relevant provisions of
this manual belongs to Inventor A.G. S.A.

6EN
|Safety Matters for Attention
Danger If the appliance is not used according to the prescriptions, it may cause serious personal
injury or even death.
Warning If not used according to the prescribed contents, it may cause personal injury or property
damages.
Do not use this
appliance in wet
or high temperature
environment (like
bathroom, toilet and
kitchen).
Before replacing the
lter, please stop
this appliance and cut o
power.
Do not place other
items on top of the
appliance, and sitting or
standing on this appliance
is forbidden.
Please use the original
lter provided by
the factory. In case other
lters are used, the
best results cannot be
achieved.
This appliance cannot
replace natural
ventilation and other
appliances like the vacuum
cleaner, kitchen ventilator,
etc.
When the appliance
is working, it must be
placed on a dry, at and
stable oor, with at least
30cm space reserved
around it.
Do not put it in a place
with direct sunlight.
To prevent
electromagnetic
disturbance, the appliance
must keep a certain
distance from the TV,
radio, microwave oven
and other appliances.
The mist produced
by the ultrasonic
humidier may aect
the PM2.5 detection of
this appliance, and both
should maintain a certain
distance
Note: Never Wash the HEPA lter

7
EN
|Important Matters
Do not use damaged or
aged power cords: Do
not replace the power cord
without authorization. If the
power cord is damaged, it
must be replaced by the
manufacturer, its service
department or professionals
from similar departments to
avoid danger.
This appliance is only
limited to 220-240V
power supply, and please
unplug the appliance when
it is not used for a long time.
Do not insert your
ngers or objects into
the air inlets or air outlets
to prevent the product
from physical damages or
malfunction.
Please unplug the
appliance immediately
and contact the service
center in time when
the appliance gives o
abnormal sound or burnt
smell or smoke.
Do not spray
ammable substances
near the appliance; Do not
spray water directly on the
appliance or use chemical
cleaners like alcohol
or hydrochloric acid,
etc.; Do not place water
containers, medicines, or
ammable materials on
the appliance.
Do not block the air
inlets/outlets of the
appliance with any item;
Do not disassemble or
modify this appliance
without authorization to
avoid accidents.
Do not move the
appliance by pulling
the power cord.
Please take care of
the children and make
sure that the children do
not touch the appliance to
avoid accidents.
Note
This section describes the contents and importance of the matters needing
attention to prevent personal injuries or property damages to the users or others.
Please read the text on the basis of full understanding of the following contents
(marks and icons), and be sure to abide by the safety matters as described.

8EN
|Product Introduction
Note
Due to the dierent appearance of products, the pictures below are for reference only,
and they will be subject to the physical products in the packing box
Name of parts
Gaseous pollutant sensor
PM2.5 sensor
Air outlet grill
User manual
Main machine
Casters Protective bag
Casters
HEPA Filter
Pre-Filter
Air inlet grill
Air Window
Handle Operation
Display screen
Product list
• Main machine (1)
• User manual (1)
• Casters (4)
• Protective bag (1)
• Filter screen (1set/2pcs) (Installed in the
main machine)

9
EN
LIGHT
ION
(UV)
Auto Sleep Turbo
SPEED MODE
ON/STAND-BY
-Child Lock-
(Press 3s)
Control panel
Display panel
ION button
Press to turn on/o
the ION
Long press for 3s the
lter comes back FAN SPEED button
Low, medium and
high (optional)
MODE button
Automatic mode,
sleep mode and
Turbo mode
(optional)
On/Stand-By button
Press to turn on/
stand-by the air lter;
When the machine
starts or is on
standby (shutdown
state with the power
switched on)
LIGHT button
Optional display
screen: Bright,
Dark and Out
PM2.5 button
When the machine
starts, click to display
the real-time PM2.5;
When the machine is
on standby (shutdown
state with the
power switched on),
press to detect the
environmental PM2.5. Child Lock Combination Button
Long press the mode button and fan
speed button for 3s simultaneously,
and it is available whether the
machine starts or is on standby
(shutdown state with the power
switched on).
Light sensing function
PM2.5 level display
Gaseous pollutant quality
indicator light
Cleaning prompt for
the Pre-Filter
Service life progress bar
of Pre-Filter
PM2.5 value display
PM2.5 quality indicator
light
Gaseous pollutant
level display
Prompts for replacement of
the HEPA Filter
Service life progress
bar of HEPA Filter
Great
Change
Clean
HEPA Filter Pre-Filter
Good
Gaseous Pollutant
PoorMed
Great Good PoorMed
OutletOutlet
-Child Lock-
(Press 3s)
SPEED MODE
Fan speed display
Mode display
ION display
Child-lock display Auto Sleep Turbo

10 EN
1Take down the air inlet grill.
Grasp the clasp position and pull outward
to remove the air inlet grill.
2Take out the Pre-Filter.
Press down and pull the U-shaped snap
joint, and take out the Pre-Filter.
3Take out the HEPA Filter.
Hold both sides of the HEPA Filter with
both hands, and take out the HEPA Filter.
4 Remove the protective lm of the
lter.
5Assemble the HEPA Filter.
6Assemble the Pre-Filter.
Align the slot position at the bottom, and
click into the upper U-shaped snap joint.
7Assemble the air inlet grill.
Align with the slot position at the bottom,
press both sides of the upper part of the
air inlet grill, and clasp the air inlet grill.
8 Assemble the lter on the other side.
Repeat Steps 1-7 to assemble the lter on
the other side.
9 Install the caster
Tilt the machine body to install
the casters and press into 4
casters with force in turn at the
bottom.
10 Then power on for operation.
|Assembly Instructions
Assembly procedures

11
EN
1Preparation
Power on for the rst time, the display
panel ickers for 1s, and then the screen
is turned o. The whole appliance is on
standby state.
Outlet
Great
Change
Clean
HEPAFilter Pre-Filter
Good
Gaseous Pollutant
PoorMed
Great Good PoorMed
Auto Sleep Turbo
LIGHT PM2.5 SPEED MODE ON/STAND-BY
-Child Lock-
(Press 3s)
ION
(UV)
2Switch
Press the ON/STAND-BY button
Outlet
Great
Change
Clean
HEPAFilter Pre-Filter
Good
Gaseous Pollutant
PoorMed
Great Good PoorMed
Auto Sleep Turbo
LIGHT SPEED MODE ON/STAND-BY
-ChildLock-
(Press3s)
PM2.5 ION
(UV)
MODE ON/O
MODE ON/S
3Pre-heating
Outlet
Change
Clean
HEPA Filter Pre-Filter
Gaseous Pollutant
Great Good PoorMed
Great Good PoorMed
Gaseous
pollutant
Great, Good, Med, Poor
The odor sensor is preheated, Great,
Good, Med and Poor status are displayed
alternately, and then it displays normally
after 1min.
Outlet
Change
Clean
HEPA Filter Pre-Filter
Gaseous Pollutant
Great Good PoorMed
Great Good PoorMed
Great, Good, Med, Poor
The particle sensor enters the preheating
state, PM2.5 value displays "---"; Great,
Good, Med and Poor statuses are
displayed alternately, and then it displays
normally after 15s;
4Work
The purier is powered on for the rst
time and then enters the automatic mode.
Outlet
Great
Change
Clean
HEPAFilter Pre-Filter
Good
Gaseous Pollutant
PoorMed
Great Good PoorMed
Auto Sleep Turbo
LIGHT PM2.5 SPEED MODE ON/OFF
-ChildLock-
(Press3s)
ION
(UV)
Auto TurboSleep
|Operating Manual
Trial operation
Note
• This appliance is provided with a disassembly protection function; the appliance can
only operate normally after the air inlet grill and air outlet grill are assembled properly.
• With the power on, each time after the machine starts, it enters the working mode
before the standby state.
• When powered on again after unexpected power failure (such as power failure at
home or the appliance is unplugged during normal operation), it automatically restores
to the working state where the power failure occurs.
Flicker
for 1s

12 EN
|Cleaning and Maintenance
Notes
Be sure to turn it o before any maintenance, and cut o power.
Cleaning of the machine body
Main machine
Wipe the body with a soft towel
Air inlet grill
Open the air inlet grill, clean dust with a vacuum cleaner, and wipe it with a cloth.
Air outlet grill
Open the air outlet grill, clean dust with a vacuum cleaner, and wipe it with a cloth.

13
EN
1When the last bar of the progress bar
turns red and the cleaning indicator light
is on, it prompts that the Pre-Filter needs
to be cleaned.
Pre-Filter
Clean
Outlet
Change
Clean
HEPA Filter Pre-Filter
Gaseous Pollutant
Great Good PoorMed
Great Good PoorMed
2Unplug the appliance, and take out the
Pre-Filter
Pre-Filter
Clean
Outlet
Change
Clean
HEPA Filter Pre-Filter
Gaseous Pollutant
Great Good PoorMed
Great Good PoorMed
3Vacuum the dust or wipe it with a cloth.
Pre-Filter
Clean
Outlet
Change
Clean
HEPA Filter Pre-Filter
Gaseous Pollutant
Great Good PoorMed
Great Good PoorMed
4If there is a lot of dirt, the common
kitchen detergents is diluted and used
rst, and then do the cleaning.
Pre-Filter
Clean
Outlet
Change
Clean
HEPA Filter Pre-Filter
Gaseous Pollutant
Great Good PoorMed
Great Good PoorMed
5Dry the Pre-Filter
Auto Sleep Turbo
LIGHT PM2.5 SPEED MODE ON/STAND-BY
-Child Lock-
(Press 3s)
ION
(UV)
ION
(UV)
6Assemble the Pre-Filter
Auto Sleep Turbo
LIGHT PM2.5 SPEED MODE ON/STAND-BY
-Child Lock-
(Press 3s)
ION
(UV)
ION
(UV)
7Plug in the appliance, and start it.
Auto Sleep Turbo
LIGHT PM2.5 SPEED MODE ON/STAND-BY
-Child Lock-
(Press 3s)
ION
(UV)
ION
(UV)
8Long press the ION button for 3s, the
cleaning indictor light is o, and the Pre-
Filter is restored.
Auto Sleep Turbo
LIGHT PM2.5 SPEED MODE ON/STAND-BY
-Child Lock-
(Press 3s)
ION
(UV)
ION
(UV)
Cleaning of the lter components
Soaking time is
about 10min.

14 EN
1 Filter model: QLT-700-F (includes 2)
Change
HEPA Filter
Outlet
Change
Clean
HEPA Filter Pre-Filter
Gaseous Pollutant
Great Good PoorMed
Great Good PoorMed
2When the last bar of the progress
bar turns red and the replacement
indicator light is on, it prompts
that the HEPA Filter needs to be
replaced.
Change
HEPA Filter
Outlet
Change
Clean
HEPA Filter Pre-Filter
Gaseous Pollutant
Great Good PoorMed
Great Good PoorMed
3 Take out the HEPA Filter
Change
HEPA Filter
Outlet
Change
Clean
HEPA Filter Pre-Filter
Gaseous Pollutant
Great Good PoorMed
Great Good PoorMed
4Remove the protective lm of the
lter
Auto Sleep Turbo
LIGHT PM2.5 SPEED MODE ON/STAND-BY
-Child Lock-
(Press 3s)
ION
(UV)
ION
(UV)
5After installing the new HEPA Filter
provided by the original factory, it can be
run with the machine and the HEPA Filter
will be reset automatically without any
other operation.
Auto Sleep Turbo
LIGHT PM2.5 SPEED MODE ON/STAND-BY
-Child Lock-
(Press 3s)
ION
(UV)
ION
(UV)
6Under other circumstances, long
press the ION button for 3s, the
replacement indicator light is o, and
the HEPA Filter is restored.
Auto Sleep Turbo
LIGHT PM2.5 SPEED MODE ON/STAND-BY
-Child Lock-
(Press 3s)
ION
(UV)
ION
(UV)
Replacement of the lter components
Notes
Never Wash the HEPA lter
Recommend to clean lter with a small soft brush or the use of a vacuum cleaner. In
the event of strong odor from cigarettes, barbecue, etc.,, the lter may produce a smell.
Please remove and clean the lter and air lter and allow 2-5 days prior to use. If the
smell persists, please replace the lter.

15
EN
|Service Guide
Faults Handling
Before inviting someone to inspect or repair, please check the following items.
Faults Troubleshooting
The display screen shows "E3" The fan speed is out of control: contact the after-sales oce for
treatment.
The display screen shows "EO" Main control EEPROM hardware failure, and contact the after-sales
oce for treatment.
The display screen shows "E1"
The fault is because of disassembly protection, and the air inlet and
outlet grilles are not assembled properly: assemble the air inlet grilles
and air outlet grilles properly.
The display screen shows "EU" PM2.5 air inlet sensor communication failure: contact the after-sales
oce for treatment
The purier is not working
Firstly, check whether the power cord is plugged into the power
socket, the loose plug caused by the movement of the purier may
aect the energizing; Secondly, check whether the air inlet grill and
air outlet grill of the purier are assembled properly. This appliance
is provided with a disassembly protection function. If the air inlet grill
and air outlet grill are not assembled properly, the machine cannot
work.
The purier has a small amount
of air and is noisy
Firstly, check whether the foreign matters block the air inlet grill and
air outlet grill. If any, remove those foreign matters; Then, check
whether the Pre-Filter becomes dirty or reaches the end of its service
life; and clean the Pre-Filter; Finally, check whether the HEPA Filter
is full of dust or reaches the end of its service life. This time the
replacement of the HEPA Filter is required.
The air outlet smells odorous
When the appliance is operated for the rst time, it smells slightly
plastic, which is normal; If this appliance works in places (like smoking
area or rotisserie, etc.) with strong smell for a long time, you need to
change the lter element frequently and reset it; Check whether the
air inlet/outlet grill and Pre-Filter are full of dust or dirt; if any, maintain
the appliance and clean the dust and dirt on the air inlet/outlet grill
and Pre-Filter.
Whether the wheels are pulled
out after inserted
Yes, tilt the machine at a small angle and pull them out with a little
eort. If the eort fails, try to pull the wheels out while turning them.
Whether the purier can be
used with the humidier
The wet environment has a greater impact on the lter element,
and the mist produced by the ultrasonic humidier may cause
abnormality in the PM2.5 detection of this appliance, so that
simultaneous operation should be avoided as much as possible.

16 EN
Product Parameters
Model QLT-700
Voltage 220-240V
Rated power 45W
CADR (particulate matters) 700m3/h
Purication energy eciency rating of the
particulate matters Ecient level
Noise <57dB
• The various performance parameters in the table are measured in the factory and for
reference only.
• Due to product improvement, some parameters may be changed, and take the parameters
on the nameplate of products as the criterion.
• Purification principle: The fan of the air purifier draws air into the machine to be filtered
through the built-in filter element, which plays a main role in filtering the dust (like PM2.5,
etc.), formaldehyde, odor, sterilization and so on.

17
EN
Environment-friendly List
Name of
parts
Harmful substances
Plumbum
(Pb)
Mercury
(Hg)
Cadmium
(Cd)
Hexavalent
chromium
(Cr(VI))
Polybrominated
biphenyls
(PBB)
Polybrominated
Diphenyl
Ethers (PBDE)
Shell
component ❍ ❍ ❍ ❍ ❍ ❍
Power cord
component ✕ ❍ ❍ ❍ ❍ ❍
Motor
component ❍ ❍ ❍ ❍ ❍ ❍
Appliance
component ❍ ❍ ✕ ❍ ❍ ❍
Wind wheel
component ❍ ❍ ❍ ❍ ❍ ❍
Circuit board
component ✕ ❍ ✕ ❍ ❍ ❍
Filter
component ❍ ❍ ❍ ❍ ❍ ❍
This table is formulated in line with the SJ/T 11364
"❍" Indicates that the content of the hazardous substance in all homogeneous materials of this
component is below the limit prescribed in GB/T 26572.
"✕" Indicates that the content of this hazardous substance in at least one homogeneous
material of this component is above the limit prescribed in GB/T 26572. But, it is extremely
difficult to make the product parts completely free of the above-mentioned harmful
substances under the existing technical conditions. In the future, the design will be improved
gradually with the technical progress.

18 EN
All the pictures in the manual are for explanatory purposes only. The actual shape of the unit
you purchased may be slightly dierent, but the operations and functions are the same.
The company may not be held responsible for any misprinted information. The design and
the specications of the product for reasons, such as product improvement, are subject to
change without any prior notice.
Please consult with the manufacturer at +30 211 300 3300 or with the Sales agency for further
details. Any future updates to the manual will be uploaded to the service website, and it is
advised to always check for the latest version.
Scan here to download the latest version of this manual.
www.inventorappliances.com/manuals

19
EN
Activate your Warranty
l Visit our web site and activate your warranty via the below link or by
scanning the QR code
https://www.inventorairconditioner.com/warranty-inventor
l Fill all the elds as shown below
þ
once the warranty submission has been completed a conrmation message will be
sent to your email
Full Name*
Address*
Postal Code*
Phone Number*
E-mail*
Unit Type*
Serial Number of the unit*
Date of Purchase*
Invoice Number*
Additional Details
Subscribe to Inventor's Newsletter
Owner details Unit details
To activate the warranty card, please ll in the following elds
* Required eld
With the current warranty card you accept the terms and conditions.
SEND
Follow the next quick steps to activate your warranty:
STEP 1
Visit our website via the link:
https://www.inventorappliances.com/warranty-card
or by scanning the QR code, as follows:
STEP 2
Fill in the obligatory fields as requested in the “Owner’s details” and “Unit’s details”:
STEP 4
Wait for the confirmation email you will receive at the email address you have filled
in - please also check your spam folder.
STEP 5
Inventor warranty is now valid!
STEP 3
Click SEND button at the end of the submission form:
þ
once the warranty submission has been completed a conrmation
message will be sent to your email
Activate your Warranty
l Visit our web site and activate your warranty via the below link or by
scanning the QR code
https://www.inventorairconditioner.com/warranty-inventor
l Fill all the elds as shown below
þ
once the warranty submission has been completed a conrmation message will be
sent to your email
Full Name*
Address*
Postal Code*
Phone Number*
E-mail*
Unit Type*
Serial Number of the unit*
Date of Purchase*
Invoice Number*
Additional Details
Subscribe to Inventor's Newsletter
Owner details Unit details
To activate the warranty card, please ll in the following elds
* Required eld
With the current warranty card you accept
the terms and conditions.
SEND
Activate your Warranty
l Visitourweb site and activate yourwarranty via the below link or by
scanning the QR code
https://www.inventorairconditioner.com/warranty-inventor
l
þ
essage will be
sent to your email
Full Name*
Address*
Postal Code*
Phone Number*
E-mail*
Unit Type*
Serial Number of the indoor unit*
Serial Number of the outdoor unit*
Date of Purchase*
Invoice Number*
Additional Details
Subscribe to Inventor's Newsletter
Owner details Unitdetails
s
With the current warranty card you accept the terms and conditions.
SEND
Activate your Warranty

116 PL
|Ostrzeżenie
Kwestie bezpieczeństwa
Uwaga
W niniejszej części zawarto treść zasad i opisano znaczenie środków bezpieczeństwa dla
ochrony użytkownika i innych osób przed obrażeniami ciała i szkodami materialnymi.
Prosimy zapoznać się dokładnie z tą częścią dokumentu (symbole i ikony) oraz
przestrzegać przedstawionych zasad.
Wskazuje na zabronione czynności
Zakaz użycia łatwopalnych
przedmiotów Zakaz użycia
na obszarze
o dużej
wilgotności
Zakaz użycia
w pobliżu
nieosłoniętych
płomieni
• Nie używać urządzenia w warunkach dużej wilgotności lub wysokiej temperatury (jak
łazienka, toaleta czy kuchnia).
• Przed wymianą ltra należy wyłączyć urządzenie i odłączyć je od sieci elektrycznej.
• Nie wolno ustawiać żadnych przedmiotów na urządzeniu ani siadać czy stawać na nim.
• Należy korzystać z oryginalnego ltra dostarczonego przez producenta. W przypadku
użycia innego ltra urządzenie nie będzie działać prawidłowo.
• Nie wolno używać zużytych ani uszkodzonych przewodów zasilających. Zabrania się
także wymiany przewodu zasilającego bez upoważnienia. Jeśli przewód zasilający jest
uszkodzony, może go wymienić tylko producent, jego dział serwisowy lub specjalista o
podobnych kwalikacjach, aby zapobiec niebezpieczeństwu.
• Urządzenie to obsługuje wyłącznie prąd o napięciu 220-240V. Jeśli nie będzie używane
przez dłuższy czas, należy odłączyć przewód zasilający.
• Nie wkładać palców ani przedmiotów do otworów wlotowych ani wylotowych powietrza,
ponieważ mogłoby to skutkować uszkodzeniem lub awarią urządzenia.
• Jeśli urządzenie zacznie emitować nietypowy dźwięk lub zapach spalenizny bądź
dym, należy natychmiast odłączyć przewód zasilający i skontaktować się z działem
serwisowym.
• Nie wolno używać łatwopalnych substancji w sprayu w pobliżu urządzenia. Nie
spryskiwać wodą urządzenia ani nie używać do jego mycia takich substancji
chemicznych, jak alkohol czy kwas chlorowodorowy. Nie umieszczać pojemników z
wodą, leków ani materiałów łatwopalnych na urządzeniu.
• Nie blokować w żaden sposób otworów wlotu/wylotu powietrza w urządzeniu.
• Z tego urządzenia mogą korzystać dzieci w wieku od 8 lat i starsze oraz osoby o
ograniczonej sprawności zycznej i sensorycznej lub zdolności umysłowe lub brak
doświadczenia i wiedzy, jeśli otrzymali nadzór lub instrukcje dotyczące bezpiecznego
użytkowania urządzenia i zrozumienia związanych z tym zagrożeń. Dzieci nie powinny
bawić się urządzenie. Dzieci nie powinny wykonywać czyszczenia ani konserwacji
użytkownika bez nadzoru. Przed czyszczeniem lub inną konserwacją urządzenie należy
odłączyć od sieci zasilającej.
Other manuals for QLT-700
1
Table of contents
Languages:
Other INVENTOR Air Cleaner manuals