ION QUICK PLAY FLASH User manual

Westfalia Bedienungsanleitung
Nr. 109919

QUICK PLAY FLASH
QUICKSTART GUIDE
ENGLISH ( 3 – 5 )
GUÍA DE INICIO RÁPIDO
ESPAÑOL ( 6 – 9 )
GUIDE D'UTILISATION RAPIDE
FRANÇAIS ( 10 – 13 )
GUIDA RAPIDA
ITALIANO (14 - 17)
KURZANLEITUNG
DEUTSCH ( 18 – 21 )
SNELSTARTGIDS
NEDERLANDS ( 22 – 25 )


3
2
7
5
5
4
7
3
1
QUICKSTART GUIDE
BOX CONTENTS
oMake sure that the items listed below are included in the box:
•QUICK PLAY FLASH
•Power adapter
•USB Flash Drive
•Software CD
•USB Cable
•Quickstart Guide
•Safety Instructions & Warranty Information
oREAD SAFETY INSTRUCTION BOOKLET BEFORE USING THE PRODUCT
INTRODUCTION
QUICK PLAY FLASH easily converts your treasured vinyl records into digital music using a standard USB flash drive.
QUICK PLAY FLASH can also connect to a computer through its USB port. We have included two software packages
to aid you in converting your vinyl recordings. You should install one of the following applications to take advantage of
computer recording:
EZ Vinyl/Tape Converter (PC only) is the quickest and easiest way to turn your recordings into digital media.
EZ Vinyl/Tape Converter conveniently saves your recordings in your iTunes* library. Novice users may find this
application preferable. We have included a handy Software Quickstart Guide with step-by-step instructions on
software installation and operation.
EZ Audio Converter (Mac only) is a basic converter application for Mac OS X and is ideal for novice users.
Please refer to the included Software Quickstart Guide for step-by-step instructions on software installation and
operation.
To install the software: simply insert the included CD into your computer and follow the on-screen instructions. After
you finish converting your vinyl, you can then burn to CD or load onto portable media devices.
Visit http://www.ionaudio.com/computer-optimization for more information on optimizing your computer for audio.
•iTunes is a trademark of Apple, Inc., registered in the U.S.A. and other countries.
TOP PANEL
1. 45 RPM Adapter- Use this adapter to play
your 45 RPM records.
2. Platter – Place your record here.
3. Tonearm- QUICK PLAY FLASH comes with
a ready to use pre-balanced tonearm and
cartridge. The tonearm can be raised and
lowered by hand, or by pressing the raise /
lower lever. Please note that the tonearm
needs to be moved away from resting
position (on the arm clip) for the turntable
motor to activate. When the tonearm is
placed back in its resting position, the
turntable motor will deactivate.
4. Arm Clip – This specially designed arm clip
secures the tonearm while at rest or when
not in use. The arm clip has been designed to remain in the up position while unlocked.
5. Raise / Lower Lever – Raises and lowers the tonearm.
IMPORTANT: Remove the plastic cartridge cover
(needle cover) before operating the turntable.

4
* If needed, you may adjust the speed of the
turntable platter by tightening/loosening the
appropriate screw (there are separate screws
for 33/45/78 RPM operation on the underside
of QUICKPLAY FLASH) with a standard
Phillips-head screwdriver.
FRONT PANEL
1. VOLUME - hold down "-" or "+" button to increase/decrease volume;
2. MODE - enters Playback or Record Mode. Press this button firmly for
about half a second -- don't just tap it.
3. FORWARD/BACK - moves to the previous/next track on the flash drive
4. f/ / - Play, Pause, and Record functions.
See PLAYBACK/RECORDING section for more information.
•Solid red light: Ready to record (Record Mode).
•Flashing red light: Recording a song.
•Solid green light: Ready to play (Playback Mode).
•Flashing green light: Playing a song.
5. USB PORT - connect a USB flash drive here
REAR PANEL
1. RCA OUTPUT - line-level coaxial output; do not
connect to phono-level inputs (on a receiver).
Note: You must be in Record Mode to hear audio
through these outputs when playing a record.
2. USB - connect to a computer to record audio with
EZ Vinyl/Tape Converter; (QUICK PLAY FLASH
can not be USB-powered; this must use a power
adapter). Use the included USB Cable to connect
your turntable to your computer. For transferring
your vinyl records to your computer, we have
provided two software packages on the included
CD. EZ Vinyl/Tape Converter (PC) and EZ Audio Converter (Mac) are the easiest and quickest ways to transfer
your vinyl records.
3. PHONES - connect 1/8" stereo headphones here (not included). The RCA outputs stop playing audio once
headphones are connected.
4. 33/45/78 RPM SWITCH - sets speed of the platter
5. Autostop Switch – This switch turns autostop on or off.
When autostop is on, the platter will start spinning when
the tonearm is placed over the record and stop spinning
when the record has reached the end. (When autostop is
off, the platter will always spin regardless of the position of
the tonearm.)
6. POWER - use included adapter to connect to wall power (9V DC, 800mA, pin +, tip –)
PLAYBACK/RECORDING
HOW TO PLAY YOUR RECORDS
1. Place the record on platter.
2. Select speed (33/45/78 RPM); use the included 45 RPM adapter if needed.
3. Undo the armclip.
4. Use the Raise/Lower Lever to raise the tonearm, then move it over to the record.
5. Lower the tonearm onto record; the record will begin playing.
6. Adjust volume with VOL buttons or your speaker system.
7. When finished, raise the tonearm and return it to rest on the armclip.
HOW TO RECORD TO A FLASH DRIVE
1. Connect a USB flash drive to the turntable’s front USB port.
2. Follow Steps #1-3 in HOW TO PLAY YOUR RECORDS (above).
3. If the light next to the f/ / button is lit solid red, proceed to Step 4. If it is lit green, press the Mode button
once.
4. To start recording, press and hold the f/ / for about 2 seconds; the light will flash red, indicating it's
recording.
5. Lower tonearm onto the record; the record will play and the song will record.
6. When finished, press f/ / for about 2 seconds to stop recording.
7. To record more songs, repeat Steps #2-6 above. When you are finished, raise the tonearm and return it to the
armclip.
123456
MODE
12345
f/ /

5
HOW TO PLAYBACK FROM A FLASH DRIVE
1. Connect a USB flash drive with MP3 to the turntable’s front USB port.
2. If the light next to the f/ / button is lit solid green, proceed to Step 3. If it is lit red, press the Mode button
once.
3. Press
f/ / ; the first song will play.
Note: Songs will play in alphabetical order by file name within each folder on the drive. QUICK PLAY FLASH
will scan through the drive’s folders/subfolders for playable music files in the following order: (1) songs recorded
by the turntable that are located in the MUSIC X_ION folder. (2) songs in the root directory (3) songs in other
folders/subfolders (including any hidden or .Trash folders)
4. Press |<< or >>| to skip to the previous/next song.
HOW TO ACCESS FLASH DRIVE RECORDED MUSIC ON YOUR COMPUTER
1. Connect the USB flash drive to a free USB port on your computer (preferably one on the rear panel of your
computer).
2. On a PC, your flash drive can be accessed by opening the My Computer icon on your desktop (this is called
‘Computer’ in Windows Vista and Windows 7). On a Mac, the USB flash drive icon will appear on your desktop.
3. Select your USB flash drive from the list of drives in My Computer (PC) or on your desktop (Mac) and double
click to open the drive.
4. The files that you recorded using the QUICK PLAY FLASH can be found in the MUSIC X_ION folder and will
be titled "Rec001.MP3”, "Rec002.MP3, etc. You can then select your songs and drag them to a folder on your
computer. Then use your favorite MP3 music player software to play back the songs.
5. After you have transferred your songs, to safely remove the USB drive, right-click on the drive icon in the
System Tray and select the option to “safely remove” the drive (PC), or right-click (Ctrl+click) on the drive icon
on the desktop and select ‘Eject’ (Mac). Once the drive has been ejected, you can remove the USB flash drive
from the computer’s USB port.
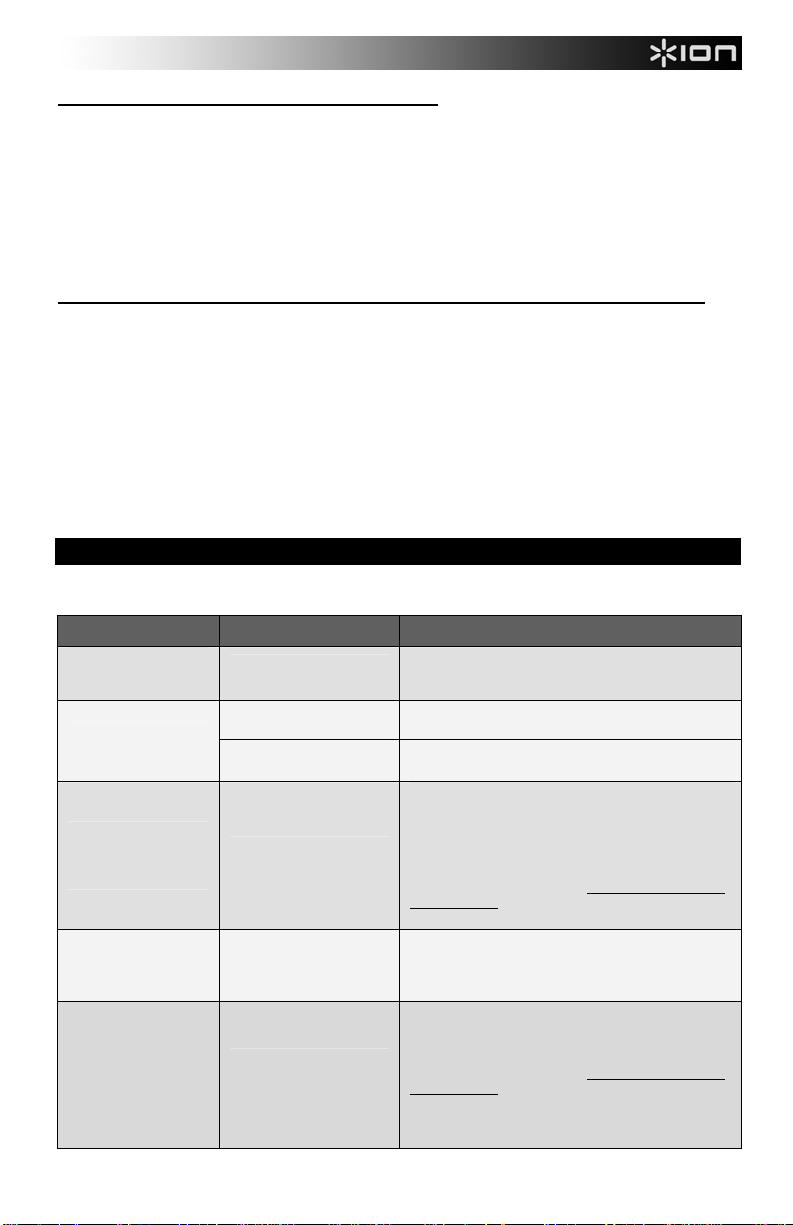
TROUBLESHOOTING
Refer to the following troubleshooting scenarios if you experience difficulty recording your vinyl to your computer.
PROBLEM CAUSE SOLUTION
I am not hearing any
audio when I am
recording.
Needle is not on the
record. Place the needle on the record.
Cartridge connection is not
secure.
Cartridge must be securely connected to the tonearm
whenever you are using the turntable.
I am experiencing poor
sound quality. Vinyl record is dirty or
scratched.
Try dusting off and gently wiping the surface of the
record before playing it.
When recording into my
computer on Windows
Vista, my recordings are
mono instead of stereo.
Recording input properties
in Vista not set to “stereo”.
In Vista, you may need to manually specify “stereo” for
the recording input.
Go to Start XControl Panel XSound (in Classic
View). Then, click on the Recording tab and highlight
the Microphone input (USB Audio Codec). Click on
Properties to bring up the input settings. Next, click on
the Advanced tab and select “2 channel, 16 bit, 44100
Hz (CD quality)” in the Default Format pull-down
menu. Lastly, click Apply to accept the settings.
My music is playing at a
strange pitch.
Incorrect speed selected
on the turntable.
Make sure that you are playing your records at the
speed they were intended to be played. Select between
the different speeds (33, 45, or 78 RPM).
When recording into my
computer on Windows
7, my recordings are
distorted.
The Windows 7 Sound
Panel> Levels setting is
turned up too high
Go to Start XControl Panel XSound (in Classic
View). Then click on the Recording tab and highlight
the Microphone input (USB Audio Codec). Click on
Properties to bring up the input settings. Next, click on
the Advanced tab and select “2 channel, 16 bit, 44100
Hz (CD quality)”
Uncheck the two boxes in Exclusive Mode and click
Apply. Select the Levels tab and set the level slider to
‘4’. Then click Apply and Ok.

18
2
7
5
5
4
7
3
1
SCHNELLSTART-ANLEITUNG
LIEFERUMFANG
Vergewissern Sie sich, dass alle hier angeführten Komponenten in der Schachtel enthalten
sind.
• QUICK PLAY FLASH
• Netzteil
• USB-Stick
• Software-CD
• USB-Kabel
• Schnellstart-Anleitung
• Sicherheitshinweise und Garantieinformationen
LESEN SIE DIE SICHERHEITSHINWEISE, BEVOR SIE DAS PRODUKT VERWENDEN.
EINLEITUNG
QUICK PLAY FLASH konvertiert Ihre wertvollen Schallplatten ganz einfach mit einem Standard-USB-Stick in digitale
Musik. QUICK PLAY FLASH kann über den USB-Port auch an einen Computer angeschlossen werden. Wir haben
zwei Software-Pakete mitgeliefert, die Sie beim Konvertieren Ihrer Schallplatten unterstützen. Sie sollten eine der
folgenden Anwendungen installieren, um die Vorteile der Computer-Aufnahme ausnützen zu können:
•EZ Vinyl/Tape Converter (nur PC) ist der schnellste und einfachste Weg, um Ihre Schallplatten in digitale
Mediendateien zu verwandeln. EZ Vinyl/Tape Converter speichert Ihre Aufnahmen direkt in Ihrer iTunes*
Bibliothek. Unerfahrene Benutzer werden diese Anwendung wahrscheinlich bevorzugen. Wir haben Ihnen die
praktische Software-Schnellstart-Anleitung mit Schritt-für-Schritt-Anleitungen für die Installation der Software
und den Betrieb zur Verfügung gestellt.
•EZ Audio Converter (nur Mac) ist ein einfaches Konvertierungsprogramm für Mac OS X und eignet sich ideal
für unerfahrene Anwender. Bitte beachten Sie die Schritte in der beiliegenden Software-Schnellstart-Anleitung
für die Software-Installation und den Betrieb.
Zur Installation der Software legen Sie einfach die mitgelieferte CD in Ihren Computer ein und folgen Sie den
Anweisungen auf dem Bildschirm. Nachdem Sie Ihre Schallplatten konvertiert haben, können Sie sie auf CD brennen
oder auf tragbare Mediengeräte laden.
Besuchen Siehttp://www.ionaudio.com/computer-optimization für weitere Informationen zur Optimierung Ihres
Computers für Audio.
• iTunes ist eine Marke der Apple Inc. und ist in den USA und anderen Ländern eingetragen.
OBERSEITE
1. 45 RPM Adapter- Verwenden Sie diesen Adapter,
um Ihre 45 RPM Platten abzuspielen.
2. Plattenteller - Hier platzieren Sie Ihre Schallplatte.
3. Tonarm- QUICK PLAY FLASH wird mit einem
bereits ausgerichteten Tonarm und Tonabnehmer
geliefert. Der Tonarm kann mit der Hand oder durch
Drücken des entsprechenden Hebels angehoben und
abgesenkt werden. Bitte beachten Sie, dass der
Tonarm aus der Ruhestellung (auf dem Arm-Clip)
entfernt werden muss, damit der Drehtellermotor
aktiviert wird. Wenn der Tonarm wieder in seine
Ruheposition gebracht wird, schaltet sich der Motor des
Drehtellers aus.
4. Arm-Clip - Dieser speziell entworfene Arm-Clip sichert den Tonarm, wenn er nicht verwendet wird. Der Arm-Clip
wurde so entwickelt, dass er in der oberen Position bleibt, wenn er entsperrt ist.
5. Hebel - Hebt und senkt den Tonarm.
WICHTIG: Entfernen Sie die
Kunststoffabdeckung des Tonabnehmers
(Nadelabdeckung) bevor Sie den Plattenspieler
verwenden.

19
VORDERSEITE
1. VOLUME - halten Sie die "-" oder "+"-Taste gedrückt, um die Lautstärke zu
erhöhen/verringern;
2. MODUS - Um in den Wiedergabe- oder Aufnahme-Modus zu gelangen.
Drücken Sie diese Taste fest für etwa eine halbe Sekunde - tippen Sie nicht nur
drauf.
3. VOR/ZURÜCK - Springt zum vorherigen/nächsten Titel am USB-Stick
4. f/ / - Wiedergabe-, Pause- und Aufnahme-Funktionen.
Siehe WIEDERGABE/AUFNAHME für weitere Informationen.
•Stetes rotes Licht: Bereit zur Aufnahme (Aufnahmemodus).
•Blinkendes rotes Licht: Aufnahme eines Songs.
•Stetes grünes Licht: Bereit für die Wiedergabe (Wiedergabe-Modus).
•Blinkendes grünes Licht: Wiedergabe eines Songs.
5. USB BUCHSE - verbinden Sie hier den USB-Stick
RÜCKSEITE
1. RCA- AUSGANG - Line-Level Koaxial-Ausgang;
Verbinden Sie diesen Ausgang nicht mit Phono-
Eingängen (auf einem Empfänger).
Hinweis: Sie müssen im Aufnahme-Modus sein, um
einen Ton über diese Ausgänge beim Abspielen einer
Platte zu hören.
2. USB - Verbindung zu einem Computer, um Audio
mit EZ Vinyl/Tape Converter aufzunehmen; (QUICK
PLAY FLASH kann nicht über USB mit Strom versorgt
werden, dies muss mit einem Netzteil geschehen).
Schließen Sie Ihren Plattenspieler mit dem
mitgelieferten USB-Kabel an Ihren Computer an. Für das Übertragen von Ihren Schallplatten auf Ihren Computer
haben wir zwei Software-Pakete auf der beiliegenden CD für Sie vorbereitet. EZ Vinyl/Tape Converter (PC) und EZ
Audio Converter (Mac) sind die einfachste und schnellste Methode, um Ihre Schallplatten zu konvertieren.
3. KOPFHÖRER - Verbinden Sie hier 1/8"-Stereo-Kopfhörer (nicht enthalten). Die RCA-Ausgänge stellen die
Audiowiedergabe ein, sobald Kopfhörer angeschlossen sind.
4. 33/45/78 RPM-SCHALTER - Regelt die Geschwindigkeit des Plattentellers
5. Autostop-Schalter - Dieser Schalter schaltet Autostop an oder aus. Wenn Autostop eingeschaltet ist, wird der
Plattenteller zu rotieren beginnen, sobald der Tonarm über die Schallplatte gelegt wird und stoppen, wenn die Platte
das Ende erreicht hat. (Wenn Autostop ausgeschaltet ist, wird sich der Plattenteller immer und unabhängig von der
Position des Tonarms drehen.)
6. POWER - Verwenden Sie den mitgelieferten Adapter, um ihn mit einer Steckdose zu verbinden (9V DC, 800mA,
Pin +, Spitze -)
WIEDERGABE/AUFNAHME
SO SPIELEN SIE IHRE SCHALLPLATTEN AB
1. Legen Sie die Schallplatte auf den Teller.
2. Wählen Sie die Geschwindigkeit (33/45/78 RPM); Verwenden Sie den beiliegenden 45 RPM Adapter, wenn nötig.
3. Lösen Sie den Arm-Clip.
4. Verwenden Sie den Hebel, um den Tonarm anzuheben. Platzieren Sie ihn dann oberhalb der Schallplatte.
5. Senken Sie den Tonarm auf die Platte; Die Platte wird nun abgespielt.
6. Stellen Sie die Lautstärke mit den VOL-Tasten oder Ihrem Lautsprechersystem ein.
7. Wenn Sie fertig sind, heben Sie den Tonarm und bringen ihn wieder in die Ruheposition im Arm-Clip.
SO NEHMEN SIE AUF EINEN USB-STICK AUF
1. Schließen Sie einen USB-Stick an den vorderen USB-Port des Plattenspielers an.
2. Befolgen Sie die Schritte #1-3 im Abschnitt SO SPIELEN SIE IHRE SCHALLPLATTEN AB (siehe oben).
3. Wenn das Licht neben der f/ / Taste stetig rot leuchtet, fahren Sie mit Schritt 4 fort. Wenn es grün
leuchtet, drücken Sie einmal die Modus-Taste.
4. Um die Aufnahme zu starten, halten Sie die f/ / ca. 2 Sekunden lang gedrückt; Das Licht wird rot blinken,
um anzuzeigen, dass aufgenommen wird.
5. Senken Sie den Tonarm auf die Schallplatte ab; Die Platte wird abgespielt und der Song wird aufgezeichnet.
MODE
12345
f/ /
123456

20
6. Wenn Sie fertig sind, drücken Sie ca. 2 Sekunden lang f/ / , um die Aufnahme zu stoppen.
7. Um weitere Songs aufzunehmen, wiederholen Sie die oben angegebenen Schritte #2-6. Wenn Sie fertig sind,
heben Sie den Tonarm und bringen ihn wieder in die Ruheposition im Arm-Clip.
SO SPIELEN SIE SONGS VOM USB-STICK AB
1. Schließen Sie einen USB-Stick mit MP3 an den vorderen USB-Port des Plattenspielers an.
2. Wenn das Licht neben der f/ / Taste konstant grün leuchtet, fahren Sie mit Schritt 3 fort. Wenn es rot
leuchtet, drücken Sie einmal die Modus-Taste.
3. Drücken Sie f/ / ; Der erste Song wird abgespielt.
Hinweis: Songs werden in jedem Laufwerksordner nach alphabetischer Reihenfolge der Dateinamen abgespielt.
QUICK PLAY FLASH durchsucht die Ordner/Unterordner des Laufwerks nach abspielbaren Musik-Dateien in der
folgenden Reihenfolge: (1) Songs, die vom Plattenspieler aufgenommen wurden und sich im Order MUSIC X_ION
befinden. (2) Songs im Root-Verzeichnis (3) Songs in anderen Ordnern/Unterordnern (einschließlich aller versteckter
Ordner und des Papierkorbs)
4. Drücken Sie| << oder >>||, um zum vorherigen/nächsten Titel zu springen.
SO GREIFEN SIE VON IHREM COMPUTER AUF MUSIK ZU, DIE MIT EINEM USB-GERÄT
AUFGENOMMEN WURDE
1. Verbinden Sie den USB-Stick mit einem freien USB-Port Ihres Computers (vorzugsweise auf der Rückseite des
Computers).
2. Auf einem PC können Sie auf Ihren USB-Stick zugreifen, indem Sie das Arbeitsplatz-Symbol auf Ihrem Desktop
öffnen (in Windows Vista und Windows 7 heisst es "Computer"). Auf einem Mac wird das USB-Stick-Symbol am
Desktop erscheinen.
3. Wählen Sie Ihren USB-Stick aus der Liste der Laufwerke am Arbeitsplatz (PC) oder auf dem Desktop (Mac) aus.
Mit einem Doppelklick öffnen Sie das Laufwerk.
4. Die Dateien, die Sie mit dem QUICK PLAY FLASH aufgenommen haben, finden Sie im Ordner MUSIC X_ION.
Sie werden mit "Rec001.MP3”, "Rec002.MP3 etc. benannt sein. Sie können dann Ihre Songs wählen und diese in
einen Ordner auf Ihrem Computer ziehen. Anschließend verwenden Sie Ihre Lieblings-MP3-Software zum Abspielen
der Songs.
5. Nachdem Sie Ihre Songs übertragen haben, entfernen Sie den USB-Stick sicher, indem Sie mit der rechten
Maustaste auf das Laufwerk-Symbol in der Taskleiste klicken und die Option Laufwerk (PC) "sicher entfernen" wählen
oder mit der rechten Maustaste (Ctrl + Mausklick) auf das Laufwerk-Symbol am Desktop klicken und "Auswerfen"
(Mac) wählen. Sobald das Laufwerk entfernt wurde, können Sie den USB-Stick vom USB-Port entfernen.

21
FEHLERBEHEBUNG
Beachten Sie folgende Problembehandlungsszenarien, wenn Sie Probleme haben, Ihre Schallplatten mit Ihrem
Computer aufzunehmen.
PROBLEM URSACHE LÖSUNG
Ich höre bei der
Aufnahme keinen Ton.
Die Nadel liegt nicht auf
der Platte auf. Setzen Sie die Nadel auf die Schallplatte auf.
Die
Tonabnehmerverbindung
ist instabil.
Der Tonabnehmer muss fest am Tonarm sitzen, wenn
Sie den Plattenspieler verwenden.
Die Klangqualität ist
schlecht. Die Schallplatte ist
schmutzig oder zerkratzt.
Versuchen Sie vor dem Abspielen die Oberfläche der
Platte mit einem antistatischen Tuch vorsichtig
abzuwischen.
Bei der Aufnahme mit
meinem Computer unter
Windows Vista sind
meine Aufnahmen in
Mono statt in Stereo.
Die
Aufnahmeeinstellungen in
Vista sind nicht auf
"Stereo" eingestellt.
In Vista müssen Sie die Option "Stereo" beim
Aufnahme-Eingang möglicherweise manuell festlegen.
Wählen Sie Start XSystemsteuerung XSound (in
der klassischen Ansicht). Klicken Sie dann auf die
Registerkarte Aufnahme und markieren Sie den
Mikrofon-Eingang (USB Audio Codec). Klicken Sie auf
Eigenschaften, um die Eingangs-Einstellungen
aufzurufen. Klicken Sie anschließend auf die
Registerkarte Erweitert und wählen Sie "2-Kanal, 16
Bit, 44100 Hz (CD Qualität)" im Pulldown-Menü
Standardformat. Schließlich klicken Sie auf
Anwenden, um die Einstellungen anzuwenden.
Meine Musik wird in
einer ungewöhnlichen
Tonhöhe abgespielt.
Die am Plattenspieler
gewählte Geschwindigkeit
ist falsch eingestellt.
Stellen Sie sicher, dass Sie Ihre Platten mit der
vorgesehenen Geschwindigkeit abspielen. Wählen Sie
zwischen verschiedenen Geschwindigkeiten (33, 45
oder 78 RPM).
Bei der Aufnahme mit
meinem Computer unter
Windows 7 klingen
meine Aufnahmen
verzerrt.
Die Lautstärke der
Windows 7
Audioeinstellungen ist zu
hoch eingestellt
Wählen Sie Start XSystemsteuerung XSound (in
der klassischen Ansicht). Klicken Sie dann auf die
Registerkarte Aufnahme und markieren Sie den
Mikrofon-Eingang (USB Audio Codec). Klicken Sie auf
Eigenschaften, um die Eingangs-Einstellungen
aufzurufen. Klicken Sie anschließend auf die
Registerkarte Erweitert und wählen Sie "2-Kanal, 16
Bit, 44100 Hz (CD Qualität)"
Deaktivieren Sie die beiden Kästchen in Exklusiv-
Modus und klicken Sie auf Anwenden. Wählen Sie die
Registerkarte Pegel und stellen Sie den Schieberegler
auf '4'. Klicken Sie dann auf Übernehmen und OK.
Other manuals for QUICK PLAY FLASH
2
This manual suits for next models
1
Table of contents
Languages:
Other ION Turntable manuals

ION
ION QUICK PLAY LP User manual

ION
ION Vinyl Transport User manual

ION
ION EASY PLAY LP User manual

ION
ION VERTICAL VINYL User manual

ION
ION QUICK PLAY LP User manual

ION
ION VERTICAL VINYL User manual

ION
ION Luxe LP User manual

ION
ION iLP User manual

ION
ION CD DIRECT User manual

ION
ION USB Turntable Technical document
Popular Turntable manuals by other brands

Kenwood
Kenwood KD-47F instruction manual

Fenton
Fenton RP120 instruction manual

Oracom
Oracom ORC-250 user manual

Pro-Ject Audio Systems
Pro-Ject Audio Systems Pro-Ject 6 PerspeX DC Instructions for use

Technics
Technics SP-10MK2A operating instructions

Bang & Olufsen
Bang & Olufsen beogram 3000 5211 Service manual